Transcripts
1. Intro: Hey there, my name is Olga Benitez, and I am a children's book illustrator and sketcher. One day, I made a sketchbook out of rubbish. We go to deliver it from the ITS store and a big pile of wrapping stuff was also delivered. I was unpacking my purchases, folding the paper neatly, and suddenly I thought of stitching a sketchbook out of it. It was an experiment, the sketchbook, where everything is possible. It cannot be spoiled because it is made from rubbish, and then the magic happened. I made the first sketch, and then the second. Here we go, I started to draw often and easily. I used to have a mindset that drawing takes a lot of time and concentration. But in these wastepaper sketchbook, I allowed myself to draw quickly. Ideas for sketches are born spontaneously, and it is very important not to mute them, but to sketch them as soon as possible. Often, I draw in two stages. First, I quickly catch the main things and then add details. In this class, I want to share my experience of drawing in a wastepaper sketchbook. I will tell you why it gives freedom of creativity and change the way you draw, why it is a great practice for those who are afraid of blank sheet as to where for those who are draw little due to lack of time. Let's start by flipping through my sketchbook to get an idea of what it might look like. I'll give you five reasons why you should try a wastepaper sketchbook, and show you which paper is right for it. We'll make a simple sketch book. You only need one crop back, and I drew in it. This will be force you the simple folds that you can easily repeat yourself even if you are a beginner. Using these illustrations as an example, I'll show my favorite techniques and tricks that work great on craft paper, and you can take them into your project. We will also touch on the topic of time, where can I get it? I'll show life hacks that helped me save time when sketching. Finally, you'll find three video stories where I create real spreads in my sketchbook. I tell you honestly how everything was for me. The first story will be about a big, beautiful house, and two small people. It has an unexpected plot twist. The second story is about wine. In it, I will make a mistake and get out of a difficult situation. The third story is about salad. There'll be no surprises in it, it is just beautiful. There's also a bonus video in the end, I'll show how as I sketchbook for myself. I love large sketchbooks and stitch them from several blocks. This bonus video is perfect for advanced sketchers looking to make a cool sketch book for themselves. I hope you will be inspired to start your own wastepaper sketchbook project and have a lot of time working on it.
2. My Wastepaper Sketchbook: Well, let's flip through my sketchbook. I painted in it for two months, December and January. Therefore, there are many winter restoration in it. It is made mostly of craft paper. It can be different. Did you know that? It also has some white thin translucent paper. I don't know exactly what it is called, but I fell in love with it. It is one of my rubbish discoveries. This is me and my son, he turned into a real cartoon, I'll show you later. This is our little Christmas tree, and here are the golden stars. It is very beautiful and tender. It's me and my son again on a scooter and a wonderful window what I bust every day. A winter landscape near my parents' house, and ducks on the river. It was a first day of a new year. In this picture, I was attracted by the bright yellow and red spots. To show you this sketchbook's thread, I need to zoom out the camera. These are long shadows from the low winter sun. This is me, my son on his scooter, and my daughter. First snowfall. The sketches are not in chronological order but scattered. Later, I'll explain why. Closing the evenings with a glass of wine, and creating this spread, I made a careless mistake. The glass has a video story about it, you'll be learned everything. My house plants. This is the window beside my desk. This is a tool, see how beautiful this paper looks because it is translucent. My kids and this is the very first spread I made in this sketchbook. The idea is simple, but these foxes had a lot of social media success and received tons of likes and comments. A winter ball kits, I brought dill, thyme, and rosemary from the [inaudible] market, put them in the water and couldn't resist drawing them. The bright colors of salad greens are so pleasant to the eye in winter. Most of all here I like leeks and onions. You will also find the process of creating this spread in this class. This is my family. My husband says that "He doesn't look like his portrait, and the son also doesn't", but I and my daughter turned out pretty well. This is one white and frosty day when all the trees were covered in snow. Before I glued the bus to the paper, it had scared away all my pencils. This is my mosaic. This winter, I had been doing mosaic for a month. The process looks exactly like this. I made it out of colored glass. When you finish your work, you cover the mosaic with paper, and then you open it again to continue. Here, I imitated pieces of colored glass. That's all, the sketchbook is over and the winter too.
3. Five Reasons to Try a Wastepaper Sketchbook: I promised to give you five reasons why to make the wastepaper sketchbook. The first reason is that it is easier to draw in it than in a regular sketchbook, it is initially imperfect. Imagine you bought a brand new sketchbook, you open it and see perfectly smooth white paper in front of you, and the thought rushes through your head and tension settles inside. At this point, it will be easy to put all the sketch until some day, waiting the masterpiece. Does it happen to you? It happens to mean time to time. Although I paint almost every day, a wastepaper sketchbook is impossible to spoil. It's sheets are wrinkled and [inaudible] it will tolerate any mistakes. The second reason is that is free. Good art books are expensive and they are definitely worth this money. They have quality paper and hard cover. They are perfect for thoughtful work but not for quick emotional sketches. In sketching, it is really important to allow yourself to make a mistake, to draw quickly how it goes. It is easy to see, but really hard to do. It's much easier to relax if the sketchbook is cheap or even free. The third reason it gives you a choice. Well firstly, you can make it this as you want. Secondly, if your sketchbook is made from different types of paper, you can choose the one that works best for you for new sketch. Sketch books with different paper can also be found in stores. If you used wastepaper, you'll definitely find the variety of it. Waste paper sketchbook is an experiment, a creative journey. I don't want to you to give up using good-quality paper and start drawing only on rubbish, of course not, but it is great to try. Learn how familiar art materials work on unusual paper and come up with your own techniques and tricks. It is also a good information or occasion for your social networks. An unusual eco-friendly, creative project eroded the interest. You can draw attention to your opinion on environmental issues and be heard. The philosophy of a careful attitude to nature, re-use the things is now is more relevant than ever, and it is a good reason to support this idea.
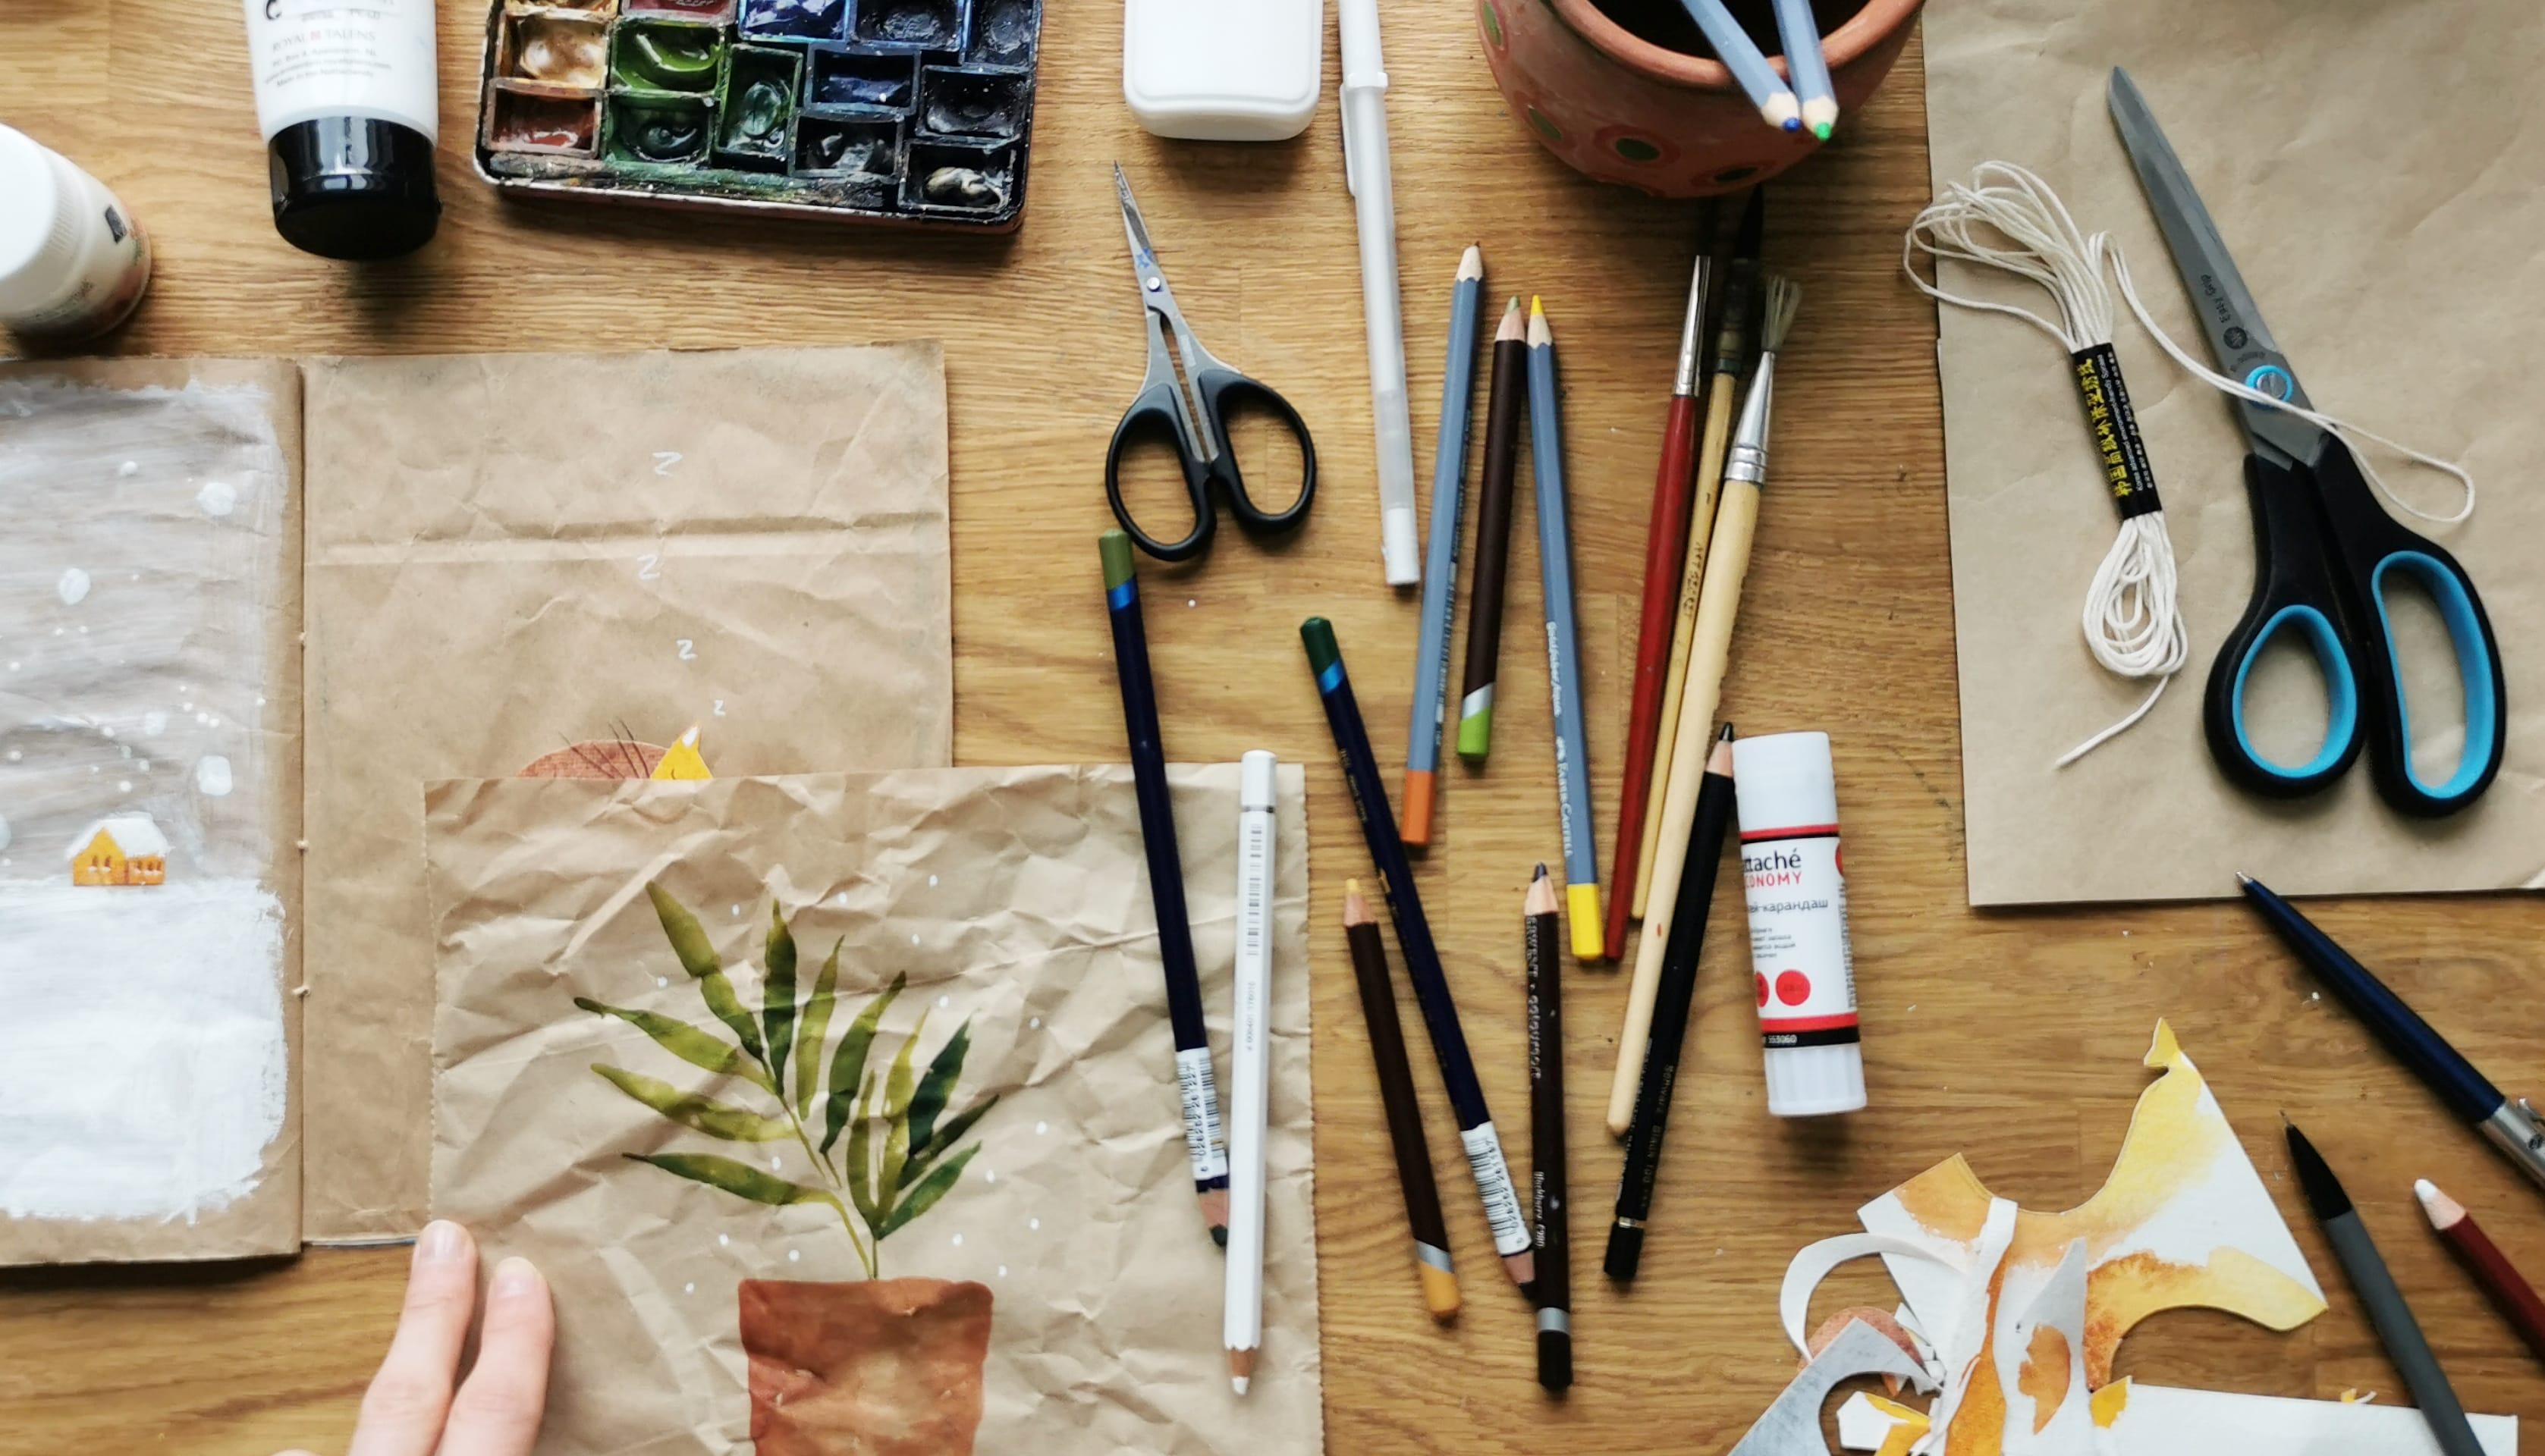
4. What Kind of Paper is Right?: What paper is right for making a sketch book out of it? Any paper. It all depends on how willing you are to experiment. But let's take a look at my books where I keep paper for sketchbooks and creativity. I always keep paper bags. This is a big piece of packaging craft paper. IKEA package, high quality paper, but it has a lot of inscriptions on it. You need a reason to use it. Cardboard is good for covers. I also keep small pieces. It is translucent, thin paper. You've already seen how cool it can work. IKEA delivery often has such paper, and some other clothing and footwear brands bag their goods in it. A white paper bag. This kind of laminated paper might work for the cover, but I'm not sure. Let's leave it here for now. This is a different type of craft paper, and the two paper types look and feel different to the touch and in color too. A little later, I'll tell you what is the difference between drawing in different craft paper. I keep these coloring bags for experiments and some special ideas. They also make beautiful sketch book covers. That's all for now.
5. A simple sketchbook from a craft bag: Now let's do a simple sketchbook of a small size from just one craft bag. I need cardboard, or some other thick paper for the cover, scissors, a stationery knife, it's optional, kitchen towels to protect the surface of the table and to remove glue, clamps for paper, threads. I like it where they are dim, the same color as the sketchbook, but this is a matter of taste. I will sew with a thick needle and thick threads, so you can see what I am doing. Glue. Most often I use office glue and PVA glue. Here is my bag, and I need to cut it up. To do this, I take a stationery knife and carefully cut it here. You can do this with scissors. I turn it to work to the other side. Look, now I need to cut down the bottom. I've got a very large canvas, so I can't catch it out for a sketchbook. The handles usually come off quite well. I tear off the second handle in the same way. I fold the paper in half, and again in half, and the other side too. This is the size of the future sketchbook. This edge is interlocked, so I decided to trim it to the top. I fasten the sheets with clamps, and cut. I have 1, 2, 3, 4 sheets. I fold them in half. Press the fold line. Now I need a towel. I put the sketchbook on top of it. I take a needle and carefully make a hole in the middle, one is above and one more below it, 1, 2, 3. I start to sew, leaving knot and a small loop on the outside. I am going down, through the loop, and up. Back in the middle again, I'm tying a knot. Done. Now I can make the cover. I take cardboard. Leaving a margin around the edges, just a couple of millimeters, I mark the size of the cover, and cut it out. I made the second one the same size. Almost done. I need to glue the covers to the sketchbook now. I fix it with clamps and leave it to dry.
6. How to Draw? Example 1: Sketchbook is dry and we are ready to draw something in it. Starting in your sketchbook, don't start from the first page, it is always scary to draw on the first one; open any other and draw on it. An important thing that you need to know is that craft paper doesn't like water, you can't make beautiful watercolor fills on it. Therefore, the first idea for drawing in a wastepaper sketchbook is colored pencils. I'll draw and, along the way, talk about the materials and techniques I use. Not everyone knows that pencils are sold not only in sets, but also in the piece. There are very beautiful and interesting shades in art stores, you can show some unusual colors. If you go shopping for pencils, be sure to buy a white pencil and some rich-dark color, and a couple more colors that you really like. What am I drawing? I am drawing onions. Waiting for spring, my children and I often plant onions in a flower bed or just in water, and watch how it grows. Look, now it's time to place the onion here, and I'll do it in an unusual way. As you know, I really love watercolor and beautiful fills with color transition, but you can't do that on craft paper. So I took a separate piece of watercolor paper and used it to create a beautiful watercolor background. This is the second idea for a wastepaper sketchbook that I want to show you. The background is dry. I draw an onion on it, and cut it out. I glue it on. I really like this technique, I use it a lot in my sketchbook. Firstly, I create the color and texture I need. Secondly, I really like the way it looks on craft paper. On top of the applique, you can add some details with a pencil. When the onion sprouts, it has strong, white roots. For this, I use a white pencil. This is the filled feature. A white pencil on craft paper looks amazing. If you buy a white pencil, then choose a pencil 1. It gives a rich color and feels like chalk on paper. White watercolor pencil is also good, but the color is less saturated.
7. How to Draw? Example 2: The onion is ready. Let's move on to the next illustration. I will paint it with watercolors. There won't be beautiful transparent vertical transitions but it doesn't mean that you should stop using the paint. When I paint with watercolors, I always keep in mind not to add too much water. If you pour a little clean water to a cubit with paints before painting, then the paint softens and it's comfortable and easy to paint with it. Pot is ready, and now I want to draw a plant in it. This winter I really enjoyed painting my houseplants. I must say that I use watercolor simply because I love it very much, and I used to it. Gouache and acrylic are even better because they need less water. I add another shade of green. The plant looks more picturesque if you use several shades. I'll show you how I draw these leaves. Hold the brush gently then press harder to widen the line and then narrow it down again. Practice and you'll definitely succeed. I'm drawing another twig, and here a couple of leaves. Now I want to show you another tool that works great in a wastepaper sketchbook. This is a well job done. It's great to add in small, delicate details. For example, I'll draw such decorative, cute polka dots. The gel pen is cheap and can be found in any stationery store. It's also great to make inscriptions with it.
8. How to Draw? Example 3: Let's move on. The third plot that I want to show you is related to white paints. The trick is that there are two types of white; zinc white and titanium white. Now I have acrylics and gouache, but it can be gouache and gouache or two acrylics, the meaning is the same. Zinc and titanium white are distinguished by their hiding power. Zinc white is translucent, it is almost impossible to make a dense background with it. The color of paper remains visible. I like to use a stiff bristled paintbrush to apply the white color, it creates an interesting texture. Now let's see how titanium white works. I hope you can see this in the video and you can feel the difference, the color of the paper is almost invisible. On this background, I want to add a small but expressive detail. It is a small house. It also has snow on the roof, windows. If you noticed, that the same technique [inaudible] and then small details on top. There is snow on the windows too, chimney, and smoke, someone leaves in this house. Let it snow. The weather is calm, and snow is pleasant, and big snowflakes spots. Do you know this effect? If you take a picture of the falling snow, then several snowflakes look like large spots, because they're closer to the lens. Done. I put the sketchbook off to dry for now and show you other the examples of using two types of white. For example, the ice rink is painted with zinc white and the snowy island with titanium, and skate tracks are drawing on top with a white pencil. Or for example here the first layer is zinc white, the strips, the titanium. Then I also cut the glasses out of the paper, and got a filled white layer. It's white on white and again on a white, and each layer has a different tone. Below you'll find a video story of the spread.
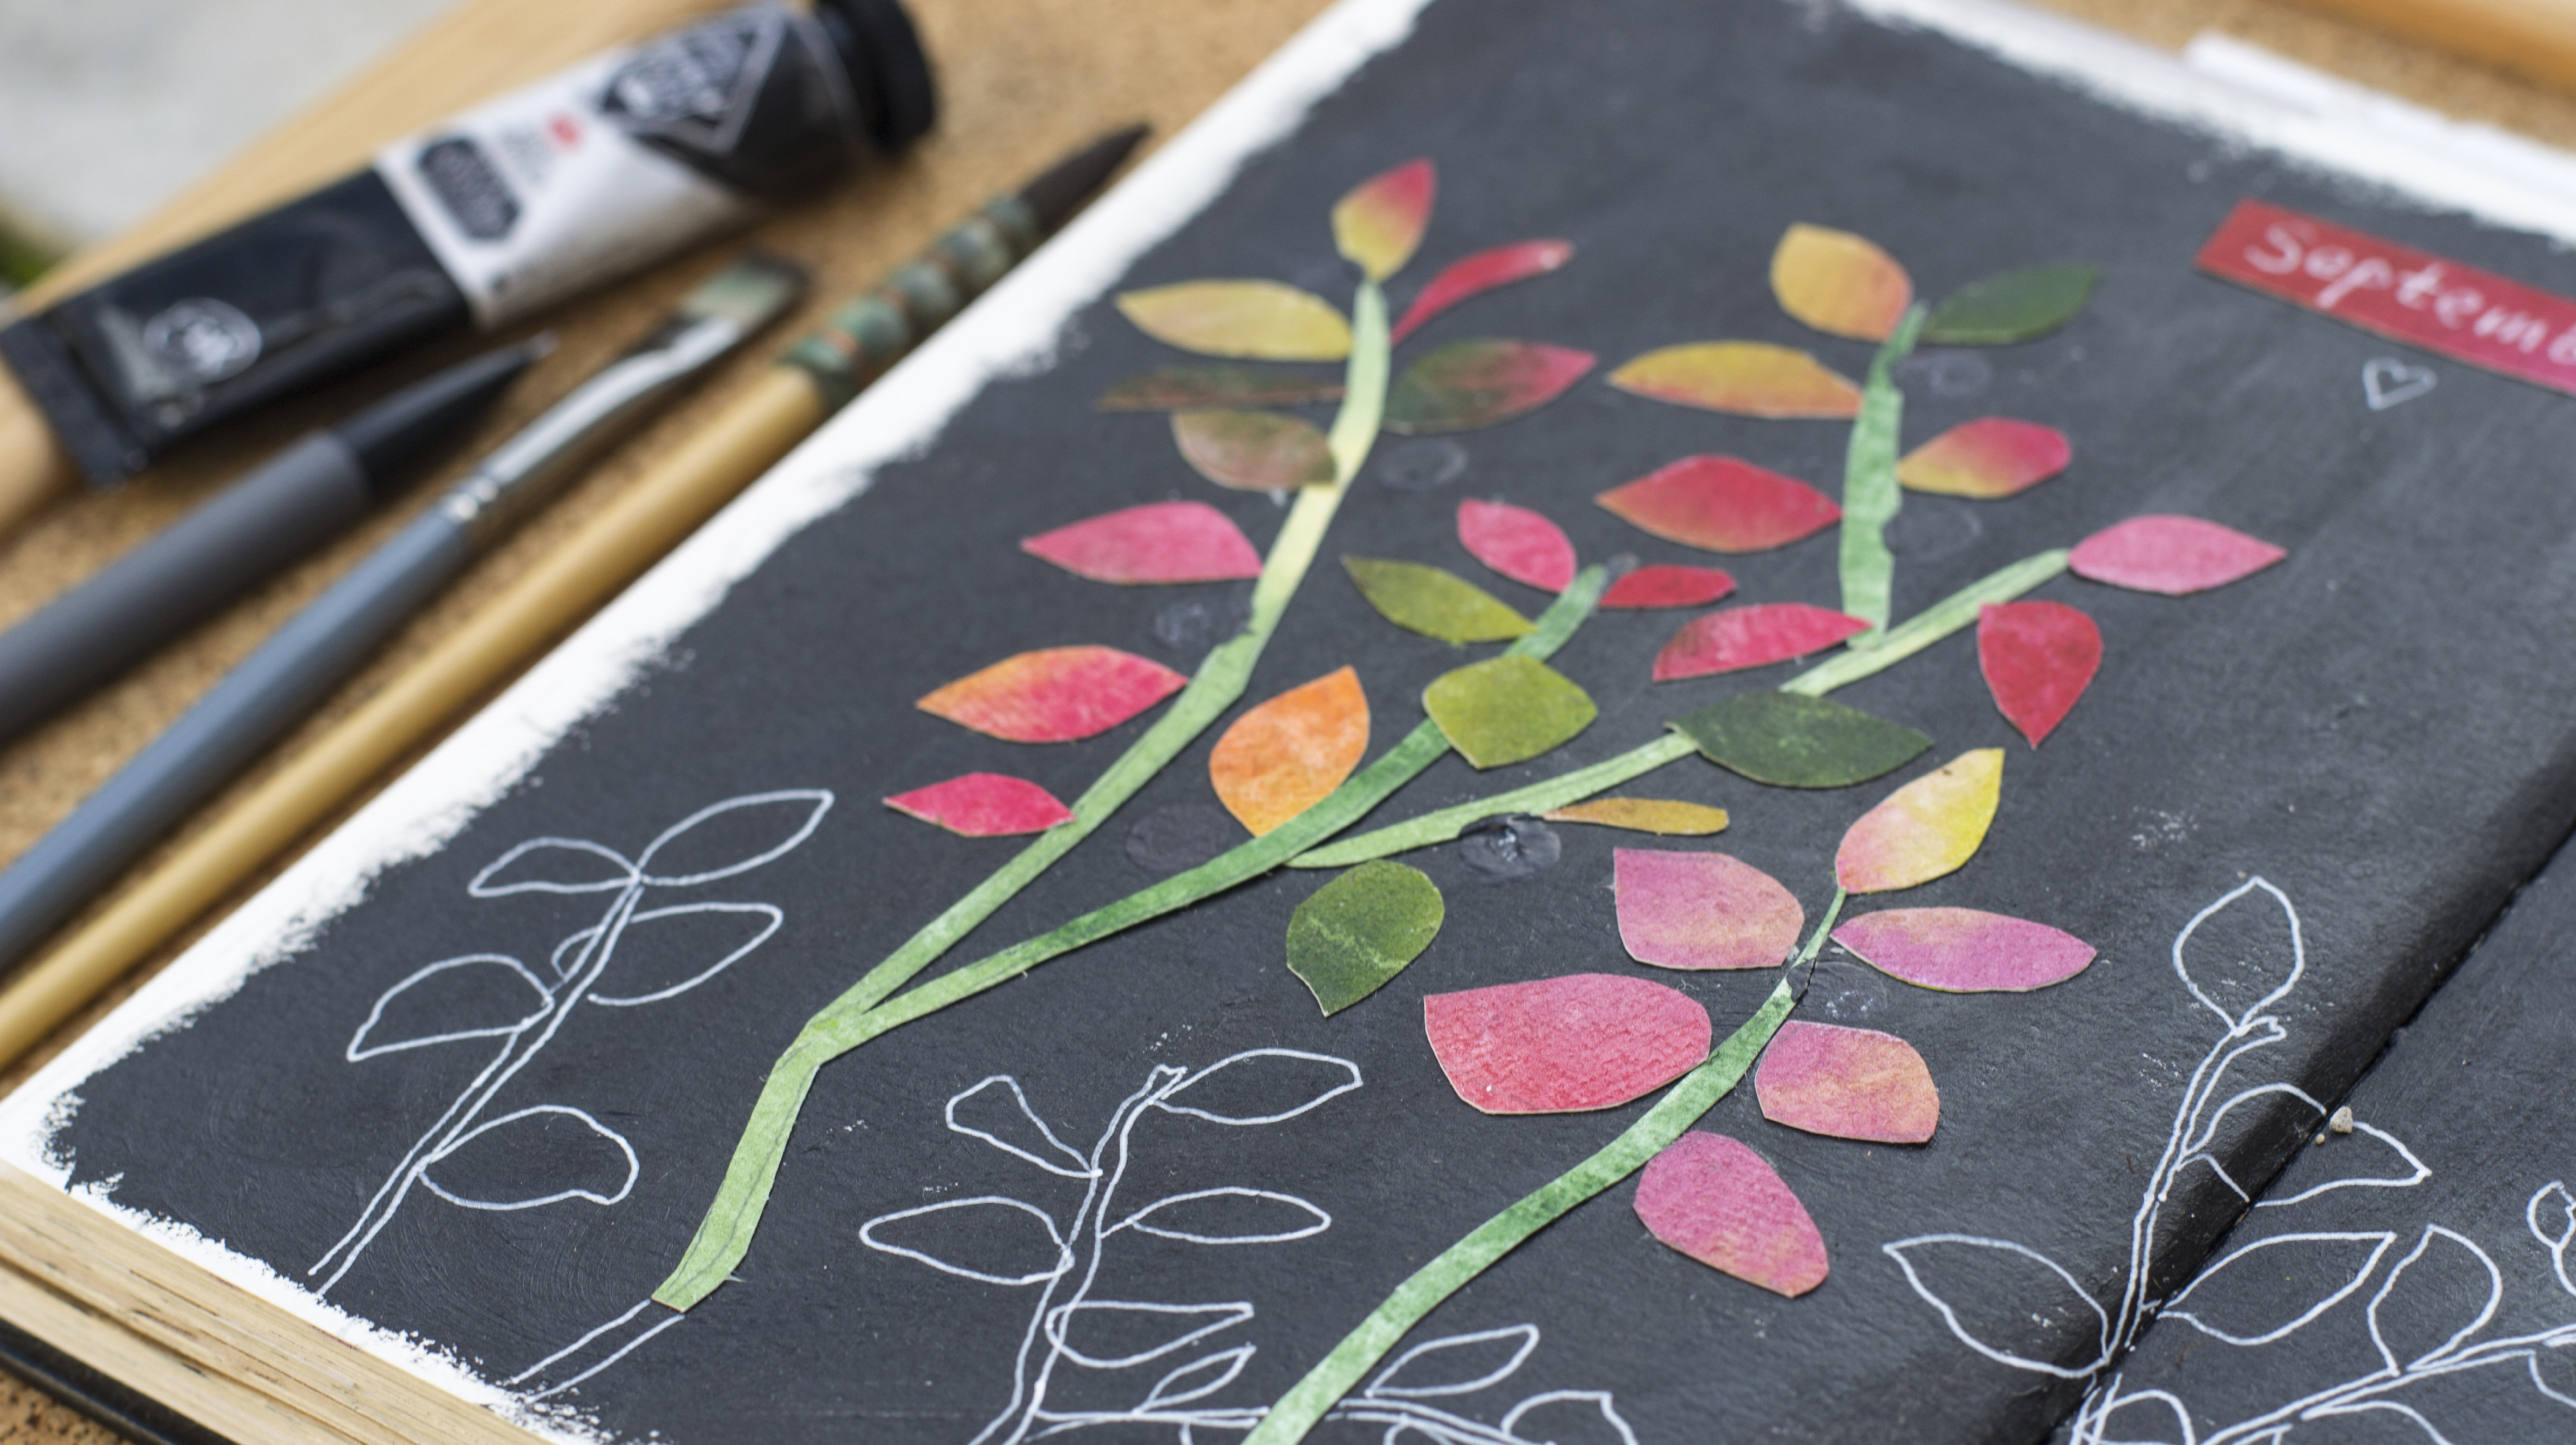
9. How to Draw? Example 4: Let's go back to the plot, now I'd like to say a few words about composition. If we have a page that is completely filled with an image, then something small looks very cool on the next page, for example some lettering or image. I'm going to make a cute thing from my watercolor background. Now you'll see everything for yourself. Yes, a fox, perhaps you recognized it. We drew one in my class, fluffy foxes in verticals, I glue it on, and now I want to add details. It sleeps sweetly. I like this composition, it seems natural to me. When the picture with the house is completely dry, you can add a bath or twigs in the foreground there. This is the beauty of drawing in a sketchbook, you can draw, move away, look at the next day with a fresh eye and add something. I also want to say that I've prepared such a fox pattern for you. You will find it in the attached files under the projects and resources tab. I put the sketch book aside and show a couple more examples of such a composition. For example, in the spread with wine, we see that this page is completely filled and here is a small lettering, and also here illustrations, lettering. Such a simple but effective technique works well in sketchbook. Well, I have four stories that I use to repeat and you can use them to practice techniques that would work great in your waste paper sketchbook.
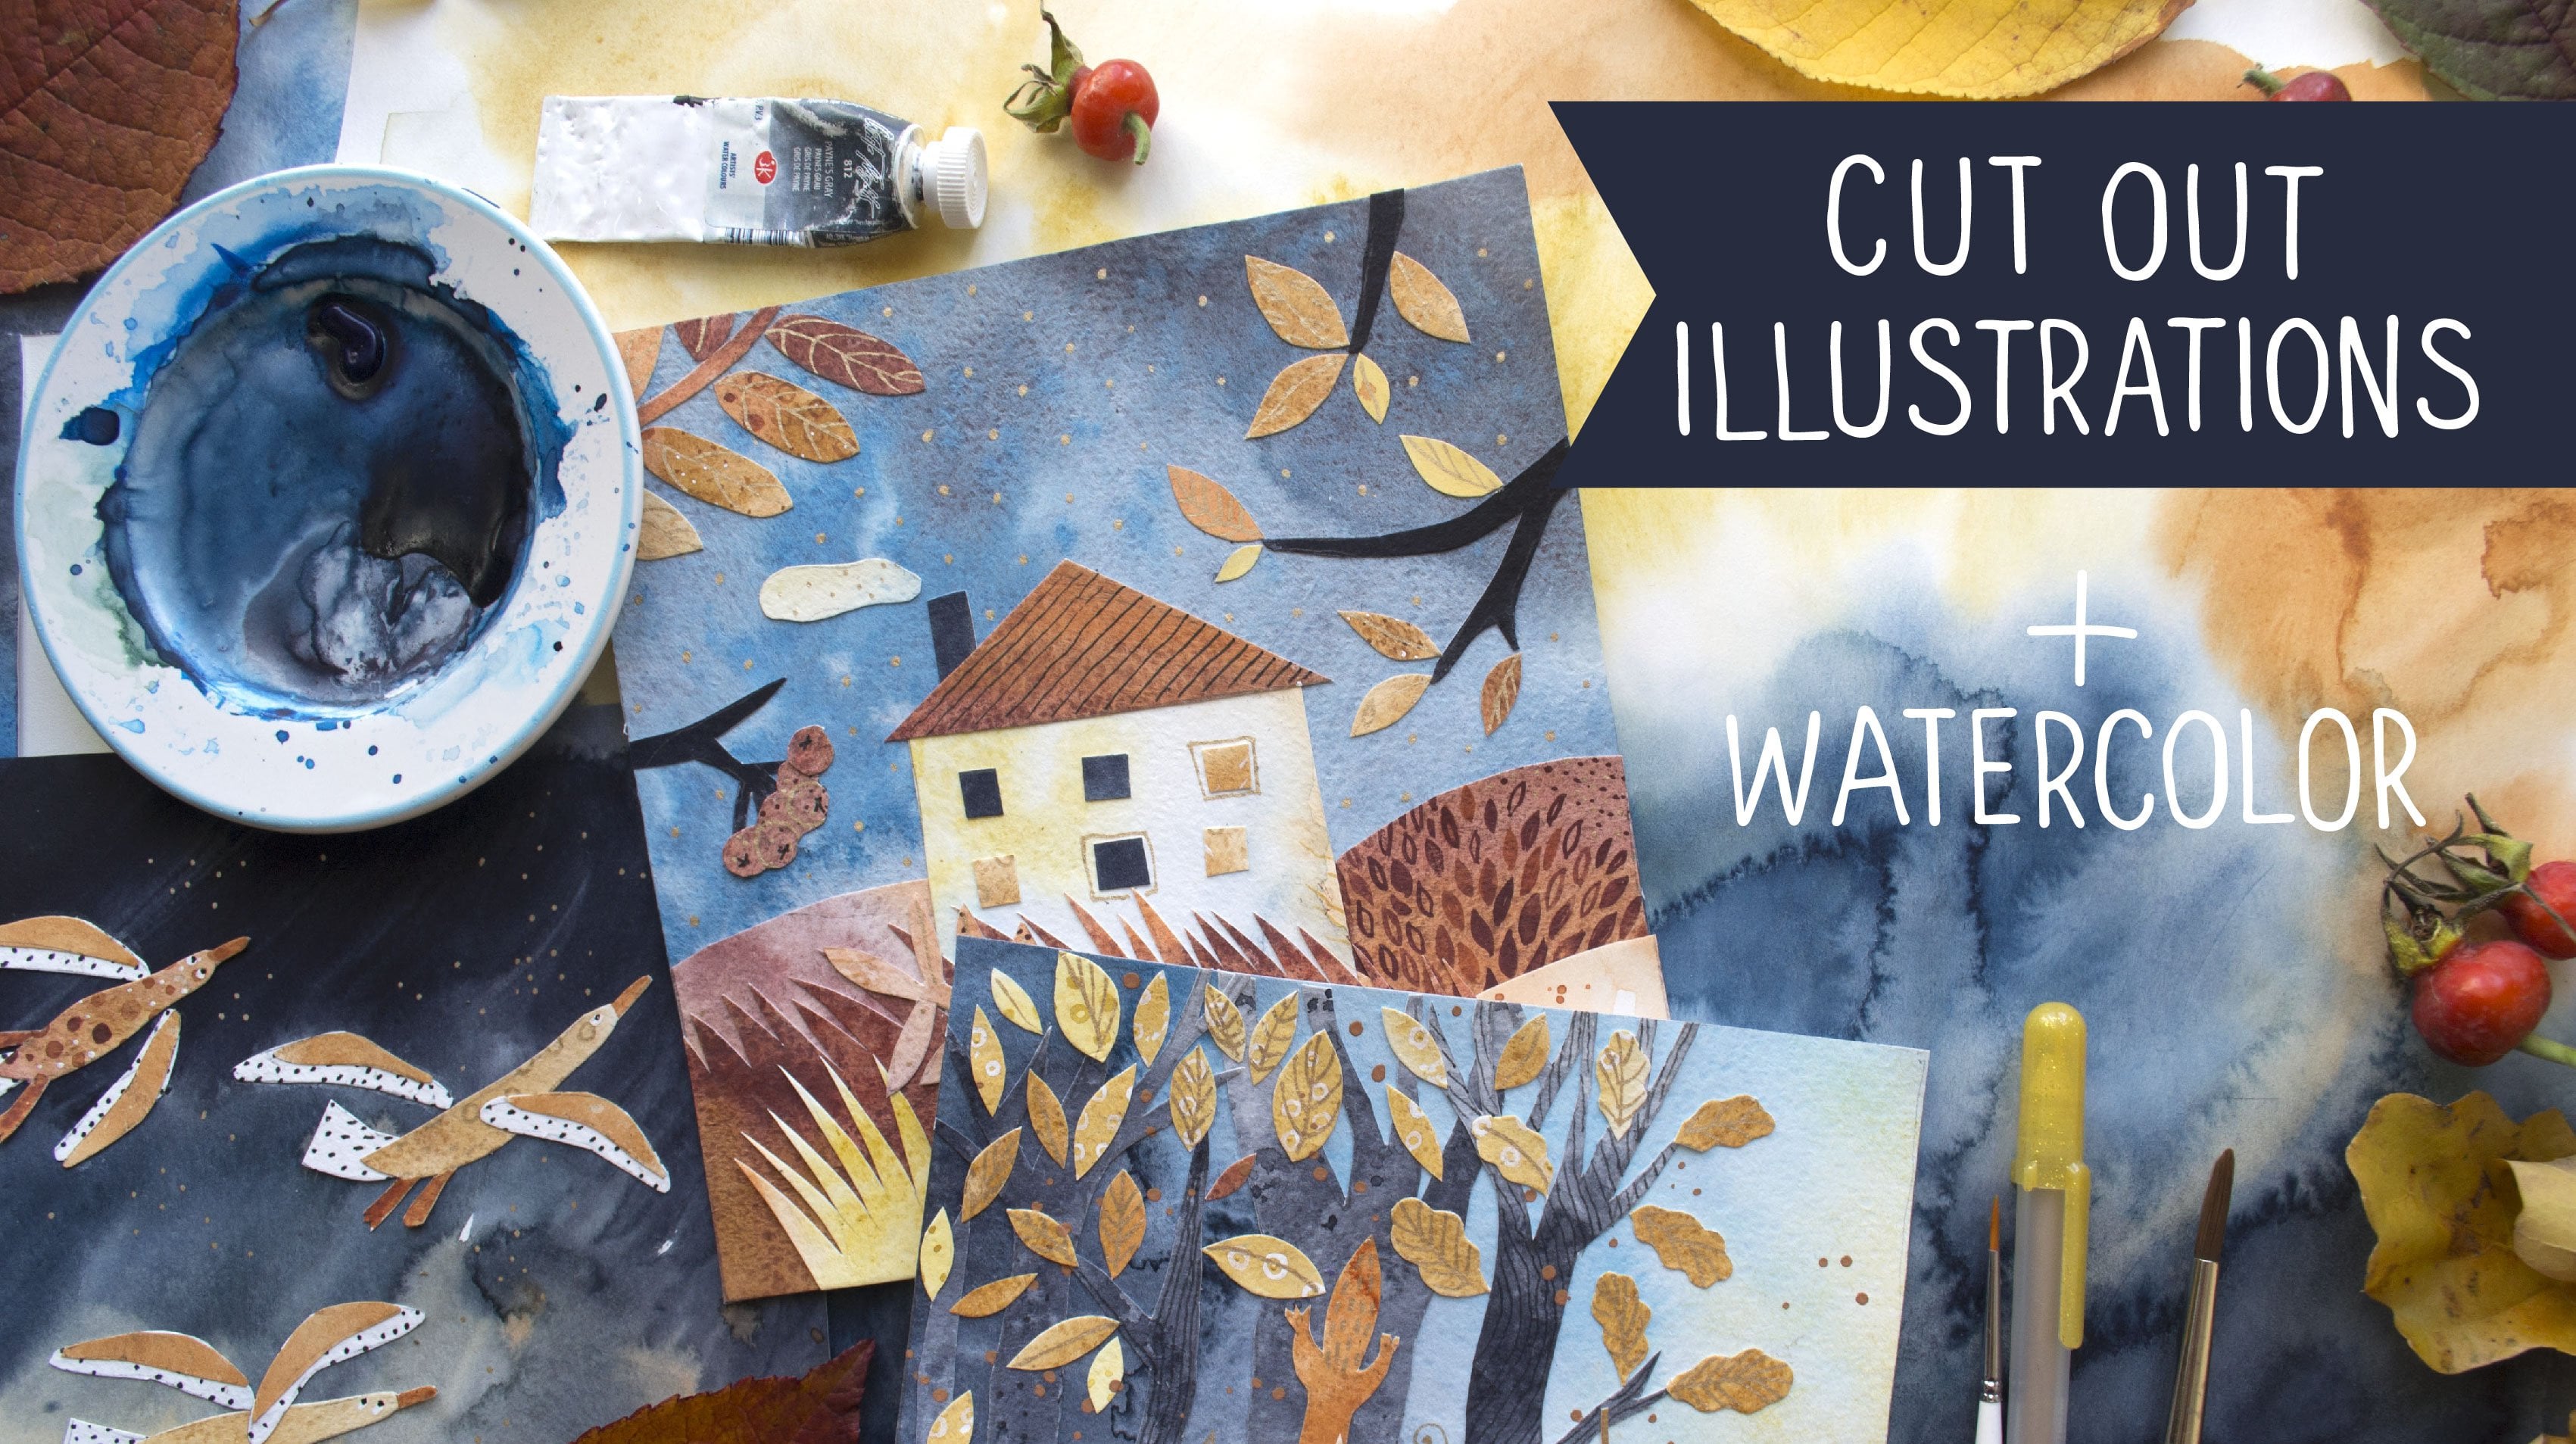
10. A Couple More Tips: There are a few more small points that I would like to draw your attention to. In preparation for this class, I drew a test drawing on very crumpled paper. Look, in my opinion, there is some cham in this, so don't worry if your paper is wrinkled. Second, there are different types of craft paper. When I started to study the topic of drawing on craft paper, I discovered that craft can be different in texture, color, density, and the paint doesn't look the same on them. There is a smooth craft without any inclusions, it is slightly darker and it is more water tolerant. This is a page of a light batch craft paper with splashes. For the dark background, I used black ink here, and this is what happened on the reverse side. After that, I decided to no longer use ink for painting and craft. But look, if this happened, then what do you do? The first way, forget it. Don't draw on this page and that's it. The second option, you can glue this place with something. I glued a piece of black paper here and these sports became less noticeable. Or you can even paint over with brush or acrylic and draw something new on top. By the way, failed sketches can be simply parted over and painted over.
11. Where Can I Find Time to Sketch?: We're always limited in time. It is a sad fact that you have to accept when you became an adult. But I have some good news about it and some bad news. The bad news is sometimes you really don't have time to sketch and that's okay. Absolutely. Don't beat yourself up, sort things out, just wait. Often, it's not even about the time, it's about internal resources to find the time. There are periods of life that any new activity causes internal resistance because the body can hardly cope with the existing lot. I had this feeling when my kid was pretty young. It also happens now when I'm doing collage project and it takes all my energy, that's okay and that will pass. The good news is there is often time, and it's a matter of habit to make drawing a common thing. The good thing about the sketch book is that it doesn't take a lot of time. Give yourself permission to paint quickly, allow yourself not to strive. The trick is drawing regularly will for sure improve your painting skills, even you don't concentrate on getting a pretty picture. I would say, especially if you don't concentrate on it. I have my own tricks on how to save the time when drawing.
12. Tips to Help You Save Time: Materials are always at hand. I have a pencil case with some basic sketching supplies, pens, liners, water brush, small scissors, glue, and clamp. A jar of my favorite pencils. When I paint at home, it is convenient for me that they stand in such a way that it is easy to find the color I need. When I go to draw somewhere outside of home, I choose a few pencils, put them in my pencil case and take them with me. I also have a jar of my favorite brushes, and a box of all sorts of things. There are wide, a soft eraser, glue, clamps, paints. I have a small box of my favorite watercolors that is convenient to take away. There are ink, liquid watercolor, and all of that. I also have a basket of paints and tubes. If I need to color, I squeeze it onto the palette. Palettes look like this, and I wash them very rarely. All of this is located so that I can quickly find and get the tool I want. Library of colored papers. As you can see, I love using colored elements in my illustrations. Therefore, I figure out how to organize different colored pieces of paper, that may come in handy. Here, they are arranged by color. You can quickly find the shade. For example, there is a piece of paper I used for today's stories, I'll put it here. A place where you can leave materials and sketchbook unfolded. It is convenient to set aside your work and leave it at anytime, and then come back and immediately continue without wasting time preparing. It is also helpful to leave unfinished work open, and glance at it from time to time as you pass by, so you may come up with interesting ideas on how to finish the work, what to add to it. Then when you sit down to draw, you don't waste time inventing but immediately start implementing the idea. There was a time when I didn't have my own desk and I painted at the dinner table. Then I used a large wooden tablet so as not to remove the materials until the work was finished. It works like this. For example, you are drawing, all materials are laid out and you need to stop urgently, then you just take this whole structure, take it to a shelf or somewhere where it doesn't bother anyone, the table is free. Then when you have the opportunity to continue working again, you are already ready for this. All these little things really work. I have tested it myself. In the video of this story about why and you'll find it below, I emphasize how much time each stage of the work takes me. I want to show that I don't usually have the opportunity and time to sit down and draw this spread from start to finish. Usually I draw in sets of 20, 30 minutes. Hope it helps you to believe yourself and find time to be creative. Next, I'll show you three true processes of creating a spread from start to finish. It's not a video how to draw something, it's a video story about how I reflect when I paint. How I make mistake, how much I actually interrupt in the process. There are all the technique that I showed you earlier, and of course there are more new features.
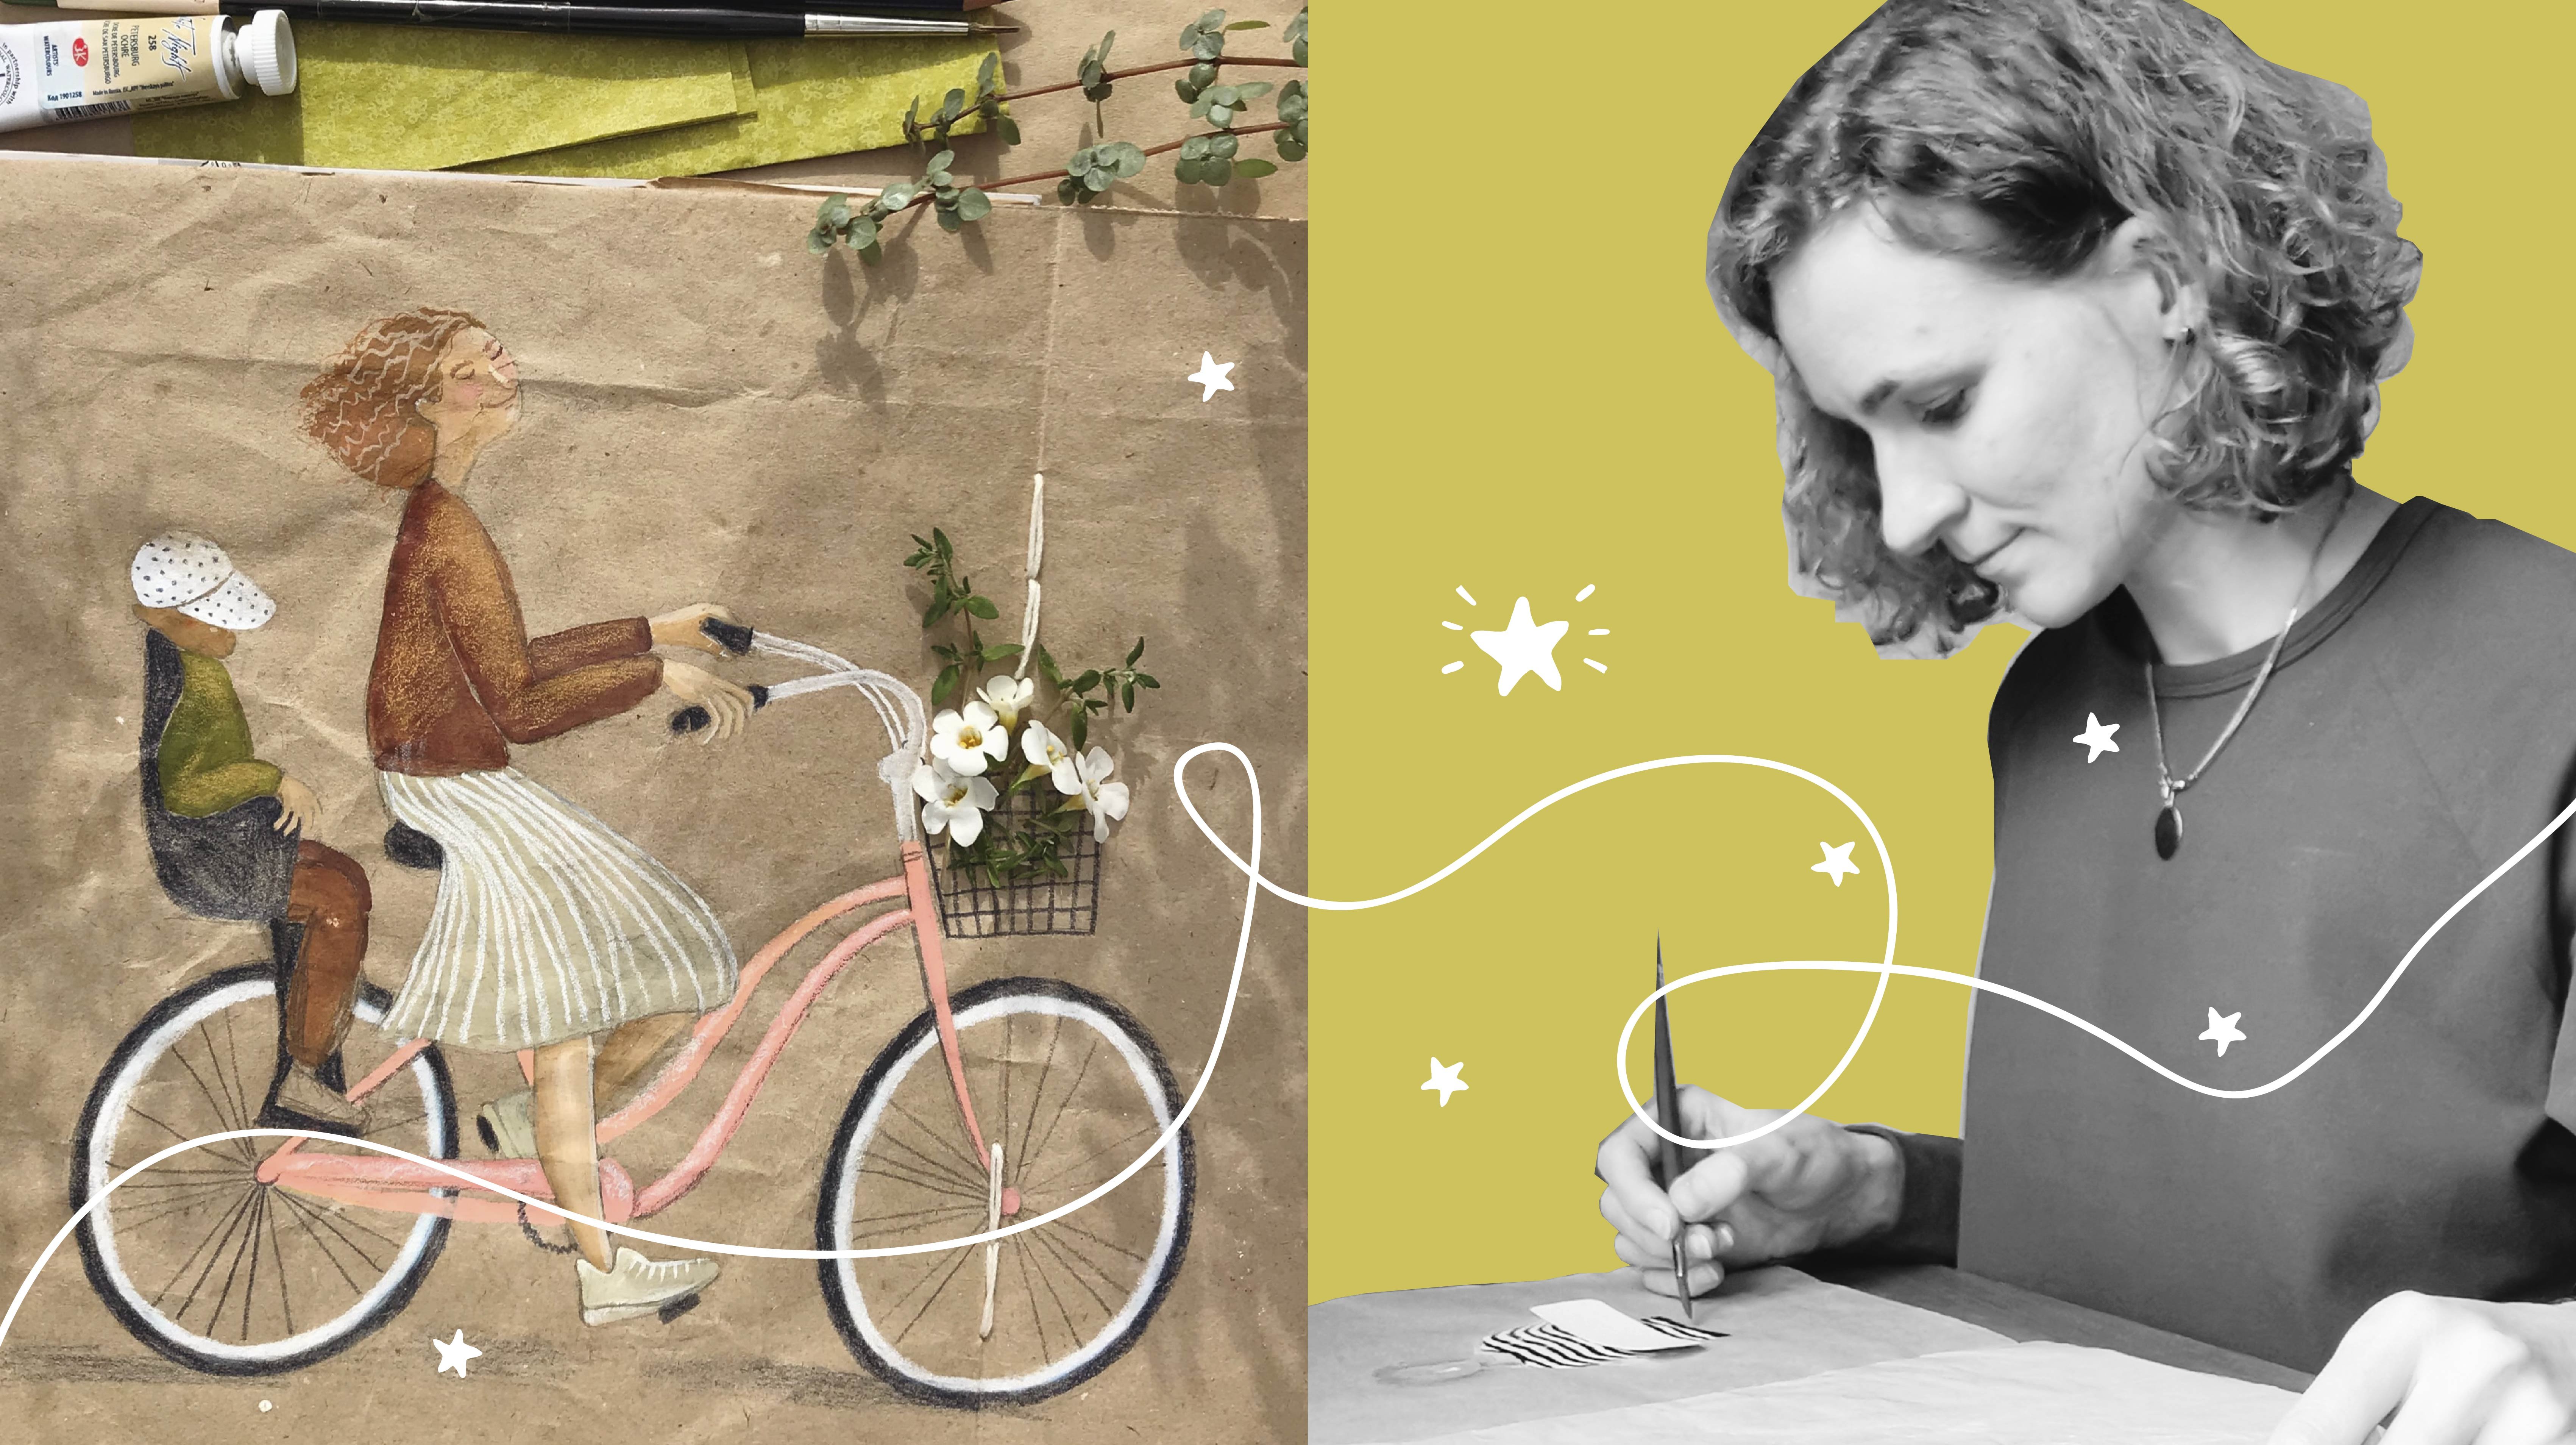
13. The First Story With an Unexpected Turn: This winter, there was no snow for a long time, and my son and I often rode a scooter. One day on my way home, I thought it will be nice to draw us in my SketchBook, and quickly took a photo in the nearest window and then again in the mirror. Sorry guys, I know that these are not kind of photo that I usually show to the public but I promise to you to show the process honestly. Returning home, while my son was washing his hands and was busy with toys, I drew the sketch. This took about 20 minutes. Earlier, I painted a closer window which we passed by every day. It attract me with his beauty and greenery. The result is a SketchBook spread where we seem to be driving past this window. Now, the story of the creation of another spread on this topic, the beautiful window with greenery, he's in a beautiful house. First, I chose a suitable spread for the sketch. I was planning to paint their house with watercolors. I chose dark craft paper, which is better for painting. I prepared in advance pencils of those colors that fit to color scheme of the future sketch, and began to outline the house. It should say that I almost never use the eraser at work and the angle was rather difficult. To begin with, I took a beige pencil. It doesn't contrast with the background. So if I make a mistake, extra lines wouldn't be visible. While drawing, I carefully looked at the photo, trying to capture the correct proportions and shape. At this stage, when the general outline of the house became clear to me, I took the paint. The front of the house was still in front of me because it is really important for me to get the color spots right. See that there is a very little water in the brush. This is what I told you about early. Then I tried to add color with pencils, but I realized that it turned out pale and I took the paints again. I decided to make the light part a little brighter. The background for the house is ready and now I need to draw the details. This is the same window greenhouse. I sketchly show the neighboring houses. Added some falling snow, trees. Everything is almost ready except one small detail. I need a separate sheet of paper for it. A small copy of a large sketch in the same pose to make us recognizable. The result is the same scene but from different points of view. Then I noticed that there weren't enough lighted candles in the window for there's on both. Then I suddenly got an idea. I could have just glued us to the sketch, but I came up with something more interesting. I took a small piece of tape and a toothpick. Then it turned out to be a little cartoon about us. It had great success in Instagram and a lot of people wrote me that they wanted to try something similar. Do you know what's the most striking? This wasn't planned at all. The idea was born in the process of drawing. I love SketchBook for this creative freedom.
14. The Second Story, in Which I Made a Mistake: One day an eye caught on the bottle of wine. This is how it looked. This is an ordinary wine and there is nothing special about it, but it looked so good against white tiles. You know the evening with a glass of red wine pleasantly brighten up the winter. I decided to paint it. I didn't have much time. I didn't even have time to think about shooting the video. I painted the background and the bottle quickly. It looked like this, paint along with pans. The background is white tiles. I created transparent background, with zinc white, and then added clear stripes with titanium. A bottle of wine, in this light, the glass looked completely black and the label is also black. To show the difference in materials, I used black acrylic for the glass and piece of made black paper for the label. It was time to cook dinner. I stopped drawing and put it off until tomorrow. In addition, by this time I haven't decided how to draw the glass. I left the open sketchbook with unfinished spread on my desk, and passing by, time to time I look at it from the side and think how to finish it. The next day I had 15 minutes of free time. It was enough to cut paper glasses. I figured out how to make them while walking back and forth, and toned the scraps of paper in the color of the wine. To do this, I used watercolors in tubes and the bristle brush, which I moisten it with tea in a mug. There is finally the moment when I can start showing the process, not just talking about it. Because I came home, set up the camera, and started filming. I glued the glasses and put wine into them. It turned out that the gluestick doesn't stick well to the acrylic background. I had to use PVA. I cut glass at the fold of the sheet. It sticks better this way and does not interfere with bending. Immediately after gluing the glasses, I realized that one of them is hanging in the air. It was such an interesting feeling. I understood that I had just made a stupid mistake. But it was no longer possible to roll back the situation. I had to come up with something else. Then I took a picture of my hand with a glass in order to finish drawing it on the sketch, and it worked out well. Then my daughter came up and looked at the sketch and offered her wine pencil. I figured out what to write on the right side. I had trouble with the Malbec inscription, but it looks good in the end. I wrote a date with the wine-colored pencil that my daughter brought me to make her feel good. To have this composition is even more interesting than the aesthetic one which was ordinarily planned. There is another reason why I love free-hand sketches. If I was doing digital painting, I would just move my glass. In this case, the mistake led me to a new, more interesting solution. The very next day I noticed that I had forgotten the question mark at the end of that sentence. Now, the sketch is definitely finished.
15. The Third Story, Botanical: I really like to go to a food shop and buy different greens for a salad, especially in winter. Juicy, crispy leaves and bright colors delight the eye. Once, I brought home such a bouquet and decided that it should be in my sketchbook. In this story, there were no unexpected tons of the process for me, but I decided to show it to you because it clearly shows how you can work with watercolor with paper sketchbook, and how cool at craft the ground works. In fact, many illustrators are very fond of drawing on a botanical theme. I hope you pick up ideas for your illustrations here. The size of my sketchbook allows me to draw light-sized greenery. This is very easy because you can think of the composition using the greenery itself. I left empty spaces where I want to complete the composition with radishes and lemons. I took a photo to check later. As soon as the sketch is done using cut out technique, most of the elements are cut out and pasted onto the sketchbook. I painted the background for greenery with watercolors. This is template for leeks. These are also the leaves for leeks. This is an anion. This is for beet and radish leaves, and that is sorrel. I didn't have any leeks, so cutting out, I looked at it further in my phone. Done. I can put it on the sketchbook spread. I decided to paint a beet leave with the paint right here. It's good when you have a variety of textures in your work. Please note that there is little water in the paint. Then I cut out this teem. Done. Added details to the leek. To make this sorrel shape more natural, I just circle it. There are two leaves of different shades of green. This is a radish. It needs a reddish-pink tone on a border with white. I found one in my library. I'll show it to you. I didn't cut out the process of lying out the radishes in order to show that finding the right position always takes time. It's okay. Don't worry if the perfect composition doesn't work the first time. I painted the tops with acrylic paint. You see in this case what is [inaudible]. While the paint was drying, I took on the onions. Cutting out, it is important to look at the real onion in order to capture its shape better. This is a lemon. I wanted to add a bright yellow spot to the sketch. One more. There is still some place for dill. I will paint it with paint. I glued onion and lemons. Meanwhile, the top of the radish have dried and I can add clear contour with a colored pencil. Everything is almost ready. I just need to add details. The lettering gave a finished look. I love the way the [inaudible] look on craft. Now the sketch is finished.
16. Final Thoughts: Well guys, I think I showed and told you everything I wanted. In the bonus video, you'll find a tutorial on how to sew a large format sketchbook. I made one for myself. I hope I made you feel the freedom that I feel when I draw in my waste paper sketchbook. As if it were a play or creative journey were everything is possible. I really want you to try this journey too. I'll be happy to see your waste paper sketch books here in the class project tab and on the social networks. You the tag mywastepapersketchbook. Let's make this idea popular. You can find me on Instagram and Pinterest @olga_bonitas. See you later.
17. Bonus Video: How I make a Sketchbook for Myself: I love fairly large sketchbooks and stitch them from several blocks. In this case, they are better laid out and then spread. What materials do I need? The materials are the same I use to stitch a simple sketchbook, except for the paper I picked out of my wastepaper box. Let's get started. The first thing we need to do is to decide on the size and cut the paper. I start with this bag. I cut it as I showed you earlier. Done. Moving on, I have two sheets of paper. I'm looking at them to find out the size of my future sketchbook. This is one page. I carefully press the folds with my fingers and cut with the stationary knife. I'm using this sheet as a template for cutting paper. Look, the paper is slightly wrinkled. I'm not able to make perfectly straight sheets so let's get rid of perfectionism and start allowing ourselves to doing perfect things. I merge the corners and now I draw arrows in the direction of the opposite side to the edge of the sheet and draw a cutting line with the pencil. The same thing on the other side. Cut out. In a similar way, I cut nine sheets of paper for my sketchbook. There are two kinds of graph paper and white translucent paper. I fold them neatly, joining the edges, securing them with a clip. The top sheet is my template sheet. It is important for me to see the middle line well. I take a ruler and the needle, I put a ruler along the middle of the sheet and measure about four centimeters from the top and make a hole with the needle for all the sheets of paper. After two centimeters, one more, and one more. It turns out three holes in a row. The same thing at the bottom of the sheet, 1, 2, 3, 4. Now slightly leave the paper and check each hole again. Look, here is my sketchbook and it consists of three blocks. I like this method when I staple more than six sheets. I have nine sheets now, so I need to make three blocks of three sheets. I then did along the line where the holes are located. You can fold each sheet individually. I make sure that the holes are exactly on the fold. Second and the third one. I find the middle of the first block then the middle of the second block and fasten it this way. Then I find the middle of the third block. Check again that the holes on all three blocks match and I fasten it. I thread a needle, double it, make a knot. I start from the middle hole leaving the small loop on the outside, return the needle to the outside through the left hole. I thread the needle through the loop. Now I'm going to the right and return to the middle. I intercept the sheet in this way. My fingers are in the middle of the second block. Again, I go to the middle hole and to the left. Now an important point, I need to go back to the third block and make a not. Back to the center, and to the right. I fasten and leave the first block. Then again to the center. But I don't pierce it inside but fix it with a knot. Stitch to the needle of the third block and repeat the steps. Needle, to the left, knot, needle, right, knot. With the second side in the same way. This process may looks confusing, but this is only the first time. Done. The next and final stage is the cover. I like it when it's a little bit bigger than the sheets in this case book. Covers must be the same size. I apply PVA glue. Any other is also possible. Gently move the paper. Remove excess glue with a towel. I fasten all these clamps and leave it to dry. Well, the sketchbook is ready. I can draw.
18. Bonus Video: Summer Sketchbook: Hi, there. Summer is over but it will live forever in my sketchbook. Let's take a look. I have a tradition of decorating some sketchbook frames with my own little son's pictures. It seems to me very touching guest read. Here I glued the envelope and put all postcards to get snows, which helped to remember the atmosphere of summer events. I really like this idea, and plan to glue the envelope in my next sketchbook too. It's me, my birthday is in June, so here is my self portrait. Forget me not, from my balcony garden. I really love these flowers, but they are short-lived and quick lose their charm. But I managed to draw them, and save them. Now they are in my sketchbook forever. This is the field strawberry harvest also from the balcony, and the Basilica. My son loves to eat it very much. There is still a bee, it's amazing how bees find their way to my flowers, because I live in a multi-story building, almost in the center of a big city. This is another sketch of this amazing plant but I actually forgot its name, it gloomed over the summer, and now in September it is still glooming too. An interesting story happen to it after three cold and dry weeks, it almost died, but then it's alive, and again pleases us with its beauty. This summer, I visited my parents, and they have a large harvest of tomatoes. Well, this spread is about it. Tomato diet and all of it. There are my garden tools, and their calendar with June. now this is my birthday. This sketch is from a trip to Karelia. This is a very beautiful place. North of Saint Petersburg where I live, rocks, lakes and a lot of seagulls. This is also from the trip. Fantastic sky. I have never seen this before. The moon, the rain, and cloud, the sunset, were all visible in the sky at the same time, and behind the back, there was a rainbow. Can you imagine it? It says here, clouds in the summer perhaps a bit especially good. This is a phrase from a famous Russian song. Sunset again, this is a mounting covered with forest, and the race of the setting sun divide into two parts. This is a family camp. We leave intense in the middle of pine forest, kitchen, playground for children, swings, beach towards [inaudible]. This is a first time I've used black paper in my sketchbook, and so far I haven't come up with anything better than drawing nice scenes. This is a tiny country house of my friends where we spend several wonderful days. The August star sky, it is easy to look for constellation on it. Here is my family, but we stand, and look at the sky. Here the stars are falling, and pay attention. They are are four. One, 2, 3, 4, and there are four of us too. Everyone has their own falling star for their best desire. Here, I had an idea with the moon but I didn't bring it to the finished illustration [inaudible] that all, such a summer. Thank you for watching. Bye-bye.
 Olga Bonitas, Watercolour girl