Transcripts
1. Introduction: Hey, you're here. Thanks for joining me. I'm Jenny. I'm an Illustrator, hand letter, and a surface pattern designer from Finland. I have always loved simple animations, and recently I've been creating a lot of gif stickers like these, which in the last six months have somehow gotten over a billion impressions, mainly on Instagram and Snapchat. You could say that I have a soft spot for simple animations. Anyway, for years I thought that even simple animations are hard to make, and maybe that was true back in the day, but they are not hard to make today. I did my very first animation in Photoshop some years ago, but I wasn't impressed by the method. Then came along Procreate 5, and Oh boy, did making simple moving illustrations get easy or what? In this class, you'll learn the simple animation tools in Procreate. All you need is an iPad, Apple Pencil, and the Procreate app. The app costs about 10 bucks. I'll cover a lot of super simple animation techniques like how to make your animation move by tweaking just a few details. Or how to create animations with fonts. Or how to animate with texture. Or how to animate your hand lettering using a variety of super-simple methods, and that's just the start. There'll be a lot more of super simpleness to learn in this class. They say that a moving object automatically attracts the eye much better than a still image. These mini animations can be used to add interest to your website or a newsletter. Or you can upload them to Giphy and use them to give you Instagram stories and reels an extra boost. I wanted to teach something super-simple that can be learned in a few hours, and where the learning curve is as gentle as possible. Let's animate.
2. Terminology and Usage: Let's start by clarifying what I mean by animation in this class. We're not talking about Disney-style cartoons or Toy Story animations. We're not even talking about animated advertisements or larger illustrations that have moving parts in them, like this one. In this class, we will focus on the most simple animated imagery, like my GIFs here. When I talk about animation in this class, I mean anything from illustrations to text that is animated, meaning that it moves. The focus of this class will be to learn the main tools for animation in Procreate and several different ways of animating an illustration or text without making it complicated. I want to keep this light and fun for you. Once you get the hang of the tools and the techniques, then you can take your animations further and create more complicated things, like these brew can here, and even this is considered simple. What is the difference between GIFs and GIF stickers? First of all, I'm not a technical expert and there's much more to GIFs than what I'm sharing here. This is just my interpretation of their differences. GIF, which is also pronounced "jif" by many, is short for graphics interchange format. They're suitable, for example, for simple line art with small amounts of colors like logos or small simple animations, and low-resolution video clips like this. What are GIFs stickers then? The main difference between a GIF and a GIF sticker is that GIFs are generally considered to have a full background like this, and GIF stickers have transparent or partially transparent backgrounds. Both of these are considered GIF stickers because at least 20 % of their background is transparent. The real background of the GIF stickers on the right is demonstrated by the flashing gray background, and the GIF on the left has a solid white square at the back that covers the entire background. For example, GIPHY, which is an online database where you can store GIFs to use them later on social media, has a rule that 20 % of the background must be transparent in order for a GIF to be categorized as a GIF sticker. So the difference between the two is all about transparency or the lack of it. Here are some ideas of where to use your animated GIFs and GIF stickers. You can even make an animated background for your Zoom or Teams calls like this one that I made for my Zoom meetings. I mean, you can still see that I'm clearly a cutout here in the middle, but it's still something fun to play with if that's something you're interested in. You could also use them on social media or iMessages if you have an iPhone. The possibilities are many, and I'm only scratching the surface here.
3. Inspiration: I know you've already seen many examples of animated illustrations. But if you want even more ideas, I have created a Pinterest board called Animated Art for you. You can access it through the link in the class description. I have tried to collect only simple ones here. Here's one with a busy mind. This one has text only. This one's my fave, the happy sun doodle. Finally, a little ice cream cone. All of these were done by using a different technique. Another great place to look for inspiration is Giphy, the place where all the gifs and gif stickers sleep. Let's have a look. Here you can search gifs and gifs stickers with search words like, "so good". As a result, you'll get some gifs related to that. Or you can click Stickers to see all the gif stickers with that tag attached to them. This is how you can search for different themes. You can also search with a person's username. I'll use mine as an example. I don't actually have many gifts, so I'll click the Stickers button up here. You'll see my stickers, and I have a lot. You can narrow the search by adding a search word after the username. Here are all the stickers where I have used a tag, "jeahdesign" and "love". I actually use my username, jeahdesign also as a tag when I tag my own gifs to help me find them later in searches on social media. If you're interested to find out more about Giphy, don't worry, there's a brief lesson on it at the end of the class.
4. Class Project: Your class project will be to create an animated illustration or hand lettering. I will show you many different ways you can do this. You will have plenty of techniques and ideas to draw from. Here are some examples of what it could look like. All you will need for creating your project is an apple pencil, an iPad that is compatible with an apple pencil, and the Procreate app version 5 or newer. Once your animation is ready, I really hope you share it with the world. You can do that by uploading it to Skillshare's project and resources page. If you like, you can post it to Instagram using #learnwithjenni, Jenni with an I and my handle @jeahdesign. I try to share student projects in my Insta stories whenever possible. I love seeing what other creatives make, so please, share your animations.
5. Getting Started: Here we go. I'm going to start by opening Procreate and create a new canvas. Click on the little plus sign up here and then the other plus sign here, so you get to give the measurements for your file. You can choose if you want to go with millimetres, centimetres, inches, or pixels. I'm going to go with pixels and create 1000 x 1000 pixel canvas. I'm going to leave it at 150 dots per inch, and I'm going to name my template as mini-animations. Then you have it ready the next time you want to create another mini-animation. Then click "Create". Just make sure that whatever size you choose, you're not making it too big. Because, for example, for Skillshare, your file size can be maximum of eight megabytes, so keep it relatively small. Also if you want to use it for your newsletter or your website, you don't want your file to be massive and slow down your site. This 1,000 by 1,000 big source is pretty good starting point. Before we start, I want to quickly show you the tools. I'm not going to get too deeply into them as I do have a Procreate basics class that covers the basics. On this side you have the basic tools, the brush tool. Here you can find all the brushes that come with Procreate as well as the ones we have bought and imported into Procreate. Here is the smudge tool that has exactly the same process, except you use them for smudging. Here's the eraser tool, the same thing, exactly the same brushes. You can actually erase with exactly the same brush as you have used for drawing. Here, you'll find your layers panel and your color tool. I'm going to explain a little bit more about the color tool later. On this side, you'll find the actions menu with different subcategories. Here, you'll have the adjustments. This is your selection tool, which gives you a little pop-up here with different actions. You can select part of your illustration with it and with the arrow, that is your transformation tools. That will give you a new set of actions that you can do. On the left-hand side, this you can actually move to either side depending if you're left or right-handed or whatever you prefer. This is your brush size slider, so you can make your brush bigger or smaller. Here you adjust the opacity of your brush so you can make it more transparent. This is your undo button, and this is your redo button. This little square icon, you can use it for different tools. For me, if I tap it, it activates the eye dropper so I can choose a color from my illustration with it. To change the tool that you use for it, you go to actions, preferences, gesture controls, and here you choose which tool you want to use for your square icon. I have chosen the eye dropper. I have also assigned another task. To activate the eraser, I hold down that little square and use my Apple pencil. I'll show you what I mean. Instead of having to choose the eraser brush to erase and then choose the brush again to start drawing, I can just hold down the square and use my Apple pencil to erase. If I lift my finger, my Apple pencil is back to being a brush. This makes my workflow a little bit quicker because I don't have to switch between the two tools here. So that's it.
6. Colour Tool: As promised, I will show you how the Color tool works. Tap on the little dot up here to activate the Color tool, you will get five different tabs. The first tab is the palettes, which is where all the palettes you've created live, as well as the ones that come with Procreate. You can create a new palette by tapping the little Plus sign, the top one, create new palette will give you an empty one, and then the three others will give you a ready-made palette from, for example, the new from photos, meaning that it will pick the colors from a photo that you choose from your gallery. I have one here that was created from an image. The same here, you can pick the colors from a file that you have, or then you can activate the iPad's camera and pick the colors from whatever you take a photo of. The color palettes in the coloring tool were updated for the Procreate 5.2.1 version. You can now choose between two different views. You can have the traditional view that's called compact, where the color swatches are small and you can say several pallets at once. Or you can take a closer look at your palette by choosing the cards option. You'll still be able to scroll through your pallets, but you will see each color as a larger swatch or card as they call it in Procreate. In addition, your colors will be automatically named by Procreate, but you can edit these names to whatever you like. The next panel is value. If you have an exact color in mind and you have the color code for it, this is where you can enter that information. So hexadecimal RGB or HSB codes. The Color Harmony tab is very interesting, it can be very useful for picking color palettes if that's something you struggle with. Even if you don't, this is a fun tool to play with. You can choose from five different color harmonies that you can use and Procreate will help you with those. The complementary means that you will automatically get the complementary color for whatever color you choose. If I want to go with a yellow, it will automatically give me a blue that's the complementary color of that yellow. Pastel yellow will have a more pastel blue as it's complementary and so on. The split complementary means that instead of getting the complementary color that's on the opposite side of the color wheel, you will get the two colors which are next to the complementary color. That's called split complementary. I find this really needs to play around with these. Then we've got the analogous, my gosh, that's a hard word for me, analogous color harmony. That means that you pick a color and Procreate will automatically give you the two colors that are on both sides of your chosen color. That together creates analogous color harmony. Then you have the triadic color harmony, which means that the three colors are equally spaced from each other on the color wheel. Tedratic means that you're getting a set of two complementary colors. These two are complementary to each other, and these two are complementary to each other. You're getting a set of four colors that go well together. Then we have the Classic tab, meaning this is where you can choose a hue and then adjust its saturation. You can see the color picker moving there, you can also move it like this. Then you can also adjust its brightness. The disc is basically the same thing, but in a different format. Here's your hue, and this middle one here moves your saturation and brightness at the same time. That's the Color tool. I recommend to try the different tabs if you're not familiar with them beforehand, and have a little play and see how it works.
7. Animated Hand-lettered Word: Let the fun begin. Let's animate our first thing, a hand lettered word. To warm up and learn the basics of Procreate animation, I wanted to start with the most simple thing I could think of, animated words like these. If you like, you can use this outline brush that I have created. You will find it alongside with instructions for installing it on the resources section. Now, let's start. You should have your previously created canvas of 1,000 by 1,000 pixels ready. We'll turn on the animation assist, which you find here in the Actions, Canvas, and Animation Assist. Just toggle that on, and a little panel should pop up here for your animation settings. Next, we'll choose a brush. I will go with the outline brush that I have provided in the resources section, and I will choose a brush size of 50 percent. I always tend to choose my brush sizes so that they are dividable by 10 or five. This way, it's easier for me to figure out what brush size I was using if I need to edit the image lighter, and if I still want to keep the brush size the same. It's easy to test if I was using precise 20, 25, 30 rather than if it was a random 27. Another option is to create an empty layer where you write the name of your brush and the brush size that you were using. Let's start with our word. If you've decided to go with the outline brush like I have, there are a couple of things you need to take into consideration. If you draw with the outline brush letters that have crossing strokes, or crossing the lines, the end result is not super pretty, as the lines don't go together very smoothly. There are a couple of workarounds for this, but none of them are perfect. The quick workaround is to not lift your pen, and just follow the line that you've just drawn like that, but this is really difficult to do without having wonky letters. Then again, if wonky is the style you're going for, that might be just the thing for you. There is another way of creating really pretty lettering with the outline brush, but that's more laborious. You need to create all of the strokes on separate layers. I will show you that method later. But since it's not suitable for super simple animations, I will show you that later as an extra. My solution is to use cursive lettering, and choose words where you don't have to lift your pen. I'm going to write the word Hi in one go like that. Once you are happy with the word you've created, you might want to move it to the middle. You do that by activating the transformation tool, the little arrow up here, and once you start moving your word, you should get little cross guidelines to show you when you've reached the middle, so there. Then you deactivate the transformation tool by clicking a different tool, or Layers panel. Once you're happy with the placement and your word, click on the Layer tool and add another layer. Your previous layer turned a little bit transparent, so this way you know which layer is active. Then recreate your word. You can either try to mimic it relatively closely. You don't want to make it exactly the same because then there won't be any movement in your animation. Depending on how much variation you create in your second version of the word, that will affect the way your animation will look. But I'll demonstrate that in a minute. Here's my first version. If I hit Play, I can see it in movement. That is a very jittery movement and I don't like the look of it. That's because it's going at 15 frames per second. If I lower this to do that, so you go to Settings and then you change the frames per seconds. I'm going to go probably with three frames per second. This is completely personal preference, so you can choose to make it move as slowly, or as fast as you like. You can see that the word wiggles quite nicely. I made the layers relatively similar to each other. I didn't change the word too much. Let me show you what happens if I make the second version really different. I deactivated the other layer by unchecking the box here, and I created a new layer in between. Now I'm going to write the word again, but this time I'll make it much bigger so that it's lot more different than the original layer. Now when I hit Play, you can see that the movement is very different than it was with the smaller word. It's almost like a flashing effect. Play around with the versions and see what you like. I actually preferred the one where the movement was more subtle. It looked a little bit more like the word is wiggling rather than flashing. I'm happy with this. Next I'm going to show you how to create your own background.
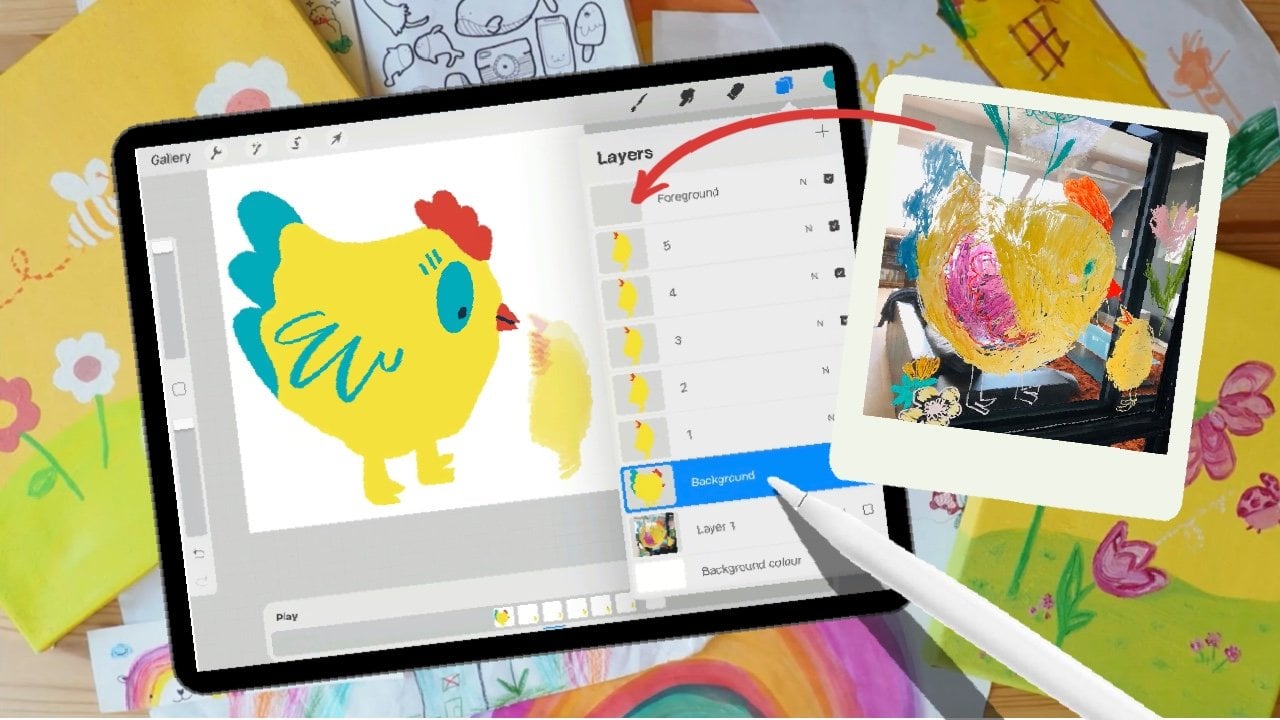
8. Animated Word: Background: If you want to have a background that covers your entire image, you can leave it as it is and you're ready to move on to the next phase. If you want to change the color of your background, you just go to the background color layer here, you tap that and you can access your color palettes and you can choose different colors for it. Yeah, that's easy. Also, if you just want to have a transparent background, all you need to do is turn off the background layer and now you're left with just your lettering. You will have an animated word that has a completely transparent background, and you're ready. However, sometimes you might want to create your own background which is not wall to wall, so to say. You do that by creating a new layer, by clicking the plus sign and then this is very important, drag the layer to the very bottom of your animation. Then I'll choose an off-white color and I'll choose a new brush since the outline brush will not work very well for this. I'm going to go with a wonky square background. As you can see, the background doesn't cover the whole image wall to wall, there will be a transparent frame around it that will be part of the file. Now, I can just drag the color from here and drop it in the middle and it'll fill in the whole area without me having to manually do that. However, something that happens when you do that is that you might have transparent pixels left behind here where this line that I created meets the colored center part. You can check if this is happening for you. I need to change this to black so you can see the demonstration. But you don't have to do these steps, I'm just doing this to demonstrate. Here's my background, and to check if this has transparent pixels, I'll turn off the lettering as well, just so you can see. I'll go to Actions, Share Animated GIF. Here, see, I hope they are showing, but all of these white bits here are actually transparent pixels in my background layer. You don't want this to happen because this will not look very nice if you use this Asam GIF sticker, for example, later on. Or even if you use it as an animation, like regular animation anywhere. If this is happening to you, the quick fix is, I'm just going to erase what I did and redo that. I draw my background and when I start to fill it in, I will drag this to the middle, but I will not lift my pen, I will keep it pressed down and slide my pen to the right. This will increase the threshold of the color drop tool and that will get rid of the transparent pixels. Let's look at that. I'll drag it, I'll hold it, and I'll drag it to the right and you can see the color threshold going up. If I take it all the way to the top, sometimes you might end up coloring the entire area. It didn't happen this time, I think it's because I had a thick brush and it understood that it shouldn't be going over the edge. But sometimes if you have a very skinny line, that might cover your entire layer. You don't want to take it all the way to 100 percent, like something around 90 percent should work fine. Now if we test this and we go to Animated GIF, let's turn the lettering off and try it again. Now, you should see that there are no transparent pixels left behind. I just wanted to show you this because it does happen sometimes and people are puzzled like, what is happening to my file. I'm going to turn that back to white because that's what I originally wanted. I'm also going to turn on my littered layers. Now if I hit "Play," it will show the background that I created as a separate layer and it will flash in a very unstylistic way. To avoid that, you go down here and choose the layer where your hand-drawn background is and you click on it, and you toggle the background button on, like that. That will turn your hand-drawn background into a background layer which is always visible regardless of what else you draw on top of it. Let's look at that again. Now, that looks much better. I think my background could be slightly bigger, so I'm going to go on that layer, activate the transformation tool, drag one of the corners and move my background to the middle like that, and then deactivate it by clicking another tool. I'm quite pleased with this one. Once you're happy with your background, that's it. This is your first animated piece. Didn't I say it's easy?
9. Super Simple Techniques: Next, we'll look at four new ways of animating the hand lettering that we just created. We'll start with the technique that I call enlarging. We're going to continue with the same hand lettering that we already created. But now, I'll remove the layer with the bigger hand-lettering, and deactivate the other one. Now, I'm left with only the background layer active, and the original hand lettering. I'm going to duplicate the original hand-lettering by sliding left on the layer and clicking ''Duplicate''. Now, the second layer that was created, I will transform that by clicking the little arrow up here. I will drag the corner and make the hand lettering a little bit bigger than the original, not much but a little. Then I'll move it to roughly the center. Now let's see how that looks. Now this is, instead of flashing, this looks a little bit more like it's pulsing. Once again, I can control how fast it's pulsing or how slow. Again, that's a nice effect as well, and super-simple. First I'm going to remove the previously created layer, then I'll duplicate the original layer once again. This time, I'm not going to make it bigger, but I will go to the transformation tool, and this time I will tilt it a little bit to the right, just like that, and let's have a look. Now, it looks like it's shaking a little bit from side to side, so another effect created in a super simple way. I'm going to delete that again, and I'm going to duplicate the original layer. Original layer one more time. Now, I'm going to re-color this. My method for doing this really quickly is to slide the layer to the right, with two fingers. This will turn the Alpha Lock on. You can see that it's on because the background has a little checkered texture. Other option is to click on the thumbnail, and click on the Alpha Lock here. That's how you get it on. Once you've got the Alpha Lock on, it means that whatever you do on the layer, it will only take effect on the pixels that you have already created on it. I cannot draw outside, since this layer only has the lettering Hi on it, I cannot draw, for example, outside the text. I'm going to choose a new color , I'm going to choose color red. For example here, the color only goes inside the lettering because that's the only thing on the layer. Now to color these really quickly, now that I've got the Alpha lock on, I'll just click on the "Fill Layer" and it will color the text grid. Let's see how that looks. That is also pulsing effect, but now just the color is changing. Yet another really quick and easy way to animate your lettering. That's three different ways of doing it. I've got one more. I'm going to delete the red layer, and now I'm going to create a new layer, but I will put nothing on it. I'll have my background, my original lettering, and an empty layer. Let's see what that does. Now this gives me the flashing effect, and I can make it flash really quickly. Sorry, that might cause some migraine for someone. Or I can make it super slow, even slower than that. Yeah, to create the flashing effect, the quickest way to do that is to add a blank layer in your layers panel. There you go. That's four different ways of making your animation move. Let's start with these two. On the left we have the pulsing one, which was created by duplicating the layer with the hand lettering, and then enlarging a duplicated layer slightly and centering it. On the right, we have the shaking one, which was created also by duplicating it and then tilting the duplicated layer a little bit. Next we have the flashing one on the right, which was created by just adding an empty layer in the layers panel. The one on the left that pulses with color, was created by duplicating the hand lettered layer, and then re-coloring the duplicated text with red. In addition, here are the ones that were created in the previous lesson. On the left, we have the wiggly one, which was created by rewriting the text on a new layer. The one on the right, with the flashing or pulsing effect, was also made by rewriting the text, but this time by making it clearly bigger than the original hand lettering, so there. Now we have several different tricks we can use to make our animation move in various ways. That means it's time to move on to animating our first illustration.
10. Animated Peach - Basics: Finally, it's time to animate an illustration. Now that we already know how to add movement to a word, we can apply the same techniques to illustration, so let's start by creating a new canvas. Click on the little plus sign up here and open a new template. The one that we just created should be at the bottom of your list unless you moved it. Like I have mine is here at the top. The idea is to draw something super simple. We're focusing more on the technique rather than the illustration itself. I'm going to choose a monoline brush. I'm going to pick a coral red color. My plan is to draw a peach you can follow along to do that or you can choose something else that you find easy to draw. Just make sure it's something simple. I'm going to start by creating the outline like that and then I'm going to fill it in with color and I'm adjusting the shape just a little bit. Okay, that'll do. If you want to, you can center it. You can also do that later, but I'm going to do it now, so click on the "Transformation Tool" and move it to where you feel it looks the best. If you have the Snapping turned on down here, then you will have the little guidelines to help you determine the center like that. Once you're happy with the shape of your drawing, then create a new layer to add some details. This is super important, try to keep all your elements on separate layers so then when it comes time to animating them, it is easier to do. I'm going to change the color and I'm going to add some details here like that. I'm going to add all my details on the same layer, but still different from the actual shape of the pear. Then I'm going to create another layer and this is where I'm going to draw a little face for my peach. Little eyes like that and a little mouth, so this is going to be my illustration that I'm going to animate. Very simple and only three layers. Now we turn on the Animation Assist, which you find from Actions the little wrench then Canvas and Animation Assist, and this little section should appear here. Now you can also see that part of my illustration turned transparent. Basically, the layer you're on is going to be shown in full color, and then all the other layers will be transparent. All your layers are also frames here in the timeline and here in the settings, you can see and adjust your layers. All the inactive layers are called onion skin frames and here if you adjust their opacity, you can see how the color changes. If I put it to max, all my layers are shown in full opacity and it's really hard to tell what layer I'm working on, so it is a good idea to make the other layers, also known as the onion skin frames, little more transparent. Also, this one here is where you determine how many onion skin frames are visible at the same time, meaning how many of your layers you can see at the same time. This is not important for our animation, but if you are for example, working on a walking sequence, then this becomes important. But you don't need to worry about that. Now we are ready to start animating the illustration. You need to choose which parts of your illustration you want to move. I want to make the face and the details move, so I'm going to create a new layer and draw the face again. I'm going to make sure that is slightly in a different spot and as the original drawing, and also I want to make the other eye blink so I'm going to draw a little closed eyelid there. I'm going to draw the mouth again as well so that will start moving as well. Also, then I'm going to create another layer. I'm going to go and choose the detail color again and I'm going to redraw the details, see what happened there? Now my peach shape disappeared, and that is because in the settings I have chosen that I'm seeing only three onion skin frames, so I'm seeing the three previous ones, 1, 2, 3. Since this is the fourth one, it's not showing. If I turn that up, it will show also the peach shape. Yeah, maybe you want to keep your onion skin frames to the max for our purposes. Where was I? The details. I'm going to redraw the details. I'm going to make sure that there will be movement, so I'm going to redraw that little bit off in comparison to the original detail layer and same for these. I want them also to move slightly. Now to see how this moves, I will need to go to the pear shape and make this the background layer. Remember we did this also with the word. You tap on the frame down here to get frame options and turn on the background. Like that. Now, this will be the background for the entire animation and it will be always showing regardless on what layer you're on. You can see that it doesn't turn opaque because it is the background. Whereas the other layers here are turning opaque. Now, if I turn the play on now, it's not doing what I wanted to do. It's showing each of the layers separately and that's not what we want. First of all, I want to turn down the frames per second to a little bit slower, maybe four. Now I need to put the face and the details on the same layer so that they are showing simultaneously. I'm going to click on the "Layer" and merge down, so these two merged, then I'm going to go on the other detail layer, click on it and merge down. Now it's merged to the face. If you are creating the same thing as I am, make sure you are merging one face and one set of details. Let's have a look. Now It's working exactly the way I intended it to. Yeah, this is the first version of an animated illustration. Super simple, isn't it?
11. Animated Apple - Grouping: Next we're going to look at illustrations that have overlapping parts, which cannot be made part of the background layer. Let's create a new canvas and draw a new fruit. I'm going to draw an apple this time like that, and then I'm going to create a new layer and draw my little details, the stalk, like that and some details like that. Also, I'm going to do a little face. This time, maybe create a little bit different face and a tiny little mouth, so there. Next, I turn on the animation assist in the Actions panel under Canvas tab. Then I'm going to create the leaf on a separate layer, so there's no trouble editing it later. Now I can make these into the background layer like that so it's always visible. But now, if I start creating the new versions of the leaf, the details, and the face in order to have that movement, and if I'm not going to merge them together, what am I going to do? There's a trick. I'm going to activate all three layers. I do that by choosing one of them, then swiping left with my finger so that they all turn blue, and then I'm going to click Group. Now they've turned into one group and see what happened down here. They are all creating just one single frame. If I undo that, you can see I have three frames here as I have three layers. If I combine the three layers into a group, they turn into one single frame. That means that all these three layers are shown simultaneously in my animation. Now I can create another layer on top of the group and that creates a new frame down here in the timeline. I can now create my leaf, which will be easy to edit later. If I don't like the movement it's creating, then I'm creating a new layer and I'm creating my details. I'm going to make sure that the stalk also moves and that my details move a little bit. Now here in the first version, I have the stalk underneath the leaf and I want that same to happen in the other group as well. I'm going to move the leaf above the details, and then I need to draw the face. Once again, actually, this doesn't matter if the face is above or below because they are not overlapping. It doesn't matter if it's located underneath the other layers or on top of them, above them. I think that was my face color. I'm going to make the apple blink as well. No, that's not what I wanted. I'm going to give a little movement to the mouth as well. Now I have also created the new layers for all the other elements. I'm going to choose one layer and then slide right to choose the rest and create a group. Once again, see what happens here. I've got three layers on one side, group them, they turn into one single frame. The tricky part is that working in groups makes it harder to do your color management. Let me demonstrate what I mean. Let's say I want to do some details for the leaf. I'll create a new layer above it and I choose a dark green color to draw the details with. Now that I draw my details, that looks fine. But in reality, this is not actually the color that I have chosen. Here is the true color. If I draw here on the side, you can see that it's very, very dark green rather than this much lighter green. What's happening here is that the other group, which is one single frame, is an onion skin frame. It has a transparent version on top of my current layer that I'm working on and that interferes with my colors. To get rid of that problem, I'm just going to erase what I just drew. You can turn off the entire group. Now you can see the colors correctly and you can decide if you like the colors that you've picked. Make sure you turn the entire other group off and then you can work with your current group of layers. Once you're happy with that and you know that all the colors work well together, then you can turn on the other group. Now I need to create the details into this group as well, so I add a layer. Now I don't have to turn off the other group because I already know that my colors work, so I'm going to leave the layers in the other group on so I can see where the details located and I can now draw it on my new layer. Let's see how that looks. I like it except that it's way too fast for my liking. I'm going to turn down the frames per second, 5, 4, 3, 2. Okay, three. I'm liking three frames per second, that's pretty nice. So there. This is a nice trick how you can keep your separate layers and edit them individually and still have it work nicely for your animation.
12. Animated Heart - Fonts: Next, I'm going to show you how to create something like this. Let's create a new document by clicking the plus sign up here and choosing the template we created earlier. Then choose a brush you like. I'm going to go with the monoline. Choose a color. I'm going to go with the coral red, and then we draw our heart. Just a little hiccup there. I might make that a tad bigger like that. Now you can write your text with your handwriting if you want. You create a new layer and write on that. But the point of this animation is to show you how the text tool works. We go to Actions, and please note here, if you use your fingers, you will get a different kind of view of the tool than if you use your pen. I prefer to use my fingers because it gives me a wider view. Let's take that again. You go to Actions, Add, Add text, and these sort of view should appear. But if you did use your pen, you might get a smaller view. All the same things are available to you, but your starting view is different. I don't know why Procreate does that, I find it confusing. But I want to edit the font, so I'm going to click the double A here and I'm going to get a view like this. You will also land here if you have used your N for activating the tool, but the initial view is different. Here I can choose a font that I like. I'm going to go with Punch Needle, which is a font that I have created myself. If you do want to use that, you can buy it from my Creative Market shop. But you can just use any of the fonts that come with Procreate. Or if you have fonts that you've bought, that you've got on your PC or you got on your Mac, you can export them to your iPad, and then you can use those as well. You can also edit the size. I am going to go with 130, I think. Yeah, that's pretty good. Here you can activate the numbers panel by tapping any of these sections here. If you want to edit the font size and give an exact number, you can do it here. You can also use the slider. It's up to you. I'm going to go with 140. Then I'm going to center my text a little bit better. Also now my text is red, so it will be impossible to see it on top of the red heart. To change that, I actually have to hop off here and activate my text again. Click on the "Text" in the layers panel, click "Edit Text", and then choose a new color from your color tool. There. Now, I don't think it's in the right spot, so I'm going to click on "Transform" and move it to where I think it's better. It's good. Now, I want to edit the text. I wanted to say love, so I'm going to tap on the text layer, click "Edit Text", and then just tap on the text itself and then delete whatever was there and write your word. I'm going to go with love. Now, once you've got your word on a text layer, you can just copy that as many times as you have letters in your word. If you're using the word love, you will need four layers because love has four letters. The top one will remain the full word. The one underneath you're going to activate that Edit Text and you're going to remove the E. The one underneath, once again, tap on the layer, Edit Text, and delete the E and the V. You can see how the letters disappear. On the bottom one, Edit Text, you remove all of the letters except for the L. I know it's a little bit hard to see what do you have there. It would've been a good idea to actually activate the Animation Assist before we started doing this. But we can also do it now. Go to Actions, Canvas, Animation Assist. Now it's a little bit easier to see what is on your layer that your editing because the others will turn into onion skin frames. Also, I think my onion skins are quite pale. I want to turn that up a little bit. Now if I hit Play, oops, that's not working very well. What's happening here is that I have not changed my heart layer to be the background yet. So tap on the heart layer down here and turn on the background feature. Now the heart will remain on the bottom, but the text is going awfully fast. I'm going to change the frames per second to maybe three so it's still easy to read. Yeah, I think that's looking pretty good. Now I want the full word to show a little bit longer. I can do this by either duplicating the layer, so having several layers of the same. Let's do that one more time. I've got three layers with the word love. I'm going to delete those two extra ones. The other option would be to go on the right layer. Down here, I see now that there's a little blue bar under these frame, so now I can tell that I'm on this frame. I tap on that frame and here I can change the duration of that frame. I can make it stand for three frames. That means I don't have to duplicate my layers here, and I save layers because sometimes you might be short of layers. My illustration is so small that I don't have that problem, but sometimes it's useful to have that option. Instead of having three layers of the same, it will just hold my last frame for as long as I have told it in the settings. For three frames, it will hold my word love. Let's see that. The end result is exactly the same. It will hold that still. I think it's actually too slow. It's holding it for too long, so maybe hold the duration for two. Let's see how that looks. Yeah, I like that better. Also, I don't want to have a full white background, so I'm going to turn the background off. I'm going to create a new layer where I'm going to create my background. But now I have assigned my heart to be the background layer. That's not going to work because that needs to be the bottom layer. For the time being, I'm deactivating the background layer. Now the heart layer turned into a normal layer. I can move this new layer to the bottom. I can create my background on this one and then I can merge them afterwards. I'm going to do a little wobbly square, which I love so much, and I'm going to fill that in. Now the heart is too big for the background, so I'm going to reduce that size. I'm going to activate Transformation tool, grab the corner and make it smaller, and then drag it to the middle like that. Now it might be that my word is too big, but let's worry about that later. Now I'm happy with the heart and I'm happy with the background, so I'm ready to merge them. But before you merge them, make sure that you don't want to make any edits to your heart nor your background because it can be tricky to edit those later. Depends on what exactly you want to do, but just try to make them ready before you merge. Once you are ready to merge, tap on the layer you want to merge down and click on "Merge Down". Now I've got one layer with the background and the heart, and I can go down here and tap it, and assign that to be the background layer. Now if I hit Play, I'm getting this. Yeah, that's pretty good. But I do want to move the word a little bit up. I'm going to choose all of them by sliding to the right, then click on the Transformation tool, and center them better. Let's see. Yeah, that's perfect. That's it. It's ready. Pretty cool, eh?
13. Animated Banana - Texture with Colour: Next, I'm going to show you how to create something like this. We're going to go back to the gallery and create a new canvas like that. Then I'll choose the monoline brush. I'll pick black for color. Then I will draw the banana like that, do a couple of lines like that. I will enlarge that slightly like that. Next, I will create a new layer, and I will color the banana with yellow color. Now you can choose how you want to color it in. But the point is not to fill it in with yellow color, but rather color it as if you were coloring a coloring page. It doesn't have to be perfectly colored. The whole idea is that it is very rough. Then next, I will move the outline layer above the colored layer like that. Then I will create another new layer. At this point it is a good idea to turn on the Animation Assist. Go to "Actions", "Canvas" and turn the Animation Assist on. Now I'm on my new layer and I'm going to color the banana again. I'm going to make sure that it's colored differently. Obviously, it is than the first time round. I will also add the text, so I'm going to go back to black and since I want the text to move, I will write it on both layers. Let's do it on a separate layer, so then we have the possibility to edit the colors without any hassles. I will leave the merging of the layers till the very end. Banana, that will do. Then a new version of it. Make sure I'm not following it too closely. Like that. I'm actually sure I don't want to edit the yellow color, so I'm just going to go ahead and merge the banana text with my yellow coloring and then move the other yellow coloring above that and merge the other banana text with the yellow banana. Now we're going to do something different than we have done before. Before we have set one part of the illustration as the background layer. This time we're going to have the outline at the very top of the layers panel, and we're going to set that as the foreground. That means that whatever you set as the foreground, it needs to be the top layer in your panel, just as the background layer needs to be the bottom layer, the foreground layer needs to be the top layer. Whatever is in your foreground layer will be displayed on top of everything else that you have on the normal layers. If I play that, the foreground layer is showing on top of my yellow banana color. Once again, this is going at 15 frames per second, and it might be a good idea to slow that down a little bit, so I went for four. Here we go. There is my little banana illustration. Also, I'm going to turn the background layer off. This could work nicely, but I do like to have some background. I'm going to create a new layer and drag that to the bottom. I will draw my background on that and then I will set it as the background layer. Here we go. I'm going to do my usual square, which I use a lot. Accidentally, I made that too harsh on the corner to be more round. That will do. Now I am on the bottom layer. I'm going to tap on it down here, and I'm going to turn that into the background layer. Then hit "Play", and voila, here we have a little cool moving banana animation.
14. Outline Hack: Just like I promised, I'm going to show you how you can use your outline brush and not worry about the overlapping strokes. Let's choose an outline brush. Choose a color that you like, I'm going to go with black. Then let's create something. I'm going to do a little cross. Now, this is the important bit. You need to create all of your lines on separate layers. Whenever you lift your pen up, you need to create a new layer. I'm going to keep this super simple like that. Now that I'm on the top layer with the horizontal line selected, I'm going to go to "Selection Tool." Down here, I'm going to make sure I've got "Automatic" selected. If you don't, this won't work. Automatic selected. Then tap in the middle of the horizontal line. Click "Save and Load" down here, then the little plus sign. Now my little selection is saved down here. Now I'm going to do the same to the other layer. I'm going to go on the vertical layer. I'm going to tap once to deselect the previous selection and tap another time to reselect. I'm going to go and choose the vertical line, click "Save and Load" tap plus sign. Now I have them both saved down here on separate selections. I've got the vertical selected, and I'll go to the Layers panel and choose the opposite stroke. Not the same stroke. I've got vertical selected here so up here I'm going to choose the horizontal. Then I click "Clear" and see, those little lines disappeared. Then I do the opposite. I'll choose the vertical line here in the Layers panel. Down here, I'll choose the horizontal one. Once again, I'll tap on the little thumbnail and click "Clear". There we have it. Now the outlines are nicely connecting to each other. Then I'm going to go to the top layer, tap once and click, "Merge Down". Now I have the whole character on one layer nicely joined together. Now there is another way of doing it, which is easier and there's less to remember, but it requires a more steady hand. I'm going to show you how to do that. We'll turn this off, create a new layer. Create the first line. Once again, we need an extra layer for the other stroke. Now all you need to do is erase the middle bit. Choose an eraser that has a monoline. This is a monoline brush, but I've just named it eraser. Then start erasing the middle part. You want to be careful here so that the end result is neat. To see if I do that, I'm getting little uneven parts here. You want to try and keep it clean and straight line like that. There we go. Same thing here. I'm going to go on the top layer and I'm going to merge it down so that the whole cross is on one layer. Now let's turn the other one on and move them around a bit. I'll show you one more thing. In addition, you can color in your outlined creations, whether it's hand-lettering or marks or anything really. You just drag your color into the middle of your sign. I'm going to do the same for the other cross, and voila. It really is not that complicated, but I still wanted to keep our first exercise of creating super simple animations very easy. I didn't want to confuse you with doing these extra steps, but still, I wanted you to have that knowledge in case you want do that. Here it is. I hope you enjoyed that, and now we're ready to move on.
15. 015 More ideas: Another option for working with the outline brush without writing in cursive is to create block letters. You can write like this, and I'm holding my pen down to let Procreate make my linework more straight and smooth. If I don't want that, I can just lift the pen and the wankiness of my own writing will stay. If I hold it down, Procreate will automatically even it out. If I want to edit that, I can just choose a brush that doesn't have an outline and color it in, so there. That's another way to use the outline brush if you don't want to use cursive. But I love writing in cursive, so I'm going to stick with that. For this pair here, I have used the Ms Dotty Mist Texture that I have created and provided for you to download for free. Adding texture is yet another super easy way to add movement to your animation. Here, I have simply created an illustration of a pair, then I have animated it, and finally, I have added the Ms Dotty Mist Texture by using the grouping technique we learned earlier. Let me show you how I did that. To add the texture, I'll go into my Layers Panel and open one of the groups that I have created while making the animation. I'll add an empty layer on top of the pair and then I'll add the texture to that layer by going to Actions, Insert File, Procreate, Textures, and choosing Ms Dotty Mist Texture. I stopped using the photos folder for storing my Procreate files to be a 100 percent sure that my files retain their transparency. I've noticed that sometimes the iPad adds a white background to the files that are stored in photos. Now that I have the texture on top of my pear shape, I go to Layers and duplicate that texture twice to make it more visible, and then I merge them down for convenience. After that, I turn the texture layer into a clipping mask so that the texture only applies to the pear shape. I will then tap the Layer and click "Alpha Lock", then I'll choose an off-white color from my color tool, and then I'll tap "Fill Layer" on the Texture Layer and my texture will turn whitish. Now I will duplicate that layer and drag it to the other group above the pear shape. I will then go to that layer and tap the Transform tool that looks just like an arrow at the top and then I'll rotate the texture twice, meaning 90 degrees, and we're done. Let's play it. I think the texture creates a nice new effect. What do you think? Here's another example of using textures. To create the movement in the background, all I did was add the speckled texture layer to both groups and then erased some of the speckles from one of the texture layers. That's it. Then I created the rest of the animation on new layers on top of that.
16. Exporting GIFs: Now it's time to look at exporting your animations and the different formats. In Procreate, you are able to export your animations in three different formats: animated GIFs, animated PNGs, or MP4 videos. Regardless of where you want to use your animations, I advise you to export them as animated gifs to your computer or a phone. The reason for that is that animated PNGs, although better in quality, are not widely supported yet. We won't be using that and the challenge with the MP4 videos is that it doesn't repeat automatically and your animations end up really short. Now, let me explain that a bit more. Let's look at this animation of the twinkling stars that has only two frames. I have set it to play at three frames per second, that would mean that my MP4 video would last less than a second. In order to make my video last longer, I would need to duplicate my layers quite a few times to make it last even five seconds. That would not only take time, but also increase the file size. MP4s don't have a transparent background, that would mean that my animation would have a solid white background and that's not what I want. It's much more convenient for me to export it as an animated GIF that can play my two frames in a loop over and over again. Just make sure that here in the settings you have set your animation to play as a loop or a Ping-Pong. That means it will play it endlessly. The difference between the two is that the loop will play your frames from the beginning till the end and jump back to the beginning and play till the end again endlessly. The Ping-Pong, however, will play your animation from the beginning till the end, and then back to the beginning, back and forth. For this kind of animation where I only have two frames, it doesn't make any difference the end result is exactly the same. But for animations that have more frames, there is a slight difference you can test that. If you choose one shot, that means literally that it plays each frame only ones. Like that, just once. If I do need to use video format for certain platforms like Instagram, then I can turn my GIFs into a 15-second video or longer very easily by using an app called Gifvid. I'll talk more about it in a minute. Let's export this animated GIF here. To do that, go to the wrench tool, which is the actions and choose, Share, and click on the animated GIF. Now here in the settings, make sure you have transparent background selected if you have part of your animation transparent, if not, then you don't have to worry about it. Here in the Alpha threshold, you can choose how much of your animation that's semi transparent is showing. If I take it up, it becomes quite transparent. If I want to make it more opaque, I can take it down. However, I don't like the look it creates, so I tend to have my threshold close to a 100, and instead what I do to increase the opacity, I go and duplicate my layers. I duplicate each layer twice, so I have three of each, and now I can either merge them into two layers or I can create groups. I prefer doing groups so then if I change my mind later, I can do that, like that. Let's see how that looks go to "Actions", "Share animated GIF", and take the threshold back up to 90 something. Now you can see I have a lot more pixels in my stars and they look less transparent. Although I still want to maintain that texture looks so I'm very happy with how they look now. Now I'll just click on'' Export'', and from the options here, I always use AirDrop because I have a Mac and an iPhone. I find that using AirDrop is the most convenient way and fastest way for me to export my files. However, you can choose other ways to do it as well. There are plenty of options here, so you can save it to Dropbox or other Cloud-based service. You can mail it to yourself, etc. Choose your method here, and then just click ''Export''. I'm going to export it to my Mac and just like that, it's done. Now your GIF is ready to be used on your website or newsletter, or to be uploaded to GIPHY if you plan to open a GIPHY account. However, if you want to post your animation to, for example, Instagram, you need to turn it into a video first. I'll show you how to do that in the next lesson.
17. Gifvid - Videos: In this lesson, I'll show you how to turn your GIF animation into a video if you're using a platform that requires video format. I find it easiest to use an app called GifVid. It's easy, super quick, and costs next to nothing. Last time I checked it cost $0.99 on App Store. Once you've got the app on your phone and you've transferred your animation to your phone, all you need to do is tap on the app, which opens it up. Then you tap on "Create", and you choose "GIF to video" like that. Then you go to wherever you've saved your animation. Mine is in recent so I choose that. Then I choose the resolution, so go for the highest. Now, down here, you get to choose the length of your video. You can go all the way up to three minutes, 59 seconds, or well, 0. I'm going to go for 15 seconds. That gives me flexibility, I can use it pretty much anywhere. That will create 24 frames for me. Then once I'm happy with the length, I tap up here in the arrow, and that will create the video. Now all I need to do is save it on my phone by tapping the little icon down here and "Save video" like that. Then I'll tap the little check mark up here to finish the process. That's it. I'm done. But wait. When am I supposed to use a video format and when do I need a GIF or GIF sticker? Well, that depends on where and what you're using your animation for. Here's a quick reminder of how it goes. I personally use GIFs and GIF stickers on my website, in my newsletter, as my Zoom meeting background, and on social media like Instagram stories. Please note that in order to be able to use them on social media, you do need to have a GIPHY account and I'll explain more about that in a minute. Doesn't that cover everything? You might wonder, do I even need videos? Well, to be honest, I only use the video format for posting my animations to my Instagram create, meaning when I do a traditional Instagram post. There are probably tons of places where videos come in handy, but that has literally been the only place where I have needed the video format so far.
18. Introduction to Giphy: I'm going to start by saying that Giphy you would actually deserve a whole class of its own. But I will try my best to briefly explain what it's all about, so you can decide if there could be something you want to look further into. Like I mentioned earlier, Giphy is an online database where people can search for gifts and give stickers. Giphy is linked to many social media platforms like Instagram and Snapchat through an API. For example, all the gifts you see in Instagram's gifts selection actually live on Giphy. You should start by creating an account on Giphy. Then you apply for an artist channel, by filling in the necessary information and uploading a few gifts, or gifts stickers that you have created yourself. Then you just wait to get approved and roll up. You are ready to use your gifts and stickers on social media. Please note that you need to provide Giphy with the link to your portfolio, website, or social media account that best represents you as an artist. Once your artist channel is up and running, you can start uploading more gifts and stickers to Giphy. A few things to remember when you upload new gifts, you need to rate them G to be a 100 percent sure they show up on social media searches. I also advise you to use all your tags wisely. It will help you and others find your gifts. I also recommend to use your own name, or brand or company name as a tag, so you can find your own gifts easily. Here you can see what it means in practice. If I want to find all of my happy gifts, it's virtually impossible to do that by only searching with the tag happy. Similar challenge comes up if I only search with my brand name. Because I have hundreds of gifts, not all my gifts will appear when I search for them, for example, on Instagram. Instagram only shows roughly about 40-50 gifts in a search. To find specific gifts, I always search with my brand name and at least one other search word. Like that. That's it. I hope you create an artist channel on Giphy so people can start using your gifts.
19. Giphy - Demo Upload: Here's a short clip of me uploading a gift sticker to my artist's channel. It literally takes only a minute to do it. Once your channel is up and running.
20. Thank You: Is it over already? I don't want to say goodbye yet. I could be making animations and gifts for hours with you. I hope you're enjoying your new animation skills, and I also want to thank you for learning with me. One way to prolong the fun is for you to share your creations with me online. You can tag me on Instagram with your design and use the #learnwithjenni. Even better, you can share your entire process and your final animations with other students here on Skillshare. I personally love seeing people's take on a theme or a topic, and often you can learn something by looking at what creative solutions others have made. So yeah, please share your animations with all of us. If you'd like to be notified about my next class, you can tap the Follow button on my profile here on Skillshare. If you're curious to find out more, you can also find me at jeahdesign.com. If you liked the free Ms. Dotty textures that we used, you might also like the other textures in the kit, which you'll find in my creative market shop. Keep creating. See you.
 Jenni Ahlberg, Illustrator, Hand letterer & Designer