Transcripts
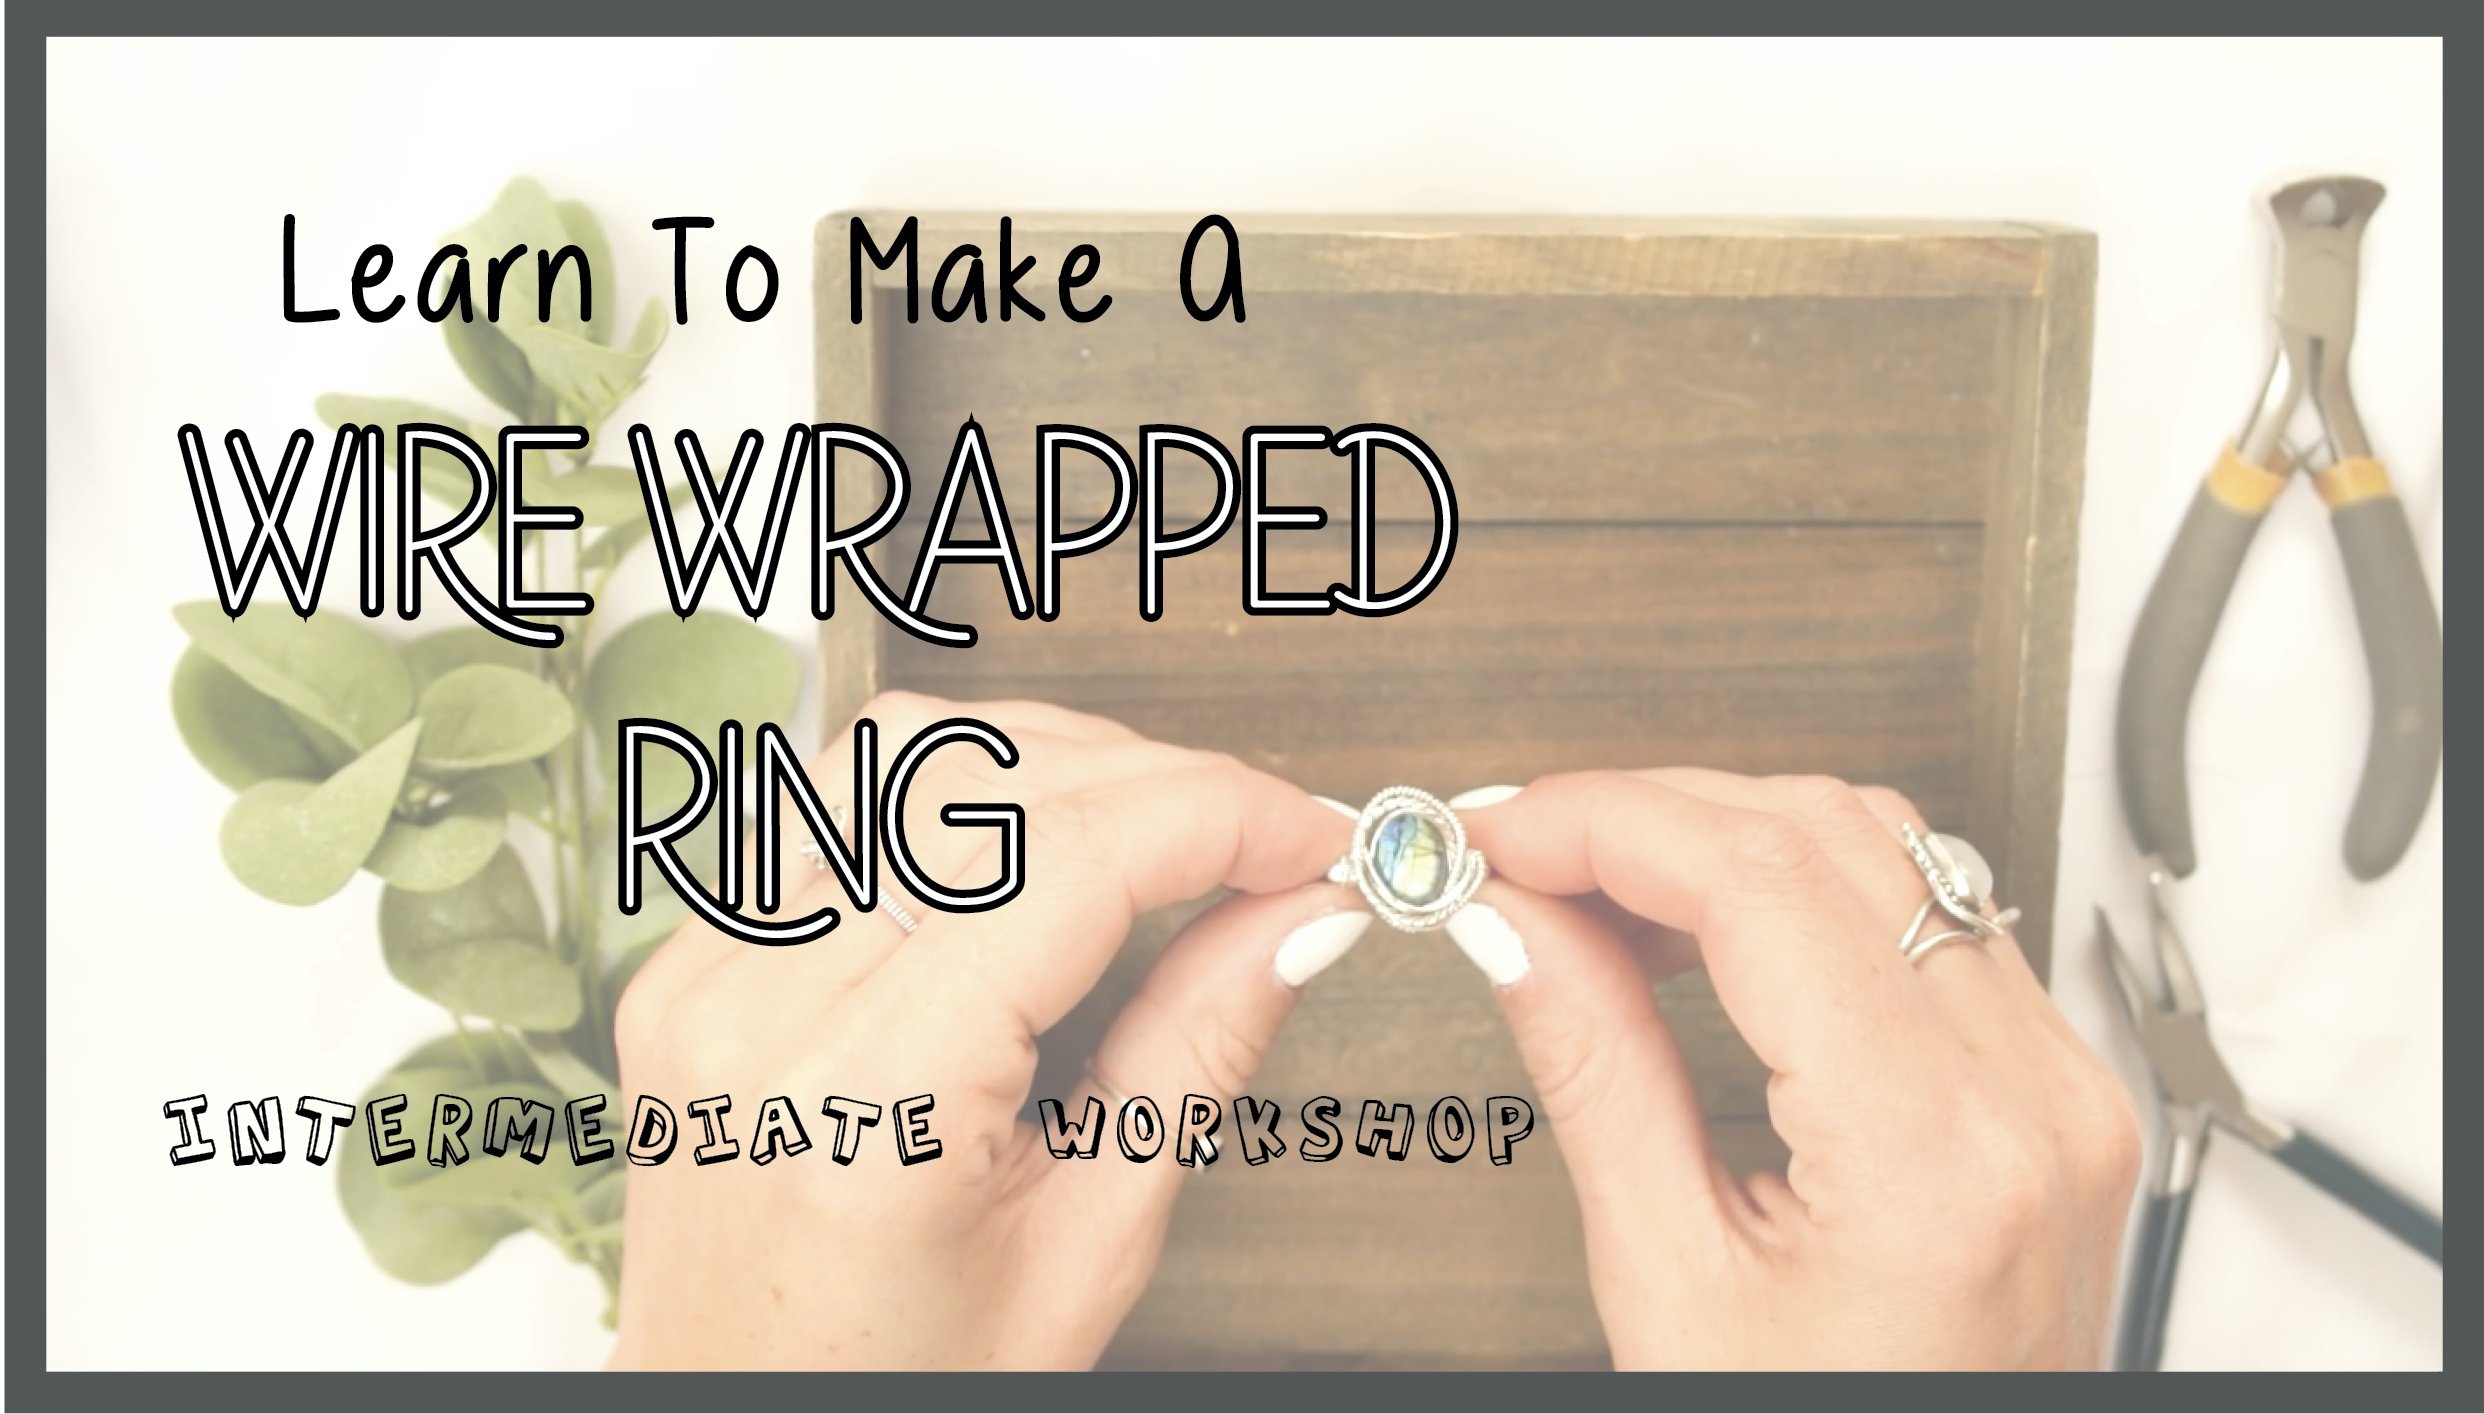
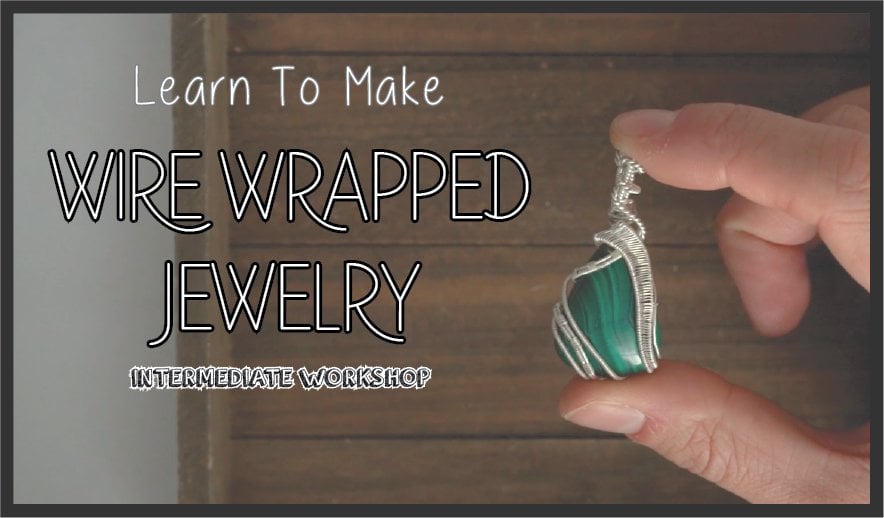
1. Introduction: Hey, guys, Rachel here. Today, I'm going to be
showing you how to make this exact wire dependent. Sunray shells are native to the Hawaiian Islands
and this one was found at about 100 feet deep right off the
coast of Oahu. Paired the sunrise shell with a labradorite just to give it a little bit of
something different. I see a lot of sunrise
shells wrapped but not often with
stones added on. I've been wrapping
for over ten years, and today I'm excited to share some intermediate skills with
you during this tutorial. For this tutorial,
you're going to need the following materials. A shell or any stone
of similar shape. If you're going to
use a shell, make sure not to use
something too fragile. You're also going
to need a eight to 12 millimeter gemstone, ideally a cabichon if you want to make something
similar to this, 22 gauge round wire, 30 gauge round wire. And 24 gauge round wire. Feel free to submit your
design so I can take a look at what you make.
Let's get started.
2. Setting The Shell: And get started. You're going to start with 22
gauge round wire. I'm going to choose half hard, but you can also use dead soft. And we're going to cut a piece
that is about a foot long, which is about one
third of a meter. And then from there,
I'm going to fix the end here that was tucked
in to straighten it out. And then you are going to fold it and cut it right in half. Doesn't have to be
exact, but pretty close. Two pieces that are
about 6 " long. Now let's take some 20
gauge half round wire. I'm going to grab a piece that
is about six or 7 " long. Cut Now we're going to take the two base wires. We're going to wrap
the half round around the base wires
right in the middle, about at a halfway point. So I'm currently wrapping the flat side up
against the two wires, and I'm wrapping as close to
itself as possible to get a nice clean look where the half round wire is showing the round
side of the wire. I often take my
pliers and pinch it a bit to try and make sure we
get a clean start going. And as you noticed,
I added a tail in the beginning because it's really hard to start it off
if you don't have a tail, and you can always
fix the tail later. So just pinching the wire a little bit to get
a nice clean base. And here's the
tail. What you can do is just simply continue
to wrap it around. Ultimately, once it gets to a point where it
is sharp and poky, you kind of cut it
and tuck it in, or if you're able to, you just tuck it in without
having to cut off any excess. So we're just tucking
it in like that. No need to cut it.
Let's keep going. So I've got a firm grip with my left hand around
the base now, and I'm just doing a real
nice tight, clean wrap. Zoom in a little bit
here so you can see. I'm gonna go ahead and
split these wires off. I'm going to go ahead
and grab my shell. It's time to place the
shell in the wire. So I'm splitting off
these wires here, and the divots in the shell are going to be where the
wire sits, of course. So we're taking one wire
and wrapping it through the divot of the shell on one side and on approximately
the same side but opposite or the same width away from the edge,
but the opposite side. We're going to do that
with the other one. And this is a bit of
a tedious process. It's tricky to get the
shell to stay at first. So we're just going to
mess with it a little bit, see if we can get it to
sit in there nicely. This half round wire
actually can be cut. I'm gonna go ahead and
cut it and tuck it in. And if we need any more
later, we can add it on. Tucking that in there so it doesn't poke anyone who
ends up wearing this. Splitting those wires back, and let's see how we can
get this shell to stay. So there's a lot of
divots in the shell. You want to pick ones
that look symmetrical. So of course, no
shell is perfect, but these two slots here on
the shell look like they're about the same distance
from the edge, and they're a good distance
away from each other. So the goal is to just
make these nice and tight and then take that excess that's coming up from the shell
and wrap it around the base just once, like that. I'm going to push it as
close to the shell as I can. Now let's do the other side. There's a bit of excess, so I'm pressing it down. Let's go around here on
the exact opposite side. Pulling nice and tight but
not too much on the shell. And as you can see, this
is a little loose here, so I'm going to go
ahead on the back, and it is definitely fixable
by pinching these wires. Be super gentle because
shells are fragile. They will break if you're
too rough with them. And I'm just pinching these
wires in to make sure that it's nice and firm up against the shell and looking
clean on the front. Voila. I still a little loose. Let's see if we can
even make it tighter. The way that you
can make it tighter is by either pinching at the base like this or making
a zigzag pattern like this. So when the wire zigzags, it creates more tension. That's looking
pretty good there. It's still a little loose. But it's 100% fixable, there's no need to
redo it if it's a little loose if you have a
3. Wrapping The Bail: Now we're going to take
round 30 gauge wire, which is a smaller gauge. And we're going to get
quite a long piece. I would assume this is
a meter, maybe longer. We're going to
tuck this in here. And we're going to
start wrapping a weave. So we're going to
go around both of these top pieces of wire a
couple times along the base. So wrapping a few times around these two base wires just
to get the wire started. And we're going to do
a figure eight weave. So we're going to go in through the bottom and around
the top wire twice, and then up in through the bottom and around
the bottom wire twice. So it ends up being a figure eight you're always coming
up through the bottom of both wires and then wrapping in a figure eight pattern around each of the wires
twice and then switch. So up and over, up and over. And we're coming up from underneath the two
wires in between them. And it's doing a figure eight. Think of an infinity sign. If you already know this
pattern, just keep going. If not, just watch a couple
more times and see if you can get it up
through the middle, over the top, over the top, up through the middle over
the bottom, over the bottom. And as you can see,
my two base wires are getting wider as I go. It's not staying as narrow as it was when we
started at the base. And that's exactly what we want. We want it to get a
little bit wider. We don't want a
super narrow pattern because we're gonna
be holding in the labradorite
with this pattern, and it needs to be
a little thicker. So I'm just speeding
this up here. Only a few more
seconds of it sped up, but just keep going until approximately we get
to a point right here. I'm still just doing
that same pattern. You can see approximately
how far we've gone so far. We're just going to keep
going a little more. We don't want to do
too much because we're going to end up having
to cut some of it off. If we do. We just want enough for it to be able to wrap one side
of the labradorite, So that's about how
far we're going to go. And now I'm going to
wrap the 30 gauge wire, just around one of the 22 gauge. No more pattern, wrapping
around one of the wires. We're just going to keep going with it for
a little bit here. And as you can see, I'm
wrapping nice and firmly. Got a firm grip with my left
hand on the 22 gauge wire, and I am wrapping the 30 gauge wire up against
itself so there's no gaps. I'm going to speed
it up here again. Just a few more seconds so
you can see what's going on, but not having to watch the whole process since
you know what to do. And I'm just going to
keep going with this until I get to the
end of my 30 gauge, which is right here. So I'm gonna cut this
little curly cue off, take my pliers, tuck in this little
pokey part because we don't like the pokey parts. Perfect. All right. So now
we're going to take our two wires that
are sticking out, and we're going to twist them. These are the other two wires, not the pattern that
we just worked on. So I like to grab
with my pliers, create almost a 90 degree angle, evenly spread, pinch and twist, pinch and twist, and I do
180 degree pinch and twists. And with my pliers, it
helps 'cause you just need a really firm grip
when you're dealing with 22 gauge wire twisting. So it's just easier
on my hand if I use pliers instead of grabbing it. Pinch and twist,
pinch and twist. Go to continue to hold
it with my pliers. And as you can see, the angle of them kind of stays the
same as I pinch and twist. If it changes, the twist is
going to look a little wonky. Cool. So now I'm going
to straighten that out. And this is going to be our bai. The twist is going
to be the ball. So picture our stone
is going to go here, right above the shell, and this pattern is going
to wrap around it, but the twist is
going to be the bae. So let's go ahead and
form the bale here. Gonna bend it down gently. I just put my stone
there to estimate how high or low the
ball should be, and it seems like right
about there is great. And you want to make sure
your bail is wide enough to fit a regular standard chain. And sometimes the end
of the chains are bigger than the chain itself. So I like a bae
that is guaranteed to be big enough for any
chain anyone wants to use. That looks about right.
So I'm going to take the tail of the twisted wire. I'm actually going
to fix the shape of this first. Here we go. And I'm going to wrap
this end around the base. I'm gonna wrap them real tight. Notice it's not
covering my pattern. It's still that base area. So the pattern can
still be pulled down and wrapped
around the labradrit. But it's kind of holding
it all together. H.
4. Adding The Gemstone: Feel free to tweak
it with your hands. And here's where the
stone is gonna be going. So now that we've
done that, we're gonna try to start setting
the labradorite stone in. And that means that we need to pull this pattern
down that we made. Down and around one of
the sides in a flowy way. So it's going to be on the
right side of the pendant, so I'm putting, like,
a nice bend in. It's gonna be on the
right side of the stone. Pinky's out. I don't know
why my pinky does that. And I'm just going to keep
doing a gentle bend so that it's consistent and just see what it looks like
with the stone in there. I think I'm going to need
to bend it a little bit more, but we're
getting somewhere. It's looking pretty good. I'm already feeling
like it's flowing. And you want it to just continue to bend
around the stone, and then I'm going
to pull those wires at the end around the back. So it's nice and firm
holding in that stone there. Stone isn't really
locked in yet, but that's where we
want it to be for now. So I'm going to pinch
this a little bit. It's just all about
those little tweaks, making sure that
every little detail helps the stone fit
correctly and sit nice. So now we have to do something with these wires that
are sticking out. And in an ideal world, we use them to lock in the
pattern and the stone. So I just took the top
wire wrapped it through the bail and I'll tighten
it here in a second. I'm just tweaking
it with my hands to make sure that the stone
is fitting okay in there. Trying to stretch it
out a little bit. Stone feels a little smushed, so I want to make sure I'm giving it a little bit of room. Make sure it's straight. And then this wire that we
wrapped the 30 gauge around, go to kind of pull
it around and down, kind of flow it around the
front of the pendant for now. Now we're going to get a
piece of 22 gauge round wire. Probably 7 " in
length, six or 7 ". Tuck in the extra. I'm gonna fix the end here so
that it's straight. So now I'm going
to take this wire, and it's going to be stuck through the back of the pendant, right in between the
labradorite and the shell. Just find a little crevice, little place where it
can be stuck through. Just like that super gently. And I have the stone in
the shell now so that I make sure that I'm not taking up room where the
stone should be. And then just fold the wire kind of over itself over the base. And give it a twist so that it's nice and
tight back there. We even going to use my pliers
and tighten it real good. This is going to be another
pattern that we make. I call it the piano key pattern, but I don't think that's
any sort of technical term, but we are going to use a little bit more
round 30 gauge wire. So I'm going to get
another really long piece because it goes quick. I would say, again, it's maybe
a meter or a little over. Clip it. Okay. So now I'm going to take those two
wires that we just added. It was one wire,
but it turned into two pieces because we
wrapped it around the base. And I'm going to give it a few super tight wraps around both of the wires with the 30 gauge. We don't actually need the
stone in there for now, so I'm just going to leave it out because it just fell out. Gonna pinch them together. These ones you don't
want spreading out while you do this pattern, although it's pretty hard
for it to do that anyway, if you're doing it correctly. But I'm just going to
wrap around the bottom of the two about eight times, the bottom one, just
going over and over. Using my finger to press it up against so that it's
nice and clean looking. We want clean wire wraps. And after I do that eight times, I'm going to wrap over
both wires three times. And I'm really putting a tight grip and
pulling really tight. Use as you can see,
these wires are kind of spreading apart, and
that's not what we want. And then after I do
the three times, I'm gonna go back to
the same bottom wire and just wrap it
eight more times. So it's about eight and
three, eight, and three. Wrap in that same bottom
wire eight times. Then wrap around both, three. And then just the bottom
eight more times. And I'm just going
to repeat this. I'm going to speed it up
for you so you can see what it looks like and how
far we go and just replicate. A You can see about how far I've gone.
Coming to the end here. And the key is that we need a long enough piece to wrap
around the edge of the shell, as you can see in the video that showed what
we're going to make today. This is the pattern that goes along the perimeter of the
shell to kind of outline it. So we just want
to make sure it's long enough in that sense. I think we got it here. The thing with it is
I like the pattern to be showing forward. Right now, it's showing if
you look at it from the side, so I'm going to kind of
twist it so that I can see it from the front,
if that makes sense. There we go. And then wrap
around the base like that. Then the thing is we're going to use this extra part up here, wrap around the other
side of the labradorite. This is also going
to be the pattern on the other side
of the labradorite, which means we need
to feed it through this other pattern like this. I'm not going through
the 30 gauge wire. I'm just going pretty
much underneath it. It's a tight fit, but it's going to look
nice when it's done. To be honest, this 30 gauge is probably of no
use anymore anyway, so you can actually clip
that off before you do this. And as always, we
want to tuck it in, but we will hold off
on that for a second, and we will just feed this
through. Just like that. And now we want
this to wrap around the perimeter of the
shell, as mentioned. So it's just going to take
some tedious tweaking to get it to fit the shell
that you're using. M. So we're getting there. Now I'm going to twist these
so that this pattern is showing and bend it because it's gonna be
holding in the labradorite. Pliers help. If it's too stiff
for your fingers to do it, you could just use
your pliers and make these little tedious
tweaks. Okay. Now, let's go ahead
and try and put the labradorite in.
See if it fits. It does. It just needs
a little tweaking, so use your fingers
to tweak that. We want it to fit nice and snug. So it's okay if it
seems a little too snug because it will
ultimately look good, and we do not want the
stone falling out if someone purchases it
or is wearing it. M So that's about how the labradorite is gonna sit in there, which is great. So these are going to be
fed through the bail, which is the very end of
our piano key pattern. And once we get this exactly where we want it, we're
going to tighten it up. We're almost there. Just needs a couple more little
tweaks with the pliers. And I actually just
changed my mind. I'm going to wrap the piano key around the bail from the front. So originally, I had fed it
through the bale as you saw, and I changed my mind
because I kind of want it to overlap
the other pattern. It gives it a bit of a cool flow and then feed it through the
bale on the other side. So it's going to kind of cover the front of the
pendant right in front of the baale So just using your pliers to gently twist little by little, it's tricky because since
we have a pattern on here, you don't want to pinch too
tight with the pliers because it will damage the 30
gauge on the pattern, so you do have to be
a little careful. So slow and steady wins the
race with this kind of stuff. And I like the way that look. So now I'm just gonna make
some small adjustments to make sure the labradorite fits straight right now it fits in there,
but it's crooked. So all it takes is little
subtle tweaks to the wire, and we will get it to fit in
there straight and nicely. And we have these
pieces sticking out of the back from the
piano key pattern, and I'm going to
wrap the shorter one around the ba,
the back of the bail. Really firmly so that it's nice and snug and
tuck in that poky part. So the piano key
went up and over the front of the bae and
then through the bail on the right side and then back around back left,
one of the pieces. We still have these pieces
of wire sticking out here. And we will do something
with them. Don't you worry. We're just going to make sure the labradorite sits okay first. And then we're going to go
ahead and make our spirals. I'm going to take a small
piece of 30 gauge wire. It is a scrap that I have, but you can cut a new one if
you need. It's really short. But this is just gonna
help make sure that the labradorite doesn't fall out and the shell
doesn't fall out. So I'm gonna feed it
through the middle of the figure eight
pattern, excuse me. And You won't be able to tell. It's super subtle, but
then I'm gonna wrap it through one more time. Pull nice and tight
so that it's firm. Using your pliers helps to pull I'm gonna twist them a
few times just to make sure it is locked in
there, not going anywhere. So if you noticed it's also
wrapped around the base. So I'm not going to cut those yet because I'll probably still use them to secure the shell. So now we have this piece of 22 gauge wire that's
a little longer. Maybe you do have
it, maybe you don't there's a little bit extra wire kind of wrapped around it. Gonna go ahead and cut that off. If you have anything
poking out or anything where you
don't want it, you can always unwrap
it and cut it shorter. So I'm going to do that.
I'm not sure if that is how it ended up
on yours as well. Bam. Tuck that in in there. And I have this little
file that helps me push in pieces of small wire. Now we're going
to make a spiral. So we have this extra
piece, like I said,
5. Finishing Up: There's a little bit extra wire kind of wrapped around it. Gonna go ahead and cut that off. If you have anything
poking out or anything where you
don't want it, you can always unwrap
it and cut it shorter. So I'm going to do that.
I'm not sure if that is how it ended up
on yours as well. Boom. Tuck that in in there. And I have this little
file that helps me push in pieces of small wire. Now we're going
to make a spiral. So we have this extra piece. Like I said, maybe
you do have it, maybe you don't of 22
gauge wire top left here. And it's long enough
for me to stick it through like
towards the top of the shell and make just a cute little small spiral
in the upper left corner. And if you don't
have it, no worries, it's just kind of a little
accent that I like to do. And you can always
add a piece of 22 gauge wire if you don't
have any left up there, wrap it around the base, and then stick it right through towards the top of the shell. And spirals are just
a great space filler. If you have any areas
that look a little bland, or where two points meet, you can always just add a
spiral to keep that flow. I'm a spiral girl at heart. And you grab the very, very, very end of that piece of wire, gently start turning it with
your pliers, of course. And then get the center to be as tight of a
circle as you can. Because then from there,
once you get that base, you can grab it with your
pliers and just twist. So I've got the spiral flat pinched with my pliers,
and I'm just twisting. All the way until
I can't anymore, and then I'm going to flatten
it in that corner there. See if I can twist it any
more than I can. Let's see. And then that looks
like it's about done, so I'm going to flatten it here. Just press it down
with the pliers. And then the wire
that's in the back, you can bend a little
bit to make sure that the spiral is sitting
flush to the pendant, not sticking out spirals
content to catch on things. Now we have these other
22 gauge round wires that we can do something with. And I'm going to make
them into spirals along the bottom to hold in that
pattern so that the pattern, so it's flush up
against the shell and doesn't kind of pop off. And I don't need this
extra 30 gauge wire that we wrapped around originally. And if you do like the way spirals look with that,
you can totally leave it. I personally just want a
regular plain 22 gauge spiral without the 30 gauge
wrapped around it, but you could still
definitely make a spiral with the 30
gauge wrapped around it. So I'm going to undo this here. I think we just added a little
more than we needed there. I'm gonna cut it and tuck it in since it's on
the back of the pendant. Again, you don't want it poking. Then I'm going to wrap it
through the base behind the shell to really lock it in. So those wires that
we had zigzagged, I just pulled it through those and wrapped around
nice and tight, pinch it nice and tight so
that it is not going anywhere. And that's going to be
the perfect little piece of 22 gauge for a spiral. Bend it to the front. And so now we're going to do the same
exact spiral technique with this 22 gauge wire at
the bottom of our apendant. So you just take your
pliers and you create as tight of a spiral
center as possible. And then you just grab it flat and just do
little wrist twists. And it just makes a
pretty good spiral. You can go a little
slower than me if you want an actual perfect circle. It is possible, but I think
this is close enough, so I'm just going to go for it. So now, these 30
gauge wires that we use to hold in
the labradorite, I'm just going to twist them
and cut it off and then tuck that in around
behind the labradorite, just anywhere on the base. Use my little file here to get it really in there and make sure
that it's not gonna poke. And then this last piece
of wire, you guessed it. We're gonna do one
more spiral to kind of complement the other one on
the bottom of the pendant. And we're going to
go the opposite direction with this spiral. I'm gonna cut a little bit. We don't want a spiral
that's too big. The other one is
already pretty big, so this one we want a little
smaller for some contrast. That's about good there. So now I'm going to wrap the spiral the opposite
direction of the other one. The other one I
went to the right. This one I'm going to the left. Same thing as before.
Then just grab it flat. Pinch twist, pinch twist. You can kind of tweak the shape as you're pinching and
twisting if you need to. I do actually want
it a little shorter. It's totally up to you how
big you want the spiral, so I'm going to start
a little further in. I don't really want it to be
as big as the other spiral. I want it to be a bit smaller. Pinch and twist,
pinch and twist. And bend it so that it
is facing the front. Go ahead and pinching that
wire nice and tight so that it is really holding in that piano key pattern
up against the shell. And last but not least, I'm going to take a
piece of 30 gauge wire feed it through
the piano key pattern. Gonna actually wrap it around the whole
thing because it's too tightly put together
to feed it through. This is just to make sure
that it stays up against the shell and doesn't pop off
when someone's wearing it, stick out, bend, break,
anything like that. I'm just going to
gently wrap it over. I'm going to wrap these around. I'm going to try and
get it up against the piece that's
around both wires, and then I'm going
to wrap it around the base under the shell. Using my file to
just tuck it in. And basically from here, after I cut these, you
can just tweak anything, make subtle adjustments to make it look exactly
how you want, bend the areas that you want to fit the shell and the
labradorite a little better. And that's it. Sometimes twisting
the 30 gauge wire after you've wrapped
it around the base, just kind of holds it
in, makes it secure. So I like to do a little twist. The backs of my
pendants are not the cleanest, but they're sturdy. So here's what we're looking
at for the finished piece. Pretty happy with it. And
here it is in some sunlight. That labradorite is popping.
Thank you for watching.
 Rachel Truax, Jewelry Maker, Photographer