Transcripts
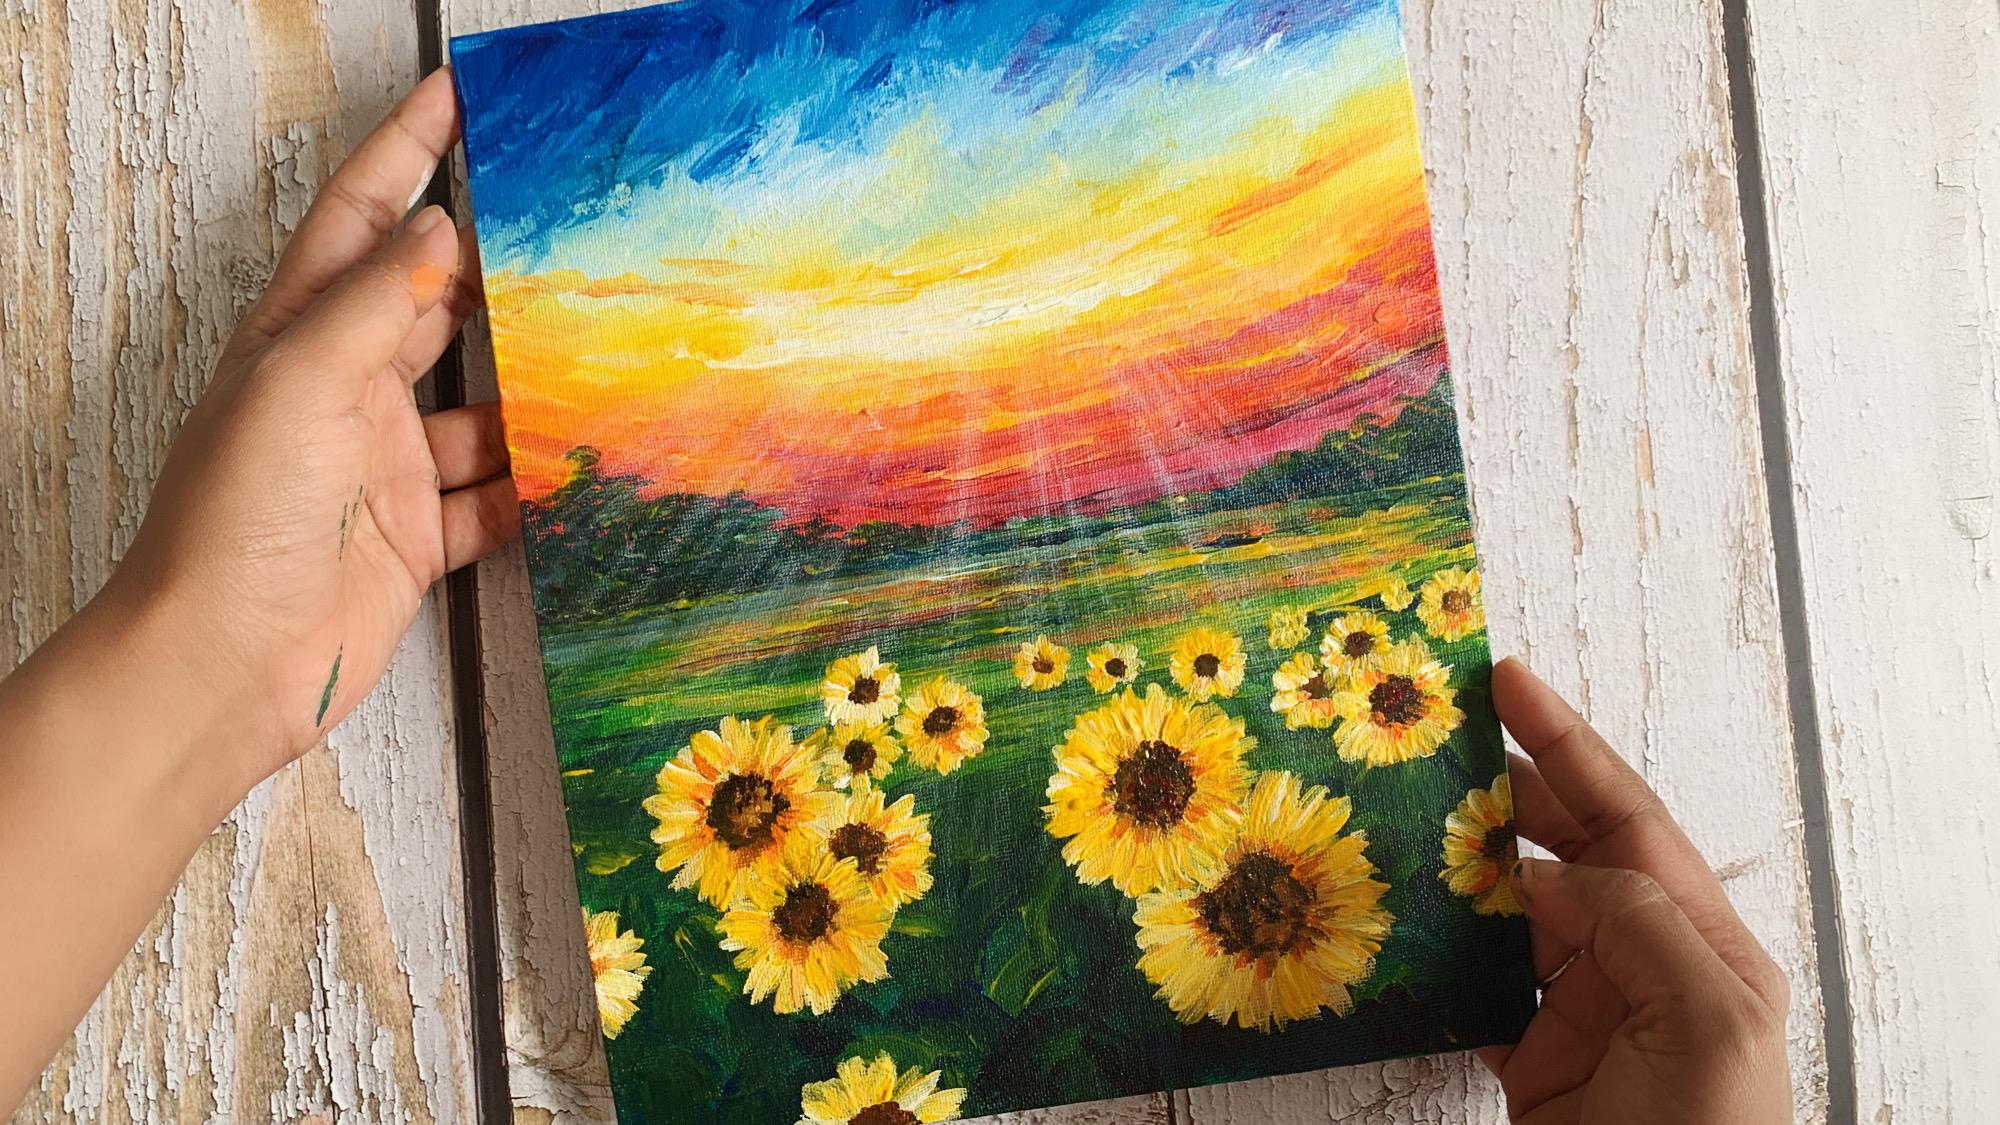
1. Welcome!: Sunsets and sunflower fields are such inspiring
subjects for artists. They capture the
beauty of nature in its most enchanting moments, and I am so excited to help you capture that magic
on your canvas. Welcome to this online
acrylic painting class where we're going to learn to paint a sunflower field and a gorgeous and
colorful sunset sky. One of the most exciting
parts of painting, sunsets is playing with colors. Sunsets are known for their rich and diverse
color palettes. You will learn how to balance
and blend warm hues like reds and oranges with cool
tones like blues and purples. In this class, I will guide you in creating a
vibrant sunset sky. And show you the tricks
of how to combine warm and cool colors
effectively in layers without creating
mud on your canvas. Get ready to learn the
techniques and methods needed to create your own
stunning masterpiece. I have used a mix of reference images to
create this painting, and I have shared all of
them inside this class. For your inspiration, come join me on this artistic Johnny. And let the beauty
of sunflower fields at sunset inspired
your next masterpiece. Hit that enroll button and I will see you
inside the class.
2. Art Supplies: All right, so let's get started. Here is my canvas board. I am using a canvas
board this time instead of my usual
acrylic paper. Let me just take off the cover. This is nine by 11
" canvas board. Now you can do it on a
straight canvas also, or canvas sheet, whatever
you have or acrylic paper, anything is totally fine. Rather than keeping
it on my table here I am just keeping it on a foam board so that I
don't spoil my table. That's for the surface. I have my plate here
and a glass of water. These are the brushes
that have taken up. Now, as you see
that I've taken up this like the big brush size 12. I normally don't use this, but today I'm going to use
this because the surface I'm painting on is almost
double the five size. I needed a big size brush
to cover this big surface. I have kept one fingered brush as well to do some
of the clouds, three of this round
shaped brushes, a little bigger, medium size. And the fine liner brushes, we'll see how we use
this as we move forward. Today, I am going to use all
the thick body acrylics. Maybe I'll use a few
of the fluid acrylics. But I wanted to use
thick body acrylics just to show you how things work. Because I know some of you
use thick body acrylics. Only you get to practice a little bit more with
thick body acrylics. This is thalo blue from
my fluid acrylics. I am taking out just a
bit of Prussian Blue. Like I said, this
painting is going to be full of multiple colors. Get ready to play with
different colors, taking out some of the
white in an apolitical, some purple as well. The name of the shade
is Prism violet. I love this color,
although I don't use it too much in my
paintings today, I will use it
because mostly I mix blue and red and I
get this shaded. Since I had this whole
tube, I've never used it. Let me just use it today. I'm not taking out pink
because I will be mixing this crimson red with white and it gives
a beautiful pink. This is some of cadmium yellow. It's pretty much like my
chrome, yellow, crimson, lake chrome, yellow, purple, prussian blue, thalo
blue and white. That's all I have
taken out as of now. Later on I'm going to take
out all the other shapes. I think I need a little
bit of orange as well. This is my cadmium orange. I could have mixed red and
yellow to get the orange. I just thought I'll
use up all my colors today and show you guys
how you can do that. All right, let's get started.
3. Step 1 - Sunset Sky Cool Colors: We're going to be
changing quite a bit of brushes or washing them. Rather than washing, I think I prefer changing my brushes. What I'm going to
do is I'm going to start off with this brush. This is also a smaller
than this stain. This is size 12. Because I don't want to wash
my brush too much. I'm starting off with this
one. Okay, let's start. The first thing I'm
doing is starting off with crushing blue
and a mix of lo, blue on the top, make it really dark. Start mixing a little bit of white to create
some pins of blue. Also, notice how I am
adding the colors. I'm just going in small
chunks and letting the brush strokes show, right? So you can see all
my brush strokes that has gone in here. The beautiful thing that
you're going to learn in this painting is how to mix
cool colors and warm colors. Because if you don't do
that right in a landscape, it can spoil your paintings because warm colors
and cool colors mixed together and gives
a very muddy shade. Which you don't want in your painting unless you
want to create that shade. Right now, what I'm doing
is just getting rid of all the excess blue
from my brush, taking more of white
because this is where my mixing of the cool and the warm colors
are going to happen. I want to keep it as
light as possible. Okay. So now just blending it up a little
bit. On the top, this corner, I'm making
it absolutely dark. It's just going once
again being dark. You see how I'm
blending very softly. Just moving my brush
around and giving it a creating a beautiful
texture automatically. At this point, what I'm going
to do also is just go on the side and add color on
the edge of the canvas. I like doing it immediately while painting
because first of all, it saves time and your paint because you already have
the paint later on, if you come and do it, you
have to take out the colors. Once again, it's just a little extra
headache like doing it. At the same time this
is done, this brush, I'm going to keep it
aside, not for too long, because I'm going
to use this color at the bottom when
I add the greens. Let's keep this as our step one. In the step two now, we
are going to go ahead and mix all other beautiful shades. Okay, before moving on, I just want to give
a little touch. See, that is why it's good
that I keep this brush aside. Because if I have
to do a little mix of blue or this shade,
I can do it really. I just want to add a little
touch up of purple over here. You can pretty much
play around and use your favorite colors and
mix it wherever you like. Just a little touch
up of purple.
4. Step 2- Sunset Sky Warm Colors: Now I'm taking out
more of white because this white is all
mixed up with blue. I'm starting off with
the lightest shed. I'm adding it just below blue. Now, this is one important thing that you should understand. Blue mixed with yellow
and yellow mixed with red is still fine as long you're not mixing blue
and red directly. What I'm doing
here is trying to, we had added the white at the
bottom of the blue there. Right now I'm going to
add white and yellow and blend it up with
the bluish area. What color will we get if
we mix yellow and blue? We get just a little
touch up of green. Not completely green, but just a little bit
of greenish texture. And that's totally fine. Just go in, play around
with it a little bit. See, I'm trying to
create a little textures here with my brush. Just having a little
fun while mixing this. Take a little yellow. I just wiped it off on
the tissue paper so that I get rid of all the excess
blue I have picked up. And that's it. Now let's come down and keep
adding more yellow. Okay, I have added a
little bit of yellow. I'm going to add
more of white here. Okay, let me do it right away. This is why I like using thick body acrylic sometimes
because as you can see, it's giving a texture to
my painting, which I love. And I'm going to mix it up
with a little bit of orange, orange, and yellow mix. You see, I'm not blending them, I'm just adding them to cover up the canvas and moving down, not wasting too much of
time in each of the places. Adding a touch up because
this is sunset sky, so there's going to be so
much of shades everywhere, having some more of it. A little bit here and there. All right, now let's move on to the crimson red and bring
in the dark red shade. It's not going to be
absolutely dark here because we're going to mix it
up with orange a bit. You see crimson. Red
is almost like pink. You don't really need pink. If you have crimson red, if you want to make baby, you can totally use crimson, red and white and it'll get
like heuriful breby pink. I think I'm going to come
all the way till he half the canis. Let's come all the way. You see how I'm moving my brush in the horizontal
direction, almost. Okay. At the bottom. You
see what I'm going to do. I'm just going to add a patch up because creams in red is, like I said, it's almost pink. And when you mix it with purple, it just blends in very smoothly. You want to mix
colors which blend in smoothly with each other and
doesn't create a muddy low. Basically, colors in the
color will that are next to each other are the colors
that you want to mix. Now I'm going to
take a little bit of purple and adding
to the pink he. White just to lighten
the purple shade. Also just below this is
going to be the green. The more dark I make it here, the better it blends. So I'm going to add just a little bit more of purple here. You see how beautifully
this is blended. Now I have a lot of painting. My brush as you can
see, yellow, orange, pink as in crimson,
red, and purple. All I'm going to do
now is get rid of all the colors,
most of the colors. Or at this stage, what you
can also do is change brush, move on to a round brush. This is a size that looks
good for me at this stage. Just go and touch up. This is just a little extra
stage that I'm showing you. When you create a painting, a landscape with
multiple colors, what we can do is just go
very softly on the color that you have added
and just touch up with some other
color that you need to just straightening out this line because I think this is
not absolutely straight. Yeah, that's all
it has been done. I'm going to come
here, revisit after some time once this has tried. And I'm going to do a little
bit more of touch ups here. But for the first layer I
think this is fantastic. You really absolutely need
to have a second layer. What? Trying to save time
and do it at one shot. But if you like doing it in layers, you can
do that as well. Come back again on top of it. What I'm doing here is adding
a little thick texture of oranges to create more tip. Just a little touch
up of yellow here. And then, like I said, this part I'm going
to come and do later. Because right now I won't
be able to do it very easily because the
colors are pretty wet. I'll do this later.
At this time, I'm washing off this
great brush as well. Don't want to keep it aside for
5. Step 3 - Field Background: Now I will move to this
blue brush that I've kept aside and I'm going
to do a little bit of stuff with this color.
What's you done? I am using a little
bit of my fluid. Acrylates green here,
I'm going to use yellow. Now. See I have
blue on my brush, and over here I'm
a little green. That's why I am using this brush because if I just take
a little bit of yellow, it's automatically going
to turn it into green. You see, I did not waste
the blue I had on my brush. I'm using it and mixing it up, adding it at the bottom to
create my green texture. But of course, I'm
going to use some of the green as well a letter. But let me just add
as much green I can. And you see a little bit of blue also shows up, which
is really good. I need quite a bit
of yellow more here. Also, you see while
I'm adding the colors, I'm letting the textures show through and I'm
starting to add green. Also, you see when the yellow is mixing
up with green here, it's creating a different
shade of green. But when the yellow
is mixing blue here, it was a different green. You get so many variety
of shades here, right? Okay. Now at the bottom, now, since green and blue is
very close to each other, I am going to add a
little bit of blue here, also along with the green, to create very
bright background. I want to add the color
on this side as well. This is just the background I'm doing because we're
going to come on top of it and create
some leafy texture before creating some sunflowers. I'm not very particular about this background because
this is going to be covered up with a different
layer on top of this. All I'm focused on is
creating different colors, different textures on the
background. That's all. It. Looks beautiful,
I know already, but what I'm going
to do is give it a dry and let this
canvas completely die. So our first layer of covering the entire
canvas has been done. And I'm going to let it dry
completely and come on top of it and add some
more colors over here. I'm going to add a little bit of the reflection of the sky falling on the field
as well right now. This is a very important
step of understanding how to create a painting
with all colors. Right now, I cannot add
orange, red on top of this, because if it mixes
in the green, it's going to create
a very ugly shade. If you want to try
that, you can try to late mix it and see the
color that you get. I don't want to create
that color on my canvas. So I'm going to let it
dry and then I'm going to come on top of it and mix all of these colors up
tiny together and so that it looks like flowing in really easily
into each other.
6. Step 4 - Field Textures: I'm back with this
colorful painting. It's been quite some time. I've given it almost
2020, 5 minutes. It took quite some
time to dry because I have been using pick
body acrylics, right? So it takes a little
extra time to dry. Now, I'm going to
go on top of this and add a few touch
ups for that. I'm using the filer brush. I thought I will
use the fiber brush for the clouds, but that's okay. Now what I'm going to do is because I'm going to work
on the field mostly, but before that I'm just
going to add a little touch up of white here in the clouds. Take out a bit of yellow, it's all mixed up with green. You see how easily I can
go this time on top of all these colors and
add all the colors once again in the second layer, because my first layer
has completely dried. All I'm doing is just going and adding just a bit of color. I just want to add a little
bit of light pink as well. I'm just mixing up freon red and white and created
this beautiful pink. I'm just adding that a bit
in some of these places. See the more layers you do
reach your painting looks. I'm just throwing all
these ideas at you. How you can do it.
Just dry first layer and then go on top of it
and add more of the colors. Just don't try to do all at once because when the colors are wet, you cannot really play around with them as
much you want to. You can't keep doing
this unless you are satisfied with the colors
that you're getting. Yeah, that's pretty much it. Okay. I think that
looks really good. Now with the same brush, I will just keep moving down
and start adding the colors. Sure. So as you see, I already have some
orange in my and those orange is
coming on the field. You see how slowly I'm going
and mixing all the colors. There is no take it slow. Mostly I'm mixing yellow and little blue
rather than green. Because the reason I like
mixing two colors to come up with a color is because it's not going to be a solid color. That is the thing I love. It gives variety of shades. But very gradually, I'm just building up the second
layer on top of it. I'm going to add more of a red over here in
a little while. Mostly I'm using Prussian
blue and my cadmium yellow to create these
beautiful shades of the field. Okay, now you see without
washing my brush, how I'm going to add just a
touch of red in between this, maybe just a bit
of blue as well. This is basically reflection of the sky on the
field a little bit. It's not going to be a
lot of reflection here. Okay. That's it. Not too much. We just need to take out a
little bit of Prussian blue. I'm going to take a more
of the dark green as well, because I'm going to
create some leaves now. But before creating the leaves, I'm going to create
some backgrounds. Do you see how many colors we're mixing in the same place? You have to be really careful, otherwise, they can
become a bit too much. Okay, this looks good. Now I'm going to create some trees here and then come down and
create the, please.
7. Step 5 - Distant Trees: For this tape. I am taking
off some more of black. I don't really need
a lot of black. Just a tiny bit of it. And we'll create
some trees here. I'm going to use actually
more of green and blue. Keep your brush dry. Okay, just taking it aside, keep your brush dry
while you're doing this green and blue mix. And with this, I'm going
to add a little touch of yellow just to add shadow to this green. And we continue this
along the horizon line all the way to the end with a more of trees. I think this is so
colorful already. It's going to turn
out really good. Just some highlights. Please, please, please. As you can see,
there are a lot of small strokes happening here which you cannot really define. Just play around
with this concept of adding just a multiple
colors in multiple layers, you will end up with
something really pretty. Okay. One more thing that I
can tell you here is you can also the Filbert brush is a little big for this
small area over here. You can actually use
a thin brush to do all the small things that
you need to do, okay? And also here what I'm going to do is just add a little touch up of orange in some
of these places. With the small brush, I
think it's much better because it won't get
on a really big area. Just a small area. Okay. I think
that's pretty good.
8. Step 6 - Leaves: Now I'm going to add some
background leaves to this. For that I am using
this feel good brush because you can just create beautiful leaves with
just a couple of strokes. So look at this, we are not
going to define it a lot, it's just going to go
in the background. You see just with one
stroke of my Filbert brush, how I am creating all this beautiful leaf like
textures in the background. It's basically mix
of all the colors. You can use a little bit of
green and yellow as well. Green and blue, yellow and blue, blue, basically different
shades of green. Touching a little bit of lag. Also in between adding the flag will create
more shades and depth can move alone. We don't want to
make it too bright here because these are all
parts of the background. Right on top of this, we're going to create some
beautiful sunflowers. You don't want to
make the background too light, it's
better to keep it see. With the filed brush, it's becoming so easy to
create all these textures and without actually doing much, so just tweaking the brush itself is creating
beautiful leaves. Once again, my
complete background is done with more
layer of textures. See how beautiful this thick, creamy texture is looking. Now I'm going to
let you try it and then we're going
to come on top of it and add some
beautiful sunflowers. Before that, I just want
to give it some more of the highlights in
the distant trees. Just a little touch up of yellow on the previous color
that we had done. That's it, I'm washing
off my fill with brush.
9. Step 7 - Sunrays: While it's been
almost half an hour, everything is completely dried. Now we are pretty much at the end of the painting
and we're going to create some beautiful stuff on this and create an
amazing painting. Yeah, the first thing that I'm going to do is use my flagbrush. This is the one that I used
to create the blue area. I'm going to create sun
rays falling on the field. And after that I'm going
to create the sunflowers. Okay. Let's do that
for creating Now, since I am using thick body
acyl, it's pretty thick. What I'm doing is adding
a little bit of water, mixing it up with white. I have a little white and
what I'm doing is I'm getting rid of the maximum water and everything on the tissue paper. I don't want to have
too much of paint. Now, you see this area
that I had done earlier. What I'm going to do
is just go over it and just add like a little
layer of white here. Just a little touch
up. Not too much. All I'm going to do is, you see that's a lot
of paint and white is going to go create some. Okay, That's a lot,
very gentle strokes. You don't want to put a lot
of pressure on your canvas and a few more
strokes on this side. The trick of doing the sun
rays is you need to have less pain pressure
and use a flat brush. You can even try it
with a fan brush. I think that's going to
be really good as well. I have done this
with flat brush, but I am more
comfortable with the, oops, you see over here what happened is a little
bit too much of white. So this is how you
do damage control. You just wipe it off because it's very
keen amount of white. It's not going to make
a lot of difference. And you just go over it and don't want to take
too much down sub, just going to leave it here. Okay, I just feel what I'm
doing now is washing off my brush completely
with the water. I'm just going a little
bit where I don't want so much of white to be. This is how you
can just take off a little bit because you
see this bright red area. You don't want to cover
it up too much with the white just going and taking off some of the shapes. Yeah, because sometimes I get too carried away
and just add a lot. Now, this is the way you
can take off Sunday, I think this is
pretty much fine. I'm just adding a little
water you to make sure water area is
completely dark. This is the benefit of having the dry canvas because
if this was not dry, I couldn't have done all this. Okay. Now see, most of it is going to go
background because I'm going to create the
sunflowers on top of it and I think this is
looking pretty good. It's reducing in some places. Yeah. So that is done.
10. Step 8 - Sunflowers: The next step, I am going
to create the sunflowers. For that, I'm using this
small round brush size three. Now, as you can
see in this brush, this is not a pointed tape. It's very rough at the mouth. At the tape, right? I like it like this
because you don't want to pointed tape and
you don't want to create like pointed sunflowers. Okay. Watch it. The colors I need
for that are yellow, which I have already here. Oh, it's mixed with green. You see? Good thing
that I checked it. I'm going to take out some
fresh white here, Yellow. And I'm going to
take out some white. Even though I have
some white over there, it's all mixed up.
Just taking out. I need a little orange
and some brown, Maybe a little bit of red. I have a little bit of
red left on my plate. I think that should be
enough. Okay, let's start now starting
with the yellow. So the first thing I'm
doing is marking it out. First thing I'm doing is with the white mix with a
little bit of yellow. This is my center to add. You see how rough this is. I'm not trying to do
neatly and nicely. I'm just trying to
do all the petals of the set flower
mostly with white, with a little touch of yellow. The reason I'm doing it with white is because if I
don't add white first, this background green
will be showing through. We don't want that,
I'm adding like this. Now you see, because I have
a rough edge on my brush, it is helping me make this rough edges of
the sunflower as well. Okay, now I'm going to take
a little bit of orange and yellow and add
from the center out. I'm not going all
the way to the end, just starting from the center, just adding a little bit. Now I'm taking just
some pure yellow. And just adding not
in all the petals, but in just some of the petals. I'm just adding a
little more of yellow. You see this thick texture that is forming as
I'm drawing this. It will happen if you do it
with a fluid acylese as well. Just need to pick up quite
a bit of paint to do this. In some of the places, I'm adding some of the white. Okay, Pretty much done. Now what I'm going to do is at the center part with Brown. Okay, Now I'm going
to come back here or maybe let me just try
and do it right away. All I'm doing is just
dabbing the paint like this. You see the texture
that is being created? And I'm just adding a
little touch of red also in this because it's wet. What I'm going to
do is just take out just a little bit of it from here and add it to the petals. Okay, I'm going to revisit
it a little later. I don't want to do it now
because it's all wet. Okay, Now let's go and
create all the other ones. This is where I'm
doing my other one. This is the center part. Let's add the petals with it. See, each petal is just one
stroke of your small brush. And then we're
going to do again, the same thing at just a bit of white in between,
in some places. Some yellows in between. Okay, I think that
looks really gorgeous. And we're going to do the finishing touch a
little later just adding just a bit more yellow
brown mix here. Also, I'm just going
to that just a little bit more of yellow
and brown in the center. Just take out a few strokes. Very simple, doing
this sunflowers again. Let's go and chew some
more. This is my center. Don't think too
much, just take out the petals however you like. You see, I'm not
following anything. Just taking one stroke for one petal and you will do it fine. Okay, then let's do some more. This is where another center. This is another one. Now what I'm doing is the
first thing I'm doing is adding all the centers
of the sunflowers. And then I'm going on top of
them and adding the petals. So the small ones really get
started quickly. One rogge. Okay. It's not completely done, even though it
looks almost done. We are going to add a
few finishing touch ups here to make the flowers
look really bright. For that, what I'm going to
do is after this first layer, I'm going to give
it a little break, make it completely, and come on top of it
and add another layer. Because like I
said, more layers, you add better your
painting looks. It's looking really good to
me at this point of time, but we just want to
do a little more.
11. Step 9 - Sunflower Details: Okay, I'm back.
It's been a while. This has completely
dried, I think. Just a little bit wet in the
center, but that's okay. Now I'm going to
go ahead and add another layer on top of
this. Let's do that. I am keeping my liner
brush also with me for, especially for the small ones. I don't want to do it
with this big brush. Let me just take out
just a bit more of yellow. Let's do it. Let me start with
the small ones. I might add a few more small
ones in the distance now. So basically, I'm
just going on top of all the flowers that I had
done in the previous step. I'm just adding one more
layer on top of it to give it a little bit more depth
texture. And everything. After adding this first layer, which I'm doing mostly
with yellow and white, I am going to add a little touch up of
orange also in there. Not everywhere, just
in view of the petals. Okay. You see how
bright it's looking when I'm adding the
second layer on top of the previous one. Okay. It's pretty much done. I will just finish up with all the yellows and
the whites and then I'll come to the center
and we're going to add the brown and black. Please. Please. Okay, so I know this one is. Let All right, so we have added a second layer of
sunflower on all of them. And now let's go ahead
and add some brown, and black, and red. The red is completely dry. Let me just a little bit, we don't need a lot of
red. Just a little touch. We could go and need
some more brown. And I'm adding a little
bit of plaque with it. Let's start with the
big one so that you understand what is
exactly happening here. I'm just not going directly, I'm just going and
dabbing on the edge. Same thing I'm going
to do in all of them. Just by diving, it will create this beautiful texture in
the center of the sun plow. Okay, so this is
done. Almost done. Now I'm just going to
add a little touch up of orange and show you how you can just combine this two so that it doesn't
look very distant, just from the center out. Just adding a little
touch up of orange. And when you're touching
from the center out, you're bringing a little
bit of brown out as well. So it's all tying
up really well. Okay, it's almost done just
adding a few petals here. So as you could see, it's so easy to create
the sunflowers, even though it looks really difficult when you first
time look at them, that's it. The complete
painting is done. You look at the textures of the sunflower that we created. I hope you enjoyed creating this painting and follow along. It looks very complicated
when you look at it at the first site. If you follow along and you create this painting
on your own, you will understand it's
pretty easy to do this, create a beautiful painting, and share what you created
in our Facebook group. If you have any questions
in any of the steps, feel free to ask that as well. I'll be happy to explain and I'll see you
in the next class. If you enjoy doing
this class with me, check out all my other
classes on my website. You can simply visit
Debord Art.com slash classes to see the
list of all the classes. You can also visit the blog to read about a lot
of art articles. And also see some step by
step painting tutorials which are absolutely
free for you to check out and try
out on your own. Thank you so much
for joining me in this class and happy
painting, my friends.
 Debasree Dey, Acrylic Artist & Educator