Transcripts
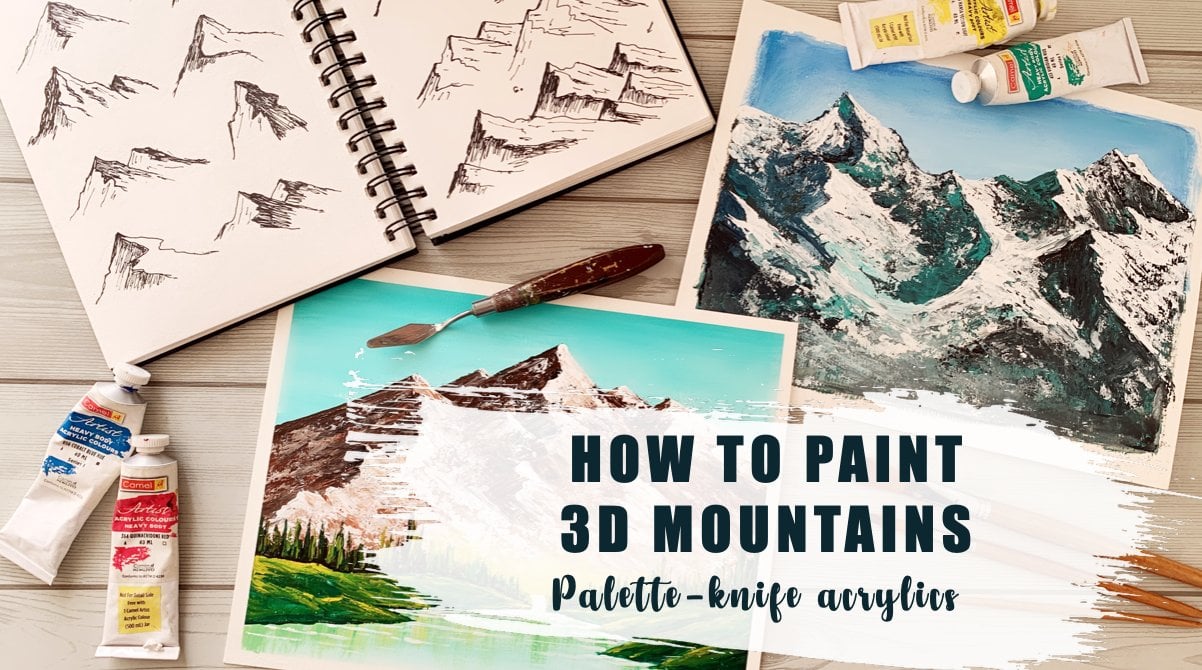
1. Welcome!: Snow-covered pine trees are
a beauty of the witticisms. And painting a canvas full of snowy pine trees
can transport us. This magical thing. If you want to paint a
winter landscape painting, learning to paint pine trees covered with snow
isn't essential. And with that goal in mind, I created this course for you. In this class, you will
learn how to paint snowy pine trees with four different types
of acrylic brushes. With a flat brush. Next with a brush, with a fan brush. And finally with the
small round brush. With each brush, you get to learn different
brush techniques and also learn to paint different
types of snowy pine trees. Once you learn all the
different brushstrokes, you can decide for yourself
which one resonates with the most and love painting and use that mostly in
your paintings. This covers the first
five sections of the class of where you
get your basic straight. In section six, we learned a very important exercise
of actually lending and color mixing
that will help you understand how to paint
any winter landscape. Finally, we finish up this class by creating some
beautiful artworks. First we learn to create
two beautiful paintings. Then we learn to create four different coasters
and fill them with raisins so that you
can use them as a home decor all for gifting
this holiday season. And finally, we will create some handmade greetings cards with lots of snow
and pine trees. I hope you're excited
by now to dive into this exciting class of learning to paint
snowy pine trees.
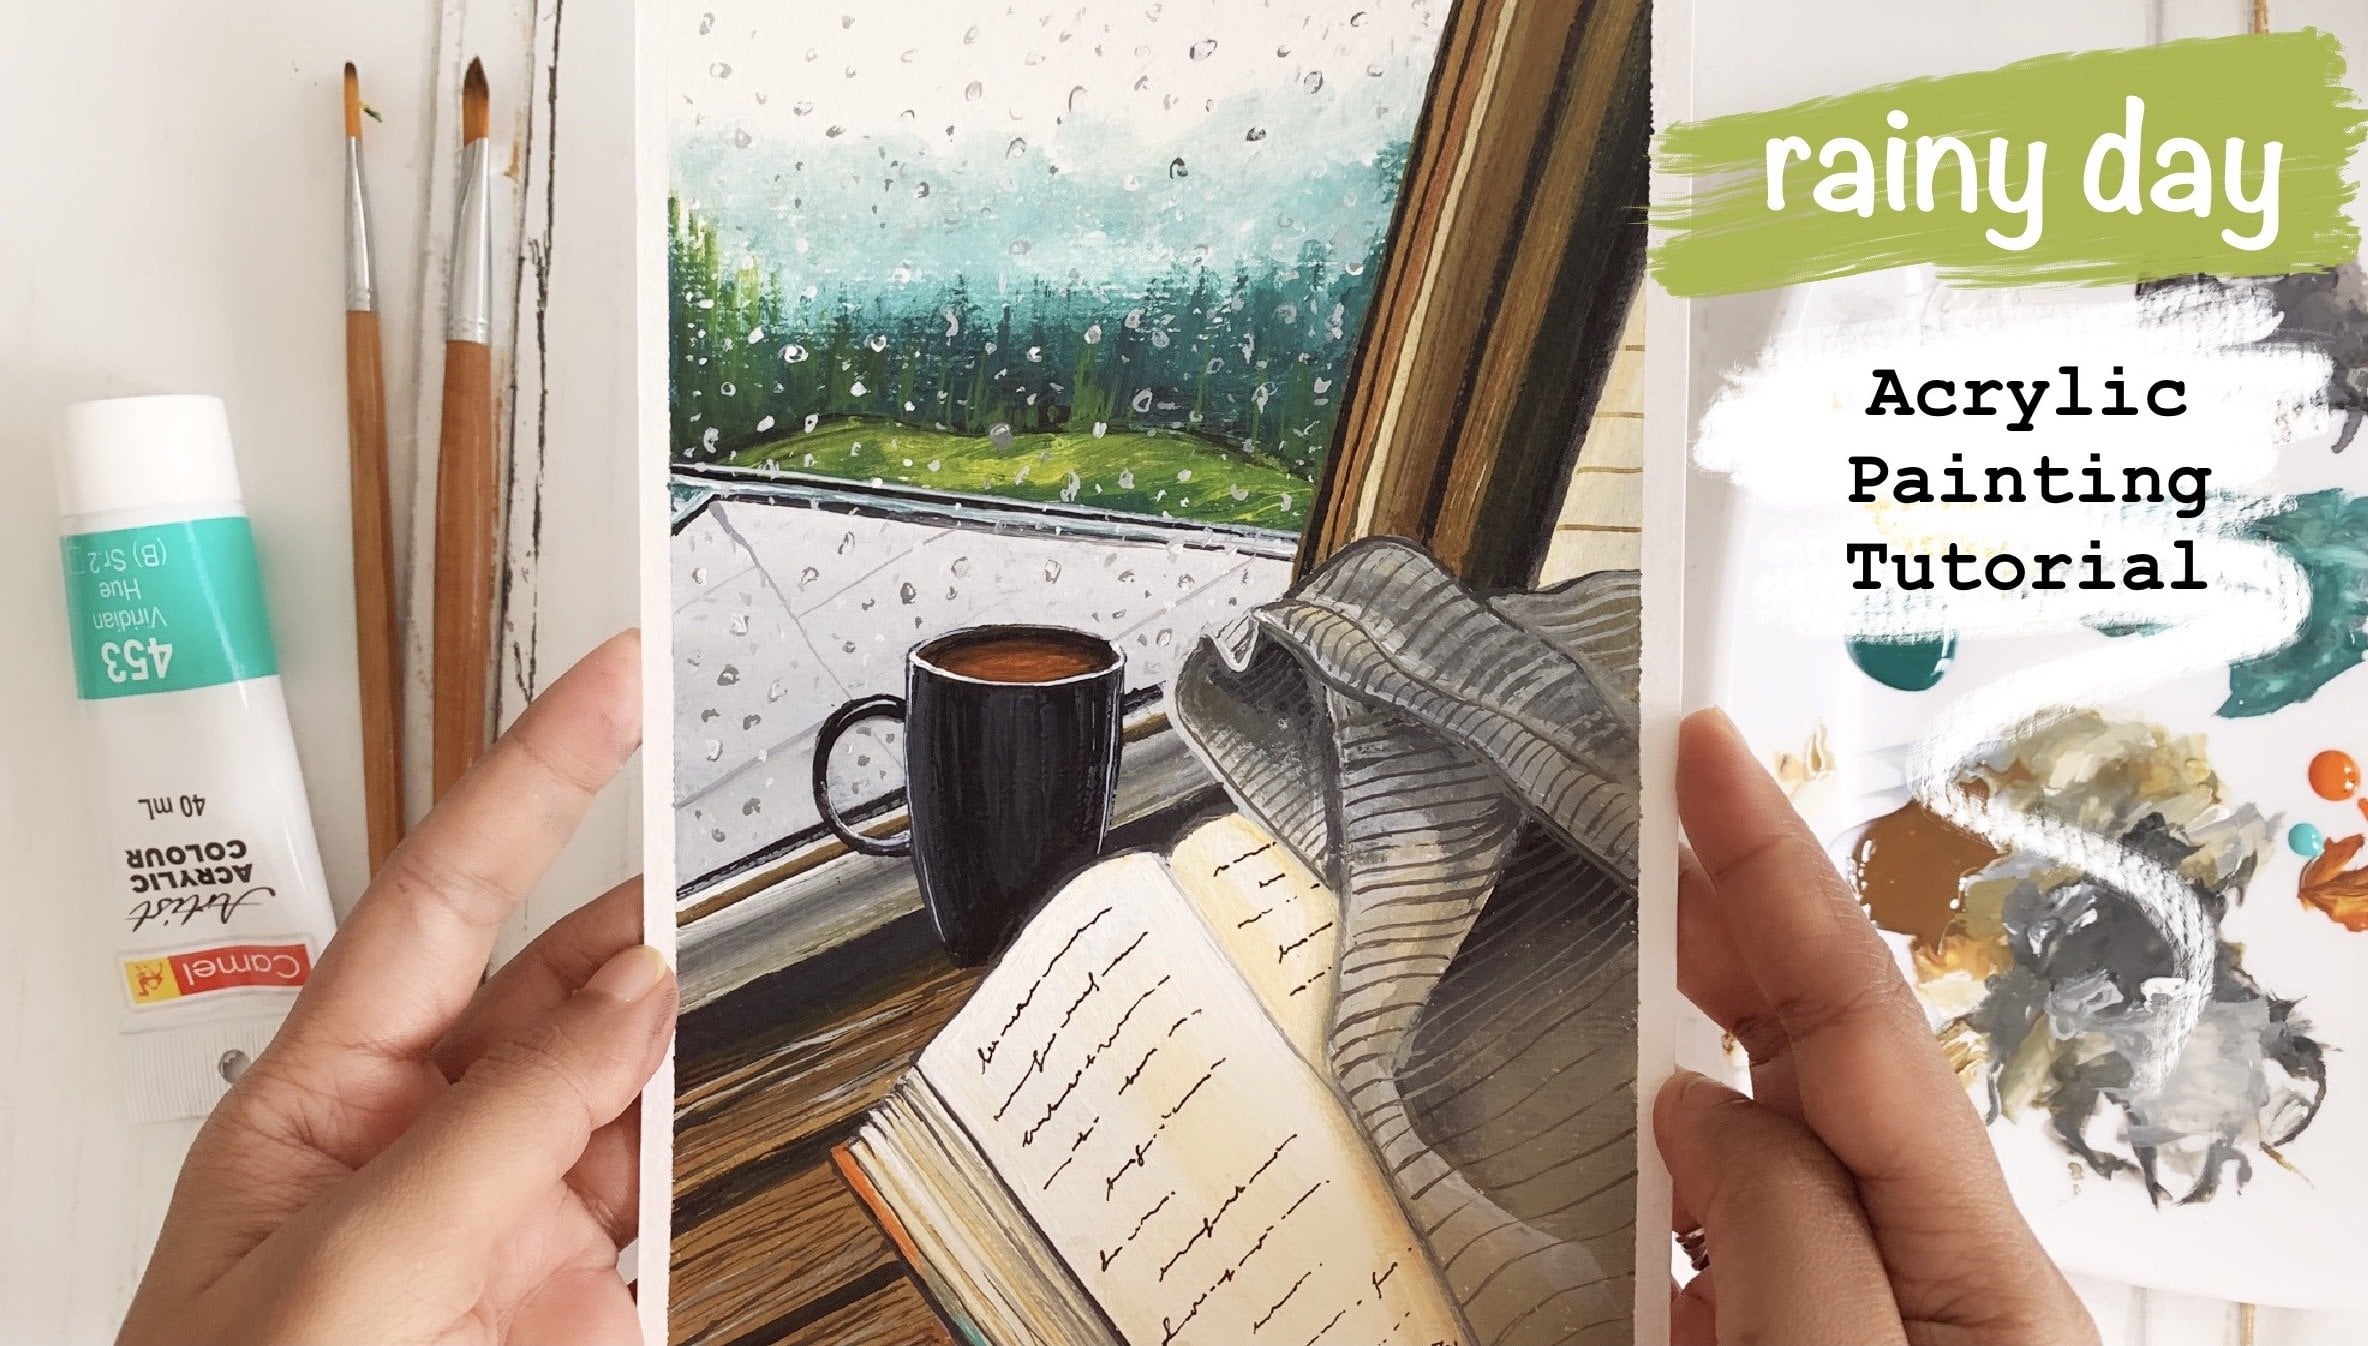
2. Art Supplies: In this video, let's talk about all the art supplies that
you need for this class. So we need a very, very minimalist art
supplies for this class. All I have used in this class
is a four acrylic papers. Now for practicing
all the techniques with the different
kinds of brushes. I have showed them to
you on an A4 paper. Now you can also do it, but I would suggest that
do it on a journal, either use a A5, A4 journal. These are very good journals
that I got from mineral. Both of these are from minora. These are binary journals, so practice them here so that you have those
practice materials, all of these with you inside the journal
because they lose, pages, may get lost. And also in the
journal you can use as many pages as
you like without thinking too much that
you are wasting a paper. Which I know from
experience that it can happen when you use one of these papers and it goes wrong, then you might feel bad. So all those things doesn't
happen in a sketchbook. That's the beauty of sketchbook. You can do whatever you need. It's always inside and it's
not going to bother you. Practice some fewer
first-time when you're watching and
practicing in the journal. And then if you want to, then you can create one
more on the A4 paper. The entire class, I have very much done using just
the acrylic paper, the paintings, also the
greetings card at the end. Also, everything is done
on exactly this paper. And two more things that you
need are these clusters. They are basically MDF boards cutouts that I got from Amazon. I linked all these items
that I have used under the resources section so you
can get them if you want to. For the painting surface is the paper and these coastal
steps that I have used, the colors are very minimalist
palette for this class. Black and white and the
blue and the green. That's odd. Now, I think I have used
one or two blue shades, but just one sheet
is totally fine. If you want to
experiment, of course, you can use differentiates
our blue like I have used, mostly Prussian blue
because I love to share. You can use cobalt blue
or ultramarine blue. Whichever blue you
have paler blue. I have used, I think
color blue and some other shades of blue also
in some of the paintings. But if you have multiple shades of
blues, please use them. But just know that just one shade of blue is
going to be totally fine. And viridian hue,
it's a green shape. But if I mix these two colors, I get this beautiful
teal blue color that I love using
all my paintings. So I, instead of using just one, turquoise blue or teal blue, I have used these two
colors to mix and create that color so that I
can get it in various shades. So if I use a little
bit more blue, it will be more bluish
teal blue color. If I use little bit
more of the green, then it can become like an aqua green color.
That's the benefit. I feel that if you mix two colors to create one
color that you have, but feel free to use any
colors that you have. So these are the
main four colors. But to twist the
end of the class, I have also shown a little
bit of demo with a RPA. And for that I have mixed
up pink with Prussian blue. So pink is also there. Or if you have just purple, you can just use that also
for the practice thing. And of course you need a plate for mixing
and a glass of water. Now, the four brushes that I used to teach you,
the snowy pine trees. The first one is a flat brush. I think I have used
this satisfies all four A4 size paper. And I think I have used this
small size also for our six. So now depending on the size that you're
painting on or if you're practicing on an
A5 journal like this, then this might be too big, then you can switch
to a smaller size. Maybe this is a stained, depending on the size of the surface that
you're painting on, you can use a size six or
eight or four, or a tool. If you're doing a
really small one with a flat brush technique, you can use a brush size to having a stage of flat brush
with you is very important. I feel in your
painting experience just by a set of flat brush. So this is the first 1 s I have shown you with our field,
but dressed the same. Same thing is applicable
with the filbert brush. Also, I have used
this ice team and our size for while
creating the painting. Because the size of the fever, the tree was small
in that painting. Again, have a set of filbert
brush so that you can use the size that is appropriate
for your painting surface. These are the first
two kinds of brushes. Then I've used the flat brush. This is a fan brush. This is the fan
brush that I've used in this class to teach
you the techniques. And I think this
brush is the best. So look at the bristles. They are so soft. Now there can be so many
different types of fan brush. So I wanted to show you I have two more different
types of brushes that I bought at some point
of time. I don't know why. Because maybe I was fascinated
by the shape of them, but I never use them in any
of my paintings in my life. So I just wanted to
show it to you that trash cans can come
in different sizes. This is a hog hair or one. So this is like a hot Brazil. I really don't like
using them much. So yeah, I never used it. You can see it's
as clean as new. And this is another type of fan brush that I tried creating the smell pine trees
with this brush and I could not do it because
it's just so broad. You can see, I could not
use this for a painting, but this one was perfect because this is like
a little smaller one. So if you don't have a fan
brush and if you need to buy, I would say by this one. And if you have some at home, you can use them, experiment with them and see how you feel. This is about the paintbrush and last about the
small round brush. I have used a size for size two. Again, same concept
applies like a flat brush. Our brush have a
set of liner brush. This is a set of brush
where I have size zero, size to size four is 2.4
is what you see here, man. And I think it goes all the
way up to size eight or ten. Having these three
sets of brush, I feel is very, very important. I love these miniature brush set because the ones that I
think there is a size zero, there is a size double zero, there's the size triple zero. Those are excellent for
painting miniatures pieces. Okay? And for this class I have used, I think size for this
was perfect for using A4 size paper for painting on the small one on the coasters. Especially on the coasters, I think I used a size
double zero for that. So having this setup brush, okay, I think I have
covered everything. Oh yes, I have used
resin in this class. But that I will tell you
the reason part comes. So all you need is
just some bracing and some paper cup and popsicle sticks to mix it
before pouring it, but that is optional. So I'm not really getting into the detail of all of that here. If you don't want to
cover your paintings with raisins, that's
totally fine. You can just leave it on
the coaster like this. Yeah, so very minimalistic set of art supplies that you
need for this class. And I wish you the very best.
3. Preparing The Papers: Now for teaching focus, I'm using these artists acrylic paper and I'm
going to paint it great, because they're a
gray background. Obviously, I can show you the white snow effects on
the trees much clearly. And that's why I prefer to
do it on a grace gray paper. But you don't have to
do that if you want to. It's a very fun process. You can totally go
ahead and do it and paint your paper gray and then I'll practice
along with me. But you don't have to because for practice purposes
it's not really necessary because you are
going to practice it on your plain white paper or
sketchbook paper, whatever. Okay, So here I am
using a flat brush with a lot of white and
the tiny touch of black. So you vary the amount of black unit depending on
how dark gray you want. I want it lighter gray. I don't want a very
dark background. So I am using a little bit
of black and with lots of white and coloring
up my entire paper. And it's a very fun process. Does the blending the colors, two colors, mixing it. Creating this paper gray. Once you've covered
the whole paper, just let it dry completely. Because the paper is if the paper is wet and you
try taking off the tape, it might get spoiled. So just wait for a few minutes. I let the paper dry completely. And after that, I'm
peeling off the tape here. And as you can see, the paper is a little formulating the center. That's only because
the paper is very wet. So again, let's let it dry completely before we
can start our projects. This is how the paper looks. It looks pretty decent
to me to work on. Since I was coloring
the paper, I thought, why not create a flu or
some of the pages idea, not just one since I was
coloring and I'm my brush, add a lot of colors. So I decided to color
couple of more pages. So I ended up doing
four of these phages. I mean, even see the
sheets a little different, but this is a little darker. Let these three, this
is much lighter. You can see the texture is
also visible in few of them, the colors and everything. Okay, so now I'll start
with a lighter one.
4. FLAT BRUSH - BRUSHSTROKES: Here is my paper. Let's start
with the very first tree. Here is my plate.
Glass of water. The first brush that I'm going
to use is the flat brush. This is six
artificials art brush, and this is the one that I'm going to use for the first tree. Colors I'm going to use are
out of this black and white, and I have two types of greens
and two types of blues. Okay. I'm going to
do one tree with these two blues create absolutely different
sheds of snow color. For one, I'm going to use
ultramarine and for one, I'm going to do cobalt blue
so that you can clearly see the distinction between
the two different colors of snows and how they look. Okay. And probably I'll end up using both of these greens, and I might also use a
little bit of yellow, but I'm not sure about that yet. Let's see if I want to
use it, I will use it. I'll also tell you
why I'm using. Before doing it on this paper, let me show you a
couple of brush tropes so that you understand how the brush trokes come
out of the flat brush so that you know how the
tree will also come out. For flat brush,
this is pretty much a new flat brush because as
the flat brush gets older, the bristles are not
so than on the top. As you can see, it's
very almost like a in line that you
can see on the top. But the Asa brush grows old. Here I have kept a old brush. You can see that
the Brasels are not sticking together and they are
feathered out on the side. These two are exactly
the same brush, but look at the difference. I am not using this
brush because most of you don't probably
have this brush, but a new brush is very much readily available
with everybody. I'm going to show the
JMo with this one. Now let me grab a
rough piece of paper and show you the brush
marks that you get out of this flat
brush and the brushes that are going to be useful for creating
the snow bine rays. I'm starting with
black and green mix. First thing is that
with this flat brush, you can create
absolutely thin line. I'll take just a tiny such as water because I'm working
with thick body acrylics. Let's paint that a
couple of times more. Now we are not going to do
horizontal line in this case, we are going to create
a vertical line. It might be helpful
for you to take a rough sheet of paper and just practice this
a couple of times. I've been doing this
for a really long time and I can create pretty
much straight lines, with my flat rush. But if you are doing
it for the first time, and by the way, if you're not getting a straight
line like mine, it's totally fine
because none of the trees that you see
out there in nature are having a straight branch coming in from the middle of it. Feel free to make it a
little bit more wavy. I mean, I think
that's just natural. Don't freight over if
you're not getting a very straight line.
It's totally fine. But just do it a few
more times just to get a hang of how the lines. You see if I have more paint, more water, the lines
are getting a thicker. I have a lot of paint
on my brush right now. If I pace it absolutely lightly, barely touching the
paper, I get this. Thin line. If I put a little bit more pressure,
This is what I get. This is one stroke that we are going to be needing for
creating the snow bind trees. The next thing is, the whole texturing of the tree that we're going to
create is touch pick. Touch the paper, and
lift up the brush. Touch the paper,
heat up the brush. This is the techni that
we are going to do. Now you can see that I'm still
getting pretty thin lines. If I pre it really
gently on the paper, I'm getting very thin lines. Almost like the lines we got
here, except that over here, we touched and dragged the whole thing here and touching and lifting
a pie brush. I hope you understood this
brush strokes, small strokes. And then for the
tip of the tree, we are going to use one of the corners of
this flat brush. You see the flat brush
is very rectangular ish with like two
points on the two ends. That point I'm going to use. Now, if you find this difficult, you can definitely use a small round brush.
That's always there. But I I want you to
learn how to create the whole tree
without even touching the small liner brush. So For the tip of the tree, you will have a line like this, then you are going to
use this corner of the brush and you are just
increasing it on both sides. You see? This corner is
acting almost like the tip of a liner
bruh, fine liner brush. You are using that to do this. Also, I'm not trying to
go completely zigzat. Instead, I am trying to do this touching and
lifting technique. The whole tree, I'm
going to do with that. With just the corner, I
am going in this way. Let's just practice that
a couple of more times. I want you to do this along with me because the more
you do better, your hand becomes
better I brain hand, coordination you get, and
better trees you paint. Do it as man You see what is happening is this
mouth is opening up. All I'm doing is going
on the plate and just pressing it on the
plate and making the. Again, point so that
I can come here and p this you understood how to use the corner
of the brush here. Now, we'll move on to the next brush trope and where
we are going to do this, but a little broader. Let me show you the
difference that happens. When you have a lot of paint on your brush
like I have now, I have a lot of paint,
and I try to do this. You see I'm getting
like a solid line. Lots of paint, solid bled. Now, less paint trying to get rid of the let
me grab a tissue paper. Let's just get rid of all the paint and just pick
a little bit of paint. When you have less paint, and you apply less pressure, you this broken kind of lines. You see the difference
between this and this? Just taking a little bit
of pain, not too much. You see this beautiful textural
line that you're getting. This is also going to be one
of the helpful lines strokes brush strokes that
is going to help you create the trees.
Now the last one. The line the tip of the
brush is like a line. Now we don't want
the line anymore. We wanted the line here while
doing all these things. Now we don't want the line. Now, what I'm going to do is
push the brush on my plate. I'm pushing it top down so that the brush resels open
up in the mouth. See it opened up. It's
spreading in all directions. C. Open it up. Now the tip is pretty much open. Almost like this old
brush that I have. This is not pointy
tip or a line, rather it's opened up. Now we're going to use this
for creating the te. See. This is like this,
except that there is a lot of gaps in between. Let's try that
again. Lovely. So at the textures that I'm getting. It's exactly the same thing
except with a lot of g, let me try this with
a different color. You see, whenever
I pick up paint, what happens is the mouth automatically closes down
because more paint helps the bristles to come
together because the paint is acting like
a glue and the bristles are coming close to each other and gluing up to make it a li. Every time I'm taking pain, my paint is getting over and tacking paint, I
have to do this. Then only I will be
able to do this extra. Again, let me just
pick up paint. Every time I pick up paint, I just push it down like this, and I come on my canvas and Now it all depends on your brush. Every brush is different, every body will
push it different. Totally depending on
these two factors, brush that you have, how
new or how old it is, and who is doing the pressing. The artist. Everybody will
be pressing different, no two people will be
able to press it similar. The amount of pressure that you, amount of britel that
is opening will decide how well you will create this. T. This texture is going to be very helpful
in creating the trees. Here is a long list of
brush strokes that you got. Practice them up nicely
because all these individual brushtrokes we are going to use in
creating the paint. Now what I'm going to do is as if I'm starting with
my brush fresh. I'm going to wash this brush of. Get rid of all the excess
paint from my brush. Completely dry it. Maybe a
little bit of green will men. I'm not cleaning it up that well and make it completely
ready for painting my first
5. Tree 1 - Step 1: Now that we have learned
or the brushstrokes, I am going to start
painting the first, true. Okay, so I hope you
also have your brush, so please keep it on
the side and you can refer to it as you are
following this tree. Now, this is my A4 size paper. What I'm doing is I'm virtually dividing this paper
into two halves. So this is going to be my tree, one entry to here. So the center of this hub is going to be the
center line of my tree. Alright, so let's start. Just a little bit of water. It makes sea green and black. It's a little bit color. And I'm going to create
the outline of my trip. All right, so the line is now the first step of
creating your tree is I'm not getting into
too much detail in your first step is creating. I want to use moral
left for this, because this is just the outline of how this tree is going to be. And I'm using the brush and kind of marking out the entire idea
of the tree, okay. How broad database
is going to be? I'm trying to find
out all those things. And do you see that I'm
in a zigzag directions. So that is how I
liked pink team, my snow pine trees
or Christmas trees. And I think when
I start painting, this base layer is, it might get increased
a little bit tomorrow. This is my overall structure. So this is your first state. In the first day, you
are just going to mark out the index shape of the tree, the outlines of the tree. This is very important
in building, does no batteries is
because what I've seen from my students work
while LBJ School pine trees. When they start painting
directly the tree from. But by the, by the
middle portion, they already gone lecture. But then you don't have space. And then it just looks like
big, fat, ugly, right? Hey, you want to mark out
the space in your landscape, wherever you are
painting your tree, you want to map
out that how much, how much space for the tree
you have so that you have a space for painting maybe
another treatise makes to it. Now, if you made this big, then you have no space of PAD. So this is almost like
outlining the tree. But instead of doing
it with a pencil. So I have tried that for the
triangular with the pencil. Somehow. I just don't feel connected inside the block is just for me. It just feels like
I'm beating within the box and I just
don't like that, but if that goal, so you go ahead and do that so you
can see the penicillin. It's a smart object
triangle so that you know, when you're painting the tree, you are not going to go outside that line and you
want to stay inside. But for me that doesn't work. So this is how I liked I
first in the state one, I first aimed the
structure of the tree. Okay, so that's our step one.
6. Tree 1 - Step 2: What is step two? Step two is, we're
going to fill this up, so make this tree a
little bit more fleshy. So right now it looks
like a skeleton. Now we are going to just
create a little bit more. So the brushstroke
that I'm going to use is obviously for the top, I'm going to use this, this attached and lifting it up. So like, like, like the
way I showed you here, touch the top, I'm
going to do this way. And for the bottom
and we'll reuse it kind of like this
with lots of paint. Because I'm not trying to create textures or the T in this step. I'm just making the
skeleton more fleshy. Alright, so let's start. I am taking lots
of paint because my purpose in this state is to add a lot of
heat to the tree. The top is pretty
much done for me, but I'm adding a
little bit more. Not trying to create any
texture in this one. Just adding it. So you see, the tip of
my brush is almost like. So from here, I can start to add the whole tip of the
brush on top of that. I have to use the corner. Why is it willing to
go broad on the job? You don't want that. So now from here, I can
use the entirety of the brush and lift, touch and do that. And that's all I'm doing. Does Emily and I am mixing. As you can see, the two colors, black and religion peel
the dark green color. I am continuously mixing these two colors
because I honestly, I don't like using
black a lot in mind. I am fleshing out the CI. I am, what I'm doing is I'm just taking lots of pain from
the tip of the brush. Also. Here. If you want, you can keep the
horizontal direction or angle of the G
string 180 degrees. As if you'll notice in mind, I am kind of making it
a little bit curvy. So that is your choice. In the secondary, I'm
going to show you how you can make the car go down. But for this first one, that's a lot of green, black, green and black mix. You see when flushing out
a little bit of patient is coming on the site,
which is okay. We don't dislike textures. It says that instead of
two, that is not the focus. Of course we loved it
shows and we are going to take the next step. So my flushing out of
the CI is not going to go into much detail in this state because in the next
step I'm going to go into the detaining and I'm going
to do increase the place. There's a bit more
week that extreme. So this is my step two where we have added a lot of flesh to
the skeleton of the tree.
7. Tree 1 - Step 3: Okay. Now step three. Step three is this restaurant. Okay? I won't say
Absolutely This kind of like this and this little
bit of this texture, a little bit of this texture. So for both the texture, what was the requirement that your brush not having
a lot of pain? So right now my brush
has a lot of pain. I am getting rid of it. There are two
requirements basically. One is less paint and
one is you push them out down on the plate
and kind of open it up. But they only you can
create the texture. So I am starting to
texture my cheat sheet. So for that, what I'm doing is because the top is
really narrow, please. So I am using the corner of
my brush very, very gently. Now from here, I can
go on the side and you see the pictures
that I'm creating. Okay. Bracing, it seemed
forget to play. Sometimes the lines become
solid and not tertiary. So if you're doing first time, you might face this problem
first time when you're doing. But once you do multiple times between come
easy to you because you make, you make the mistakes once you learn from your mistakes
and then you repeat it. That's it. But make the mistakes. Because unless you
make mistakes, they will not really learn. Okay, see, I made this mistake. So we need two things
that I still love. The place, the little bristles a little
bit more and open it up. And we are painting some things just so you see when I'm creating the t-shirt, also increasing the
shape little bit more, but I'm not going to go all out. But just a little bit more. You see my zigzag pattern
is still very much visible. Just pushing it down. So at this stage, if you want, like, I don't have patients to do this
pushing all the day. But for showing you,
I am doing this. So what I do is for this step, I always use my own rest. So this is a very old brush. I haven't told me only because I want to create
amazing things with this. So if you have a flashlight distances
of show a little bit and then I'll switch to
once you can do is see. So you don't have to
do this pressing and opening up the prisons
are not in this brush. It really does come
naturally without much, especially on the edges
because there's no point retakes shooting event inside because it's kinda solid color. So the focus is on
creating shadows on. So you see, I told you, by
the time we reach the base, the base is going to increase because we add the texture is going to increase
a little bit. So it's kind of helpful to keep an old brush and
not to hit, right? Okay. But there are disadvantages
of this brush also. You know what, if you keep
doing with this brush a lot? So you'll see this gap
in between each of these section of the trees
that we get filled up. You see already some
fellows have funkier. So that's why when you're
creating small trees, you cannot do this,
but you can very easily use this flat brush. And by just pressing and
opening up the bristles, you can very easily go and create textures
and if it will not fill up the gap between
the two layers. So that's our step number three, where we have extra
to the truth. I just feel over here and I
have gone a little extra. So that happens always
with me, my painting, pine trees that I
won't go a little overboard and just go
out a little bit more. It always happens, but I'm just telling you it might
happen to you also. So just be careful while
you're doing this, especially the
first three states, because in the
first three steps, we are creating the
shape of the t. We are getting the
desired shape, the structure, forming
the structure. Because on top of these, we will not do a lot of shooting and add on
on top of this one. So basically we're not going
to go to much of the sides. So the first three
steps are very crucial when you're
painting pine trees. Make sure that you are
doing it very carefully.
8. Tree 1 - Step 4: Okay, Now the next
step, in the next step, which is step number four, we are going to add some highlights to the tree
before adding the snow. Before maybe there's
no pine tree. What do we have to
do? We have to first paint a fine, right? So right now we have just done the basic structure
of the pine tree. And then the next step, what I'm going to do
is add a lighter shade of green to show that
light and shadow. So let us assume that in this one the light
is coming from the right. Actually the light is coming
from in my table right now. On the right side is my windows, so the light is
coming from there. So let me assume that light
is coming from the right. So there will be more
highlight on this side of the tree and there will
be darkness on this side. Okay, So that is helping make unrealistic snowy pine
tree just by varying the highlight and
shadow and create the three-dimensional effect of the tricks for doing that. Now, we have added the darker shades are ready now
to add the lightest. For adding the lightest shape. I am going to add the
sap green on the right. You'll see right now
what I'm doing is I'm only on half of the tree, so I'm going to add
from here to here. I'm not going to go
on the left side. This is I'm just trying
to take it down, making it easy for
you to understand. And of course pressing
very important. Otherwise the textures
are not going to form. C because this sap green
is also not very light. So this color is not really much visible in skin damage or
injury to see too much. I can see with my eyes, but it's very light. Okay, now that I've done almost to the center
of all of this, so I'm adding on the
top part of this, each of these sections, not on the bottom, but because that light is coming
from the top. The top part is highlighted just a little bit on just
feels like not every week, like we did everywhere. In the fourth state, we just add a little bit. So I'm not very happy with
this because it's not visible. So let me grab that yellow. This is cadmium yellow. And just a little touch of
yellow with the sap green, we'll make that
very much lighter. And then if I do it, you will be able to
see TLB I will give. Everybody is happy.
So let's start from the job stocking
be done. Offline. Yes. You see how nicely it's
visible on the highlights. And I am adding H2S, but like I said, the light is coming
from the top. The dabbing technique. So if you're doing this
17 me for the first time, make sure you practice it
on your rough sketch book or a sheet of paper a few times. So you see I haven't
moved towards the left. I have completely to the center. Now. Now we can leave the left completely without
touching as it is. So we will pass the leg, but not so much as much we
have touched on the right. So on the left, just
a few lines here. It was the tone. And opening my prison. Now let me tell you that instead of doing
snow line three, so now under this, but
we'll just start adding this new instead of this note. If you go ahead with more
yellow on top of it, this is kind of
like light green. Then you make it light, and then you make it
almost yellow there. You can make it lemon yellow, then you can make it,
I think the last one. So if you keep
adding more layers, so let me show you
just a little bit. Just a little. Just by adding more yellow on top of you are just
going to increase the layer of this tree and he will make enough creating a very
beautiful pine tree. Notice no binary, just
a beautiful pine trees. So that is the technique
of creating pine tree that you can learn from
this class as well. So not just smell pine tree, you can create
pine tree as well. So you just have to keep
doing more or less. You can see this is lighter, more lighter than this side. So this is leafy top, this is a little bit more light. You need just a little bit. See what happens is, I'll tell you the mistakes
that often happens. And if you notice, you know, if you do the mistake,
how you can correct it. You see why the adding the highlights
sometimes what happens is you need to keep a little
gap of this dark in between. So sometimes I tend
to go overboard and cover up the black but also. So in that case, what you can do is
wash your brush, just wipe it off because
we already have the dark black and viridian
who are the best. So just take that
up a little bit. And then you can come here and add little bit of
the dots in-between. Whatever you think
it is required, what is whenever you feel added a bit too much
of the highlight, especially at the bottom, you want to keep it done
because at the bottom is the shadow. Okay. I'm pretty happy with how
my state for someone down. And again, if you feel you
about it too much of shadowed, you know how to add the
highlights now, okay. So this is just showing you how to cut it. If
you do any mistakes. And on the top, generally
what I like to do is instead of keeping the
highlight only on one side. So here for us that
highlighted the right side, instead of keeping it
just on the right? I keep it on both sides
because on the top the light is falling
almost equally. Okay, it seems this
is the first G I'm showing you to evaluate slowly. I don't paint binary. Is this the only ever? Because I haven't painting pine trees for a very long time. Like I've painted
like thousands and thousands of binaries
probably by now. And I can do it pretty fast. But since this is the first
tree I'm teaching you, I'm doing it accidentally slow. Let's take forward is done. Okay, Now we will let it dry. But in the actual painting, if you're doing a landscape, you might not have
just one tree. You might have a secondary. So what you do is
you do till here, like all the green
part of the tree, then you can do
the, another brain, but by then this will dry
and then you can come back and add the snow
effect on the trees. So by the time
you're doing this, this one will dry and then
you can go on this one. But right now I am going
to wait for this to dry. And then I'm going to do
step five and step six. So there are two more steps
remaining in state five, we're going to add
one layer of snow. And in step six, we're going to add another layer of snow, which is much more whiter. Now you can take this even beyond and you can add
a step seven also. But normally I have seen that just two layers of
white snow is fine. For doing that. I am
washing off my brush. Even watch this potential this
one I don't need anymore. Okay. And this time also, you don't have to make sure that it's completely
clean because we will use a touch of green. So it's fine. Now, let's start off
with step number five.
9. Tree 1 - Step 5: The first tree I
am going to use. These are the two
blues that I have. So cobalt blue and
ultramarine blue so far, the first one, let me use KOBAS. I loved the cobalt
blue shade by the way. The ultramarine blue. So you'll see what the effects. So you will see two trees. I'll do one with COVID if
N1 with the ultramarine. So you'll clearly
see the difference between the two shades of blue, the snow effect that
you get on your tree. For state five, we are going
to create this no effect. And exactly the brush
strokes is going to be like what we did in step number four. I'm just going to do a little bit here
and show you how it looks so that you'll get
a good idea of say five. So the color mixing
is going to be white, blue, whichever blue you're
using totally your call, you can use the opposite
reward suppression. You also, I loved the
Prussian blue effect as well, but I feel Prussian blue and this cobalt blue is
kind of similar. And then take just a
little bit of green. Any agreements by you can
use viridian green also. You'll see kind of like
a bluish green effect is what you are getting here. So this is not absolutely blue because why I say the
reason for this also, the tree is green, right? So the actual tree is green. Why we are adding the snow? We want to keep the touch of
green and then adult slow. But you will see some
landscapes where the snow pine trees
are absolutely like the actual tree looks black because all
the green leaves are gone so that the tree
is absolutely like dry, dry branched tree with
very dark talent, least, where the
green is not visible. So in that case, you
might not want to do the highlight effect
with so much of yellow. You might want to use burnt sienna for
that because you're showing like a
dried leaf dry tree and the snow is on the dry tree, which is actually the factory. In the winter, the pine tree
actually dies completely. The green is gone, it's all black and the snow
has fallen on top of this. I personally like to
create pine trees. Pine trees with a green
tree back background because I just don't like black. So I like and not like
the colorful effect of the green from
the background. So whatever green, so
you will see once I start adding the snow, all these green is
going to be gone, but little bit will be visible
and whatever it would be, disability is going to be
kind of like yellowish cream. Right? So with that being
said, let's add.
10. Tree 1 - Step 6: Now comes the last
and final step. We're going to add the
snow for adding this. No, of course I'm not
going to wash the brush. I want a lethal effect
of I'm just wiping it off onto the tissue paper and getting rid of
as much paint again. And I'm going to use only white. But you see the white is
not absolutely pure white. It has a little
mix of blue to it. And let's add this is the
most payments tape of mine adding this stopping to
the corner of the brush. Just talking a little bit
on the left side now. Okay? So all of it is done. Now, I'm going to
add a step seven because I just feel the snow
is not absolutely white. So for that, what
I'm going to do is let me wash off
the brush, okay, so that I get absolutely
pure white to start getting rid of all the colors that
I have on my brush. Almost gone. And now let's add pure white. The corner of the brush gently, because this
is the last step. Specialty on the edges
where the snow has fallen, probably a lot more. We are adding a touch of white on the left. With the white. You see how I'm doing the texturing. Test with that, flat deep off the brush and just
adding a few lines. Okay, Now, I just feel I just need to do a little
bit of correction. The bottom which
has become too much of white and not much green. So all I'm doing is
washing off my brush. And it's taking a little bit of lack and green and just adding a little
bit here and there. But I feel too much of a highlight color and the
shadows are not that visible. This is how you credit your cheat just in case
something has gone wrong. Spatially in the bottom, I like to add more shadows and they will. Our first tree is done. You might want to add
a little bit of shadow just below each of
these sections. This is just options. So whatever you like, I quite like this the way
it has turned out so far. I think to me it's absolutely looking like a Christmas
tree, don't you think so? I think the oldest sections
are looking very beautiful. It's looking almost
like it's giving me that circular cylindrical
structure of the tree. And it's looking like
proper three-dimensional. And the colors and my lights
are looking very good. So this has been our first tree. Now since this was the
first tree, like I said, I showed you all the six steps, or rather saving steps individually and I
did it very slow. Now I am going to
do the other one. The only difference between the first one and the second one is going to be like I was
talking about the card. So this tree is
little bit like this. Now you can keep it straight. Absolutely straight. You can keep it down. If you look at some snow
pine trees pictures, the pictures of the trees, you will see that the
tree is comes in. All right. So this is one I like. So I did this and I'm
showing you this, this other carbon one. So for that one, I'm
going to do it here. And the only difference between this and this
is going to be bad. I'm going to use ultramarine
blue for the stone rest. Everything is going
to be similar. Plus I'm going to
do it a little bit more faster so that
you understand how we paint a tree faster, not discounting, because then you're going to pay for
it. The vote on your legs.
11. Tree 2 - Step by step: Okay, so I already have
black and green on my brush. So let's start with a
secondary levels within that. So the reason I'm
doing another one, I could have ignored this because I want you
to practice more. Because the more you practice, the better your hand and eye coordination
becomes embedded in painting. So by trees. Okay, So I started with
black and green as usual. And taking kind of getting rid of all the excess paint for
creating the center line. Okay. And we will see the first step that
I showed you in the previous one
that I showed you. I don't do it myself
personally when I do it. But again, for your
sake of understanding, I'm going to do
it. This is mine. So now I'm going to flesh it out. So you can stay lots of paint. Again. Second and passed. It happens simultaneously
while I painted alone. In my feelings, I do step
two first and then state. Which means that while
I'm flushing of the tree, I normally at the
picture as well. But again, for the
sake of teaching you, going to structure
equals let me add flesh. Okay. So the exact
flushing is that no, I'm not going to take
water but just the paint. My brush, open up the prisons and add some tick
shows on the sides. Okay, So the problem
is that after you see is I have a lot of
paint on my brush. So just wanted to get
rid of the pain so that I have only on the
tip of my brush. So you'll see all of
these things are so vital for painting of
good snow pine tree. How much paint you have on your fresh piece of going
very gently on the edges. The edges are the most
important one because on the center is
kind of solid color. And I'm going a little faster. I'm sure you are able
to catch up this time. So practice the first
tree at a couple of X and then do this one. In practice, they turn, your skin becomes, is the case with everything
you're doing live. More you practice the
better you become. So how many times have you
painted snow binaries before and have not been
able to do it and then you're coming
and seeing my video. If that is the
case, let me know. Or if you're learning
for the very first time. Then definitive way to
learn painting, very nice. Pine trees. And then also you have to do it multiple times. Don't just do it once. I have a painting, I still remember
the first time I ever painted as Nobody be, some around 2000
Cody and seems thin. I have painted like
countless snow my interests. And as D practice a lot, I will show you probably in
a later video how much I have to fill this
last week you can do. I know how to paint
my pine trees. But more I practice better. I become even after doing
thousands of snow pine trees, I mean, isn't that crazy? And I think that is the
case with anything. The more you practice somehow, you just learn something
new every time. I just knowing, but
still everyday practice, I just learn something new. I think more of a
lag in the bottom. State three is over. And now I'm going to
add the sap green. This time. I am not going to add the yellow because this little bit of yellow that
is showing through it, which is not a very good thing because he has no bitrates,
shouldn't have any yellow. That was just for you to show you how you can create
just an all my pine tree. I added a little bit more, which I normally you shouldn't. So safranin is just too late, so I'm just mixing a little bit of yellow with the staff may just make them sad premium
little bit more later. And we are on to our step. Which step is this? 1234? Named my Brazil. Okay. You see, this is what I, when I paint on my own, I just don't go all the way
to Lake on the right side of the cheap ones and they've come back at the color and
highlight color on the left. I just keep adding on the left, but compared to the right, and they have come up again. Okay. Alright, so the highlight and shadow is vacated. It is, it's mostly on the right. Look at it up close. So this is just a pine tree and now we're going to
make it snow pain. No, I'm washing off my
brush completely deaf when a tissue paper and
I'm going to take ultramarine blue
layer of the snow. Just a tiny touch
of green with it. More fluids to whites. Because in the
next step anyways, we're going to add the
white on top of this. So might as well, just a little bit more
blue in this step. That became a big
blob over there. What do we do with this? I'm just going to add black
and green. In-between. Okay, so that was our
step number five. I'm washing off my
brush and completely going to add a clean
white or double of this? No. Okay. Let's take white. I'm going to gently, very tiny dots is softly
adding lots of wide. But I'm keeping my
textures in depth. I'm not adding too
much of pressure. Act too much a patient. These beautiful shoes will
not come with very gently. Bluish white. Left side
is a little lift up. I'm just adding snow on them because I'll keep obviously the snow has fallen beloved
as well. It's just not. To highlight it. You see
a problem with this tree. I just feel this triangle
shape is not paying. A little bit has
increased on this. So normally if that
happens in my painting, what I do is generally on
the background there is a blue color of the sky or
whatever bedroom calories, then I just add that color. But since here I don't
have a background. I have a clean bed down
and not doing that. But I'm just telling you what you can do
to color correct. Your Christmas tree
or snow binary. And another thing that I
also sometimes what I do is just increase it a little
bit on the left side also, and increase it on the
top also to match with this line and end up increasing my tree little bit on the top using just the
corner of the brush. Okay. I have to tell
you one more thing. So I normally when
I paint alone, what I do is I just played
them by Linda State shooting. I hold my brush like this. And I'm telling you so
that you can also do it. But because if I do like this, you will not be able
to see anything. So that's why I'm holding my brush like this
and I'm adding. Now that adding the pictures is very much possible.
If I do like this. But if I do like this, you get a much better picture. You see it's a kind of peak picture that you get
when you do like this. But if I do like, this
is more like a light. Show you the difference
of in a, in a minute. Let me just finish this
and then I'll show you exactly what I mean by this. Okay, so I think that
my white is added quite a bit on the
right you too, and I'm fairly happy
with how it's looking. Okay. I picked up a little
bit more white. I like a good extent
of white to this node. This is looking lovely. Like a thick layer
of peak bunny. White. Almost looking
like it's like as if drop-off snow on my tree. Maybe less patients.
You can only achieve by adding very less pressure
to add a lot of picture, you are not going to
be getting mixtures. Okay? Our second tree is also done.
12. Final Touches: And I think it's
looking beautiful. You tell me What do you think? Ok. And the texturing that
I was talking about, let me show that
to you in a bit. These are like all the
final two means are texturing that I do is normally
does take a little bit out only in certain places rather than keeping it like absolutely like a straight line. So what I do is so
this is my seventh. Seventh step is
adjust, increase. She lives in some places. And like I said, Hey, tend to overdo this and cover up all the
beautiful shadows that I have seen highlights that only headlines as long
there is a good shadow. So if you cover up the shadows, then there is no point in doing pilots because the highlights, I'm
not going to be visible. So I need to stop. I need to stop but
in our second okay. Okay. I'm not washing off my brush. It's very difficult for me to stop when I do these
kind of things. See, look at the
pictures. Beautiful. Now like I told you, for doing this entire two trees, cleaning off my
brush competencies. Now for doing this is
that fruit trees I showed you that I was holding my brush like this and
bring the texturing so that you can get to see the
indicting how I did it. Now, if I don't do it like normally, I don't
do it like this. Right? Because
when I'm painting, I like going like this and
then I can do it faster also. And what happens is by
chance and forget to press the brush on the plate
to open up the braces. When I come on top of my canvas, it automatically opens
with the pressure. You see it's opening up. This is a very effective
way of doing it. And I'm just telling
you all the tricks. And what happens is
while you are doing 11 of the sections of the tree, it just adds a little
bit of texture up and down because your results
are opening up like this. So you go like, Okay, so now let me show you
what I mean by that. So here is, here is the
one I just taught you. And here is the one
that I did before, which I did it without, you know, without filming. So obviously I
could go on top of my canvas and I could
do that sharing. So you can clearly
see the difference between this and this
are exactly the same. However, sure, you see the textures are a little broad
and they're not so pains. So here what happened was since my vessels
works like this, it was creating
thin line texture. And in this one you see, since I was going like this, the textures are exactly the same two trees with
the exact same technique, but the Luke is so different
because of the actions. Depending on how you're doing
your texturing exactly. This is how you're
going to end up having two different trees using
the exact same technique. And then look at this one. Same thing. My textures are pin line niche. So they are kind
of like pin line, whereas in this
one they are kind of pretty vague because they went on the top
like this and they created a texture again
with the same technique. See the different kinds of
and also one more thing is, it's looking very different here because I did it
on a white canvas, and this is a gray canvas. So the color difference
is also there little bit. I am not able to get both
of them in the frame, but yeah, I think you are able to understand the
difference, right? Let me put them side-by-side. Okay. I'm going to put the picture
of all these images so that you can see both
the things that I have done and how differently, how differently they
turned out because of a little tweak in the x-ray. Okay. And I'm just going to add a
little bit of land and finish up these two these two trees. Let me grab my color. And for this one I'll
use cobalt blue. So the light is
coming from here, which means I will create a
little shadow on the left. Tomorrow. Snow on the right. Just a little land to a touchy. Okay. And for this one, I am going to use the
ultramarine blue. Just a little something
to make your fees low. Good. She looked. She also please happy
that you're giving it a land to stand on kind of view. And I like adding little pig, let you know to
create some beautiful white. And that's it. Now to make it look
even more preachy, I can add little bit of
snow drops on top of this, you know, spreading some white. I'm just thinking out loud. I don't know if I'm
going to do it. I still don't know. I'm just typing right now. Everybody should do
it. I don't know. I don't want to do it right now. Let me just you the different kinds of
trees and then look at both of these papers and
then decide if I want to make some snowfall in this beautiful piece
of paper where I showed you how to create
snowy pine trees. Anyways. So we are done with the first two trees
with a flat brush. So I hope you'll learn
how beautiful and easy it is to create snow pine trees with
your flat brush. So I have always
painted my flat brush. But now I'm going to teach you another technique
with a filbert brush. Let's get onto that.
13. FILBERT BRUSH - BRUSHSTROKES: Okay, here I got 1/1
mole of my gray paper, and here is my filbert brush. So this is from a set of
filbert brush that I love. I bought the entire
state because Philip brushes come in all
different sizes in that seat. And I can use the size that is perfect for my canvas size. This is the size that
I'm using for E4, but the size nail
number is eight, whereas the one that I
did in the previous one, so both of them are same size. Now you know that the size of the brush varies
from brand to brand. So this size was five
and this size is eight. But both of them are the
same size over here, which is perfect for
painting on A4 size paper. Sure. Right. Okay. Now before a teaching
you the fever brush trees, let me show you the brush marks. Okay. Like I did, you know, like I did for the,
for the flat brush. I will start by mixing
black and green. The very first row. So the restaurants are
very different than the flat brush
filbert brush ones. And like I told you that, Let's pick up snow pine
trees with flat brush always because I wasn't
aware of filbert brush earlier when
I started painting. And this I have discovered
very dissenting, not very descended like
couple of years I would say recently come back
to my earlier, which are not courier rather than my career
studying 2015, but I started painting in 2014. That was doing my corporate is when I used to work
and paint at home. Do this. I do not know of the filbert brush at
all. Vivid brush. I found out in the
last couple of years, I think since the lockdown, researching more
and understanding, learning more about
painting and stuff. So this is the same technique, same brush technique that
we did with the flat brush. So we're doing that same thing with this trope is
absolutely the same. Okay. Now, for the next day, I showed you the clean lines. Now for the flat brush syllabus, look at the picture. This was absolutely
straight line. Whereas for filbert brush, look at the shape.
So cool, right? Because the tip is rounded. I want to know, let me show you with a little
bit more paint. Okay. And now let's see for the
tip, tip of the tree. So we are going to do exactly the same way as we
did with a black brush, but you will get, so here, there is
no corner right? So I'm pretty much using the
same tip of the brush to create d. So for the tip,
it's a little difficult. I mean, I'm just being
extra courageous and doing it without
the favorite brush. But you can always
feel free to use up. What liner recipe, a
small round brush. You might see some will come nice and
will not come so nice. So It's totally depend
on your practice. More you practice
the better you. So I'll tell you my trick. What I do is after painting the whole thing when I'm
actually in my landscape, I'm using the liner brush. I just saw the team and
then just add that. Nice. Okay. So that is the tip. And
then comes the picture you, okay, so this is when you are
doing with a lot of paint. Now you understand the
two different types of texturing you get once
we'll do it like this. Once when you're doing, let's not get the belly of the brush, but you get more of a pin line when you hold
your brush at this angle. And when you hold
your brush like this, you get P. You can get a peek ot team depending on
the pressure you, okay. And now for these
last kind of picture, so that less stateless picture, you see that there's a
little difference between the patient is looking
kind of similar, but this one has a sheep to this one did
not have a sheep. That's what I feel. Okay. So I hope you understood the brushing technique
of the feet wet brush completely and without
wasting any more time, let's get to our team.
14. Tree 1 - Step by step: So once again, we're going
to do two trees, one width. This time, the two
trees are going to be a little different than the previous ones that we
did in the previous one. Flat brush technique. So this time I'm going to do the downward direction first. And then I'm going to do the
upward direction because our population is going to
be a little different. Okay? So let me start with a
downward center of my canvas. And I'm going to do it a little bit more faster this time. So that's step number one. Now, let's create. You see I am combining
step two when she here, can you notice that while I'm flushing of the tree
at the same time, I am trying to, because that is my
natural habitat of painting because I don't
do this separately. So this time I pull
and 22.3 together, that would be a little
bit more faster. But I'm telling you so that you understand medical doing
for the first time, take your time, do the
flushing out first and then so be it. You see how my tree is not
properly shaped. Like. It seems like the TPP has
gone to one of the sides. So whatever you do is increase a little bit to the center. I just shifted the
center a little bit. I hope you understood
what I just did. If not, you can just go back a little bit and watch it again. I just shifted the d
little bit was the right. And now, now I'm going
to do that carving. Show that we get with
nothing but brush. And I'm going to wipe off the excess paint so that I
can create nice pictures. And I am using that feed on, so I go to add. So this is like fee is
what I'm doing now. I think septic shock
on the H. And again, I'm just opening up the results. This time just for fun. I'm not going to do the
light from the right. I am going to do the light
from the left just for fun, just so that you know, you get undecided on board
the boat, the case. So by practicing this with me, you're going to get a
handle, everything. Okay? Just adding, picturing. This is my texturing steps. So I'm just adding on the
beautiful textures that I can. And I'm increasing
the base of the tree little bit to bring it to ship. I absolutely love the pictures. Okay, now it's time to add
some lighter sheets to it. Show the highlights. And this time we're doing it. Just eating the dog
told the blacks from my brush because I have a lot of blacks up just
getting rid of it. So that when I add the lighter shade, the
highlight sheet. Not together. No, no,
no, no, yes, no, yes. You know, I am loving
this brush technique. Why? Because it says giving this beautiful texture of
the leaves like, you know, like just pick that t. So like I told you in the previous
flat brush technique, I'm holding my brush
like this and touching. I'm not going like this, right? So I am pulling
like this and just buy in this method
with a fever brush. Pulling like this is
creating such beautiful. They should have the leaves, the foliage is right. This is looking at almost
realistic, this effect. You don't get it with the brush. So I feel personally after
trying put the techniques, I feel favorite brush you can ask me which
is my favorite one. Now, I would say,
even though they were done with
people growing up, I've never tried this
because I didn't know. But good for you. I'm
here to guide you. So you don't have to
say e.g. do like it. Totally, totally,
totally go ahead with, I've created hundreds of buildings with a flat brush
because I didn't know it. But now she tells
me I would tell you that just do
it with a brush. Because I have these pictures. You Bye, beautiful. Everybody has a
different definition of beauty in their mind. But I've seen beautiful
morning parts of it loose, gives a more realistic feel. That's why I'm saying
more beautiful. Right side. Left side
is the highlights. I just don't remember,
just for fun via EDI highlight
on the left side. Let's get this beautiful. Okay, I am just going
to add a little bit more black and green, like what we did in
the previous one. And just add a few more shows. Since like extra. Once more. This is how you shape your tree. It's almost like you
need a haircut and shaping the gut how you
would ship, ship at it. But I mean, I always
fascinated whenever I go for hair cut to see how
beautifully shaded, right? So this is where
I have this tree. It's like gardening
your tree and give me the shape that you like. Okay, I think I'm loving this shape like the
way it is forming. So we are done with
step number four. In the next step now
we're going to add the snow color that
I am washing off my brush, off all the paint. And again, I will do this one cobalt blue and
this one ultramarine. But this time I'm not
really taking green. Okay, I am taking, Let's see, let's find
out what happens. This number we must be fins because this green
is a little bit, not a lot with
just a little bit. So it's great to mix up a little bit with at
least that's what I view. Let's see what happens. Just opening up the
prisons little bit. Okay, I just feel
adding leafy green. I mean, again, it's just my choice if you'd
like to do just blue, you can feel that
little bit of green. On the right and on
the right also as and when I'm coming
down on the right hand, we pay less. On the
left hand going. You see this beautiful
color when you mix, listen, green along
with the fluid. On the right. I think I absolutely love
how it has come out so far. And I don't want to
add too much to it because I have a problem
of doing too much. Because in the next two months,
more of the whitish blue. And let's see how that happens. Because if I add too much,
what happens in this step, if you go overboard, you cover up all the
previous courses that you've done
in the background, which you don't want to cover, a little bit of black and green
should be visible, right? So that's H for
step number five. And now I'm washing my brush. I am just going to wipe off
my brush against you don't say it says blue
and pink and white. And let's add some lights. Trying to open up the bristles, sequent back and create so many different
sections of foliage here. Like I'm doing not
just on the side, I'm doing a little bit
in the same title, so loving this white on this side. This is the reason I added the gray back home first of all, so that I can show
you how it looks when you add the white
on the other side. So if you don't really
have good green, but just for fun, you might try. It's just fun to see this. I don't like this has
become a bit too much. So maybe I'll just cover it
up a little bit of slack. Increasingly on the
side of texturing. This time you see
with a flat brush, we stayed only on the sides. Here we are with a little
bit in the center. Awesome. That's why I keep
painting with a fever. Rash is a good choice. Bend up black brush. Just a little bit of blue because on the right
side and we want to add too much light color. Printing off the present
because one beautiful dishes. Decide, I just added
too much as it's fine. Yeah. See how nicely I'm
decorating my tree. Like most like decorating
a Christmas tree. Okay, So this is all done. On I'm going to do
now is wipe off my, wash off my brush completely and add just a little bit
of black and green in some places where I
feel I have gone too much. Okay. So I'm just taking a
little bit of black and green. And I fit here. I have gone a bit too much. So I just come and add little bit of green
here to cover it up. Here also because at
the bottom I want more of shadow color, not too much of a
highlight color. And even sure Also I feel
I've gone and listen to overboard and added
too much snow. So just adding a little bit. Okay, now my tree is complete.
15. Tree 2 - Step by step: Now I'm going to
show you type 23 on this side with a filbert
brush that this is going to be a little different than the previous three
trees that video. Okay, so this is
with a fever brush, but in this tree,
this is the kind of tree that you will see in
the landscapes quite a bit. So once you learn this, you will understand how to sew the technique is
pretty much similar, except just one tweak in the technique that will
give you a brushstroke, rather a little bit tweaking the brushstroke
that will give you an entirely different direction.
Alright, so let's start. Again. I'm starting with
my black and green. And this time I am making the structure
a little different. Not exactly going in the
exact direction, right? Kind of going equally
on both the sides. This time I'm not doing that
dabbing technique also. So earlier I was
doing like this. So this time I'm not
really doing a debit. So maybe a little bit more
broader in the bottom. But yeah, pretty much
the structure is done. And now I am ready to
flesh out this tree and add some strokes
to wait for that. I am not really doing
too much of debbie. Rather, I am using my brush and beating it forward
like this painting, as in. Okay, let me show
you the brushstroke so that you understand
what I mean by this. Okay, here's my brush sheath. So rather than just this, I am moving my brush
along with Debbie. So it's a bit like this. So kind of like moving my brush like this in this in this way, better than just doing this. So that's the only difference. So I am moving my brush. And also instead of zigzag, in this one, I am
going from them. See me hurt point on both the sides and on the
bottom of the tree trunk. I'm just trying to create. So what I'm trying to create
here is, let's say e.g. so let's say this is one
of the branch of the tree. So this is the tree, this
is one of the brand. And I'm trying to create
little strokes like this, like how you see the palm tree. So that is the effect that
I am trying to create. Now, a very gentle
way and not going overboard and doing
this very loudly. Test a small strokes. So this is a little
different than all the previous or the three previous
treatments that you loved. But once you learn this
previous three trees, I feel this is going to
get so easily because you understand the steps,
all the six steps. So the states are going
to be exactly similar. Just the brush
stroke is different. That is not going to
be much patients. So step three, which
is a shilling stamp, that is not going
to happen here. So this is just a fleshing out the bony structure of
the tree that we created. Instead. Band these branches are kind of coming
out and going up. So this was done. So this is kind of but I'm using the tip of the brush to
create this way up texture. Rather than painting it. I'm trying to create
it with the brush tip. Making sense. If
you have any doubt. I hope I'm hoping
that I'm really good explaining a really
good that it won't have any doubt after listening
to my explanations. But if you still have any doubt, any any doubt at all, feel free to ask me. I'm always happy to answer any of your questions because
answering your questions help me improve in terms of pitching also
and picking myself. Because it's just
I just learn by teaching more questions you
ask better it is for me. Obviously, your delta. Okay? You know what
I'm going to do? My center line is
kind of shifted now every time it's
happening, which is fine. So I'm just trying to just
add more color in the center. So the center line
is not visible. And I think I have
done pretty good, pretty proud of myself. P anticipating lines. So these lines you can create with small liner brush holds, but I feel that final bleed with a wet brush is just
another level. Okay. So that was our step two, which is kinda mixed with
step three because we added the texturing while doing
it. Or you know what? Instead of three,
I can actually add just a little bit of a
shame for the heck of it. So this takes shooting is
the exact same brushstroke that we did in the previous one. There's nothing different. Okay, so step three is done, and now we're on to
step number four, where I'm going to mix
yellow and sap green. And we're going
to continue doing the same thing just in them. On the upper layer of
this is just the same. I'm adding that little
bit of sap green, not too much of the yellow. Okay, so that is
step number four. And now we're going
to add the snow. And this technique is
going to be at least two. So this is going to be again, the stroke that I
showed you where you are not Gabby Heather, you're dragging your brush. So instead of Debian, you're treading So exactly
that technique we're going to do in this one and
with the snow. And I'm going to use
ultramarine blue. In the first step, which is first step
of this node rather, I am going to mix
blue and white. And so this is a little different than
all the previous trees. Okay, So pay attention this one, and I'm starting from the top. The top part is not too different because it's
a tiny little section. As I'm coming down, rather than going in the way we did in all
the previous ones. In this one, I am going to drag it. Drag it. Okay, So jacking up it, just taking tiny touch of what does because the colors
are drawing on my plate. Jaggedy, jaggedy. And because of the shape of these brush strokes are
coming kind of roundish. So sometimes I'm
using the flat side, broad side of the brush
and dragging like this, just sticking with
his water like this. And then sometimes I'm holding
the side of the brush. So there are two different. Then we show it to you here. There are two different types of brushstrokes happening here. One dabbing is a
jogging is like this. One tagging is like this. So depending on the space, I can do it like this, or I can do it like this. And on this small ones, I am doing it with
assigned and adding. Okay. I am jumping on
to step number six. Okay. This is, like I said, I don't distinguish
between the stapes, right? But for you I will
stop here, which is, this was more of
ultramarine blue and white. So this was then
a few remaining. So this was our step number
five where we added more of ultramarine blue and
white mix and recreate it, be bowling shoes of snore at rather than all
the small ones that we did in the previous one. Now in the last step, I'm going to use only white. I'm not washing my brush. I am using the same brush. And all I'm going to do is
add one more layer on top of. The top is just the same. The edge of the brush to
create the structure. Okay, and from here
I start dragging gouache on top of this and
adding some more strokes. Just adding more strokes. The dot, the top, I'm adding some
more small strokes. And also these gaps. We don't want to
keep so many gaps. So I'm just bringing
in white in-between. And depending on the gas. You see that my
natural tendency is to that because that
is what I'm used to. Reading technique is beautiful, just helps you do
the way you want. So now if you're
learning this for the first time and if
you like this technique, you can try this also without
previous trees that we did and see how it turns out because I'm sure it's
going to look good. Okay, Now I'm going to just
add a little tiny extract Dutch of extending the
snow on the outside, Elizabeth, the tip
of that brush. So I'm adding, instead of doing this with a
small liner brush, which you definitely can do, I am using the deep off topic but rest because it
just creates a texture. Also. Want to add too much in that
bottom because in the bottom be dark shadow that I think
I added a bit too much. I guess I could do a little
bit of correction and more of my green and black mix
and add a few strokes. So you understood the
main difference between this tree and all
the previous ones? That in this one I did
dragging the object Debbie. And in the previous
ones we did model. Okay, so our final tree
structure is done, and I think it's
looking beautiful.
16. Final Touches: And now just before
finishing it off, I'm just going to add a
little snow in the bottom. So these two trees are done. And now let me show you
the difference between the same thing when I did it on my own alone without the camera. So it's just the same thing
done another time for you to understand that the same tree can come out a little different
every time you do it. So this is the one
that I practiced before teaching it to you. So you see the technique
is exactly the same. This one looks very
similar to this one. I don't see much difference. And this one also
looks quite similar, but little differences there. I think you're on the age. I haven't added
too much of white. And that I didn't do only because this is
a white background. So if I, even if I add white, it is that it will
not be visible. That's why I did not add white, you are, and I could
add more white. So this is how this tool works. These are our four trees
that we learned so far.
17. FAN BRUSH - BRUSHSTROKES: In this video, we
are going to learn snow pine trees with
a fan brush, right? So, but before painting
snow pine trees, let us understand how a fan brush works because
if you're anything like me, you wouldn't know
much about family. I didn't know honestly
for a very long time. And fan brush is not
very easy to use. You need to know the
right techniques that light strokes to create, but it's very easy once you
learn it, it's really easy. Okay, so I am going to
show you a few strokes, brush strokes with a fan
brush that will help you create beautiful
snowy pine trees. So here is my plate. And this time I've taken
out a fluid acrylics. The reason being, this
is a very thin brush, as you can see the bristles. So for small round
brush or a fan brush, I can't really work with pig body acrylics without
mixing it with water. That's why I decided to use a fluid acrylics so that
instead of using water, a lot of times I can
directly use the paint. Now if you don't have a fluid
acrylics is totally fine. You just have to keep mixing water with your
paint to make it a little diode because
these small brushes, they cannot pick
up a lot of paint, a pig body paint and it can really paint that when there is no mobility in your
brush if you don't have a good amount of
water. That's the reason. In a fluid acrylics,
it's just easier to use and do the demo. Okay, So let's see first
couple of techniques. So basic things that we can do. So here is my brush. And of course we can do a
couple of straight lines. So now you see the
bristles are kind of stuck together and they are
separated in like 34 clusters. So if that happens, it's kind of a little difficult. So watch what I do. I'd like to do is use
just one of the corners, this corner or this corner. So that way you can
use it almost like a liner brush and create
a beautiful lines. And this is particularly not helpful for creating
small pine trees. But since I'm showing you
how to do the flat brush, check out all the techniques, all the strokes that you
can do with a fan brush. Look at this, how pretty all these beautiful strokes
or you can actually create a lot of nice green
leaves with a fan brush. So say e.g. c. So this is almost looking like a tree that is
coming up on grass. Or you can create a
palm leaf like this. So once you understand
how to use fan brush, it's actually very useful to create beautiful
leaves and trees. So can you see how
easy it is to create beautiful pictures with a rush? So yeah, there are
so many strokes, but this one important
thing that I want to show you is that, so right now the bristles
are kind of separated. But if you take a lot of paint, so let's say I'm
dipping it in a lot of what happens when you
dip it in a lot of paint, the prison stick together. And because like
one whole thing. So that time we, if
you do like this, you see, you just get a
different kind of strokes. So basically, the
thing that you need to remember is if you don't
have a lot of pain, it just opens up. If I just get rid of
all that exists between two that I have on my bristles. Okay, So now it's
starting to open up. And you see that now when you take just a
little bit of paint, then you have this
kind of strokes, which is a little
opened like this. If you've been on a lot of paint them, this
is what happens. Okay? So that's just a little bit
of basics of the fan brush. It's really fun. So if you have exploded yet, so just pick up your
fan brush and just keep making masks on our journal
and see what happens. What you can do
with that, right? This really good
thing to do, okay, Now coming to our
snow pine trees, let me show you a couple of
demos what all we can do. So one of the technique
that we're going to use is the dabbing technique
that we have been doing with all the previous
two brushes. This is the actual, this is the brush movement
that we're going to do. Now you can go like
this downward curve, or you can go like this when there is a less space. So let's say I'm just
painting a tree and show you, let's see, in the top, if you put this, it's just
going to become too broad. So we don't want to make
it so broad on the job. So at that time, we're going to use this
corner of the Brazil. And as we keep coming down the base of the tree. And here, it's kinda good to go with the
full length of the result. And now we can use braces to create the texture. So that is how it is. Back. As you can see, the
tip of the brush is kind of like a Portugal is
not really downward curve. So this is the
downward, upward graph. So it's kind of easy with a
fan brush to create a pain, to create a pine tree. We test downward. Now we have reached the
length of the bristles. And now, so basically you can't do these small
trees without fan brush. So it's kind of useful
to use a fan brush if you're doing a bigger, right? So this is just one of
the basic shapes that we learned in the
previous two brushes. I'm not going to do
a complete demo of this simple tree
with a fan brush now because you already
know how to do it. So I just showed you also your homework would be to
create two trees with a, with a fan brush and create one with a
downward direction, and create one with
the upward direction. So this would be your homework. So you understood I gave
you a little demo of it. It's absolutely easy. The fan brush helps you do it. But now for the actual label
with the fan, fan brush, I'm going to give it them over a little bit different
kind of a G naught, a base simple, upward
or downward curve, because you already know
it by now because with the previous two brushes
we did just that. I hope you understood completely go haven't
watched those videos. You can watch it. And then you can
do it very easily with a fine brush,
with a fan brush. It's so easy to do it. The structure like this. And then you just
increase the shape. I'm just giving you ideas of
how you can do it, right? So you just take your fan brush and create the oral
structure like this. And then you test
it in some places. I'm showing you a very heat
up very, very rapidly. I've not really trained
to do this here, but just giving you ideas how easy it is to do
with the paintbrush. But, but let me tell
you a fan brush if you just if you're using
Canvas for the first time, if you've never used it before, you might find it
a little tricky. So when I, we fan brush, I did snow pine trees. A lot, lot of bets like
gaining tanks at least. And after that, I
could get comfortable. So the reason I'm
letting you know, it might be that you'll get comfortable just
after two times, just after doing
it for two days. But normally I have seen that femoris is a little tricky if you have not used it before. So if you're trying
for the first time, I would just suggest
that try doing it a couple of times and
you are good to go.
18. Tree 1 - Step by step: So now that we're done
with the brush strokes, one of the gray sheets. And now I will give you
a demo of two trees. And these trees are
not very simple. Curves, downward curve
or upward curve, but they are a
little complicated. So I just thought of something different kind of tree
with a fan brush. Otherwise it's just going to be the same too boring trees, which I don't want to
do. Let's make it fun. And that's why let's do
something different. Okay, so the basic strokes
are just the same. So I will start with
black and green, and then I will take out yellow, blue, and white to do that. No pine trees. Okay. So dividing my sheet. Okay. Let me start. I'm using just the
edge of the brush. Keep observing from here itself. It's not a regular
tree that we have done in the past sections. Sure. I'm trying to do
something different. Look at the structure
of the tree and said the basic skeleton of the tree, that itself is a
little different. So I'm leaving a little gap
and taking some branches out. So if I have to
describe this tree, it would be something like
going in all directions, in upward direction and
in downward direction. So if you look at some
of the snow pine trees, you will see that
there are a lot of trees out there in nature,
which is like this. So that's why I thought let me do a combination of both and shooting something
different. Okay. So you are coming up and tone. I think pretty much my
skeleton structure is done. And I did not do too
much because I am going to add the texture
on top of it and then give it the actual shape. Okay, Now let's start
texturing to this. I am using the edge of the
brush to do the test suite. And this takes shooting is
kind of like what we did in the last in other filbert brush
second one where we can. So let me show it to you here. So that kind of texture that I'm trying to do is like this. Where I am with one stroke. I'm creating all those
small tropes that we did individually in the previous one is just because
of the fan brush, we are able to do this. Read me out on this small lines. Okay, doing slowly, it
is a little complicated. I understand. By VP, just watch it carefully once and
then try doing it. So basically, if you understand the science of what I'm doing and it'll be
easier for you. So I created the branches,
a main branches. And then I'm going
individually in each of the branches and
then creating the patient, but not in a random way. But I am just taking off
small strokes like this. Okay? I'm also adding
some more branches in-between and the
texturing for them. So you see the design that I'm doing for each of
the branches itself is making that she looks so different than the
previous ones we did. So see, this is going down, this is going out. So it's a mix of both
up and down structure. Let me show you the picture
that I'm looking at so that you understand the
kind of tree that we ever do. So this is, this is the tree that I am
looking at, the date. So I will add it
in the reference. And you can have
a look at it and see all the small branches
that are coming out. Okay? And also notice that I'm leaving some gaps in-between
these branches, which is going to get
filled up a little bit. Maybe start adding the snow. Pm. Accidently loving
this fun thing that's happening because of the band Rush that begin
to match. That's okay. In magnitude. Can be done. Okay, So pretty
much the structure of the tree is done. Which is Alpha, which was right when we
did the texturing. In state three. I think we're going to add the lighter color and
give it a dimension. I'm absolutely loving how
this tree is starting up. It was a little complicated. I agreed. I was a little scared
also to teach you this, but I'm sure you will
learn to do it just fine. Just creating the
base of the shield. So just try it once and see how comfortable
you feel with the band Rush. If you feel comfortable
than good, if you don't, you have a lot of other ways
to pink snow pine trees. I absolutely love the structure
that we have done here. I think it's looking fabulous. Now I'm going to take out
a little bit of yellow. And I am mixing the
yellow with the black. And I'm getting this
kind of olive shade. I don't want a
bright green color, so I am mixing yellow
and black here. And let's just add a little bit of texturing just to
make the CI nice. So just adding a little
highlight on the left side. One more thing to keep in
mind while you're doing this. See, I have a lot of
paint on my brush, so I'm just going to label
a little bit and make, keep in mind that do not
put a lot of pressure. Because normally fact
if old fan brush, you need to have a lot
of paint in your brush, otherwise the business
will stay open. Like I told you in
the previous video. So it's actually necessary to have little extra
paint in your brush, which means you cannot put too much pressure
on your painting. Because if you do,
it will become a big troll, which
we don't want. We are just adding highlights. So absolutely, I am
doing fatal touch. My gosh. A bit more. Green was very dark because of the lag I
already had in my brush. So it's not very light, so just adding a little
bit more lighter shades so that the highlights
a bit more visible. I hope you are understanding the brush strokes
that I'm taking. Let me show you once again just in case you
are not very clear. So here is my branch, each of the brands, this is this is the main
trunk and the branches. And I am taking the strokes out. Okay. So that's all I'm taking. Just take it very slow. Do we gently do not rush. Why you are doing this? Once
you get the hang of it, you can definitely go
faster and do it quickly. Okay? But if you do it for the first time,
just take your time. Do it nicely slowly. Adding little bit of back. Basis is to keep
good enough shadow. Okay, So our third
state is done. Now, I will take out the
blue and white and we will add the slope lines. And Prussian blue,
even these two colors. So I'm using that credit one. We just finished doing a safe for where we added the
highlight on the tree. And now we're going
on to step 5.6, where we're going to add the snow color on the
tree. So you look at it. We've got the fan brush
out there like for strong bristles on it so
that I'm not going to use, I'm just going to press it on the plate few more times to
get it kind of even out, kind of fanned out. I can now Let's go.
So let's start. I'm starting with the corner of the brush and I'm
dabbing a little bit. Okay. Not truly, fully in the fan brush strokes
that really people, okay, Now I'm starting to do that
on the top is very less rate, so I don't want to try to embed. And now recently I am adding dark pen brush strokes
on to the branches. Ready gently, very,
very faded touch. Because if you press, it's going to get all mixed up and all
these beautiful textures, the strokes are not
going to be visible. Okay? See I'm using the right side of the brush to go in late
because this is kind of easier when I'm on the right and using the
left side of the bristles. Just trying to
make it as easy as possible for you to
understand and decode so that you can easily
do it on your canvas. Okay, Just wait, one
branch at a time. Usually is nothing else
except I'm just doing one small thing that I do
not do either or your tree. We're going to stand up. I mean, we did pretty much this one in the last tree of
the filbert brush. So the same thing
I'm doing here. So instead of going just on the both sides and we taking a couple of
strokes in the center. Okay. You need a lot of beat. The pen brush to work. Okay. So I take that is done and strokes and
beautifully looking. And can you see how fast this is with the fan?
Brush it gently. Once you get flu at it and
you do it multiple times. Is this fleet, they'll
just one stroke. You can just go on each
side and your tree will be done in probably 5 min, right? So it's a really easy thing to do if you have the
practice of it. Otherwise it can be elliptical. Like for me, I do not
have the practice, so it's a little
difficult for me. Okay, so that was our
step number five, and now we will add just
the snow or double. Know I'm cleaning off my brush and getting you to off
and just using white. Okay. So let me
start on the top. Use the accident with
the corner of the brush. John is a little tricky
because it's a metal. Okay, now I'm starting to add
the patience of the panel. You see how much, how
big blob it became because I did not do fit the data and I've
been lucky fast. Just have to be
careful and go slowly. We did it with the fan brush and we created a
beautiful beach retreat. So do you realize
how easy it is now that most often nobody is done? I'm just going to go over it
and add a few more pictures, especially on the edges. Because on the easiest though, the snow is going to fall a
lot more than on the inside. I'm just waiting
on the edges and adding some final touches. Before finishing off this tree. Sometimes when you feed your fan brush is
not helping you. You can always use the corner of the brush and create the strokes
matter where you go. That's all. Okay, So I just finish it off by creating a small man for it. And, uh, before finishing
you talk, it's almost done. I'm just going to do
a little correction. I just feel the shadow
part is almost gone. What I'm going to do
is a little bit off black and green and
just add a few. So this you can
ignore if you don't want to is just I just feel it all just adding little
bit of lab branches. And then I date is
going to be good. So adding just a few
lines on the side. Especially here where I
added a big blob of white. This is the time I can
do the corrections. Understanding
corrections is always good in between so
that you don't have any fear of being
days because you know that if you do
anything mistake, you can always go
back and correct it and then still be confident. Saying dog, you don't
you're not really scared of stocking up
or making mistakes. I'm just adding a
few of the strokes manually one-by-one because I just want my tree
to look pretty, pretty as per my definition
so that I like it. Okay, So our first tree is done. This is how it sees him. And I think we learned to create a very different kind of tree than the previous ones here. And he's always good to
learn something new. It's a little complicated. I would not see that, but I'm sure you will find
that it's actually easy. Once you learn, do we get?
19. Tree 2 - Step by step: Okay, now let's create
the second one. The second one is
all to wait to be a little different than the previous ones is
going to be kind of like a different kind
of complicated tree. So let's start. I'm starting with
black and green. The same tonight first. Okay? So this one is not
going to be weak. So much of a gap in-between. This one had a lot of gap. So for this one, let me just create the structure quickly. This is also not a very
standard structure that like we did in the previous two with the previous
two brushes. This one is also a
little weird in shape. Even though basic
skeleton structure is also kind of different. There is no fixed pattern to it. It's just going in all sorts of like up
and downward direction. I just want to increase
it a little bit more and give it a proper shape. Yeah, I think this is
good for the time being. And then once I add the texture, it will flop out a little bit more and have started to it. Okay, so here in this
one we're going to learn something new
with the fan brush. So in this one we did
this kind of stroke, right? This kind of stuff. But in this one, I'm going to teach you
another kind of stroke, which is the one that
I showed you here. This one, alright. Tried to very gently because
my brush has a lot of fast. It's going to be a show. Okay, So the picture, He's coming, nice,
I'm liking it. And it's kind of
happening fast because the mouth is pretty wide than the flat brush
and the brush. So the picture you
have a little faster. Now, I'm going to add a little
bit of yellow to my brush and just add a lot of yellow. We've been followed
the light pattern from the left so and highlight
only the left side. Can you see the
dictionary is coming so nicely now with the band Rush, and I'm doing it on
top of the black. They could see very easily the other pictures are
coming with the fan brush. Just a few strokes. I finished the entire picturing. What other highlighted. Okay, I'm absolutely
loving this one, but they shouldn't happen really fast because of the fan brush. And also it's looking gorgeous. Okay, now I'm ready to wash off my brush and we
will add the slope. Make sure that it's completely dried as it's dried
it off a little quickly because I don't
want the white color to mix up with this
with this background. Okay, so now how we did two different shades of
blue in the previous, previous brushes
for this one also, I'm going to do a
different shade of blue, but without taking out
any other further. So here is my Prussian blue, here is my dark green. And I'm going to mix these
two and get a beautiful, this is the blue that I got, and this is the one that goes, so it's a little different. I don't want to have similar
kind of blue look at this. This is like, I
think absolutely the color of the snow day. And it's beautiful,
teal blue color. Very gently going on the job. And I'm doing this, Debbie and creating
small textures. The reason I'm more
beamed is so that my pen brush is kind of together and it
doesn't split out. So to achieve that, I am adding more mixing
morphine, cheddar. See how beautiful the
dishes are coming. Chest with a tip of the bristle, I am able to give some
amazing pictures. No binds. Okay, so that's it. This is done. Maybe add just a bit more. Just a little bit. Okay, that's done. Okay. I am washing
off my brush and I will take just white now. And I have to go
very gently, okay. Especially on the job. The corner of the pen brush. Okay, that's done. Now let's keep going
forward as it downward. And at discrete small, small strokes with the Debby. Also notice that I'm
trying to go on top of the blue that I added in
the previous step and not cover up green
and black that we had because we want to
have the shadow shrink. Otherwise I'll have
to correct it. A green on top of that. Okay. More or less, the
entire gallery is done. I'm just going to go over
it a little bit and add just like the big
blobs of snow falling. And that I'm going to do with
this texture as it dragging the brush that I'm going to do with a
quarter of the bristle. So only in a certain places that may be chunk
of snow falling. Okay. Whenever possible, I am trying to get
some texturing because that's how
we want to drink. This one should be there. Now, a little bit
more on the H's. Okay. Now, if you need to correct. So in this one, I don't really feel I need to do a collection. But if you feel you have
added a little bit too much, you can always add little darker shade
and add some shadows. I'm just I'm just
repeating it again because I know if you agree for the first time you might find is a little difficult to do. And again, I would
suggest that you do it at least couple of times
before giving up. If you feel like
you're not able to do it in the first shot, that is totally normal EV to know that it is normally between this for the first time, it's natural that you will not be able to do it the
way I'm doing it. Because I did it probably
20 times before. I was confident that I can
paint with a fan brush. Okay. So don't give up if you're not, it's not happening
in the first goal. Just try it again. Just take it up sheet of
paper and just keep trying. This is best-case books
come really handy. Because in sketchbooks,
you can just do again and again and again, and just without bothering
if it is coming out. I absolutely loved the
shape of the tree here. And now I'm going
to add some snow. Okay, So that's it. We learned two types of
trees with a fan brush. And I hope you learned something new to do like kind of
complicated type of us know binary and
do not give up if you did not get it
in the first goal, give it at least one more, one more shot before giving up. And I'm sure you
will be proud of yourself that you give us
give it a second attempt. Okay, so now let's move
on to the next one.
20. ROUND BRUSH - BRUSHSTROKES: Hello and welcome back. So, so far we have
learned to paint six trees using three
different types of brushes. Okay, So this was the
one with flat brush. This was the one
with filbert brush and this is the one
with a fan brush. Okay? So one of the thing that is common to all these three
types of techniques that we learned with three
different brushes that you can't really create very small trees with
these brushes because these, these brushes would be helpful. These techniques
would be helpful if you're creating a big painting. Big, I mean at
least A4 size that before or if you
have a landscape or winter landscape where
your snow binary is like the hero of the BD. So it is taking most of the
highlights of the painting, then it makes sense to paint the tree with one of
these three brushes, whichever method is
comfortable for you, right? So say e.g. there is a
landscape where there is snow background and it is like
one big tree in the front. Makes sense to do it with
a filbert brush like this. Or you can use a pen brush and do this one whichever
is comfortable for you. But, but we did landscapes. You can look at snow
pine trees that are binaries that you
would see in a distance, or maybe off small size. Now, small size can be
done with a flat brush. Also. If you have a smallest size brush,
something like this. So this is a very
small size flat brush. So with this, you can create
a small, fine tree, right? But even small ones. So e.g. you are painting a really small size canvas
or you are painting small, small, small peak or maybe
four-by-four whatever. So for all the
small paintings of painting with a round
brush, really easy. And you can do it, do your pantries they
quickly and effectively, rather than working with a big flat brush or a
filbert brush or fan brush. For painting with
these, you need, you have bigger surface,
but small brush. You just need a
small, small space. So for PGY1, a small space, the most effective way of
doing it with a round brush. Okay, so now I'm going
to keep this aside. So now I'm gonna
keep this aside. And we need to learn to paint three different
types of pine trees. No pine trees with
the round brush, the round brush that
I'm using it is from a state of miniature
rest state that I have. You will find the link in
the resources section, and this is size number
two that I'm using. You can use three also for
all so demanding on legno, you can just use whichever
you want to use. I'm using this one because I really want to pay like small. There's no point in
creating a big tree with a round brush because this
is going to take forever. Then why would you do that? Right? If you have
to create a B-tree, you might as well use one of
the three previous brushes. So the main reason we're
using small brush, round brushes because we
want to create small trees. Okay, Now in this one
I'm going to show you three different
types of trees that you can create with
a round brush. Now, with the round brush, see that you can create
so many varieties of snow binaries because there are so many different structures
of a snow pine tree. So if you are painting different structures of pine trees, then obviously the tree is
going to be your friend. But there are, I failed after painting lots of
snow pine trees. I think they're aligned
with the roundworm. There are basically three
techniques that you can use. I mean, there could be more, but these are three
that I have used effectively most of the time. And I mean, out
of this here I've actually used one or two mostly, but I'm teaching you three
different techniques. Once you learn the techniques, then creating a painting by
painting as the round brush, you can use whichever method
is more comfortable for you. The three techniques involves three different restaurants. So there is not much to be
done in with a round brush, but I can still show
you just a couple of brushstrokes that you need for these
feeding, these things. Okay? So again, I'm going to
use fluid acrylics for this. Okay, So I've taken
out four colors. Black, cadmium yellow,
Prussian blue, and white. So I'm just going to use these four colors to do
the demo of this one. I am not taking all green, particularly for this one, because we can create a green
by mixing black and yellow, so I'm not losing weight. Okay, now let me show you the three main brushstrokes
that is going to be helpful. And in taking the tree for the first stroke
is small dots. This is the first pressure. That's it, as simple as this. So we're going to use
this technique and create a tree like this where
we are creating dots. So I'll get you the detail of it once I start
showing you the demo. But just to make you understand, I am telling you this
is all you're doing. So the dogs can be can
be exact dot like this, or it can be like
sideways like this. Or it can be like this. Whatever is comfortable, not it's not going
to matter so much. All you have to do is
Debbie and Debbie, right? All my debits. Okay. So this is number one. Number two, brush stroke back. We're going to use this
small dash kind of stroke. Very easily. You can create this
week round brush. It can be just smiled ash also, or a little longer dash. So how this is going to be
helpful is we're going to create the branch of the
tree with these strokes. And a number three brushstroke
is long lines like this. Dot, fandom, middle,
middle length dash, and then long dashes like this. So how this is going to be
helpful in creating that she is like this. Okay? So that's all for
the brushstrokes. There's nothing
really to practice. You're just observing
this. Once. If you just watch
this, That's enough. Who understand how it is
there is nothing to practice. You will start
practicing directly when I start showing
the tree demo.
21. Tree 1 - Step by step: So here is my gray sheet. This is the fourth one
that I painted initially, I want to do three
trees on this one. So I'm gonna do small ones and fit them on this A4 sheets. So I'll start with
the middle one first. So I'm going to do
the middle stroke. So out of the three
brushstrokes, or the middle one, this one, number two, that is the
one I'm starting with. Okay? So I'm gonna do it in the
center because the center is doing on the side so that I can guess the space I need
for each of the trees. So I'll start off with, and I'm starting with just pure black, nobody in this day. And with a small strokes, I am going to start
creating the skin. You can see I'm not going
into the exact direction. Rather, I am starting
from the same, same center line, center point
in the main line, oblique. It's like a Christmas tree. I'm taking small steps, right? Medium, medium size jokes. Okay, So that is done. We have structured
the whole tree and now I'm going to add
some dictionary. Okay? So now creating the texture, we are going to do the same thing that we
did in the pen brush, where we created
these small lines below each of these chunks. So that is exactly what
I'm going to do without small mountain gushing.
That can help. I'm just having a
liner brush is very important for a
nominal regressions. Fine. But I honestly
like this one, like this mediation breasts, brush set that I bought. I think I've been using putting your mouth because it really pointed deep and
helps me create small lines. Right now we're doing our
Cohen's d, which is shooting. Don't cheat. Okay, so the entire structure
of the tree is done. Now I'm going to add
some dimensions to it using the yellow. And after that, I will
start adding the snow, but since I don't have green, what I'm doing is just my brush already has
a lot of black in it, so I'm not taking in more. I'm just mixing the black that I had was just probably
get you don't listen because a lot of blood
just mix it with yellow. You see you create this
beautiful olive green color. I'm going to use this and
create some of the dimension. For the cheap. Now, I am creating pretty much medium-size
tree here right? Now, if you're painting a small landscape where
your trees even smaller, you might want to ignore this state that
I'm doing right now because this small highlight is not going to be
really visible. Because once the snow comes on top of it is going
to be hidden anyway. Because of the size of the tree is not going
to be the seat, but the big ones that we did
before in those months into it made sense to do
because it is a big tree and little bit of green was
visible even after that, it seemed that this is about, this is not absolutely small. All right. So this
has some to it. It's like medium-size
G, I would say. Let's see, I'm not adding
too much, just a little bit. Just to make that field
give it a structure. I'm mostly using the
same brush strokes that you had planned on using
the medium-sized stash. Alright, so this tape
is also done now in the next two staves and
would add the snow. What people play,
brush and mixing. Blue. And now you can change the shade of blue here by using a different
shade of blue. But this is the only
shape that I have, all the fluid acrylics mediums. So just taking that
time, that's up yellow. And adding to this move
kind of like D shape, quite a bit of white. And now I will start
adding medium size jokes. Remember that's what
we're doing here. This is statement number two. I'm changing this small. And notice that I have a few strokes in
the center like this. Not just on the sides,
but some mistake. Okay. Would amount of snow color has and now I'm not
washing off my brush. I'm just wiping it off. And I will pick up white and directly go
and add the snow on top. This is happening pretty fast. It's not like the
previous trees which took a long time. They're on Russia. Life. My light source. Now, if you need
to do corrections, so let me show you a little
bit of correction so that you will feel confident that even if
you do some mistakes, you can always go
back and connect it. For creations. You need to have shadow beneath each of
these line strokes. So wherever there's less space, so I can see that he's a
little less space here. The black is not
showing too much as in I've covered up
the black two months. So those are the
places I am going and adding some more of
the neck strokes. Okay. So washing
my brush again and just add a little touch
of white on that page. Adding some more
highlights in the wall. And we are done with
the first tree.
22. Tree 2 - Step by step: Now let's create the first one, as in the one with
the dotted ones, which is sticking number one that I showed in
the previous video. And now we will start with that. Okay, I think this is
one of my most favorite. We often small trees,
bigger, round brush, and this is the one
that I use most of the time in my landscapes whenever I'm painting
a small pine tree, this is the technique
that I use, that I use. This is also very
good technique, but I don't use it much. I feel for me, this is a little faster. So here is my center line. And then we're going
to create some doors. And here I'm trying to go
in the zigzag patient now, each of the dots that she
doesn't really matter, you can do we to have
all feels good to you. But what matters is that you
are daunting with 11 degree, just machi all day. And Debbie, you see the beauty
of this technique. Pretty, it's looking
dotted lines. It's almost like, or maybe we are creating the
texture of this tree. I am trying to bring
it to the same level. This one, I think I will have to create one more level of the
tree and then come down me, I think now I am at the
same level as the tree. Okay. That looks good. I
think I can stop here. And my structure is also done. My fixturing is also done. Everything is done
and just making sure that everything
is done the way I want it and just extend
the branch on this side, or a few of them. Now on top of this yellow,
rather olive green. And just create little
bit of that mentioned, trying to stay towards the top
of each of these branches. I absolutely loved the dimension that formed of this tree. And did you notice that
the center part also, I have quite a lot. I mean, there are a few dots where the background is visible. But it's looking like
part of the DOD, but most of the tree
is pretty quick. That's quite congested,
kind of a thing. Very different
from this pattern. Katie, some more
textures on the left. And I'm totally happy with
how this is turning out. Okay, so let's create
a dark blue color, blue shade of the snow first. Just a tiny touch of yellow
to make it a greenish. Okay. Okay. Do it. I'm doing it very gently and just making sure
that my dots are falling on the job of the branch area and not on the bottom because of the water we want the blacks. Since this is a small tree, we have to be
careful by the dots because it's such a small
glazing can move anywhere. So I'm sticking mostly it was the net because that is where the highlight color
keys branch by branch. In some places,
we want too much. I hope you understand
already by now, the basic structure.
Nobody tree. Because if you know that you can literally just create any tree, the stapes are really
important points. You never even have
to pay so many days, like I told you in
my previous videos, I don't really remember
the stapes because I created them to
make you understand. I, myself don't use them
so much while painting. I just keep on doing it. Again, just a
little bit of black below this video because
there's not much black. Okay. So the snow, the snow layer of the damage and bombing
has been added one day. And now I'm going
to add a new one up to n. Let's see how it
turns out and accordingly. I'm doing it very,
very slowly for you to understand how I am progressing, how I am making
each and every dot. But when I've seen this in
a landscape, I really fast. If you are also doing
this for the first time, you are learning how
to paint pine trees. We round, brush, take your time first couple of
times and do it slowly. And then once you get
to be maintained, after doing it a
couple of times, I'm sure you will become
a row and your hand will also move very fast. So see how I'm creating
each and every dot to create the snow
effect of the tree.
23. Tree 3- Step by step: Now we are going
to create though. Okay, So Todd months the stroke, remember it was
like a long stroke. Right? So let's start
with that center line. And the long lines. Let me just go though. So that's a good
area marked out. And now let me start
filling it up. Good. You remember the strokes
are kind of long lines. See each of the trees have
very different techniques. So depending on which one
you resonate with the most you are going to use in most of your
paintings like this. This is the one that I
resonate with the most. But it might happen that you resonate with this one the most. So Chido child, all three and see which one you feel
good while doing it. Or rather you feel easier to do compared to other,
other, other two. Nobody's going to ask you
which technique you use to create this book by raising
your big day, right? Nobody's going to ask you this. The reason we're doing
this exercise is so that you understand what
are the different ways you can create snowy
pine trees and find the easiest way possible for you to
implement in New York. Okay, So the basic map out and kind of
texturing is also done. And now I'm going to
add dimensions to it by mixing it with yellow
with the olive green. I'm going to add some strokes. I think this one, this
one is happening faster. I think it's one of the longest. But also because I
was doing it slopes. So again, that vanishes on
how fast or slow you do it. Okay, So let's create the
darkest smoke color first, and then we will add
the lighter color. So I love this color
that I created as taking the non strokes. But since this is
the narrow portion, I'm not really a beach, take very long strokes. So That's it. Now I'm going to add the white, this white washing or wiping
my brush and taking the white to take leave
because I want you to become a one chip lighter
than absolutely white. Okay. I feel I have
covered covered up the shadows too much. Too much. I would have a
new connection in this one. Before moving on to lab, I just want to add a good amount of white so that I don't have to come back to white anymore. Okay. Now I'm washing off my
brush and just a lot, just a tiny bit of
black in some places. Okay, So that's it. I like poetry is also done. So here are the three
different types of trees that you can create
with the round brush. So not just three different
types of trees, honestly, you can create so many types of trees without, without own rush. But these are the
three main techniques that I feel like you understand. You can create any
kinds of small trees, small, snowy pine trees
with your round brush. I realize I forgot to add the
land for this so quickly. Okay. I hope you liked that. Here is our three
different types of techniques to create
with the round brush. So do try them out
once, just once. Follow the video along
with me and create it. And they figured out which
is the one that you want to paint for the rest of your
life to paint the snowpack. I also wanted to show you the other trees that I did
with a round brush technique. So here is my journal where I practiced before
teaching it to you. So you can see there
is not much difference between the ones that I showed now and the ones I did earlier because with
the round brush, there is really nothing
much that you can get. A few more that I did. Basically just the
three techniques I practice multiple times. Because the more you practice, the better you get. So I want to encourage you to practice more than
once if you can, because if not anything, you will end up with
lots of snow bank fees like me, like this.
24. Small snowy pine trees: In this video, I'm
going to do to how to create different structures
of snow pine trees. Because snow pine trees can be in pine trees can be in so
many various structures. I pretty much tried to cover
as much I could come across. And if you just
practice this once, understand how the different
trees are painted. And if you just do it once, it will help you also, whenever you see a pine
tree in your painting, you will know how to tackle it. So these are pretty
much the same using the similar techniques that we learned in the
previous video. But I feel especially if you
learn this kind of trees, this will help you in
creating misty pine trees where you see a lot of different
shades of the same blue. So that is what I tried doing, some lighter shades
in the bag and some darker shades in the front. So practice this
couple of times. This and this are
pretty much similar. And this is also one that
if you practice this one, you will understand
how this idea, considering that the
light ray is coming from the left side and how you can create
these small pine trees. And if you have the
practice of doing this for, for some time, then whenever, because there are landscapes
where you see this kind of small distinct pine trees
in a lot of numbers. So if you don't have
the practice of it, it will take you forever
to create a painting. So if you just
practice this one, you will actually have good
practice with your hand. If you want. Please
do it more than once. Because more you practice
the better you get. Okay? So with that being said, let's start the process and just watch and paint along with me. Try this out once so that
at least you have this painted in your sketch
book on A4 paper, wherever you're doing,
you have it with you. Once. I'm done with
your own hands. And it is good to refer back whenever you are creating
a painting and it will help you break down the painting in
your head fairly easily. Once you know how to create different types of
snow boundaries.
25. COLOR MIXING + BLENDING EXERCISES: Hello and welcome. In this lesson, we are going
to learn three things. Before starting to paint any
of winter landscape scene. You will not need to
understand three basic things. Number one is actually blending. So how you blend the colors to create the snow
effect the sky. So basically in any
winter landscape, you will have the
ACLU basic elements, which is the sky and this node. And there can be a
lake or something, but that'll be part
of the ground, right? So sky and the ground. And then that is number one. So first you will learn
acrylic blending. Second, you will
learn the colors, the colors that will create a
beautiful winter landscape. So there are so many
different shades of blues and greens and purples that you will see now
in the landscape. And so the purpose of
this exercise is to understand the colors that you like painting with the most. After painting a lot
of winter landscapes, what I realized is for me, it comes down to
just three colors that I really enjoy painting. So those are the three
colors that I will show you. The purpose of this exercise is also to make you understand, do this exercise with
your choice of color so that you understand the
colors that you like. And the third thing
that we are going to learn in this exercise is how to create
the landscape form. We just get winter landscape. So there can be so many various wavy because there's less
snowfall on the land. So they're going to be so many different types of land forming that can
be distant land, that can be a frontline. So all those different types of combos that I'm going to teach
you through this exercise. So once you understand this, you can literally
create anything being just on your own
without any reference and just place objects
here and there and create your very own
winter landscape. Just to sum up the
three reasons why I am teaching you this exercise. Number one is going to be very helpful to understand
accurately blending. Number two, the
color combination. Number three, the
land formation. So these are the
three basic things that you are going to look. Okay, so here is
my A4 sketchbook. As you can see, I
have taped it down on all the four sides and I
have divided the people also into two so that I
get like three sections. So the three sections
are pretty long, but you might want to paint a vertical one.
That's totally fine. I just want you to use this length of the painting
doesn't really matter. What matters is the
color combination. So you can do this
color combination into a square form also our
indoor vertical format. So that's totally fine.
The reason I used a broader space for doing
these exercises so that I have more space to do the
blending and show you how we can mix the colors and create different winters gaps. Here are my colors. Here is a glass of water. That's all you need for
this practice lesson. First and foremost thing
I want you to do is watch this lesson with the colors
that I am teaching you. And then instead of practicing
exactly what I'm doing, you can practice
this same exercise with your choice of colors. So the colors that I have chosen for my winter landscape
is Prussian blue, viridian hue, and pink. These other just
three simple colors that I'm going to use to create oil differentiates of my winter landscape and of
course, black and white. I mean, how can you create a main thing without
these two colors? Right? Okay, so let's get started. I'll take out all the
paint on my plate and we will start our start with all the six color
blending exercise.
26. Exercise 1: Okay, So I have taken out white fresh in blue region
who and pink, I have not taken out the black
because in this exercise, we're not going to
paint the objects on top of this landscape. Here, my focus is mainly on creating the
background landscape. Teaching you how to
create the background, beautiful land formations
and the background of a winter landscape where black doesn't
necessarily always come. You can use a light touch
of black if you want to create kind of like
a grayish background, if that is what you want, you can definitely
pick out black. But the, the backgrounds
that I want to do for that, just colors and
white is important. And you can see I have
taken out a lot of thick body acrylics are
white because white is like the most important color for painting snow and
with the landscape. So we need a lot of white. Let's get started. So I am thinking I will start off with this page first thing, I will do these three pages. So in this page, first thing what I want to do is just work with one color, okay? Just one color. So say e.g. Prussian blue for this
color, for this one. And then I'm
thinking I will mix. The reason I've taken
out green is obviously you don't see much green
in winter landscape. The reason I've taken out green is because I want to teach you how you can create
a beautiful blue color, which is my favorite color. Now I know that that blue color may not be available
in all brands. Or it can shade is almost like the blue or
the blue kind of shade. But the reason I prefer green
is because when you mix these two shades and create
that beautiful shade of blue, you can vary the color shade depending on the proportion
of these two colors you use. And that gives you
more opportunities, more options to play
in your landscape, not just one color. So say e.g. you take out just
one color, pillow, blue, and we'll
mix it with white. You will only get shades
of blue, mothership. But when I mix these
two colors to create a tailor blue effect or
a turquoise blue effect, or a teal blue effect. I can vary the quantity of green that will be
more greenish blue. Or I can use more of blue and blue that will make
my shed more of a bluish. So I have our choice of that. And for the third one, I'm going to mix
Prussian blue and pink. Exactly the same
logic applies here. The reason I don't
use the violet is because when you take out purple or violet from your pain, you can just launch it. Whereas when I mix
these two shades, I can change the shade of the color depending
on what I want. I can make it even
just pink and white. Or I can make more of pink, less of blue, which makes
it more like violet. And I can take more of blue, lesser pain that makes
it more like purple, bluish purplish shade or it can be pinkish
purplish shade. So there's so many options that you get when you mix two colors to create a secondary color. So I hope that is clear. Now let's get started
with our first one. So in this first three pages, I'm going to do to these three colors
that I talked about, Prussian blue, just simple, Prussian blue, teal blue
color, violet shade. And for this tree, I don't
know what I'm going to do yet. So let me finish this
one first and I'll see what I want to do on this page are the colors
that have taken out, the pressure taken up
fluid acrylics rest. All of them are people yet,
doesn't really matter. You can take out whichever, whichever color that you have. Here is the Prussian blue. And starting with very dark. For retail landscape,
I don't like using so much of dark shades. I like to keep the
background absolutely light. So I am using a lot of light. Don't down though. Okay, here. There is one thing that
you need to learn is the brush stroke and the
blending that I'm using. So you see, I'm kind of going in what I've been told
duration time window. And I am also
feeding a gradation of kind of dark blue and
the dark to light blue. So this can be one
form of landscape. Oh, and I forgot to say that
the brush that I'm using, a size six brush. So I just want to make it
a little bit more dark. So I just wiped up as
my brush and a lot of white and just add a tiny touch of that Prussian
blue on this corner. Okay, that's done. I'm just wiping off my brush and not wait to watch
it a lot. Okay? Then what we are going to do is this is how you create
a with the landscape. What you do is you just bring it down with white mixed with
the Prussian blue color. So don't worry about anything. Just been in, bring the
gradation from top to down with this bluish white. So you see the
white is, no matter how much white and picking up the color is kind of like light pressure and that
is the color we want. Okay. So my entire background
mixing is done. You can see the brush
strokes here and there. Like kind of beautiful
brushstrokes created. Now for this guy, if I wanted
to create some clouds, you can go ahead and add a
little patches of light. This is kind of like
blue mixed with white. It's not really pure white. And the background is wage, so it is going to blend in. Okay, so that's all
about our background. I just feel that I want
to add a little bit more of dark blue on the top. It's just too late. Just one on one corner.
Otherwise my painting might look very flat. I just wanted to have a good
contrast in the landscape, so just making one
corner dark will do it. Okay? Now, the next step
is letting it dry. So I will leave the
complete background dry, and meanwhile, I will
also wash off my brush. So the whole background is dry. Now you see how we create a lag. So now I wash off my brush
and I picked up a light. And you just go in-between
and just create a land. That's a good snow land. And now all we have
to do is just blended down with a light blue color that we have as the background. Just gently drag it down. Very gently. I'm not pushing too hard
because if you push out it will stay lot of white. Okay? So just gently blending it into the
black background. Now, if you like, creating textures like me, what you can do is really
thick layer of white on top of it and add a good
amount of snow. So now we will leave
it at that, that is, our first landscape
is as easy as that. Now I have a lot of white. I'm not washing your
job because I need this color for my next next one.
27. Exercise 2: So for the next one, I am using blue and viridian
hue mixed with white. So let me blend the
color on my plate and take lots of light,
more of view. And you'll see we created this very beautiful
steel blue shape. Now in this one, in the
first one we created this blending with more of
like presently strokes. But for the second one, I'm going to show
you a different kind of acrylic planning. Okay, So for this one, I think I will do the last one and then we will
come and do the middle one. Let me start. This one. I started from the top. Here. I'm starting from the center. And I am taking it up like this. And here's my strokes
are not like this. It's more like short strokes. And I'm pleading it like this. So now let me take up
some white and start from this corner and
bring it all the way here and blend it with this
dark color that we added. But look at my strokes,
look at my brushstrokes. I'm making some
small, small strokes. Kind of zigzag motion. Not exactly zigzag, but just
to make you understand, I'm kind of going in zigzag
motion to do this blending. See, like I said, I
can change the shade of blue that I'm creating here. So all I'm doing is
taking a little bit of Prussian blue more
and adding that. So you see, I got
a beautiful mix of teal blue and Prussian blue
in the same landscape. Now if I want to give a touch of Prussian blue here and
there, I can do that also. Everything in B,
those small strokes. So the blending looks
absolutely different. Busy, very light handed. My I do not have
too much appreciate I'm not applying
pressure. Add on. Just going very likely. Okay. I have a lot of
Prussian blue in my brush, so all I'm doing
is wiping it off. Taking that same blue color
again and just cleaning it. You see I'm just
adding tiny touch of green in some places. You see how beautifully
blending is happening here. This corner is mostly white, so we don't want to add too much of the same concept applies. We will bring it down all
the way to the bottom. So this same color, same color, we will apply
all the way to the bottom. So for that, I will not
use a lot of color, but just more awful
white to bring it out. Whatever little palette
I have, my brush. You see, so the whole
background is almost filled up, just adding a tiny bit more of way and afford the brushstroke. I'm kind of moving
my brush in sulcus. Right? Now. I am going to, now we will
create this new plot, right? So for that, I am
washing off my brush, getting rid of all
the excess blues and greens from my brush. And I will pick up
quite a bit of light. Okay, Let's start with his wife. Okay? And let's create
one land like this. And let's create one land a
little distinct like this. Okay, and now all
we have to do is blended down with
the background. This is a distinct line and
this is a foreground lens. So since this is the foreground, we will add more white in
this one and bring it down. Very gentle strokes and
blending it with tobacco. This is another land
formation where you're doing one land in a distance and
one land in the front. Okay. I was just
dry this part and add just a little
bit more of white, but maybe I will do it later. I just want to darken the
background just a little bit. So for that, I'm just
using this data sheet once again and adding just
a little dark shade on the background here. And also create some textures. It's a very kind of
like foggy background kind of thinking that
we are trained to help this land is kind of getting blended into
the foggy background. So that's done. And on this corner
also to leave, it just adds a
little bit of dark and blended with the white. Okay? So now you just tweak it. You understand the concept now. So now you just tweak
it and see how, what do you, you like. Okay. So I think I liked
the land like this. I did add a little bit of this greenish
background to this. You continue to learn just by adding the background
or the lack of color, whichever is required
in that part. So this is very nicely done. It just makes it a little
bit with the smoke. Okay, I think that's beautiful. Now, all I want
to do is just add a huge thick layer of white
like we did on this one. So for that, I need to
make it dry completely. And then also I'm just washing
off my brush completely clean and taking
good layer of white. Deem a good amount of white and blending it into
this bluish green background. Give it the shape that you want. I'm just changing the shape
of my land here a little bit. But that's how we did the one
with the teal bluish shade. I absolutely loved that
these white little bit mixed up with the new
in the background. And the color is getting
totally loving it. So this small, small
things that makes you happy will make your
landscape happy has failed. So just play around. I'm just trying to give you
an overall concept that you can use to create
any winter landscape. Alright, so we are done
with the two colors. Now, let's play with the
purple shade little bit, okay.
28. Exercise 3: Now for the purple shading, I am mixing light, Tiny veto, Russian
blue, and tiny veto. Think. Okay, maybe just a
little bit more pink. Just defining the shield. I like, I think this
sheet is quite good. And let's take lots of
white, more of pink. Okay, That's a pretty shade. Okay, now let's start painting
our follicle background. You see there's a tiny touch of Russian blue also coming up, which is so pretty light, which is adding to
our color shade. So that's it for the top. And now all I'm going to do is get rid of the
excess paint from my brush and pick up lots of
white and blended into it. So for this one again, I'm kind of doing long strokes, not this short strokes. And leave the gate with the dark purple
color that I have. This one again,
we're going to do a little differently so
that I want to give you different aspects of
doing different landscapes. So in these two, we added the snow in the
front with a lot of white. But see, look at this one. What I wouldn't do. We do this a little differently. I'm just mixing a
little bit more of the violet color and just
adding a lot of Jewish. Okay, so here is my buffer. Move the brush strokes the
way it feels comfortable. There is no particular
way that I'm doing it. Okay. Now, all I'm doing is getting rid of this maximum amount of paint and adding a bit too much of white
in the background. And you can clearly see
my brushstrokes are very visible in the background. And I am going to not wash, but wipe off my brush even more and add a good amount of
white in the background. So you see the difference here. We are adding lots of
white into the background. Not as a land in front. And now we will take it up and
blend it with the bedroom. And to maybe I just wanted
to add more of light at the bottom so that the
background is almost whitish. Maybe pretty light. Kind of Pope was shaped and
blending it in with tobacco. Okay, so that's done. Lots of white. Now this way
can be reattached to later. But for the time being, what we're going to
do is get back to the dark color that
we created at first. And we will create
a land in front. Okay, so that is the difference. Elc. Now create the land the way you want that just
giving you a shape like this. See, I did not wait
for the background to dry and I'm going to leave
immediately on top of it. That's because I, you see the widest kind of blending with this background
that we're creating. And I like that. Okay, Now we'll go all
the way to the bottom and just completely
fill up this area. I'm not taking any more paint. Just using whatever
color I have on my brush here because this has become too light
because of the white. Great. So my entire big background is done. Now again, I just
wipe off my brush and just take little
bit of white. Just to add a little
white in the land here. Not very prominent, kind of like blending it
with the white here. That is why I left
it where it happens automatically so that I
didn't have to do the job. It just happened because
there was a lot of way. And also I'm going
to create one more, another short layer of land. Absolutely. So see you can
create 23 layers of lens. We do landscape and
make it look pretty. So. I like this
land in the front. This is like proper snowy land. Kind of three layer. Let's get these two are
this is like one layer. This is kind of like 1.5 layer. And this one has like
good two layers of land. Okay, so you'll
understand how it's looking nicely when
I take off the tape. But, you know, understand
the concept question. We are done with the first
page of the landscape.
29. Exercise 4: Now what I'm going to do on
this side is I'm thinking that I will teach you three more different
land formation, but the DC-3 that you learned is actually
good enough for you to create any kind of fall
landscape that you want to do. But lets us explore a few more options and try
doing it in different ways. And for this, what I'm
gonna do is I'm going to mix these colors. Okay, so maybe Prussian
blue and teal blue in one, Prussian blue and violet in one. Blue and violet in one,
something like that. I mean, not exactly like that. But I'm just giving you
an idea that you can mix and match these colors
also to do this, so say e.g. these are not the
colors of your choice. You'll want to do with
a cobalt blue maybe, or maybe you want to do
with ultramarine blue. Maybe you want to do
with green background, whatever colors that you
have tried on this now, chyme mixing them and create landscape which
has good options. So these are more
like only one color, even though we created
it mixing two colors, but it is ultimately one color that is prominent
in the landscape. Now here I think I want
to have a mix of both. Okay, so for the first
one on this side, I think I'm gonna go with steel blue and Prussian
blue mix because these two are my most favorite color for painting winter landscape. But there's going to
be a very subtle mix of Prussian blue and blue. You see when you're
creating the loo, you already have a shade
of Prussian blue with it. So it's not going to
be very different, but it's going to be a little different from the
way we did here. So let's start. So I am mixing these two colors to create
a pretty deep blue shade. Here. We kind of kept it dark
on the top, but sure. I think I want to make it make the landfills so
kind of like like this. And now I'm going to mix it up and make it white on the
top, completely white, okay. And then I will add some
Prussian blue in the bottom. Let's see. I'm just
experimenting with it as I see any POC, that shade of blue
here in this one is more towards the green side, which is with you something new. I think by accidentally I ended up using
little bit more green, which is totally fine. We don't have a
problem with that. Okay, mode of white on the top. Okay, So it's done. Now, what I'm going to do is just add tiny bit
of Prussian blue on this bot blended in
with the background. You see how I'm blending
these two colors. Kind of weight now, right? So it's easy for me
to blend right now. Leader, it might be
a little difficult. And follow the stroke thoughts. I'm thinking small, small strokes and blend it
with the background. Look at the way I'm blending. Instead of using the
tip of my brush, I am making it to
lie on my canvas and kind of going in
London no direction. Leaving it with the background. So what's happening is it's
not creating a very bold mix, and it's mixing the software
interface absolutely. And also creating some
beautiful textures. Now with the same concept and
taking little bit of white, just adding on the
top a little bit, bringing it down in some places. Okay, now I'm going
to wipe off my brush because it already has
a lot of deep blue, so the white is not
very prominent. So now I want to add some
more of light from the top. Okay, I think that's pretty
good background you see the strokes that I used in blending and they
are looking pretty good. Now I'm going to
wash off my brush. Okay. Washed and cleaned it off. And now we will start
with a lot of white. And let's create a
white land here. Okay, Now, let's fill it in. Okay, That is little
bit of teal blue shade coming which was not
cleaned properly. So that's okay. It's not going to make
a lot of difference. But my focus is on heavy, mostly white in this block. So you see we got a very okay. You see the tubule is coming
and coloring my land level. I don't mind. Let's okay. But it's mostly white, right? Okay. Now I'm going to take tiny
bit of Prussian blue. So this was more of
teal blue on the top, even though we add a tiny
bit of Prussian blue. But here now I'm going
to add little bit of Prussian blue. The land. That's a lot. We don't want so much, so I just do add some
more white to it. And I'm also adding a good
amount of white to this. And a lot of Hawaii. Again. I'm adding some shading to the white here with depression. And I'm pretty happy with
how this turned out. You can see the bend of the
flow of the land though. The landscape very
beautifully in this. Okay.
30. Exercise 5: Now, in this one, I'm
thinking of doing a deal, blue violet mix. How about that? Okay. So let's get to that. Okay, So I don't
know how to wash my brush because it
has a lot of white. I am directly starting
off with the top. Okay, this has a little
bit of flashing blue. That's okay. And this background, I
want to keep it more nice. Okay, So you see I did not
have to pick up any color. So all the colors that was remaining in my
brush is coming out. So I think I'll go with this. This is kind of mix of t
blue and a Prussian blue, which is coming
out from my brush without me doing anything. Which is great. And I'm just going to use
this teal blue that is coming out from my brush and
make this landscape. You see, look at the beautiful background
that we are creating here. Right now, most of the colors have come
out from my brush. So now when I'm taking white, it's kind of just white. So here is my land
already formed. Okay, let's make this
like this, like this. Okay? And while the light that I have, let me just mix it
with the background. See I'm placing my brush and the color is coming out from
the bottom of my bristle heal so much beauty of
acrylic painting her. Okay, Let me wash my brush. And what I want to do is the pulpal color that I had
to make speeches dried now. So I'll just mix a little bit. And that's color and
we'll add to this corner. Now that the land is done, I'm just going to go over
it and add some white. Make this look like
a nice no land. And we can also add a
layer from the distance. For this one, let
me use a little bit of whatever mix I have. Honestly doesn't matter,
so I'm just doing that. And of course, whatever I add, always I have to blend it
with my background, right? So see how beautiful color
will be formed without actually using much of paint with whatever leftover
paint I had in my brush. This exercise, basically the point
of this exercise, when you're doing this, you accidentally
discover some landscape like this one quite
accidentally just happened. The color combination, right? Because of the color's
lived in the brush. So that way you understand
one color combination that you like and then you
can use it in your painting. So here also we did like two landscapes to do
layers of plants. One in the distance here, and one in the front heel? No, just adding my
finishing touches to make it look pretty
the way I like it. I think that's fine. It's quite different. It's very light. I don't know if I like
this license so much, so I think I just want
to add little bit more about this and add shadow to this. Okay, I think now I like it. This landscape we
evolve much more once we add some
objects to them.
31. Exercise 6: Now let's make the last
one of the experiments. This is how it's looking, although five of them. Okay. Now for the last one, I don't know what I want to do. Let me just go with the flow and see what we
do. What can I do? I have on my brush right now, let's make this a little bit
of blue mixed with white. Okay, I think I had
some purple before and I ended up having
different color, which is more like teal blue, but it also had a
little bit of purple to it. That's okay. And in this short
stroke kind of texture, I actually love this
picture rather than, you know, this long strokes. I mean, not that. I don't like that, but I think I preferred
this one over that. Okay, this is done. Now. I think what I want
to do is add more white and I want to blend
it with some force. Okay, so let's see,
do I have purple? Maybe I'm just
create little bit. And I think I'm
still in the sky. When we blend this with this
new color that I did before. Okay, I want more of thinking
this happens at Okay. Don't have any
space for my land. It's this guy is coming
down quite a bit, but I'm loving the
color combination of the teal and the poeple. Do you see that blue and purple can create such
a pretty pollination. And I have kind of like little whitish portion in the front. And I totally love it. Okay. Now, let's create a land. What color land I
haven't created yet? Maybe, you know,
Prussian blue and white. Okay, I will wash off my brush. I haven't washed
my brush in a way. Okay, and now let's
create a land. What shape of land
we want to create? What shape that I
haven't created yet. Okay. Something which is
elevated on both the side and not so elevated
in the center. So something like
something like this. Then I need to just pay displays a little bit more because
otherwise it could be empty. So I'm just adding
a little bit of purple to it. Okay? So this is done. Now, I will add more white on the size. Displays up. And now let's just add a tiny touch
of Prussian blue to it. You see the variety of
things that you can do once you understand this concept that I
am trying to do here. Just a little touch
of just having such a good playtime with this
as I'm teaching you this. Because I'm also discovering so many things in the process. Here the strokes I am taking
are kind of like this. Short strokes while
also trying to create some points and the
line direction. Okay, I'm going
to leave it here. Take a little bit more of
Prussian blue with the tip of my flat brush and do the
same thing from the side. Not too light, not too dark. Just to touch on both the sides. And this is quite dark, I think on one of the corners, maybe this corner I'll
just add a little bit to more of Prussian blue color, which is not absolutely
dark, Prussian blue, which is when we want
to keep it light. And some more of
weight on this corner.
32. Final words on color blending exercises: K and we finished all
the six landscapes. Let's have a look at them. Let's have a look at all
the six clearly now. So we learned quite a bit
of things in this lesson. I hope you understand the thing that I'm trying
to teach you here. It's not about creating
a pretty landscape. It's about understanding the science behind
these landscapes. The way you can mix, mix, and match
these three things. Color combination, land, land formation,
and brushstrokes. You can mix and match
these things and create anything out of this, these three things, Okay? Okay, so now let us fill up the tape and see how pretty
or how ugly it's looking. I hope it's not looking ugly. But right now it's very messy. I can't see what is happening. One thing I forgot to tell you, and I think I
should mention this because this is a question
that I get a lot. How am I feeling of
my tape so easily and it's not tearing off any of the papers because
it generally does. Can you see this black
thing in my tape? So what I have done is I
am wearing gray t-shirt. So all I have done is
before placing the tape, I have applied it on my t-shirt quite like at least
three to four times. So all this bubbling from
the t-shirt that gets onto the team and then
I have placed it. So that is why I am able to
peel off the tape so easily. Okay, So this is
just a cool trick. If you also face this problem, you can try and not
just once or twice, do it many, many times so that most of the
adhesive tape is gone. So that is the autofocus
not having at all any adhesive just good enough
to stay on the paper. That is why these
things have happened because there was not
too much of additives, so a little bit of color
spill from the side. Wow. What do you think? I am totally in love with how this pretty
landscapes are looking? Okay? Now one of the important
thing that you probably are wondering
right now, okay, fine. We understand the science of
creating winter landscape. We understand all
the permutation combinations we can make, but how do we make it
a pretty landscape? Now, this is your main question. So what you can do now here is in all these
pretty landscapes, all you have to do is create small pine trees
with a round brush. So refer to the tutorial where I talked to so
many different types of pine trees that you can
create with a round brush. You can do those, say e.g. this is a distant land here. You can easily create some small misty
pine trees layer of it on the distance over here. Then, say e.g. in this slide, you can create
a big tree in the front, or using any of the
brushes that you like, fan brush or a filbert brush
or a flat brush, right? So refer to those tutorials. If you haven't referred to those tutorials where you will get an understanding
of how to do this. Those you can also
create mountains, right? You can so e.g. in any of the landscape
wherever you like, you can create
distinct mountains, blend it with the background, and then create my
interests in practice. You can also create a lake. See e.g. you can create a lake like this
coming from here, from the distant land. Okay? You can create some
pine trees over here, coming from the front,
like this, right? For this one, you can create some pine trees
coming from cure, maybe couple of from the front. So I tried to give
you some ideas. Maybe few misty pine
trees over here. One from cure or two from
your, one from the front. In this one you can create some, something, something
in the background. So the few elements of
winter landscape is fine. Then you can create some
of the birch trees. Also. You can fit some mountains. So these are the three
things that easily you can mix and match and create anything, any
beautiful landscape. Now what am I going
to do with this? Maybe I will love. I haven't decided yet what
I want to do in this one, but maybe I will do something later and shared it with you. I hope you enjoyed this lesson. This lesson is a really helpful if you want to understand how to create
winter landscapes. I do not want you to
skip this. You like. I highly recommend that you practice this exercise
with your choice of color. You don't have to do it
with my choice of color. But I do it with your
choice of color with more than meat mixed and matched to three colors
in one of the landscapes. Try creating different
types of landforms though. Top to bottom. Or maybe like this. Like this, you can create so many different
land formations. You can create so many
different brushstrokes. You learnt so many
brushstrokes than this one. So this was more like kind
of curvy, long strokes. This was also very long strokes. Flat, kind of blended properly. This was more a small strokes and using the side
of the bristles. So I kind of laid down
the Brazil on the paper. This is more of the
short stroke with a tip, the tip of the brush. This was kind of going
round and round motion. These strokes. This is kind of a
blend of everything. So the mean brushstrokes that I think is important
is one is long stroke, where you can either make the brushstrokes visible
or blended smoothly. One is a short stroke, and the third one is going in
a down round motion round. We are blending.
So please practice this exercise and
show me what you did. I hope you gained much
knowledge from this video. And once you do this, you will be able to pain to any retail landscape
without any reference.
33. DAYLIGHT SNOWFALL PAINTING: Okay, so we have covered
quite a lot, right? So I hope you're practiced
everything by now. Spatially, these
four different types of trees with four
different types of brushes, and the small ones with
small round brush. If you haven't,
please practice them before starting the
paintings in this section. And also the exercise
that I taught you. Because if you have done this, it is going to be very
easy for you to create the paintings that I'm going to teach you in this section. So before we start, I just wanted to show you and tell you a couple of things. Here are the two paintings that we are going to create
in this section. Look at them how
pretty they look. Okay, so now what I
wanted to show you is that the tree that I have
painted here is the one, the filbert brush,
which is this one. And I have used a
Buddha techniques. So little bit of this kind of strokes and little
bit of dragging strokes, both of them I have used
in this one because I don't think consciously
when I'm doing this, I just feel like doing
whatever is coming out of the out of my
brush at that point. And that happens only because I have practice them
a lot of time. Now one important
thing that I want to tell you is that
you don't have to do the filbert brush one if you don't feel comfortable
after practicing it. So instead of the filbert brush, so exactly in this
same landscape, you can either do a flat
brush one or a fan brush one, whichever you feel comfortable. If you feel comfortable with the flat brush when you
can definitely do that. Okay? And in this night painting, I have used a flat
brush. This one. Okay. So that exact one I have
done to it and even with a small distinct
pine trees also, I have done the one with a
flat brush and few of them with the small brush,
especially this one. It just kind of lines like this. And also in the
day painting also, I have done some of these distant trees which are almost like this one like this, this group of trees over here. Okay, so now that
I've explained to you the techniques
that I have used, and you can end the reason I haven't used the pen brush and because honestly I'm not very comfortable painting
with a fan brush, but I'm sure I can do it. I just not try. But I want to tell
you that, you know, if you feel comfortable
with a fan brush, please paint one with
a, with a fan brush. Or if you want to practice more, what you can do is create the same background and create
three different paintings. We do three different types of pine trees instead
of these two. Okay. Now, before starting to
paint these paintings, I also wanted to show you
all the practice that I did just to encourage you how much important
practicing is. So here is my rough journal. This is an A4 journal that
I use for practicing. And look at all that. These are the ones
that I showed you also when doing the
each of the brushes. So there is a lot I have practiced just to
make sure that, you know, I I I get it right because practicing
once isn't an hour. So I have practiced quite a bit. As you can see, hear, and feel more in my
A5 journal also. I wanted to just see how
it looks on a background, what how it looks
on a plain white. And I just kept practicing. You can see how ugly this looks. And obviously I haven't
put in too much of effort into doing this. I just want you to
practice and see, try out with different strokes. You can see I've tried so many different types of strokes. So why you're practicing
multiple times? You can also experiment
because once you get the basic six steps, that's why I focus so much on the basic six days
because once you understand that you can do
anything with any brush, any strokes, anything
that you like. Just keep on practicing,
keep on experimenting. And that's all I've
done that I feel that's quite a lot of practice that I did before shooting this class. And also just to get my
hands more easily to paint. Us know, pine tree. Because I was looking at my paintings
from couple of years back. And the way I used to
paint us know, binaries, I could not believe
how much I have progress just by practising. So I just wanted to encourage
you to practice more. Because I know the tendency
is always to create a pretty painting first
without practicing exercises. So I just wanted
to show you how I did so that you also feel
inspired and do it on your own. Okay, so now let's start
creating these two paintings. One day and one night painting.
34. Step 1 - Sky: Okay, so let's get started
with the first painting. Okay, so here is my eight
by 8 " acrylic paper. So this was an A4 paper. I have just cut it
down to eight by 8 ". And I stuck it on top of a
canvas, stretched canvas. And I have taped it on the site. The reason I have done this is because if I tape
it to the table, I wouldn't be able to lift it up while showing you some of the
brushstrokes if required, then my hand will come on top and the view will be
blocked from the camera. And that's why I have done this. You don't have to do this. This is just for the teaching
purpose that I'm doing it. But if you're painting, you can actually do it on stretch canvas
directly like this. Or you can paint it
on a sketchbook. Or you get painted
on an acrylic paper. You can cut it into square, or you can do it in
a landscape form, or it can do it in
a portrait form. Anything you like. Now here is my plate of colors. This is the same plate
from the previous video, and I have all these
other colors also here, but we don't need all these
colors for this painting. For this painting we
need just three colors. Only three colors, black, white, and Prussian blue. So I already have
Prussian blue and white. I'm only going to
take out some black. And the tree that I
want to show you first is this one from the
filbert brush that we did. So we're going do this one. I used a big filbert brush
because the size was A4. So this is a pretty big,
I don't want to create that big brush snow pine
tree on this canvas. So I want to do
probably like this big. And so for that reason, I'm using a smaller size, bigger brush, which
is from the same set. So that is why it's good
to buy brushes in sets so that you have different sizes and you can use it
on different size. Okay. So this is
the filbert brush. I think this is the sizes. I'm not able to
view it properly, but this is just one size
smaller than the previous one. And then this is the same size flat brush that I'll use to cover the
background of the painting. And I am using a small liner
brush to create some of the mystifying the small pine
trees in the background. Okay, so just three brushes, three colors, and your Canvas, That's all you need
for this painting. And of course, a glass of water and some tissue
paper's very important. Alright, so I am starting
off with the background. And for the background,
I'm going to do just a Prussian blue and white. Okay? So I don't want to take the dielectric Prussian
blue because it's very, very dark as you know, it's a very highly pigmented color. I mixed the Prussian blue
with just a little bit of white so that
it's still dark, but not as dark as
it's pure pigment is. Okay. And the strokes that I'm using are kind of long strokes. They are not very short strokes. Lots of beamed to
create picked picture. Okay, I think that's good. Now I will start taking
more of a white. One important thing
that I want to tell you is that for painting
winter landscape, I always prefer
peak body acrylics because of the
pictures that you get. I absolutely loved the
textures that you get. Okay. Okay, actually we
will come down. And let's say this
is our distant land. Very simple landscape formation that we learned in
the previous video. Okay. And now we've been just
blend it with the top. Dark Prussian blue. Here you can create some of the cloud-like show with
little bit of white. If you feel I'm going
too fast for you, you can just watch it once and then watch it maybe couple
of times and then do it. Okay, So I'm just
trying to create a beautiful sky with
clouds floating because it's a DC. More. By tier. You see when you
pick up two colors, they automatically mix
and create a shape that you cannot decide in advance what shape they
are going to give you. But they always end up
giving you a British yet. So that's why rather than mixing one solid
color on your plate, I always like to create by
mixing two shades on my plate. Okay, So these are
some floating clouds. Good sky. Do I want to
add just a little bit of that Prussian blue on
the top to blend it in. And let see, I do not want a really dark
background because then my pine tree will
struggle to show stopper. I want my snow my entry to be the snows showstopper
of this snow stopper. Oh, that's a nice word. I discovered snow
stopwords of our building, yours, so I don't want
to make it too dark. So that is good. So I just took some long
strokes, like curvy strokes. This is the one that we
did in the previous video. The top right, that
same stroke. Okay.
35. Step 2 - Snow land: Now let me create the land. For creating the land, I'm using just a little darker. And I'm giving you
leave like this. I'm taking just a tiny touch of water because it's very dry. I don't want the smooth
background, definitely, but just having little
water just helps me move the color nicely. Okay, and now we're going to
add just a lot of white in the ground because we want
to create a lot of snow. So honestly there is no
definite stroke here. My focus is just on covering
the entire background. Covered up my Internet
acrylic people. See I am going to
add some more snow after doing the pine tree
depending on where it comes, where the base of it comes. Based on that, I will
create some more land Leto. This is just for the time being to cover the whole background. I'm just using a lighter color, lighter Prussian blue shade. And my wife is almost gone. But whatever it is there, I'm just adding little touch
ups on the background. And then later I'm going to add a mortal fit below
the pine tree. Alright, so the
background is painted. Okay, so the job of our
flat brush is done. Now I'm going to let this dry completely and then I will add the misty pine trees in the
background before adding the main trees in
the foreground. So we will let it dry now.
36. Step 3 - Distant pine trees: Okay, So we are done
with our flat brush, so I don't need the
fat brush anymore, so I just wash it and keep it aside and switch to
my small round brush. This is size three. And for creating them
distinct pine trees, I am going to use this color, Prussian blue, white,
and tiny bit of black. So the three colors
that we mixed, our Prussian blue, black, and white, maybe just a more Prussian blue because
we don't want to make it look like gray. We rather want to make
it look like blue, light blue, but with
a touch of black. And I kind of twist my brush
like this to get rid of the excess paint and mixing it with white with some water. Because more liquid
my brushes better, I will be able to being
the snow biometrics. So just trying to get
I have a lot of water, so I just get rid of that. So I hope you'll
practice creating this small Brian g is by now. And if you have, you will be able to
do it as fast as I am doing this when I had added
a bit too much water. I'm also changing the height of the binaries to
make it look nice. Also, you see that I'm changing the shades of the
trees in all of them. None of the trees are
absolutely the same shade. That's because every time
I'm picking the color, I'm just mixing all the colors. And that is giving me
some differentiate. It's not like, you know,
absolutely similar shape. Maybe I'll create
a few dark also. But since these are
distinct pine trees is better to do
them kind of light. Kind of like pine tree
forest in a distance rate. And one trick that I
want to teach you here is that when you're
creating a distinct forest, you create some
of them like this individually and some of
them in the distance. You can just create some
lines like this and it gives the illusion of forest. There are a lot of pine
trees in the background. This is just a cool trick
that I realized many, many years back when I started painting this winter landscapes. And hey, think it's
a fabulous idea. Okay? So you see that it just looks like there's so many
trees in the background. There are other layers
in the background. I'm not going in
the center a lot because my main trees
are going to come here, um, and on this side, on the right side also, I'm going to just
create a few to give the illusion of a pine
tree forest in the back. Not very prominent at all. Hi, I'm reducing the
height also as I am moving towards the same toe. So I think that's all I
don't want to do anymore. Maybe the one on the
side, I've been in, the height, play around with it. There is no hard and fast rule. You can just do whatever
you want to do. Pine tree. And all I do is just add a little bit of
shadow of these trees. Like this may be subtle. It's not going to
be that visible. Just a little bit of shadow. And I'll also add some
snow in-between on this distant land before
moving on to the from trees. Snow stoppers. That's done. So my round brush
work is also done. And again, I'll let
it dry and then we will come to that
main center trees.
37. Step 4 - Big pine trees: All right, Here is
my filbert brush. I have also keep this paper right next to me so
that I can refer to it. You can also do the same
it will help you create, if you've already done this, is Cupid and x2, y2. It will help you create or you
can just refer to my blog. I have this image on my blog. So you can just refer
to that as well. Okay, So I am waiting my
brush little bit and I'll start off with lag and
Prussian blue mix. This beautiful color. Okay. I'm starting off. Megan, start off with the
one on the right first. Okay. Let's take
this a bit higher and I don't want to
take chances with it. I think I should do it
with a small round brush, but I am feeling adventurous and there is no
harm in trying out. Being bold and trying out. Yeah. I don't like the tip too much, but I will fix it later
with all round brush. Remember, our first step is creating the skeleton of the CI, and that is what I'm
focusing on doing here. The age of the brush. I am able to create
these lines on the side. Doesn't really matter much. So in the center I can use the complete belly of the brush. And on the side, I can use this. Okay, main structure is done. Now let me do it
the way I like it. I will probably increase a little bit tomorrow
on the sides. This I can do in the
later stage also, but I'm just doing it now. Okay. That's pretty good. Now, I don't want
any more black, but before washing
off the black, what I'm going to do is do the entire structure for the
left one left tree as well. And meanwhile, what
will happen is this color will
also dry a little bit so that I can come on top of it and at
the highlight colors. Okay, so I had missed my
black and blue again. And let's make this a
little distinct one. So I'll make the
size a little shot. Maybe I'll bring this down
a little bit, little down. So to just to make it
look a little different, but I can do all those adjustments
when I paint the snow. Alright, so the two basic
structures of the tree. Now I'm washing off my brush. Even if it is not absolutely
killing, it's totally fine. Because I'm going to mix
this color with white. So that will be our first layer. So this layer, I want to
make it a little dark. And also at the same time, while creating this layer, I'm going to create some of
the textures of the tree. So mostly you see
these branches, each of the foliage
branches that are done. I'm trying to go on top of them. So if this is one
of the foliage, I'm going on the top. So my focus is on
going on the job of each of these and
creating a texture. The top, I'm going to deal
with a little detail. But for the time being, Let's do this step. And in the middle, I am also taking a
few short strokes. You remember how we learn
to create this paint? This tree is better
if you do it once, it will, absolutely
make it easy for you to understand what I am doing if you
haven't done it yet. All I'm doing is taking some short strokes On top of
that dark color that we had. And you see how beautiful
layer of highlight we created. And I'm adding a few of
the strokes in the center. Okay, same thing continues
on this tree also. Let's see the tip of
the filbert brush create such one's textures, which is so good for creating
our snow pine trees. Okay, I feel a little
black to be added here because a lot of gap here. So you know how to
do color correction. If that is, you have added
a bit too much of y h, you can always go back
and add some black liter. Knowing it is useful
because you don't know, no matter what
mistakes you make, you can always go
back and correct it. Okay, So one layer of
highlight is done at, i'm, I think the trees
have started to look pretty
three-dimensional already. Now, I will not
wash off my brush. Rather I will mix of
white and Prussian blue, kind of like fresh snow color, the morning delight,
fresh snow color. With that color, I
will go on top of it. Very light brushstrokes. And also very less compared
to the previous layer. What we did. This color is almost same
as the color of the sky. So make sure not to do too
much that blends with the sky. So here you see I'm adding all the strokes
mostly on the black. And I'm not trying not to
go too much into the sky. And I'm adding just the tip
of the filbert brush here and there to add sound beauty. At some pictures
also in the process. Just the tip of the brush. Okay, same thing. Let's repeat on this one. Stick to the center
of the black, mostly so that this color is visible and doesn't blend
with the background. Okay. Three days of colors
have been done, and now it's time to
add absolutely bright, no color on top of this. So for that, I'm washing
off my brush, clean it off. And now we will go
with just white. And starting from the top. Okay, you don't have to do this. You can do it with a
small round brush. I'm just being courageous
and doing this. Okay? And just with
the tip of the brush, I'm just adding some no
textures on the site. This is my favorite
parts of this painting. So I'm happily do it and hold it up so that my
hand doesn't block your view. Just one stroke on my canvas is creating a beautiful
picture of the foliage. And in-between these textures, I can also do a few
jags like this, small strokes and create some some of the
lungs trucks also. So if you understand what's happening
here is I'm actually combining the two methods that I created with in the
filbert brush techniques. So there are two trees
I created right? The first one I created
mostly this picture. And for the second
one, this section, the structure of the T is
that of the second tree, but I am using the textures
of the first G as well here. You don't understand, okay,
let me show it to you. So I created this people, does it feel but
brush around extras. Here. I did the dragging. I'm combining both
in this method, in this painting and
trying to create whatever. I feel like there is
no hard and fast rule. That is my b d. I can do
whatever I like to do. So I'm just creating a few
dabs of the secondary, especially in the center. And on the edges. Again, I'm going back to this sectioning. Such a fun thing to do, right? I hope you are able to do it. I know it looks complicated, but once you understand
the techniques, It's really, really easy. I hope you understand if
you're doing along with me, you know how easy it is. And if you have
done the practice, of course more than once, if you don't practice, you cannot expect yourself to come up with a
great tree because it's all in the practice. More you practice, the
better your trees become. Snowfall in the
daytime feels so good. I mean, as I'm painting this, I'm remembering my
snowfall days in London, walking around in the snow, watching the pine
trees on my car. I mean, snow snow pine trees or snowfall has his jump
in the night as well. But the d is even more beautiful when you see
blue and white everywhere. The whole thing is done. I'll just add a few of the
white snow on the top, especially on the top
of those branches where the snow would have
fallen a bit more in some places and just adding and we will be adding some snowfall
on top of this hill. All the places where there
is not too much of white, it will be filled up by that. Okay, so I'm leaving it at that. I can continue this for
much, much longer time. But for the sake of this video, I think this is looking good. Overdoing, it can spoil it. Also, you know that
from the backtest.
38. Step 5 - Tree shadows: Okay, now what I'm
going to do is just add some shadow off this pine tree and put that I'm using this PR, Prussian blue color. And adding this. Sure. See how pretty it looks
once you add the shadow. Okay, I'll add some
more white here, is to blend it into
the background. So this is why I did not add too much of snow
when I was painting the background because I told you after the tree
has been added, it will be eventually, we will do it nicely. So it's almost like the sun
is coming somewhere from the backyard and the
light is falling. And that's what is creating
this shadow layer of white. And you see this light blue
background is creating, helping me create the
snow even better. If that was not there in the white wouldn't have looked so much promising and not too much. I think I can stop here. Very difficult to
stop. By the way. I love the beach of
white snow on this side, it's very prominent to white. Now, I have a lot of
white in my brush. And I'm going to do the
final step which is adding snowfall on
top of this painting. Before doing that, I
just want to paint the tip of my brush
really nicely. So I'm taking this
dark blue color that I had prepared before. It is almost dried, so I'm just mixing it again and it's too watery, so it just makes more color. And I am just adding the two. And adding some voltages
on the side over here. Adding some blacks as a shadow
underneath this, wherever. I feel it's too white. And that's it.
39. Step 6 - Snowfall: And now the absolutely final step of the painting,
we're almost there. So for doing the snow drops, I want to show you
how I do this. So I'm mixing a lot
of white with water. So the water is very important
step of doing this step. I'm adding lots of
white with water. You can use another
brush and just dab it on top to create some of the snowflakes
falling on your lens. Make sure they fall a
lot more on the tree. And it's good if some of the jobs are big
and some are small. I don't want to do too much. I want to show you
how I do it later. After this. I want to take some more of this and just add, see, most of these jobs that are falling our kind of
perfect circles. But we don't want to
keep it perfect circles, rather we want to make
it some random shape. So I'm picking some of these dots and changing
the shape of it. And also one thing I
feel if you don't, if you leave them
as perfect circles, they look more like stars
rather than so forth. So of course it's a daytime, so there are no
stars in the sky. But we want to make us no false. And for that, we are
changing the shapes. Okay, So the painting
is complete and it led me now on the canvas. And let's find out how it looks. So here is our final painting, and I think it's
looking cautious. I'm just not too happy with the strokes of the snow
here, but that's just me. I'm sure you would come up
with something that you like. I just want to add a little
up to this final thing. So watch it if you want
to insist is asked me, Okay, You don't have to do this. I just feel I want to add
a little bit of shadow, the Prussian blue
shadow over here. I think I'm okay with the snow. I don't want to add too much of snow over your textures
are looking good. Look at them up close. I think shows I'm
looking beautiful. So I hope you enjoyed painting this painting
along with me. Let me know how it
turned out for you. If you enjoy it. And I would love to see what you create it.
40. WINTER MOONLIT NIGHT PAINTING | Step 1 - Sky: Okay, so I hope you enjoyed
painting the previous one, which was a deep painting. And now we're going
to create a night painting with a lot
of snowy pine trees. This is the same acrylic paper, eight by 8 " that I have
fixed on a stretched canvas. Here is my plate. This is the same plate from
the previous painting. And I wanted to show you that my pins are all pretty wet
steel. As you can see. I'm painting after
almost three to 4 h now. This is a question
that I get a lot, so I thought I will
address this here. I keep my plates inside. I have this semester since D, which valid, which is
with an airtight lead. So if you keep, keep your weight
fans inside that it stays wait for hours, but days and weeks
and I have had paint will stay wait
for months even. Okay. So if you I mean, the masters, it is a bit
on the expensive side. But if you find any container where you can
keep your plate inside, you can use that
is just a cooling deep to keep your paints
wet for a long time. Okay, so here is my glass of water and here are the brushes
that I'm going to use. So this is the one
which is going to be with a flat
brush technique. So this is the flat brush
that I will use for creating the bigger tree and also
for doing the background. And I have kept one
small flat brush we using which I
can show you how to create small pine trees, also with the same
flat brush technique. So this is size
to this size six. And I'm keeping the size one and I can use this
also if required. I don't know if I
would need this, but I'm just keeping
it on the side. And of course, a liner brush to create even the smaller by interests and also to create the bush tree that will
come up in this vein. So this is a night scene. And for painting the 19, normally I feel
just Prussian blue makes the painting look like a day painting and adding
a bit of green with it, creating the teal blue color, which I like, which
is my favorite color. By mixing Prussian blue
and viridian view, along with why these
two colors mixed, gives a very nice look. Alright, so now let us create the background by using
different strokes. Here I'm going to show you a stroke which I
haven't shown to you in the color mixing exercise and the brushstroke exercise. But it's very easy and you will be able to do
it really easy. So I'm starting off with white. And I'm starting over here. So mostly not all the strokes that I've showed
you, I like this, or short or round strokes
just for lending purpose. But here we are creating
one big round Texas. So this is how our top
part is going to be. So now I have added
quite a bit of white. Now I'm ready to create the teal blue shade that I
want to use in my painting. This is more bluish. So you can decide when
you are mixing the color, which is the shape
that you like. And I'm not going too
close to white yet. And let's say my
sky is still here. Okay? So we are going in row. Let me create a little
darker tone first. Then I will go
light on the edge. I want to create
absolutely dark color. Okay, and now I will start moving onto
the lighter shades. So for creating the
lighter shades, I'm mixing more of white. More white. I'm not getting any more insight because then it will
become all bluish. So let me stop here. I mean, I'll go inside
up in a little while. But let me first
fix the outside. The inside out.
Outside, we'd kind of darker to lighter shade. Went more dark. I'm just making sure that I have added color in my entire
canvas and there is no white. Okay, I see some white
spots left here. So making sure that
I go ahead and add a few bad the snow
white canvas lift. And also I have created
a blending from dark to light in this
circular motion. The bottom part is little
bit, little bit left out, so I just go on the bottom also. I hope you're getting
the blending part. All I'm doing is trying
to blend dark to light. I'm going multiple times
unless I'm happy with the blending is coming and also have covered
the entire canvas. So I think I am pretty
much done outside. Now. I think it's
trying to get inside. And I'm also adding
some strokes of light to make the blending
look really attracted. Okay, I think, I
think that's good. I just wipe off my brush and
add the white over here. So the reason I
wiped off my brush and I did not wash
it is because I do not want the indicted blue color to wash off from my brush. I still want a little bit shade, but I want mostly white
and the moon will come in the center lot on the
surrounding part, I'm making more lighter
before painting the moon. Okay, So this is all
kind of light bluish. It's not absolutely white. And now with my finger, I'm just going in the
same term and adding some white to create the mode. Okay, you see I created little
texture on the moon here, which is looking pretty cool. Just with my fingertip, trying to make it
a perfect circle. But I think that's
fine. I'm test-taking little bit of black to add a
little pre tomorrow morning. Okay. Let me not get too carried away. I think this is pretty good. The bad, the moon. And the blending also has
been done really well. I might, so it's 200
white on the side. So I'm just going with my color, blue-colored little bit more and I'll add a little texture. Okay, I mean it almost gone. So a hesitant school back and
add a little bit like this. Okay, I'm Liz, I'm happy. So this makes me happy
and I am done with it.
41. Step 2 - Snow land: My brush has all the
teal blue colored, all the mixing white
and everything. I'm not washing my brush with the same brush without
washing it off. I am taking lots of
white and I am coming on top of the sky and
adding a land. Sure. You see the colors that I had. I'm just taking
tiny bit of green more because I want to have that greenish aqua
blue effect over here. And I'm adding lots
of snow color, which is just pure white. Maybe I want to
take it even higher or chest a little bit higher. Okay. So just coloring it off just in random direction doesn't matter what exactly
is happening. Okay, So one side of the land is done and now we will
create the other side. So for that, I'm just mixing a little bit of green
and blue again, creating my teal blue color. And I am going on
the other side, creating a lab that
goes in front of this. Let me mix little bit more. But my focus is more on
green this time, right? I don't want to
make it a bluish. So I'm mixing more of green and just a tiny touch of
water because it's very dry. Okay. So I added the land
from them site. And now I will blend it with white dots of white. You see this gradient color. If you just add tiny
bit of it with white, it just creates such a
beautiful bluish shade. It's not absolutely green yet. It creates a beautiful shade. Even though it looks
like green on K. So you'll see, I
blended this into this, this land, into this land. And I think it's looking
really, really nice. I'm just adding more white and just blend it off. So you see I'm just going in random direction, random motion. There is no particular brush stroke that
I'm following here. Just my focus is on covering
the entire background. Okay, so my entire
canvas is covered. Now, that was my first target. Okay, So that is done. Now on top of this, I will go and add a lot
of beautiful things. So before that, I just want
it to dry completely so that I can work on it and still pulled on blend
with the background.
42. Step 3 - Road: It's kind of dried
and now I want to create a little rod
coming from here. Okay, just a little drop. So for that, I'm I still haven't washed my brush is
just the way it was. I am taking a little kind of mixing my teal
blue color again. And I'm coming over here. I had to mix a
little bit of white. Otherwise, it's not
letting me create. And that's it. You see, I kind of
give the illusion of a road forming over here. And on the side, I will create lot of white to make this green
path more visible. Some mode of white. Okay, That's a bit too much. I'm going to be into a big
snow pine tree on the right. So all this background is
going to be a little hidden. And then it's going
to be I mean, I can paint it repainted
a little later. But for the time being, just to add little bit of snow on either side of the road. I am just adding
some snow color on. So I'm just adding more snow on the site and lending
it with the road. Okay. I think my road is a bit too blended
with the white, so I'll just go over it and
reattach it to once again. Okay. I think that's
very well blended. The road is kind of going
behind these land over here. Okay. I'm very much happy with how the outcome
has kept down doubt. There's going to
be, like I said, a lot more to be added here. But before washing it off, maybe I don't want to
add anymore over here. Here I will because you're
the big tree will come up. But this side I probably
I will not add anymore. So for that reason
I'm just adding one last layer of
white over here. And once it dries, I will add some birch
tree over here. Okay. So let's add some snow here. Oh no. My beautiful blending is
kind of wind over here, so I'll just blended once again. Okay. That's it. And that's it. Do you see how beautiful
the blending turned out? And now I'll just
wash off my brush because I think I'm done with this brush for the
time being late. I'm going to use this brush for creating the
big snow bank fee, but that time I will
start with black. I don't need it
for the database. So look at the texture or
the color combination, the blending spatially up to those and see how
beautiful. Let's see. Okay. You can absolutely see the 3D curve of the land
falling from both the sides. Now I will let it dry completely
and then I will start adding all the little snow
mine trees in the background. So first we will
cover the background. Then we will do the big
tree and we will do the branch Bush
stream on the front.
43. Step 4 - Distant pine trees: Alright, so now to create the
distinct snow pine trees, I'll use small brush
for this place because it's really
tiny and then as it, as it goes bigger, so this is the way I
am going to do it. So as it goes bigger, probably I will use this flat brush. Okay. So I'm mixing black and Prussian blue and green. So exactly the teal
blue color that we used in a lighter
form, that same color, just with a touch of deck. Okay, So this is
the color we are going to use for the
misty pine tree. I'm starting from here. And always for misty
pine trees when you are using a small round brush, always have lots of colored. So remember, that's why I was using fluid acrylics
when I was teaching the I'm round brush techniques. So exactly for that reason, I am you mixing it
up with little bit of water to make
it kind of fluid. Okay. So starting off in
the center, we will go 1.2. So this is the most
distinct ones. So when start off with
the most distant area. Okay. I hope you're
understanding how the technique of these snowy
pine trees are coming. Make sure they are stretch. Okay. So this one
got a little tilted. Try not to make them tilted. Tried to keep them straight. Okay. What is the technique I'm
using here? Straight line. Then just zigzag, zigzag. And as you go down, just increase it a little bit. That's all. I'm just going to
repeat this tape. It can be a little
bit boring for you to watch it if you're
just watching. But if you're painting
along with me, you can keep playing the video. And I think I will stop here. And I will create
one on the side. So for this, I'm
using a flat brush. And the flat brush technique. With a flat brush technique, the pictures are
automatically coming. I don't have to do much. So this is the tallest
one on the edge. And then after that
little smaller. I'm doing this in
the exact same way as I taught you how to paint with the with the
flat brush technique. Except I'm using a
smaller flat brush. The tip, I will correct it
with a small round brush. With a flat brush,
It's happening so much faster also, right? Starting with the corner
of the flat brush, then using the entirety
of the flat brush. Okay? And do this, but also with a flat
brush and then I will switch to round brush. Okay, so this is done
with a flat brush. I will again use the flat brush so I'm not watching it yet. I'd probably be due to more
in-between and I'm over here. It is simple. Do not
make it complicated. Do not think also is complicated because if you think
it is complicated, it will be complicated
for you, okay? So do not even think
it is complicated. I have taught this to hundreds and thousands
of my students. People have never
painted pine tree. You have already learned
all the techniques. So people who have never
even lifted a paintbrush, they have also painted it
because it's that simple. I want you to
understand that, okay? Alright, and now just for fun, I'm just thinking I'll
just create even a smaller one and even one more. I'm just, you know, my
rising as in when I'm going I don't know if this
will be visible much, but I know I did this. So that's what matters. A tiny line here, right? So our first layer is done. What do we do next? We add the layering on top of
it to make them look good. Okay, So with the same
colors that I had, I'm just mixing lots of white. And I will not entirely in
some parts and add the dishes. Maybe just a bit more clean. Okay. For the small ones, I don't think I will switch
to the flat brush again because I would have more control if I am
or let me just try. Let me show you
also how it looks, okay, Now, the big
one is actually good. The big one is coming out good. Just a few textures in-between. Let me try this one. See, it's not that comfortable
with the flat brush, so I haven't switched
to the liner brush. See, the moonlight is here. So this is the direction the
light is falling, right? So my left side, my left side, my binary is left sides are more illuminated. So I'm adding more
highlights on the left. Let me try a little
bit more with gosh, Yeah, Nice. Okay. The big ones are done. We will do one more
layer of highlight. By the way, this is
not the only layer. Let me just do first layer. So what happens if I have
taught this painting many, many times in my physical
workshops and I have trained, I've seen many people
paint this with me. People are various,
experienced repeated before. We've never been to before. And I'm telling you from my experience that
what most people do, does is they kind of
hurry up this process. I want you to enjoy
this process. I know it's a big boring. Bring this small trees
in the background. Oh my God, so many trees. But don't think like that.
Don't feel like that. Enjoy the process
because you are, you just learned painting pine
trees and you're creating a painting where the binaries are small in the background. Maybe nobody will, will watch it or ignore it will not come in the immediate eye contact when somebody looks
at this painting. Now, I am taking just a lot of white with the same brush
without washing it. And I'm adding technique I'm using here while adding the white highlight,
I'm using techniques. One of the small round brush, which is more like
dotted techniques, I'm just adding a few dots. I'm trying to add up. They're so small. You don't know what's happening. But yeah, I'm kind of make the dot technique
was like this. You are just dabbing, right? So that is what I am doing here. Yeah. So I was saying that do not focus on
the thing rather than, Oh my God, this is
such a boring process. Okay. Enjoy the process because. You're doing it for yourself
first and foremost, right? So just enjoy the process
of doing one small gi, give your hundred per cent in creating just a one small tree. With all your effort. Do it with all your labs. Don't just rush it through
because then there is no point of doing this
exercise, doing this painting. Okay, I hope you are
getting my point. I'm taking my own
sweet time to do this. Okay? I think this line
formation is looking nice. This is thickening number three, remember we did small
light, long lines. So that is the thing
I'm doing in this one. Mixup. Long lines, short dash, and the little dots. Mix up all the three
techniques that we learned in the round
brush technique. I'm doing all of them. Okay? So all that trees are done. I think this is not that white, so I might be doing this one touching the best with
the snowy ground. It just noticed that
I hadn't done that. Okay. Now in the next step,
before doing this, there is one more thing left, which is adding some shadows. So for adding the shadows, I'm mixing listen bit
more of blue-green, creating that blue shade. And I'm adding some shadows. Blue shade mixing it with white. The morning is here. So other reflections
appalling this way. Sorry, all the shadows are
falling in design gap. Okay. So the right side
is completely done. And now we will create the
pine trees on the left side. The left side, I will mostly
use this small flat brush because the size of the tree is going to
be a little bigger than on the left, on the right. So I'm mixing the colors. A little bit of black also. Okay, I'm starting
from this end. I just took out a little
bit more of viridian hue. And I'm mixing it with black
because the first layer, I want it to be quite dark
mode of blackmailing. And so remember the
flat brush technique. We did, one with
the curves down, one with the curves up. And there is one more that you
can do that I didn't show, which is doing the street. Right. So I'm adding more black. That's my plus tree. Let me do the next one. Okay, I see with the land rush, it just happens much faster. And you get beautiful textures. Okay, that is done. Maybe a few more
lines in between. To show it's a fine for us, just like we did in the
previous painting also, right. And then one more. Oh, my pine tree on the
right side is hidden. I knew this would
happen, but it's okay. I don't want to go too much
at overriding this trees, but maybe chest a little bit. I think I'll stop here. I don't want to go any further because it will just
cover up this one. Okay? So this was my first layer. Now with the same brush, I will add one more layer and this time I'll make it green. Okay? Okay. I think I'm going in a
downward direction and this one, can you see that? Okay. Just in case you don't remember, Let me show it to you. Okay, So these are
the two techniques to trees we learned
with the flat brush. One wing in upward direction, one wing in downward direction. So you can do whichever
you want or even instead of going
in either curve, you can go just trait. Also. Some of these have
come out a little straight and this one has
gone become downward. Okay. You know, I did a mistake. I did the light on this side. However the moon is the light
would be on the right side. So on this one, I will go on the right side. One on so I'll just scroll a little bit towards the right. Okay, these are too small. So basically I'm having a
problem with a flat brush. What I'm going to do is
switch to the liner brush and add the shading on the right side of
this small trees. Okay, and for this
one on the left side, I will just add a little bit
more of the dark shades. Just covered up the highlights
that I did wrongly. Okay, so I have added all
the highlights that I liked, and now it's time for
me to add some shadow. So for that, again, I am using the same teal
color mixing green, blue, and black. Sure. I will just go a little
bit like this too much. Okay. Maybe I'll just mix it up a
little bit with white snow. And that the shadow. Okay, I quite like the land. And also the shadows
that are coming retreat.
44. Step 5 - Big pine trees: Okay, so the entire background
of the painting is done. And now the final
thing remaining is creating the final
thing, the last two things, we're going to
create a beautiful big snow pine tree
like this one, which looks almost
like a Christmas tree. I like creating this one, but you can definitely
create this one or you can create with
a straight curve, also straight line also. For creating the big one, I am switching to
the same brush, which is size six with PTAs, started creating this painting. And I am going to use or start
off with black and blue. Mostly black. It's okay. I'm not taking too much
of our green in this one. I will take it a little later. That's totally so
I'm starting here. Okay? Now for the top, but I'm don't
want to take a risk and do it with the flat brush and
spoil my beautiful painting. So I will start with a small
round brush at the top. Okay? Now I will start treating
with entire tip of my brush. Let me just create
that structure first. Okay, I think that's pretty big. I think this is fine. Okay, so now I'm
going to go on top and add some access to this. Or maybe I should just
add just a bit more of the leaves to give
it a little more. Structure. Failing to flesh
it out a little more. Then create the structure is created if my tree tilting little bit
towards the left, it looks like so that's okay. Maybe there is when it
is tilting little bit. And now I'm just
creating some textures. Now I'm mixing in. This
is a bit of viridian hue to get that hillshade in a dark. And I'm just going over it. Once again to add
some highlights. It's not too much visible,
it's almost black. But I'll show you up close and you'll see that the blue shade, shade is visible on
top of the black. And remember this
time to highlight the left side because
the moon is on the left. Okay, so look, look
at the colors. So there is a little
shade of blue that is on the left side. Now, immediately I'm going
with another layer of shading, which is just a
little lighter shade of the previous
sheet that we did. Not too light shade, lighter. Okay, and now I'm going to
add even a lighter shade. I'm not washing
off my brush here because I want the
shape to remain. So I'm just mixing more white to this little bit of green light, but this beautiful shade, I'm adding to it on the left, it's turning out more
whitish, which is okay. Anyways, we are going to add a layer of white on
top of it, right? So with little bit of white comes up,
that's totally fine. Okay, more or less the entire
highlighting has been done. Now, I'll just
wiping off my brush and I am taking test
pure white this time. And the brilliant shade
of white on the left. That's my round brush. Okay, so that's our big
tree that has been done. I quite like it. It's looking like the highlighted one
coming out in front. And I'm just going to
finish it off by adding some shadow in front of it. So I'll just mix little black, brown, black, blue, and green. And maybe just a bit more. The money is here, so the shadow will
fall exactly the side. And I'm going to blend in and blend it in with
some white snow. I am wiping off my brush because I have
too much of lack in it. I don't want so much a black for the for the snow colored. So I washed off my
brush and I added some teal blue color.
I'm adding it. Okay, so that's in
that blending is done, the shadows completely done. And now I'm going to create
the birch tree on the left. By the way, if before or
washing off my brush, I think I want to add a
touch of this dark shade. Somewhere here I feel the shadow is not
that when feasible. Only. This is the correction
that I taught you in the next video. All right, so just a little bit of correction
wherever you feel, you need to add more black, you can just go ahead
and add at nato. So this is where I feel more of little shadow should be showing. Okay, and it's done. So I'm washing my flat
brush and I will use the liner brush to create
the birch tree in the front.
45. Step 6 - Birch trees: Okay, so for creating
the birch tree, I am mixing just a
black, nothing else, just black with a lot of
water making it fluid. And I'm going to start here. I'm going to start sure. And take it all the way up. I'm ending it like this. You can do a straight tree also. I just want you to
do a bending tree. Okay. And now I will create
some branches to it. Have I have some water
in your brush while you are painting with a small
round brush on these hills. I'm going to create a lot more. But before creating
a more branches, let me create one more tree. Look at that shape. I did
not intend on doing it, but it just happened like
that. And I like it. Okay, now I'm going to paint all the beautiful branches
coming out of it. Make sure that you are using
just the tip of your brush. If you feel you're not having
to do it with the beak. Round brush like mine. Switch to even liner brush. I can keep on doing. But I think this is good
number of branches. I can stop here. Now. I'm going to add some
shadows to this. So I'm watching
it with my black. I am taking some of
the teal blue shades, which I don't think I have, so I'm going to
create some of it. Okay. And then now I'm
going to go over it kind of in the center
with a very light touch. Absolutely like that. And I think I like to
use more green here. Okay. You see I'm not adding
on any of the side, I'm kind of going
from the center. You notice that the
black is on either side. So right now we are creating
dimensions of the tree. Like how we created
dimension of the tree, as in the snow pine tree, by adding highlight colors
exactly similar way. Now we are adding the highlights to all
of these scratches. Okay, so small
brush, not so much, just a light touch up
brushing. Okay, that's it. Then finally, I'm going
to add one more layer. And this one is going to come on the right of the tree
trunk because of the moon. White patches on the branches. Just a little bit
patchy. Don't have to go over all the branches
entirely. Just a light touch. And I am going to add some
snow to this tree now. So where ever the
snowfall has happened, which are mostly just the gaps
of each of these branches. And I'm using my teeth, body acrylics and just
chopping kind of a big blob of light into this gaps. Okay. So the tree is done. Oh, there is one more, small one here, so
I'll add some more. And the very final thing is creating the
shadow of the tree. So here is the moon. So the shadow is going
to be like this. So for the shadow color, I am using this kind of
like little grayish. I did not actually
mix any color. I had some white. I just mixed it with kind of grayish and absolutely
dry stroke. I don't have too much
water in my brush. So you see it because I
don't have much paint. I'm getting these
broken lines which is perfect for the shadow. And I'm just going to add some snow at the
bottom of this trees. And that's it. This went on for a little
longer than I expected, but that's only because
I took time to create all these small pine
trees with a lot of care. And now let me just peel off the tape and see
how it's looking. So here is the final painting. Have a look at it up close. I am absolutely happy
with how this turned out. Look at these two
side-by-side so that you understand how this is looking more like day and how this is looking
more like night. So this is more of like
French blue color. This is more of like tone
down till bluish color. They are looking just
gorgeous next to each other. You could just frame them
and put it in your wall. And you notice that I didn't do us know fall on
this one and that's fine. If you want to do
snowfall, go ahead. By all means do it. But I think it's just looking good by not adding
snowfall in both of them. And that's it for now. Thank you so much
for joining me. I'll see you in the next video.
46. RESIN COASTERS | 2 SQUARE + 2 ROUND: So now in this section
we are going to learn to create four different clusters with four different paintings. Now, I have chosen two of them on round posters and two
of them on the square one, but you can definitely
do either on whatever your choice of
canvas size is, okay? Or you can just do this
one also on ground, or you can do all four of
them on brown coasters, or you can do all four of
them on square coasters. Whatever you have at home or whatever is your
personal preference. I just decided to do onto different types to show
you how they look. I somehow like the look
of the round coasters, but I think they are
also very pretty. Okay. Now, before starting
this coasters section, all these paintings, it's very, very important that you have practiced this small pine
trees with a round brush. Because these are all the
techniques that we are going to use in this one because
it's such a small size. It's it's four-by-four. Basically this one
is four by four and this is also with a radius, with a diameter of 4 ". So they're really
small and it's, it's kind of a struggle
to paint them. I use like a zero-zero
liner brush for this, but still it's a struggle
to paint the small, especially the small ones. This one's in the background,
the small binaries. This is, these are
still much okay to do. But you can do it
really well if you have practiced this pine
trees spatially, this one and the techniques
that I taught in this one. So what happens is when
you have practice this, you will understand
which one you like most and which one
is easier for you to do. There'll be one or two of
the techniques that you will naturally result to welcome creating any of the paintings. So say e.g. in this one, I have used the small, medium-sized strokes
like this one. And in this one, I have done the dotted one. This first one. Okay? And here it's a mix
of dash and dot. Here it's more longer
strokes like this one. So it's not just one technique. That is what I want you to understand in this
video right now, what I'm trying to tell
you is that there is not one particular
method that I've done just because I've practiced all these different types
of small pine trees. It's kind of, you will realize that while
you're doing it, one or the other method will come up while you're doing it. But if you practice them, you can easily do
them on a painting. And one very important
thing is if you understand the six basic steps that I have taught you in the
beginning of this class. That is what will help you
create any pine trees. Look realistic, look
gorgeous in your painting. Even though see e.g. this one is so small. Even here I have applied
all the six steps, not exactly
prominently separately as they will see the video. But you can see that there is a first black line
and in the back. And then I have added two
or three highlight layers. That is there in all of them. All of them. So you won't be able
to understand them. So individually
each of the steps, but they are all there. Also. I wanted to say one more
thing is that in this video, rather in this section, in each of these
goes to paintings. I have not done it very slowly because I
am assuming by now you have practiced everything
data the two paintings in the previous section
and you already know by now the basic things. So I will not get into detail of each of the basic things, but more or less tell you how to create these paintings
so that you can create these beautiful
cost coasters and use them in your home
or use them for gifting. So let's get started
with our first pasta.
47. Background: All right, So let's begin. So here are my two
MDF, wooden panels, which I'm going to be using or creating those square coasters. And you can see this brown color on the edge, which I like. So I'm going to keep
it as the backside and use the other side
as the front side. So here is my plate, the brush, It's a pretty thick brush. And I'm going to color it with a white acrylic paint,
which is fluid. This brush is waiting brush I consider certain
number or size number, but it's the way
big one to cover the coaster with
just a few strokes. So the color I'm using
is white acrylic paint, but you can definitely use
JSON if you have it at home. I also have j, so
but I prefer using this white fluid
acrylic paint because I have a lot of them
stored at home, so I'm using it, but it's totally your choice, what you want to use. So all I'm gonna do
in this tape is color the coasters completely in the front and on
all the four sites because when I paint
on the front end, like to extend my
painting on the side. And since we are going to
be using this as Coasters, it just makes sense to have a little bit of beauty
added on the site also, which will be when we
use it as a co-star. So that's why I add
this tape itself. I like to add the white
color on the sides. So Yep, So pretty much that's all I'm going to be
doing in this tape. I am going to color these coasters posters on the sides and keep them
ready for painting. So of course, after
coloring this, you have to let it dry
for a few minutes, depending on your
weather in your country, as much time it takes to dry. So I keep it under
the sun and it just try ys in NP 15 min. Okay, I get them for drying. And here are my two round
MDF for wooden boards. I think the size is so good and I love painting
on round canvases. So again, I'm pretty
much going to follow the same thing that I did
for the square canvases. And color, fill these two also, and also make sure to color on the side of this town Canvas. Yeah. You get a little bit of paint in your fingers when
you do this tape because it's just coloring all the way to the
side. But that's okay. After this tape you can wash off your fingers and then
we start painting.
48. Square Coaster 1: So here is my white
wooden canvas, which is called
completely dried up by now and it is ready
to be painted. So here is my plate. I already have some
white paint on my plate from the previous step. So I'm going to use that white and I'm taking out halo blue. I thought of experimenting
with Taylor blue in this painting rather than mixing Prussian blue
and viridian hue. The other colors
I have taken out, our burnt sienna and black. So I'm starting off by painting the sky with a lot of white, with very little tailor blue, just to give a touch
of blue into the sky. But I want to keep this painting
more on the wider side. And that's why I decided
not to use too much blue in this painting and just give a kind of like a
highlight touch of light. Okay, so look at the color
that I'm mixing on the plate. So it has a lot of white with
a very less amount of blue. And the strokes
doesn't really matter. Use it the way you want to. Our focus is blending the white into light bluish
towards the horizon. Okay, So the blending
is very well done now. So now with the same brush, I picked up a lot of light
and adding the snow line. I did not wash the
brush because I wanted that slight blue touch up in my brush and in that
white color that I'm adding. But it's just not too much. So that's why I picked up a lot of
weight because when you pick up a lot of white or whatever color remaining
is there in your brush, it won't make much of a
difference unless you press your brush on the canvas. I'm not pressing too hard. So that's why I might enter
land is almost white. You can see that on the
bottom part of the pre-sale, you can see some blue is
remaining from the previous day. Now I'm adding kind of like a
good layer of white to give some shape to the land
that I'm building. But it's just pure white. Using my liner brush size two to create the
house. So I'm mixing. Want CNN white, so
that's pretty much all the color that I'm gonna be using for painting the house. So right now, I'm starting
off with a lighter shade. And then gradually
I will increase the density of burnt
sienna so that it becomes dark and also add
some burnt sienna with black lead
to finish it off. But at the moment, I'm
using just one sienna and white to color the whole house. Now I'm using more of
just burnt sienna and creating some
horizontal strokes to show the wooden
panels of the heart, which are placed
in horizontal way. It's a very small, tiny place to work with. So use a very liner brush. Here. I'm using double
zero liner brush, which is even smaller
because you have to blend 23 colors into
this small space. So what absolutely
slowly and do this nicely and neatly
because there's just this much portion
that I'm doing. That's all we have to be doing. Just a little bit of painting carefully
and filling up the colors and doing
a bit of blending. Here I'm using black santa and blending it
with the bugs and, and white that I did
in the previous step. Okay, Now that the tiny
places over I switch to my number two liner brush and using Y just to create
the roof of the hut, which is not that tiny. And I can very easily go with the white color and add
the roof of the house. But here also you have to be
bit careful because it's not a very big place as a
little tiny place again, it's kind of difficult to
paint on a smaller size. That's why it takes
a lot of skill. And I would say a patient. To add this minute
detailing when you work on a
smaller size canvas, it's always like
the same thing if you had been doing on
a bigger size canvas, they need to type
in much easier to do on smaller size canvas. It's a little, it can be a
little difficult sometimes, unless you have the right brush. If you have the
right liner brushes, then it's definitely kind of becomes a little
easier, I would say. Now I'm trying to make some snow drops from this
from the heart on the side. So I'm just dropping some
of the lines on the side. Small lines, very
small, tiny things. So, so difficult to do it by just a tiny it as because it's not going
to be very prominent. Dan, and now I switch to the number two liner brush and we are going to paint
our snow binaries. So I hope you feel practiced
on the snow pine trees. You are a master buying now to create us
know, buy-in fee. So first step I am at
starting with black and with a little touch of blue, it's not too much visible. First, in the first step, I'm just going to create out all the structures of the pine
trees into this painting. Okay, so after
finishing creating the outline structure
of the pine trees, I am adding the fence as well in this state itself before
moving on to the highlights. Because my brush already has this dark black color
with the little blue mix, but it's not really visible. And since this fence is
also with the black color, so that's why I'm
just doing it just because has this color. Very gentle. Don't see if
I'll tell you one small tip. If you find it difficult to
do with the liner brush, or what you can do
is use a black pen that with a tiny
point, micron tips. Especially. You can use
that and put this up like a cheating code that
I'm telling you if you find it difficult to
do it with the brush. And now I'm starting off
with the highlights. For the highlights, I'm again, you know, the highlights
tapes very well. So I'm going to do
to three layers of highlights with a little
darker shade of blue. This is like more like black, blue and white mix. And then I'm going to do, I copied layer of
white at the top. Alright, so all the trees
are finally done completely. Now in this tape I'm
going to add some shadows to the fence and a little
bit to the trees as well. So that I have mixed
is more of like gray with little bit of black
and loves lots of white. And so I have just created
the shadows of the fence and I'm going to create some shadows of this little hut as well. Cute. I feel like I've added a bit
too much of the shadows. So this is a correction
that I'm doing. And by adding little bit of white when I feel I've
added too much shadow. So this is always a
trick that you can employ wherever you feel you
need to create something. You can always add the
background color to it and it will be
taken care off. So look at it up close. It's looking quite beautiful and I'm adding just
a little touch of white highlights on the tree to make them feel of the
strokes are very prominent. No, I'm just making sure that these white part is all dried. It's not wet at all. And now I am going to add them
and paint this small dog. Okay. So just you can just
watch this one the way I'm painting it because there is no proper I would say
a technique to it. I'm just my intuition and
trying to paint a dog. I'm not I won't say I am
absolutely a pro at it. So what you can do
is just watch me and do this on a
rough piece of paper. And it's very easy. I won't say it's difficult. You are just
creating the body of the dog and tilting the head by extending it a
little bit towards the right and just creating
the legs. That's all. But since it's so tiny, it can be a little difficult. Again here also, you can use the cheat code that I told you. You can use a micron deep black gel pen
to create the dog. And you should be fine. You can practice it
a couple of times on rough paper before doing
it on to the capitalist. Here once again, I'm just
adding a little bit of white because I feel I've just done a bit too much
of the dog on the mix side. So I'm just adding little bit of white just to cover it up. This is the connection that
I've already taught you, that it will, if you have
to correct something, you can always add a little
bit of the other color, the background color,
and cover it up. And finally, I'm adding some final touch
ups to the heart. And our first coaster is ready.
49. Square Coaster 2: Okay, so here is the
second square canvas ready to be painted. Here is my colors. It's the same plate from
the previous painting. I'm only taking out a
little bit of viridian view because you know that
I like using viridian, how fine of a little touch of greenish effect to the painting when I want to create
a evening effect. And in this one
I'm going to paint the sun setting in the horizon. So it's kind of like
an evening ish look. So that's why I prefer
adding a little bit of green effect to my background
rather than keeping it PR, bright blue. So that's my logic. Okay, Now here I'm
starting from the horizon and then going up and creating this dark color from the horizon to the
lighter color on the top. And I like coloring
on this side. Also. One other thing that I want you to
understand is that I wipe off the excess paint from the brush rather
than washing it. And then use a lot of white and blue because
if you don't wash it, then you still have that remains of the color that you
used at the horizon. And that color is blending
with the white and creating a lighter shade of that color
rather than pure white. Okay, So now all I'm doing is
blending these two shades. And I like keeping
the bristle kind of lying down on
the canvas because when I keep keep my
bristles like that, kind of touching the dad's side of the person on the canvas. It's very easy to split
rather than using just the tip of the brush. This is where the sun
is going to come. So I'm just kind of
keeping a placeholder for it and adding the
color around it. This dark shade around it. So I'm just creating a little
bit of dark sheet to create this kind of like bluish greenish color and
adding it on the side. Instead of because it's
kind of stuck blending. So I'm using my
finger to blend it. All I'm doing is
tapping my finger into that blended area and
using a bit of white. And the blending becomes
a really easy way to do this with your finger
rather than your brush. Because with a brush
I just feel I don't have that much control
as much I have with the finger just by tapping
the finger because the surface of the finger is like really good
to blend colors. So just in case you didn't
know that it's going to be very beautiful
experiment for you. Okay? Now I am picking up
quite a bit of white and creating the sun in the center of that placeholder that we
created little bit audio. I'm just increasing the site
to make it look perfect. Circle. Look at that up close. Now I switch to my
brush and picked up a lot of light
on the same brush. I did not wash my brush. I'm going kind of
halfway. Not halfway. I would say two-thirds
way to the sun to cover it up and then add
the snow land below it. And all I'm going to do
is add a huge texture of a huge quantity of white
paint to create new land. Okay, So the complete
land is done now. I am blaming little
bit of black with the white and just creating some of the snow landscape of the undulating
land structure. So that is what I am creating
with the brush right now. So I'll create 23
such formations to I think two is good enough. I don't have space for anymore
in this mall landscape. And I'm going to blend it with whites and add some more white. Just blend it with
the white background. It's no land. Now I switch to the liner
brush size too. Because I felt
with a flat brush, It's kind of difficult to blend because the space is too small. So I'm switched to the liner
brush and it's kind of easier to blend it
off with this brush. Okay, So after all
the blending is done, I'm just adding one layer
of white just below this undulating lens
that I created, just to make sure that
there is a lot of whites no visible on the left. So I'm just going
below all the lines that I created and
adding a layer of white. Okay, look at the
textures up-close. Not that this is going to matter a lot once we pull the
rays it on top of it. But yeah, so you can see a
lot of textures into it. So now again, I'm switching
to my zeros zero liner brush, which is the tiniest
one that I have. Now, I think I have one
more in the triple zeros. But now I'm going to use
this tiny brush and create this beautiful snowy pine
trees in the background. My favorites of
snow by interests. And the texture that
I am trying to use is the dotted one that I taught you in the round brush
technique in the first one. The reason I liked
the dotted ones, especially when I'm creating
the small pine trees, the very small ones, because if you create strokes, it can get bigger. But with small dots, you
can keep the size of the tree really small and it's still give it a
beautiful eggshell. I felt like it's a
little too small, so I'm just
increasing the height of the tree a little bit. And you can see that
I'm just going in zigzag direction and adding
some tiny dots on the side. So this is how we
the same process. I am going to create all the snow BY entries
on this horizontal line. For this one, I'm using
already a little bit of white. I'm not waiting for
the next round. The highlight because
it's so small, it's not going to be visible. And just to create, make this pine tree look
like in a distance, I am adding a beautiful white to it so
that it looks a little different because the dark
black ones are kind of in the front and the lighter ones
seems like in a distance. Okay. So on-site pine
trees are almost done. You can see that I've created
a few, one distinct one. And since these are so small, I did it in one step itself. And I'm going to add a layer
highlight on top of this, but you can definitely
do it if you want to. But I just feel it's
unnecessary and I like the shades
already created. While creating it with black, I actually added a little bit of a lighter blue already in the, in one go itself. I created the structure
and the highlight itself. Not a very prominent
highlight though, but I'm happy with it, but I'm just telling you
if you want to do it, you can absolutely do it. And now comes the step that I'm probably most afraid of doing, painting the reindeer
into this landscape. It's again, just like
how we created the dog. There is create the
shape of an animal and creating nick and
the body, the four legs. So again, do it with a gel
pen and practice it on the, on a rough piece of paper
before doing it on the canvas. I am somehow confident, I'm very confident
of myself that I can do it correctly
on my cofactor. And, you know, my tree, if there is something
goes wrong, I can always add some white
background to cover it up. So I'm doing it very confidently
on Canvas at one shot. And I'm sure if you just watch it once you will
be able to do it too. Hello. Okay. So I'm not happy
with the legs at all. I think they are
twisted and all. So I am just adding some
white background to cover it up and creating a
slender legs of the MDR. But I think they
are looking good, especially I love the horn part. But yes, I wish I had done it with a pin and not with a lightener brush
because with the pain, obviously you get a
very good grip of doing it and you
can do much better. But I just think of doing
it while I was painting it. I thought of it later and I'm
telling you now so that you don't have to struggle
painting with a liner brush. Okay, So this is
pretty much done. Look at it up close. I think it's looking **** good. And let's bring in the other cluster and look
at them side-by-side. I think they are looking like such a beautiful state of coasters and they're
looking so good. Okay, You know what, I'm
as I'm looking at it, I just feel that I have
added a bit too much of gray on one in the snow land. And I don't like
that three loops. So I'm just adding a
little bit of blue. That's up to the land is
not really blue data. I'm just adding a lot of white along with a
little bit of blue, just to make it look
a little bit more vibrant because I
feel grace to dull. It just makes my Canvas look
too dull and I don't like gray and black and all that
in mind. Landscapes too much. So I'm just adding a
tiny touch of color with the white and blue
in the snow land. And that's it. So here are two
canvases side-by-side. I think they are looking lovely. Okay, Now let's move on
to the round coasters.
50. Round Coaster 1: Okay, so let's start
with the round coaster. So the white color
is completely dried. The colors I'm going to use for this painting, our Taylor blue, a little bit of viridian hue, which is already there
in my plate from the previous painting and white. So I'm starting with my
flat brush and adding the blue and white
and also a little bit of viridian hue from
this side of the plate. It's the same plate that I used in the previous two
paintings as well. Now, the main thing
of this painting is how beautifully you
blend this background. Okay, so that is what is going to add the beauty
of this coastal. There is nothing too much in this painting that
we're going to do, just the background. So do the background
fade beautifully. See how I am
blending the colors. I'm not going with the
same color all throughout. I have just adding little bit of light
shade in some places, little bit of dark
colors in some places, and I'm not trying to
blend them all together. Okay, so here I just feel if you like that finger technique that I showed you in
the previous one, you can start implementing that experiment with that and see how it
turns out for you. So all I'm doing here is adding little bit of dark
blue here and there, and then little bit
of green in there, the little bit of white here. And they're trying to bring them together with little bit of blending
between them. Obviously, you
don't want to have separate categories of
colors of the canvas, but it has to be all
blended together. But this blending also you see that I'm doing is with
the dabbing technique, the way I did it
with the finger. So yeah, so that
is the main tree. Basically you have
to keep dabbing whether you do it
with brush or finger. So now that the front is done, I am going to use
the same colors and paint the side of
the coaster as well, so that it looks pretty okay. So the entire background is done and I'm ready to create a moon. So far, everything I am
creating one day and one night. So here is the light one
for the circular canvas. And the next one
we will do a take and just making it perfect
circle as much I can. Okay, So now I am using
just my liner brush and white and I am creating
the pine trees. So by now, I'm sure you are a pro at paintings? No pine trees. Leg in the previous one, I barely use to highlight color, and I used mostly
with black and blue. Similarly here, I'm not creating anything with
the black at all, whereas I'm creating almost a snow highlight
color of the pine trees. So whichever landscapes,
as for whatever here also, I will add a little bit of
shadow with a little blue underneath each of
these snow branches. But the main focus here
is on the highlights. So what I want you
to understand is depending on the landscape
you are doing when you, especially when you're painting a small pine tree with
a small round brush. It is definitely important
for you to understand all the six steps
so that you know which one to ignore
and which one to do, and how you can combine all the six steps
into the pine tree. So here I just added little
bit of shadow with the blue. There is no black in this
one because it's not necessary because it's
mostly white snow pine tree. So you know what to do
and in which landscape, what to do and what to ignore. Okay, So likewise, I'm going to create all the pine
trees in this landscape. I think this is one
of the easiest one, just one background and then creating three or
four pine trees around the circular canvas. Okay, now I'm
mixing a little bit of water on my brush and mixing the white paint and
I'm going to splatter some snow on top
of this landscape. So in the previous two, we haven't done it. But if you want to, you can. So here I am just trying to
splatter some whites know. By the way, I just think this
flattering is happening. I'm not too sure
if they are snow falls or the stars in the sky, but it can be some of both. Because we have created such
a pretty background sky. If some of the white
dots fall on that, it can give the
appearance of some stars. But yeah, overall, Canvas looks good
with this white dots. Here it is. Our first circular
canvas is ready, and I think it looks pretty. And I think it's obviously one
of the easiest ones to do. I'm just adding little bit of
gray that's up to the moon. My perfectionism
kicks in sometimes, and I just want to make it
look perfect as much as I can. So just adding a
little touch up to it. You don't have to bite. Yeah. I think I absolutely
loved these coastal
51. Round Coaster 2: Okay, So now comes the last
and the final round coastal. And for painting this, I am mostly going to be using just Prussian
blue and white. And at the end just a
little touch of black. But the entire
painting is going to be done with just
these two colors. I'm starting with the sky, but with a lot of light
and Prussian blue, mixing them, blending them together to create a sky effect. My target here is to blend these colors
not very properly. And then add some white
clouds in-between floating by creating
some random strokes. Here I'm not trying to blend them smoothly
as you can see. I'm just creating the
colors alternately, some dark blue on the top. And the reason I'm creating
the dark blue is so that when I create the white
clouds on top of it, it just stands out. Good. I'll be the same color. I'm just dragging it all the way down to create the lake part. I'm like it's just this it's
going to be the same color. So I'm just dragging the remaining paint on my
brush all the way down. And now I'm just
creating some of the lake water reflection. So the lake water it
because it's the water. I'm just going to use
horizontal strokes. So right now when I have all
these colors on my brush, I'm just using both
these colors to create some horizontal strokes
of blue and white. This is going to
just go in the back. A leader, we're gonna do it
nicely with a liner brush. But for the time being
with a flat brush, I'm just outlining and dieting. Right? With the same flat brush. Just wipe it off a little bit to get rid of the excess of blue. And I'm using just the white to create the land structures on the side of the
lake or a river, whatever it is, it's just a
kennel or a lake or river. And I created the distant
land in the back also, which is also snow-covered. So all these are basically
outlining the structure. Instead of doing
it with a pencil, I'm doing it with
my colored brush. Now. I will let it dry
completely and then I will start adding the detailing
with the liner brush. My canvas is all dried now
and with the liner brush, I am creating the
outline of this river. Towards the bottom, the
place I'm painting now, it's mostly where I'm, we do add the dark color of
the Prussian blue absolutely. Do is very high pigmented color. If you just use the
concentrated fresh in blue, it's very, very dark color. So that is the color that I'm using to create the
dark shaped leader. I am going to add
some black to it. But for the time being, I
don't want to add to it because then my white it
will also become grace. Right now, I want to keep the color combination between
Prussian blue and white. So I'm just mixing these
two colors to create the water effect onto this link. Okay, now that the basic
structure has been done, now I'm adding some black
and Prussian blue mix. Only at the bottom
of this land as in the land where the leg
is touching the land, that is where
basically the shadow of the land on the water. So that is the area that I'm
adding this dark color to now in the center of it. And again going and adding some of the blue and
the white strokes are kind of blended strokes to show the watercolor of
the river flowing into. The water always is done with
just horizontal strokes. Now I'm adding the
white land on the side. So you see that
white structure that we created initially with
a flat brush is all gone. The lake is completely done. So now with the white color, we will come on top of it and create the land's very nicely. So some of the, some of this link color that dark blue that we did is going to get hidden, which is fine. And the lake is going
to come in front as in breaking through the water and the land are forming
from both sides. So after I think most
of the white land, I'm mixing a little bit of black and white to create the gray. And just like we did, the shadow color of the water, keeping it blue, black and blue. Here also, we have to keep
creating the bottom of the lake land of creating
some shadow for the land. By mixing a little
bit black and white and creating the gray color to show the shadow of the land so that the
highlight looks prominent. So the highlight is on the top. The bottom is great. Structure is done and it's
starting to look pretty so. The water and the land
structure is completely done. So far. One final time I'm
just going in into the water area once again and just creating
some white strokes. White and blue blends
into the water. Okay, now start this. No pine trees. So here I am. I'm doing, I'm going to do
all the six states, the tree. So I'm starting off
with a black shade, lacking little bit
of Prussian blue mixed with the darkest color. I'm going to mark out
all the pine trees. Then I'm going to go
with a layer of blue, highlight them blue and white. And then finally wide, we're going to do all
the steps in this one because these are
not very small. And here we can do the shading and it's going to look nice for
the snow pine trees. I'm not going to say anything, just you could just
start painting along with me because you already
know all the steps by now. Okay, So all the snow
pine trees are done. You can see all the layers of highlights onto
the snow pine trees. And I think it's
looking so beautiful. And again, I am queen back
to the water one final time. I promise this last time, I'm just adding some
more water strokes with the white of the water. I just feel it's too dark. So if I add a little wipe, it will look nice, kind of matching with those
new land on the site. That's it. That's it. Our second canvas is done. Second round coaster. Look at both of
them side-by-side. I think they are looking
pretty **** gorgeous, one D and one night,
beautifully created. And I hope you've also created your two beautiful coasters.
52. Preparing The Resin: Here are my four coasters that are ready for
the reason for. So I want you to
have a look at it up close before we start applying
the reason on top of it. Because once we apply
the raisin on top of it, this beautiful view, the textural view of these canvases is
going to be vanished. And it's going to have
a very clear Luke, once the reason
comes on top of it. So I am having a good look at it and take some pictures
of your coasters. If you want to have a picture of your coasters
at this point of time when the textures
are very much visible. And now we will start
During the raisin. Next, I'm going
to be a clip from my racing class where I will
tell you what is resin, how to mix resin and how to
use it in your artworks. In this video, we are going
to create the racing. Now, if you are
watching this video, chances are that you already
know what a raisin is. But I will still
mentioned what is raising and how we can create
a racemic mixture. So basically raising
comes in two parts. One part is called the raisin and one part is called the hard. Now. Now some of the
raisin and we mixed these two competence
and can be mixed in one is to one ratio or
two is to one ratio. Three is to one ratio, which means three
parts of one component and one part of the
other competent. So here I'm using the
one from Fortune, Amy, as you can see the brand
name in the part a, which is the reason part that
I've taken out three parts. So you sit 90 g
on my wing scale. Okay. I just pick it
up and put it down because sometimes the weight can change after I have pulled. The reason that is
what I have noticed. Now, I am boring
the second part, the part B of these
two components, which is basically
the hardener and that has to come in one ratio. So if I've taken out
the first one as 90 g, I always try picking out the raisin part in
multiples of three. So that's why I took
out 90 gram exact so that I know the one
bug has to be 30 g, which means that together it's going to be 90 plus 31, 20. So this time my focus is on getting the wing
scale up to 120. Sometimes it can be 1 g here and there, but
that's totally fine. So right now I have
raising components in these three parts of the raising and one part of the hardener and now
comes the actual part. What you have to do
is you have to keep mixing it very well. So I have stored this
for a good five-minutes. So five-minutes, you can
put it on your timer, put time in it 5 min, and then you have to
keep stirring it. And as it gives starting it, the liquid that was
initially completely clear, you will see that it starts to become a little bit muddy color, not color, but the
transparency vanishes. So that is when actually
the two chemicals are reacting with each
other and they are forming one clear mixture. So after mixing it for 5 min, you will see that it has
become completely light, crystal like transparent
liquid form. And that means it is
now ready to use. This is the only one time that I am showing
you how to mix. The reason this is
what I have done throughout all the projects
that I will do in this class. I won't be showing it
to you again and again. So just, if you just watch
this once you know how to create the reason and you're good to go further
in their projects. So I don't create a lot
of raising at once. I like to create it as an when I'm going for the first project, I created one for
the second project I created one more
time because this raising Hardin's after starts
hardening after two to 3 h, you'll see that the
container is becoming warm. The temperature
increases in your car. So whenever you find that the
temperature is increasing, it means is starting to harden. You have to work on it immediately after
you mix these resin. I generally like to work on my projects within the
first hour because from the second-order onwards it
starts kind of hardening and completely
cure it by curing, I mean, that completely hardened the reason
owning your project, it takes about 24 h that
probably you already know. But the main thing
is after working, after mixing the two components, you don't want to keep it in your container for a
very long time and you would want to work on
the project within the first hour of
creating the racing. So I hope you understand how
to prepare a resin and you are good to start this
project. Okay, So let's go.
53. Resin Pour: Okay, so here is my owing scale and I am putting a
paper on top of it. The weight is zero, and now I am pulling the
reason to a measure of 60 g. Okay? So on the unmet weighing
scales it's showing 60. And now I'm going to
take out the hardener. And in the tree is to one ratio, it should come up to
802-02-0203 parts. Another 20 is one part. So here is a total of 80. And now I am going to store
the resin mixtures very well. So this mixing, you have
to do it for a good 5 min. I did almost close
to five to 7 min. Keep stirring until
your resin is ready. So here is my mixed resin. So it's like very well mixed. And here is a little trick that I'm going to
share with you now, which is a little different than what we did in
the resin class. So in the Bayesian class, if you have taken that class, you know that we mixed the
resin and then immediately we started adding colors to it and started using
in the project. Whereas here, when I generally use resin
to cover my artworks, I let it sit for a
good like today. I have let it sit for
exactly 1 h 40 min. Now. So what happens when you
let it sit for some time is you see the consistency of the resin is not as thin as it was when
I first mixed it, that you would see when you
mix out raising pigment, when you mix both
of them and you started for quite some time, it becomes very, it is really
dilute at the beginning, but when you let it sit, it gradually starts Picking up. So remember earlier I have
let it sit for even 2 h. How do you know?
What I'm doing is continuously since last
one-and-a-half hours, 2 h. I am continuously
starting it in every 15 min. And now I see that it's
very well thickened up. And you also feel a
slight warm in your hand. So when I'm holding the cup
like this, it's a paper cup. It's quite warm. So by this warmth also, I understand that it is
pretty much starting to cure. So you know that the resin will start curing up in
some type, right? In a few hours. So that is what is happening
when we let it sit, it just gets picking it up. Okay, So this is
the only trick that emulator tell you that I use before boarding the clear
reason onto my artworks. So now what I would do is
put the wood, the artworks, The Coasters on top of this paper cups just to elevate them a little
bit from the table. Now I would recommend that
you cover your table with a plastic paper or
plastic cover so that it cannot spoil your table. But I'm not doing
it because I think I would be able to peel it off from this table if it falls, if it was mine, my goal is to make sure that
it doesn't fall. Okay, so let's see how
successful I turn out to be. Okay. So I'm just keeping
these two aside and let me start working on
them one by one, okay? Yes. And one more important
tip that I want to tell you is that here is I don't
know what this is called, but it's kind of like
a bubble inside. And when you keep it on top, if it is in the center, that means your
service is labeled. I think I got it for free when
I bought a set of frames, photo frames from Amazon, that is when they gave it, so that you can
measure if a frame is straight on the wall
when you're framing it. I find this very useful. So if the bubble
is in the center, that means my table is c. This
one is little to the side, which means it is tilted a
little bit on this side. Okay? So the reason I'm
using this is because I know my table is slightly
tilted in some parts. So I use this. So right now I will pour it. Displays is very straight. I have seen this this side. Yeah. So the moment I start moving little bit decide
it just keeps moving. So I'm just measuring it out
so that I know I will be keeping my cool stuff like
this along these lines. The line I think which
is very much straight. Yes. Okay. But right now I will bring it
inside the camera frame so that I can show it to
you how I am doing this. Okay? Later on, I will move it, right. Let's for it one by one. Okay. Now, why do we need
to pick it up? The reason little bit. I did not tell you the reason. The reason is when I pour
the resin onto the coaster, I do not want you to
follow up from the side. If it is very dilute, it will follow
pretty easy, right? But I have tried this
in the past and these walks wonder if the
reason is a little peak, which it is right now, then it has high chances of staying on the coaster and not
falling off from the side. You can see how thick it is. See how thick it is
that I am having kind of struggling to
push it on the side. And this is what will
not make the reason. Jp. See, look at, look
at, look at this. I am approaching the
side here and steel. There is no chance of falling unless your table is tilted. Mine, and you keep
it at a place where it has chances are
flowing to the side. Otherwise you see it's
very thick. Very thick. I think I read it
a bit too long. I could have started
doing a little earlier, but I just wanted to make sure. So very well covered. At this. I don't know if
you can understand how rarely discovered
and it is very Picasso, these very less chances of
this flowing from the side. This is a good way of boring. So now I'm going to push it on the side and work
on the second wife. Okay. Now one last
thing that I like doing after going the
reason is just go on the side and just tap it with just a little
bit of reds and you can see it's already very hardened and it's not
going to fall off. I'm very sure about that. So all I'm doing is
because I want I have painted the sides of the
posters as well, right? So I wonder side also to be covered with resin
so that it looks good. So all I'm doing is just
touching the sides of this. And I just wanted to show you how they look from the side. So you can look at them from the side when the sunlight
is falling on them. Couldn't figure out if there is any sport that is
remaining which is not covered
properly or something. So you can just go around like this and make sure that you have entirely covered the
coasters and there is no spot remaining. Okay. So I hope you understood how to pour regime on your coasters. So make them really
take one and put the bubble tube like this to measure if the thing
is straight or not. And then all you
have to do is for erasing on top clear resin on top of your course
does and that's it.
54. Final Pieces: Okay. So it's been 24 h
and it's the next day. And this is how the
resin coasters look, look at them, how
shiny they are. How amazing It's looking. The pictures are almost gone, but some of it is still visible. Here also, everything
is looking very smoothly blended even though
I haven't tallied that way. But I think it's looking
pretty gorgeous. And they are ready to
be used as a coaster. Immediately. Look at the shine. This
is how the bag is. None of the reason has
stripped from the side. Just to inform you, none
of it has it has dripped, nothing has gone on the back. And it's only because
I have bought a really peak resin
on top of the canvas. So you can see it's fairly
clear, clean on the back. Here there is a literal
job popping out. So wherever there is a little bit of
reason that has gone, you can just cut it off
with a knife like this. It's fun. Little joke. But anyways, I will take care of the bath in a little while. So all of them looks good. On the back there is
nothing popping out. Why? Why am I showing
you this is because this is the resin coastal that I
created in the reading class. And if you sit the back
of it, it's pretty ugly. And that's only because this was a liquid resin that I had pulled on top and that had
dripped on this side. And this is how it has become. So anyhow, so I'm
showing this, say e.g. when you drop the
erasing on your canvas and the by chance that
this happens, um, what you can do is, I mean, otherwise also, what I'm going to
do now is make them absolutely ready for a
to be used as a canvas. I can see a little
bit pump here also, which is a little
bit of erasing. I'll just cut it off on so yeah, so it's smooth now. Okay. So I have an A4 size paper here. You can take any colored paper, black, white, doesn't matter. Your choice on I'm gonna do
is now that this paper into these sizes and face them behind so that it looks like
a finished coastal piece. Okay, So here are the papers completely cut out from
these A4 size paper? Or just one quick thing that I want to tell you
is that I just made sure that the paper is not exactly as the size
of this coasters, but a little bit smaller. Why? Because I don't want this paper to show
off from the front. That is why you can see there's nothing none of the paper that you can see from the outside. And in the backside. It's just a little bit
inside, which is fine. So I did for the circular one so that the paper is
not visible from the front. So now I'm going to stick
it on the back using physical or you can use
whatever glue you have at home. Any glue is totally fine. Okay, So here are
the final posters. So I think they look perfect on the backside and absolutely
ready to be used right away. So you can use them for your personal use or you
can use them for gifting. Christmas is coming up and I think they
make perfect gifts. I hope you enjoyed this
section of the class and you enjoyed creating
this pretty coasters. So I hope you understand that all the paintings that
we have learned so far, or maybe, you know, any pine
trees that you can think of. Backtesting you can
actually paint them on this four-by-four
size wooden coasters. And you can create
any poster out of these pine tree
paintings that we learned. And they are just
perfect for Christmas. So thank you so much
for joining me in this section and I'll
see you in the next one.
55. HANDMADE GREETING CARDS - Preparing the papers: Okay, now onto the final
section of this class, and here is the A4 size paper. What I'm going to do
is cut it into half. And then I'm going to use each
of these section to create one greetings card that I think is going to be perfect for using these Christmas
and New Year's, whatever is your location that you want to
wish your friends. I want to create
two greetings card out of this because I want to wish to open my most
favorite people by sending this to guts. Okay, so the first
thing I'm gonna do is cut it off into two equal parts. Okay, so here are two A5 size of papers and I am going
to fold it into half. Okay. So here are
my two creating Scott Ready to be painted on? I still haven't decided
what I'm going to paint. But let me start
thinking of something. And it has to be something with a fine trees because that's what we learned in this class. So I will try to create
something very easy, very simple on this one. But you can talk like all the paintings
that we have learned. You can create any of
them on these cards, especially the one that we learned in the cost of section. I think this will make
such a beautiful, something which is
based on white, will create a very
beautiful reading, Scott, I feel so you can create
it like this and use up this space for writing message. Look at them. They
look so pretty already just by facing
live on the card. But I'm going to paint
something on top of this. And let's get creative.
56. Card 1 - Purple background: Okay, so before painting
on the grading, Scott, I am going to tape
it down on my table. Okay, So this is well taped. Here is my plate of colors. And the colors I decided
to use for this one is, I haven't really painted any
purple painting as of now. So I thought I should
do a corporate bond. So I've taken out Prussian blue, pink, black, and white. Okay, and here is the
size for a small brush, which I will start
blending of the colors. So the color I want to use is obviously Prussian
blue and pink mix. So I am going to create
these pretty color first. Okay, So I think that's a good amount of color
that I have prepared. And I am going to start off somewhere and create like a V, The land, like this. Okay. Like I said, for my card, I do not want to use
a very dark color. So that was the only
dark color I used. And now I am going
to teeny down. As I go up. I want a bit more of a pink because I feel
it's too bluish. Okay? So I think this is a
very beautiful color. Okay, Now I'm going to go do some blending from
dark to light here. And I am going to use the side of the bristle
to do my blending. I felt my brushes are
too much of pain, so I'm going to wipe
it off a little bit. So I am going to have little bit of
pink in some thoughts. Some light. So blending all the
colors here and there, and creating a very
pretty background and more of white on the top. Okay, I have to be careful. I don't want to spoil it
this side of the card. I take this pretty purple
color is looking really nice. I haven't done any painting
with this color yet. This is my first meeting. Okay. Here what I don't
like the blending, it's looking more like a line. So I'm going to use some
more of this color. Maybe just a little
bit of the dark tone. Maybe there's just a little
bit of Prussian blue also by not lending it in. Okay, no, that's too
much of Prussian blue. I wanted to switch
to purple again. Okay, I'm washing off my
brush now because I feel I got a little too much of
Prussian blue in my brush, which I don't want,
and I wash it off and now back to a little bit more of the
purple shade of pink. Okay. Just a bit more of
pink on this side. I have my sister in my
mind as I'm doing this because most favorite color, you can see she, She's lights, something
in her stuff. So I think this will make
a perfect gift for her. Okay. Just a little bit more of this dark purple on this corner. See, I'm moving my brush, encounter known direction
and contemplate, dig off. Okay, I absolutely loved this beautiful background
that has happened here. Okay, now what I'm going
to do is same brush. I'm not washing it off, just picking up loads
of white paint. And I am going to go
over it like this, create that undulating
lend structure. The snow-covered land. Not pressing my brush too hard because my brush
has a lot of purple. And I don't want to get
rid of it yet because I don't want that
color just here. So I'm pressing my
brush just a bit more to take out
that purple color. See, it has come out. And now very slowly and gently, I am going to blend it off. Since I'm not going to put
any reason on top of this. And this picture is going
to look through it forever. I wanted to add a good amount of white texture as just a
white thing body paint. Because I think it's
just pretty clear. It's like the snow effect. And again, I'm just
adding just a little bit more of this blue color. See, placing my
brush to get out. Take this color out, which is here at the bottom
of the bristle here. And good, good amount of color and texture and everything
out onto this guy. Okay, now what I'm
going to do is get rid of as much paint
as I can possibly. And then what I'm going okay. Just I just wanted to add just a little bit
more of purple. Okay, see, I have so much of
purple in mind price still. You know what I'm thinking? I think I want to
wash off my brush and have like
absolutely clean brush before doing the next step. So I'm just washing it
off, asking as possible. And now I am taking another
huge layer of white. And what I'm going to do
is add one more layer. Remember the landscapes
structures that I taught you? You can do one layer, two layer, three layers of land,
whatever you like. And now is going
to be all white. You know why I'm
keeping this on white? The bottom part, because
this is where I can read my message or just add just a tiny bit
of small message to make the card look pretty so. That's why I said I like to
have more of white things in my painting when I want to
use them as greetings card. And you see a little
bit of purple is coming out at the bottom, which is totally
fine, not too much. Because I cleaned off my brush
and does adding layers and layers of white paint to make it look pretty. So. That's it. The whole background is done. And now I am going
to wait for it to dry a little bit because if I start painting on top of it, my hand is going to
blend up the colors, so I'm going to wait for it, dry it with my
hairdryer and maybe and then I'm going to paint
some pine trees around it. Okay. Now it's not completely dry, but it's almost dried
and I will try to be a little careful and
paint on top of it. So the color I'm using is mostly black mixed with a little
bit of Prussian blue. And I'm going to start
with the first one. I am going to start
it behind this land and take it all the way
up maybe till heal. And lucky bit of blue. And I'm going to add
some tiny textures. Okay, So this is the pattern
of the tree that I am trying to create here. Okay? You can see my fleet. Okay, here there's a
thick layer of white. So I have to be a bit careful
and add on top of it. So we're all I'm going
to do is add huge layer of paint here so that
it goes on top of this. So creating some
small textures like this one we created
with fan brush, but this place is too small for a fact for my fan
brush to be used. So I am doing this with
a small round brush. But I think the dishes are
looking nice in this way. Okay, so that's my first tree. Maybe I'll just add a bit
more of textures to this. Not too much. Okay, and now I'm gonna do one
more of this tree, maybe one or two
more. Let's see me. One only fuel. One is done and one that
would be the last one. I don't want to add too
much clutter displays. Small place anyway. Okay, so the main line is done. And now I'm going to create some of the lighter
shades on top of it. So I'm mixing a little bit
of the purple sheet with the white light bluish color. And I'm going to
go on top of this. It's not going to
be very prominent. Okay? And I'm going
to finish it off by adding some snowfall
on top of this. So I'm mixing it up with
a lot of light and water. Okay, good number of
snow has been added, so I'm just going to change
the shape of few of them. I think this one on
top of this tree, I quite like it is very
big and of a weird shape. Okay. I think that's all not going to play around with it anymore. Let me uncheck this and
see what's there inside. Look at this pretty predict
card that we created. I think it's so good. There are unlimited options
that you can do with it. And I absolutely loved
this whitespace in the bottom because I'm going to write some message over here. So let me write that and
show you how it looks.
57. Card 2 - Blue background: Okay, so now let's work
on the second one. For the second one, again, I'm going to tape down
my Todd onto my table. And here is my pleasure. Color is the same plate
from the previous one. And all I've done is taken up a little
bit of viridian hue. And I'm going to talk to coloring that
indented becquerels. Okay? So for this one, of course you understand
by now probably that I want to do my favorite
color, teal blue. So here is my color. And I want to add it a
little bit on this corner. I'm trying something. Absolutely. Meal. Let's
see how this turns out. Only this bottom right corner. I want to keep it
absolutely dark, remaining all of it. I want to and also see how
I'm pleading subjects shoes out of it. Absolutely. Light color of green. Okay, I think this
is pretty good. And now I'm just
going to add some more of white into
the background. And I'm going to wash off
my brush completely clean and add lots of white
on the other side. And blended in. Just a very smoky, foggy kind of background
that we're treating here. This can create a beautiful
painting as well. If you want to try this out
as a painting, I think. See how beautifully I'm doing the shading all over Europe. Okay. I just feel this corner
is not that prominent, so I'm just going to create this dark blue color once
again and add some of it. And I'm dabbing it so that
the pictures look beautiful. Okay, that's a lot dark. But only in some
places, not everywhere. See how I am kind of
vibrating my hand to create some of these textures
in some parts. Okay. And while I am with this one, as they moved the dark color, what I'm also going to do now is before painting
the pine trees, what I want to do is something, again, something new
that I want to try out. I am mixing a lot of
water with the, okay, maybe I will not do this
with a flat brush and I will switch to my liner brush. Okay, he already
is my liner brush. And I'm mixing these two colors, creating this dark teal blue, almost like peacock blue color. And I'm going to add a
few drops here and there. More water because the
more water you have, better splatters you make. I wanted to make this
corner very dark. I think I would splatter
some more on this corner. And just a few more
here and there. Maybe I will make a
little bit of white. Make this color a
little lighter. And slice. Oh, look at that blob. I kinda like it or not
that I dislike it. But I did not want that big, but if that happened, It's okay. Okay. So now all the blobs are coming a little lighter shade
than the first layer, which was very dark. And now I think I want to
make even a shade lighter. You see how I am graduating
from one step to another and kind of improvising
Mike Flynn. And some more lighter
drops, some water. I want to get this
white clean so that I have some
space for writing. Okay, I think
that's good enough. Quite like the background. It's like a foggy background
with a little art, create art and
creativity, kind of. I think I just want to
add a few more dots. Sure. That's it. Not too much. That's it. Just a little bit. And now I'm going to let it dry. And then once this dries, I'm going to add the snow
pine trees on top of this. Okay, now this has almost dried and now I'm going to create
some pine trees on top of it. And I'm going to vary the
shades little bit because you see there are so many
variations of colors here. So I'm going to
vary the sheets of the biases according to
the background color. Okay, so let's see
how I do that. So I'm starting off with
the lightest colors. So here's the lightest color, Here's the middle color, here is the darkest color. So it's all the teal blue, just more white added onto
them up starting off with though lightest color and the size I'm using is a keynote. See, number one. You can see it's
almost not visible, but as it's coming on the
dark bark, it's visible. I feel that she pops
this brush is too much, so I'm switching to double zero. I think that's better. Now I'm taking the dot product
one and adding one. Maybe. See, I did not increase
the base of it. I kind of put it down from here because
if I increase the base, it's going to come all the way here and I do not want that. So improvisations, okay, even a darker one because this place is
already pretty dark, so I'm mixing the
colors once again. Maybe I should make this
just a bit of black with it. Yeah, I think with a
little bit of lag, it's kind of looking better off trying to create some dots on the side and some
shirt to this tree. Changing the shape
of the tree itself. I think this is looking good. And maybe I want
to create a little taller one with the
medium sheet probably. How about C one phloem? Sure. Too high. I know. Okay, that's too dark. Maybe I want to switch
one lightest shade. Kind of doing the technique. And you see as the color of the tree is matching
with the background, I'm kind of leaving it at that and bringing
just a line down. So this is, these are
all artistic pine trees. Just increasing the
fixtures on the side. None of this is plan
is just happening. So I'm just keeping my eyes
open and seeing how well I can blend it with this
beautiful background that I have created. Right? And maybe some of the
lighter ones over here. This one I'm taking down
all abroad and nice. On the way to the base. That's a lot darker and
probably make it a bit lighter. I want to add some white to
this and see how this looks. Yeah, Some of my
highlight colors. Nice. So there is no fixed pattern. Just follow your
intuition and do wherever you feel like doing it, however you like,
have fun with it. Play with the background. You have created a
beautiful background. I go like this. It will be exactly like mine. But you understand how to create an even do it with any color that you like and then match up your trees
with the background. So it's kinda like a fun game
with your snow pine trees. So have fun with it. And now I'm just thinking, I will add some white
highlights to this one, maybe a little bit to this one. This is the benefit of
understanding how to paint a snowy pine trees
because once you do, you can never go
wrong when painting. So by increasing, even
if something goes wrong, you will be able to
correct it and get it. That is the beauty of good understanding the
basics of doing anything. Once your basics is strong, you can literally do
anything out of it. Okay, do I want to
spoil this place? This I like this
picture over here, probably I should not. Okay, one last
thing I want to do is add a little snow
drops on the double food. We have added all these
colorful abstracts on the side. But now I want to
add a little snow drops on this area
that So for that, I am using a not so four
terms with the white color. And I'm trying to drop the
white on top of the trees mostly so that it looks
like it's snowfall. So rather than creating
the highlights with the with my brush and painting a layer of white highlight layer
like we normally do. Sure, I am using my abstract. Brushstrokes are other splatters to create the snow drops
on top of this trees. Okay, So our second
card is ready, and now let me fill it off
and see how it's looking. Wow, I think it looks
absolutely classy and purchase. Just for the person that I have in mind that I want
to give this talk. And I'm going to write
something on top of these and show you how
it looks a little later. I want this to
completely dry off. The doors are pretty wet. I'm done. I'm going to write
on both the gods and show you how this looks.
58. Card Message and Packaging: Okay, So here are the two
final greetings cards, and I think they look absolutely excellent with
just a little bit of words. I did not want to
put a huge message on the front of the painting and just give a couple
of positive words. So the reason I wrote, joy and calm because I want to wish Joy and
come to the person. I am giving this to. Inhale and exhale because this is just a reminder to live in the present moment to the person that I
am giving this to. I hope you enjoyed creating these beautiful
cards along with me. And you created something
very beautiful, if maybe not the same one
that I taught you here. Maybe something
different, something from your own imagination, or maybe something we learned
in this class earlier. You can just pick
whatever you want and create something that you
can gift to your loved ones. Now, one last thing that I want to tell you before finishing off the card is instead of writing your message inside
in this paper, I am going to show you a
very easy trick of writing. So that is something you will
need to change the message or something you made a mistake. You can easily do it. Take out a paper from any of your sketch book or
journal that you have at home and then cut it according to the
size of your card. Okay. So here are
the two small papers that I have cut out
from my journal. And now what I'm going to do is just add this inside with a little washi
tape like this, whatever you have at home. So I had a few of these. So this just makes
it look very pretty. All you're going to do is
just sit here like this. And for the blue one, I will use this blue washi tape. Okay, and our final
card is ready. Look at them how pretty
it looks perfect for writing any message
that you want to hear. And if there is any mistake, you can always change
it, replace it, maybe I'm going to take it if the main washed it is
not very strong glue, so I might stick
it with a favicon once I have finalized
the message, but this is how it looks. And finally, you can put them in a beautiful envelope
if you have them at home. I don't have any
pretty envelope, but I have these plastic covers. So I'm going to put
them inside. This. Here is one. They look very nice, store-bought with a
plastic cover like this. It looks very classy,
very elegant, like as if you're just
bought it from the store. And yet you have these
beautiful cards ready, all done by yourselves
sitting at home, learning how to paint a snowy pine trees and you
can use them for gifting your friends and surprise your friends with
your creativity. So I hope you'll enjoy
this entire class. And you learned a lot of things. We've covered a lot
actually in this class. Thank you so much
for joining me.
59. Thank you!: If you're watching this video, I am assuming that
you've already done everything that I
have taught you in this class and you are here. So first of all, kudos to you, give yourself a huge pat on the back for
coming here and for completing everything that I've taught you so far in this class. Before wrapping up,
I just wanted to go over all the things
that we have learned. We have covered a lot of
things in this class. You have learned a
lot in this class. And if you can carry it
forward and Pakistan in your buildings and create more winter landscapes or width. By practicing all these
different types of pine trees, you are going to be really good at painting
snowy pine trees. I hope you're already
feeling by now that you are painting better trees
than before, right? So let's go over all the
things that we learned and do a quick recap. First, we started
off with learning the two very basic trees or
with flat brush technique, where I showed you the six individual steps for creating us
know buying tree. Then we repeated
the same thing with the filbert brush
in the first three. And then the second tree, we tweak the
structure of the tree little bit with the
tip of the brush. And we created a very
gorgeous looking kind of different for tree. And then with the fan brush, I start to use these
two types of trees, which are more like the
secondary of the filbert brush. It's kind of like a
little complicated with a very beautiful structure
of the Christmas tree. And then finally, I
taught you how to paint the snowy pine trees with the round brush with a
three different techniques. I feel this is a technique that mostly we are going to
use in most Chapel paintings. Then finally, I told you with
the round brush how you can create different types
of snow pine trees. The small ones that you
do in a distance like a misty pine trees or chief
forest at a distance. So that's all about the
techniques that I taught you. And after that, we
learned creating these two beautiful paintings that you can create
on a huge canvas and add as one piece. Or you can even gifted these two paintings
by basically done to show you how you
can use these trees that we learned
in the techniques and put them in your paintings. So this is the one which is done with a flat
brush technique. This is the one with the
filbert brush technique. And in the distance we use
the round brush technique. So now I want you to try out one painting
with a fan brush, because I haven't done
any of that here. And after that, we learn to
create these four coasters. I feel very easy and you can
create so many more cost us out of this snow pine tree class that
you have learned. And then finally, we learned to create these
still greetings card. I hope you have created
them and you are going to use them to give to your
friends this window. And that's all, that's all
we learned in this class. I hope you had a good time, good experiencing, learning everything
that you learned here. Before wrapping up, I
just wanted to tell you that if you
have any question, please write it to
meet this class. I don't consider this
class as a complete class because I might add more things to eat
based on your feedback. So if there is anything
that you don't understand, if there is anything
more that you want me to teach these or write it to me so that I
can curate this content. I can edit this content. I can add more to it
depending on your feedback. So if you have any
feedback for me at all, please write it to me. And if you have
any question that also you can ask me if you've created any of this from this class and if you're sharing
it on your social media, please tag me because I would love to see what you've done. You can also post them in my Facebook group
if you want to, or you can share it on your
social media and tag me. Thank you so much for
joining me in this class. And I wish you a
very happy winter season full of lots of
snow, pine tree painting.
 Debasree Dey, Acrylic Artist & Educator