Transcripts
1. Introduction: Hello, welcome to stylization
for Illustrators. How to draw Objects. Less realistic. My name is Mr. Tom Froese. I'm
an illustrator. I'm a teacher.
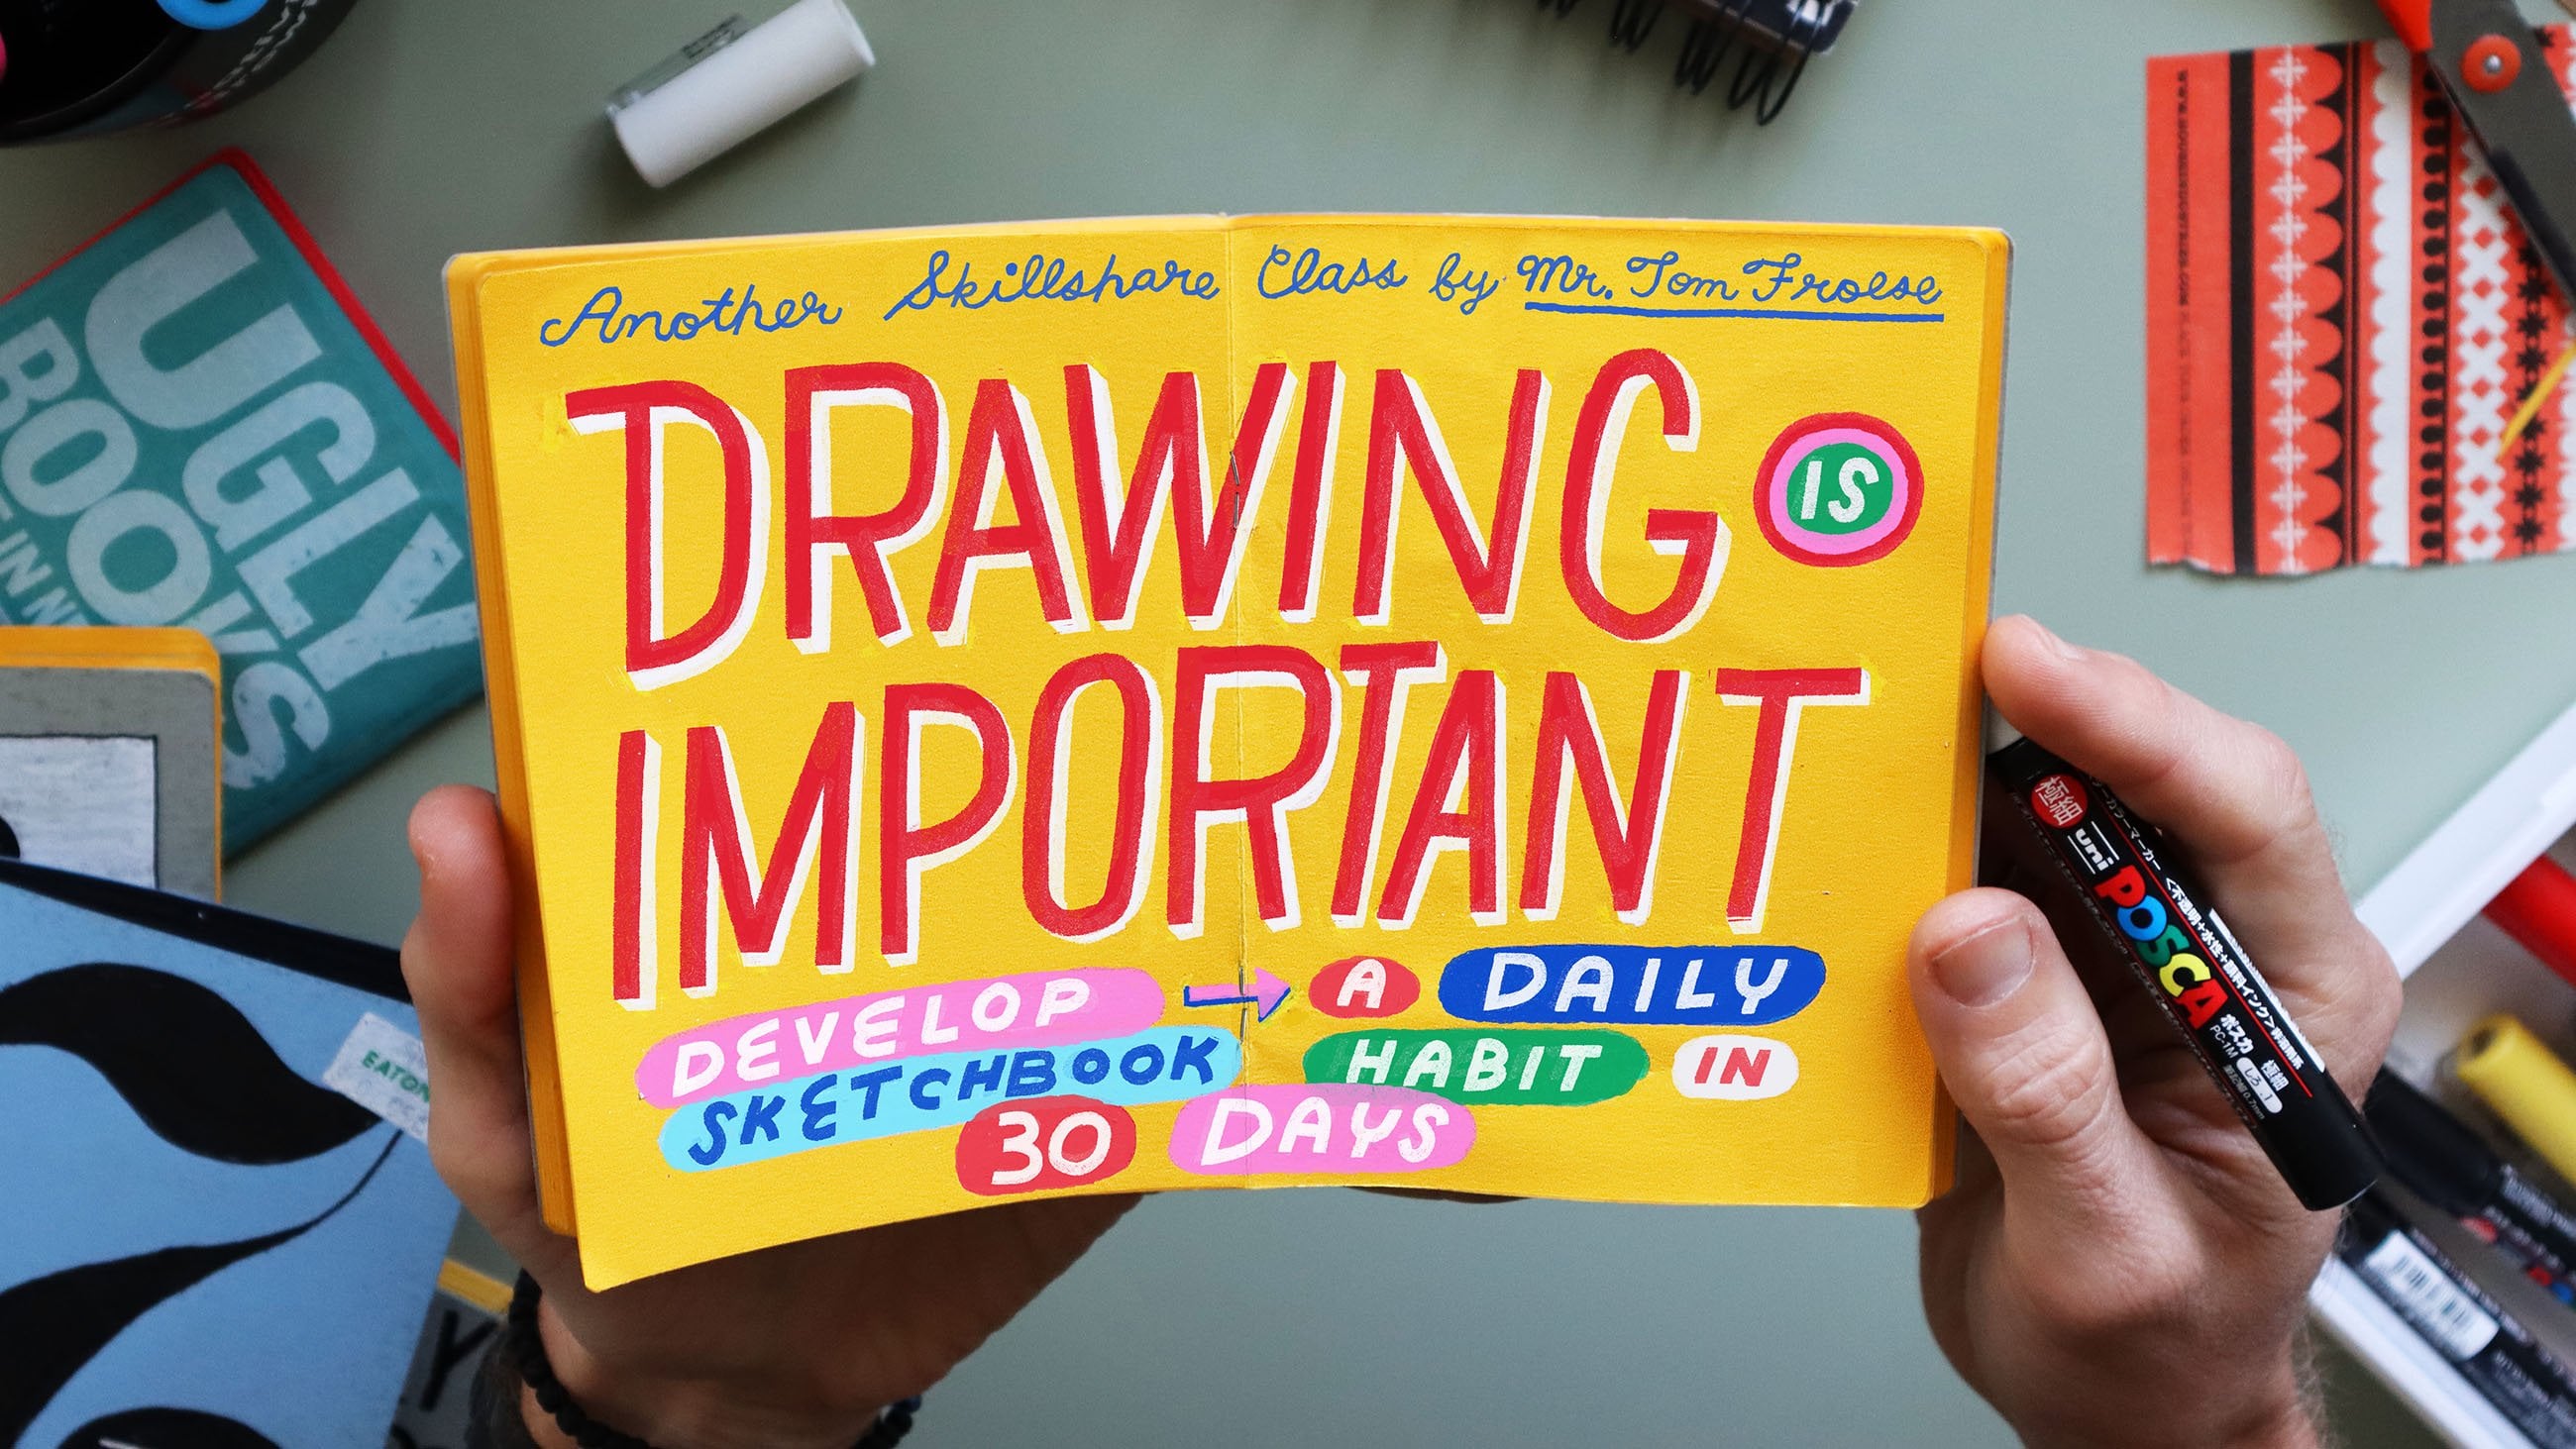
I've been teaching online for about a decade, and I'm also a newly
minted author. I have a new book called
Drawing Is Important. So I made this class because
as strange as it seems, many artists find it harder to draw less realistically
or non realistically. So if that's you, you've
come to the right place. So maybe you've looked at
a stylized illustration, something that has
a kind of look to it that other people have made, and you've wondered how they've figured out how to do that. You might want to do
something similar in your own work because
maybe you want to have a more unique
illustration style, but you don't know
how to get there. Especially, you don't
know how to do that in a way that isn't just
copying what other people do. You want to do something
that's unique. So I'm going to get into
this later in the class, but I'll just say
that stylization is something that you can
develop on purpose. It's not really a
special talent, but something that you
figure out bit by bit. I remember a clear point in time when how I stylized actually
became very clear to me. Was this project here
that we're looking at for a cover for a little local
magazine called The Growler, and my idea was to have
this character on it. I wanted some kind of
guy drinking beer, but I didn't know
how to fit it into this squarish space that
I had to work with. I drew this beer bottle shape, and then I thought,
what if this guy just fit into the bottle? What if he was
somehow fit inside, like a ship in a bottle, I
guess, how would he fit? What would his posture be? Importantly, I give myself
permission to break free from realistic proportions
and anatomically correct or possible poses. That might seem
obvious at this point, but for me at the time, it
was like, I get to do that. Now, this was more related to stylizing people or figures, and I've already
taught this in a class called Odd Bodies. But my point here
is that so much of this is about mindset. We're not bound to draw things
as they are in reality. We get to play with them. We can actually just have fun and draw completely
in the wrong way. So the backbone of this
class is what I call the five principles of
stylization, flattening, abstraction, customization, exaggeration, and singularity. And together, these spell faces, which hopefully is a convenient
mnemonic device for you. Now, I'll explain each of these step by step in the class, and you'll get a
chance to practice each one as we go in
little drawing exercises. For the final project, we're
going to be illustrating a favorite object based on
your favorite era and hobby, and that can be used
for something like a T shirt or an art
print or poster. The focus, of course, will
be on the illustration, but I find it's
always helpful to think about how an
illustration is actually going to
be used because illustration is always
made for something. Real. To complete this class, you're going to need some
basic drawing tools. Honestly, for most
of those class, you'll probably just do fine with a sketchbook and a pencil. If you want to complete
the final project, then you'll also need some
kind of illustration tools, whatever you want
to use will do. I'll be using Procreate and my custom brush pack called
Inky Basics in my demos, if you want to follow
along or use that, I'll include this for
free with a class and you'll find that in
the class resources page. So if you're ready to
start styling objects with me, let's begin.
2. What is Stylization?: First things first, let's talk
about what stylization is. Stylization is about
drawing things in a non realistic way for
whatever reason that might be. For illustrators, it's usually about having our
own unique style. When you see the work
of an illustrator and recognize their style, a big part of this
is in how they stylize or reinterpret
real life things, creatures, people, and so on, in a more interesting
and recognizable way. You know, just
take, for example, this tiger that we're looking at here by Alison Martin Provenson. You can see that it's a tiger, but obviously it's
not a photograph. It's done in a very playful. Stylization can be about telling a story as we saw in
the previous slide, or it can be to
mystify the ordinary, like what we see in
this abstract version of a tiger by Celestino Piari. Stylization can also
be a way of creatively drawing attention to a
particular quality or idea. In this clever illustration, the stripes are actually
formed by where the leaves those green leaves
around the edges overlap the tiger
in a playful way. Why is it so hard to
stylize for some of us? From a young age, we're taught or just instinctually
believe, I guess, that the most important
thing to learn about drawing is how
to draw realistically. This is what most people
think about and probably want when they want
to learn how to draw. By the time we're adults, we have this one way of drawing
that seems to be the most important and it's become so ingrained in how we approach drawing that it's
hard to shake out. Anything that's not
realistic that comes from our own hands feels like
we're doing something wrong. We might even think that
it's a bad drawing. How do others know how to
stylize and how do they know how to do it in a way that doesn't just look
like a bad drawing? You might think that such lucky illustrators
are just born with a certain natural talent and the rest of us will never
have access to that. You have to be talented
to figure out how to do something in a unique
and stylized way. Well, the first big shift that I want to give you in
this class is that stylization is something that
you can learn and develop. It's not a magical skill that you're either
born with or not. The second big shift that
I want to give you is that there's this
key difference in intent between
drawing realistically and drawing in a
more stylized way. They're both valid
ways of drawing, but one has a different purpose.
You can put it that way. It's a difference
between depicting reality and expressing an idea. Take, for example, these two illustrations representing
a typewriter. They're both stylized
to a certain degree. They're clearly both
not photographs. One is far more about an idea than a particular
instance of a typewriter. This is an example
of the principle of abstraction that we're going to talk about in a little bit. So any illustrator is going
to stylize to some degree. Some illustrators
will stylize more and some will stylize less. In my maps, for example, the figures and objects
that I include are stylized as both a storytelling
and design decision. That's kind of my reason
for stylizing here. Want to represent the
various buildings, beaches, figures, and so on, in a way that tells the
story of the place, but in a more simplified way. In a map, there's
so much going on. I need to keep each icon
simple while they're still being I want those icons to be recognizable
for what they are. But I don't want to
simplify them so much that they just
become really boring. Then finally, I
want everything in the composition to just
look like it belongs. I try to stylize all the
elements in the same way, and this is part
of how I achieve consistency within the image. So in my more conceptual
illustrations, these are more idea based. You can see that
I don't represent reality very faithfully
here either. Instead, I look for
ways to use things as symbols to express ideas. The important thing
here is that I have to balance expressiveness
and clarity. I want to play with the
proportions of my figures and simplify things
like the hourglass or the pencils in this case, but not so much that they stop making sense to
the average viewer. So stylization isn't
just about making things zany or jazzy or crazy. They have to be grounded
somewhat in what people understand as reality or
as a meaningful symbol. These are just a few examples of what stylization is and
what it can look like. So just to conclude,
stylization is about drawing things
less realistically. And as illustrators, we usually have a specific reason
for doing that. So I named a few
of these reasons in lesson storytelling
or just to have a style. But now we'll turn
the question to you. Like when you're here
taking this class and clearly wanting to learn how to draw less realistically, why? What's your reason for wanting to draw in a more stylized way? You can write this down
in your sketchbook or share it with a class. Either way, I'll see you in
the next video where we'll take the first steps in the
hands on part of the class.
3. Choosing Your Object: Now it's time to
take that first and important step in
the class project. You're going to be illustrating the same object a lot in
the next few lessons. So it's important that you
find it interesting enough to draw over and
over and over again. So just to start, think of your favorite era and your favorite
hobby or pastime. And then think of an object that represents both of these things. This will be your muse for
the rest of the class. For me, I love the
1960s and by far, my favorite pastime is running. So after a bit of brainstorming, I landed on what is probably the most obvious thing that's related to these two things, which is running shoes. For you, take a moment to brainstorm what that
is for yourself. You have your favorite era, maybe it's the 1980s and
then your favorite hobby, maybe it's I don't
know, winemaking. What does winemaking in
the 1980s look like? That's very specific, but
you can start to think about what are those objects that would be related to that. So that might be
wine bottle, corks, some kind of machine
to put the cork in, a carboy, like, the
thing that you actually, like, ferment the wine in. And then you can make it even
more specific by thinking about what did these things
look like in the 1980s? So this example is maybe an example of something
that might be more challenging because
maybe there's not really an 80s
aesthetic to winemaking. Maybe there is, but
that's the idea. So it might take a little
bit of trial and error to get to the perfect
object for this class, but that's basically
how we get there. So the next step
is to go and find a specific instance of
your chosen object. You might already
have it in mind. Maybe you went right for
a particular make and model of a car or
a favorite camera. For me, I went to Pinterest, and I looked up
1960s running shoes. And then from there, you know, a bunch of results came up and I found a pair of shoes that
I thought were pretty cool, and this is what I chose. You're looking at some
beautiful Nike daybreaks. I think that they look
both nice and vintage, and I now basically want
to own these shoes. Before we go on, once you've
selected your object, go ahead and draw it
in your sketchbook. Draw it in a way that you
would normally do right now before you learn
anything in this class. You can try to stylize
it as best as you can, or you can just draw it in
whatever way comes natural. It's important that
you do this now rather than after you
learn and actually understand stylization more
because that way you can compare how you draw the same thing now with
how you'll draw it later. So pause this video
now and spend maybe 5 minutes
drawing your object. When you're done,
you can share it on the class projects page and then come back here to
resume this lesson. So let's talk about what makes a good subject and a
not so good subject, at least for this project that we're going
to be working on. So the first tip is to find something more iconic
rather than generic. Something that's iconic has features that are unique to it, like the CLE running hat. Well, there are a
lot of imitators of this style of hat today, CLE kind of invented
this multi paneled look. You know, it has these different panels of
different colors, and the hat's a specific shape. And then they have this large CLE logo right on the front. That's kind of like the classic
product that they make. Anyone who knows about
these hats would recognize one even if it
didn't have a logo on it. Now the opposite of
iconic is generic. Take the pink hat on
the right, for example. Do you know what
brand of hat that is? Can anyone even lay claim
to that style of hat? Even though I pulled
that directly from Lulu Lemon'sPducts page, it's basic and it's open source. You know
what I'm saying? No one owns that look and
that's what makes it generic. Either way, it's
recognizable as a hat, but it has no real
distinguishing qualities that we can sink our
teeth into today. The next tip here is to find something that has a
well defined shape. This is versus something
more shapeless and blobby. Case in point, can you tell
what these objects are, you can probably tell what
one is, but not the other. As delicious as that
pano choco looks, it doesn't really have a lot going on in its overall shape, and that makes stylizing
it more difficult and the results of trying
to draw that in a stylized way more
disappointing. So the next tip is
to choose objects that have the right
meaning built into them. For example, if
you need an object to represent the idea of fruit, then one of these is going to do a better job of that
than the other. You know, even if you knew that the right object
was a dragon fruit, it's more obscure than an apple. Now, whether you need to
choose a meaningful versus obscure object kind of
depends on the assignment. In today's class,
choosing something with a more defined shape is more important than whether it's
symbolically meaningful. All right, so the
next tip here is to choose an object with
enough detail to work with. Again, there's no rule of how complex or simple
your subject is. It really depends
on the assignment. For this class, I
recommend choosing an object that has
enough defining details, both in the overall shape and within it to
play around with. For example, perhaps a
single orange is too simple, but a bag of oranges like the one I'm showing
here by Alice or provides lots of interesting details
to play around with. On this note, I'm showing
two illustrations, not reference photos. But for this class,
definitely use real world objects either from a photograph or something that you actually have physically in front of you. Otherwise, we're just stylizing someone else's stylization. The next tip is to
find a reference of your object that shows it in
the most recognizable way. If you own the object,
then place it in such a way as it can resemble what we're
talking about here. Often if you're
trying to capture the likeness of an object, it's best to show it in a flat, straight on view, like
what you see here with this Botti stovetop
espresso maker. So the images here show the same espresso
maker in two views. In one, it's iconic shape. It's really clear,
while in the other, it's more obscured because
of the viewing angle. If you work on a flatter
graphic style like I do, you'll struggle to
make recognizable stylized illustrations when you're trying
to draw them in some kind of angle like this. They call this three
quarter view angle. I'm not saying
it's impossible to stylize an object at angles, such as this Eames chair or the espresso maker we
were just looking at. But if you're struggling to draw something in
your own style, this might be the reason why. Speaking of Ems chairs, some objects just have a
built in style to them, like the Ci hat or the
BLD espresso maker. These have an iconic,
instantly recognizable shape. But just like anything
else you want to draw in a less realistic way, it can be fun to play
around with iconic objects like these and just see how
far you can stretch it.
4. Principle 1: Flattening: Now it's time to dive into the five principles
of stylization. Make sure you have
your drawing tools with you because we're
going to be drawing our different objects in many different ways to learn
these principles by hand. So I mentioned this at
the start of the class that the five principles of
stylization are flattening, abstraction, customization, exaggeration, and singularity. Now let's go through
each one of these in more detail, starting
with flattening. So flattening means to remove the illusion of depth or
three dimensionality. Its purest form, that
means no shading, no shadows, and no perspective. A key feature of my own
style is in flatness. I don't show much
depth, if at all. I like how it looks
when I flatten things, and I like the
challenge of trying to represent the real
world in a flatter way. And by that, I mean, with minimal solid colors and most elements defined by their own shapes
rather than outlines. So imagine a silhouette
of the object, and it's still
being recognizable, like we see in
this vespa writer. Flattening is the most
fundamental quality of stylization and possibly one of the
hardest shifts to make if you're used to drawing
in a more realistic way. So this is just an example of an Eames chair shown
as a flattened, more pure silhouette,
so on the left, and then in a very
simplified way, but in a more straight on view,
like we see on the right. Flattening can happen in full force or it
can be more subtle. Just, for example,
the espresso maker on the left of
this slide is more extremely flattened
while the other retains some information
about its depth. Both are equally valid choices. It really depends on
personal preference and sometimes the context
or the assignment. Either way, in both, the specific object they're
representing is very clear. So let's dive into our
first drawing exercise. So in this exercise,
we're going to practice drawing
in a flatter way. So first, draw your chosen
object with some details, but without any sense of
depth or dimensionality. And then in the second
part of this exercise, draw the object as
a pure silhouette. And in this demo, I'll
show you how I did this with my own chosen object. So first, I'm drawing
the shoe in a flat way, and I've chosen to
draw it kind of in its most basic view, which is the side view. I mean, when you
think about a shoe, this is the elevation
or the projection of the shoe you think about
the side view where you see the toe and the heel
and everything in between, as flat as possible. This would be a lot harder
to draw in a flat way and resist adding
shading or some kind of suggestion of
three dimensionality. If I were trying to draw in
a more foreshortened way, like with the toe in the front, and then you don't really
see the heel at all. It's possible to draw that flat, and that could be very
interesting exercise, but of course, it
just makes it harder. So that's what's going on here. And now, in this second view, it's really straightforward. I'm just drawing it as a pure silhouette So
I was able to just copy the first shoe
and then fill it in. And then I see the silhouette. And even though this is
a very basic exercise, it allows me to really
see how effective showing this shoe
at this straight on view is presenting or representing that object in a familiar or recognizable way. If I were to have drawn that
shoe from the front view, like with foreshortening
with the toe in the front, you don't see the heel
or anything like that, filling this thing in as
a pure silhouette would clearly not be very recognizable
as the shoe that it is.
5. Principle 2: Abstraction: So the next element
is abstraction, and that means reducing the object to its essential
visual qualities. Think of abstraction as removing details
all the way up to the point where it stops being what it is or
being recognizable. Flattening is actually a form of abstraction because
we're stripping away information that describes
depth and perspective. In my own work,
flattening kind of just naturally leads
to abstraction. Example, this image
of the Taj Mahal, it's actually a smaller
spot illustration in a picture book
because it's small, I didn't need a lot
of details in it. And so this is just an
example of work where I'm playing with a balance between too much and
too little detail. And I really like playing
with this quality. The question you can ask when attempting abstraction
can be something like, what is the minimum
amount of information needed for someone to
know what this is? Classic example of
abstraction that I've used in other classes is if you want to represent some kind
of coniferous tree, you can show the tree with all its little needles and
branches and its exact shape, or you can just draw a triangle, perhaps with a little
stem on the bottom, and that could equally
represent a tree, I guess, a pine tree, but
just in a more abstract way. There's no right or wrong
amount of abstraction. It's more of a spectrum. It always depends on your style and on the specific
project you're working on. So in this image,
I'm just showing you how abstraction can
be more intense as in the left image
and more subtle as in the right image
or example here. I think it's also
important to note that in the most abstract example here, it kind of needs
those hands there to retain any semblance of
a typewriter at all. If it was just the dots, you might see those as
something completely different. So now we're going to do
an abstraction exercise. And that means drawing
our objects three times, first with maximum details, next with medium details, and then third with
minimal details. I'll show you how I've done
this with my own object. So in the first version here, I'm just drawing this shot
with as much detail as I see. I'm not really holding
back too much. It is kind of
flattened, but you can see I'm even adding
shading and tone to differentiate the different
panels on this chute and your object can look
super busy and detailed. At this point, it is supposed
to have the most detail. For the second part,
I'm removing some of that detail and we're calling this the medium
amount of detail. And so here I've stopped
drawing tonally, and I've even kind of simplified how I'm drawing the treads. I'm being a little
bit lazier here. I'm letting myself not draw
them in a more square way. It just took less effort to draw as these
little undulations. Now, in the minimum
detail version here, I'm just drawing it as minimally as possible at
the risk of it being, like, really boring,
to be honest. So I've just drawn kind of
like the outline of the shoe, like, the outline of the
silhouette, basically. And now I'm not filling
in much detail, but I'm starting to name what the parts are that make
this shoe what it is. Kind of jumping ahead here
because this is actually more of a singularity exercise that we're going to
get to in a bit. But in this
abstraction exercise, we are thinking about what are the qualities that make
our shoe what it is, and how much of this do we need to leave in for it to actually be recognizable for the exact
specific object that it is? Then finally, I
decided to go back to the medium detail version because this is kind
of the sweet spot. You don't want it too
detailed and you don't want it too abstracted,
normally speaking. And so what I'm doing is just tracing over my original shoe, but with just a little
bit less detail than I did in that first
version so that it looks exactly like a
Nike daybreak shoes just flattened and I have the
details outlined in this way. Look different for you, depending on how you draw. And, of course, it's
going to depend on the object that you chose. But if you do this extra step, you want to think about
what is that sweet spot between total abstraction
and too much detail.
6. Principle 3: Customization: The next principle of
stylization is customization. This means editing the real world object to suit your needs. We can start with a
source image or object as our starting point and then
customize it in some way, whatever way we need
to make it more interesting or to tell
a specific story. I think this is fairly
obvious but of course, we don't want to
just illustrate from a reference photo
exactly as we see it. I just need to make sure you
know that you're allowed to deviate from your
reference image or from your real world object
that you're drawing. Fact, you might want to do
this for various reasons, perhaps to distance your
original art that you're making from the intellectual
property of the photographer. That's important that
you don't plagiarize, or at least that you
don't make it so close to it that you can be
accused of plagiarism. And also another reason is just to make the job
easier for yourself. Just for example, this was an icon that I illustrated
based on this reference photo, and of course, I didn't want to illustrate all those people. It was just a lot of detail. I had 24 icons to
do in this map. I had a lot of work to do, and so I made it simpler for myself. There are three ways
to customize or edit what you see in
the original source. And so I just have three
examples of a Nike shoe here, and hopefully this clearly shows what these
different levels are. So we can subtract specificity, and that means taking away something that
makes it too particular. Sometimes we want to suggest something without
directly showing it like a particular model of
shoe or a particular brand. Maybe there's a copyright issue. So in this case, we might want to remove the Nike
logo from the shoe, and it's just more of a generic. Also add context or
story to the image or otherwise change details in some way that we want
for whatever reason. For example, here I just
added a shoelace where there wasn't a shoelace kind of coming off of the actual
reference photos that I saw, and this just adds a
little bit of character to the image and perhaps
a tiny bit of story. The third way we
can customize is in editing the
design in some way. So this is where we
can change details, however we want for
whatever reason. So in this example on the right, I've removed the
swoosh from the shoe, but I thought it
looked too plain. So I added back my own logo. I made it up. It's just
a starburst, basically. And this brings back some
detail without bringing back that specific brand that I didn't want to include
in this example. Okay, so for this exercise, we're going to practice
customization. Draw your object, customizing it in each of these
different ways, subtracting specificity,
adding extra context or story, and editing the design or
the situation in some way. So first, I'm
subtracting specificity. So that means I'm removing
some kind of detail from my Nike daybreak
shoes that makes them less specifically
Nike daybreak shoes. And the obvious thing to do here would be to remove
that nike swoosh. That's such a big part of what makes these
shoes what they are. And so what I end up with is kind of
a generic branded shoe. So in the second part
of this exercise, I'm adding context or story, and that just means
adding details to it that weren't there in the reference
image for some reason. And in this case, I've added ankle, like you can see the sock
there coming out of the hole part of the shoe. And then there's the toes wiggling out of a hole
that's been torn in the toe. Then the lace. And so just adding
personality and character. And why would I want to do this? I mean, it really depends
on the situation. But the point here is that I'm
able to riff on the object and bring more to it than what I actually saw in the
reference image. And then in the last case
here, I'm design editing. And design editing
doesn't always mean like you're changing something and
being a designer about it. In this case, it is a
little bit more literal. I'm changing the design
details of the shoe. I've removed the Nike swoosh. I've added in my own logo, this little Starburst, and
I've changed the panels. Of the shoe, like the
way the wrap around toeing looks and the thing
that wraps around the heel. And this is just to
show that you can take a reference image and
not follow it exactly. Sometimes you just need to know what is the shape of a shoe or what's the quality
of a running shoe or a vintage running
shoe, in this case. And that's all you need. You don't necessarily need to
show a very specific model. The other thing you can
do, as you can see here, is just get carried away and see how far you
can customize it. If you're having fun and
you can't stop, keep going. And if you want to share
it with the class in the class projects page,
that would be great.
7. Principle 4: Exaggeration: The next principle of
stylization is exaggeration. This means pushing one or
more characteristics of the object beyond realistic
proportion or intensity. I think this is the one you're going to have
the most fun with. So just looking at
the Eames chair in this example, what
do you notice about it? I've exaggerated the complexity
of the wire frame legs. Sort of plays with
two things about this feature of this
iconic piece of furniture, the complexity of the frame itself and the experience
of trying to draw it. Exaggeration isn't just
a stylistic decision. It can also be a conceptual or storytelling
one and this one, I'm using it as a way of showing that frustration
of trying to draw the eiffel base of this a. So in this sense, exaggeration is not just about
scale and proportion. It can apply to any quality,
complexity, texture, color, pattern, weight,
delicacy, and so on. So in this old
illustration of mine, I'm exaggerating or
otherwise distorting the proportions of the body and the number of
joints per legs. So exaggeration
here is I'm going overboard with the
bendiness of a pose. I'm making hands too big,
the nose is too big. These are all kind of
ways that I stylize. And if you think
about caricatures, where people will
draw someone and make fun of their big nose and make it huge or they have big ears and they'll
draw giant ears. The caricature is
using exaggeration, and that's what this
principle is all about. Often exaggeration is about identifying what's
most distinctive about the object and
then amplifying it, such as the rectangularity
of a city skyline or perhaps the wiry
spiny complexity of a bunch of shopping carts. This is an
illustration by one of my favorite
illustrators, Ben Shen. So exaggeration works best when it's rooted in something real. Not distorting randomly,
you're finding some actual essence that's there and turning up the volume. The question to ask is, what is the most
interesting characteristic or thing about this object, and what happens if
I push it further? And just an important aside is that exaggeration
can go up or down. So if something's small, you can exaggerate its smallness to make it even more small. Okay, for this exercise, we're going to be playing
around with exaggeration. So identify at least one quality of your object and draw with that quality pushed
as far as you can go while keeping the
object recognizable. You can do this for as many different qualities
as you'd like. So for my object,
the quality that I wanted to start
pushing was narrow. And this is just a quality that a lot of vintage
running shoes have. If you look at
their side profile, they're not very chunky. They're very sleek and narrow. And so I'm exaggerating a
little bit with this idea, and I kind of started off a little bit too
chunky to start. And it was actually kind
of like the opposite. And then in the second one here, I really went long in this shoe, and that's how it
got super narrow. And so I was satisfied with that as an exploration,
and then I moved on. The next quality that
I wanted to play with here was the waffle sole. That's what Nike
calls these soles, with these chunky
squarish things, these treads. It's a waffle. And so here I'm making
those treads really chunky. I'm really exaggerating
how big and high those are and
how prominent they are compared to the
rest of the shoe. So the next quality that
I wanted to exaggerate and riff on here was this
wedge shaped mid sole. That's the white
foamy part under the main body of this hot. And interestingly, when I made it really big like
this in the drawing, I realized that looks a lot like the Nike Alpha flies,
which is, like, the super shoe that
elite marathoners wear, and this is something that was designed decades
after the daybreak. But it is very interesting just to look at
this modern shoe. It has this exaggerated sole, and it makes me wonder
if designers at a company like Nike
actually just riff on their own products to get new versions of their shoes
that look like their brand, but just with slightly
altered qualities.
8. Principle 5: Singularity: Final principle of
stylization is singularity. So this is about
identifying and expressing the defining quality
of the object. What makes it
singularly what it is, as opposed to any other thing? We've already explored
this principle when we're looking at the Nike shoes and the
Bileti espresso maker. At this point, you might
be catching on to the fact that these principles
don't work in isolation. They kind of happen all at once. The takeaway for this
principle is that there are two different ways to
think about singularity. There's the type level
where we're asking what the defining qualities of a specific type or
category of something are. And then there's
the specific level, where we're asking what
the defining qualities of a particular instance
of something are. So what are the
defining features of a stovetop espresso
maker in general? And what are the
features essential to the very specific model of espresso maker we
see on the right, the BL Mocha Espress? Which level you work
at really depends on the intent you have for
a given illustration. Are you representing an idea of something or that
specific thing? Perhaps more than in
the other principles, singularity is the
most related to what your object actually means. Not just to what it looks like. Both meaning and style are important and will
happen at the same time, but knowing what you need
to express the most, either the idea of the object
or the specific instance of it will help you know how far to push one quality or the other. And I'm just showing a drawing
I made a long time ago or an illustration of Asab 900, which is a very
iconic older car, and it is a very specific model. And if you know cars, then you'll recognize that
this is this particular model. And I couldn't just draw a
general car to express this. I needed to add qualities
like the spoiler and just the very particularities
of its shape. It's just a strange
and quirky car. So for this exercise, we're going to play
with singularity. So first draw your object
at the type level. And so for my example, I'll be drawing a 1960s running shoe or a
vintage running shoe. This is what I mean by type
versus specific instance. Next, draw your object
at the specific level. And so, again, in my example, that means drawing specifically
the Nike daybreaks. So in order to do this exercise, I pulled out some more reference photos just
to get a sense of what do vintage running shoes from the same era look like? And I'm starting to identify with these little callous
what those qualities are, like these branded
panel swooshy things. That's where the Nike logo would go or the adidas stripes. And then they have these
kind of wrap around outsole that kind of wraps and curves up over the
toe in the front and often wraps around
the heel as well. And then there are
these suede panels, and often there's this kind of nylon mesh material
between them, and they have these kind
of bright bold colors. And so that's what I'm
riffing on where I'm drawing just like this idea
of the 1960s running shoe. What are those qualities in other versions of product
as the Nike Daybreaks? And now, in the next part, I'm drawing specifically
a Nike Daybreak. And of course, after
all these exercises, I have the essential
details of what makes this particular object what it is in a singular way. But I've decided to
actually go and pull other versions of Nike
running shoes from the same era to
further dive into what really makes
a Nike Daybreak what it is compared
to other models. It's kind of sibling
products there. And I'm just playing around
with what that form is in different ways and even drawing it at a
different angle there. There's no wrong way
to do these exercises. These aren't about making some final illustration
that you're happy with. It's about just
asking the question. What do each of these
principles mean?
9. Putting it All Together: All right, you've practiced
each principle in isolation, and now it's time to
bring them all together, and that's what this
lesson is about. For this exercise, we're
going to set our references aside and try to draw our
objects purely from memory. This is key to drawing things in our own unique stylized way. The way this works is that
when you draw from memory, you're probably going to get a few things wrong and a lot of how you draw in a unique way is in how you fill
in those gaps. It also gives you space to
draw in a more expressive way because there's no
correct version of the thing staring
you in the face. Without a reference
image to go by, you maybe you have to
flick a little switch, but there's a part
of you that wants to do the correct thing
and see the image, but it gives you this wide
open space where you're like, I guess I have to make it up, and it's in that
making things up where your style and that kind of
magical shift can happen. I mentioned this already, but the five principles
of stylization aren't like a checklist
that you kind of go through one at a
time in isolation. They kind of happen all at once. I guess the idea here
is that you often control which ones
you lean into most, and it always depends
on the situation. As you go in this exercise, try to consciously apply the various faces principles
in different ways. So that probably means drawing the object over and
over and over again. The end of this class,
you should have at least one version
that you're happy with. And then you can use that as the basis for the basic version of the final class project. So you're probably also
going to find that you tend to lean into just one or
two principles the most. When you look back at all the exercises you've done so far, do you notice a trend? Are there certain principles that seem to come
more naturally to you or ones that you're most satisfied with when
you see the results? These might be clues
about how stylization works as part of your
illustration style. When uploading this one to
the class projects page, I encourage you to share
about your process, of course, showing
those drawings, but also writing in
some reflections. So earlier on in the class, I had you pause the
lesson and draw an object before learning all these principles and
going through the exercises. And now you've come through kind of learning what the
faces principles are and more intentionally
brought these into the drawing
that you have now. So I encourage you to reflect on the differences between
your first drawing and the drawings that
you've done now.
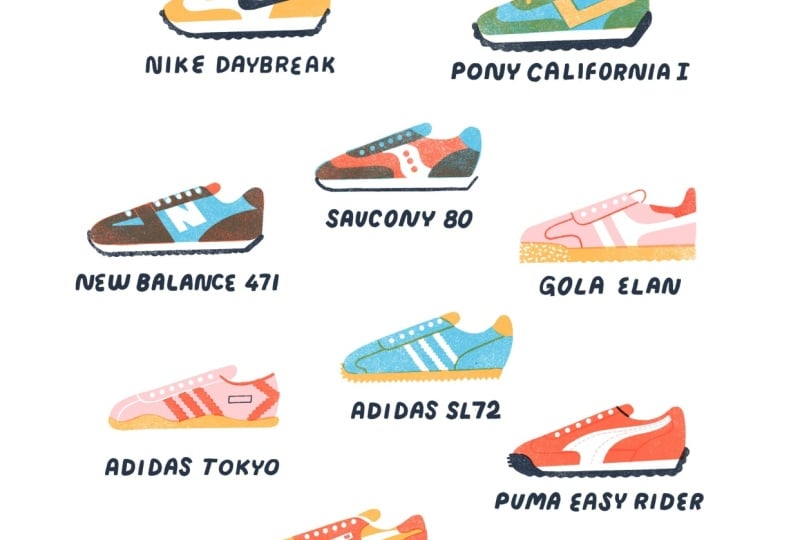
10. Extended Principles: Repetition and Variation: In this lesson, we're going
to move beyond stylizing just one specific
object and play with multiple objects
of the same type. Recalling the lesson
on singularity, we played mostly with stylizing the specific instance
of the objects, such as the Nike
Daybreak running shoes. We're going to play
with stylizing a bunch of different objects
of the same type. For me, it's going to be 1960s running shoes or more broadly,
vintage running shoes. By exploring variations of
a certain type of object, you can become more
fluent in generating your own versions
with or without references of that
object in the future. Hopefully, as a result
of doing this exercise, we'll help you draw whatever
your object type is from memory in your own way without needing the training
wheels of a reference image. Here's the exercise. Find three
to ten different examples of the same kind
of object and draw them all in a similar
stylized way. For example, in my project, I chose a handful of different types of
running shoes from the same era as 1960s
Nike daybreaks. So I look for similar models
in other brands like Kuma, Adidas, New Balance,
G, and so on. Then I drew each one of them
using the faces principles, aiming to use the same level of stylization across
the entire set. So again, I'm not drawing them kind of flat and then
abstract and then customized. I just try to apply
an even quality of stylization to the entire set so that they were
stylistically consistent. Now, by studying
different objects within the same
category in this way, you start to see patterns. Like, what are the basic parts to a certain type of object? What qualities or parts are
essential to the category and which are kind of like extra or very particular
to just one model. What distinguishes
a Nike daybreak from a Gla E lamb, for example? Like you're going to find that they share
certain qualities, kind of, on average, the vintage running
shoe looks like this, but then there's little extra
things that each one of them has a detail that makes
it more uniquely what it is. This exercise feels a lot like the singularity exercise when I was riffing on the
type of object, in my case, the 1960s or
vintage running shoe. The difference here is
that I don't have to draw these ones from
memory at first. I actually have my reference
photos in front of me, and I'm trying to draw them
all in a very similar style. So same viewing angle, and eventually I'm going
to lead up to actually drawing them all with more or less the
same shape as well. So after kind of
studying them in O mode or observation
mode in a rough pass, I do a second pass here. I started drawing each one based on the same platform,
if you will. You can see that
I drew the exact same or I actually copied and pasted the exact same shoe
shape over and over again. I tried to hold
to that shape for every single model as possible. And so here I'm
making a family of vintage trainers
that are specific, like Glas, Nikes,
New Balance, Adivas. But making them look more
similar to one another. And so this just
gives me a chance to practice stylizing
in my way in a repeated way that's more
intentional and creates a really cohesive set of objects in this
particular sketch. So I did this in
three total passes, and in my final pass, I wanted to refine and simplify my drawings
as much as possible, and I really can't get to
this level of consistency and refinement in the set without going through them a few times. In the end, I have a set
of sketches that I could easily transform into a
completed illustration. The end of this exercise,
you'll have a set of stylized sketches that
can become the basis for the extended version of
the final class project. Remember to share your sketches on the class projects page, along with any notes about
your observations or your experience of stylizing any struggles that
you encountered, any breakthroughs that
you had along the way.
11. Final Project: All right, it's finally
time for the class project. This is where everything
you've been drawing can come together in a more final
color illustration. All right, so here's the brief. We're going to be creating
an illustrated graphic for a T shirt or print
and we're going to be basing it on one of the sketches we made from the
last two exercises. There are two options for this. You can do whichever seems most interesting to you
or you can do both. In the more basic version, you just would illustrate
a single object. Basically transform one
of the sketches you made in the exercises into
a final illustration. In the more extended version, you would be drawing multiple objects of
the same category. So this is based
on that variation and repetition exercise
we just worked on, and then you're going to
show them all together. And I'm just showing you
my example here where I have just a single
Nike daybreak, just a beautiful, simplified, stylized version of that shoe. And you could see
that being like a cool graphic on a T
shirt or maybe a sticker. And then in Option two, I show how I've done lots of different types of shoes within
the same category, and that kind of
creates a cool I mean, that could be a nice T shirt
graphic or an art print, as well, especially if you're really into vintage sneakers. So here are the
project constraints, and these are just kind
of more technical things. So I suggest working at
eight by 10 " at 300 DPI. This gives you enough
resolution and sort of size to make a good
T shirt graphic or, you know, framable art print. When you're saving your file, no matter how you're
working on it, whether it's Procreate or Photoshop or Illustrator
or something, save the output file
as a JPEG or PNG so that you can share
it to the class projects page on the web. I recommend that you work in
a maximum of four colors, and this just will help you. It forces you to be creative because if you start
feeling like you're running out of colors
and you don't know how to represent a part of your illustration
without an extra color, you have to be creative in what you substitute
for that color. Maybe it's adding more texture or maybe it's
drawing an outline, or maybe it's overlapping those colors so that they
create an extra color. Those are all ways of adding to the sense of stylization
in your work. So for this one, I recommend
not having any background, so I just have white
or a solid color only. You can think of
that solid color as being maybe the color of the T shirt that might actually be a good thing to
think about before you begin. Now, just a few tips. I would aim for a balance of simplicity and
interestingness. How much detail can you remove before it
becomes unrecognizable? And what details can you leave or add in that makes
it more interesting. So just a word on what finish
means in this context, it's about having
a stylized drawing or illustration, of course, with intentional decisions about color, line, and composition. That's it. It's not about being super highly detailed
or highly rendered. The tools and media that you
use are completely open. They're your choice. You can use digital analog, mixed media. You can just do it with colored pencils in your sketchbook. Whatever is natural
to your practice. Now just a little disclaimer. Of course, I'm showing
you how I'm applying the stylization
principles in my own way. I'm not saying the way I illustrate in terms
of my technique or the colors or things that I like in my own work are
the only way of doing it. I'm just showing you how I would do it because
that's really all I know. I hope that you're able to take the principles and apply
them in your own way. But I also want you to feel free to learn by what I'm doing, especially if you're starting out you need to
imitate to learn. Later on, you can innovate
when it's time to earn, when it's time to make
original illustration that is more from you, you'll start to figure
that out later on. So I'm working on Procreate, and of course, the first thing I want to do is create
a new canvas. And because I'm working in
a specific file size here, I'm going to create a new Canvas type
being eight by 10 ", and I'm going to set the DPI to something a little more
than I'm recommending. But I'm giving myself 350 DPI in case I need to make any of my final illustrations a little bigger for some unknown
reason to me right now. So the next thing I do is
paste my kind of sketch from the previous exercise down here and work at the composition a little bit so
that's interesting. So that means adding a few details that I want
in my final illustration, which includes some
custom lettering, little labels under each shoe, and then ultimately reorganizing them so that they're not so much in a straight
up and down grid. I want them to be a little
bit more free flowing here. I have my sketch composed in
a way that I'm happy with, I set the opacity of that sketch layer
down to around 20%, and I set the blending
mode to multiply, and this will just
allow me to see the illustration I'm building
from it through the sketch and actually create
all the layers of my final illustration underneath that sketch in my layers. And the brushes that I'm
working with here are in a custom brushet that I
made called Inky Basics. I'm including that in the
class projects and resources. Another thing just
to note is that I'm working in a way
that I like working, which is in minimal colors, and I multiply those colors
over top one another so that I get these kind of nice extra colors
called overprints. You'll see what I
mean as I go on. I just like the constraint of working in minimal colors
and seeing what I can do with those and what kind
of surprising qualities come up when I try and
overlap them in this way. I do my best not to have to outline anything in my
final illustrations. Everything's shape defined
is just my preference. And so that often requires
going back and forth, changing the colors
here and there, and kind of working that out as I go in the
finished illustration. I find it's very grounding
when I'm working with brighter colors to
have one dark color, and that kind of helps the other colors
kind of pop forward more. And like I said, it just gives each element in my illustrations a bit more of a grounded look. Once I've done one of the shoes, I move on to the other looking for ways to use the same colors. Now, looking at the Nike
Daybreak specifically, I had fun with this one, not using color for certain
parts of the shoe, so it looks like the
shoe is complete, even though I
actually don't have anything in that
white area there. And this is another
part of what I enjoy working with when it
comes to illustrations. And one thing that I didn't think about while
I was sketching that I came up with here was
having a hole, kind of, like, almost like punching out a hole where the laces would go and repeating that element as much as possible throughout
the set of shoes. That just creates a sense
of visual harmony to the whole set. No pun intended. The logo in the Scene shoe logo in the middle there has
holes in it in reality. And so it was convenient that I could use my little hole punch motif in that as well for
some extra surprise harmony. So one way of stylizing
that you don't get to play around
with so much in your sketches is in colors. So one thing you'll
notice is that the color of my reference shoes, like in reality, are very different than the colors
I'm working with here. Sometimes I reference them
as directly as I can. But most of the
time, these are just non existent colors for the models of shoes
that I'm referencing. This is customization,
basically. I'm using my own colors and adapting those to these shoes just because these are the
colors I always work with. Particularly in the
new balance shoes that I'm illustrating here, the colors were just basically tone on tone,
like blue on blue. In this case, I'm just letting myself customize the colors in a way that I want and that
work well with my constraints. So for the goals here, I found it hard to not use outlines or lines
to define these panels. I would have preferred to use
shapes that were filled in, but because I wanted
these Gas to be pure red, aside from the outsole there, I did end up for now,
just using outlines. Later on, you'll see that I figured something else out for these and allowed myself to deviate from
this all red look. You can't tell from
the time lapse, but I probably
spent about 2 hours on this entire illustration. You'll see here in
the Adidas shoe that I was also trying to figure
out how not to use outlines, but I ended up just using
yellow over blue for now. And letting it be an outline
rather than a shape. And then I realized, Oh, I could just use yellow for the tongue and the kind
of back of the heel part. It was at this point,
when I was drawing the Adidas Tokyo that I decided to add one more color because I wanted a lighter tone, especially for this shoe. I felt like a defining
feature of this shoe was the lighter tone
with the red motifs, those kind of zigzaggy
stripes appearing over. And so once I did that, it kind of opened up to me using that lighter pink elsewhere. We'll come back to
that in a moment. Doing this ree book classic
was actually really fun. It's actually a very
different shoe in its shape in real life,
compared to the others. So part of the interesting
project for me here was still making
it look like it was part of the set and not
really thinking about what the shape quality of
each shoe is in reality. Three box here just have a very different panel
arrangement where the logo is complicated enough
that it actually is included as the sort of upper part where the
lace is laced through. None of the other shoes
have that quality. I start to notice just how
each model of shoe has very particular things about them that none of the
other shoes have. Like the Puma has these
kind of ridges on the toe. But meanwhile, a lot of
the shoes have this kind of reverse angle wrap around tread on the heel that
at first I thought was uniquely something
that Nike Daybreaks had. Here I'm struggling with
the amount of detail to give the stitched part
of the Puma logo, trying to figure out how
essential that is to actually making that logo
look like what it is. Detailed do I get? Do I
start drawing in the logos? And I realized I was getting
a little carried away there. All right, so the last big step here is drawing my lettering in. And so I like to do hand
lettering and I like to create very structured
hand lettering. And what I mean by structured is you can see I'm
working with a grid. Everything has kind
of even proportions. I have a top line and a
baseline for all letters, and I kind of cut the
terminals of letters, the ends so they have a
more squared off look. Gives them that
sense of structure. This is just something I like to do might
be a little bit. Sometimes I feel
like squaring off all my ends is a little bit of an obsession rather
than a necessity, but I enjoy doing
it, and so I do. You also see that I create
my lettering all in one go rather than in place under each shoe
kind of separately. And again, this gives my
strokes and my lettering, this kind of even
consistent look. Every time I come
back to have to do lettering if I wait too long or if I do it
somewhere else, it will vary more. And so I like batching different parts of my
illustration so that similar parts come down at
the same time and end up having a consistent
look as a result. So with the Gla Elans, I decided that I would
try making that the light pink that I had introduced
with the Adidas Tokyo, and that meant I had
options for what to do with the leather panels
instead of outlines. The outlines aren't that bad, but I guess it's just my
preference to create shapes. Now, this is a place where
I got really carried away, and it was really a bonus
part to this project. I'm not expecting you do this, but I wanted to
just see if I could add a title to this
group of shoes. Imagining it being some
kind of art print. First of all, I had
to think about, like, what is the title? What would I call
this vintage shoes, 1960 shoes, foot
fleet, feet fleet. And then what would
the style be? And so I was playing around with different
styles, of course, working in the grid
as I do and trying to find a quality of lettering that worked
well as a title, but also kind of harmonized
well with the shoes. I really got carried away, but that is what
happens sometimes, and it's actually a good thing to get carried away if
you have time for it. I was just trying
to figure out how to bring a certain quality to this lettering that made sense to be paired
with these shoes. So the unique thing here about
my inky Basics brush set is that it has these
texture stamp brushes, and you can create this kind of printmaking effect by creating a mask on a layer and
then filling it in, filling that mask in with one of the brayer textures or
whatever texture you choose. And this is how I went
into each color layer, and yeah, I just gave
it a little bit of that printmaking
texture that I love. And then seeing
where I could add that back into the lettering. And as you can see,
towards the end, I decided that the lettering could actually have
qualities like the shoes, like the outsols like you see with the
little blue ridges or dark blue ridges
on the bottom and different panels and textures that kind of suggest
suede, I guess. So bringing in some of those contour lines in the
middle and extra colors, I got super carried away. In the end, I
decided that having the lettering was
just too much extra and that I probably didn't want any of it in my
illustration at all. But along the way,
I kind of created this interesting
lettering style. And so it's not a complete loss. So when you're
done this project, please share it on the
class Projects page. And don't just share
your final illustration. Share your process
along the way. This is a great way to
document your progress. If you share anything
on social media, be sure to tag me
at Mr. Tom Froze, and you can use the hash
tag stylize with Tom. And definitely, don't forget to compare how you
started out in that first drawing earlier on in the class to how
you just drew it now. Did learning the
faces principles change how you approach
drawing less realistically? Let us know, write some of those observations along with posting your images on
the class projects page.
12. Conclusion: That's it. You just
learned how to draw in a more stylized,
less realistic way. You learned the five
principles of stylization. And you learned how
to apply them in both isolation as
best as you can, and then in a more
natural integrated way. Of course, these principles
are meant to work together. This isn't a formula that
gives you instant results, but a framework for
drawing what you see in a more interesting
and often playful way. Eventually, with practice, you won't need to think about
these principles at all. If you ever feel stuck on
how to draw something, you can always run it through these principles
to figure it out. Alright, that's it.
Class is dismissed. Look out for my next class in this series stylization for
Illustrators. How to draw. Figures. Less
realistically or people. I'll figure out the name later. Anyway, thank you so much. My name is Mr. Tom Froze. I'll see you in the next one.
 Tom Froese, Illustrator and Teacher