Start Simple: Easy Ways to Draw Cats | Lisa Griffin | Skillshare
Search

Playback Speed


  • 0.5x
  • 1x (Normal)
  • 1.25x
  • 1.5x
  • 2x

Start Simple: Easy Ways to Draw Cats

teacher avatar Lisa Griffin, Illustrator

Watch this class and thousands more

Get unlimited access to every class
Taught by industry leaders & working professionals
Topics include illustration, design, photography, and more

Watch this class and thousands more

Get unlimited access to every class
Taught by industry leaders & working professionals
Topics include illustration, design, photography, and more

Lessons in This Class

    • 1.

      Welcome

      0:56

    • 2.

      Part 1: Shapes

      2:34

    • 3.

      Part 2: Simple Sketching

      5:15

    • 4.

      Part 3: Refine

      1:41

    • 5.

      Class Project

      1:14

    • 6.

      Bonus

      1:04

  • --
  • Beginner level
  • Intermediate level
  • Advanced level
  • All levels

Community Generated

The level is determined by a majority opinion of students who have reviewed this class. The teacher's recommendation is shown until at least 5 student responses are collected.

371

Students

6

Projects

About This Class

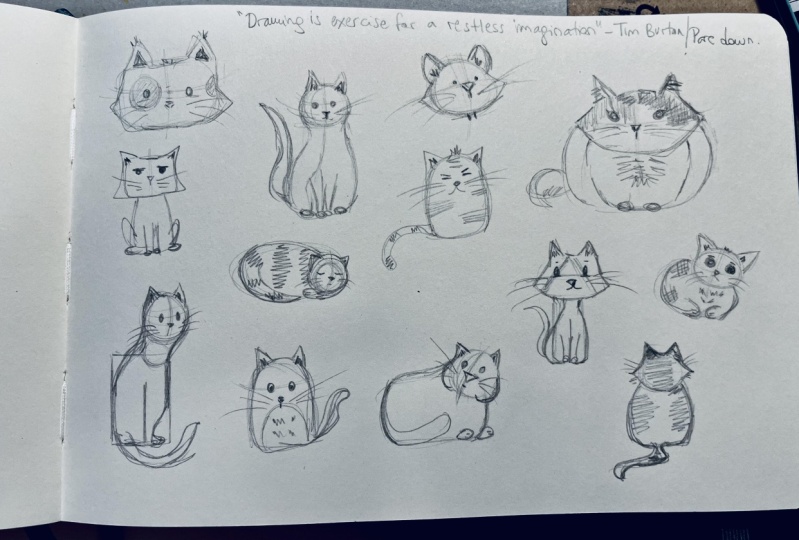
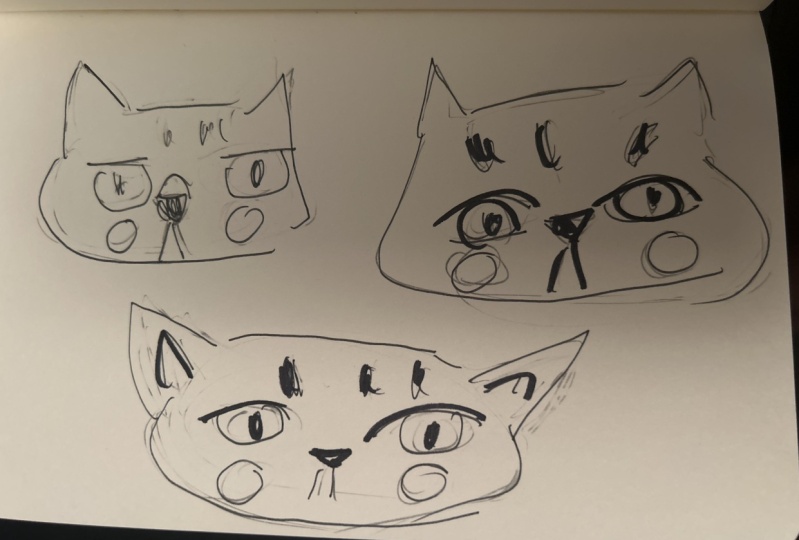
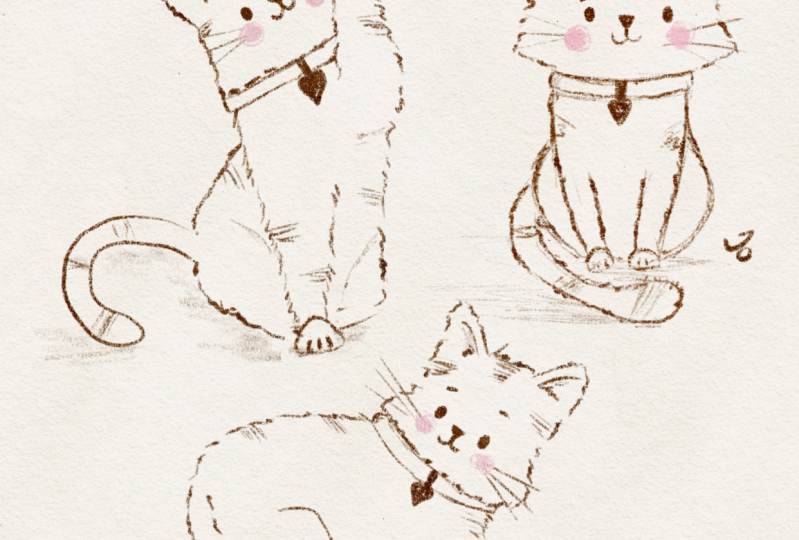
Have fun in your sketchbook while you learn some simple ways to draw cats by combining shapes and lines. 

In this short class, you will learn:

• How to break down a "subject that is difficult to draw"

• Three ways to sketch a simple cat character

• How to combine traditional and digital techniques

• Better sketchbook habits 

• How your art style will emerge (and evolve) through time spent drawing.

PLUS: Download a "How to Draw a Cat Face" worksheet + Sketching Sheet to assist you with the class.

Easy Ways to Draw Cats, is taught using traditional and digital exercises to make it accessible for all creatives! Whether you're a beginner, looking to develop a sketchbook practice or simply love cats, all levels are welcome to join.  

•••

This is the second class in The Sketchable Series. Bite-sized classes designed to help you develop your art style and encourage a sketchbook practice through exercises on specific topics. Each class is around 15 minutes in length to help you learn, even if you're short on time.

Meet Your Teacher

Teacher Profile Image

Lisa Griffin

Illustrator

Teacher

I’m Lisa, a freelance illustrator who creates whimsical art for children's books, gifts and stationery. 

Through a mixture of sketching, illustration and business classes, I want to encourage other artists and illustrators to pursue their passion for art. 
It can be difficult to find time for ourselves in this busy world, so I've designed classes that are easier to fit in a hectic schedule. Making time for art is important to level up skills and develop your style  - so keep that pencil moving and have fun CREATING ART!

Visit me on Instagram (@lisamgriffinart) where I post cute illustrations weekly. 

Freebies and class updates! If you want to s... See full profile

Level: Beginner

Class Ratings

Expectations Met?
    Exceeded!
  • 0%
  • Yes
  • 0%
  • Somewhat
  • 0%
  • Not really
  • 0%

Why Join Skillshare?

Take award-winning Skillshare Original Classes

Each class has short lessons, hands-on projects

Your membership supports Skillshare teachers

Learn From Anywhere

Take classes on the go with the Skillshare app. Stream or download to watch on the plane, the subway, or wherever you learn best.

Transcripts

1. Welcome: Hi, I'm Lisa, a freelance illustrator. In this class, I want to teach you a few easy ways to draw cats. Even when you're short on time, you will need minimal supplies. Basically a pencil and a sketchbook if you like, working digitally. I'll also demonstrate using my iPad and the procreate app. In the short class, I will share with you how to break down a subject. And I'll also demonstrate three easy ways we can draw cats. The more you draw, the more you'll see your art style begin to emerge. Grab your paper and pencils, and let's start drawing. 2. Part 1: Shapes: Before we begin sketching, I want to talk about shapes and how you can construct any object using simple shapes like triangles, circles, and squares. In order to make a difficult subject less daunting. As a way to demonstrate this. I'm just tracing an image of a cat that I found. And I'm want to have very simple lines. But as I do that, you can easily see shapes are taking form. How can we simplify a subject without losing important details? For a cat, I would think that the top three characteristics are probably the ears and usually a tail. Tail if, if someone said cat ears tail and probably whiskers. If you have an iPad, you can easily do this exercise yourself just by tracing over an image. And if you don't, that's okay. You can print out a picture of an object. And with tracing paper, just go over it with a pen or a pencil. When we turn off this image layer, we're going to see those simple lines and shapes form a discernible cat. Trying this one more time, I'm using this sweet little kitten will start with the oval and then add the ears. Wasn't happy with that ear. Two little dots for eyes. Another triangle for the nose, and a point for that little frowny face. This time we don't see the tail, but we can outline that plump little kitten body. And those two reports. This isn't very simple and easy exercise that can help you train your eye to see shapes within objects. 3. Part 2: Simple Sketching: I want to show you three easy ways that you can create some cat illustrations. And I'll be demonstrating this in a sketchbook using a pencil. Grab whatever materials you are most comfortable with. Let's begin by drawing a rectangle. This will be our first cat. And next to it we're going to draw a smushed oval, round at the top but flatter at the bottom, which will give our cats and weight. And going back to our rectangle, we will start to build this cat. So adding two stacked round circles. One will be the head and the other is going to be his neck and shoulder area. Connecting these shapes with some very fine lines. It's going to be a cat who's sitting up. And his face is slightly at an angle. Two triangles at the top for ears. Interests drawing that line so I can understand where I want to place his eyes and little nose. So as you can see, everything is being built off of that triangle, which was his initial shape. And sketching outside of that rank tingle at the bottom, I'm forming the cat's tail. Keeping my lines pretty light. Now I go back and just erase those initial shapes. Don't spend a lot of time on this. Most of my sketch books are pretty messy and I like to keep some of those underlying foundational marks. But it's totally up to you. If you want a neater sketch book, then you can go and erase away. And now I'm just going back and fine tuning those details, darkening the eyes, adding some whiskers. With those little details and a few shapes. We have our first cat figure. Now we'll move on to a second style to create a cat in. And with this one, we're going to use that smushed oval shape. And we'll add two years at the top using triangles, going to make another mark. So I have an idea of where I want to place his eyes and his nose. I tend to prefer doing little dot eyes on a lot of my characters, but feel free to switch it up. Adding those whiskers. And from the bottom of that smushed oval, we will add the tail. This cat, this little chubby cat is going to have some striping details. And adding a little bit at the top tube and adding a little bit of those stripy details to his tail. And lastly, the loaf cat. So this is a fun one. You're just going to draw. Again, it's a rectangular shape, but we're going to round it at the edges. Drawing in an oval. In the top right. This is going to be our cat's head. And using lines just to connect those shapes better. This is just helps me envision again the line where I'd like to dissect its head so I know the angle he's going to be looking and adding his little eyes. Don't like that. Yeah, I love. As I said, my sketchbook is messy, so I don't have a problem with using the eraser when I need to. And if I don't like something, I'll go back in and change it. It's just an easy way to work. You don't put as much pressure on yourself and you sketch and draw as playtime and discovery time. And I think that's the best way to do it personally. Two more little dots for eyes to show some variation because I do want you to experiment in your sketch books too. I'm going to add a little bit more to those eyes. Trying out a style I don't typically use. And that's what I think makes sketch bookings so great. You should have the freedom to try out different techniques and maybe even stretch yourself as an artist in ways you hadn't tried before. 4. Part 3: Refine: Since we've gone over some basics of sketching, traditionally, I want to show you how I work digitally. And that just means combining traditional and digital techniques. My favorite thing to do is just add my rough sketch to procreate. And I do that just by inserting it as a photo. You can also take a photo with your iPad of your rough sketch if you prefer. When you add a photo to procreate, it's on its own layer. Turned down that layer to about 20 to 35 per cent. Then I just begin lightly tracing over it. And they do this with one of my favorite sketching pencils. And yes, I do my best to name my layers because I tend to work with a lot of layers and procreate, and that just keeps me more organized. In once that's done, you can begin sketching, speeding up the process a bit and showing you a time-lapse without my hand covering the drawing, it might make it easier for you just to see the process of how I work. It's really just refining that rough sketch and paying attention to the lines and adding a little bit of detail that wasn't there before. I love the flexibility of working in this manner because I have that underlying rough to go by. And then I can just focus on shading and line work in bringing this little character to life. 5. Class Project: Our project is to share some of our cat sketches. You can do this in your sketch book or on the provided sketchbook sheet. Use the squares to fill in some adorable cats may be experimenting with shapes, sizes, and expressions. And a few final tips. My most important one being is to make time to draw and draw for you. Draw just to try new techniques and explore new subjects. And just play in your sketch book. That is how you will get better, and that is how your own personal style will emerge. Leave your sketchbook out. Having something within your line of sight will make it a lot easier for you to keep up with this wonderful creative habit. Thank you so much for spending time with me and taking this class. I can't wait to see what you create. 6. Bonus: As a bonus, you have this, how to draw a cat face. Free download. Start with a circle, add some ears and some fluffy cheeks. I do like my fluffy cats. Drawing some lines. So you can understand where you want to place the eyes, the nose, the mouth, and then just go in and add more details. Starting with a circle, you can pretty much create any cute little cat face that you'd like. I hope you'll enjoy exploring the many varieties of cats that you can create. Happy sketching.