Transcripts
1. Welcome to the Class: Spring is the season of renewal, the softness in the air, the gentle colors, endless
feels of blooming meadows, and everything feels
full of possibility. There's a sense of hope and
new beginnings that makes this time of the year especially creative. Hello, everyone. I'm Asharia an engineer
and a watercolor artist, and welcome to this class. I'm so happy you are here. In this new class, we
are going to paint a dreamy lavender
meadow in watercolor. This class is designed
to be relaxing, beginner friendly, and joyful. In this class, I'll
guide you through creating glowing spring skies, building soft layers
of purple and green, and painting the
delicate lavender stems that feel full
of movement and life. We'll focus on creating
depth atmosphere, and that peaceful feeling of standing in a meadow
surrounded by color. Whether you're just starting
your watercolor journey or you simply want a
calming, creative escape. This class is your
invitation to slow down, breathe and paint along with me. So grab your brushes, your favorite
purples and greens, and let's step into a
lavender meadow together.
2. Art Supplies: All right, so let us take a
look at the art supplies. First up is the paper. So for this particular class, I'm going with the brand
Saunders Water food, which is a 300 GSM, 100% cotton paper, and you can take a look at the texture
of this particular paper. Now, it is not compulsory to go with this
particular brand, but you can choose to go
with any other brand, which is 300 GSM and
100% cotton paper. Okay, so to work on the wet on wet technique or
for that matter, any other technique having a good paper is very important. Next, let's take a
look at the brushes. You will need a larger sized
brush to wet your paper. It could be a flat brush or it could be a larger
sized mob brush. And later, you will need
some basic round brushes, basically, size number eight, size number six,
size number zero, and you'll also need
a larger sized brush like size number ten or 12. Just keep all these brushes. We may not use all of them. But it's good to keep handy. Then a pencil and an eraser
to draw the pencil sketch. Of course, you'll need
a palette and paints, and the detailed section of the colors is done
in a separate video. You can go ahead and watch that. You'll also need
two jars of water. One jar of mine is broken, so I'm going with
this plastic jar. But yes, make sure to have
two glasses of clean water. And you'll need a
masking fluid to mask the foreground lavender
flowers. All right. So make sure you have that. And if you don't have
it, just go ahead and paint it on top of
the background. Then you'll need a cloth, and these are basically all of the art supplies
and you'll need a backing board or a plastic board like
this to fix your paper. So these are the art supplies. Go get them ready, and I'll see you soon in
the next section.
3. Spring Colour Palette: All right, so let
us take a look at all the colors that you will need for this
particular painting. The colors are really
simple and not complicated. First up is the bright blue for painting that
beautiful, simple sky. And if you don't
have bright blue, you can go with any
shade of light blue, but I personally love to use bright blue in my
landscape paintings. Next up, olive green, and if you don't
have olive green, you can take a
little bit of green, mix a little bit of yellow, and create this
particular shade. This is basically to paint that meadow that is there in the background and also
in the foreground. Then you'll need a darker
shade of green that is the sap green and to make
it even more darker, you can add a little
bit of paints gray to it or you can add a
little bit more of this particular same
shade to create the darker version of
this particular green. So next, for creating the sun rays and the
warmth in your painting, you will need different
shades of yellow. You can go with yellow
and a mix of orange, but I'm going with Indian
yellow and Indian gold. Both of these are from
the brand white knights, and if you don't have
absolutely, do not worry. A particular yellow or orange from your
palette will also work. The next color is let
from your palette. This could be any let. If you don't have
bolet, you can go with purple and you can use the same mix to create lighter tonal values and
darker tonal values. So to create darker
tonal values, add a little bit
of more paint to the same mixture and to
create a lighter version, add lots of water and create the lighter tonal
value. All right. So these are pretty
much very basic colors, and last one is the paints gray. This is basically to add
those teeny tiny birds, which is optional
and additional. Okay, so prep your colors and Alcoson in the next section.
4. Pencil Sketch: All right, so let us begin
with the pencil sketch. So the pencil sketch is
going to be really simple. First, we will start by
defining the horizon line. And for those of you who don't
know what's horizon line, it is nothing but a line
separating the sky from your bottom meadow or
your grass field region. Okay. So basically, we want to divide the paper
into two sections, not equally half, but somewhere like one fourth and
the rest of the paper. All right. So that
was the horizon line. Next, we are going to
draw the lavender field. So I want some of the
flowers to be in the front, and the rest of the
background is going to be in the out of focus mode. That means it's
going to be blurry. But the flowers that
we are drawing now, those are going to be
painted wet on dry. Okay, so yeah. Let us start, and it is very simple. So first, let me finish the
complete pencil sketch. And once I have
finished doing that, you can pause the video, take a screenshot, and
then you can go ahead and draw the pencil sketch
freely without any stress. This way, you will avoid rubbing your paper
multiple times. Okay. And yeah, so I think the pencil sketch is
going to be really simple. I know it may look a little bit complicated
right now because, you know, there are some petals
involved and all of that, but the petals are
really simple. You have to just draw the
petals in an irregular shape. Nothing has to be like
perfect here because flowers are not perfect.
You see the petals. They are of different sizes, different shapes, different
colors, and all of that. Okay. Just be organic and
natural and trust in yourself, and the end result is going
to be unbelievably beautiful. All right. So yeah, you can just wait and watch for me to complete
the pencil sketch. All right, so you
can see how I have finished sketching out the
first lavender flower. Okay, in the similar manner, we are going to draw
a few more flows. So now, drawing these
flowers depends upon you. You can draw as many
as you want them, but I want to have a
soft lavender meadow with some flowers
in the foreground. Okay? So you can decide on that. You can either have a
bunch of flowers or you can have something
like I am doing here, and it's all up to you. Okay, so there's no restriction. You can see I am just drawing the petals in a very
organic manner. I am not looking into the reference photo
as of now because, you know, the reference
photo is very detailed. So all I did was I went to Pinterest I just type
lavender flower sketch, simple lavender
flower pencil sketch. I got few references, and I combined all of those and created
the pencil sketch. You can also do that because
that's a really easy method. Sometimes the reference
picture might be difficult, so you want to go and search for pencil images or
pencil sketches, and that's how you can make
your pencil sketch quicker, faster, simpler and easier. So let's continue to draw
the pencil sketch, and yeah. All right, so I have
completed the pencil sketch. I went ahead and drew four
lavender flower bunches, and you can also pause the video right now,
take a screenshot, take your own sweet time to
create the pencil sketch, and I'll see you soon
in the next section.
5. Wetting the Paper: All right, guys, so I went ahead and masked out
the pencil sketch. You can also do that. And
once it is completely dried, let us start by quickly
wetting our paper. So since this is going to
be a wet on wet painting, we are going to wet the paper
thoroughly and nicely so that our paper stays wet
for a longer duration Okay. So guys, paper is
really important. Go with a 300 GSM, 100% cotton paper, and the second step is to
wet your paper nicely. So take your own sweet time. I know it seems a little bit
boring to wet the paper, but if you want to
see beautiful results of the wet on wet technique, the only thing is to wet your paper multiple
number of times. I'm going to take my own
sweet time, do this, and I think meanwhile, you can go ahead and trip
your paper as well, okay? And I'm repeating these
points because I see a lot of times that students
come to me and tell me that, they are not seeing the results. The wet on wet technique is not working properly with them, or the paper is drying out soon, or the paint is bleeding, and there are multiple reasons. But one important thing
is it's not your fault. You are good with your
techniques and your basics. It's just the art supplies. Maybe your paper is not good, maybe you're not wetting
the paper multiple number of times or maybe
it's the weather, and there could be a
number of other reasons. But I believe if the paper
is 100% cotton, 300 GSM, and if you wet the
paper thoroughly, wait for the paper to soak all the water and then
rewet it multiple times, then I think it should
perfectly work. Okay? So just give
it a try and yeah, let's hope for the best. Alright, guys. So my
paper is nicely wet, and I think I'm ready
to start my painting. I hope you guys have taken
your own sweet time, and your paper is
also nicely wet. And what are we waiting for? So I'll see you soon
in the next section.
6. Painting The Sky: Alright, so now our
paper is nicely wet and let us jump
start into our painting. I am really excited
to start this, and spring is such
a beautiful season. It's the beginning of new
opportunities, new hope, and the sunshine gives
you a nice warmth and everything is so bright and so green during the
spring, isn't it? So let us start. I am
starting with the sky, and as you always know, bright blue is my favorite
color for painting the skies, especially in the
landscape paintings. And if you don't have bright
blue, then no worries, you can go with any other
light blue in your palette. Okay? So you can see, I am not adding this in
a particular manner. I'm just going organically and just trying to
drop the paint. And as usual, I'm always starting with the
lighter tonal value. And as I move ahead, I build on the colors. Okay? So do not go with the darker color
at the first place, start lighter, and then you can gradually build up the
colors. All right. So you can see that
right now there is no much water on my paper. It's nicely wet, and there are
no large puddles of water. And on my brush, also, there's no water at all. You can see it's semi wet
but not completely wet. Okay? This way, you
will be able to control the paint
flowing on the paper. All right. So yeah, just make sure to have
a nice tissue paper so that you can take off the
excess amount of water. And now, once you
have painted the sky, let us start by adding some greenish meadows
onto our paper. And this is also going
to be in the background. That means it is out of focus, and we're just going to
keep touching the tip of the brush to
the paper and just let it bleed organically
and naturally and create some bushes out
there in the background. Now, this process is
going to be repetitive. All you have to do is
take whatever green is present in your
palate like olive green, leaf green, or even sap green. I am going here with a mixture of sap green and olive green. Define the lighter and the
darker tonal values because I do not want to have a
single color for my bushes. Bushes are always of
different greens, and that is what I'm
trying to bring out here. So you can just watch
and then you can paint it for yourself or you
can follow along with me. All right, so now you can see how the bushes are
taking its shape. We started with a lighter color, that is the olive green, and then we added a
bunch of sap green, not entirely, but onto the
inner and outer edges. Okay. That's how the bushes
are looking at the moment. I know it may look a little
bit weird right now, but once you start
building the layers, the bushes are going to
look really beautiful. So just keep adding your paint, have that patience and do not worry about how your
painting is going to turn. Just trust the process
and, you know, just pour your heart out into the painting and just
wait for the end result. Okay? So let the paint
flow and do the magic. Just make sure that you
don't have too much water on your brush because in order to have control
over your paint, you need to have very little
to no water on your brush. Okay? So if you feel like
your paper is getting dry, then you can go
ahead and, you know, just slightly wet your brush and that region of the paper, and you can just
continue to work. All right. So yeah. All right. On the
right hand side, we are not going to paint
the bushes because there we are going to have the sun and the sun rays falling
on the bushes. So to paint the sun,
I'm going to go with a mixture of Indian
yellow and Indian gold. And if you don't
have these shades, then you can go with
any basic yellow that's present in your
palette and you can add a little bit of orange to it to make it like a nice
golden yellow. So the sun is, again,
really, very simple. I'm using my flat brush. I think this is the
half inch wash brush, and, you know, I like this to kind of create
those sun rays. It's really very easy to do it with this kind of brush
instead of a round brush. But if you don't have
this, you can just take your round brush and
go ahead and paint it. And each time you
go over the bushes, make sure that you're not
lifting that green and putting it back
onto the sun area. Otherwise, it's
going to turn green. So every time you go
over the bushy region, just make sure to clean
the brush and again, come back and create those rays. So creating these sun
rays is really easy. Just make sure
that your paper is nicely wet and you should have a minimal water on your brush and a
little bit more paint. And then you can
create these rays by pulling the paint outwards. Okay. And each time
you pull the paint, make sure your brush is nice and clean when you go around
with the next time. It's really very simple S. For those of you who do not
have the flat brush, I started using the round brush. So with the round brush, also, you can create this
sun rays effect, and it is really simple. Okay? So you need not worry about the exact same art
supplies that I am using here. Just go with whatever you have, and it's about the
technique guys. It's not about the art supplies. Once you get the
technique right, you will all be good to go. Okay? So, yeah. All right. So now that we
have added the sun rays, I feel like this is going
to turn a little bit lighter when the watercolors
are going to completely dry, so I'm just going ahead over it, but this time with Indian gold. So I'm picking up a slightly lighter version
of this Indian gold, and I'm going to go over those sun rays that I
had created earlier. So you can see I accidentally picked up
the green and, you know, I put it there, but
you can cover up your mistakes quickly because
the paper is still wet. If your paper has dried,
then you cannot do this. Okay? So the magic of
watercolors is when it is wet, you can fix the mistakes, but again, you
have to be really, very quick and the timing is really important
in watercolor guys. So if you get it right, everything is going
to be beautiful, and if not, it's going to
get ruined, and that's fine. We can all start
it all over again. It's not about, you
know, quitting and, you know, just saying that,
Oh, I cannot do this. Because if you're stuck there, then you'll remain
stuck there forever. So that's not our end goal. The end goal is to keep
trying and trying and trying, and the someday there we are going to get
everything right. Okay, I think more
than the painting, I'm giving you a lot of
life advice over here. But I feel that's
really important, not only in our painting, but also in our real life. And I feel that is a
game changer, okay? So the sun rays are
looking really beautiful. The green bushes over there
are really looking gorgeous, and I absolutely love
creating the sky. And now, let us go ahead and paint the meadow in
the next section.
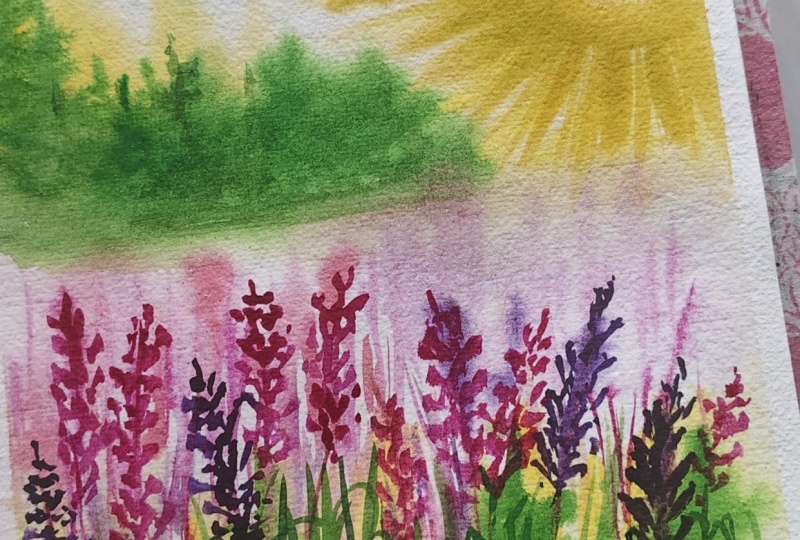
7. Lavender Meadow - Part 1: All right. So now that we have
painted the horizon, let us quickly start by
wetting the meadow region, and we want our meadow
region to be nicely wet because we are going to work
on the wet-on-wet technique. So we want our people to stay wet for a longer
duration of time. Okay? So you can go ahead with your larger
sized mop brush, round brush or a flat brush, and continue to
rewet your paper. Okay. So take your
own sweet time and do this because we are
working on the wet-on-wet. And I keep repeating
this because I don't want your paper to
dry faster and, you know, you getting
frustrated later. So just take your
own sweet time, re wet the paper multiple
number of times, and then let us quickly start. So I'm using my size
number six brush, and I'm picking up
the lavender shade. Basically, this is
not a lavender shade. I use the dark purple
from white nights, and I have diluted
this mixture and created a lighter version which resembles the
lavender color. Okay, so go with any let or any purple from your
palette and add lots of water to it and then bring this color to the
lavender shade. Right now, I'm just
going to go ahead and drop this paint
onto the paper, and you can see that I am just touching the tip of my brush and I'm trying to create those
tiny little lavender flowers. I'm just creating, you know, leaves of those
lavender. You can see. There's nothing
really to explain. It's just like a straight line, a stem in the center, and on the either side,
you have the leaves. So I'm just trying to create a blurry lavender meadow that
is there in the distant. And once this all dries up, we are going to take off the
masking fluid and then add the main focused flowers
onto the foreground. So this is the basic idea. First, we are going
to start with very lighter tonal
value of the color, and as we progress, we are going to
keep on building. Now you saw the
background was light. As I come towards
the foreground, I'm picking up more
intense color value of the same violet or
purple that I took earlier. I'm trying to create more
depth into the painting. Now, this is going to
remain same and we're going to fill this
entire background with the same procedure. You can just keep watching me and then you can
follow along with me. All right. It is
just very simple. Pick up your brush, load it with little
amount of paint and note that there should
not be too much pain. There should not
be too much water. Otherwise, you're
going to lose control. Everything is going to mix flow into each other
and create a mess. So we don't want that
to be happening. Also, you can keep a
tissue or a cloth handy so that whenever you
feel like there's too much paint or
there's too much water, you can just wipe out
the excess amount, and, you know, you can just
paint it like stress free. Okay. So I'll just
keep doing this and you can just watch
and paint along with me. All right. So this is how
the background looks like. I hope you also have painted
the soft background, and I'm hoping that you
had a very good control on the water as
well as the paint. Okay, so it's really simple. And if you are having any doubts regarding this
particular technique first, I encourage you to try it
on a scrap piece of paper. Basically, you want to take
a paper wet it nicely, and then take the same
let shade and go with your any smaller size
round brush and try to practice painting these
lavender flowers. And once you get the
technique right, you can come back to your original painting
and start painting. That way, you will not
commit any mistakes, and you will have
more confidence. Alright. So this is how
the background looks like. If you want to add few
more lavender flowers, you can go ahead and do that, but just make sure not to
make it too much crowded. Let us start by painting
the meadow region. So I'm picking up my sap green. You can go with a mixture of olive green or any
lighter green first. So we are always going to
start with the lighter. And as we move
towards the viewer, we are going to make the color more darker and more intense. And this is how we
create the rule of perspective and we also add depth to our painting to make it look more natural
and more realistic. So I am adding this
green from the middle, and I'm going to take it all
over towards the bottom. Okay. So remember, all of this is being done while
the paper is still wet. So this is going to be
the wet-on-wet technique, and later once the paper dries, we will be adding more
and more details. So again, this is going
to be a repetitive step. Just go on picking your any
lighter shade of green. At this point, it's going to be very and we are going
to keep building it. Okay. So go ahead and do that. You can see in between, I'm also using a little bit of
warm shade of that green. So to create that warm shade, I'm mixing my yellow
with my green. I'm sorry at this point, the palette cannot be seen here and there was
no much space, but I'm explaining all the
colors that I'm using here. Also in the beginning of
this particular class, I had a separate video for the colors that we're going
to use for the painting. So yeah, there's nothing
to worry about the colors. Alright, so now
that we have added the base layer of
this green shade, I feel like I should add
more lavender flowers, and I just went ahead
and added that. And if you feel like
you have added enough, then you can totally skip and
wait for the next process. All right. So this is how it
is looking at the moment. I know at this point
it might look a little bit weird,
but like I say, always, trust in the process and the endings are going
to be really beautiful. Okay. So if you want to add
more flowers at this point, you can go ahead and do that. And if you want to add a little
darker lavender flowers, you can go ahead
and do that, but just don't go overboard, okay? So keep it minimal
as much as possible.
8. Lavender Meadow - Part 2: All right, so now coming
to the next step, we are going to build
the layers of green now. So let us create some grassy
patterns at the bottom. I'm picking up some
fresh olive green and a mixture of
sap green again. You can go with any
green of your choice. Just make sure not to go with a bold green in the first place. Go with a lighter tonal value, and then as you
progress gradually, you can increase the
tonal value of the green. Okay, so you can see I'm using the same brush and I'm trying to create some grassy patterns, some strokes, some upward
movements you can see. So if you are not sure
how to do this, again, you can practice this on a scrap piece of paper before
you begin the painting. And of course, later,
you can come and, you know, just put it on
your main painting. Okay. So if you're not confident, just practice the
techniques first. And once you get it right,
you can come back and do. Okay, so it's really simple. You need not worry
about the direction, how it has to be because grasses do not have any direction. They can just grow in
any way they want. And that's how the
nature is, right? In the nature, if you see,
there is nothing perfect, no tree, no leaf, no flower is perfect. Everything is so
beautiful and so unique. And that is what
we are trying to capture in today's painting. So now you can see
from olive green, I have switched to Sab green, and in some areas, I'm adding this
particular green, and in some other areas,
there's a different green. So we want to play with
different tonal values. We do want our painting
to look really flat. We're just going to
introduce multiple shades, do a mix and match, and create a nice, beautiful
organic painting. Alright. So you can just keep watching and you can
paint along with me. All right. So now that we have
added a bunch of grasses, now it is time to add
a little bit of depth. I'm going with a deeper green this time, the same sabgreen. And if you don't
have darker green, you can mix a little
bit of paints gray to the same green mixture and create this darker version
of the green. Okay? There's always a way out,
so you need not worry about a particular color
not present in your palette or you don't
have a particular art supply. Just forget about
all those things. Just work with what you have, enjoy the process,
and that's it. So yeah, now you can see
it's all about layering the greens and creating
those beautiful grasses. And now I'm switching to my smaller sized brush and
I'm adding these teeny tiny delicate stems to
our lavender flowers that are present
in the foreground. Forget about the ones, those are in the background. Those really don't matter because they are not
standing out really. The ones that matter for us is the flowers that are
present in the foreground. So when I mean
thin and delicate, it's really very
thin and delicate. You don't want to have
thick stems over here. Okay? That's not the so
just be mindful about that. You can go with a
rigor brush or you can go with your size
number zero brush, but just make sure
the line is very thin and very delicate. Okay. So this is how it is
looking at the given moment. And I feel like the paper is still wet and we
can work a little bit more. But if your paper has dried, you already know what
needs to be done. Okay. Now I'm going with my rigor brush and
I'm trying to create these grassy blades
and they have to be, again, really very
organic, very natural. They do not have a
particular shape. Just go with your intuition. So I felt like rigor
brush is too thin, so I switched to my
smaller sized brush because I feel like that is
more comfortable for me. But it's up to you.
You can go with any brush of your choice. So we're just going to
define these grassy blades. I don't know what to
call them exactly, but they look like grass blades, and that's what we
are trying to create. So just create different
shapes and patterns. Add it randomly. I need not
be at a particular place. You can just go ahead
and add it anywhere. Just make sure not
to cover too much. Okay. Just keep it nice and
delicate and beautiful. All right, so let's
keep adding these. All right, so you can see that our painting is taking
such a beautiful shape. At the beginning, everything
was weird and out of place, but now you can see the
moment we added that green, it is just popping out and everything is looking so
beautiful and so gorgeous. So you can see, I have added those grassy patterns
everywhere at the bottom, and I went with a
really darker tone of green on top of
the light green. That is why we go with
a base layer first, and then we add the
darker tonal values onto the lighter ones because it gives a nice depth
to our painting. All right, so I'll see you
soon in the next section.
9. Adding Foreground Details: All right. Everything
is beautifully dried. Now it's a big relief. You can take your own
sweet thy because we are finally working
on the details, basically the dry on dry. Okay, so we'll start by adding the lavender flowers that are
present in the foreground. So starting with a very
light cobalt blue, if you don't have cobalt blue, you can go with any
darker shade of blue, but make sure to go with
a lighter tonal value. We'll add the base color,
and then on top of that, we can add the actual let
color for the lavender. All you have to do is
just go ahead and fill out the shape that you have
drawn with your pencil. So make sure to remove the masking fluid nicely before you start
the painting. Okay? And there is nothing really
to explain much over here, but just for the few
flowers in the beginning, I'll just try to
explain and guide you. And after that, you can just follow along with so I'm just going ahead and picking my smaller sized brush.
You can see already. It's a size I think
size two or size zero. I don't actually
remember the size, but it's a smaller sized brush. So you can just
pick up the paint, the lighter lavender
that you used for your meadow in
the background. The same shade, you
can just go ahead, and I started from the bottom, but you can start
from the top as well. So whatever is comfortable, you can just go
ahead and do that. So you can see, I'm just filling out the leaves
on either side, and I'm just trying to
create that flower. And these flowers
in the foreground should be standing out
from the background. And that's the reason
I said go with a very lighter
background so that we can have these lavender
flowers popping out. And standing out
in the foreground. All right. So it's going
to be a similar process. You have to just keep
adding these flowers. Take your own sweet time. There's no rush.
There's no hurry. And once you have done
with your background, you don't want to
spoil the foreground. So, guys, please have a
little bit of patience. If you're feeling bored, turn on a podcast, go for a coffee break, or just do a little
bit of exercise. Just wake up from your desk and, you know, just take
a short break. Come back and then add
your flaws. All right. So that's going to be
the whole process. And yeah, so you can paint
and watch along with me. All right, so I have added
all the lavender flowers. I just cut short the video
because it's the same process, and I thought it would be unnecessary to add the
repetitive process. So, nevertheless, we'll quickly start by defining the stem for these particular
lavender flowers that we added in the foreground. Just as you did it in
the background, again, we are going to thin delicate stems for these
particular flowers in the foreground as well. Again, you can go with a rigor brush if you're
comfortable with that, or you can switch to
your smaller size brush like a size number zero. Note that the stems have to
be really very delicate, guys, and I'm repeating
this multiple times. Otherwise, you're going to lose the perspective
of the painting. The lavender flowers
in itself are very delicate and the stem
has to be very delicate. Okay? So yeah, these are
the beautiful stems. Now let us go ahead and draw the grass blades for these particular flowers
in the foreground, just as you did it
in the background. In a similar way, you're
just going to create teeny, tiny grass blades or
teeny tiny leaves onto either side of
the lavender flowers. You can just watch me and then you can create
it for yourself. And Alright, guys, we did it, and I'm really so happy
with the painting. I think one more last
lavender flower is left. So let us quickly
go ahead and add the leaves and do not go
overboard with this, guys. Just keep it minimalistic. The more simple
your painting is, the more beautiful
it is going to be. Alright, so I'll see you
soon in the next section.
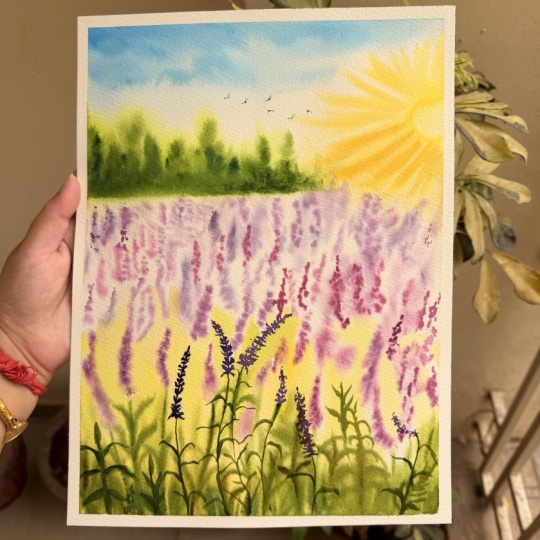
10. Have a Happy Creative Spring: Alright, guys, and I'm really excited to show
you the final painting. Just take a look at the warmth and the beauty of this painting. Everything is looking so soft, so delicate, yet so
beautiful and natural. I hope you really
enjoyed painting this beautiful lavender meadow
along with and if you did, then I highly encourage you
to post your beautiful, wonderful, unique creations into the project gallery of
this particular class, and I would love
to share it with the other students
on the platform, and I would also love to
give you the feedback, which would be very useful
for your future paintings. And if you do have any
questions and queries about a particular technique or in general about this
particular class, then you can just
start a discussion in the discussion section
of this particular class. And before we wind up
for today's class, I'm truly grateful for everyone
who made it till the end. So I will be coming up with new such beautiful
paintings in the future. Until then, keep creating and happy painting
and have a great day.
 Aishwarya Shetty, my__paint___story | Watercolour Artist