Transcripts
1. Welcome : Well, hi, welcome
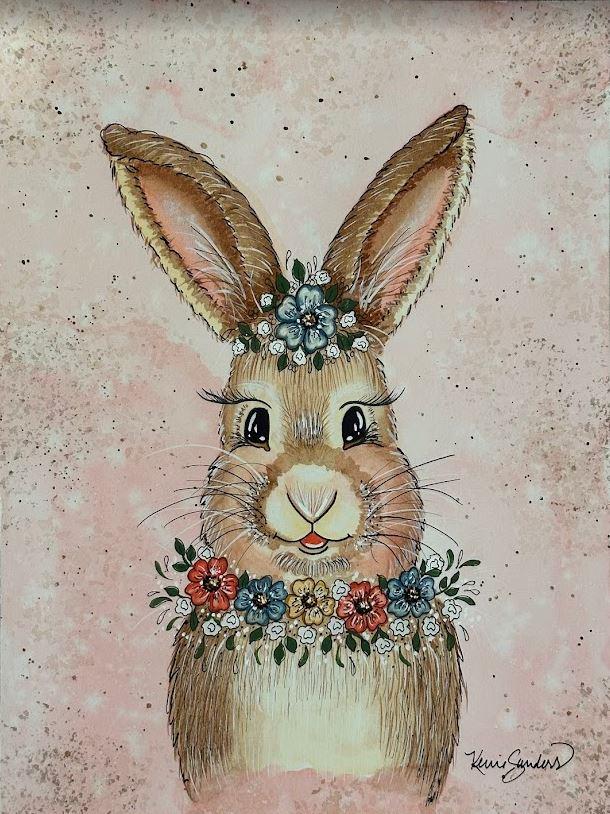
on into my studio. My name is Carrie Sanders, and I'm an artist and a teacher. And today, I have for you this adorable springtime
bunny rabbit. This is great for Easter
or just for spring or if you just want to forget about
snow and cold for a minute, and join me for a
fun, cute project. This is filled with lots
of great techniques. It's good for every
ability painter. If you already know how
to paint, that's great. Hopefully, I'll help you
sharpen your skills. And if you're a
beginner, then I'll be teaching you some
great fun things to do. We'll be doing things
like washing and glazing. We'll be splattering.
We're going to do some textured painting
with a sponge. We'll be doing some linework, and, of course, we'll be inking. You know, I have been painting
for many, many years. I've won awards for
some of my artwork. I've had a pattern book
that was published and sent across the nation along
with pattern packets. In other words, I've been
around for a minute, and I understand as a teacher
the most important thing that I can do is to give you
a class that is valuable, full of great information, techniques for you
to learn from, and hopefully it's fun and you have a good
time along the way. And that's what I
try to accomplish in every class that I
teach here on Skillshare. If you would like to
take a look at some of the other classes that I
have available for you, well, here's some
right behind me. These are some
springtime classes that I've posted for you. But really, all you need
to do is go to the top of this page and type in my
name, Carrie Sanders. And all the classes I
have here on Skillshare, we'll populate for
you and you can take a look and see if something
looks interesting, and maybe we can
spend some more time together. That would be great. Also, if you would
like to just get a little ping whenever
I pop out a new class, all you need to do is look for
this button and follow me, and I'll just send you a little notification when
I pop out a new class. Alright, but if you would like
to join me for this class, just a reminder, I do post
my classes in real time, which means you have the ability to speed them up,
slow them down, stop and start them, do
whatever it takes to make sure that you are comfortable
with the learning process. Alright, let's move
on to the next video, and we'll get started together.
2. Class Project: Alright, my fellow
friends and artists, your class project
is to complete one adorable bunny rabbit. And you can do this by following
my videos step by step. I'm with you from
beginning to end. And again, I do
those in real time. I post them in real
time so that you have the ability to speed
them up, slow them down, stop and start them, do
whatever it takes to make it a great experience
personalized for you. That's the most important
thing to be comfortable. But once you have
finished your project, I would love to see
them. Please post them. All you need to do is look for this button on this
page of Skillshare, and they make it real easy
for you to share your photo. It's so fun to see what each
other has accomplished. You know, you are each so
talented and creative, and each of your
pieces will turn out a little bit different
than the other persons. It's kind of like baking a cake, and we all get the same recipe, and they all turn out just
a little bit differently. So please take a moment
to share your artwork. In our class gallery, and it gives me the
opportunity to go in and click on the
little Heart button. And also, that's just
a really great place for us to communicate
back and forth. If you have questions for me, I am so happy to answer
them. I check it frequently. If we have comments
for each other, it's a great place for us
to build each other up. We as artists just don't get enough appreciation,
I don't think. So let's support one another and post our pictures in
the class gallery. All right. I'll see you there.
3. Supplies Pallette Pattern: Thanks again for joining me on this cute little bunny, guys. I'm so excited to get
started with you. Let's do a quick review of
our supplies and our palette, and then we can jump right in. I have provided
for you a pattern. It's a PDF on this
page of Skillshare, so you can just
print that out and refer to that or use
that if you would like. You can also
freehand, of course, but just take that pattern, put it on a piece of
light tracing paper, and then we can use that
to apply our pattern. I'll show you how to
do that in just a. You will need a piece
of graphite paper. I prefer a wax free
paper so that it doesn't stick to your
watercolor paper. It's water soluble. Today, I'm going to be
using hot press paper. Hot Press has a smoother
surface than cold press. Cold Press has more textured.
You can use either. It doesn't matter. It's just
that I'm going to be inking, and so I like to have
a smoother surface. What's most important here is
that it's 140 pound paper. If you are going to put all the effort into
doing a great project, then this is where you
want to put the money. It's great to have nice brushes. It's great to have
nice quality paint. But honestly, your best
result will come from giving yourself 140 pound
paper or better quality. It expands and contracts and
does all the things it's supposed to do to interact with your water and your paint, and you'll have a better result. Alright, you will
also need a pencil. I'm going to use a stylus
to apply my pattern. I'll show you that to you later, a good eraser so you don't damage the surface
of your paper. Today, we're going
to be using a sponge to apply some fun texture
to the background. This is a sea sponge, a piece
of one that I just cut off. You could also use a sponge that you have in your kitchen. You can use whatever you want to apply that extra texture. I'm going to open
this up so that you can see these brushes
a little better. Today, I have pulled
out a couple of flats, so a number ten
and a number two. So basically, kind of a
medium and tiny, small. Same with my rounds. You can see I have a
variety of rounds. So I've got a ten, a six, and my number four, you know, that's my favorite. And then you're going to need a couple of liner brushes
for some detail work. So you can see the
difference in length. This is a number one,
and this is a five out. So you'll need you can
do some nice long lines, and you'll need something
to do the teeny tiny fur lines as well. So basically use
what you have, guys, adapt to the tools that you have and don't go out and
buy a ton of new brushes. I hate to see that.
My favorite tool, as you know if you've worked
with me before, is tissue. We'll be using a lot of this because we'll be splattering. We're going to do some
wet on wet technique, and it's great for all kinds of things that I'll show
you through the process. You're, of course, going to
need a large container for some clean water and
some paper towel, some sprits to keep
your palette going. And let's review our palette. Let's go ahead and do a
review of our palette, and then we can apply our
pattern and get started. So, here are the paints. It's very limited palette, actually, which is nice, right? So I'll be using naples
yellow, burnt umber, sepia, quinacridan coral,
indigo, put this over here. Cillian blue, yellow
ochre, and averte. Specifically, I'm using
Holbein Ta verte, which is very opaque in comparison to other companies that make different Tra verte, which is more transparent. I wanted something
that was almost like guash, very opaque. So that's what I choose
to use for the leaves. You can do what you
want, of course. And then I will be using a little bit of
bled proof white, which is very opaque white, and I'll be using
some white guash. We'll be mixing this with our quinn coral to
get our background. So I will be using that white
guash quite a bit today. And then of course, I always like to share
my favorite pencil. I don't get paid for doing this, but just to expose you guys
to something you maybe, you know, might want to try
at some point as an artist. This is a Blackwing pencil. This is a matte
finish, but they have Palomino and all different
types of finishes, but this is my favorite
favorite art pencil. So if you haven't
treated yourself to a good pencil, I
recommend this one. Always, if you're going to be erasing on a watercolor paper, you need to use a
soft beaded eraser or a soft rubber eraser
so that you don't damage the surface of your
paper that's very important. And then I'll be applying my pattern using a
stylus. It has a ball. And what that does is,
as I apply the pattern, it retains the integrity of the pattern so I can reuse it over and over and
not ruin my pattern. Today, I'll be using
two pins to ink. Now, the important
thing is, guys, whatever you use, make
sure it's waterproof. Like, test it out. Do some testing on
paper and let it dry and then paint on top of it and make sure it
doesn't spread out. You would not want to ruin
your beautiful piece. And while we do the inking last, sometimes you're tempted
to go in and just, Oh, I want to paint
this little thing. And then if you don't
use that waterproof ink, it ruins your whole piece. So Today I will be using a NibalFnePoint,
which is this one. You can see it's a
little bit thicker line, and it goes on a heavier black. I like that darker pigment. And then I will be using
a stdlerPoint one, which is a very fine line, there will be a lot
of places that I like that little hint of black, that really fine line. And both of these are
waterproof, tried and true. I've used them many, many
times over the years. So that's what I'll be
using. Use what you have. Please just test it out, make
sure it works well for you. Alright, that's it for supplies. Let's go ahead and
apply our pattern. I have printed out
the PDF that's on this page of Skillshare so
that I have the pattern. And then I took the pattern and traced it onto a
piece of tissue. And I have a piece
of graphite paper. I'm just going to
slide that underneath. I've secured it with a
little piece of tape. I'm gonna take my stylus. And I like to start
by just making a little line and make sure that I have the
right side down. I have applied a pattern before and not had the right side
down and had to redo it. So I'm going to speed up
the camera guys and just apply my pattern by
going over the lines. It's really boring to watch, so I'm going to speed
up the camera here. You apply your lines.
I'll apply mine, and I'll see you
in just a moment. Okay, we have
applied our pattern, and sometimes if needed, like when we're going
to do a background painting around the
edges of our bunny, I want to make sure
the edges are nice and clean and the way I want it
to be for the final piece. In other words, I want to
make sure that this is the shape that I like
because right now, we're going to go in
and we're going to paint around that shape. So take a close look
at what you have just applied to your
pattern and make sure, you know, if this has
one, two, three, Idense. Make sure that's what you want. Maybe you want it all smooth. Maybe you only want two indense. Make this piece your own if you want them to
match on both sides. In other words, this
is where I take my art pencil and I
just tighten it up. These don't match exactly, so maybe I'm going to scoop
this out just a little bit more and see how that
impacts my line out here. So just tighten it
up a little bit. You don't have to be too fussy, but this is your opportunity here to make it the way you want it to be for your
final piece. Oh
4. Background Wash: We're going to start
by using some guash, white quash, and
quinacnin coral. I've put some out on my palette. I'm using my largest
size round today. It's number ten, use any
large brush you have, and I'm picking up
a lot of water. Throughout the class today, I'll be giving you the
ratios of water I'm using so you can try and use the
same amount I'm using. We'll be using 99%
water, 1% paint. So very watered down and
starting with the white, add the tiniest, tiniest
amount of this quinn coral. It's very strongly pigmented, and we're just looking
for a soft pink. And you get to choose how
pink you want it to be. I've done several versions
of this painting, getting ready for my class, and some I've done
stronger pink, some have done softer pink. And for me, I like this
light softer pink. It's actually a
little bit darker than it reflects on the camera, but I like a soft pink. That's just my preference. And I'm going to mix up quite a bit because
we're going to do the entire background here
using a wet on wet technique. And what that means
is we are going to start by wetting the paper, and we'll do this in segments. So I'm just going to pick
up some water on my brush, and it's okay that it's already tinted I mix the paint with it. That doesn't matter. So I'm kind of cautiously
going around the lines. That's why I
tightened up my lines to make sure I was happy. And just carefully. Remember with watercolor, paint flows where
the water goes. So first, we're
applying this water, and then we're going
to apply the paint, and it will go wherever
your water is. So if you have a
nice clean edge, it's not going to flow into the bunny rabbit,
and that's great. That's what we want. So now
I'm going to pick up some of this nice pink and just
go ahead and put that on. You can see how
nicely it flows out. And don't worry about
getting an exact, even smooth coverage because
we're gonna splatter this. We're gonna sponge this. And so a textured
surface is great. That's just totally fine. Alright, let's go ahead and add a little more water
to the next section. Now, you notice I'm not
making it like soupy water. I apply some water, and then I smooth it
out using my brush, being careful of my lines. And the paper does its job. It absorbs just
enough of the water. Great. I'm gonna pick
up some of this paint. Again, it's like a
99% water, 1% paint. It will flow right to the edge of that water line
that I gave it. I'm gonna help it
along right here. Beautiful. Wow. Isn't that fun? Love it. Okay, I'm using just water
on my brush, no paint. I'm going to soften
this edge so it's not hard because we're going to come now with our I'm going to use my
number four round. And I'm going to
pick up water only. While this is slightly wet, so it's not super wet,
but it's not dry. And we're gonna
splatter water on. And what that does is it lifts off the paint
that we've applied. See how that's
already coming off. And it'll blossom
out a little bit, so you don't have to
go crazy with it, but that's gonna add a beautiful texture to our background. Okay, that was fun.
Let's go ahead and turn our paper so that we
can do around the ears now. Great. And it's still
wet right there, so I can just go ahead and
pick up where I left off. And now I'm going
to add some water. It didn't clean out my brush because I just kind
of want it to blend. More water. This is
just water on my brush. Softening a little
bit right here where it comes together, so
I don't have a line. The nice. Okay. This is water on my brush coming
up the other bunny ear. I think that will end
that section for me. And let's go ahead and
add some paint now. It's already tinted, but let's make sure it's
the right color. Beautiful. All right. And we can turn our paper. Now, that's still pretty wet. So I'm going to go ahead and move along
just a little bit. You can't splatter
water if it's too wet. You need it to be
a little more dry. I'll go a little further. This is just water.
Okay, maybe about there. So cute. Alright,
let's just soften that edge with water and
come back and splatter. We softening that
edge with water. So it's a soft. And,
oh, look, I dripped. Oh dear. There we go. Okay. Now, we're splatter. You can see how it's already
lifting off. Don't you love that?
Such a fun technique. I love doing this in
snowy scenes as well. If you've done any of
my Christmas projects, you've seen me do that. Alright, this is
just clean water. I'm careful. If you go over your flour, it really will not matter
at all. So don't panic. I don't think I really try too much to be
careful with that. I'm more concerned with the
shape of the bunny rabbit, so Okay, we've got our water. Let's pick up some
of our mixture. Feeling like this
is a little dark, so I'm going to add
a little more white. Remember that watercolor dries one value lighter than
you see on your palette. So take that into consideration. Okay, I'm just gonna bring
that down. Wonderful. Now I'm going to just
have water on my brush, and I'm actually just
go to soften a little bit around that flour I
don't want a hard edge. I'm going to take
a little piece of tissue and just tap there. Now I have a soft edge there. Okay. Let's go ahead and well, it was still a
little dark for me, so I'm gonna just
lighten that up but Tad with some water. I don't want to
have a dark section when everything else is light. Sometimes that happens. I had a little bit of white. Oh, that's better. Good. Okay. I'm gonna let that
dry just a tad. While it is, you can see that I have little
edges from what we call those is cauliflowers when it blooms out,
you get a hard edge. I'm fine with that.
It adds texture. We're gonna come
in with a sponge. It's not gonna matter. So don't worry if
that happens to you. Having cauliflowers
can be really fun. This can be a really great
part of your scenery. So I think we're
okay to come in with our number four,
pick up some water. Give it a little tap tap. Yep, look at it lift
off. Wonderful. How do you do, guys? We need to go ahead and let
this dry completely. This process cannot be sped up using a hair dryer
to dry it quickly. You want it to dry on its own naturally so that it blooms out and lifts
off the pigment. So let's let it dry. I'll
see you in just a moment.
5. Background Texture: I have added burnt
umber to my palette, and I'm going to add some
water to it, a lot of water. Again, we're going to look
at 99% water, 1% paint. And I have gotten
out my sea sponge. I dipped it in water, rung it out real good, so
it's not dripping. It's not overly wet. It's
just nice and moist. And I'm going to
pick up an area of this burnt umber at a
little more water to it. And you can see them just
picking up a little bit. And I'm going to test it out
start in the corner. Yes. Okay. So I want it
to be very, like, keeping in mind it is going to dry one shade lighter even. So I'm going to start just
by putting it here and there where I feel like it. Get some more. Now I have tissue handy. In case it goes on
really dark somewhere, you can go ahead and tap it with your tissue.
I will lift off. Okay. And I realized I
was so excited to start sponging that I didn't do pink
on the bottom of my bunny, so I'm gonna do that
real fast here. Just across the bottom,
about half an inch. Notice I did an
uneven edge as well because we're gonna let the fur just kind of
drip down into that. And I'll leave that for now. Is to dry. Okay, so have you applied the brown everywhere that you
would like it to be? If so, let's go ahead and
pick up our number four, come into that bird number. This will be about
98% water, 2% paint. We're gonna splatter,
which I love to do. Now, I'm going to
protect the rabbit. I'm just gonna hold a tissue. But I don't want
any of the splatter to get on my bunny
if I can help it. So I always kind of tap
a couple of times on my palette first to get rid
of some of that excess paint. And then I'm just gonna lightly tap Good. Now, I'm going to stop
there for a minute. I'm going to use my tissue
to just lightly touch. Now, this has to be
straight up and down. Don't swipe or
you'll have smears. But you can see how that
lightens some of them. I don't want all of them
to be really dark and I don't want all of
them to be muted. So just kind of here and there, while they're still wet, just go to pick up a
few. There. I like that. Okay, let's come
back and do some more again with the
98% water, 2% paint. And cover up these
ears a bit. Okay. I got a couple of
really big ones. I'm just gonna taps. See how that softens
beautifully. Good. Ah. A couple more. There we go. I like that better. Back to mixture. Great. Good. Okay. Now, if this is dry enough, I'm going to add just a
little bit of sponge there. My to get a side of the
sponge that I really like kind of middle there. Yep. Good. That has
to dry completely, and then we'll take
the next step. Alright, I have
picked up some sepia and added that to my palette
and watered it down, 99% water, 1% paint, cleaned out my sponge, and I'm gonna pick
up a little bit. And just emphasize. I like to kind of
anchor the piece. Like, I like to do the corners, and you can see I'm
going really lightly. Just a little bit. You can see how that kind of pulls
it, anchors it down. I'm going to do a little in the corners, all four corners. You do what you want. But you can see how you can kind
of get carried away. So go lightly. Add more if you want more. There. I think that's probably enough for me.
Let's let that dry. Coming back to my number four, picking up water and coming into my white wash. And this will be about
98% water, 2% paint. I'm gonna splatter with it. And it's gonna be Oh, so light. You might not want to do it. But I think it adds just a little added
texture, and I like it. So your choice. But
if you look close, you can see it
makes a difference. And I think it sprucees it
up nicely, so I'm doing it. Very fun. Hey, let's
turn our board. You can really see
it right there. I just think every little bit adds layer upon layer,
makes it very fun. Great. Good. Okay, let's let that try. Now I think we're ready to
move on to our buddy rabbit. So let's clean up our
palette so it's usable.
6. Wash and Shade Body: Our piece is completely dry now, and I have pulled out naples
yellows that on the palette. And I'm going to pick up
some water on my brush. I'm using my largest brush. You could also use a large flat. We are going to wash
in the entire bunny. A wash is when you
apply paint to the entire area, all one value. So it's not going to
be lighter or darker. It's all one value. I'm going to be using 98% water, 2% paint, so it's going
to be quite light. And remember, it's
going to dry one value lighter than
when we paint it. And I'm literally going to start at the top and
just work my way down. I'm gonna go right
over my lines. Okay. And if you have a
few splatters on, like I do, Okay, that's great. It just adds
character and value, you know, fun to your piece. Don't worry about it. Just
relax and enjoy the process. This is such a fun
little quirky piece. And in most ways, there's no right or wrong. So don't stress, enjoy. Trust the process. I'll
walk you through it. I just picking up more
water as I need it. And I'm not gonna try and
do exact flowers there, just kind of little lumpy
bumpies. That's okay. Lumpy bumpies is a
technical term. Oh. This is just going to give
us a good base coating, a nice light value so that we're not looking at
a stark white paper. Looking at stark white paper, it's great in some places, but oftentimes it can just throw you off with
your color sense and how deep the values are. And for this piece, our
underlying tone is going to be in this yellowish tone for
our cute little bunny. So this is perfect. And I just want to tighten it
up a little bit right here. A. The bunny is completely dry now. I am using my number six round and I'm coming
into this Quinn coral. This is going to be a
99% water, 1% paint. And I'm going to just wash in. Again, that's all one value, the interior of the ear. Wow, isn't that pretty? And putting out on top
of the naples yellow just really enhances that color. I love it so much. Let's just water on my brush so I can smooth it out a little. Now, I'm being mindful. We're gonna put brown above it. We're gonna leave this area
with the naples yellow. So shape it the way
you would like it shaped and then walk away. Leave it alone. Oh. Great. Okay. This water on my
breast so that I can smooth it a little bit. Great. Now, it's still
slightly wet, which is great. I'm going to pick up some
of this burnt umber. This is a 991 ratio. There we go. Now, it's moving. And I'm going to shade just the top portion
of that inner ear. So I'm just gonna
bring down a stroke. You don't want to
overwork it with your brush or it's gonna
lift off the pink, and we're trying to kind
of blend both of those. Now this is water on my brush. I'm just going to move
it along that edge, soften it and see how that blends with the pink.
Isn't that beautiful? Okay, let's do the other ear. Basically one stroke,
water on my brush. One stroke. Beautiful.
Let's let that dry. Actually, while that's drying, let's keep going. Shall we? Alright, let's keep moving
with our burnt umber and our 91 99 and one mix and bring
it down and bring it down. Now, I'm gonna pick up
water and just soften that. We got flowers up there, so I'm not too
worried about that. Water. Just want to soften
it a little bit by his eye. We're gonna have a
lot going on there. I'm gonna have to pick up a little bit more waited too long. Lo. Great. And pick
up just a tad. Gonna hint around that
flour a little bit. Look how I'm pressing
down on the brush. I'm not using the tip. I want it to be wide and just
kind of broad, so to speak. Okay. Just using water, keeping it off that eye. Good. Let's let that dry. Coming back to our
make sure this is still 991 burnt umber. We're going to just
come down on this edge, this outer edge
of the top of the here and I'm going to leave a little bit
of that white showing. But I'm going to This
is water on my brush. I'm just going to soften
it here and there, so it's not quite a hard edge. But I don't mind the
hard edge up here 'cause that's where it kind of folds over,
so that's okay. Alright, let's do
the other side. Now, you notice I'm
leaving it textured. Everywhere I go, I'm
leaving textures. Don't try to make everything completely smooth through
this whole piece, because it's a cute
little bunny full of fur. And even though their
furs super soft, it doesn't mean you don't
want it to look flat. You know what I mean? Texture that a little bit. If you have too much
water, touch your tissue. Notice I always have
my tissue handy. Bouncing my brush
on it a little bit. And I wear it folds over here. I want to darken that
and bring it down. Yeah. Yep. Okay.
Good. All right. So I think we can
bring a little bit of this kind of bet
between her eyes. So I'm gonna darken a little
under the flower just a bit. And then I'm pushing
on the brush again. I'm just kind of smudge it down, just kind of
squiggling the brush. Cute. We're gonna leave it kind
of highlighted around. I've given you a
full colour photo for reference, but I
have it on the screen. Kind of leave it whitish
around those eyes. But that helps with the texture, guides us with the fur. So fun. Alright, we're going
to pick up some of this Quinn coral again 991. And we're going to stay away from the inner
circle, do nothing there. We're going to do
the outer cheeks. But we are going to bring
it in under the eye. I like to kind of start there 'cause then I don't
forget about it. And stop with the nose. That's where the nose
goes up. But let's just wash in some
cute ink cheeks. Oops. I brought it down
too far on his inner. There we go. See if you
make a mistake like that, just quickly touch
it with your tissue. That's what the
tissue is all about. And really, it wouldn't have
hurt anything if I'd left it there, so no panic. All right. And
down. Oh, my gosh. So cute. Rosy cheeks. We're gonna put some brown
on them in a minute. But Super fun. Now, before that
dries completely, let's take this water on
our brush, and you got it. We're going to soften that edge just so that when we
come in with the brown, it doesn't look like it's like like makeup or something,
a straight line. Let's do the next side. And I'm going to
soften this inner. We're gonna put brown
over this part, so it's not a big deal. Good. All righty. And let's go ahead and put a little bit on the
lower edge of this nose. Don't go all the
way up. Let's leave some of that nice naples
yellow showing through. But just a little
hint on her nose.
7. Ears Detail: Now, let's come back
to our burnt number. It's still a 991. And we're gonna I know it's hard for you guys to
see where my flowers are, but what's important is
where your flowers are. So we're just gonna come in
and kind of bring that down. And I'm going to soften
that edge, of course. Okay. And same thing over here. Did you know you have a
natural arch with your wrist? And that's why you
see me turn my board. I want to have a
nice soft curve, and my wrist
automatically does that. So let your body do the work. And now, let's soften up here where it
touches my flowers. And it's gonna kind of add a little shadow
under the flowers. And I'm just really
wiggling the brush. I'm not actually trying to be, you know, where every petal is 'cause it just doesn't matter. I'm gonna use this down
a little bit with water. This is just water on the brush. Great. I am trying to leave
quite a bit of naples there. If you put too much water
on, it's gonna lift off. Touch that with my tissue. Beautiful. I'm going to switch
to my number four brush, and I'm gonna come up to
the outer layer of the ear. And this is still that same mix. But I'm just going to emphasize this outer
edge of his per ear. And I'm going to start to indicate a
little bit of the fur. I just ling some out. Oh, yeah. Sweet. Just let it kind of drift in to that nice highlight that
we left with the maples. Great. Okay. Let's do the other ear. And the same thing.
I'm just going to turn this so it's a little more
natural curve for me. Awesome. And then we can start to bring it
down a little bit. A little more water. Can you see me touch my tissue. I'm just pulling excess onto the tissue so I don't get
too much on my paper. I like to err on the
side of caution. It's easier than
trying to lift it out. Okay. Great. She's starting to
take shape, isn't she? Let's keep going. So now we're going to come down to
the base of those ears. And this is actually
going to be pretty dark because behind a flower, it's kind of a tucked in area. This is called glazing when you're adding layer upon layer and it changes the value. You can do it with
multiple colors or the same color
on top of itself, which is what we're doing here. We're using the same color
just on top of itself, and you can see how much darker. I have to do the same
thing over here. Sorry, my hand's going to be in the way of the
camera a little bit. Want to emphasize the shadow. Good. Even bring some up
higher, like longer hair. Okay. Now we're gonna
switch to a finer brush. Use my five ought. Picking with our burnt umber. And we're going to add first, we're going to add
some little tiny furs. And I'm gonna have them kind of criss cross each
other. You can see that. I'm having them go every which way you don't want to
have it look like, you know, a picket fence. No fences growing on our ears. We just want to
have it look like little short pieces of fur here. Okay. And then we're going
to do the same thing, but fewer on this outer edge. These I'm gonna
have kind of come downward instead of
sticking straight out. So I'm more like fur
that's laying down. Remember, we're
going to ink this, and so you don't have
to fill it all in. It's okay. Now, let's do
the same thing over here. And same thing. I'm gonna pull these hairs
down a little bit. Okay. Now, I think I would like to just come in and
it up a little bit inside. This is tucked inside the ear. Especially at the top
here kind of rolls over. Maybe a little more down here. Hey. Yep, I'd like to
be a little darker. This is how we
develop the shape, so it's important to
get our shading in. I think it needs to
be shaded in my head. Just kind of between
the fur here, just inside the ear, adding a little more shading, a little more
texture. It's great. Good, good, good.
Let's look that dry. This still looks too flat to me, so I'm gonna pull
out my number two flat back to the burnt umber. This number two flat does
not hold very much paint, so we'll have to reload. But that's the whole point is
I don't want to overdo it. But I just I'm gonna come in. I'm almost using a chiseled
edge 'cause I want it to look kind of
like little hairs. Yeah, I like that better. Coming between the little furs and pulling that out a bit. Yep. I like that better. Can you see how that makes it kind of roll versus this that looks flat? Let's
do the other one. Good. That feels better. And I would actually like
to use the larger flat. Still using the same
mixture this 991. I'm just going to add a tiny
bit on this upper edge. Yeah. Just tucks it
back a little bit. This one maybe doesn't need
it as much. We have a lot. Okay. Good, Let's let the
years dry for now.
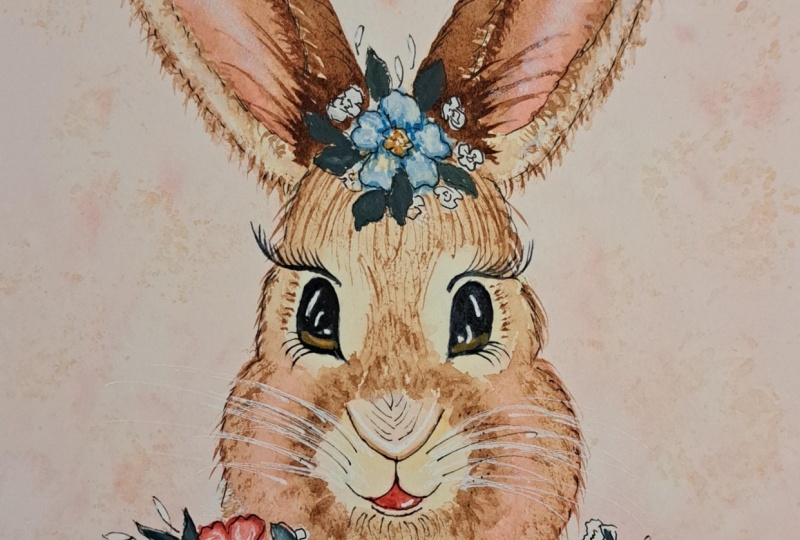
8. Adding Brown Fur: I had to take a minute and draw in the eyes and the
mouth and my flowers, mostly because I wanted you
guys to be able to see it, but also it gives me a
good line to work with. So I took a second
just to do that. And now I'm ready to go ahead
and pick up my liner brush. This is my number one liner. And I'm going to pick
up this burnt umber. It's gonna be a 982. And notice as I give
you a scrap paper. I'm pulling this
through the paint, and I'm rolling it
because what I'm doing is I'm rolling it to
a fine, fine tip. Okay? See, I'm rolling
that I'm lifting. You can get a really beautiful
tip on your brush when you do that cause we're going to start out with some fine hairs, especially while we're trying
to get a fill for things. Just throw out a
couple in the ear. Not too many because
we're going to add white, but I do want a few brown ones. And same up here. We can kind of crisscross
a little bit, just a few. And then we're going to
go ahead and pull some down the first few, I'm going to be a
little bit careful, and then I'm going to
fill in, not as careful. But the first view give us, like, the curvature of his head. You always want to follow the curve of whatever
object you're painting. So same over here, following the shape of her little
head, little forehead. And then I can be a
little bit more speedy. And I'm gonna add lots
of fine little hairs. And they're not
the same lengths, some are longer,
some are shorter. And I'm not going
into the flower. That's part of why I needed
my flower guideline there. And I'm leaving space, so we have the eyelash. But I'm leaving
space above that for some white kind of eyebrow type hairs that we're going to leave that
we're going to put in. And I want these hairs
that come down the nose, the bridge there to be shorter. And I did put a little guideline right there, that little curve. That's where I'm going
to stop with this. So now you see why we left a little of
that Naples yellow showing. Gives us a nice,
natural highlight. Sticking with our Burnt
umber or 982 mix. We're gonna add just a
few hairs. The hair, fur? Maybe I'm saying it wrong. Oh, guys. Just along this outer edge. Don't
come in too far. He So cute. Oh, my gosh. I just love it.
Alright, let's stop for just a minute with
this and pull out. I'm going to use my number
four back to our 991. But mostly we want that to show the curvature
of her face, and we don't want to lose this beautiful rosy
pinkness that we put in. I push that back. It came in
a little far. There we go. And since I have my
flowers in place, I'm just going to
lift off a little bit off of the flour
at this point. If you get it wet and you
touch it with your tissue, it lifts off the paint. Alright, let's do
the same thing. On the other side, I'm
going to turn my board, so I have that natural arch. There's just water on my brush, softening that edge,
leaving the pink. Okay. Oh, that looks cute. While we're here
with this brush, we're going to just add a little smudge little
age of paint here. Let's see I've
just worked it up. Just doing a little ziggy zaggi. I don't want it all to
be the same length. Ooh, isn't she just starting to take shape and look so cute? You know, you can do this
with a blue background, as well, and I almost did. Or a lavender background
would be beautiful, too. What I left a gap there. Nice little highlight
underneath the bottom lip. Do bunnies have lips? Yes. Yes, let's say they do. Okay, and then I just
want to add a touch here where the cheek
the roundness of the cheek meets the upper Good. All right. And while we're on a roll here,
let's keep going. I'm going to add another layer. Notice I'm wiggling my brush. I'm not holding it still. I do not want a straight line. Oh And that can stay kind of a hard edge, if you want it to because it's kind of a shadow
underneath the flower. I'm going to add just a hint. Not as dark, but a tiny bit here and there behind
these top flowers. Great. Alright, now let's
go back to our number one. We are still using our 991
mix on the burnt umber. And And then I want to bring some out and
start with an outline. And following that
contour ever so lightly, guys, just a light light touch. A Alright, and then let's give
her a few whiskers. These are also going
to be contoured. So we're gonna round
them out on this side. And as we come towards the center, they
get more straight. Out the center is where we'll start rounding them
the other direction. Great. Okay. And now
that we put our brown on her little chubby cheeks, Uh, I'm going to add just a few. We haven't put in the eye yet, but I'm going to add
these are not eyelashes. This is just a
little bit of fur. It's kind of rounding
slightly around that eye. It's kind of little
emphasis without overdoing. Yo. Now, as we did up here, you want these first
hairs to be sure and follow the contour
of your rabbit. And I'm gonna have some of
them come out into the pink. I'm not going into the flowers,
staying underneath them. Oh. Now, I'm choosing to stay pretty light in the center area. You do you. You do
what you want to do. Maybe start light, and
if you're like, Oh, it's too light, go ahead
and add some more. But if you start really dark, you can't really take it off, so notice how I'm doing some
down lower, some up higher. I don't want a straight line. No picket fences. Remember? U. And I'm just I'm coming
down into the pink. Just letting it fade away. Alright, I'm gonna
leave it at that. Gonna let that dry completely.
9. Base in Flowers: I put serleim blue
on my palette, and I pulled out my small flat. Cerlem blue is quite
transparent, as you know, so I'm using probably an 80 20, 80% water, 20% paint. Okay. The reason I wanted
to use a flat is because what I'd really like
to do is leave them. I'm going to actually,
I'm gonna tap in a little extra paint around
the center of the flour. Rinse out. And I'm
going to lift off. Alright, my fingers got wet. I'm gonna lift off
this outer edge. So I'm gonna lift
it off with water. You can see how that gives some dimension to your
cute little petals. If it's being really stubborn, you can touch it with your tissue after, and
that will lift it off. You can see that lifts
it off quite nicely. Okay, I'm happy with that. Yeah. Good. All right. Now, pick out which flowers
you want to do blue. We're gonna do these in our
blue and pink and yellow. And maybe you'd rather use
some different colors. Maybe you want something that's
in the more orange tone, more of a coral tone or throw in something that's lavender.
That would be fun. So, again, you do you. What makes you happy?
What's your favorite color? Oh Again, I'm going to pull off. Great. Okay. Next, let's move
on to I'm a Du quin coral. Now, I'm going to do
kind of the same thing. I'm not going to lift
off as much, but Until this paint has
more pigment and it's a little more
stubborn to lift off. Go ahead and touch it with
your tissue if you need to. All right. Now we're gonna
take our naples yellow. Because that's so light, I'm not gonna lift anything off there. I am gonna take
this naples yellow. This is probably 955, 95% water, 5% paint. Put it in. I'm gonna dab it
into the centers. I'm literally using an up and down motion and dabbing it in. I'm not stroking it in. I don't want it to
smear or blend. I just want it to sit
on top of what's there. That'll get us started
on our centers. Good. All right. Now, while
we have this color out, I'm going to use my number four taking this down to 98% water. 982. And I'm going to
add just a little bit of shadow under that nose and
around the mouth here. So I'm leaving. If
you get too much, you can just touch
it with your tissue. I'm leaving some areas of that very first base coat,
so it's got some light. It's got some dark. I have put some indigo on
my palette now, and I've switched
to my five out, and I'm going to
put these eyes in. Well, I've left room for the
color of the eye below it, which will be some yellow ochre. But this just helps me
see where it should be, and I like to start by lining them both in and then seeing
if I got them fairly even. Now, obviously, you
don't want to feel the IN using a five out. That's not gonna
go well for you. So let's switch over
to switch to my four. Hard for me to see to
the bright spotlight. I get a glare on my paint. Alright. Now, obviously,
they're not exactly the same. That's okay. I just wanted
them to be mostly the same. Oh.
10. Face Details: Beautiful. Alright,
let's switch over to our liner brush and
put in some eyelashes. You could do eyelashes with
the pen if you prefer. Again, I'm rolling
to a nice fine tip. Alrighty. Now, before I do the
bottom of that eye, we need to put in
some yellow ochre. You could use white. If you want the white of an eye, you
could do that instead. But first, the
indigo needs to dry. It's not dry. I've added white guash back
to my palate now. And I'm going to
start with oh a flat, a medium flat and
a piece of tissue. And I'm going to do
some dry brushing. So dry brushing is you notice I didn't
put this into water. It's literally a dry brush, picking up some paint and
wiping most of it off. And that gives you this
dry scratchy kind of look almost like an old
barn door, an old fence. I'm hoped on fences
today for some reason. But you can see that gives it kind of a fuzzy look
inside of her ear. And that's what I want to do. I'm gonna pick up some more. So this is 100% gouache
paint on a dry brush, picked up, wiped off. And then I'm just
gonna scratch it in. I moving I'm twisting my
brush back and forth. I'm not afraid to press
hard. Good. I like that. Alright. I'm going to add a little bit of
this cute fuzznss. Is that a word fuzznss? On this puffy part of her cheek. We've done so good to preserve this beautiful highlight,
this natural highlight. We're gonna emphasize it. Guys, we're almost done. Oh. This has been so fun. Thanks for doing it with me. I'm so happy to have you here. Alright, a little bit
on the top of the nose. Oh. Great. Alright, let's rinse
out our brush. Picking up our number two flat. We're gonna add
some white flowers. Picking up a little
bit of water. This is probably Oh, I would say 90% paint, okay? Opposite of what
we've been doing. 90% paint, 10% water because we want it to go on very strong and we're gonna just throw
in some flowers. Okay, one, two, three, four, five, six, seven, eight. We try to work in
odd numbers, right? So now I have nine, and I'm done. That works for me. And I'm going to add
some down here, too. Awesome. How'd you do? This
wins that out real good. Come back to my five ought
picking up some yellow ochre. And this is gonna be about
90% water, 10% paint. Now, you can bring it up around the site if you would
like. I'm choosing not to. I don't really want that. All right. That's
going to dry and then let us finish
our lining around it. So while we have this out, let's go ahead and add some dots in the
center of our flowers. And let's go ahead and do the same thing with number
while we have that out. And then we might as well do
this while we have this out. So let's back to
our yellow ochre. We're going to enhance the outer edge of our yellow
flower, just the yellow one. Right. And let's add a
few little lines, which will help make
it look contoured. Great. Just for that yellow one. Okey doke.
11. Lashes and Flowers: Okay, coming back into our
indigo using my number one. This is about a 955. Now, this has to be dry. If it's not dry, wait for it. Now, my first eyelash
is gonna kind of follow that cheek line. Okie doke. Right. Yeah, let's
fill in the mouth. Wet this down to the details, guys. This is fun. Coming to the quin Win
coral, taking my fat. And I guess while
we've got this, let's do the edges
of our flowers. And let's add just a
few contour lines. Okay, let's do the other one. Okay. Let's do our blue while
we're doing this. And some contour lines. It gives you the chance
to reshape any petals that might have gotten
a little wonky on you. Good, guys. Okay, let's pull out our doctor
Martin, doctor PH Martin. And you can see that mine
is getting a little dry. So every once in a while, I'll just sprit a little
water in there. I usually paint with this. I just put a little bit in
my cap it dries pretty fast, and it's very
thick, very opaque, which I love about it. So I'm going to start at the top and kind of work
my way down, actually. Still using my five out. Now, if any of these white
flowers faded too much, this would be a good chance
to just brighten them up. Okie doke. I'm going
to add just a couple of a few just to add variety. So we have some that fade
into the background. Now we have a few that are
going to stand out a bit. I'm going to use
my thinner brush. And I'm using a contour. Yes, I like that better. I
know we just did this in blue, but this adds another
layer, some contour lines. I'm going to add a few
dots in the center. Yes. Okay. And we're gonna connect these
flowers with vines, but if you feel like adding any Now, here's where I'm going
to add some fun little white, short hairs and whiskers. Okay, I'm going to put a
highlight on her lips. Okay, so let's put some Great. Yeah, I'm going to just emphasize a
few here and there. Let's start in the middle till I get a feel for what
that looks like. Emphasize the highlighted area. Hey. Now, I would like to just
add a few few little dots. Now, I could pull
out my stylist, but I don't really I
don't care enough to. Like, I don't they don't
have to be perfect ground. Well, as soon as I say that,
I put one on that's too big. Oh. Because we're still gonna ink, and we're still gonna
put on whiskers, so it's not a big deal, but I just want a
little bit little dots where hairs gonna come out. Whiskers are gonna come
out. God. Alright.
12. Leaves and White Sparkles: We're still gonna do
this with ink, too, but I'm gonna pull out a
few long white whiskers. Super fun. Okay. Coming
back in with the bleedproof white and my number one liner gonna add a couple
more highlights. I wanted to add a
stronger highlight just at the base
of his nose here. Okay. And I want to add
few dots on the center. Now, I'm going to take
some of the sepia and add some dots to
that center as well. This will be mostly around
the edge of the center. Okay, I have pulled out a verte. This is Holbein, which
I mentioned earlier, is very opaque, almost like guash,
which is why I like it. I have multiple averte versions which do different
things for me. Okay, and I'm also
using a five ought. I'm just going to do little
leaves here and there. You can see how that just
goes on nice and opaque. It covers everything
it goes on top of, which is great for this. Now, I am going to put down
a couple of leaves that kind of kind of cup
the white flower. If you're not comfortable
free handing these, go ahead and use your pencil. A Okay, make sure
you're stepping back, six feet, taking a look and placing them where
you'd like them to be. Notice I'm not really
putting any up on her face. I mean, you could
put a little one or half a leaf or something. But there's enough going on
on that face that I don't really want to
detract from that. Okay, um, actually, I
shouldn't have rinsed out. But the next thing I
want to do is just add a few petal strokes
or coma strokes, which is touch and
press and lift. So I'm just gonna
add a few here. Just touch and press and lift. So I think I'm done. Again, step back six
feet, take a look. Okay, guys, I stood
back six feet and I felt like it just needed a
little more sparkle for me. And so what I did was I added just a little more
highlighting, like, a little bit of white here and a little more white on
the outer edge here. And then I added white dots around the center
of these flowers, and you can see I threw
some sparkles here. Are in the flowers, just like little baby's
breath, so to speak. So that's what I did to feel a little more
happy about mine. Do whatever you would
like to do with yours and then let
it dry and we're going to pick up our ink pens and finish up with our inking.
13. Inking: Last stage, you guys,
we're almost finished. I'm going to start
with my Nibal pen. This is a fine point. Again, make sure that you test whatever you decide to use, making sure that it is
completely permanent waterproof. And then you won't
have to worry if you go back in and make some change with your
watercolor, it won't smear. So double check. Better be sure. Safe and sorry. Alright, I'm just going to start by adding just a few little indications of fur on the edge here.
Nothing too serious. Get warmed up a little bit. But here's where we want
to maintain the shape. I'm literally gonna wrap
that around up there. Just that shape of
that rolled over tip. Okay, and then I'm going
to have this f here. I don't want to lose that
beautiful white edge we maintain, so just a few. Great. All right. Now,
I'm going to bring some down here and here. Just a little indicator. Don't want to
overpower what we've done so nicely with our paint. I like a smile on my bunny. I did one with less of a smile, but I just kind of like that. In fact, I'm going to
put a little bit of a corner of the mouth there. Great. Now, I'm going to
switch to my thinner. This is the stdler 0.1. So it's very fine. And here's
where if you wanted to, maybe I'll just do a
couple to show you. You could add a couple hairs
there if you wanted to. Now, we're going to
outline our leaves, and I don't always stay right
on the edge of the paint. I prefer not to. I like
to have little gaps. I think it's more interesting. If you want to add a little vein or attach
these with a vine, you can. You don't have to. Oh Just to add some filler. It's not too strong. It doesn't take away
from what we've done. Maybe I'll add also some
round berries or whatever. Great. Now, if you don't
like having clearberries, you can go ahead and fill
those in with a color. You could do it with
the pink or the blue or white,
whatever you like. Alright, I'm sticking with
our thin marker here, and I'm just going to add a hint of some fur right here just to emphasize
above the muzzle. A little bit around
the eye here. Okay. Couple more eyelashes. Got to have a girl girl. All right. And then let's
see. Wh else I want to do? Oh, I wanted to add some
little whiskers here, make sure that they're rounded, and they allow the contour of
all our beautiful painting. Now, I'm switching back to
the Nibal and I'm going to put some little dots. This doodling is so fun. It's like the funneest part
for me, I love doing it. Okay, so here's where
I'm going to do a couple thicker ones and
maybe some thinner ones. Let's see. I kind of
like the thick ones. Alright. Now, you can see where my pen skipped
because I hit a dot. So I'm just gonna
gently fill that in. Okay. And it's important to have some of
them criss cross, so it looks a little
more naturalish. Now, I think it's
okay to go ahead and come in with our thinner, yes, and just add some
shorter whiskers. Fun. Yes, I like that. Do you like that? I think
that worked out well. Okay, so let's just look
from our ears down. Let's go ahead and outline
our flower, our big flower. I kind of overlooked it. And I'm using the thinner
marker because it already has all this
beautiful painting on it that I don't
want to detract from. This is just to
kind of emphasize. And I'm going to use
the thicker one. Oh, it's so cute,
isn't it?'s gonna make that center pop a little
bit more. Yes, I like that. Great. Okay, you could even
We did those white dots. You could even add a few. I wouldn't do many,
but a few black dots. Cute. Cute, cute. All right. Yes, I like that very much. Okay, so I'm back to
my thin marker again. Coming down to these
white flowers. Almost can't see him on that
pink without the outline. Okay, that helped tremendously.
14. Final Ink and Signing: Et's go ahead and outline. Let's just start on one
side, work our way over. I'm not sure if
I'm gonna outline just our little
designs there yet. So I'm gonna leave them for now. Oh, that's so cute. Okay. I'm going to outline some of these
and see how I feel. Maybe some of the bigger ones. Hmm. I think I'll leave some done and some not done, and
I'm good with that. Okay, now let's switch back to our thicker pin and just enhance
the center a little bit. Definitely like that.
And then if you want, you can add a few black
dots with our white ones. So cute. Great. Now, if you'd like, you can add some black
dots here and there. You could also use
paint for this. Cute. Alright, let's hang on to our Nibal,
our thicker one. Great. And then let's
come back to our thinner one and add some
individual hair fur. And as I get towards
the center here, I'm going to go light and fewer, shorter space in between. You know, you got
it by now, right? Alrighty. Now, if
you would like to add just some clear drops
like that, you can. I'm gonna add a few just so that it kind of matches what's above. Mostly, I think,
just on the pink. Yeah, maybe one or two
that come down. Great. Okay. At this point, guys, let's step back six
feet, take a good look, see if there's anything we're missing or that we would like to change or add before we wrap up. Okay, guys, I stood
back six feet, and I added a little bit of white highlighting using
the bleedproof white. Along this edge of the ear, I felt like it just needed a little extra texture
right there. And then, you know, when we added these
little just little sprits these little white lines, I added just a couple.
You can barely see them. But I wanted it to
match down here. I wanted it to be consistent. So I did that. And then I added one more dot on each eye in the corner towards
the corner of the eye. That's all I did. So that was just my preference.
You know me? I like a little sparkle. Got to have a little, you know, little brightness
with the highlights. Thank you so much for
taking this class with me. I hope you look in the mirror and remind yourself just
how talented you are and how skilled you are and creative and how
wonderful it is that you are learning new things and perpetuating the
abilities that you have. I'm really proud
of you. I'm very humbled and grateful
that you spent your precious time
with me today. Let's go ahead and
sign our name. Always claim your artwork, guys. Always be proud of what you've
done and be proud to put your name on it and show others what a wonderful talent
and skill that you have. All right. I will see
you in the final video.
15. Congratulations and Bloopers : Hey, congratulations.
You did it. You completed your spring bunny. I'm so proud of you,
and I'm so happy. I hope you're thrilled
with your project and that you took
the time to sign your name and that you're
gonna hang it somewhere wonderful in your house or give it away to someone special. If you feel like this
class was of benefit to you and you know someone else that might benefit
from this class, would you mind
sharing it with them? All you need to do is look for this link and send it to them, and both you and
your friend will benefit from Skillshare,
which is a pretty cool thing. Also, if you could take just
a moment and snap a pick of your class project and
look for this button on this page of Skillshare and upload it into our
class gallery, it gives us the chance to click that little heart button and make comments on
each other's piece, and it would be so delightful to see what you
have accomplished. I would love that. If you would like to spend
more time with me, here are a number of my classes that are available for
spring and summer. But all you need to do is
go to the top of this page, type in my name in the
search bar, Carrie Sanders. And all the classes that I
have here on Skillshare that are all ready for you
to go we'll populate, and let's see if there's something else that's
of interest to you that we could spend
more time together. That would be great. And lastly, if you would
like to follow me, then that just means
you'll get a little ping whenever I send out a new class, and all you need to do is look for this button and
click on follow, and that will take
care of that and just get a little notification. Alright, guys.
Thank you so much. I'm so honored that you
spent some time with me. I know your time is
valuable, and there are wonderful teachers
here on Skillshare. So I do appreciate your time.
And until the next time. Oh, I guess that means it's
time for loopers. Alright. Take care. Bye bye. Well, hi. Welcome on. My lips are sticking
to my teeth. Welcome in. Hippy, hoppy. Here we go. Hippity, hoppy. 'Cause I have this
cute little Easter the spring Easter bunny, and that's not what
I call this class. So What they call the fun? Oh, yeah. Easter house. Easter's in the house. Easter but in the house. Easter bun it in the
house. Oh, yeah. Easter bunny. He's
not a Easter bunny. She's a spring bunny. M.
 Kerrie Sanders, Artist, Teacher, Creator.