Transcripts
1. Introduction: Hi everyone. As the title states
in this video, we will be doing 3D
key corn keyboard, which is also interactive
in under 20 minutes. Using supplying, we will work on a browser and I'll put
the final project link in the description
so you can always go check it yourself
in case you wonder. Also notice that discourse
assumes you have at least beginner level
knowledge of supply and if you're totally
new to supplying, we also have an
introduction course where we are talking about
the basics of spline. Once you're finished
that course, you will feel more comfortable making these kind of projects.
2. Making a 3D Keyboard: From toolbar at the
top of the screen. Let's create a cube firstly. And I am holding Shift and
Alt Option while creating, just to be sure it's equally
proportioned on all sides, reset its position, and now we are sure that it is
centered as well. Selecting the cube, I
will just go collect a smooth and edit button
and decreased subdivision all the way down to 0. Now we want to narrow the
top side of the cube, right? Select that side and
maybe we can make a charter in order to
decrease the area. And then just drag the
little circle here. Again, hold Shift to
keep the proportion and decrease the size and equally on all of
the coordinates. It looks nice for a template. What we can do next is increasing
the subdivision level. Maybe three. And let's say we
want to edit much. It's more like a
sphere right now, but runway at a subdivision. And we can use LU
Patch Tool for this. It will get shaved. Let's make sharper
to the bottom. And also, I want to
add a new subdivision. I want to drag this
one to the top. And I will keep, I think, subdivisions until it looks like the key material right now. One more. Okay? This looks nice. And always check the
object from top. To see if it is symmetric. I will reset position again. Just to be sure and check. It looks nice. So what I want to do next is rounding the corners a
little bit from top. So I will select these
and these corners. And by the way, I'm
holding Shift to select all of them
at the same time. I will just drag and
a little bit more. Okay, This looks great. Next step is extroversion. I select the extra
tool from up here, and I will push the center of the key down so that we have a small pit forms and select
these squares like me, and only leave the
corners actually. So you can see the
effect of extrusion. Actually, let me overkill it. You can see it easily. We could also drag it
up to create a peak, but in this case we
want a slight slope. So this is fine. Alright? This is already
looking like a key, right? Maybe it should be shorter, but I want to keep it like this because we will
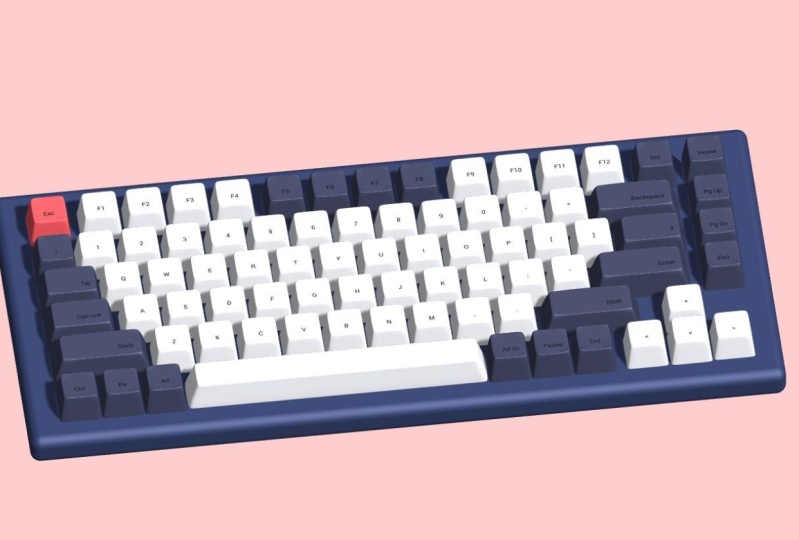
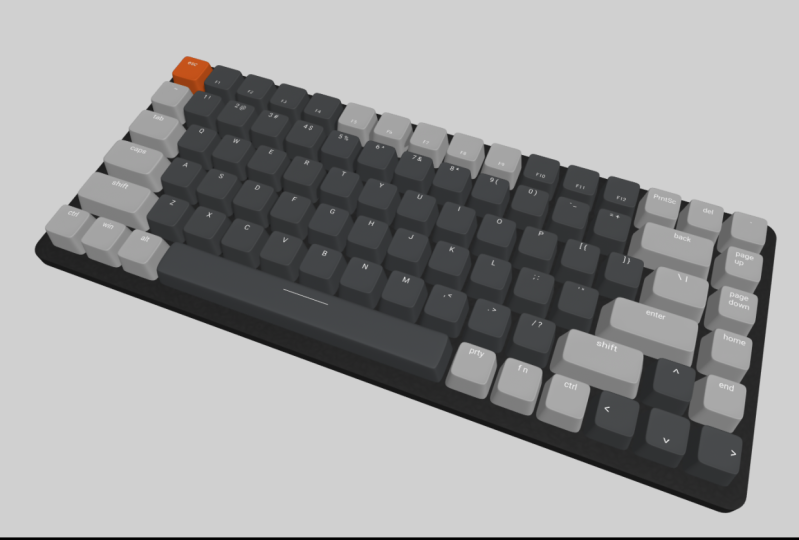
add the keyboard, bass just underneath the keys. So you will understand better why I want to keep it like this. When we add the layer base, Nike Chrome keyboard, we have
three colors of light gray, dark gray, and orange one. Let's actually go and get an
example image for reference. So this looks fine. I will just copy this image here and paste it into spline. Now we can use it for reference. Let's change the color of
this key to light gray. I will say color picker here, and this is fine. And I will duplicate
this key for dark gray. Let's pick the color. Let's first pick the color
picker here and click on here. Now we have the dark
gray here as well. And finally, I will
duplicate it again to make its color orange. Like this one. Alright, we
have three types of t's here. Ready? Let's make the case
of the keyboard. First, I will change the background color,
something lighter, so that we can see
the colors better because the case color is
going to be something about. I will create a brand new
object for the keyboard case, which is going to be a cube. Again, let's say reset all. We can not see the keys because they are
just inside of it. Let's drag this object
noun from the side view. Let's drag it down. Now we can see the keys. And let's make it smaller. Maybe. Maybe from this side. And this side as well. This looks fine for now. We will edit the size as we increase the
number of chiefs. Alright, now, for
the case material, I want some color,
some darker color. Let's make it now. Let though, this
looks fine, Okay. Not the material should don't
look that smooth though. So I will add a noise
to the material layers. And let's decrease the strength
because it is too much. And I will play with
the values down below, maybe smaller values
decreasing here, and increasing the movement. I want darker colors
for all of them. And so I will just randomly
pick some darker colors. For this one as well. They should be almost black, but variety is good
for the marsh. So I have four different colors
and all of them are dark. So maybe then increase
the distortion and let's get a closer look. Let's increase the strength. You see it better. Okay, let's play with
these guys here. I don't think really changed. Decrease the strength
of the knowledge, and then now it looks better. But it's not like so maybe we should pick some darker colors. So maybe this is,
these are two gray. For this. We don't see the noise exactly. Let's pick this one as well. Like this. Okay? Hopefully this looks
like a key Chrome case. I'm happy with my
table right now. Maybe we could have
some corner, read news. And that's it. We're
done with the case. Let me make the reference
image visible again. It will control
the keys positions and alignment with that image, enlarge it to see it
easily and put it here. So we have the orange gear
at the top-left corner. Let's put it there. Next to it, we have dark gray key and let me move
it there as well. Finally, we can keep the
light gray one here for now. Okay, We can create text objects in spline
from the toolbar. And we can click here
and just start typing. And we need escape. Or this key, I will increase
the font size, maybe 41. And let's make the
color white and position it just top
center of the tea. Maybe this is too light. Let's make it a little bit gray. So this looks better. I believe. Maybe a bit whiter. Okay, this looks better. Now. And now we can duplicate this one for the
other key as well. Let's bring it down here. I will change the text
content like this, and let's say F1 for the F keys. So maybe we can have
smaller font size for FTEs. I believe they are smaller
in the key corn. He walked. And finally, I
couldn't find any key for attaching the
text to the surface. But since we created it
by clicking on surface, it's, it's why
rather is adjusted. So we can look at it
from this perspective. You can see the text position or are well-placed actually. From that one, all we need to do is to adjust the
case placements. To do that first, I will group the key and text so we can move
them together. Like so. And I will make
the orange keys x value to 0 so that we can calculate
the required distance easily. Alright, let's see. 250 is not enough, 300, still not enough. 320, maybe. This is actually too much. So let's try 310. This is great. It would be really easy if we
could make it 300, but this is too close, so 310 it is. Let me also drag the
chase down here. Now we can start duplicating
the keys, right? I need to add 310 to
the x value every time. So this value should be 620. Let's move it all
the way, right? Not to take this one and this value should
be 900 and Turkey. I will do the same thing for
the rest of the keyboard. Just don't forget to
apply the same logic for vertical alignment as
we did on horizontal. Here, I am repositioning the orange key zeros
00 just to make things is just wanted to check if we are doing with the same proportions
as the real people. There's almost perfect. We are good to continue. I am on the backspace key, and this should be
bigger than the other. We could go and create a new 3D object and
model it from scratch. And it would be
the best practice. I recommend you to do that. But I'm choosing the
easy way here and just scale the key
we already created. Okay, but let's delete the text here because
it is not looking good. And I will just
duplicate a new text from and move it
into this group. Now let's change
its position here. Okay? I am almost done
with the keyboard, but we cannot do the same thing for space skin
since it's too big. You see when I scale it from a regular T, It
looks really bad. So we need to model
it from scratch. Let's finish the keyboard first. Andrei model space
key at the end. Just moved right a bit. Create a new cube here. And we will apply the same steps as we did on the regular case. So click Smart and ended, decrease the subdivision level. And now let me resize the
object as the space key. Click Edit Mesh again, and select the site
pool to the top side. And we want to
decrease the size of the top side by holding
Shift and Alt option. To resize it equally
on all sides. I will increase the level
of subdivision two tree, just like we did before, so that we can add subdivisions. And we can drag this one, actually not like this, I want. And horizontal division. And then drag this one all
the way to the bottom. Now, let's do the same thing for the new subdivision and
low-power to the older a top. Now we can start adding new
subdivisions like this, maybe on this side, here and here as well, here, at the corners. Like this and this. I'm finally here. Maybe we can add two more. Just hear from top
and also on right? Okay. So I believe this looks
like a space key. And I'm just resizing it
and put it in its place on the keyboard by adjusting X, Y, and Z values. And also change its color to the gray that we used
for other tips. Alright guys, we made such
a great process so far, almost done with the keyboard. While I'm working,
I want to do with the case is to increase its corner around maybe. So maybe drag it like
this to increase the size first and we
can increase the corner. Let's, let's make it bigger. We can increase the corner
all the way around 60. I read it says to make
I think it's okay. So let's do the same thing
for the other side as well. I will just drag it
just a bit more. I believe it is looking great. In this section, I am updating
the texts on each case. And before completing
the keyboard, I want to check if we can add animations so that the
keyboard will be interactive. Electing the Q1, Let's add
a new state to this key. So we have two states in total, by state and state. And in the second state, Let's move the key down so
it looks like it's pressed, maybe a bit more. We also need to add an event. To trigger that n-dimensional. I will make the
animation type key down and press Q to one. Let's try to run this
animation result. I click play here and press one. So it works. But
this was too slow. We should decrease the
duration of the animation. So let's make it 0.5. Maybe. Let's try better, but
this is still slow. Let's try 0.2. It's alright. I will enable cycle here. Okay, Now it also comes
back, which is good. But when I hold the key down, it is still cycling
by the dimension. So this is not what we want. Actually. What we can do better is
we can add a second event. And I will change the type
of this around to key up. Press K is one, and we can say, go back
to the base state. Okay, Now when we played, when I hold the key, it stays there and when I
release it, it comes back. But let's also change the duration of the
secondary one to 0.2. So it comes back tester. And in this way, we
can just press it, we can hold it, or we can just tap it quickly and it responds all
of the actions. You know what, maybe we
can make the duration 0.1. So I believe it will be
more realistic in this way. Yeah, it's better. Now. It has almost like
a real-time interaction. I cleaned up my Hierarchy, rename the group
with the key names and rewrite the text on the g's. Applied the same logic
for all the keys so that now we have a nice
interactive keyboard. If you want to export this, we can export a livelier L and send it to anyone instantly. I really like this
option of spline. And when someone
clicks to this URL, they can see your work. They trigger the
animation as well. You can also export as iframe tag embedded to
your HDMI cord instantly. I haven't tried
exporting caught yet, but I believe this
also works with the latest update of spline. You can get Vanilla JS
react or three JS code. You also have options like
image and video format. I hope you enjoyed during this project and see
you on the next one.
 Yeti Learn, Design | Code | Animate