Transcripts
1. Introduction: In the film-making world, we have a saying which goes, audio is a king of video. This means that the
perceived quality of your video is more influenced by the quality of your sound than the
quality of the visuals. Despite this, sound
editing is usually taught in a very
complicated, confusing way. There's a lot of clashing
advice out there. Then, there are all of these intimidating
knobs and frequencies. While I am here to
clear things up, this class presents a clean, step-by-step, and
streamlined process you can use to enhance the quality of the
sound in your video. My name is Dandan, and I am a top teacher
here on Skillshare, and an Emmy
Award-winning filmmaker. Often as creatives, we are
visually biased and ear blind. Besides teaching
you the technicals, this class will also teach you how to hear sound in new ways. Whether you're looking to
post videos on YouTube or create a commercial for your
company's latest products, this class will help you deliver your message with
high-quality sound. Even if you're
creating podcasts, the principles learned
in this class will help your episode stand out
in that noisy world. For this class, you'll need Adobe Premiere Pro
and Adobe Audition, both of which can be
downloaded as free two trials. However, all of the steps demonstrated here can be applied to any video editing program with comprehensive
sound capabilities. You'll also need a good pair of headphones and a quiet space, so you can really hear
the nuances of sound. Without further ado, let's dive right into this fascinating
world of sound. Welcome to the class.
2. Class Project & Tip for Success: For your class project, you have two options. You can either edit a short video clip with the principles learned
in this class. Then post a before and after version on the Projects
page on Skillshare. Or you can share on how
you're planning on applying the principles learned in
this class to your project. Tips for success; if you're not used
to hearing sound, it can take a while
before you're able to hear the nuances. It's just like color grading. When you start learning
how to edit color, it can be difficult to see the subtle color tones of
the highlights or shadows. It's the same with
sound editing. So don't get discouraged
if you can't easily hear the sound differences I
mentioned in this class. I will actually exaggerate
them so they are clearer. The important thing
is to keep practicing and listening with a
good pair of headphones. Get excited. You are developing a new
superpower of listening.
3. Prep: Organize Your Timeline: Before we start, let's get set up and
organized which is going to streamline everything and
save you a lot of time. In this part, we're
going to separate each sound source and
type on its own track. For example, here in this timeline for my
documentary short Dottie, you can see how Dottie,
my main character, has a dialogue on this dedicated track
named Dottie's voice. You can rename the track
by right-clicking. If you use different mics
to record your character, make sure you separate
each mic on its own track. Same if you recorded your character in
different settings that sound vastly different in terms of their ambience or room tone. Then, you'll want
to put the music, each song with its own track. Below the music tracks, you'll want the sound effects. You have the choice
here of separating each of your sound effects
according to their own track. This can be helpful if you have multiple sound effects
at the same category, like lots of footsteps. That way, you can globally
change all of them from one command instead of having to adjust each
clip one by one. Or if you don't have so many sound effects
like my case here, you can just place them
on two main tracks since it's not so much
work to adjust each clip. If you need to add more tracks, you can right-click and
select "Add a Track". As you can see, you can also tell where do you like
to place these tracks. I have also color-coded the sound clips according
to their category, just so it's easier to see
what I'm working with. To do this, you can
right-click and select ''Label'' with
the color you'd like. [MUSIC] Now, I want to show you
the audio panel, which will be our main hub in Premiere Pro for
the sound editing. To do this, we're going to open the audio panel and then
the audio track mixer. If you can't find it, go to Window and then click
"Audio Track Mixer''. Make sure not to
get this confused with the Audio Clip Mixer. You can undock the panel
to make it bigger. As you can see, all of your labeled audio
tracks are here. Every change you make here will affect all of the
clips on the track. Now, hit the little arrow on the left to open
the effects rack. This is where we will
add our effects. Below this, you have the fader, which will control the volume
of that specific track and save you from
having to go in and changing the levels
of each clip. Now that we're all set up and oriented, let's take actions.
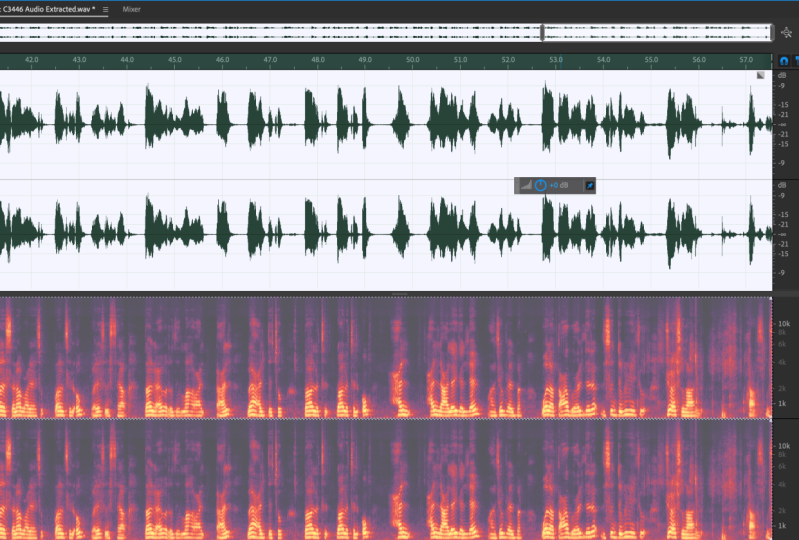
4. STEP 1: Clean Up Your Sound: The first thing
you can do to make your sound better
is to clean it up. Besides general noise, which you probably know can be fixed
with noise reduction, there are five common unwanted
sounds you want to fix. The first is clipping. Clipping happens
when your sound peaks hit or surpass zero, and what it sounds
like is distortion. As they get more and more, a visual analogy are
those hotspots in your image where the areas are
so bright they look white. Information is lost there
and it doesn't look good. Similarly in sound, you want to avoid your peaks hitting
or surpassing zero. Even when you set your recording levels to
give yourself headroom, sometimes some transient peaks will slip through and clip. This often happens
when someone is laughing or making an
exciting exclamation. Here I have an
example of something that clearly sounds
distorted from the clipping. As they get more and more you can see how the top
is just shaved off, and it hasn't even hit
zero decibels yet. If I bring the volume down, it still sounds distorted. As they get more and more. To fix this, it's simple. We'll need to send over a
clip to Adobe Audition, from our Premiere Pro interface. To do this, right-click on your clip and hit Edit
Clip in Audition. Now these two programs are linked and talking
to each other. Whatever changes you
make an audition will automatically be applied to
your clip in Premiere Pro, when you hit Save. We're going to use
the Declipper effect. To add this, we're
going to go to Effects, down to Diagnostics, and then select Declipper. Then we're going to highlight our entire clip and hit Scan. On the bottom it'll
show us the number of possible clipping
problems that were detected. You'll see in this
case there are 61. Now hit Repair All, and if you play again, you'll see that I
removed the distortion. As they get more and more, if you even look
at the waveform, you can see how the
top is now more rounded out compared to before. Amazing, isn't it? I'm using the
default setting now. But if you still hear some distortion you can
try the other settings, like Restore Heavily Clipped. The second thing we're going to listen for are mouth noises, also known as clicks. In this example you can
hear these mouth noises. [inaudible] I left home when I was white. If I isolate them, they sound like this. To remove these, it's also very simple. In Audition, you can go
to Effects, Diagnostics, and now you hit Declicker, highlight your entire track. Just like we did for declipping, you're going to hit
Scan and Repair All. [inaudible] I left home when I was white. As you can hear, the
clicks are still there. So I'm going to try the heavy Declicker setting and see whether
that works better. [inaudible] I left home when I was white. I got turn green on the fields, and I return red to the house. It does. [inaudible] Likewise you can do
this in Premier, by going to the effects rack and adding Automatic Click Remover. If you still hear some
clicks coming through, adjust the threshold
until they are minimized. The third thing
you're going to watch out for are plosives, which are the popping sounds
that happen when the rush of air from saying consonants
hit your mic from your mouth. Often this happens with p, h, and t words. This is what it sounds like. Plosives, plosives. Most of the times your plosives will be more subtle than this. Listen to the words two and
effect in the next example. Hit Preview to hear what it
sounds like without effect. This is something that
you want to fix by addressing each
plosive one-by-one, instead of adding an effect
to the entire track. Here I have the clip
with a plosive. Hit Preview to hear what it
sounds like with the effect. Go to Effects, find
the FFT Filter, add it to your clip, and then choose,
Kill The Mic Rumble. As you can see, the
plosive goes away. Hit Preview to hear what it
sounds like with the effect. Similarly you can do
this in Audition by highlighting the problem
word. Hit your peaks. Then go to Effects,
hit FFT Filter. Hit your peaks. You can
also move the curve a little bit downwards to
grab more of that plosive, if any remains with
the default setting. Hit your peaks. Avoid your peaks hitting. The fourth thing you're
going to watch out for are any distinct unwanted noise
passing through your vocals, like glass breaking outside
or airplanes flying overhead. Here I brought an example
of an interview I had, where there is a bus
passing outside, since my main character lived
in Lisbon, a busy city. At that moment they began
a printing factory. To fix this, this is where the spectral display on waveform mode in
Audition is needed. To turn it on, go to this button here which says
Spectral Display, and boom, this beautiful
display comes on. What this does is basically
map out all the energy of the different sound frequencies
with brighter colors showing more intensity at the frequencies
located on the right. You can see I have one from my left channel and one
for my right channel. The yellow means a concentrated
build-up of frequencies, going down to purple, which shows less
concentrated frequencies, usually scattered noise. What's cool about this is
that you can get really targeted with your sound
selection and sound removal. For example, if I
select this portion, it will allow you to
hear just that portion. You can even get nit-picky and
use the lasso tool, just like in Photoshop, to select a specific area
to reduce or remove. In this example you can see where the bus
sound is concentrating. You can even test by
moving the selection above and hearing whether
there's bus sound in there. There's not. I'm going to bring down
my selection until I isolate the bus sound
as much as possible. Now I'm going to tell
Adobe Audition that this is a sound print I'd
like to remove from my track. To do this, I'm going
to go to Effects, Noise Reduction,
Learn Sound Model. Now Audition is
going to say, "Okay. I'm going to listen for
this particular sound." Then select a portion of the speech where the
sound is present. At that moment they began
a printing factory. Go to Effects and hit
Sound Removal Process. Play your sound to hear
how the effect is working. At that moment they began
a printing factory. As you can hear, there's no more bus
going through his voice. At that moment they began
a printing factory. The last thing we're going
to address is reverb, which is basically echo. If you recorded in a large room that has a
lot of hard surfaces, chances are there's going
to be some echo present. Here I have an example
where I recorded in a hard surface room where
there's lots of reverb present. Days when you don't hear or feel anything from your
inner intelligence. To minimize this reverb, it's simple, you add
a dereverb effect. I'm going to add it
now to the rack, so it applies to
my entire track. As you can hear, if I push it all the way up, my voice sounds distorted. Chances are that if
you haven't been in touch with this intuitive voice, it's going to be a
little shy coming out. So there can be days when you don't hear or feel anything. I'm going to push it until I start hearing my
voice distorting. From your inner intelligence, and that is totally
normal and okay. Chances are that if
you haven't been in touch with this intuitive voice, it's going to be a
little shy coming out. So there can be days when
you don't hear or feel anything from your
inner intelligence. So there can be days when you don't hear or feel anything. It's going to be a
little shy coming out. As you can hear,
it took away some, but not all of the reverb. To do this in Premiere Pro, you can also add a dereverb
effect to your entire track, which will affect all of
the clips on that track.
5. An Important Note on Using Audition: When you edit in Audition, there are two modes. The first is waveform mode, the second is multitrack mode, which looks like an
editing timeline. The big differences between the two are that with waveform mode, all edits and effects
are destructive. That means whenever
you apply some effect, like the DeClipper, and hit "Save", it will make the changes into
your original source file. There's no going back. With multi-track mode, the edits and effects
are non-destructive, meaning that even
if you hit "Save", you can remove them later. Why use waveform
mode at all then, which you'll see me using
throughout this process? There are three benefits. The first is that you can
really look at your waveform clearly and make
micro-adjustments. For example, you can bring
down some peaks with control. The second is that it offers
a spectral display, which, as we just learned,
allows you to clean up any unwanted sound or
noise with precision. The third is that there
are some effects, the ones labeled process
like the DeClipper we used before that are only available
on the waveform mode. When editing with
Adobe Audition, I recommend saving a copy of your original
source file just in case you hit "Save" by accident and bake an effect
that you didn't want. I know destructive sounds scary, but a lot of the times, you just want to remove the
noise and be done with it. Rest assured, when
using waveform mode, you can apply effects and
Control Z to undo them. However, if you hit "Save", there's no going back.
6. The Essential Frequency Ranges: The second action you can take to make
your audio sound much better is to use EQ, which stands for equalization. But before we dive in, we'll need to learn about sound. Before we start editing sound, let's first understand
what we're working with. Sound is made up of
air disturbances that vibrate at
different frequencies. For example, when you
pluck a guitar string, it sends disturbances through the air that vibrate
at a certain rate. The higher the frequency, the faster the sound
wave moves up and down, the more sound waves
there are per second. The higher pitch the sound, the lower the frequency, the slower the sound
wave moves up and down, the less sound
waves there are per second and the lower
pitched the sound. The frequency of sound, or the number of sound waves per second is measured in Hertz. Just like how the
visual spectrum can be divided into
different values, sound also has a spectrum
based on its frequencies. You can divide the
sound spectrum into six zones for mixing. For video editing, you just need to focus
on five of these areas. Note that these are ranges, so every sound engineer defines them slightly
differently. The exact numbers may vary depending on your
unique situation. Why do we focus on these ranges? Each of these ranges have
specific characteristics, including good and
bad qualities. This is similar to your exposure
curve and color grading. You have the blacks, shadows, mid-tones, highlights,
and whites. When you're able to see
something off balance, you know which area to
address to fix the issue. Let's go through these
ranges one by one, talking about the good and
bad characteristics of each. The first range, 0-50 Hertz, is your
extreme low-end. This area is usually more important for music
mixing then for video. Since this is where
the frequencies of a nice full base in
punchy kickdrum reside, the sounds in film
usually do not vibrate at this lower
frequency range. If they do, they are probably
unwanted rumbles from cars passing by or accidental microphone
bonds that sound boomy. I've isolated this region with my multi-band compressor just so you can hear what
it sounds like. Two options. You can either re-edit this. As you may notice, there's not much you can hear in this range from my speaking. However, I have a
sample here with some outside rumble Not so nice. In fact, we usually just remove the
sounds in this range by applying something called
a high pass filter, which I will get to later. In summary, a nice
extreme low-end brings out a nice punch. Typically in music instruments, if this range is not
balanced properly, it can make your mix
sound boomy or rumbly. Next is the 50-250, 300 range. Here I have an
example of my voice. I'm going to emphasize this range so you can
hear what it does. Share how you, it's like color grading. When you start
learning how to edit, the sounds in this area, govern warmth and thickness, like what you often hear
in those nice podcasts, voices that sound like
melted chocolate. This area is especially
useful for vocals if they are sounding thin and you'd like to bring
out their warmth. However, if there's too
much of this range, your mix will sound muddy. These spoken words will lose their clarity and sound muffled, almost like you are
speaking through a pillow. Here I have an
example of my voice. I'm going to emphasize this range so you can
hear what it does. Because it'll be
hard for you to hear the nuances of the sound
processing that I do. However, you'll need
a pair of earbuds. You can hear that if
I remove this range, the voice sounds thin
as you sound later on. You'll need Adobe Premiere
Pro and Adobe Audition, both of which you can download
as free two-week trials. Third, we have the
250-1 kilohertz range. Here we have the
central frequencies of voice for intelligibility. Hello, it can be difficult to see
the subtle color tone, of the highlights
of the shadows. It's the same with
sound editing. The more you practice the
more you train your ear to. If this range is well balanced, the mix will sound
full present and open. If the frequencies are not
well balanced in this range, your vocals can sound boxy, which describes the
effect of recording in a place with lots of
drywall and tile. Here is what that sounds like. The class resources section. Last but not least, you'll need a quiet
space to learn and edit. For your class project, you have two options. You can either re-edit. If this range is not
balanced properly, your voice can also sound
too congested or nasal. Here is what that sounds like. Clip onto the projects page
on Skillshare or you can share your reflection of
how your perception of sound has changed after
taking this class. If this range is
not present enough, the voice sounds not
present or full, because you don't have
those frequencies that make up the vocal body present. I do here can be applied. It can be very helpful. It can also be very
helpful to have the sound frequency map
printed out in front of you, located in the class
resources section. Last but not least, you'll need a quiet
space to learn an edit. Fourth, we have the
1-5 kilohertz range, what's known as the upper
mid-range or high mids. Here is what that sounds like. To pick up on the things
you didn't hear before. Don't get discouraged if
you can't easily hear the sound differences I
mentioned in this class. I will actually exaggerate them a little so
they are clearer. If the sounds are
well-balanced here, your mix will have clarity. When this range is too high, the voice sounds shrill. You have two options. You can either re-edit
the sound from. You can either re-edit this. For your class project,
you have two options. You can either re-edit
the sound from a short video clip using the principles learned
in this class. When this range is too low, the voice sounds stall
and you can boost this range to brighten up the
mix and add some clarity. Or you can share your reflection of how your
perception of sound has changed after taking this class. Or you can share how
you're planning. Finally, we have the five
kilohertz and beyond range. They are unclear. The important thing is to keep on practicing and listening with a good pair of headphones. Get excited, you are developing a new superpower of listening. This is where
sibilance is found. Sibilance is the "s"
sound in speech, which helped bring out
this nice crisp clarity to your spoken words. The exact location
of these sounds depends on the unique
properties of your voice. A big mistake I see people make is having too much
sibilance where the "s" sounds in their speech sound painful like they're going
to chop off your ear. Besides that, too
many frequencies in this range can make your
audio mix sound aggressive. I will actually
exaggerate them a little so they are clearer. The important thing
is to keep practicing and listening with a
good pair of headphones. Get excited. When this range is too low, your speech can sound
inarticulate because you don't have that sibilance to add
definition to your words. Your mix can also sound
not present or forward, like it's playing in
the distant background. Thing and listening with a
good pair of headphones. Get excited, you are developing a new superpower of listening. The anatomy of sound. I know, this might seem
like a lot of information. Don't worry about
them too much yet. We're going to work
with this frequency ranges in the next two lessons, where you'll get
to learn by doing.
7. STEP 2: EQ Your Vocals: Back to EQ. What
an EQ tool does is allow you to raise or lower certain frequencies
in your sound. Like a sculptor, we
focus first on lowering frequencies that are building
up too much in the voice. This is also known
as subtractive EQ. For example, if your voice is
sounding muddy and unclear, you'd want to dip the
presence of frequencies around the 200-300 hertz range. Then, we'll boost any frequencies that
are not present enough. This is known as additive EQ. Most times you don't even need to boost other frequencies, because cutting the
problem frequencies solve the problem. Before we get started, go ahead and highlight
a short portion of your dialogue by creating
in and out points. To do this, move your play head to the
start of your selection, mark in or I if you're on a Mac, then move your play head to
the end of your selection and mark out or O
for the short part, then press a "Loop
Playback" button. What this does is
it'll keep replaying this clip once it reaches
the end of your selection, just so you don't
have to keep moving your mouse back to the
same starting point. I lived was the world, but it was a very small
community. We grew up. To do EQ, first add the parametric EQ
effect onto your effect rack. You can undock the audio track
mixer to make it bigger. Now double click on the
effect to pop up its window. As you can see, this
parametric equalizer maps out all of the frequencies
present in your clip, showing you the value
in hertz on the x-axis and the loudness in
decibels on the y-axis. What this tool allows you to do, is shape the frequencies
by creating bands. As noted by the dots
L, one through five, and H. For this
attractive EQ part, there are four steps. The first is to add
a high pass filter. What this will do is remove any low-end rumble
that we don't need, that aren't found in voice. To do this, click on the
"HP" button to activate it. You can see how now a
new point appears called HP with an accompanying
slope down mine. Before the line was even, now the line is sloped down. The frequencies on the left of the line will not be allowed
to pass through this mix, while the ones to the
right of the line will. As you can see,
it'll show you at which frequency
value the threshold center's on, here in frequency. With your timeline plane, move this high pass threshold, 250 hertz as a starting point, and keep moving it to
the right until you start hearing it
distort your voice. We grew up with those riddles and stories because
we had no television, no books hardly, but pictures, no
cartoons of course. I thought where I lived, was the world, but it was
a very small community. We grew up with
those riddles and stories because we had
no television, no books. Usually, for males, you
can keep it at 60 hertz. For females, you can
bump it up to 80 hertz. It really depends on the
pitch of your voice, so keep your ears open. The second step in
this part is adding a low-pass filter
on the other end of the spectrum to cut out any unwanted sounds on the high end that we
don't really need. Usually noise from the room
or high pitched static. Set this at 18 K and move it to the left until it starts
distorting your voice. Generally, you don't
want to move below 14 K. Riddles and stories because
we have no television, no books hardly, no pictures, no
cartoons of course. I thought where I
lived was the world, but it was a very
small community. You can also change the
slope of this line. In this clip, there was a lot
of noise on the high end, so I'm going to make the
low-pass filter steeper, so it cuts out more
of that noise. No cartoons, of course. I thought where I
lived was the world, but it was a very
small community. We grew up with those
kind of riddles and stories because
we had no television, no books hardly, no pictures, no
cartoons of course. I thought where I
lived was the world, but it was a very
small community. The third step is to listen
for any problem areas. Does your voice sound nasal? Does your voice sound dull? Then go to the EQ chart, identify the potential
problem area, select the band in that area, and pull the frequency
slightly above to hear where the source of
that area is coming from. For example, in this
clip it sounds muddy. Most of the time when you're recording an interview subject, for example, to start
off a little bit on the quiet side because
they're a little shy. But then as they
get comfortable, their voices start
to raise and during the enthusiastic parts they get really excited to
share their story. I know muddiness happens
around 200-300 Hertz, so I'm going to select
"Band 2" and raise it, moving it back and forth until I can isolate the muddy area. But then as they
get comfortable, their voices start to raise and during the enthusiastic
parts they get really excited to share their story and sometimes there are
laughs like ha, ha and you can see that when
you have this variation, it's good to even
things out a bit. Sometimes they can even
speak very quietly. Now I'm going to
adjust the Q value or the width of my band
to make sure that I isolate the
muddiness as much as possible without affecting
other frequencies. I'm then going to
pull the frequency slightly down and
hear the difference. Sometimes they can speak very quietly or sometimes
they get so excited about sharing their story that their voices get
louder and louder. To start off a little bit on the quiet side because
they're a little shy, but then as they
get comfortable, their voices start to raise. During the enthusiastic parts, they get really excited
to share their story and sometimes there
are laughs like ha. As you can here, now the
voice sounds much clearer. You can turn the effect off
by clicking this button here and turn it back on to hear the
difference you've made. After you've made some cuts or realize you don't need
to cut any frequencies. Now is the time to boost any frequencies that
are not present enough, also known as
sweetening the sound. For example, if your
voice sounds thin, you can increase
the frequencies in the 200-300 hertz range
to add more warmth. If your voice lacks clarity, you can increase
the frequencies in the 1-5 kilohertz range. For example, in this clip, my voice sounds dull. It takes some
practice to know what problem areas sound like. The key here is to play
around and trust your ears. I'm going to boost the
1-5 kilohertz range. It takes some
practice to know what problem areas sound like. The key here is to play
around and trust your ears. If your voice
sounds good to you, then no need to boost
any frequencies as that can bring in additional
sound artifacts that you don't need. It takes some practice to know what problem areas sound like. The key here is to play
around and trust your ears. You can start with Band 1, narrow the Q and do a sweep, hearing if any bad
sounds come out. Experiment, what does the voice sound like if I make a gentle cut to this range? What happens to the voice if
I narrow or widen the cut? It's going to take
you practice to hear the differences
and frequencies. But I promise, the more you
practice and listen, the more you'll be able to hear these differences, clearly. Use the EQ map as your
starting point and friend.
8. STEP 3: Compress Your Dialogue: The third action you can do to improve your
sound is compression. Pay attention to
this section because compression is the most
challenging element, in my opinion, to understand in the
sound editing process. But have no fear. I'm here to break it
down in the clearest, most simple way possible. Compression is a form
of processing that reduces the dynamic range
of your audio clip. Which means the difference
in loudness levels between your loudest parts
and your softest parts. When you record
someone speaking, for example, in an interview, there's usually some variation in the loudness levels
of your wave form. They can start off
shy and quiet. But as they get
comfortable and are talking about something
that really excites them, they can start talking louder. Sometimes there's a laugh which just really pops
out in your waveform. While it's good and natural
to have some dynamic range, in video and film, it often sounds better when
you even things out a bit. This makes it easier for the audience to hear
what is being said. They don't have to lean in
to hear the quiet parts. In fact, if you watch
The Matrix movie, which has excellent
sound editing, you'll hear how the
whispering parts are not so different in loudness
from the normal talking. By using a compressor, you even out the dynamic
range of your audio clip by bringing down the loudest peaks and raising up the lowest ones. This makes a voice
sound tighter, more present, more forward, which cuts through the mix more. To make the clearest example, I have recorded myself. I'll play it now so
you can hear how it has soft parts and loud parts. Sometimes your
interview subject can start off quiet
because they're shy. But as they get comfortable, they get more and
more excited and enthusiastic about
sharing the story. Sometimes, hahaha, there can be laughter and
transients like, yeah. Now, I'm going to add a two-modeled compressor
to my effects rack. Can you see how the waveform
now looks more condensed? Or in some editing terms, fat. This is without compression
and this is with. Now hear the difference, this is without compression. Sometimes your interview subject can start off quiet
because they're shy. But as they get comfortable, they get more and
more excited and enthusiastic about
sharing the story. Sometimes hahaha, there can be laughter and transients
like, yeah. This is with. Sometimes your interview subject can start off quiet
because they're shy, but as they get comfortable, they get more and
more excited and enthusiastic about
sharing the story. Sometimes hahaha, there can be laughter and
transients like, yeah. Let's get into these settings. A compressor is made up of
four elements: the threshold, the attack, the
release, and the ratio. The threshold is
the decibel level at which the compressor
begins to work. If I set the threshold
at minus 12 decibels, that means that any peaks
bouncing below minus 12 will not be touched
by the compressor. Only those that break above
minus 12 will be compressed. Next, we have the ratio, which tells the compressor
by how much to bring the peaks down if they
exceed the threshold. For dialogue, set
this at three to one. This means that for
every three decibels peaked above your threshold, the compressor will only
allow one decibel to pass. If you set your threshold at minus 12 decibels and one of your peaks is
playing at minus nine, your compressor will
reduce that peak by minus two decibels
to play at minus 11. If one of your peaks is
playing at minus six decibels, your compressor will
reduce that peak by four decibels to play
at minus 10 decibels. Third, we have the
attack setting, which tells the compressor
how fast it's going to kick in and compress any signal
that exceeds your threshold. Usually for dialogue,
you can have a fast attack at
two milliseconds. This means that
as soon as a peak exceeds minus 12 decibels, the compressor will
start compressing the signal down after
two milliseconds. If your attack time is too slow, it will let some peaks above
your threshold pass through. For example, I'm going to set the attack to 100 milliseconds. Sometimes hahaha,
there can be laughter. Do you see how the peaks go
above minus 12 decibels? Because the compressor is not grabbing those successive
peaks fast enough. Now, I'm going to set the attack back to
two milliseconds. You'll see it will not go pass
the threshold at minus 12. Sometimes hahaha,
there can be laughter. Fourth, we have the release, which tells the compressor
how long it's going to hold the signal down after
it begins to compress. For dialogue, you can put
this at 100 milliseconds. That means that
the compressor is going to hold any
peaks that exceed the threshold down for 100 milliseconds. Now let's put these
settings all together. We already decided to put
the ratio at three to one, the attack at two milliseconds, and the release at 100 milliseconds since those are good settings for dialogue. Now is a question of where
to set the threshold. To do this, first eyeball a general
decibel level at which your average
peaks are playing at. In this clip, I see that
the peaks of myself, this section here, is playing at around
minus 18 decibels. That means that I want
to bring down all of the peaks that are playing
above minus 18 decibels, so the overall loudness of
the entire clip is more even. I'm going to start out
with that as a threshold. Listen to how the voice
changes as I move the threshold down to
minus 18 decibels. You should hear a tightening up. To get more and more excited and enthusiastic about
sharing the story, and sometimes hahaha, there can be laughter and
transients like, yeah. Now, you may see that there's
this meter flushing red. This is known as a gain
reduction meter and it only flushes when the
compressor is working. Also telling you by how many decibels is
reducing the peak by. I'm going to play the clip
again and watch how it doesn't really flash red
during the quiet parts, but more during the
parts that are louder. Times your interview subject can start off quiet
because they're shy. But as they get comfortable, they get more and
more excited and enthusiastic about
sharing the story. Sometimes hahaha, there can be laughter and
transients like, yeah. As you can see, the
gain reduction meter is only flashing during the times where the peaks are exceeding minus 18 decibels. Showing me by how many decibels they are being reduced by. Hit "Apply" to look
at your waveform. As you could see, my waveform
now looks more even. Then, listen to the clip. Sometimes your
interview subject can start off quiet
because they're shy. But as they get comfortable, they get more and
more excited and enthusiastic about
sharing the story. In sometimes hahaha,
there can be laughter and
transients like, yeah. As you can hear, the clip sounds more even, the loud parts and not
poking out as much, which means we set
a good threshold. If you find that there's still a distinct difference between the loud and soft sections
of your dialogue, bring down your threshold even more to make them more even. Make sure though not so set
your threshold down too much. You remove all of
the dynamic range and your voice sounds
monotonous or robotic. Sometimes your
interview subject can start off quiet
because they're shy. But as they get comfortable, they get more and more excited and enthusiastic
about sharing the story. As you can see, because I have brought some of the
highest peaks down, the overall loudness of
the entire clip went down. The clip sounds much softer. This is where make-up
gain comes in. This tells a compressor by
how much you want to raise everything backup again after you have brought the peaks down. What this will do is raise the loudness of the entire clip, including the quiet parts of your dialogue that were not brought down by the compressor. I'm going to raise it now
until my dialogue is bouncing between minus 15 and
minus 12 decibels, where it was bouncing before
I added the compressor. Sometimes your interview subject can start off quiet
because they're shy. But as they get comfortable, they get more and more excited and enthusiastic about
sharing the story. Sometimes hahaha,
there can be laughter. Sometimes your interview subject can start off quiet
because they're shy. But as they get comfortable, they get more and
more excited and enthusiastic about
sharing the story. Sometimes hahaha,
there can be laughter. Sometimes your interview subject can start off quiet
because they're shy. But as they get comfortable, they get more and
more excited and enthusiastic about
sharing the story. Sometimes hahaha,
there can be laughter. In summary, to do
compression, first, set your threshold, ratio, attack, and release. Then use makeup gain to bring the loudness
of your clip back to your target level. Just a note on the effects rack. You don't need to hit apply
for it to be working. If the switch is
toggled on and green, that means you're
previewing the effect. However, it's only when you hit Apply that the waveform
will change its shape. You can always undo this. You can go back and tweak
your compression settings before it makes the changes into your original source file. The effects on Premiere Pro, on the other hand,
are non-destructive. They will not change your
original source file.
9. Compression Example 2: That was more of a dramatic example of
loudness fluctuations that I use to show the effect of the compressor more clearly. Let's now take a look at Dottie's case where she spoke
for the most part evenly. As you can see from the
waveform, it's pretty even. There are just these
transient peaks that come through that I'd like
to bring down a bit. For example, in this section, you can hear how the no books, no pictures, is hard to hear and how the no cartoons jump out. We grew up with those
riddles and stories, because we had no television, no books hardly, no pictures, no
cartoons, of course. Likewise, in this section, you can hear how walked and
five miles jumps out a bit. I was pondering depression
in 1933 and so when I was little and we
used to go to school we walked about five miles. Like the previous example, I'm going to eyeball a
threshold to start with. It looks like on average, things are peaking at
minus 12 decibels. I'm going to use that as
my starting threshold and hear what it does. We grew up with those riddles and stories because
we had no television, no books hardly, no pictures, no
cartoons, of course. As you can see from the
gain reduction meter, there was not much
compression going on. If I hit "Apply", you can see how there's
not much change. The higher peaks still pop out. You can also hear how some
words still jump out. We grew up with those riddles and stories because
we had no television, no books hardly, no pictures, no
cartoons, of course. I was pondering depression in 1933 and so when I was little and we
used to go to school, we walked about five miles. I'm going to increase
the threshold a bit more until I hear a difference. We grew up with those riddles and stories because
we had no television, no books hardly, no pictures, no
cartoons, of course. This sounds good to me
at minus 17 decibels. As you can see,
if I hit "Apply", things now look more
even but we're still preserving some of
the dynamic range, so it sounds natural
and not robotic. We grew up with those riddles and stories because
we had no television, no books hardly, no pictures, no
cartoons, of course. Now, because I've
reduced the decibels of many peaks, things
sound quieter. I'm going to push
the makeup gain to bring everything back to where it was before
the compression started. When her voice was
bouncing around minus 12 to minus 15 decibels. We grew up with
those riddles and stories because we
had no television, no books hardly, no pictures, no
cartoons, of course. We grew up with those riddles and stories
because we had no television, no books hardly, no pictures, no
cartoons, of course. We grew up with those riddles and stories
because we had no television, no books hardly, no pictures, no
cartoons, of course. I was pondering depression in 1933 and so when I was little and we used to go to school, we walked about five miles. I was pondering
depression in 1933 and so when I was little and we
used to go to school, we walked about five miles. Her voice sounds more
present, tight, and even, which will also help
it come through the music playing underneath. The two modeled compressor works the same way
in Premiere Pro. You won't really be able to see the difference it makes to the waveform as clearly
as you can in Audition. However, it's a great
way to train your ears.
10. STEP 4: De-ess Your Dialogue: The fourth action we're going to do to
improve our sound is soften any harsh siblings
found in our speech. To do this it's simple. I have a clip here
with harsh siblings. Make sure you reduce
your volume now, so you don't hurt your ears. Perhaps you're in a transition, or you just don't feel
like where you are now is authentic to being. I'm going to add
a DeEsser effect. As you can see,
it's the compressor just for one specific region. First, isolate
where your siblings is happening by playing your clip and hitting pause when the harsh siblings,
as being said. Then look at where the sibling's peaks
in the frequency chart. You can adjust the endpoints of the frequency window
to isolate it. Then adjust the threshold until it softens, but doesn't become too dull. Perhaps you, perhaps you, perhaps you, perhaps you, perhaps you, perhaps you, perhaps you, perhaps you, perhaps you, perhaps you, perhaps you're in a
transition or you just don't feel like where you are now is authentic to your being. Perhaps you're in a
transition or you just don't feel like where you are now is authentic to your being.
11. STEP 5: Balance Your Mix: The fifth action we're going to do to
improve our sound is making sure our music and sound effects are well balanced in our mix. We're now going to focus
on the music to make sure it mixes well
with our dialogue. The first step is to level your music so it's not
overwhelming the dialogue. A good way to familiarize yourself with a
good mix is to play a film that's in the same genre as yours, and just listen. From me, that's Chef's
Table on Netflix. What is the loudness
difference you here between the spoken
dialogue and music? How are the sound
effects weaving in? Here is the clip from
my documentary, Dottie. I have three layers of
sound here, her vocals, the ambient wind rustling
through the trees, and the music. Well, life is could
be like a dream. You don't get it at
all, but it's like a flash of something that is there but gone
at the same time. As you can tell, the
music is overpowering. First, I'm going to open the audio track mixer and
go to the music track. I'm going to use a fader to reduce the loudness
of the music. I'm going to mute the wind
rustle ambiance for now. [MUSIC] Well, life is
could be like a dream. You don't get it all, but it's
like a flash of something that is there but gone
at the same time. Her voice, although much
better than before, still feels overtaken
by the music. I could lower the
loudness of the music, but then the music
gets too soft. Well, life is, could be like a dream. You don't get it all,
but is like a flash of something that is there. I'm going to EQ the music, making a cut where
Dottie's vocal frequencies lie so it'll give her
vocals more room. To do this, I add a parametric EQ effect to the effect rack for
the music track. Well, life is could
be like a dream. You don't get it all,
but it's like a flash of something that is there. Now, there are
portions of this clip where there's music
but no talking. A cool trick with the
essential sound panel in Premiere Pro is auto-ducking. This will automatically
generate loudness keyframes for your music so it'll play softer when there's
dialogue present. To do this, make sure you have designated your dialogue
track as dialogue. Then click on your music track and designate that as music. Check ducking and
specify by how many decibels you'd like the music to play softer when
there's talking, and how gradual you'd like
the ducking to occur. Then hit Generate Keyframes. As you can see, it automatically ducks my
music when Dottie is talking. Well, life is, could be like a dream. You don't get all, but it's
like a flash of something that is there but gone
at the same time. Play with these
settings until you are happy with your results. I hope you're feeling excited now as your mix is
coming together. Now, we're going to
address sound effects. Like music, you don't
want this to be too quiet or overpowering. You can also EQ
your sound effects to make more room
for the vocals. For example, here
in DaVinci Resolve, I have a meditative
art film I made as part of a 24-hour
film challenge. I'm showing this example with DaVinci Resolve to demonstrate
how the principles learned in this
class can apply to any video editing platform with comprehensive sound
editing capabilities. It feels exhilarating like I'm ice-skating on this
knife-edge of the unknown. As you can tell, there's also this ice
skating sound effect that overpowers my talking. I reduce some of its
frequencies that competed with my
voice frequencies. Now you can hear my voice
coming out much better. It feels exhilarating like I'm ice-skating on this
knife-edge of the unknown, where anything could happen.
12. Final Thoughts: I want to congratulate you for finishing
this class because that was a lot of material. I hope you found these
lessons illuminating, and now feel excited to
play with your sounds. I also hope you are leaving with the ability to hear
sounds in new, more fascinating ways
in your everyday life. Remember to post a
before and after of your video clip on
the projects page, so we can hear the difference
you've made to your sound. Please check out
my other classes on my Instructor page if you're looking to further your
film-making or creative journey. Thank you so much for
taking this class, and know that I am
cheering you on. Happy sound editing.
13. Newsletter Sneak Peak: [MUSIC] If you
enjoyed this class, I invite you to leave a review and sign up for my newsletter. This is not a
ordinary newsletter, but instead a
virtual tea-house of wonders where I share
curated inspiration, behind the scenes, updates, and more high-value resources on the art of authentic
creative living. It is my most intimate space to spoil my readers with delight. Sign up to receive on my course
instructor page. [MUSIC]
 Dandan Liu, Filmmaker | Contemplative Creative