Transcripts
1. Overview: Hey, there. I'm Jess, the Face behind
Jess Miller draws, and I'm excited to welcome you
to Social Media Marketing, Leveraging Instagram
for Illustrators. I think that we can
all agree that we're in never any battle
with Instagram. Stuck in a follower count Rd, low engagement, no
reach. You're not alone. In this course,
I'm going to share strategies on how you
could move away from vanity metrics and
use Instagram as a marketing tool to grow
your creative business. This course is geared towards illustrators and
commercial artists. In the following lessons, I will dive into the
practical stuff, such as curating your content, sharing your process,
and building connection. But first, let's talk about what Instagram should be your go to for your creative business. Instagram isn't just another
social media platform. It's a marketing Powerhouse. It's a visual platform that exposes you to potential
collaborators, art directors, and brands. In fact, 90% of my client inquiries come
straight from Instagram. But it's not just about
finding client work. It's about building and
fostering a community and establishing yourself as a respected artist
in your niche. So if you're ready to level up your social media marketing, let's make your profile a
magnet for opportunities and a hub for community
growth. Let's get started.
2. Curating Your Content: All right, let's
get started with our first lesson,
curating your content. The first things first, let's do a self audit. Switch to a creator account and regularly track your insights. By switching to a
creator account, you can get in depth insights
on engagement reach, follow account, likes,
et cetera per post. Share your name and a photo in your bio to increase
your brand awareness. This is super important,
because I think as artists, we tend to hide our
face behind our art. But you really want to
connect a name with a face. And for mine, I picked a photo
of myself and my studio, and for my user name, it's Jess Miller, my name and
exactly what I do, I draw. Write a bio that features
keywords. What are keywords. They are ideas and topics that define exactly who you
are and what you do. So focus on figuring
out who you are, what value that
you have to offer, and what's your specialty. My profile, for example, have my full name, my pronouns. I have an artist account, and I have my
geographical location? I'm an LA based illustrator specializing in hand lettering, surface pattern design
and character portraits. I also include my e mail. Even though there's
an e mail button, a lot of times brands
don't see that. So I like to include my
full e mail in my bio. I include a little free guy as an incentive to sign up
for my e mail newsletter. Then you want to
do a self audit P two and ask yourself
these questions. On a whole, does your Gridlo cohesive Do you have a style. What is your specialty
or your niche. Archive work that doesn't fit
or reflect your best work. You don't have to delete it, but just archived for now. This one is super important. Keep your business life separate
from your personal life. Treat your Instagram account
like your portfolio. If you were going
on a job interview, you wouldn't want to
randomly show pictures of your lunch or some family
time with grandma. It would just be random
to the client, right? So, treat this just like
your work portfolio. And I know what you're
thinking, and you're like, but I want to show those photos of my personal
life, and you can. Consider showing them in your stories where they'll
expire after 24 hours, or you can create a
separate account. I have two accounts. This is my business
account, Just Miller draws, where I keep it all business
related, all art related. And then I have a
personal account just for photos of my
family and friends. And focus on the posts
that perform well. How can you reinterpret
and reshare that piece? Also consider what kind
of content to make. There are six different
types of content, and the first is conversational. Ask your audience a question
that sparks conversation. This can also be controversial. So if you're not
afraid of controversy, think about sparking a
debate with your community. One of my personal
favorites is educational. Teach your audience a new skill. People go on social media for tips and tricks
all the time. And I like to show some of my favorite Adobe
illustrator tips or procreate tips through
a tutorial style reel. And obviously, people go to
social media as an escape. So make sure that your art is entertaining
to some degree. And you don't have to dance or perform or sing by any means. But think about making entertaining content that would grab your audience's attention. And obviously, you want to
create beautiful content. Instagram is a visual platform, so you want to create content that is top notch and
aesthetically pleasing. Motivational. Think
about ways that you can motivate your
audience to take action. And another one of my
favorites is inspirational. Inspire your audience through positive, feel good content. I do that with a lot of hand lettered messages or just some personal storytelling. Post consistently
and frequently. Consider using pre
made templates. Batch your content in advance. Have a dedicated planning day
to schedule your content. I do this typically
on Mondays so that I can plan and schedule my content for the
rest of the week. Spend less time scrolling
and more time creating. Of course, you want to look to the Explore page
for inspiration, but you also want to spend more time brainstorming and
creating original content. My personal favorite,
repurpose and reinterpret your best
performing content. And I'm gonna go more in
depth in the next few slides. Consider combining
pieces together. So these two pieces I made
on separate occasions. The first was a character
portrait inspired by Frida Cow. And the second is
a Be Kind TR Mind. It was for a go fund
me kindness campaign. I really loved both
of these pieces, but they were kind of unrelated. So I thought of a way to
merge them both together. So I took elements from both. I took the handler quote
in a different style, as well as the foliage
that was in her hair, and I combined them for this mental health
Awareness Month, Bekin Ter Mind Post. It really resonated
with my followers. It got over 17,000 likes
and people really loved it. I didn't have to reinvent
the wheel by any means. I had already created these
two pieces in advance and I just thought of a different way of
reinterpreting them. Here's another way to repurpose your best performing content. This was a piece of to
mushroom art that I created for Halloween and people really seemed to like it. I redrew the elements
in different colors and I made it into a
repeating surface pattern. I made it kind of funky. I added a lot of dots and stripes and made them kind
of fantastical looking. And then I applied it to
my caste of fi collection, and it became a best seller. So I already kind of
knew what my audience, what kind of art they liked. I thought about making it
into a repeating pattern, and then I actually applied
it to real products, and it was a really cool way to see them on tech accessories. Also think about creating
many collections. So, again, we're on
this mushroom theme, but I created this
art for Halloween, and I handlet the
phrase, Your Pure magic. And I surrounded it by
little mushroom icons, and it was a great
handletter piece that I could put on
a mug or a tilt bag. But I thought, How can I take this and make it into a pattern? So I took those icons and those gords and
pumpkins and mushrooms, and I made it into a
repeating pattern. And then for another post, I shared how it was applied
on a digital mock up. So it's a notebook, and
so I showed kind of a real case scenario of how
the pattern could be applied. So consider ways of how you
can share your art process. And I like to show my process
through videos or reels. And I'll show you
quickly some examples. This repeat pattern,
for example. I quickly showed just little
clips about how I made all the different icons and
how I drew them in procreate. And then I showed what it
looked like as a pattern swatch and how I stitched that together
as a repeating pattern. Here's another process video
that I just set to music, and I showed how I illustrated this dragon in
Adobe Illustrator, all the different shapes, patterns and elements
that made up my dragon. And here's a fun
one, a holiday card that I made for
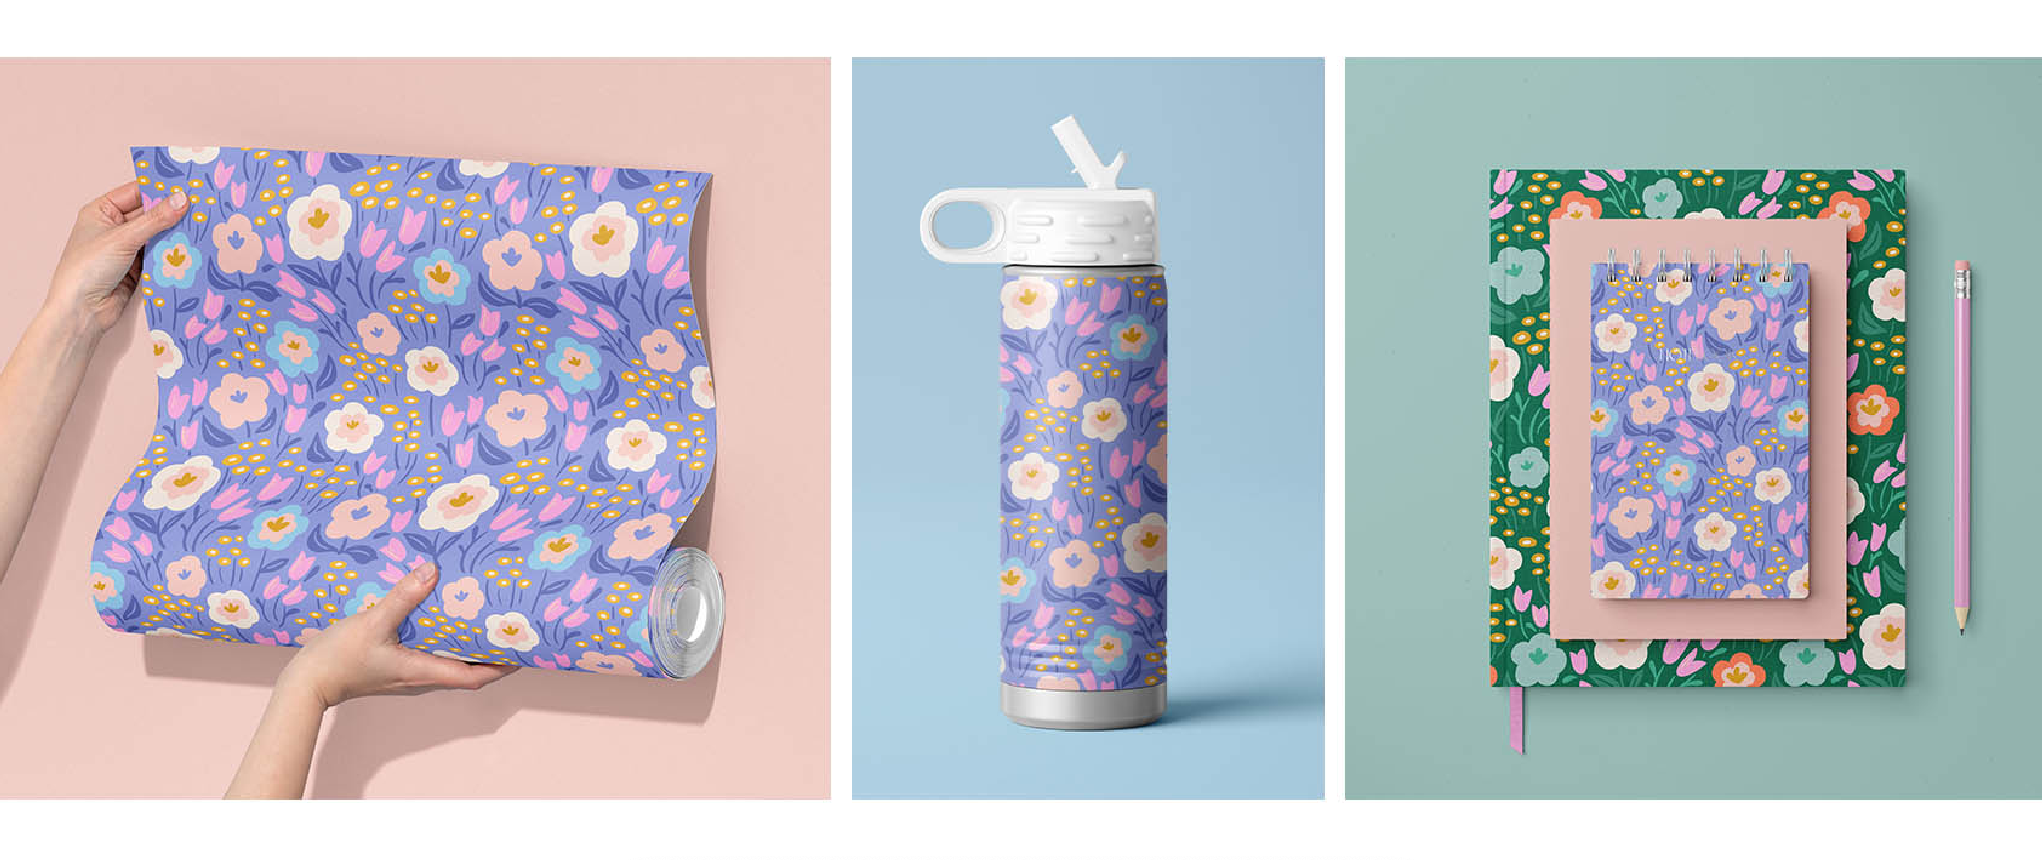
American Greetings. And it was just a quick reveal, and then I showed it in store. Mockups are another great way
to show off your artwork. They're a perfect
tool for manifesting the kind of projects that
you want to get hired for. And it's much more compelling to see your art on a
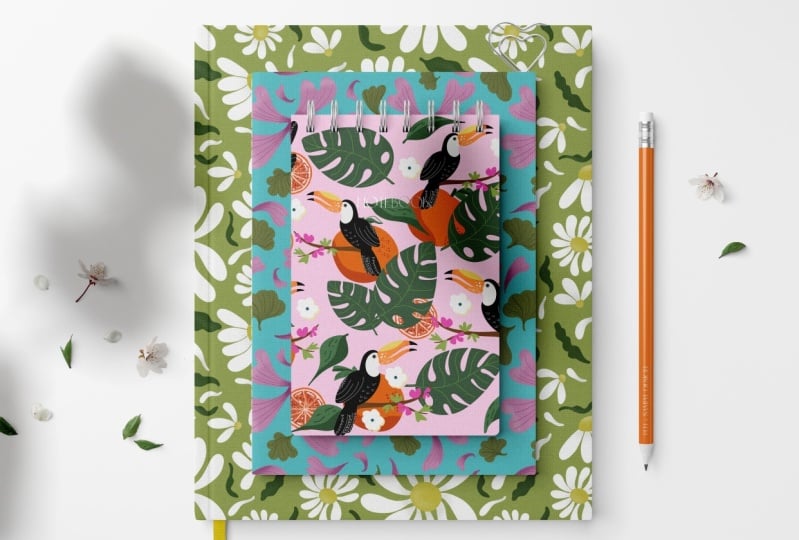
physical mockup. It gives your art context. So instead of just posting your art as a little
square on Instagram, show it on a digital mock up. It makes it much more
appealing to art directors. And here are just
a few examples of how I have used
digital mock ups, anywhere from gift
cards to clothing, fabric, makeup,
coffee packaging, tow bags, you name it. And it shows all the
different applications that you can apply
your artwork to. Now I just want to show
you some of the sites that I like to find
mock ups from. And the first is CreateC. They're my favorite site
to find mockups from. They're really high quality, as well as affordable. And they just have such a
rich variety to choose from. I'm going to type in the
subject matter of fabric. And then if you scroll down, you can see all the different fabric mock ups that
they have on their site. And they're pretty affordable. They range anywhere $15-35, and they're pretty easy to use. It's a photoshop file. And you just double click on that mesh and then put
your artwork on it, save it, and it automatically
wraps to the shape. Of that mockup. If money is
really a factor for you, you can definitely check
out their freebies tab. They offer a variety of really high quality
free mock ups. There's tow bags, cards, shoes, fabric,
mugs, you name it. And also Create C donated three mockups
just for this class. So if you go to the
class resource section, make sure to download your three free mockups
for this class. And if you really
don't have any money, you can check out free picks. Free picks is totally free. They allow up to two
downloads a day, two or three downloads a day, so I'm just going
to type in fabric. Granted, they are free mock ups, but they're not photoshop files. They're typically
just flat JPEGs or PNG files that you kind of
have to photoshop yourself. So you get what you pay for, but it is free. And then I want to show
you how easy it is to make mock ups from
Adobe Express. Adobe Express is totally free. The free version has
some limited features. But if you already have a
creative Cloud account, you have access to
the premium features, and I utilize this for
a lot of mock ups. And I'm just going to
show you how easy it is to mock up a top bag
using Adobe Express. So I'm going to search
their media for top bag. Scroll through some
of the photos, and I like this lifestyle image. But I don't really like
the tile background, and I want to remove it. An easy way to remove
that is to use their quick feature
called remove background, and it removes the background
with just one click. That's really, really easy and quick way to remove a
background from an image. You can also change the
color of the background. So maybe I want to
make it more brand color. And it's that easy. And then I can go and apply my artwork directly
on that tow bag. Also consider photographing
your artwork. So anytime I get a product, I photograph it with my iPhone, and I utilize
colorful backdrops. So these are just some
cricket vinyls that I pick up at Michael's
for a pop of color, and I add some simple props in the background
for visual interest. You don't have to be fancy. You don't have to buy a fancy
camera or fancy equipment. I just use my iPhone, and that's how I shoot
all of my photos. But I really love to style it, if I can and show actual
photographs on my website, as well as my Instagram. Because at the end
of the day, nothing is better than seeing
the real thing, right? So it's a recap. Instagram rewards users that use the entire platform
and post frequently. By resharing art,
you are able to create more content in a
shorter amount of time. It also built your portfolio, built brand awareness, and
establishes your specialty. It attracts clients
and partnerships. It's super helpful
for them to see mock ups in real world
examples of your art.
3. Categorizing & Scheduling: This section is all about categorizing and
scheduling your content. Let's start off with talking
a little bit about hashtags. They're not so relevant anymore, but still are used to
categorize your content. So let's cover some
does and don'ts. Use five to ten Niche
specific hashtags so your followers can easily
search for your content. This is also going to
feed the algorithm. So you want to use Anything that is specific to your
specialty or your niche. Look in the search bar to see what hashtags are
popular and trending. You could also go to alternative social media
platforms like Pinterest or TikTok and see
what's trending over there and see if you can
bring it back into Instagram. Search high performing
content to see what hashtags are
popular and trending. Also create custom hash tags
to categorize your posts. And I'll show you examples
of this in the next slide. Some don'ts to consider. Don't use hash tags that have nothing to do
with your content, because this is only going to feed false information
to the algorithm. Don't use overly
generic hash tags. These will make it harder
for people to discover your content due to the
volume of people using them. So don't use any kind
of hash tag like Pash tag explore hashtag
summer vibes, because those have
over 1 million uses. And if you use that, it's just
going to be oversaturated, and you're just going to
be one post in 1 million. And don't copy and paste the same hash tags
for every post. Try to switch them
up when possible. And I see this all the
time with creators using the same hash tags over and over again out
of convenience. And that can actually be
flagged as bought behavior, and you can get shadow band. So really think about using different hash tags
for every single post. And here are some examples. So I bucket them according
to my specialties. So I have three
different buckets, hand lettering,
character portraits, and surface pattern design. For hand lettering, it's all
lettering and type focused, whether it is challenges or different groups that use
their specific cash tags. I call them out. As well
as character portraits. Again, like, draw the senior style challenge or
fun with faces. Any kind of challenge that I want to relate back
to my character portrait. It all has to do
with illustration, female graders, anything to
do with character portraits. And then surface pattern design has everything to do with
surface pattern design, the community patterns,
even trade shows, they are surface
pattern design related. I include those. What to
pin to your Instagram grid. Think about pinning
high performing posts to grow your following. So anytime I have a real
or a post go viral, I'll want to share it
again with my audience. Because it resonated with them, I will pin it to
my profile grid. Pin a post, introducing
yourself or your business. Walk us through your
creative journey. People love to see the
artist behind the art. And when you can introduce
yourself and pin that, it's really easy for
art directors and brands to find that right away when it's at
the top of your grid. An educational post to position
yourself as an expert. This is one of my favorites. I love to teach through
tutorial style reels, and a lot of times,
phys go viral. And I had one about a grain brush that I
created an illustrator, and so I pinned
that to the top of my profile so that my
users can easily find it. And consider pinning a freebie. If you have a newsletter. This is a great way to convert your Instagram
followers to newsletter subscribers
is when you pin some type of freebie incentive
for them to sign up. And what to highlight
is very similar about me introduction
reviews and testimonials, particularly if you offer a
specific service or product. Behind the scenes
content, people, again, they love to see what's going on behind the scenes
and your process. Frequently ask questions. I get the same questions
asked over and over again. What program did
you draw that in or what brushes did you
use to create that art? I like them to refer back to the frequently
asked questions. Any kind of freebies. Again, people love freebies, free brushes, free templates. You can highlight
that on your grid. And lastly, polls
and fun and games, any kind of fun trivia
or get to know me, you can highlight
that on your page. You can also consider
using custom icons. For your highlight covers. For me, I just use
different colors, but if you want to
get really granular, you can design
different icons and really add some customization
to your highlights. And consider scheduling
your content in advance, especially if you
get overwhelmed with how do I post
so frequently? And how do I post all the time, especially multiple
times a week? One way is to schedule all your content in advance
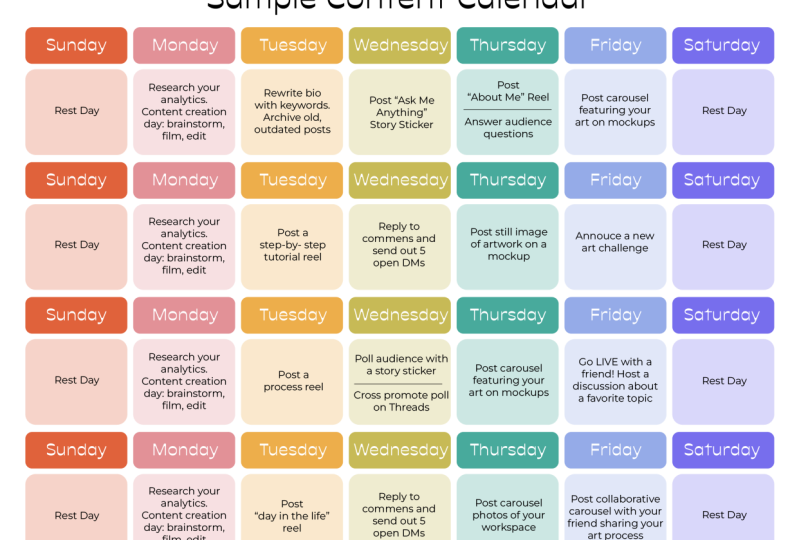
and use a content calendar. Utilize programs like
Later Planly and Adobe Express to schedule
your posts in advance. Schedule a content creation day where you film all
your content at once. I typically like to
rest on the weekends, and then I will start a content
creation day on Monday. And then that way, I plan all the content that I'm
going to create for the week. I film all my clips, and then I edit them
on that filming day, so it's all ready to go
for the rest of the week. And here is an example
of my content calendar, just a month at a glance. And you'll see that on Sundays and Saturdays,
it's a rest day. And then throughout the week, I'll have all my
content planned. And I don't always
post every day. Sometimes I will post
a story sticker, like, ask me anything or I'll
post a carousel or just simply reply to comments
and send out five DMs. It's just a call
to action for me to interact more with
the Instagram app. But I'm not necessarily
posting every day. I also included this calendar
in the resource section so that you can plan out
your content for the month. I also included in
Instagram scheduler, so you can plan out
any kind of ideas, published date, the type of content that you
want to create, whether it's a static fee post, carousel, reel, et cetera. And then a whole bucket for you to brainstorm this content. And I included to do less and a little spot for you to
include hash tags and links. And if you really
want to get into it, you can start scheduling
your week at a glance. So this way you can get more
in depth and have more space to write out what kind of content you want to create
day to day for the week. I also want to share how
you can use programs like Adobe Express to schedule
your content in advance. So I created this
little animation of one of my illustrations
using Adobe Express. Super easy and fun. It's a little real
that I created, and now I want to
schedule this post. So what I do is I go to share. Schedule post. And then I'm going to select the channels that I
want to share it to. So Instagram and TikTok. I'm going to share it as a real. And then I'm going to
type in a caption. And then I just typed in
summer state of mind, easy animation using
Adobe Express. And you can type in different hash tags to
include, et cetera, et cetera. You can even include emojis
that you want to create. Maybe a sun for summer. You also have some
options for Instagram, like being the first to comment, or you can disable comments. Then now you can
select scheduling. I can either select published now or I can schedule
it in advance. So I just want to
open up my calendar and pick a date
that works for me. And then you can scroll up to the top and
select a real cover. So I think I'm going to
probably select this one. That looks pretty good. I think that'll look good on my feed. You can preview it in advance. Just to make sure everything will look great on your feed. Alright, everything
looks good to me, so I think I'm
ready to schedule. And then you just
click schedule.
4. Building a Community: In this section, I'm talking all about building a community. And the first step is to
connect with your audience. The key to the connection
is then like trust factor. When you've built a relationship with your followers where they feel like they know
you and genuinely like you, then that means that
they can trust you. When your audience trusts you, they become more supportive,
willing, and engaged. And that comes down to
sharing what you love to do in a natural
and organic way. Build a community on a personal
level through stories, DMs, and captions and
share your process. Don't be a gatekeeper. Our natural instinct is to
have a scarcity mindset. Once we share our secrets, everyone will copy us, and we won't be
original anymore, which is simply not true. Generosity builds trust. I have found from being
open and honest with my followers that have
built genuine trust. Be generous with all
the information that you have and teach your
followers all that you know. And consider adding
value to your posts so that you're not
just posting to post. Become the expert in
all that you know. Be the G to person, and share through a tutorial
style real or creative Now, I know that Instagram
is a visual platform, and so they're pushing
video content and visuals, but don't forget about
the importance of captions and storytelling
and captions. I think people often forget that keywords are also
found in captions. So keywords are in your
user name and your bio, and they're also in captions. Start with a good headline, lead with something thought
provoking or exciting. What's going to capture
their attention right away? Instagram only shows the first one to two lines of your
caption in your feed, so make sure that it
counts. Make it personal. Share a story to give context to that post because
this adds value. This is a perfect
example of this. I hand lettered the phrase, what you water grows, and then I included
a testimonial about working with my
creative business coach. And I was vulnerable. I told about my struggle early on and how after
working with him, I was able to turn things
around and diversify my income streams and really thrive in my
creative business. I think that it really
resonated with my audience. I feel like it was relatable. A lot of artists struggle, and so to make that
relatable content and share that vulnerable story, it really resonated with them. And this post, it was
just a single post, and it got over 7,000 likes. So for a single post,
that's pretty good. And end with a call
to action that triggers further engagement
from your followers. Whether that's a mani chat
trigger or just simply saying, click Lincoln Bio for more info. You want to trigger
more interaction with in and around Instagram. Remember to communicate
with your audience. So if someone asks a question
or they leave a compliment, just simply reply back to
them because that boosts your engagement when you reply back and
reply back quickly. Consider participating
in collaborative posts. So make a list of ten people within your industry with
similar niche to you. Start following and building a genuine relationship
with them. Reach out and ask if they'd like to collaborate
on a post with you. I love to do
collaborative posts, especially for licensed artwork that I create for a company. This example on the
right is a real that I created for the
company Wild S Heck. They create a hats with artwork inside the
brims of the hats. So I created a process
real showing my process of how I created the art
specifically for their hats. And I posted it as a collaborative reel so
that their audience, the people buying the hats, can see the artists behind
the art and can see all of the different hats that
I created within that line. And it was great exposure. We got exposure to both of
each other's audiences. And I also want to show this collaborative reel I
did with the happy planner. And in it, I showed how my art started on
the iPad as digital, and then I illustrated 12 different dividers,
one for each month, and I wanted to show the
complimentary sticker books, as well as how I use
them within the planner. It was just a really
fun collaborative way to show off the product
that I designed for them. Instagram stories is content that gets pushed just
to your followers. So, of course, it's a
powerful feature for building and fostering
relationships with your audience. So get personal with stories. Ask a question, post a quiz, create a poll or add an external link to
drive more engagement. Utilize these stickers
within the stories beater. There is no secret
formula to stories, but you definitely get penalized
if you post too much to your stories or post stories that are just back to back
without any kind of rest. So I suggest just posting
six stories a day, two in the morning,
two in the afternoon, and two at night. And if you're seeing low
engagement on your stories, let them fully expire, and then post fresh
content once they expire. And here's some
examples of how I use story stickers in my posts. One of my favorites is
posting a pole sticker, asking my audience which
colorway they prefer. And in that way, the audience gets to interact with the story, and they get to cast their vote. Another great way to interact with your audience is
ask some questions. I host and ask me anything And then I try to answer
it within a real. And this is a really great way to get direct feedback from your audience on the type of content that they want
to see you create. And then, of course, I love
to utilize link stickers. When I'm promoting the Happy planner design
that I created, I posted a link to the Happy
Planner website where you could swipe up and check out the planner
on their website. That is perfect for any kind of product that you
want to showcase, or maybe it is a link to a
course that you created. It is a great way for them to check out that website further. And if you thought
stories or personal, direct messages are
even more personal. DMs are the most overlooked
feature on Instagram. So if you want to rank higher
in someone else's stories, get into their DMs. The more you DM someone, the higher they will rank in your stories
and in your feet. But how do you do that
without being creepy? Simply just reply back
to their stories. So if you see something
really intriguing, like it's a piece of
art that they created, they're sharing their process, just simply reply back
saying how much you love it. DMs are also a great
outreach tool, whether for growing personal
or business relationships. Great one to build personal relationships is
if you have a new follower. Let's say someone just
started following you. DM them and say, Hey, thanks for the follow,
compliment them. I really love that watercolor painting you did of a Sunflower. And then encourage them to
interact with your profile. So let's say you have
an art challenge. Say, Hey, I have an art
challenge coming up. Would you like to participate? Here are the rules and the timeline for
when you can post. And if you'd like to
reach out to a company. This is a great strategy if you want to work with a client
or license your artwork. I try to send them a DM first, tell a little bit about
myself and what I do, share examples of my work, and then ask if they have an e mail that I can follow up with with
more information. Join communities. Connect and engage with other artists
in the community. When you follow someone new, Instagram will suggest other
similar accounts to follow. So if I follow one
of these accounts, it'll probably show me a few more that are very
similar that I should follow. And you want to join
communities and organizations and groups
within your niche. So that all makes sense. This feeds the algorithm. So if you follow one art group, it'll show you
another one, it'll show you more art content. If you start following
different groups that have nothing to do with
the content that you create, it kind of confuses
the algorithm, and they'll start showing you very random people and
organizations to follow. Organizations typically
have contests, resources, challenges, and meet ups to grow and foster the online community. So they are a great way
to interact and engage. Like, when I first started out, I followed as many of
these communities, and I joined in as many of
their challenges as I could, not only so I could
build my portfolio, but also meet new
artists as well and consider participating
in art challenges. This is an example of one of the many art
challenges that I've hosted It is the Spring
floral pattern challenge. And it was really simple. I just encouraged my
followers to create a pattern that focused
around spring florals. I even included a createC mockup that they could use to
show off their pattern. And all they had to do was
share it on Instagram with the SFP Challenge 2023 hashtag. Here's an example
of what I shared, I shared my pattern in
two different colorways, as well as on digital
mockups from Cretz. And then here is this a
snapshot of some of the many, many entries that I got. But it was really a
great way I shared them in my stories and I
fostered the community, and it was a great way for
me to meet other artists, and it was a great way for
them to build their portfolio. Challenges are a great
way to meet new artists, form connections,
hone your skills, and build your portfolio. And the best part about this, it was a full circle moment. So because I shared my art, I put it on practical mock
ups in real world scenario. It was picked up by an
art director for TJ Max. They really like this pattern, and they put it on all
their party supplies. So paper plates, paper
cups, and napkins. It was a full circle
moment because I shared it in a art challenge. It got picked up on an
art licensing product. Here are some of the many art challenges that
I've hosted in the past. Some of the common ones are
draw this in your style. So I feature a character and I encourage my audience
to draw in their style. I also focus a lot on holidays. So I did a art challenge
called My Punny Valentine. That was a lettering challenge. I encouraged my
audience to handler and illustrate Funny
Valentine theme to puns. I also did a summer
themed art challenge, as well as a Halloween
one and Christmas. Consider hosting a live session. Go live with a friend,
discuss a topic, or demonstrate a process, tutorial Just chat about
your favorite topics. So these are some
examples of some of the live sessions that
I've hosted in the past. One was with my creative
business coach. We talked all about
pricing and negotiation. I also hosted a draw with us. It was like a draw along
with my friend Jess, and we each shared
our drawing process, and we created a piece
during an our live session. And then I talked all about art licensing
with my friend Heather, and we had a live Q&A. So it was a great interaction to go And in the class
resource section, I also included a worksheet where you can plan
your live sessions. So you can schedule date,
time, topic, duration, your main points of discussion, as well as your target audience, call to action, any kind of props or notes that
you want to include. So what thing to keep in mind? If content is king
engagement is queen. Spend time com, saving, and sharing other artists work. This is all engagement. Take time to respond and
interact with peers, as well as new followers. Share a story in your caption or ask a question to
spark conversation. Utilize those story stickers. And don't expect
others to comment on your posts if you're not
actively doing it yourself.
5. Reaching New Audiences : In this section,
I'm going to cover all about reaching
new audiences. First off, you want to
adapt to the platform. So when Instagram rolls
out a brand new feature, that means that they are likely putting a lot of money behind it and want their users to
start using that new feature. They might even incentivize it. So this happened when Instagram
first dropped reels and they offered a bonus payout if you started using
that new feature. And they even started to do a bonus incentive for threads. You definitely want to follow
accounts such as creators, Adam Moser, and
Instagram for business for all of Instagram's
new and updated features. These accounts drop all sorts of tips and tricks on how to
grow your Instagram account, and they have all the
updated features. So anytime they drop a new feature or make
an announcement, they'll do it through
these accounts. Definitely consider
joining Threads. It's a great alternative
to posting on Instagram. It's so much more conversational
and community based. It is like in old
school Twitter. So it's very text driven, and there's lots of discussions
and debates going on. And it doesn't have to be aesthetically pleasing,
like Instagram. You can just ask questions. It's like talking
to your community to your friends and
getting advice. And it's a great alternative way to grow your Instagram account. So you can cross promote any kind of thread
content that you have by sharing it on your stories or your
posts on Instagram. And don't forget
about carousels. So you can still reach new
audiences with still images, but make them carousels. And I think carousels
are a great way to tell a story through
multiple still images. Later media reported
that carousel posts have a 19% higher engagement rate
versus single image posts. And I hear this from
a lot of people that their still images don't really perform well and their real
content doesn't perform well, but for some reason,
carousels seem to work. So definitely experiment and see what kind of posts
work best for you. As carousel posts
allow you to post up to ten images and feature more visual content
in a single post. I've also seen the same carousel repeat numerous times when I'm
scrolling through my feed. They just switch out an image. I noticed that, like, Oh, I
already commented on this. I already liked
it, but they just show a different carousel image. So it's another way for you to appear in the feed more often. Carousels are great for product reveals,
brand storytelling, customer reviews, behind
the scenes content, asking questions and more. My favorite way
to use carousels, I show a surface pattern design, and then I'll show
it as a pattern and then in a
different color way, and then I'll show it
on digital mock ups. And it's just a great way
for me to show the pattern as a pattern and then how
it is applied as products. And definitely definitely
create reels and video content. Heels are still the
number one tactic for reaching new audiences. Reels don't have to be fancy or require any kind of
expensive equipment. I film all my reels with
my iPhone in my studio. I don't really have any
fancy filming equipment. I just have a regular tripod. I bought on Amazon for $20. So I can link all this in
the class resource section, but I just want to
encourage you that you don't have to have fancy
equipment to film reels. And you don't have to
talk to the camera, dance, point to
words, any of that. I keep it I keep my content very focused on what my audience
wants to see. I share my art process, so I'll show some
B roll footage of me drawing or you know, me at my computer, creating
art or me drawing on my iPad. So just be be true
and authentic to you. But let's cover some
real dos and don'ts. Definitely make sure your
content is entertaining, fun, educational, or inspiring. Shorter tends to perform better, but definitely experiment
with length time. If it's a quick process reel, then you probably want to
keep it under 15 seconds. Keep it short. You want to grab their
attention right away. But if it is a
tutorial style where it's step by step and
it's education based, then you might want to
make it a bit longer because you don't want to leave out any important information. Definitely treat it
like a mini commercial with a bunch of
short little clips. It'll keep the interest
of your viewer. And definitely use a clever
hook or transition to grab the viewer's attention and
use a strong cover image. I always use a cover image, and I describe exactly
what's going on in the reel. So when someone is swiping through my account,
They can see, Oh, that's a tutorial on how
to create a grain brush, and they can immediately
check it out. Save reels that you
find inspiring. So you definitely want
to go the Explore page and check out, see
what's trending, maybe see what your other
artist friends are creating, definitely, do a
little research. Experiment with trending audio and making your own audio. So In years past, Instagram
was really pushing trends, and that was kind
of a way to grow, was to repurpose
like trending audio. But now Instagram recently released that they
are encouraging you to create your own
original audio and your own original content, which is great for us as
artists and creators, so we can really lean into creating our own
original content. Let's cover some don'ts. So this is probably obvious, but don't post anything blurry or anything that
has low resolution. It can be as simple
as like wiping your camera on your iPhone
before you start filming. It's something that I
forget about all the time, and then I film along real, and then I see that it's kind
of like blurry and smudge. So definitely definitely
make sure that your equipment is clean
before you start filming. Don't film anything
in like TikTok or even in cap cut without
removing the watermark first, because Instagram
will instantly see that watermark and it will get pushed down to the
bottom of the algorithm. They want to encourage you to create your reels
within the app, which you totally can. But if you prefer to create them in other apps like
CPC and in shot, just make sure that they don't leave any kind of watermark. And make sure that you film in the ten by 80 19 by
20 aspect ratio, so that is in portrait. Instagram isn't favoring
landscape videos right now or square videos. It looks kind of bad having those thick black borders
around the videos. And so definitely that content gets pushed at
the bottom typically. So you want to make sure
that your video fits within that 1080 by 1920 ratio. And consider using
close captions. You can use a little
caption sticker, especially if you're
film in editorial reel, where you have to show
step by step in detail. Definitely include captions
with your voiceover. But don't get crazy with texts. Don't cover the majority
of your video with text. Instagram is a visual platform, so you don't want
to be text heavy. Don't make it very
lengthy or boring. Try to keep it short
and sweet because you want to grab your
audience's attention. They're scrolling
through, they're seeing probably hundreds
of reels a day, and you want to make
your stand out. And so why not make it just short and sweet and
easy to consume? Now, let's cover how to
get discovered on reels. So consider using search engines to find commonly
searched topics, even outside of Instagram. So think about using
YouTube, Pints, TikTok. They have different search
engines than Instagram. TikTok, typically, they have their content trends
way before Instagram, then it kind of trickles down. So a lot of times, I will search different topics,
see what's popular, see what's trending, see what's kind of going on on TikTok, and then kind of bring
it over to Instagram. Create unique and
original content instead of recycling trends. So in years past, it was a lot of push for
using trending audio, what kind of audio was trending. But now it's actually, again, it's in our favor to create
our own original content. They're encouraging voiceovers. They're encouraging
us to be original. Ask your audience what they
would like to hear from you. This is one of my favorite
ways to brainstorm. What kind of content I
should share as a real. I like to ask my audience. So I'll ask them through
a sticker and stories, and I'll say, Hey, ask me any creative business
question or technical tip, and I will do my best
to answer in a real. And that's a great way to get direct feedback
from your audience on exactly the kind of content that they
want to see from you. And consider filling
in the gaps. So create original content
that no one else is creating. This is called pocket content. So anytime you search through
YouTube or on TikTok, and you want to find an
answer to something and you can't quite like nobody
else is doing it. I think that's a sign that you should be the one
that creating it. In this next video, I'm going to walk you
step by step and how I create a process real
from start to finish.
6. Process Reel Demonstration: So now I want to walk in
through my process of how I film and create my reels. So I first start off
with a flake clean desk. I prefer to use my
branch standing desk so I can adjust the
height accordingly. And I always film
next to open windows. So I have open windows
on both sides. I don't fill with any
kind of artificial light. The past, I have tried it out, and I always get a horrible
reflection on my iPad screen. I always like to set
the scene and make it interesting in some way with some kind of
props or backdrops, just to add visual
interest to my reels, 'cause my art is so
colorful and I feel like if I filled on a white
desk like a white backdrop, it would be quite boring. So I discovered
that I really like to add a punch of color
with cricket vinyls. So I bought these from Michael's in the
craft supply section, and they are just
final backdrops. That I layer. And I kind of color coordinate according to which artwork that
I'm working on. And as you can tell,
they're quite narrow. So I always like to color
block using two colors. As you can see, they're
kind of narrow. So I can't really fit
my iPad on one color, so I always like to
layer two colors. And then I always use a
tripod to film overhead, and I like to use my
Canvas tripod for this. So it's technically a lamp, but I've never used
the lamp part. I just use it as a
tripod to hold my phone. And I really like it because
it's really easy to adjust. I can adjust different
angles and orientations. And I just slide my
phone into this clamp. And I can easily film
overhead shots of me drawing. So once I'm all set up, I will start shooting short video clips of
me recreating a piece. When I start a reel, I
always work backward, so I have a finished
piece that I start with, and then I turn off
certain layers, and I redraw them. So that I'm not
here creating art, you know, for hours and hours. I'm just filming
short little clips. They're usually 15 seconds
or a minute or 2 minutes, and I just film short little clips of
me recreating the art. So now that I'm all set
up to start filming, I pick a piece. So this piece is
already finished. It's a funny little friendship
card that I created. No show average friendship. And I'm just going
to start filming some short clips of me
redrawing these elements. So I probably want to show some kind of video of
me lettering something, and then probably using a
texture brush on those ddos, and then probably
some little sparkles. So I'll just I'll
quickly film some of these elements over again, and I'll show you how I
add them into my reel. So what I do is I just turn off the elements that
I already drew, so I probably won't
to turn those off. Probably just redraw
some of these chips. Here you go. Let's
go to turn off. So texture on those chips. And then I'll just turn on my sketch layer and just
turn it down quite a bit. And then on a new layer, I'll just start redrawing
these elements. And I also like to switch
up my camera angle. So maybe for this one, I'll do, like, a zoomed in shot. I'm just adjusting
my overhead tripod. And then I'll do some
kind of close up for texturizing those nachos. And then now that
we finished that, I'll probably show
another overhead shot of me adding some of
those sparkle elements. And I will quickly
just go back and turn on my other layers
that I had on previously. After I have shot all of
my short little clips, I want to start adding them
into an app called In Shot, where I can start editing
my reel together. I have found that Instagram
can get really glitchy, and I've worked it in the past, and I've spent a lot
of time editing, and then all of a
sudden, the app crashes and I lose everything. Super frustrating. So, I
like to use the app insho It has a lot more features, and I can also download the raw file afterwards without any
kind of watermark, which I really like in
case I need to send the raw file to a brand partner or a client, I have that option. Whereas, if I filed
it within Instagram, it would have that
Instagram watermark on it. So I just click on the app. And what's nice about In Shot, it's available on your iPad, as well as your iPhone. So it makes it very accessible. I typically edit all my videos
directly within my iPhone, but for the purpose
of this video, it's a little larger screen. So I'm showing you on my iPad. So the free version has ads, and it does include a watermark. So I think that it's worth it to pay for the
premium subscription. I pay about 17 or $18 a
year for the premium. So it's pretty affordable. If you want to do it monthly, I think it's three
or $4 a month. In my opinion, I
think it's worth it. So you just select video. And then it shows you your photo album library
within your device, and you can select all of the clips that you
would like to feature. So I'm just going to
go ahead and click on all the clips that I would
like to feature in my video. And then you select
the green checkmark. It's a reveal clip, and I actually want to
move it to the end. So right now, you just
kind of want to quickly go through and view
all your clips and start rearranging
and editing them. And it's really easy to do. You just long press, and you can move this clip all
the way to the end. Because that's my reveal clip. So it's pretty easy, and
you can use these sliders to trim down the
video. Trim it down. And I want to make
it about 3 seconds. Three to 5 seconds or even
less than that is ideal. But treat it like a
meti commercial, right? We want to film lots of different clips at
different angles. And then you want to make them about three to 5
seconds just to capture their visual interest because there's a lot of people
scrolling through the app, and they'll probably
swipe through your, so you want to kind of
capture their attention. And one way to do that is to make your real like a
meeting commercial. So I'm going to just take
some time and go through these clips and use the sliders to kind of trim
them down and edit them. So for this one, it
is a shading clip. Definitely want to
keep that, but it's a little too long. I'm going
to do the same thing. I will just trim it down. Probably around there.
It's still too long. It's about 7 seconds. I'm going to hit the speed
button and increase the speed. Now it's less than 3 seconds. You can play it back
and take a look. Okay. That looks
pretty good to me. Then I think I want to don't need this clip
anymore, so I can hit delete. I like this little clip. I'm going to find a
good spot to start it. As well as end it. It's
about 1.3 seconds long. That's pretty good.
And for this one, I'm adding texture to a chip. I think I'll trim it down,
probably around there. A little more texture
to this chip. If I want to split a clip, I can just find the
spot where I want to start and I hit
the button split. I don't need this
clips, I can delete it. And then I can hit
where I want to end it. So I can delete this long clip. So I'm just going to play
back what I have so far. Okay? That's looking
pretty good. But I think I want to
rearrange these clips, so just long press. And I think I want to add
this towards the end. I think I want to add definitely some hand lettering video. I'm going to start it here. I'll split, and I can
delete this very long clip. And I'll end it around here. I'll delete the rest of
that. It's still too long. It's about 14 seconds long,
so I'm going to speed it up. It's about 3.9 seconds long. I think that looks pretty good. And I think I'm going to move this clip all the
way to the front. I don't think I need this clip. I'm just going to delete it. Go to delete this one as well. If you look in the lower
right hand corner, it tells you how long
the whole video is, and right now about we're
a little s of 3 minutes. So you just want to definitely take some time to go
through these videos, trim down anything
that's unnecessary. Like, I don't need this video,
I'm going to delete that. Actually, I like
this reveal better. I think I might keep this one instead because I'm zooming in and then zooming
out really quick. So I will trim it
down to around there. Play that back. And then
out to show the final. All right. So I actually
talked through that. I don't think I want
to include my audio. I'll show you how to remove it. So with this video selected, you want to hit the
little music note button, and you can view all
of the little clips, and there's a little
percentage sign showing you the volume. So if I click on
that, I could turn down the volume for each clip. I would think about
maybe keeping the audio if you were talking through some
kind of tutorial. But since this is
just a process reel, I'm keeping it pretty simple. And I'm removing all
of the original audio, and I am probably just going to pair it to some
royalty free music. So once you turn
down all the volume, I'm just going to
hit the check mark. That looks pretty good. And I don't think
I need this video. So I'm going to delete
that. Et's see. This one. I don't need that. Right now we're
about 19 seconds. Let's watch these video clips. I think I decided to keep this one instead
of the other reveal. I'm going to move it to the end. I'm going to delete
this version. I don't need it anymore.
Okay. Now let's play it and see how
it's looking so far. Almost, I think some of
these are out of order. This one, I want to
show a little bit more. And this one, I want to move. So it's all about
kind of finding the right timing and rearranging the clips
to your liking. That's looking pretty
good. Although I think I want to speed this up. So let's check that out. Okay, I think that's
okay, really good. It is at 12.8 seconds right
now, so I think it's perfect. It's short and sweet. And now I'm just going to
add some royalty free music. So again, I hit the music note. And then I could
record a voice over. If I wanted to, I just
hit that red button, but I don't think I want
to record a voice over. So I hit the music. And shot comes with a lot of music options
that you can use. I like to use royalty free music but I downloaded ahead of time. I just downloaded
it from Pisa Bay. Just some generic music. So I'm going to
use that instead. The advantage of using
royalty free music, in case you are filming a
partnership reel or any kind of branded content
or in case you want to run ads on your reels, it has to use
royalty free music. Otherwise, you'll get penalized. Of course, 'cause you don't have permission from
the music artist. So that's an advantage to using your own royalty free music. So I'm just going to
play it back right now. And I think it's
looking pretty good. It's in a spot where it shows a bunch of
short little clips. They transition really
smoothly. I hit. The checkmark, if I wanted to
add any extra transitions, I could just hit this little
white square at the bottom. And then I have a variety of different transitions
to choose from. And you get a little preview of what that
transition looks like. It's kind of nice, especially
for like a product reveal or you know, anything that you kind
of want to highlight, you can add a cool transition. But for this video, I don't think I'm going
to add any transitions, but I just wanted to show
you that as an option. So once you are satisfied
with your video, you can export it
to your device. You just in the upper
right hand corner, just click the square
with the arrow, and you can save it, and it'll
save to your photo album. And you can also
select the resolution. I always click 1080 just because Instagram
automatically compresses the video down to 1080. So it's not necessary to export it anything
higher than that. So, I just click. Okay. And then I ask you me. Sure. It's great. All right. So now, you can check out
your photo library, and you can watch the real. See how it looks. And
if it looks good, then you can go ahead and
upload it to Instagram.
7. Closing Thoughts: Congratulations. You've
made it to the end of leveraging Instagram
for illustrators. Throughout this
course, you've learned the essentials of
transforming your Instagram profile into a dynamic
marketing tool that can elevate your
creative business. We discovered how to perform
a self audit to ensure your profile is cohesive and reflective of your unique style. By focusing on consistent,
high quality posts, and using specific keywords, you can enhance
your visibility and establish your niche
in the our community. Hopefully by now, you understand
the power of building genuine connections
with your audience through engaging stories, personal DMs, and
thoughtful captions. Remember a strong community
is built on trust, generosity, and
active participation. Whether it's joining
our challenges, hosting live sessions or simply interacting
with your followers. Utilizing the full spectrum
of Instagram features, especially reels and carousels, can significantly
broaden your reach. By saying adaptable
the platform, you can keep your content
fresh and engaging. While other platforms
might tempt you. Stay focused on Instagram
allows you to master its tools and maximize its potential for
visual storytelling. It's an ideal platform for illustrators to
showcase our artwork, attract clients,
and build a brand. Now it's time to put your
knowledge into action. Download the Instagram
content creation guide in the class resource section. I included worksheets, calendar, and checklist with
actionable tips. For your class project,
upload the screenshots showing how you implemented
the take action prompts. Don't forget to tag
me on Instagram, so I can see your content. Use Hashtag Instagram
for Illustrators. Thanks so much for tuning in. Can't wait to see
what you create. A.
 Jess Miller, Graphic Designer & Illustrator