Transcripts
1. Hello, Welcome !: Winter landscapes
hold a serene magic with snow capped trees
and soft glow of sunrise, creating an ethereal
beauty on your paper. The muted blues and whites of the season evoke a
calming atmosphere, making your painting,
truly beautiful. Hi. I'm Sakuta, a passionate
watercolor artist. What began as a hobby
has blossomed into a full time career fueled by
years of experimentation, exploration, and
learning through basically both my
trims and mistakes. Over time, I have fallen
in love with watercolors, and today I'm here to
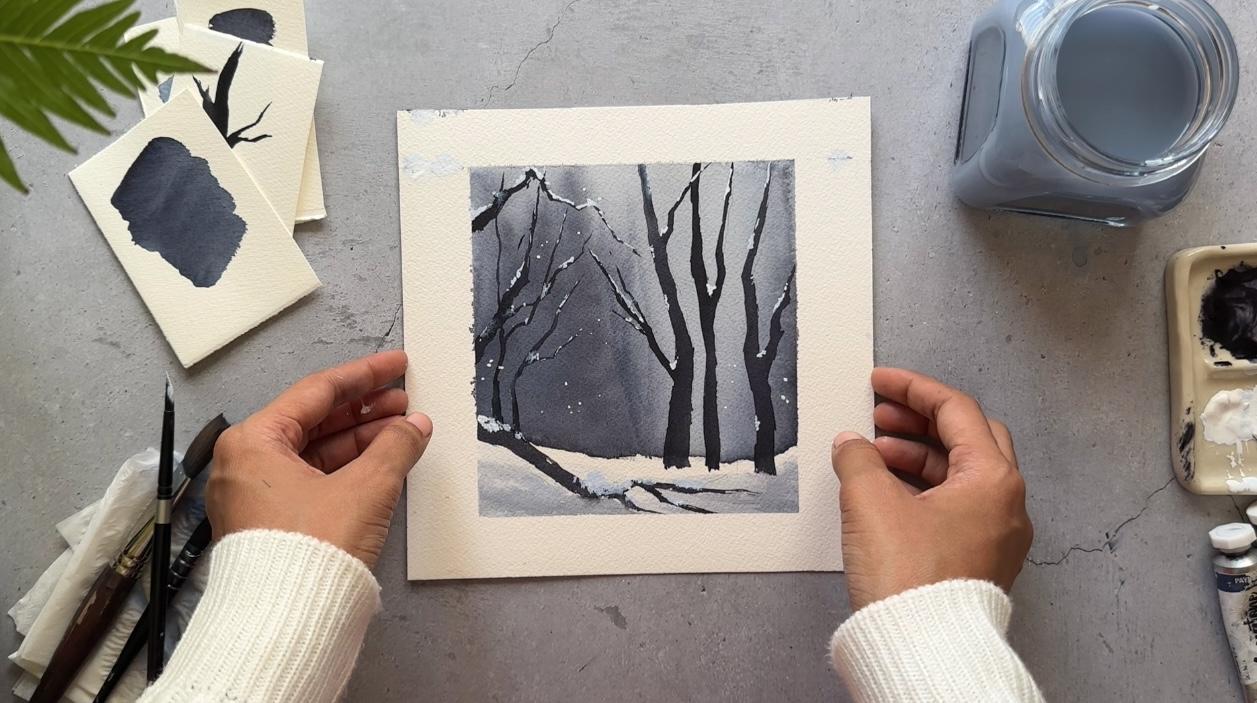
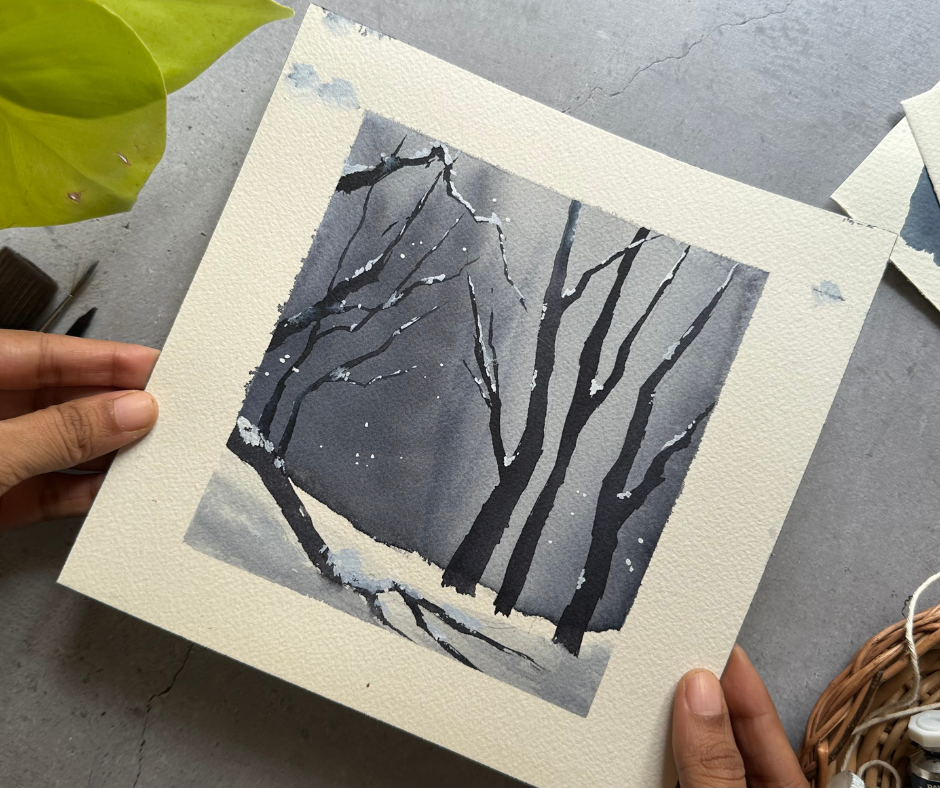
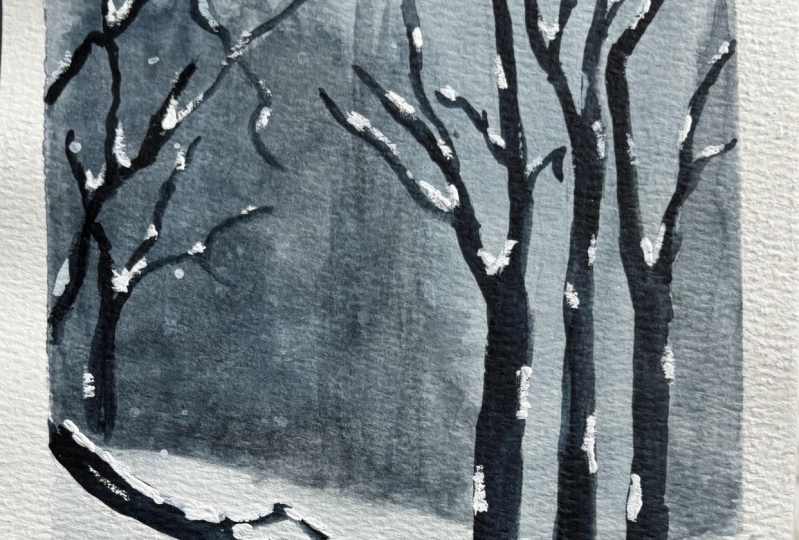
share that joy with you. In this class, we will paint this wonderful watercolor
winter landscape. There is a special
focus on how to paint the snow that is
here on the trees. So if you're new to
watercolor, do not worry. We will start with
a simple sketch, then build the
painting step by step, layering the background,
adding the foreground, and finally bringing it all together with delicate,
snowy details. And I'll be here guiding
you step by step. This class is a
perfect opportunity to explore the beauty
of winter through art. So grab your brushes, and let's create something
magical together.
2. Overview : First of all, thank you so much for choosing
to join me today. This class is about 30
minutes long, give or take, and we'll be painting a
serene winter landscape with an emphasis on snow. I'm going to teach you
guys an easy method to achieve those beautiful
snow capped trees. This class is
perfect for artists with basic understanding
of watercolor, but beginners are more than welcome to join
and give it a try. We will start by discussing all the art
supplies we're going to need, followed by a quick and fun
colors watching session. From there, we will dive
into the class project. We will begin with a
simple sketch that leads into painting the
landscape step by step. This project is thoughtfully divided into three
parts background, foreground and snow, making it super easy to follow along. It's also a perfect way to spend some self care time
while exploring the calming beauty
of watercolors. So what are you waiting for? Let's grab our brushes and bring this snowy wonderland
to life together. I hope this interests you. If yes, then I'm going
to see you guys in the next video where we will discuss all the art supplies. So I'm going to
see you there. Oh
3. Materials: Hi. In this video, we will discuss all the
art supplies that we're going to need to paint this
winter watercolor landscape. So let's begin. I will
first begin with the paper. So this is arches, 100% cotton, 300 GSM paper, cold pressed, and I'm using this
paper in blocks. You can also purchase
them separately as well. The block usually
comes with, I think, 20 papers attached to it, so you can just use
them one by one. Later, you can cut it
off using a cutter. This block is in square shape, and it's 20 into 20 centimeters. So it doesn't matter what size
of the paper that you use. Make sure it is 100% cotton, 300 GSM and coal pressed. And coming to the paints, I have used three paints. I mean, three colors
in three brands. This is Pines gray from
the brand aquaton. This is Indigo from
the white knights, and this is Chinese white
from the brand camel. I'm going to be using different
shades of these colors. I'm going to be swatching
those colors for you guys in the
next video as well. So make sure you have
these similar shades, if not the brands, and
you are good to go. Coming to the brushes, these are all the brushes
that I've used. I know there are a
lot, but trust me, they are very useful
when you are going for a landscape that has so
many shapes and sizes. So I have divided these
brushes into categories, round brushes, and these
are rigor brushes. They're very sharp, and
this is a flat brush. So this is from
the brand aquaton. I have used this brush only to wet the paper at
the initial stage. And coming to these
round brushes, this is silver black velvet. Number six, small round brush. I've used this to
paint the trees. And this one is from Rafael,
and it's number zero. I have used this to
paint the background. So this one, I
think I did not use the silver black
velvet number 14. Yeah, only those
two round brushes. And these are rigor.
They are very sharp, perfect to paint the details. I think I've used this to only
put dots of snow, I guess. Yeah. So these are
from the brand Dawnci. If you don't have
these brushes in exact brands, it's
perfectly alright. Just make sure you
have one flat brush, one round brush, and one
smaller sharp brush. Alright, we will need
a watercolor palette, as well, and watercolor
jar, you know, to put the water, of course, and masking tape to cover
the borders of the paper. And some paper towels. They're very important. So yeah, in the next video, we will talk about the colors. Let's go.
4. Choosing the Color Palette: I'm going to be using only
three colors today Pines grey, indigo, and white color. Pines gray is from
the brand called aquaton and indigo is
from white knight. I'm looking for darker shade, but not so dark that the
contrast go unnoticed. So what I'm going to do is I'm going to watch
the pines gray here. And if it is dark, I'm going to mix a
little bit of indigo. If not, I'm going to use only Pines grey.
Now let's watch. And I've also taken
the white color here, which is very important because we're going to
be painting the snow. So this is not Guash white. This is white watercolor, from the brand called camel, you can use any brand of
the colors that you have. And now let's watch
the pans grey. No, I don't think so. This color is very dark. So let's mix a bit of indigo. Do not take too much of indigo and do not take too
much of Pines gray either. Keep it 50 50. And I'm going to
swatch right on top of the Pines gray and I'm going to slowly add more water to
get the values of the color. You can see the different
variations of the same shade. Yeah, we're going to be
using all these values. I'm going to explain it
later as we paint further. And this is the perfect color
for our painting today. Yes, we got the color right. So step one, success. Now let's move on
to the next step. That is the sketch. So I'm gonna see you guys
in the next video. Thank you for watching so far.
5. Laying The Groundwork - Sketch : As we have discussed
in At supplies video, I am using arches, block paper. So this is a block. That means the papers come
attached to the block. You have to separate them
later using a cutter, and I have already
taped my paper as well. You can use any
paper that you have. Make sure it is 100%
cotton and 300 GSM. And I've taken a
normal to B pencil. The first step is to separate the background
with foreground. So I'm just drawing that
foreground land with a pencil. And the sketch is very
simple and straightforward. All we have is this
foreground and a few trees. And there is one tree that has fallen on the foreground.
So that is all. Like I've said, the
sketch is very simple. There will be background trees, which will be very blurry. And on the foreground, there will be around three
or maximum four trees. And we don't have to draw
the trees that will be on the background because
they'll be blurry. We're going to just sketch the trees that are on the foreground. That's
what I'm doing now. T one is done. Now I'm sketching three, two. Make sure they are pointing
in different directions. That means the trees are in random shape and size,
which is more natural. We're going to be painting
a few more trees later, but we don't need
any sketch for that. We are almost done.
I'm going to add a few more branches
to these trees. Alright, we are done
with the sketch. I'll be attaching
the final pick of the sketch in the
resources tab below. You can download the
sketch over there as well and sketch
at your own pace. And yeah, we are done. I'm very excited
to start painting. So I'm gonna see you
guys in the next video. H.
6. Painting The Background (Part 1): Let us begin.
First, we will take the lightest shade of Pines
gray and the indigo mix. I'm gonna watch that
a shade right now. Take Pine's gray,
little bit of indigo, and very little amount
of white color. Do not use a lot of white. To make the color lighter, you can use more water as well. I'm just using the
white so that it appears in a right shade
for you guys on the camera. But if you want to paint the lightest shade of any
color, just use more water. But it's okay. You can
use a white as well. That's what we're
going to do today. And now that we have
got the perfect shade, I'm going to be
wetting the paper with clean water
using my flat brush. Only wet till that border that we have sketched between
foreground and background. Now we are only painting the background and
not foreground. Okay. Now let's take the
color that we have swatched, and let's begin painting
the background. To paint the background, I'm using my Rafael
number zero, round brush, and I'm taking generous
amount of paint on my brush, and I'm going to paint this color all over
this wet surface. Remember, this is a background and backgrounds are
supposed to be blurry. So we're not focusing on
the shapes right now. We're just focused on spreading this paint
across the paper. This step looks very easy, and it is easy, only when
you have the right paper. So make sure you have 100%
cotton, 300 GSM paper, and not any less
than that because the paint won't spread and paper will dry up very quickly, and you can't paint
these kind of wet on wet backgrounds
with normal paper. When you paint on a wet surface, there is a chance that there will be a
formation of puddles. You can see right here, and
you have to remove it with a brush or with a paper
towel before it dries, or else it'll give
you the blooms. So yeah. After that, I'm going to be taking
a bit darker shade, and I'm going to start painting the trees
in the background. Again, we are just
going to paint the blurry shapes and not
the detailed trees here. I'm going to take
a smaller brush. This is silver black
velvet number six, brush, and I'm going to
just shape the trees. My paper is still wet, and you have to do this step
only when the paper is wet. So if your paper is drying up, stop the process, let it dry, and then re wet and then
continue the process. I know it's a bit complex, but that's how watercolor is. For background, we don't have to
be very detailed. So make sure you
get the shapes of the trees right and
you're good to go. Let us paint a few shadows
in the foreground, but with very light shade. Thank you. I think this looks good for me, so I'm going to
stop the process. And I'm going to see you
guys in the next video where we're gonna brush up the
background a little bit. H
7. Enhancing The Background (Part 2): All right, the first
layer has dried up, and this is the most
important step. Make sure the previous
layer has completely dried before we start the
second layer of the background. Now I'm going to be taking my flat brush and re
wet the paper again. Now, you have to be
very careful with this step because if
your paper is still wet, there is a chance that
the previous layer will come off when
you wet the paper. So like I've said before, make sure your paper
is perfectly dried up before you rewet the paper. A lot of puddles here, especially the one on my left. So I'm going to just take a tissue and remove
all the extra water. You don't have these water
puddles on your paper, you can just skip this step. Now, I'm going to take a
bit of darker pines grey. That means more pines gray
color and less white color. I'm going to just paint
over the previous layer. Remember, this is only enhancing the background
that was already present. So I'm just going to add one more layer of this color
because it was too light. And it was also looking
a bit washed out. So These pine trees are
in the background, so you don't have to worry about painting them in right
shapes and sizes. Just a few blurry figures are enough like I'm
doing right here. Add a little bit of color in the middle as well because
it is looking too light. I'm going to take
the smaller brush, wear black velvet number six, and I'm going to just define a few shapes of
these pine trees. Very lightly, we're not
going into detail here. I think I'm done, and I'm
gonna let this one dry completely before we move on to paint the trees on
the foreground. You guys in the next video.
8. Creating A Captivating Foreground : The background is
completely dried here. Now I'm all ready to
paint the foreground. So for foreground,
we're going to be painting darker shaded trees. So for this, I'm going
to be taking pines grey. I'm not mixing it
with any other color, just plain pines grey. As you can see,
this is the color. And I'm using silver
black velvet number six, the smaller brush. Let's begin painting the
trees on the foreground. I'm not comfortable painting
the trees this way, so I'm going to
just move my paper around so that I can
get the right angle. I'm going to also
keep my palette here this side so that you can see the color
that I'm picking up. I'm using only Pines gray. Now, this is great. So as you can see, I have
started painting the trees, and the contrast is beautiful. Our landscape has started
taking up the shape now. As you guys know that I have
recently gotten married, and we went on our
honeymoon trip. There I have seen lots
and lots of mist. And one of the sceneries that I have loved instantly was
this particular pig. The painting that
we are painting today is an inspiration
from that pi. I'll try to include
that here somewhere. I'm so so glad that I'm painting the exact same thing that
I've seen on that day. It was so beautiful. I just wanted to share
with you guys that, that memory, because
I think it was the first time that
I've seen so much of mist in real life. And I was so excited
for the whole trip. Alright, we are painting
a third tree already. I'm not painting too many of these trees
here on the foreground. I'm gonna paint in the
next video that is sn. So yeah, currently I'm okay
with three of these trees. And as you can see, they have
different shapes and sizes, and that's very important to keep the randomness
in the nature. Now I'm going to paint a few
branches to these trees. Now on the ground, there was a tree that
we have sketched. I hope you guys remember. So I'm going to just
paint over the sketch. I'm taking a very light
shade this particular shade, and I'm going to just paint the shadows of this tree that
has fallen on the ground. We are done. In the next video, I'm going to show you
how to paint the snow, which is very important step for this particular
landscape because that is what our emphasis is on. So yeah, and we're going to be painting a
few more trees as well. So I'm going to see you
guys in the next video.
9. The Magic Of Snow - Painting Frosty Details: The trees have all dried up, so let's begin
painting the snow. To paint the snow,
I'm going to be using Chinese white watercolor, not gouache, just
plain watercolur. And also this small brush, it's silver black
velvet, number six. So I'm going to actually start sketching
a few trees on my left. Like I've said in
my previous video, I'm not going to be sketching a complete detailed tree sketch, just a placement of where
the tree should be. It's a light, simple sketch. It's just for me to have an idea where the tree on
my left should be, so I can paint the
snow on my right. So this is it. We
are just placing the white watercolor on the
branches of these trees. So you can already
see that there is a snow that is it looks like there is
a snow on the trees. Very simple right.
This technique is what I would always go for while painting my
winter landscapes. And I continue to paint this white watercolor wherever
I feel, it's necessary. And there is a thing that you have to be careful
about while painting this type of this technique is that we tend to overdo the placement of
the snow a lot of times. Trust me, it happened
a lot of times for me, so just be careful and plan beforehand where
you place the snow. I'm gonna wash my brush and
take Pine's gray color. And I'm going to start
painting the trees on my left. For this, I do not
need any sketch. I just needed a placement of
where the tree should be, and I have done that
before already. So yeah, you just
have to wing it. I'm deliberately painting
these trees in a warpy manner. I mean, these are
not very straight. And that's the whole point. They have to look in different shapes and sizes because in nature,
this is what you see. You don't see any uniform in
trees or anything, actually. So I'm just following
what I see in the nature. I'm going to paint
one more tree over here, and even here, we have to be very careful
as to not overdo it because these type of freehand
sketches are very addictive, and we tend to get
lost in the process. So to avoid it, please try to take breaks in between
these sketches and paintings. So because once you have
done it, you can't go back. The whole painting would look odd if any one
element is overdone. I think these are enough
trees on my left. Again, I'm almost
overdoing this, and I hope to God that I'm not. So I'm going to just stop
and start painting the snow. Here, the pines gray that I have painted before has
already dried up, so I'm going ahead
with the white. But if your trees are still wet, you might have to wait a little bit before proceeding
with the white colour. I think I have overdone
the snow on my left, so I'm just going to
remove a bit of snow. Easy technique is to paint
over it with pines gray. Simple, right? That is it. And now I'm going to take a
bit of white and I'm going to paint the snow on the tree
that is on the ground. We are almost done. So I'm going to take my rigor
brush and I'm going to put a few dots of white paint here and there to
give that snowfall effect. So snow here and there
on these branches. I think we are done
with the snow. This is one of my
favorite techniques to paint the snow in a simple and very easy way and very beginner friendly as
well for winter landscapes. I hope you enjoyed
this technique. I'm going to see you guys in
the next video where we go through some final touches before we finish
up the landscape. So I'm going to
see you there. So
10. Final Touches & Reflections !: We're done with our
winter landscape today. A few things before
we wrap it up. So make sure your
paper is dried up from previous layers of paint, and then you can remove the tape that is
covering at the edges. And there will be some paint
at the edges of the paper, even though we put
the masking tape. Sometimes this happens. So what you can do
is you can paint a bit of white watercolor
wherever the paint is. That's what I'm
going to do here. I'm using watercolor block. I'm going to have to remove
the paper using a cutter. If you're using a block, you have to remove your paper just like I'm doing right now. These cutters are really
sharp. Be careful with that. We're done with today's winter watercolor
painting session. I hope you guys enjoyed painting
this landscape with me. Before we go, I want to
discuss a few things with you. First thing is what
we have learned in today's class project. First thing is
minimalistic palette. We have painted this
whole winter landscape using only few colors, only three to be exact. So using less colors gives you atmospheric aesthetics to your painting as well. So if you are painting
similar watercolor, sorry, winter landscapes, you can go for minimalistic palette. It gives really wonderful
look to your paintings. Second thing is, we have learned how to paint
the snow as well. It's one of the most easiest
methods you can go for, and that is all. So I'm going to be waiting
to see your class projects. So if you paint them, please upload in the
project section below. And if you have any doubts, please make sure to start
a discussion as well. And yeah, I hope you
guys enjoyed the class. So I'm going to see you
guys in my next class. So thank you so much
for joining me today.
 Sukrutha Jagirdhar, Watercolor Artist I Creative Entrepreneur