Transcripts
1. Introduction: Potter drawing has been one of the most traditional yet
most challenging subjects for visual artists. After creating a class
for absolute beginners, it was time to
take things a step further and dive deeper
into this theme. Hi, my name is Matos Macedo, and I specialize in
realistic drawing. Sometime ago, I launched a
class for beginners called skin tones in colored
pencil Introduction to colored portrait drawing. As the name suggests, that class focused on
teaching how to choose the right colors to represent the many different skin tones
we find in the real world. Now that we know how to build up base layers with
colored tensils, the goal in this new
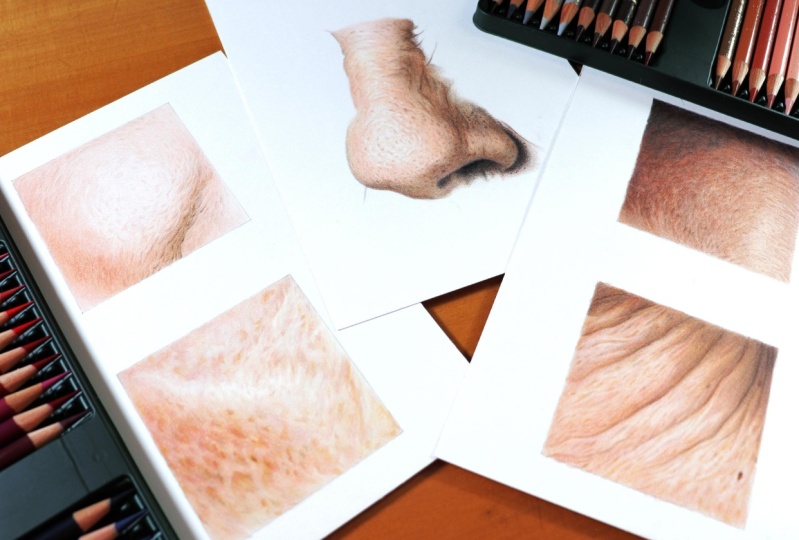
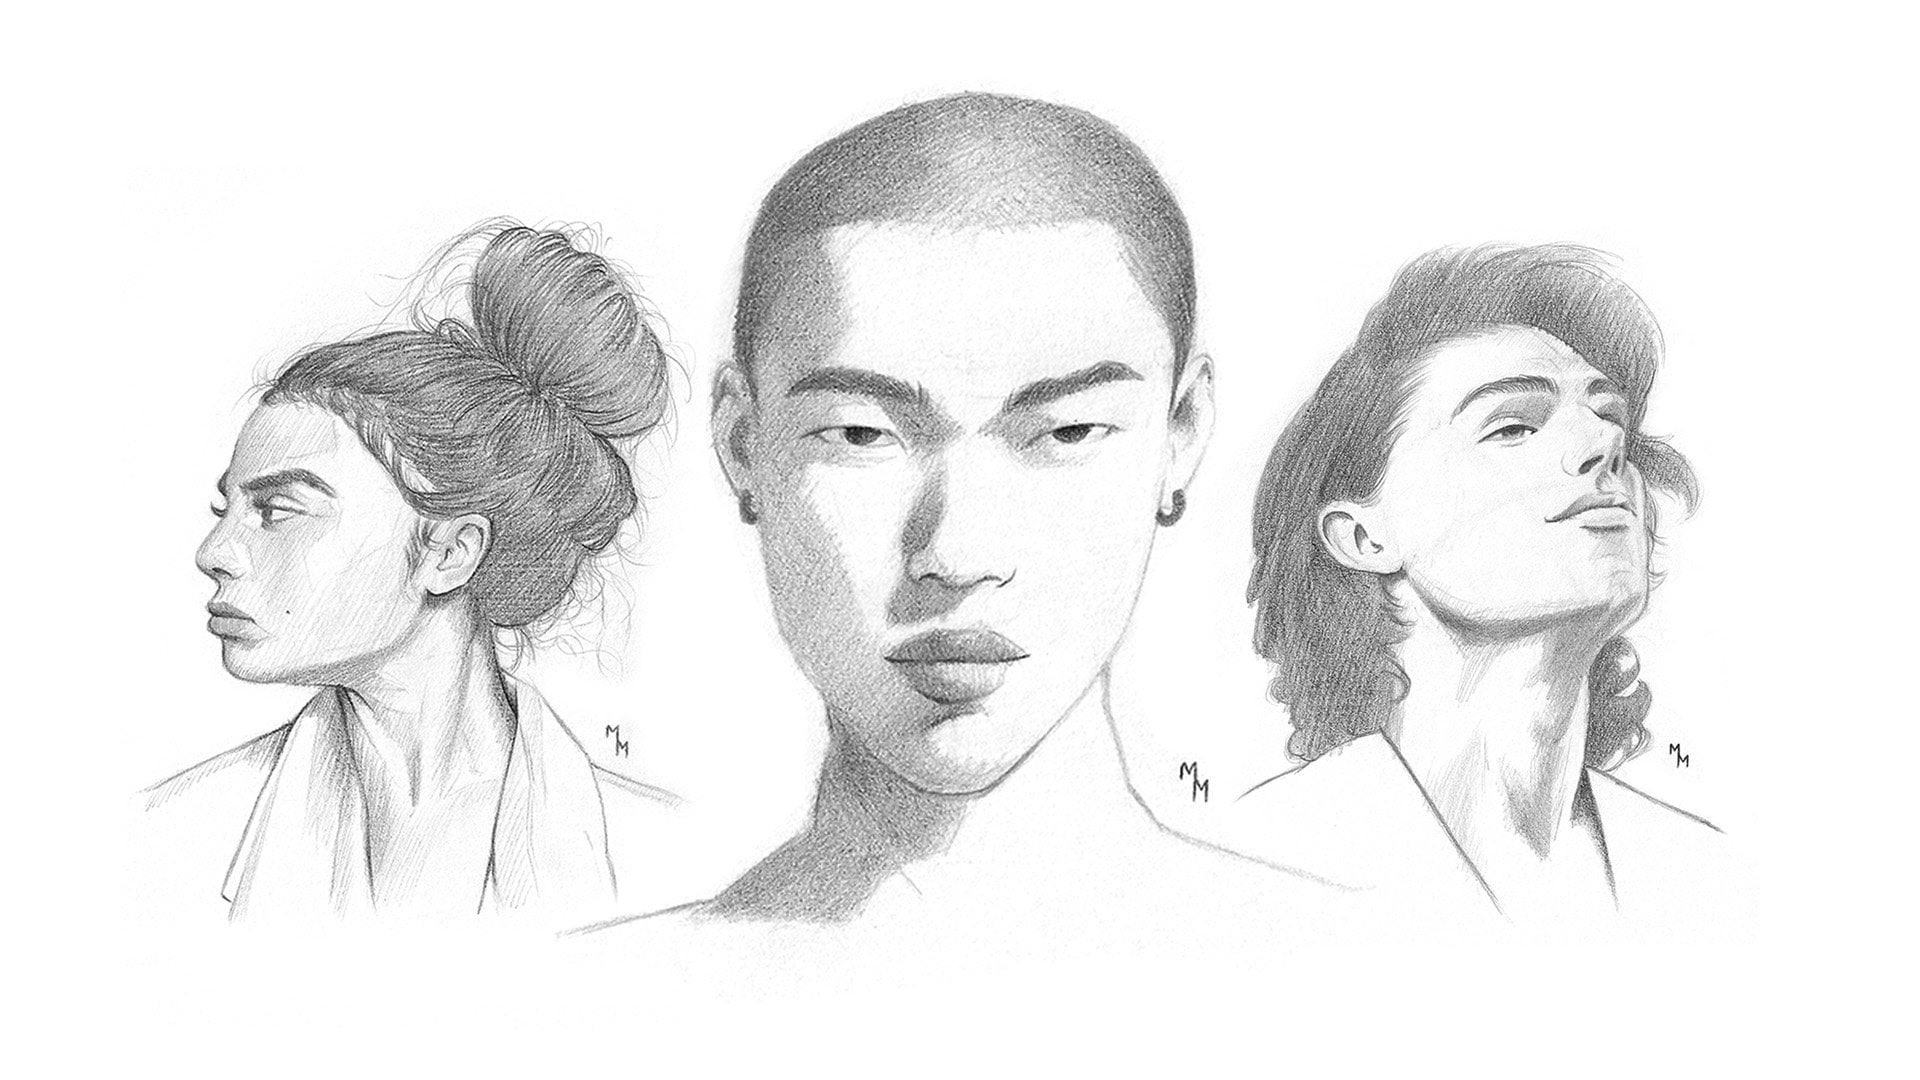
class is different. Here we'll focus on texture. We'll begin by working with
four different skin types. One lighter, one darker,
one with freckles, and another with wrinkles, each with its own
unique characteristics. To wrap things up, we'll
take on a final project that brings everything together in a more complex exercise. In this last step, we'll
apply what we've learned to draw both the texture and volume of a part
of a human face. If you've already started
exploring the world of button drawing and
want to sharpen your skills, this
class is for you. Don't miss the
opportunity to take your work to the next
level and let's draw.
2. Class overview: Welcome to this class on
How to draw skin texture. In this video, I want
to quickly walk you through what we'll be covering
in the upcoming lessons. First, I'll show you
all the materials I use throughout the class, and you'll have access to a detailed supply list with every color
listed one by one. Then we'll go through
five exercises. The first one is
light smooth skin. The second, a dark skin tone
with a rougher texture. The third features
skin with freckles, the fourth an older skin
type with visible wrinkles. Finally, in the fifth exercise, we'll draw a nose, working on both texture and
volume at the same time. My hope is that by the
end of this class, you won't be just
drawing better, but also that you
enjoy the process and have fun with
these exercises. Now let's talk about
the materials.
3. Materials: Let's go over the materials you'll be using in this class. All the items I
mentioned are listed in a downloadable PDF file so you can check
everything on your device. Think of this as a
list of suggestions. If you have the exact same
materials, that's great. But feel free to use whatever
you already have on hand. Let's start with the most
important one colored pencils. I'm using three different
brands throughout the class, Fabe castle polychroms,
Prismacolor Premiere, and Kahan Dash luminance. All of them are
excellent choices, probably the best ones
you'll find on the market. They are on the pricier side, but the good news is that you
can buy them individually, so there's no need to purchase a whole set with
colors you won't use. Prisma color premiere is the softest and creamiest
of the three, which makes it great for
filling in large areas quickly. On the downside, it wears down faster and has a
more fragile tip, so it's not ideal
for fine details. On the other hand
of the spectrum, Fabe castle polychroms is
the hardest of the three. It's perfect for
small detailed work because of how precise it is. But when it comes to
covering large areas, it will take a bit more
time and patience. Kahan dash Luminus is
the best of both worlds. It works really well for both detailed work
and larger areas. So if you're only
getting one brand, I'd say this is the most versatile and the
best overall choice. The only drawback is the price. It's the most expensive
one on the list. The specific colors used in each exercise are listed in
the PDF I mentioned earlier. The paper you use is just as important as the pencils,
maybe even more. For realistic drawing, it's essential to pick
acid free paper with a smooth surface and a
weight of at least 150 GSM. Different brands
may vary in tone. Some are more yellowish,
others more bluish. If you want a safe
recommendation, I suggest Strafmoe
300 bristle smooth. It checks all the boxes, and it's my personal favorite. I'll use graphite pencil to sketch the last
exercise of the class. I recommend using a
harder pencil here, something like an H, an HB or at most a B. For sketching, I needed
eraser is also super handy. It's soft and moldable, and it lets you lighting your lines without
fully erasing them, which is really
helpful at this stage. To add some light details later on I using an eraser pencil, it's an inexpensive tool, but incredibly useful when
working with colored pencils, totally worth having one. This one's a bit less common, but I also use an
electric eraser. It's optional, but
I do recommend it. It's great for creating sharp, bright highlights in
colored pencil drawings. And finally, you see me using a brush to gently clean the
drawing from time to time. It's better than blowing on it because saliva can
smoother work, definitely something to avoid. A table brush or even a makeup brush like
this one works just fine. And that's it. These are the materials you'll be
using in this class. Now, let's jump into our
first skin texture exercise.
4. Fair skin: Hey. Hey, guys. Let's get started with our very first exercise
in this class, which is all about creating
a light skin texture. If you've taken any of
my other classes before, you probably know that I usually start with
the darker tones. So I'm starting here with the 178 nougat pencil
from polychroms. And, yep, I go straight into
building the skin texture. In a way, I'm defining both the volume and the
texture at the same time. Why do I start with
the darker colors? Well, it's because they help guide the rest of the drawing. They work as a reference. Plus, the lighter colors can be used later to blend everything
from this first layer. At first, I start building the texture with small
controlled strokes, trying to mimic what I see
in the reference image. Now I'm going for more general shading
using brother strokes. This is just the first
layer of shading. Now I'm switching
to color number 280 from polychroms
which is a darker brown. This brown will help add
more depth to the drawing. Here, I'm also using some
luminant pencils like 836, which is an ochre tone. One thing to watch out for is not oversaturated
the drawing. When it comes to skin texture, pinks can easily make it
look way too vibrant. That's why you see me using more ochre and brown tones here. Now I'm picking an even darker
color, 037 from luminance. The darker tones help bring
depth and as a result, volume to the drawing. I'm using this color both for general shading and for
adding some texture marks. The third luminant
pencil I'm using is 876. It's a warmer tone,
a bit less dull. This is the kind of
color that makes a drawing look more leafy, but something you want
to use in moderation. So I'm basically
switching between these three luminant scholars to work on the volume in
this part of the face. Here I'm bringing in a Prisma colour pencil
number 939 pitch. It's a slighter pinker
tone that's going to make the drawing look a bit more
saturated and vibrant. Since it's a lighter color, I can push it a bit
further in the drawing. I use this one a lot
for lighter skin tones, and I'm really
going to rely on it to help with the
volumetric work here. Mm. Okay. Now I'm switching to another
prisma color 927 light Bach and moving further into the
field area of the drawing, doing a more general shading. This is still just the
first layer of color. So what I'm really doing here is blocking in the colors
in a general way. Later, I'll build it up
with multiple layers to blend everything together
and get a more solid finish. Now, I'm starting the
second layer of color. Going back to the Luminance 037, I'll keep working on the
volume of the drawing. This is cinnamon, number 189 from polychroms. It's pretty similar to
Prisma colors pitch, but with a slighty
pinker and darker tone. Right now, I'm using it
for general shading, but honestly, polychromo pencils are better for adding details. You'll notice that later on. For the texture work,
I mainly use colors 178 and 179 from polychromos. Texture work is like this. It does require a
bit more patience. I never tried to
make an exact copy of what I see in the
reference image, but I'm always using
it as a guide. From this point on, I'll keep using the same colors
from the previous layers, but now focusing on
consolidating the fill. So I'll be switching between ocher tones and
some pinker tones. How much of each use
really depends on your own sensitivity
and observation skills. When it comes to getting a
softer and smoother feel, prisma colored pencils are
the best in my opinion. They're super smooth thanks to the walk in
their composition. In my opinion, they're not
the best for tiny details, but I still use them to add little spots and blemishes
across the skin. Here I am again with that lighter peach tone,
927 from Prismacolor. I usually use the lighter tones to help blend the
colors together, and that's exactly what
this one is going to do. For now, though, I'm
still using it for general shading moving
around the lighter areas. Now I'm back with 178
from polychromus, which is a pretty neutral tone. It helps darken the
drawing without affecting the
saturation too much. Up in this upper section, I'm also adding a few more
little spots with this color. Now I'm using another
polychroms color number 132, beige red, which is very similar to Brisbane
Coors Light pitch. So if you only have
one of these two, don't worry, one
would be enough. In this bright area, I'm going in with the pencil eraser to
add a few highlights. Of course, it only works if you've already filled that
area with some color. The effect isn't
super noticeable here in the video since it's
already a pretty light area, but still it's helpful. Now I'll focus more on this bottom right section where I'll be using
the same colors. Oh Here I'm back with 280 from polychroms just to push the
texture a bit further. I prefer working like this slowly because it gives me
more control over the process. It's almost like
sculpting the paper. Here I'm switching between a few polychromo colors
178, 179, and 189. The first two are for darkening
in a more neutral way, and the third one
is for adding a bit more of a pinkish
tone to the skin. Now I'm back with
Prisma color 927. Since the area is
pretty well filled by now with shadows and
textures all placed, I'm using this color
to blend the layers underneath and get a smoother,
more polished finish. For this, you'll need to
apply a bit more pressure. In other words, press a little
harder with the pencil. But if you're using
prisma color, be careful. These pencils have
pretty fragile tips and tend to break easily. So apply pressure
but not too much. Now I'm using the white color from polychroms
number one oh one. You only see me using these in the final layers for the
same reason as before. It helps blend the
colors underneath. And here I'm finishing up with some final pinkish touches using 132 and 189 from polychroms. I hope you enjoyed this lesson. Next up, we are going to
work on a dark skin tone. We'll be drawing black
skin. See you there.
5. Dark skin: I Alright, guys, now let's begin the
second exercise in this class, which is all about rendering
a dark skin texture. Just a quick reminder. The list of colors I'm using is available in the attached
materials for this class. Here I am already starting
with the darkest area as usual using luminance
color four oh seven. Notice how right
from the beginning I try to mimic the texture
using the motion of my hand. The way you move your hand
can actually help you recreate the texture you
see in the reference image. As you lay down this first
layer with the sepia to, try to create a gradient going from dark to
light, top to bottom. D Now I'm adding in luminous black oh oh
nine to deepen the shadows. There is a bit of
hair in this area, too, which is why the
black is important here. I'm repeating the same motion I used with the previous color. Um Uh Now I'm adding a warmer
brown into the mix. This is Luminus 69. To that, I'm adding
prisma color 1081, which is also warm,
slightly pinkish brown. Little by little, the shading becomes more solid,
more filled in. Next, I'm coming in
with Prisma color 945. This one is even warmer and lighter than
the previous one. I'm gradually working my way down into the lower
part of this area, repeating the same circular
motions as before. Now in the lower section, we have a relatively dark area. So I'm continuing with the 945 adding
texture here as well. Back again with
Prisma color 1081, adding a second layer of
shading in this darker area. Here I'm returning to the sepia and Black
tones from luminus. That's four oh seven
and oh oh nine. To get a more solid fill, I need to apply a bit more
pressure with a pencil. Texturing work really does
take a bit more patience, but in my opinion, the
effort is well worth it. It really levels up the drawing and makes
it more engaging. Here I'm using a
watercolor pencil from Kahan dash, number 866. It's basically the same
color as Luminus 866, but softer in texture. Both are excellent choices. Since it's a lighter tone, I push it further into the lower right area
of this exercise. Now I'm adding Luminus 876, which leans toward an char tone. I'm using these to move a bit closer toward the
highlighting areas. Here I'm working with
polychroms 283 a warmer brown. It helps make the
drawing more vivid, adding some saturation
to the tones. Now with another
brown, this time, it's polychroms 280,
a darker brown. The pencil adds more
depth to the drawing. And again, using polychroms 283 to build up more
richness in the color. Now I'm bringing in Luminous 866 again to help blend the tones I've
already established. The pencil adds a more
subtle pinkish Dutch. I'm adding colors according to what I see in the reference. It's really important to compare your drawing to the reference
photo from time to time. That's how you make better
decisions as you go. Now I'm using Luminous 836. Since the goal now is
to blend the tones, I will apply a bit more pressure to get that shading effect. You can go ahead and cover the highlighted areas
at this point too. At the end, I'll use
lighter tones here. It's not a white area,
just a light one. That's why it's important
to start building in the base skin tones here
in the earlier layers. After adding another layer of burnt sienna, that's
polychroms 283. I will continue
with Prisma color 927 to help blend the colors in this highlighted area. And that's it. This exercise is
basically finished. Now I'm just adding some final touches to adjust the drawing to
match the reference, switching between different
colors as needed. I hope you enjoyed this lesson. I'll see you in the next one.
6. Freckles: Let's get started with
another exercise. This time, it's all
about freckle texture. Here, we need to pay attention
to two things separately. One is volume, and the other is the freckle texture itself. These two things don't necessarily follow
the same pattern. I'm going to take
a bit of time at the start to locate the
freckles in the drawing. For that, I'm using
polychromPencil number 187. I'm continuing the process
using polychromos 180. This is a dark color which helps give the
freckles more depth. Now I'm switching to another
polychroms pencil number 131 to add a
slightly pinker tone to some of the freckles. I'm not going to
change all of them, the ones that appear pinker
in the reference image. Now using polychromos 189, this is also a pink tone, but less saturated than the
last one and a bit lighter. Here I switched to a duller more grayish
brown, polychroms 178. This is another
target adjustment. Again, I'm not changing
the color of every fracle. Now that the freckles are
more or less established, I'm going to start working
on the base skin tone, focusing more on volume. I started here with prisma
color 1017 clay rose, a slightly darker pink. Now I'm using a
lighter pink from prisma color 1019 rosy beige. Next is another pink
tone, prisma color 1092. With this pencil, I'm focusing
on adjusting the freckles, change their hues a bit. I use this color a
lot in this exercise, even in the lighter areas. Oh. Now, with a lighter pink, prisma color 939, I'm continuing
with general shading. This is another color I really like using for
lighter skin tones. Now I'm using Luminus 132, applying more pressure to the pencil for stronger shading. At this stage, the
freckles might start to look a bit faded,
but that's normal. Later we'll come back and reinforce the ones that need it. No. Now switching to a
slightly different color, Lumnus 732, which has a
subtle greenish tone. In fact, greenish tones are great for reducing
pink saturation. So if a drawing looks over pink and you want
to tone it down, try using greenish colors. Now I'm going back
to polychroms 189 to bring back some of the fracos that faded under
the shading layers. Little by little, the drawing is starting to look
more interesting. This is one of the
lighter stones. I'll use in this exercise, Luminus eight oh one. Since it's a very light color, I'm using here in
the final layers, blending the colors
underneath it. The same goes for white
prisma color 938. I'm applying a little bit
at this stage, but gently, especially if you're using
prisma color pencils, which tends to have
a more fragile tip. Now, toward the end
of the drawing, I'm reinforcing some
of the freckles that got too light and that I
want to stand out more. Here I'm using prisma
color 1092 once again. Some of the fracos still
need to be darkened a bit. So I'm going back
to polychromos 187. The first color I used in the drawing. It's a warmer tone. Oh. Now I'm using another ochre tone from polychroms This time a
darker one number 180. This color will help certain
freckles stand out more. Here I'm adding a little
touch of polychroms 132, a slight lighter pink. And to finish, I decided to add this warmer brown burnt
sienna polychromos 283. And that's the color I'm using
to wrap up this exercise. I hope it was
helpful once again, and I'll see you in
the next lesson.
7. Wrinkles: Hey, everyone. Now we've
reached the wrinkle exercise. This one takes a bit more
effort than the previous ones, but trust me, it's
definitely worth doing. I started out using Fabecastel polychrom
pencils because I want to begin by mapping out the wrinkles in the drawing. Since polychrom
pencils are firmer, I find they're the best
option for this initial step. The first color I used
here is number 177. In this drawing, I'll be
using both 177 and 176. They're very similar browns. If you only have one of them, don't worry, just go
with what you have. Pay attention to how the
wrinkle lines aren't drawn with the same intensity
throughout the piece. I reduce the pressure
on the pencil as I move toward
the lower areas. The deeper folds of the wrinkles are most visible in
the top portion, which is also the darkest area. Now I'm using burnt
sienna polychroms 283, a warmer brown tone. Here I'm using the color 175, a sepia tone that's
very close to black. This one will mostly be used in the upper portion where
the shadows are deeper. Once the wrinkles
are mapped out, it's time to begin
general shading. For that, I'm using one of
the polychromos browns. In this case, 178 nougat. Now, I've switched
to Prismacolor 1092, a rosy tone commonly used
in light skin tones. At this stage, I've already
started working on texture. Notice how irregular
the marks are. I'm trying to replicate what I see in the reference image. Uh, This is polychromos 176, similar to 177, but
slightly warmer. I'll use it to reinforce the wrinkles in
the darker areas. The wrinkle lines blend
in with the shading. What we see are lines are really just
stronger shadow points. Now, I'm using prisma color 939, a lighter shade than 1092. This is one of the most frequently used colors
in this exercise. And now an even lighter tone, prisma color light peach 927. This is the base color
for this skin tone. I'm still applying
it gently without too much pressure since I'll
be adding more layers later. Now I'm using polychromos
187 burnt ochre. As the name suggests,
it's warmer and slightly more orange
than the previous tones. It shifts the overall
skin tone just a bit. Back with Brisma color 1092, a darker pink colld nectar. I'll use it to reinforce the
wrinkles I've already drawn, giving them a
slightly rosier tone. Here again with polychroms 283. And once again, we've
burnt ochre 187. M. This skin also has some small blemishes, which I'll add using
polychroms 177, a dark brown. Polychroms 178 is a lighter, more neutral brown,
less saturated. I'll use it more broadly across the drawing because it doesn't oversaturate
the skin tone. Now, if the drawing
starts looking too gray, I go back in with pink tones, especially prisma color 1092 and 927 to adjust the overall color. By this point, the
fill is more solid, but I still feel it needs a
bit more contrast and volume. Now I'm introducing a
new color Luminus 132, a soft light yellow, more on the neutral side. As I said earlier, I felt the drawing
lacked contrast. So now I'm reinforcing
the shadows. I'm starting with Poly
Cromos 177 again. Mm. This contrast adjustment applies both to the darkest
and lightest areas. Here I'm using
Lumnus eight or one, the lightest tone, I'm using
this piece aside from white. At this point, the drawing
is quite advanced. It's a good time to take a
break and when you come back, carefully compare
your drawing to the reference image
that will give you the direction on
where to go next. And keep in mind the adjustments you need to make might
be different from mine. No. Now I'm adding a color
I haven't used in this exercise yet
polychroms 189. Back again with polychroms 187, a very useful walker tone. It helps warm up the
overall skin tone and gives it a rosier look. And finally, reinforcing the
shadows with polychroms 178. I hope you enjoyed this exercise
and that it was helpful. Now, let's try to
apply everything we've covered in these lessons
to a more real situation. Seeing in the final
exercise of the class.
8. Nose: Sketching: Alright, we've now reached the final exercise
of this class, drawing a highly textured nose. The goal here is to apply everything we've learned
in the previous lessons. You'll see there's
nothing radically new. We're just putting it
all into practice. Start with a free hand sketch. Begin by marking the outermost
points of the drawing, the highest, the lowest, the leftmost, and
rightmost points. That helps you figure
out in advance how much space the drawing
will take on the paper. From there, it's a matter of sketching the node
from the outside in, starting with the basic shape and gradually adding
details to each part. To make the sketch more
visible on camera, I used a slightly darker pencil. But recommend use a
lighter graphic pencil so it doesn't show through
in the final drawing. This sketch is just a
demonstration on a separate sheet. The version of actually color will be done with
a lighter pencil. Now, I'm using a needed eraser to gently fade out some
of the sketch lines, especially those early
structural guides. If you have one
of these erasers, they're great for
lightning pencil marks, especially if your
sketch is too dark.
9. Nose: Lower Area: With this cache done,
let's start coloring. I'm beginning with
luminous black oh oh nine to establish the
darkest parts right away. That will give me a ton of reference for all the
other colors that follow. I'm combining that black
with luminous four oh seven, a deep sepia tone to
expand the shadowed area. Here, I briefly used Fabre
castle polychroms black 199, simply because that
line of pencils is better for small details,
as I said before. But you don't need both
backs from different brands. Just use whichever one you have. After laying down a base
with black and sepia, I'm working in prisma color 1081 in the corner of the nose. It's a reddish brown tone. Now I'm using prisma color 1080, a neutral brown, almost
grayish and relativity light. It's a good base
tone for light skin. At first, I use it to
block in some shadows. H Back with polychromos 199
carefully, though. It's a very dark color, and it's not a
natural shadow tone. That's why I always blend black with other colors to
soften its effect. Again, using prisma color 1081, that reddish brown, it helps make the drawing more
vivid and saturated. Now using Prismacolor page 939, a mid range pink tone. Notice how I'm working
from dark to light, slowly building up the tones. Now introducing
prisma color 946, a darker brown tone. Here I'm going back in with
Black and sepia to refine the shadows inside the nostril and intensify the
surrounding areas. From this point on, I'll
be using the same set of colors to build up the
lower portion of the nose. This is where your
judgment comes in. Use your sensitivity
to balance each color. When it out, compare your drawing with
the reference photo. Oh Now here's a new color in the mix, polychromos 178, a fairly neutral brown used
to cover most of the drawing. Now I'm using prisma color 927. This time pressing a little harder over the darker layers. Back again with
Prisma color 1080, definitely one of the most
used colors in this exercise. Introducing another new tone, prisma color 945 Sienna Brown.
10. Nose: Upper Area and Texture: Now I'm layering more
of prismacolor 939, adding new base tones. I'm also using this
color to begin shading the upper
part of the nose. Be sure to preserve the
center of the nose as a more illuminated area that's essential for giving the drawing a sense of death and volume. Adding more layers
of prismacolor 927 that soft light pink, and then coming
back in with 1080. Now, I'm starting to define
the texture more clearly. For that, I'm using prisma
color 946, the dark brown. I'm drawing both parts
and general shading. This part has to be done
patiently and attentively. That's the nature of
working with texture. There's really no
way to rush it. Very similar to the previous
color is polychroms 280. If you only have one of
them, that's totally fine. As I've mentioned before, I prefer polychroms for small details because
of the firmer lead. I will also use this color
to add more shadows. Now, with polychroms 178, I'm expanding the shadows slightly toward the
center of the nose. Since it's a lighter brown, it creates a soft effect, which is exactly
what I want here, a smooth transition
from shadow to light. Using polychroms 189 now
to mark additional bores, even in the highlighted areas. When drawing these, closer
them closer together in the darker areas and spread them out more in
the lighter ones. This helps reinforce
the sense of volume. Now, with polychroms
132 Beige red. Adding yet another
color prisma color 997. It's a more yellow toned
color that I think works well as part of the
base for the skin tone. I'm applying it with
a bit more pressure to blend with the
layers beneath it. Now reinforcing some boars
with Pony chromos 178 and 280. And continuing to fine
tune the overall tone, this time with Brice
McCullar 939 and 1080. The colors used in the upper portion are the
same ones we've been using, including darker
shades like black 199 and brown 280
from polychroms. As I move into the
central area of the nose, I use polychroms 178, that lighter more neutral brown. So to summarize,
I build contrast with darker tones in the
shadowed areas and use lighter, more neutral colors in
the illuminated areas. I start by focusing on
values, lights and shadows. Then I just the
overall skin tone using pinker, more
skinle shades. These colors blend
into the layers beneath helping to
create a natural tone. Here, I used an electric eraser. It's not an essential tool, but it's incredibly useful with colored pencils
because it can lift pigment from the paper and create bright
highlights quite easily. I use it here to
bring out some pores. Then I followed up with a pencil eraser to
soften the edges of those highlights so they don't look too harsh
or artificial. A To wrap up, I'm using polychromos 189 once again to refine
some of the bores, and then prisma color white
938 to just a few highlights. And that brings us to the end of the final exercise
of this class. I hope you not only
learned a lot, but also had fun working
through these lessons. Thank you so much for watching and I hope to see you next time.
11. Conclusion: And that's it. Like I said, I hope you not only
learned a lot, but also had fun exercises
throughout this class. Don't forget to share your drawings in the
project section. I'd love to see what you've created and give
you some feedback. And one more favor. If you made it all the way
to the end of this class, please consider
leaving a review. That really helps
me stay motivated and continue producing high
quality classes for you. Thank you so much
for watching for sharing a work and
for leaving a review. I truly appreciate it. Keep drawing and asking
you the next class. Bye. Oh