Transcripts
1. Class Intro: Hey, there artist. I'm
Step Eiser Coleman, and this is Sketchbook Sets, a beginners introduction
to Sketchbook practice. Now, I'm a bird artist, but over the years, I've illustrated over
55 children's books. I've also illustrated for products like greeting
cards, t towels, art prints, puzzles, all
sorts of different things. I've made a ton of art, but some of my most
satisfying art has actually been made
in my sketchbook. Not necessarily my
prettiest start. Um, but my most creatively
satisfying art. I started my sketchbook
practice a few years ago after spending about ten years illustrating children's
books in photoshop. I was kind of
feeling a little bit frustrated with my nearly
all digital process. Everything was filling
a little uptight, and I knew that I
wanted to get back to exploring with
materials on paper, and I wanted to change things up with my art
practice a little bit. So I started my
first sketchbook, and it did not go well. I had a really hard
time getting started. I had a hard time letting
go of expectations of what a sketchbook was going to
look like or should be. And once I got to the point of being able to let go
of those expectations, that's when I really
started having fun in my sketch books. That's when I started experimenting with
different materials in my sketchbooks and different
ways of drawing things. And that's really
where I learned to be a more competent artist. And really just a happier artist because I've noticed that time spent in my sketchbook helps me feel more grounded in
my creative practice. And my sketchbook
practice is really, like, the center of my entire art
practice at this point. If I miss a day
in my sketchbook, I feel like just kind of
off kilter for the rest of that day until I finally
find a few minutes to get in my sketchbook
and make some So, I built this course to be a gentle introduction
to sketchbook practice. I know from my own
experience that I needed a really soft approach to starting my
sketchbook practice. I needed to find
ways to take it easy on myself and to give myself, you know, the ability to explore things without
judging myself. So this course is
really low pressure. You're going to be given
some light parameters to guide you through starting your sketchbook
practice in the form of seven sketchbook
exercises. This one. This is the one
that we're going to be doing on Day seven. They're going to be super
simple sketchbook exercises that are just geared at
getting you started, getting you comfortable,
getting you to understand the materials that you want to use and how you
want to use them. You're also going to learn a really easy writing
exercise that you can use to connect with your sketchbook
on a deeper level and really start to notice things that
feel good about your process. In addition to that,
you are going to get some tours of my sketch books, and I'm going to
talk a whole lot about my philosophy behind sketchbook practice and
how we can grow as artists by showing up for our
sketch book practice on a regular basis. So, I hope you'll
join me in class.
2. My Sketchbook Practice: Hey, there, friends, welcome
to Sketchbook seats. In this first
lesson, I'm going to be talking about my
sketchbook practice, kind of how it started,
where it's going, how it's doing. All right. So you may know that I have been a children's book illustrator for about the past ten years. Now, in my children's bookwk, some of it actually
does start on paper. I always feel that I do best when my ideas start
on paper as opposed to, like, starting in
photoshop or in Procreate. So my process has
always involved like some level of
sketching on paper. But it's always been really
specifically for a project. If I have a kid's book, I'll start, you know, sketching on paper for that kids book. If I have you know, something I'm doing
for, like, maybe, like, a greeting card client
or something like that, yes, it will start
on paper, for sure. But for The better
part of a decade. I really didn't have a sketchbook practice
that was for fun. I didn't have a sketchbook
practice that was just for me. And what happened
is a few years ago, I started to feel that. I started to feel like my
work wasn't fresh anymore. I just really started to feel
like I needed something. I needed I just needed
something new, really. And it took me a while
to figure it out. But what I actually needed was to give myself some space to just make some art
that was for fun, for exploration.
Not for a client. Not for a project, not
for anything specific, just for me, just a place for me to go and hang out
and make some art. So a few years ago, I want to say probably
like four years ago now, I started back down the road of having a
sketchbook practice again. Um And it wasn't easy. You know, it took me
a while to figure out how I wanted to use materials. Actually, it took me
a while to figure out which art materials I liked, which sketchbooks I liked, how I like to use materials
together, how things layer. So, you know, it was at first a frustrating
experience for me because, you know, you see everybody's
beautiful sketch books on Instagram and on YouTube. And I think that you
just expect, you know, like me, I've been working as an artist full
time for 15 years. So I kind of expected
to be able to pick up a sketchbook practice
and just be awesome at it. And that was not
the case for me. So this is the point in this course where I'm going
to tell you to be patient. If you are new to a
sketchbook practice or if you are looking to refresh
your sketchbook practice, starting over or starting
for the first time, it's probably not going
to feel great at first. You're probably not
going to be able to make the kind of art that you
want to make at first. You're probably
going to be really frustrated with the
results at first. But here's what I
want you to know. Tim spent making art
is never wasted time. You are constantly learning from the experiences that you're having in any art that you make, but in your sketchbook,
especially, you've really got the
chance to explore things, to follow the what
ifs of making art, to ask yourself, well, what happens if I
combine these colors? What happens if I
combine these materials? What if I draw
something this way? Okay. What if I try to
draw it this other way? This is a really great
space for you to just try things out
and learn as you go. You will learn something from every single page
of your sketchbook, even if it's just learning I don't want
to do things that way. I don't like those
colors together. I don't enjoy how I drew that. I would rather try it
again some other way. So for me, having a
sketchbook practice has meant uncovering new
ways of making art, feeling more confident
as an artist in general, not just in my sketchbook, but as an artist in general. And my sketchbook practice has also meant uncovering
things that I can take to my digital art or to paintings that wouldn't
have thought of before. You know, different
ways of drawing things, different ways of mixing things. There are just all
of these, like, beautiful layers of things
that I've learned because I've opened myself up to
a sketchbook practice. And that's what I
hope that you're going to gain from this as well. I hope that through your
sketchbook practice, you're going to be
a more confident, courageous artist,
and you're going to feel so much creative expansion. I'm really excited for you. So head over to the next lesson, and I'm actually going
to give you a tour of three of my sketchbooks.
3. Look Inside My Sketchbooks: Okay. So in this video, I'm going to be
taking you on a tour of three of my sketch books, actually have a stack, like, a big stack
of sketch books. And it was really hard to choose which three
to share with you. But I ended up choosing one
that is really specific, which I'll show you in a minute. This one is a current sketchbook that I'm working through now, and this one is a
sketchbook that I use specifically for
my bird illustrations. So I thought it might be
interesting for you to see the three different
sketchbooks and how I kind of approach
each one differently, and how I have multiple
sketchbooks going at the same time for
different subject matter, for different materials, for different
purposes in general. And sometimes, I'll
just, you know, like to skip around
in my sketch books. So if I'm working in this sketchbook and
things go sideways, then I'm going to switch over to another sketchbook for a
while to just sort of, like, refresh myself
a little bit. Now, before we get started, looking through my sketchbooks. I just want to mention that
my sketchbooks are not, like, the beautiful
sketchbook tour kind of sketchbooks that you see on
like YouTube and Instagram. My sketchbooks are very
messy and unfinished, and I actually think that they are really
beautiful anyway. I don't need a
sketchbook full of beautifully finished
paintings and illustrations and drawings to prove that I'm a good artist. These like this space
within my sketchbook. Is for exploration.
It's for play. It's for following the What if? And I don't feel like it
needs to be a performance. Not that people who have
really beautiful sketchbooks are putting on a show or
anything, but for me, if I was really
focused on just having a sketchbook that contained
nothing but beautiful art, it would definitely be a bit
of a performance, for sure. All right. So,
let's take a look. Let's actually start
with this sketchbook. This is a bird sketchbook I've been using for
about a year or so. It's not actually full yet. This is a Moleskin
ye blank notebook. It's not technically
a sketchbook. It is like a blank notebook. It's got kind of thin paper. But I have used these for years in my
children's book projects. Whenever I'm sort of
like figuring out art, it usually starts in these. So that is what we're
going to be looking at right now is this sketch book. Now, these are sketches that are going to
become something. So this isn't just like me sketching for the
fun of sketching. This is me sketching
to understand a specific species of bird that I'm intending
on illustrating. So you'll see, as I
flip through here, I actually tend to not sketch in pencil or rather graphite. I tend to sketch with either
neo Color two crayon, these or with luminous colored
pencils, which are these. Sometimes I sketch with markers. Sometimes there's
some paint in here. Um, but the overwhelming theme in this bird sketch
book is that I don't want to be sketching with anything that's
going to let me get really uptight with my
details and my shapes. That's not a bird. I
just want to be able to, like, keep it loose and
fun and not too serious. And you'll see because
this paper is really thin. You know, you can see the images that are like coming through on the other sides. But
I kind of like that. I think it just gives
it this sort of, like, friendly, approachable
sort of feeling. You'll see here, if you use marker to block in the shapes, like the shape of the bird, and then I go back in with a pains gray luminance pencil and add in some of the details. And I kind of stuck with that
method for a while here. L I love to write like
little notes to myself. And then sometimes I'll do some little
thumbnail sketches. If I have if I'm working on an illustration,
I love this sky. I kind of love blue
and yellow together. Here's a Robin.
It's another one. I love this one. I know I said that I actually
don't use graphite, and this is graphite. But this is actually
a graphite stick. It's like, I would show you
if I had it right here, but I don't like, just, like, a, you know, long rectangle,
that's like this thick. So you can't really
get a lot of, like, good fine lines and details with it, which is why I like it. And I love the texture
that you get with it. Here's another little bird. Beginning. Yeah, I
just kind of decide, Hey, I want to draw
some humming birds. This was from a
humming bird cam. That I was watching on YouTube, but I was just doing some rough quick sketches with markers. This is from a drawing
session with my friend, Holly Surplus, called
a Bird in Hand. See, I guess there are
some random drawings in here that weren't
for specific things. This one, though, is an
American Pygmy Kingfisher, and this actually did
become an illustration. Most of these did
become illustrations. These were some ideas I had for some bird illustrations for
my children's book portfolio, and for my licensing portfolio. These actually never
did anything with, which I'm kind of
sad about, but I did draw these humming birds. U This is a gray crowned crane. You see, I'm just kind
of trying to capture shape and indications
of feathers, a little bit of motion, a little bit of movement, but I'm not trying to be
really serious with it. Again, this is a theme
with my sketch books. I'm not trying to
make final paintings and final illustrations here. Look at that cranky little guy. I'm just trying to explore a little bit and learn a
little bit about shapes. It Looks like here I actually started working with markers. Which, you know, this
paper is very thin. So if you're going to be
using markers and paints, it's going to bleed
through this paper. This guy, I did a little
mixed media approach. I used marker and neo coolors, a little bit of gouache
paints, all sorts of stuff. You can see the page
as a little buckled. It's because I use stuff
that this doesn't want. Here's a little bird
sketch that I did. And this marker actually was showing through the
back side of the page. So that's the sketch. And then on this side, I painted the bird shape with
a little bit of gouache, a very little bit of
gouache and not very wet, because, again, thin paper. And then I used neo coolor twos to add in these leaf shapes.
Actually really like this. Um I feel like I should
do something with it. Here are just some more
random bird sketches. In this case, I sketched with
the neo Color two crayons, and then I added a
little bit of water. We'll talk about
those in a minute. And one of the other lessons. Again, papers kind of buckled. This doesn't really bother me. But, you know, it
kind of buckles up. More sketches. Oh,
I love these guys. I was just kind of
experimenting with making marks to create the
shapes of the birds, and then going back
in with pencil. I also love this color
palette, like this, like indigo blue
with a paints gray. And this is luminous pencil. I can't remember
what color it is, but it's really
beautiful together. And then here is a hickey illustration that
I was working on recently. You see I had a little
accident right there. And that's it for
the sketchbook. So let's go on to our next
sketchbook. All right. So let's look at
another one that is actually a really
specific subject matter. Okay, so it says I started
this on December of 2020. I actually didn't
start drawing in this until January of 2021. So I'm about two
years into this, and I'm maybe, like, three quarters of
the way through it. So one of the things I like
to do in a new sketch book to kind of get over the fear of the blank page is to test some materials,
which I did here. I had some new Karen
Luminus pencils. So I wanted to test some
colors out here and, you know, make some scribbles. That way, I've already
used up the first page. It's very low key. I don't have to stress about
it at all, no. And then When I turned
over to the next page, I was playing around
with some acrylic guh, which I had gotten, and I
somehow landed on drawing a polar bear over this acrylic guh background
and then adding some snow. And I thought to myself, why not just make
this sketchbook entirely about polar bears. So that's what we've got. I've got another little
materials test here, and a note that I
left myself about a polar bear story, which
I didn't do anything with. This guy is probably one of my favorites out of
the entire book. I love his pose. I love
his cute little face. I love all this
texture back here, which I got from layering some gouache and
some neo colors. This one was really satisfying. I did skip some pages in this sketchbook because I went kind of heavy
on the gouache. I didn't really want it to show through the white polar
bear on the next page, so I have skipped some pages. There's another little scene. There's another, like,
sort of big scene. You sort of get like
the icebergs and all of this texture. So fun. There is a tiny little
polar bear there. Lot lots of green in
this sketch book. I was loving this green
color. Here's another one. Most of these are drawn
from reference photos, obviously stylized
in my stuff style. I love all these
just like layers of gas and neo coolor and pencils. It gives such a
gorgeous texture. Let's just keep going.
There's another tiny guys kind of switching up the colors. It this guy's face. It this guy. I actually drew this guy a couple
of different ways. I had just gotten
some pan pastels. So I wanted to
experiment with doing a negative space shape
with some pan pastels, which I thought was
actually kind of cool. Actually cut out this shape
with a piece of paper, laid it down here,
and then smoothed over with some pan pastels
to make this texture. Se here the pan pastel has
rubbed off on this page. That's why I didn't
draw on this page because I didn't
want it to rub off, and I also didn't
want to have to shove a piece of paper
in between there. There's the same guy with
some gase and some textures. These guys are
ridiculous looking. This guy is foreshortened
in a weird way. I love this one. I love a lot about the shapes of the
polar bear, the textures. I love this little sort of like peachy orange color
with the green. That's really satisfying. Here is a vertical one. I like that one, too. Oh, I
should have left it turned. Now I'll go back this way. And I was just drawing with
paint at this point, like, just sketching with paint, which I think is a
really fun practice. Is another one of icebergs,
another tall guy. And Oh, look at that
guy. He is beautiful. I haven't looked at the
sketchbook in a while, so I'm kind of discovering
things that I'd forgotten. One little penguin in the midst of a polar
bear sketchbook. Here I was testing out
some new materials. I think these were stabilo,
woody pencils, maybe. Here's some negative
space experiments. Again, negative space,
negative space, and we are going to
have a lesson on this. It's one of our I think it's our day three drawing exercise. But I love negative space
exercises in my sketchbook. It's such a great way
to discover, like, some really delightful, quirkiness in anything
that you're drawing. 'cause you're kind of having to give up a little bit of control when you're doing a negative
space. It's just a scribble. It's another negative space guy. More negative space. I
told you I was really into negative space. Oh,
I love this one. Oh. This is a negative
space drawing, too. I just love these wonky shapes. I love the blue and
orange together. So so fun. Another negative
shape, kind of, like, harkening back to this
guy in the beginning, this sort of, like,
slidy splot thing. Love that. This funny guy. Here is just, uh sort of
like a pinkish polar bear. Here, I try to do some
white on white experiments. Went crazy with some pink
acrylic ink here. I'm here. I did a little bit of collage, so I scribbled on some papers, cut out this bear shape, and then I kept the
cut out and used it as a negative negative shape. Here's another negative
space experiment. With this one, I had just gotten some liquidx acrylic
markers that have this really
wide tip on them. And I was just kind
of experimenting to see what kind of
effects I could get. Obviously, just testing
some materials here. This is, you know,
not just a way for me to start a sketchbook, but it's also a way for me to be mindful when I
am feeling kind of, like, uptight about
a sketchbook. You know, when things are feeling a little like, Oh, like, I'm getting too
serious about things, I love to just, like,
make a mess here. And then we've just
got some more. I think I drew these
with brush pens. And you can see, I tested
the sky right here, dream with a brush pen,
and then right here, I did a negative space
drawing. I just love these. Here's a really big
negative space drawing. I just did with a little
bit of textured gash. And that is it for the
polar bear Sketchbook. Now that I've flipped
through it with you, I'm actually pretty excited
to start using it again. Alright. Now, here is our final sketchbook in this sort of long
sketchbook tour. It's fun though, right? I love checking out other
people's sketchbooks, too. Now, this sketchbook, I
forgot to tell you, this one. This one is a Royal Talents
art creations sketchbook. And it's actually what I'm going to be using for this course. I'm going to use this one, so I've got a fresh sketchbook, just like you do. So yeah. This is that sketchbook. I love these because
they're affordable. I think the size
costs maybe, like, I don't know, $15.
You can paint on it. If you're doing watercolor or anything that uses
a lot of water, the pages will
buckle a tiny bit, but they don't really
bleed very much. It can actually handle a lot of stuff, which is really nice. So that's what we're
going to be using for the course or what I'm going
to be using for the course. Now, this is an archer and
olive watercolor notebook. Um, here they are. I don't actually think
they make these anymore. I checked for them a
couple of days ago, and I couldn't find them. But the paper is kind of
similar to this Hanamul, which I'm sure I'm not
pronouncing right, but you can see it right there. These watercolor books. These have 100%
cotton paper on them, which actually means they
handle wet media really well. So if you're more of
a watercolor person or you like to use squash
with a lot of water, these are really
fantastic for that. But again, we're using the Royal Talents rt creation Sketchbook for this course,
which is affordable. You can also take a beating. So this is an Archer
and Olive Sketchbook. This is actually one of
my current sketchbooks, and my goal with this sketchbook was that I wanted to
focus on painting. Um, like, you know,
with a brush and paint and not as much using like markers
and other things. So a lot of this is just like testing out different strokes
and ways to use the brush. I've got pages that
are just like testing new brushes that I've gotten and seeing what kind of shapes
I can make with them, what kind of textures
I can get with them. Like, how I would
draw certain flowers. Like, this is I'm testing out some lavender with some
different brushes, and then testing out lavender with some different materials. So this side is watercolor. This side is guash,
used as watercolor, like, really thinned
down. I love this. I've decided after much trying and erroring that I really like gah better
than watercolor. Again, just testing
out some brushes, this time to see, like
what kind of, like, cool textures I
can get with them. And just making note of what I can get with what brush,
I can come back to that. Let's see here some
flower shapes that I drew. I don't like
a lot of this. And I think it was
really important for me to share this
sketchbook with you because I look at a
lot of this and I'm like, h. But as I flip
through the sketchbook, I kind of see like moments
of me figuring out how I like to paint and how, you know, all of those
things work together. Like, I am not happy
with this painting, but I can also see that I
learned a lot as I went through this and I kind of carried it forward with me
and my art practice, which is What a sketchbook practice
is all about, you know? It's about learning things and making new discoveries that you wouldn't have
discovered if you weren't giving yourself
a space to play. Like, for example, I love
layering. I've discovered. I love layering, like
leaf shapes with, you know, line art leaves and then colored pencil textures. I just find it
really satisfying. And then I got this page with these
cute little lady bugs. I love this page. I think it's adorable. I
got more flowers here. I love this flow actually, I really love this flower. And these are cool things for me to make note of
because I'm saying, Okay, I love this flower,
I love this flower. I love this flower on this page. So I'm kind of just filing
those things away in like my visual library so that when I am working on an illustration or just
working on a painting, I'm coming back to these
things that I really loved. And when I need a little
bit of inspiration, too, I'm also finding
that it's really helpful to just flip
through my sketchbook. And I see things
that at the time, I thought were kind of M. But then as I come back to them, I'm like, Oh, like, I
actually really like that. That's something that I
might use in the future. I love pages like this where I can just fill up a page with, like, a really general shape. Like, here I was just exploring different shapes
of leaves, which, you know, I'm a bird artist, so drawing leaves is obviously
a big part of what I do. It's going to be
in my art a lot. So I really loved experimenting
with these pages. Some more texture tests here. And then I think this
is the most recent page where I'm experimenting
a little bit more with, like, layering paint
with other things. So I've made notes
here of when I'm, you know, mixing, like, neo coolor and
gouache or luminants with water color and then
more luminants on top or, like, luminans and gouache, and then paper towel to remove the wet paint to
create a texture. You know, just all kinds
of fun notes for myself. I discovered that if you paint with guash, and then
you kind of, like, color in around the edges
with eco line brush pens, you get this amazing
texture right here. It's just fantastic. So, yeah, that's where I'm
at in this sketchbook. I've still got maybe
about half of it to go. I hope that you've enjoyed this really quick tour
of my sketchbooks. I hope that, like,
it makes you feel hopeful that my sketchbooks
are not full of, like, absolutely beautiful
perfect drawings, because I really hope that
you are going to feel encouraged to show up make some messes in
your sketchbook, try some things that you maybe had never thought of before, and just really dive in and
have a lot of fun with it. So go ahead and head
to the next lesson, and we're actually going to
change gears a little bit. We're going to talk
about mindset and art.
4. Minding Your Mindset: Hey, there. Welcome to
the lesson on mindset. So I know that this is a
sketch booking course, but we are going to take
a little detour into psychology and mindset
just to talk about what I think is a
really important concept that we can all apply to our sketchbook practice and
to our art practice as well. And the concept that
we're going to be talking about is growth mindset. So growth mindset and
fixed mindset are two terms for
intellectual motivation that were I don't want to
say developed or uncovered, but let's say uncovered by an American psychologist by
the name of Carol Dweck. Carol is well known for her studies of intelligence
and motivation. And in 2006, she wrote
a book called Mindset, the New Psychology of Success. And that book set forth that successful people fall into
one of two categories. We have fixed mindset folks. And if you have a fixed mindset, you believe that everyone is born with a certain amount of intelligence, talent,
strength, whatever. And then if you're on the
opposite end of that, if you are a growth
mindset person, you actually believe
that there are no limits to what someone can
learn as far as, like, intelligence,
or, you know, growing a talent or in
strength or whatever. A growth mindset believes
that you can always learn, you can always improve. And a fixed mindset believes that you're just kind of
stuck with what you get. So in art specifically, you'll find a lot of
people, you know, who believe that, oh, you're just born talented. You know, like,
everyone is just born with a specific
amount of talent, and then that's it,
you get what you get, and you know, that's
all there is. But those of us who
have made art for, you know, a large
chunk of our lives, know that Most people don't
just arrive on the earth, making their best art. You know, there has to be
a level of practice and exploration and trying things and giving yourself
space to grow over time. So I think you see where
this is going, right? I am hoping that, if
you don't already, I'm hoping that you will adopt a growth mindset in
your art practice, and especially in your
sketchbook practice. So in art, I know that as long as I'm
willing to put in the work, As long as I'm willing
to, like, kind of, like, embrace the messy
and perfect middle, I can improve at anything. So an example for me is that
I don't like drawing houses. Don't like drawing architecture. Actually, there are a lot of
things I don't like drawing. But houses are a good example. But I also know if
I committed myself to drawing houses
on a regular basis, I would get better at it. If I said to myself, I'm drawing nothing but
houses this week. By the end of the
week, I would see some level of improvement
at drawing houses. If I kept going for a month, I would see more improvement. And if I kept going
for an entire year, I probably would, you know, look back and be like, Oh, I can't believe I ever
thought houses were difficult to draw
because they're so easy. Um, any single
thing that you put your mind to and are willing
to put some effort into, you can improve your
skills at that thing. You will get better at it. You know, the reason that I
am so good at drawing and painting birds is because I've drawn and painted, like
thousands of them. You know, I wasn't that
great at them at first. I got better and
better and better. You know, I'm better at illustrating children's
books overall now than I was,
like, ten years ago, because I've worked at it,
because they've improved, because I've put
effort into you know, becoming a better artist and practicing the things that
were holding me back. So I definitely, obviously, am an advocate for Growth
mindset in art and in life. I 100% believe that if you work hard and put in a focused intentional
effort at something, you will get better at it. And that's a thing to note to. When it comes to
improving at anything, it's not just, Oh, I'm going to show up
and make art every day, and I'm going to
get better at it. Yes, you will get better
at it if you just do that. However, if you put a focused
intentional effort into it, you know, for example,
my houses example, that is a focused intention. I want to improve at houses. I'm going to work on that. Your intention might be I'm
going to work on color. It's not something that
I feel comfortable with, and I would like to feel
more comfortable with it. So I'm going to focus, on
color in this sketchbook. I have one sketchbook going right now that's
specifically for painting in Guash because it's something that I
want to get better at. And I know the only way that I'm going to get better
at it is if I actually have a focused
intentional that it. So I hope that you will
adopt a growth mindset as we begin this journey through
your sketchbook practice. And I hope that you know that where you are at right now with your art is not where
you're going to be at at any point
in the future. I a week from now,
a month from now, five years from now, you're
going to grow as an artist. So if you are feeling frustrated with your skills right now, or if you're like I was back when I was just
working on digitally, and you just feel like
you need something fresh, don't feel like you're
stuck here forever. If you're willing to show up, And put in the work
to do the thing, you're going to see
some differences. You're going to
learn some things. If nothing else,
you're going to learn how to enjoy the process, which is really
important to you. So Carol Dweck is
quoted as saying, and this is from
her book, Mindset. The passion for stretching yourself and sticking
to it, even, or especially when
it's not going well is the hallmark
of growth mindset. So that's an important
point to keep in mind. Growth mindset isn't all
sunshine and daisies. You are going to
have days where you don't feel like drawing
in your sketchbook, you're going to have days
where you show up and draw on your sketchbook, and
you don't like any of it. You'll have days where things
go completely sideways. But you will learn
something from every single time that you show up and draw in your sketchbook. That's the difference between an artist who's going to
improve and feel more confident and
courageous in the art that they're making and an
artist who's feeling stuck. You have to be willing
to put in the work, even when it doesn't feel great. Even when it doesn't feel
like it's going really well. And you know, the
funny thing is, like, when I go back and
flip through my sketchbooks, I have found time and time
again that things that felt so crappy at the time and things that
I was so annoyed about, they actually aren't that bad. With a little bit of distance. I've realized, like, Oh, like, the stuff is actually Yeah, the stuff is actually not bad. And I can see that I've
learned things, too. So I'll see that, like, you know, Oh, I obviously learned
this and then used it in future sketchbook drawings or used it in illustrations. So there's always this, like, learning and absorbing going on when you're working in
your sketchbook practice. Even when you feel
like you're not having the best day in your
sketchbook practice. And one final note before
we head to the next lesson. This is me inviting you to
let go of expectations. This is what kind of got me kind of twisted up when I first started my sketchbook practice, is just seeing everybody
else's beautiful sketchbooks and expecting that my sketchbook
would also be beautiful, or seeing the body of
work that I've done over the last 15 years and expecting that my sketchbook would
reflect exactly that. But what I was forgetting
is that I was approaching a sketchbook practice from
an intention of exploration. I was feeling very uptight
with my digital art, and I really wanted
to bring more, like, traditional materials into
my digital illustrations, and I really needed
to explore and figure out what that even meant, what kind of things I
even wanted to be using. You know, how things worked for the way that I illustrated. So in order to do that, I really had to let
go of expectations. I had to let go of any idea of any outcome whenever I sat down for my
sketchbook practice. And I invite you
to do that, too. I invite you to focus
on the process. I invite you to focus on the moments that
feel really good. You know, you're going to have
those moments where you're pushing a marker around on a
page and you're just like, yes, I love how these colors
are smushed together. I love this texture. You know, I love the shapes
that I'm drawing right now. So pay attention
to those little, like zing moments as you go. And what you're going to find eventually is
you're going to find that you're in
a place where you just really enjoy the process, and the outcome is just a bonus. If the outcome is something lovely and that you're really
excited about, amazing. If it's not something that
you're really excited about, you will still know that you learned things along the way, because you paid attention to those little moments
during the process, that really felt like something. So your sketchbook practice won't always lead to
something beautiful. Don't we all wish that every time we sat down to make hard, it would be something beautiful. But there's a lot of
bad art that's kind of, like, got to pass through us before we can get
to the good art. So embrace that process. And if you pay attention, you will always learn
something. I promise. So join me in the next lesson, and let's start uncovering
your sketchbook practice.
5. Your Sketchbook Seeds: No matter where you're
at in your art journey? It's important to
take a few moments to ponder what you hope to gain from your
sketchbook practice. Are there specific skills
you hope to focus on or maybe specific subject matter or materials you'd
like to explore? Would you like to build your
confidence as an artist? Would you like to loosen up
or maybe do the opposite? Would you like to have
more fun with color or maybe explore an entirely
new way of making art? Or do you just need a break for making art on
a digital device? Maybe it's one of
these things or maybe a combination or maybe a totally different
list altogether. As you embark on this
sketchbook practice, I encourage you to choose one, maybe two, but no more
of your ws to focus on. Having 47 ys makes it tough
to focus on any of them, and that's why I really
recommend narrowing it down. Remember, this choice
isn't forever. You can focus on one thing this month and then switch it up next month or hold one focus until you feel good about
it or get bored with it, and then move on to another one. You can come back to
a focus after leaving it for weeks or
months or even years. Now, write your focus on a piece of paper
and tuck it inside your sketchbook or just write it directly in the sketchbook if
that feels better for you. And now, join me in
the next lesson, and let's talk
about sketchbooks.
6. Choosing A Sketchbook: Hey, there artist.
In this lesson, we're going to be talking
about choosing a sketchbook. Now, the first and most
important advice I'm going to give you in this lesson is to start
with what you have. There's no need to go out
and buy a new sketchbook. If you're like any
other artist on Earth, you probably have a
stack of sketchbooks, hidden away on a
shelf somewhere, waiting on the right moment, which is funny that
we do that, right. So I would say number one, if you have a
sketchbook that's just been sitting around waiting
for the right moment, what if right now is
the right moment? Ahead and grab that sketchbook and use that for this course. I was also one of
those people in the past who would
buy nice sketchbooks, and I would sort
of tuck them away, waiting until my
art wasy of them. I think that I felt
like I had to be one of those people who
is going to make a really perfect
sketchbook, which I'm not. I'm a person who's going to make really messy sketch
books where there's a lot of exploring and
trying things and, you know, half
finishing drawings, and then moving on
to the next thing. And that's absolutely fine. There's nothing wrong
with that. But I kind of had to come
to terms with that. And when I started, when I started my sketchbook
practice a few years ago, I had one of these sketchbooks. So this is an
Archer and O olive. It's a blank notebook, but a lot of people
are using them for sketchbooks.
It's really nice. It's got this really nice,
like cloth bound cover. Um, and the paper is
actually really nice. The paper is really smooth. You can paint on it. I prefer a sketchbook that has
got smooth paper in it. You might prefer a sketchbook
paper that has got textured paper in it is
completely up to you, and that's something that
you need to think about when you are choosing
a sketchbook. Anyways, I had this
really nice sketchbook on my shelf for a
really long time, and a few years ago,
when I got back to my sketchbook practice, I
was like, you know what? I'm just going to
start drawing in this sketchbook
because I am deciding right now that my art is
wy of this sketchbook. And now, I only draw in, like, you know,
nice sketchbooks. I don't need to, like, pick up a sketchbook from
the Dollar bin or, like, draw on a stack
of, like, you know, computer paper because when I'm telling myself that
my art is only worthy of drawing on a stack
of loose computer paper, I'm telling a pretty
telling story about what I think about
my arts and what I think about myself as an artist. When I tell myself, my art is worthy
of the sketchbook. I'm telling myself
a different story. I'm really saying, Hey, man, I've got confidence in you. I believe in you
and I believe in the art that you're going
to make in this sketchbook, and that it doesn't
matter if it's beautiful or if it's
messy or whatever. Still deserves a
pretty sketch book. So if you want to be a
pretty sketch book person, be a pretty sketch book person. If you want to be a, you know, stack of paper person, be
a stack of paper person. It's totally up to you.
So I'm actually not going to suggest a sketch
book for this course, but I'll tell you some
sketch books that I like. So we've already
talked about this one. This is an archer and O
olive blank notebook. They're very pretty,
which I love. The paper is really
nice and smooth, and it's really
lovely to draw on. So bonus. I've also drawn in
these moleskin sketchbooks. These are actually
not my favorite. I know a lot of
people love these. There's just something
about how the I don't know, how the materials push around on the paper that just isn't
as satisfying to me. But more satisfying
is these guys. So these are royal Talents,
art creations, sketchbooks. They're actually
pretty affordable. I think this size,
which is, like, five by eight ish costs
like ten bucks, 12 bucks. So they're pretty affordable. The paper is amazing. You can actually, like, this
is acrylic ink on this page. You can really use, a decent amount of water and
paint and marker on these. And the pages will
buckle a little bit, but they can really stand
up to a lot of damage. So these are kind of like my go to book because
they're affordable. They come in super
pretty colors. So, I get to keep up with my
nice sketchbook practice. And I just really like the way that the materials that I
use work on this paper. Now, if you are going to be
using watercolor or anything that has anything
that's really wet, material wise, this may
not be a great choice. You can probably do a little, like dry ish wash of watercolor
and get away with it. But because, you know, things like watercolor are
going to soak into the paper, this paper is not made for that. For that kind of thing,
you would actually want to have like a 100%
cotton sketchbook. So look out for
that if you want to use watercolor in
your sketchbooks. Now, if you're using guash, these are still absolutely fine. These are great for markers, pencils, pastels,
whatever you want to use. I love this one. One of the other sketchbooks that
I'm kind of digging now, and this one's
actually good if you want to paint. This is a Stillman and Burn Zeta
series Sketchbook. And it's actually got
it's got smooth paper, but it can handle
a lot of paint. The pages, I think
it's 140 pounds. So the pages are nice and thick. This is a little bit
better if you like smooth paper and you like to
paint with a lot of water. Like, right here, I used
quite a bit of water, and no buckling or anything. And then one more option for your sketchbook is these
handbook sketchbooks. This is one of their
watercolor books, and it's got a
really nice, like, textured paper on it, which, you know, obviously
we like around here. But again, you don't need to buy a new sketchbook to get
started in this course, at all, you can start
with whatever you have. So grab something
off your shelf. And get started. So before we head
to the next lesson, let's actually talk about
digital sketch books. Which is something that I
liked for a really long time. I loved sketching in my iPad. My big problem with sketching
digitally is that you have the ability to easily erase or undo things or
move things around. Basically, all the things
that make digital art amazing make it not so great for a sketch book practice
because a lot of the spontaneity
and the messiness is just going to be
erased immediately. Now, that said, I
know that not all of us have the same
situations in life. So it may be that for you, it's easier to sketch and
procreate on your iPad. If that's the case, I don't want to discourage
you from doing that. I don't want to stop
you from making art. I do want to encourage you, if at all possible. Get a sketchbook,
make sss on paper. So you can really feel
like what the difference is between sketching digitally
and sketching on paper. I swear you're going to notice. That said, if you are 100%
going to be sketching on your iPad for this
course or just for your art life in general,
here's what I recommend. No erasing, no undo. So that's it. Don't use your eraser for anything and don't
undo anything. Every mark that goes down
for your sketchbook, for your digital sketchbook
is a mark that stays down. It's a mark that
you have to work around and figure out
how to work with. It's a way that you're
going to be able to keep this foneity in your sketches. And it's going to take a
lot of practice because we're also trained
to automatically, like, hit the undo button and procreate or control
Z in photoshop. So it takes a lot of practice to undo the tendency to undo. So If you're digital
sketching, no erasing, and no undo, but I 100%
recommend actually, like, sketching and
painting on paper. You're going to learn so much. There are so many, like, happy
accidents that happen on paper that you're
just never go to run into if you're
working digitally. For me, when I'm
working digitally, it's almost like I
have to manufacture those happy accidents. I have to know I have to know what the happy
accidents even are first. So for me, I'm learning about those happy accidents
in my sketch books. And then when I go to work digitally, I
can be like, Okay, I like how these
colors mixed or I like how these materials layered. So how can I bring that
into my digital art? So yeah, that's my $0.02 about digital sketching
versus paper sketching. I prefer paper
sketching, but again, it's up to you where you
want to get started. Alright, so you've got your
sketchbook picked out now. So join me in the next lesson, and let's talk about choosing materials and
colors to work with.
7. Choosing Materials & Colors: All right, artists. So in this video, we're going to be
talking about choosing materials and colors. So let me talk a
little bit about just a couple of ideas
I like to keep in mind. I personally like to keep
it as simple as possible, especially for this course. So I have chosen materials that don't
require a special paper. So we're using this Royal Talents art creation Sketchbook, which will handle actually a
lot of things pretty well, but for watercolor, that
probably doesn't work. Um, so I'm making
sure that I'm just choosing materials that we
can definitely use here. And I also really like to have sketchbook materials on hand that don't require
a lot of prep. So if I want to paint
with Gach, you know, I have to get my
paints and my brushes and water and towels, and it's a bit of a production, a fun one because I
love painting and Gach. But sometimes you just
want to grab some workers, make some scribbles and
get started, right? And the materials
that we've chosen here you can actually
do a lot with. So I'm actually pretty excited
to share that with you. So, let's talk
about the materials that we've got laid out here. This is what I'm going to
be using for the course, but I always 100% encourage
you to use whatever you have. So if you have favorite
materials, grab those. And if you have things that
have kind of been like hanging out in the back of, like, your art drawer, like your art supply drawer, grab those and give them a try. And, of course, you know, if you are in the mood to
buy some new things, these are some of my
all time favorites. So again, Royal Talents
art creation Sketchbook. This one is like
five by 8.5 ish. Let's take the a
little thing off. There we go. So now
we can open it up and see that it's got
really nice smooth paper. And so we can kind of get over the fear of the
blank page here, which we will talk about a
little bit in the next lesson. I'm just going to go
ahead and open this up so I can start making
some scribbles. So one of the first things
that I want to start with is I want to start with
these eco line brush pens, which are actually
some of my all time favorite art materials because they're super easy
to get started with. So let's pick a dark color here. So this one is deep
green, number 602. And I love these
markers because, like, look at how like juicy that is. Like, it's so pigmented
when you use these markers, and I've got a little bit of
water off camera here and just this Princeton
Neptune square wash brush. So I'm taking a little
bit of water and Dabne and look at this. You can actually get
a watercolor effect with these eco line brush pens. Now, again, this
particular sketchbook is not going to like
a whole lot of water. So I'm actually
going to be pretty mindful of how much water I'm
using on this sketchbook. But I just think this is so cool that you can use
these in this way. You can also blend colors
together very easily. Let's pick a green here, and then let's just start
coloring a little bit. And you don't have to use water, but I just think that I
just think that it's fun, and I just want to
show you how it works. Yeah, look at this. We
can create these nice, like gradient fades of other colors. It's
really beautiful. It's really satisfying. Let me just rinse my
brush out real quick. So these are going to be my first material
that I will almost always choose for my
sketchbook practice. Eco line of brush pins. Another really cool thing about this particular brand of brush pin is that
they're refillable. So you can actually
pop the lid off here, and you can buy bottles of
this liquid water color, and you can drop the
color in here and then pop your lid back
on, and you'll see here. If you look at the nib, it's actually got an extra
nib on the inside. So this pulls all the way out, and you can swap it for that
side when it gets worn out. So I just think it's
really cool that these are so fun, so pigmented, and then also they're
really eco friendly, so you don't have to
worry about throwing the plastic marker bit away
when you're done with it. Next step for me
almost always is, these are neo color two
water soluble wax pastels. These are really cool.
This one is Jade Green. I will give you all a list below this video of all the
colors that I'm using here, of everything that
I've got selected. These are really
cool because you can use them in a bunch
of different ways. For this class,
one thing that we will be doing with them,
obviously is sketching. So I love that you can just
use them as like a crayon. You can sketch
with them. You can tilt them over on the side. And get some really
awesome texture. Like, how cool is that? That's
a really great texture. And again, I've got my little
dar of water back here, and I'm just barely
dipping my brush in it. Look at this. These
are water soluble. So you can lay
them down and then apply a little bit of
water to them and get some really amazing textures and all kinds of
different effects. You can also let me grab. Sorry, my dar of
water is kind of gross. Yeah, just nasty. So you can also dip the tip
of your crayon in the water. And use it like that. So you
kind of get a really nice, like smudgy sort of effect. And then you can
sort of lay it on its side and sort of
paint with it like that. You can just do so many
cool things with these. That's why they are like,
over and over again, one of my favorite materials, because you know, again, you can use them as crayons, you can use them wet. You
can dip them in water. You can put water
on top of them. It's just so cool. They also this is a little wet, so this isn't going
to work too well, but they also layer
really nicely over your ecolne brush
pens, which is nice. Now, one thing to know
about No colors is that these two things, colored pencils and
brush pens do not layer over top of these unless
you've put water on them. So, like, this part,
I've put water on it, and I can layer brush pens
and pencils on top of it. But, like, this part right
here is very waxy still, so it's not go to layer
anything on top of it. And don't worry because for our day one sketch
booking exercise, we're going to be experimenting with these materials
and kind of seeing, like, what they can do. Because, you know,
the best way to learn how to use
these things is to, like, get in there
and try things. Alright, so my next favorite, most often used material is these Karen dash luminance
colored pencils. This one is number 739. It's dark Sap green. It's one of my favorites. These are so soft
and so pigmented. So amazing. Layer
over the arn dash. Again, you see here when I
try to color over that wax, part of the neo color two, you can see that wax kind
of shows through there. That's just part of learning
how your materials work, and you might like that.
So make note of that. They also go really well over
the eco line brush pens. You can, you know, again, get a nice soft texture with them if you use
the side of them. You can get a really
nice firm pencil line. I like to grip my pencils and my brushes in different ways
when I'm in my sketchbook. So sometimes I might
hold out, you know, way at the end and
see what I can get. And then sometimes I might grip really tight if
I really need to do, like, some nice details. So I've got a variety of colors in all of
those things so far. Now, Before we head
to the next video, where we're going to talk
about the blank page. Let's actually go ahead
and talk about color. But a quick note
before I forget, you will notice that one
material that you do not see here is a eraser, and you will also
notice that you do not see a graphite pencil anywhere. That's because we are
in the practice of embracing our mistakes
in our sketchbooks, because they're not
really mistakes. They're just little stones on the path of our
artwork fort, right? So No racing at all
in this course, in my sketch books, no acing. So you will not see
a graphite pencil, and you will not see
an eraser anywhere. We're going to be drawing
without sketching and getting some really quirky and
fun results because of it. All right. So let's talk a little bit about
choosing colors. No. You haven't actually seen what we're going to be
drawing for this course. You haven't seen the
reference photos. So I would actually encourage
you to choose your colors now before you've seen the reference color
the reference photos. Well, the reason that I
love to do this is because, again, it just takes
me down that path of, like, what if with my art? What if trees are orange? What if grass is blue. When I choose a color palette in advance of choosing my
subject matter for that day, I just think that it kind of pushes me outside
of my comfort zone, and I really encourage
that for you as well. Um. So, this is the color
palette that I'm choosing. I've been really
into, like, sort of, like, greens and yellows
and oranges lately. But if you're having a
little bit of discomfort, choosing a color palette, I want to talk about a couple of ways that you can do that. So the first thing that I really recommend is just paying
attention to color. Attention to things
that you like, pay attention to color
combinations that you like, or, you know, start with, like, your favorite color. Start with what
you know and love, I think is some of the best
advice that I can give you. So, like, I love this
color palette right now. So I will use this color palette in my sketchbook until
I get sick of it. So Sometimes that means I'm going to use this
color palette of my sketchbook for a day or two. Sometimes it ends
up being a week or two before I get tired of it. If you struggle with color, I recommend getting
a color wheel. It's so helpful just
as a reference. I can really do a whole class on color. Maybe I will one day. But for now, I'm
just going to say, I recommend getting a
color wheel that will show you the compliments compliments, complimentary colors, split
complimentary colors, which are like a triangle shape, triadic colors, which will
make like an actual triangle. And then you have
tetratic colors, which are going to be four
colors that go together. So my tendency with colors is to either build
an analogous color scheme, which is actually
what we've done here. So my analogous color
scheme runs from orange, all the way over to
like blue green. So basically, this whole half of the color wheel is the color
scheme that I'm using. You can always use this side or like any other combination. As long as the colors
sit next to each other, like in this row,
they're going to be happy together in
your illustration. So that's an easy way
to think about that. My other favorites
are complimentaries and split complimentaries. So if you know my work at all, you know that I absolutely
love blue and orange. It's one of my favorite
color combinations. Now, keep in mind when you're choosing colors from
the color wheel, like, it doesn't have to be like this blue and this orange. It can be, like, a dark, like, indigo sort of blue, and then it can
be sort of, like, a peachy sort of
orange, like this one. This is just, you know, a starting place for you. This is just a place for
you to get inspired. So, in addition to
complimentaries, which are across from each
other on the color wheel. I also love split complimentary. So a split complimentary means, so we'll go blue,
which is my favorite. A split complimentary is the colors on both sides
of the compliment. So blues, complimentary,
color is orange. The colors on
either side of that are red orange and
yellow orange. So I can build a color
palette that is blue, red orange, and yellow orange. Um Those are my favorites, but you don't have to
follow the color wheel. You don't have to
follow any rules. Just pick colors that you
love and are excited to use. This is your sketch book, so this is a really great place to experiment and have
tons of fun making art. All right, so let's take a look at This other little sketchbook
that I've got right here. Look at this tiny little KD. Also, color note. I just, like, sat this sketchbook on top
of the sketchbook, and I love these colors. Like, I could build a color palette around these
two colors right here. So good. I love them. So, when you see
stuff like that, Ma note of it so you can
come back to it later. Now, One thing that I like to do is I have this
tiny sketchbook, and I actually use
it for color tests. So I'll test, like layering different colors of
different materials. This was acrylic ink, I think. But I'll also use this to
choose my color palettes. So I will, you know, scribble down some
different colors. So here we've got
some oranges and greens and like a pop
of like purply pink. And then I'll find, whatever materials that I want to use that
have those colors. I'm here, just choosing
different palettes. Yeah, I've obviously done
a lot of color tests in here with different materials. The reason that I like to do this is because I can
come back to this if I'm feeling unsure about
colors or overwhelmed, I can come back and flip
through my little notebook. Like I love this color palette, all is like the earthy
browns and rusts and then the pops of this
darker blue green and this brighter
green and the yellow. It's a really good palette. Yeah, when I need inspiration, I've got this little book here. It also gives me a place to
test my colors if I want to. That's a nice one. Oh, here's
that color palette I liked. It is a indigo, paints gray, and then a dark flesh
5%. Colored pencil. Yeah, looks really nice. So yeah, I just like having, like a little space like
this to test my colors. You can also test your
colors in your sketchbook, can use a scrap piece of
paper to test your colors. Just do whatever feels exciting
and comfortable for you. So One last thought about colors is When you're choosing
your color palette, especially if you're doing
something like this, where you're choosing
colors before you have actually chosen
your subject matter for a sketch book session, it's a really great
idea to make sure that you have dark colors, medium colors, and light colors. So you'll notice like
my green section right here from my
Ecoline brush pens, I have a light green, which is a pastel green. Medium green, which
is bronze green, and then I have a deep green, and then I also have
like a turquoise screen. But you see here, I
have different values. So that is going to help me create contrast and
my illustration. It's going to give me a
lot of different options. And if I don't have,
you know, like, my yellows right
here are actually pretty similar value wise, but I've kind of balanced
that out because I've chosen a lighter
yellow down here. This is a yellow neo
coolor two pencil. So it's a little
lighter in value, and then I've got this
medium cadmium yellow, luminance pencil that's
a little bit lighter. So I've got enough variation
in not just color, but also in contrast in value. So that's really
going to help me as I get started with
Musketch booking. Alright. So head over
to the next video, and we are going to
have a lesson on the blank page or how to get over the
fear of the blank page.
8. Fear of the Blank Page: He there, artist. Let's
talk about the blank page, perfectionism, the fear
of getting it wrong, the fear of messing up, the fear of not being good enough. As artist, I think we all suffer from fear
of the blank page, whether it's a sketchbook
or a canvas or, like, a document in photoshop. Like we all kind of suffer from the paralysis when it
comes to getting started. So I have one trick that
I'm actually going to share with you to
help you get over your fear of the blank
page. And here it is. The easiest way to get
started is to get started. So usually, for me, that means getting started with something small or
something that feels easy. So my go tos are usually testing out materials on the first
page of my sketchbook, drawing a bird because that's something
that's really easy, and I can consistently do well. Or just like smudging, paint and marker and
whatever all over the page in my sketchbook. So let's take a
let's take a look at a couple of my sketch books and see how I started these. So in this Archer and O olive, I started with some
materials tests here. I was testing out. I
think I was actually testing whether or not I could use water in
the sketchbook. So yeah, I tested
that out and then went on to draw on the next
page, some pretty cute owls. Look at those guys.
I love those guys. But the cool thing about
starting out with, you know, making marks on a
page or testing materials or drawing
something that you're really
familiar with is that it immediately gets
rid of the blank page. It's no longer scary. You've already, you know,
you've already drawn something, you've already
messed up the page, so you're not going
to, you know, make it any worse or better. Here's another one
where I've just tested out materials on the page. And then on this
one, I drew a bird. Because birds are
something that I'm really comfortable with drawing. So for me, starting a
sketch book with a bird. So like in this one, I painted
a bird on the first page. This is a really good
way for me to start out. On this one, I just smushed some colors around on the
page just to get started. Any you know, any way to make marks on the page and
just sort of get rid of, like, the scary
blankness of it all. Any way that you want
to do that, do that. I also use these
methods when I'm feeling really uptight
in my sketchbook. So if I feel like I'm like that perfectionism
is creeping in, and I feel like I can only put a drawing in the sketchbook if it's gonna be a good drawing. If I start to feel like that, I'm gonna take some paint and slap it all over the
next sketchbook page. I'm just gonna make a huge mess. Sometimes I'll draw something
on top of that paint. Like, sometimes, you
know, I'll kind of see something in the splatters
and be like, Oh, that looks like,
you know, a cute little bird or a
monster or whatever. And then sometimes
I just leave it. But because I have
made the mess, already, because I've
covered the page, it already gives me the
comfort of knowing, Okay, well, this is already messy, so it's okay for
me to loosen up. It's okay for me to dive into this and do whatever
I feel like doing. So I hope this
helps. Little bits. You know, just make it
easy, make it approachable, and either make some
marks, make some messes, or draw something that you are really familiar and
comfortable with already. So head on over to
the next lesson, and we're going to
be talking about your seven days Sketchbook
challenge for this course.
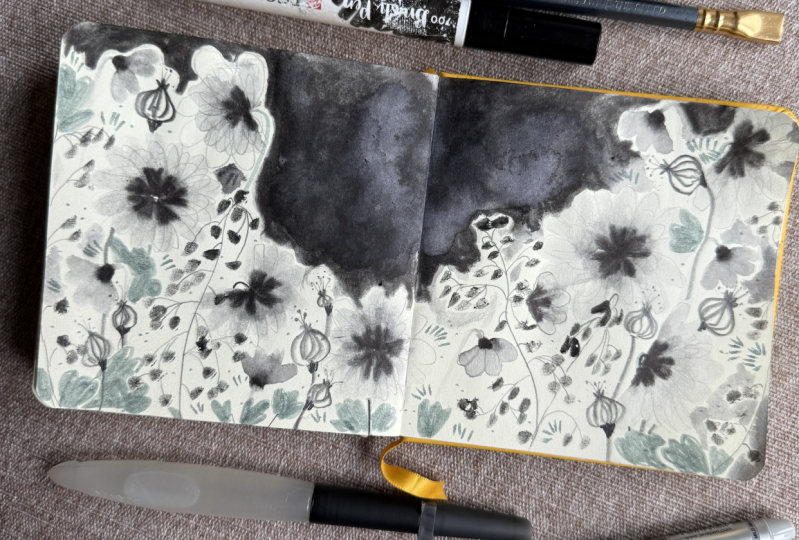
9. 7 Days of Sketching: In this course, I'll take
you through a series of seven sketchbook
exercises created with the intention of going through
one exercise each day. So instead of rushing through
all the exercises at once, I encourage you to go ahead
and watch the videos, but then commit to doing one exercise per
day for seven days. Slow down and give
yourself time to ponder each day's work before
moving on to the next. Might find it helpful to use a tracking sheet
for this project, so you'll find one in the
Project and Resources section, along with a reference
photo PDF for inspiration. Over the next seven days, I'll guide you through some
simple sketchbook exercises. You'll learn to loosen up and hopefully enjoy your
sketchbook time. Each exercise will build on what you learned in
the previous exercise, starting with Mark
making on day one, and ending with a
beautiful wildflower Sketchbook spread on day seven. Remember to release
your expectations of what your art
should look like, and instead, just follow
the trail through the forest of your art
and see where it lands. Embrace the process, practice, enjoyment of the
making of the art, over focusing on the outcome.
10. A Simple Writing Practice: Because we're creative, we tend to be our own
harshest critic. We see the worst in most
of the art that we make. And that's why I like to include a simple writing practice along with my
sketchbook practice, to help myself focus on
finding the good stuff, and to appreciate the
work that I've done, even when the work isn't good. At the end of each
sketchbook session, take a couple of
minutes to answer the following prompts
right in your sketchbook in a journal or on the downloadable worksheet in the projects and
resources section. First of all, find three things you like about
today's sketchbook pages. What's one thing you'd like to try in a different
way next time? And what did you learn today?
11. Day 1: Mark Making: All right, friends.
Welcome to day one of our sketchbook seeds,
beginnings exercises. Now, these exercises are designed to build
upon one another. So today, we're going
to be starting with mark making and really
exploring our materials, experimenting with
layers and creating textures and making
different marks, experimenting with adding
like water to blend things. And then, you know, as each day progresses
through this week, we'll be adding in
some new experiments, trying some different things until eventually we
get to day seven, where we are going to be drawing a beautiful wildflower
meadow in our sketchbooks. So as we work through
these exercises, you can look at the
reference photos if that helps you
to feel inspired. For today, I actually am not going to be looking
at the reference photos. I have scrolled through
them on my iPad over here. And, you know, I've got
some ideas just of, like, textures and colors
that I want to keep in mind. So you'll see here that I've got my sketchbook opened
to the first spread. You remember on the first page, we did some tests in the video about choosing
colors and materials. So this is the first
double page spread. And I've got these little
exacto number two bulldog clips that I like to use to hold
my sketchbook pages down, so they're not flopping
all over the place. So my plan is that I'm going to on this side of the
page, I'm going to lay out, like three rectangles
in our marker, and then I'm going
to test layering, like, different things
on top of them. So let me actually
start out with that. I'm going to use
this is a apricot. And I'm just going to block in, like, some rough rectangle
shapes and just color it in. This doesn't have to be
neat, or it can be neat. Your sketchbook practice is
your sketchbook practice. So if you want to
be messy with it, be messy with it, if you want to be neat with
it, be neat with it. I know, for my personal
creative exploration, it helps me to be a little messy because I'm not really
in real life, that messy. So it helps me to
relax a little bit, I think, and sort of, like, uncover things in
my sketchbook that I normally wouldn't be like apt to uncover because I'm a little bit
up tight in general. So when I'm doing
something like this, one thing that
helps me to loosen up is to hold my materials
like really far down. You notice, like, I'm
holding this marker like down on the end
instead of, you know, here. Again, totally up to you how
you want to approach this. But what I want you to do
is just what I'm doing, which is make three
blocks of color. I have chosen an orange, a yellow, and a green. This is apricots,
this is yellow ochre, and this is bronze green, which is actually one of my
favorite eco line colors. I have this in like the
jar watercolor two. Really nice. Now you see these are leaving
like some, you know, marker marks as I smushed
them across the page, so it's not a perfect
block of color, and frankly, that's fine. So we're going to let
these dry for a minute, because if you don't
let these dry, when you start to layer on
pencils and neo coolors, you're not going to get
the expected effects. I'm going to go ahead and clip down this side of my page, too. I didn't think I
was going to, but it's already starting to
buckle up a little bit, so I'm just going to
add that little clip. So let's go ahead. Let's test some water, so I've got my Princeton
Neptune square wash brush. This is a quarter inch. It's got soft bristles, which I like. I'm just going to dab that
in my water jar and give it a couple of dabs on clean towel. I'm just going to smear it
on the edge right here. Just so I can see what kind of effects I get with these
colors in this water. I really just love
how it softens the edge of the eco lines. No, I got a little bit
of yellow in there because I wasn't very mindful
of rents in my brush. It's very typical of me and very fine because it's a sketch book. So I'm just going
to wipe that out. Now, while we're waiting
on those two chill out, let's actually hop
onto this page. And let's test some marks. So I'm going to pick
some different colors. Let's pick. This
is a deep orange. So I just want to
see what happens. If I hold the marker
really far away, what kind of marks can I get? And if I hold it really up
close and go very light on it, what kind of marks
do I get then? And if I push down, Well, that's kind
of cool, right? So that's cool for, like,
drawing birds or flowers. Like, that's a
really nice shape. And let's see if we
can do it this way. Yeah, look at that. Look at those cute
little tear drop shapes. That's something to make note of for future reference for sure. So let's see if et's
see if you go this way, you kind of get this nice little like rough edge on the bottom, if you do your lines this way. So that's kind of cool to note. And if you sort of work
it on the edge here, you can actually get some
cool textures as well. So All good things to know. So let's grab one of our
neo coolors real quick. I'm going to stick with oranges
for this side, I think. This is a vermilion that is
obviously broken a half. With these, I can try
to use it on its side. And you'll see that
I'm going to get a really nice texture here. I can make a really nice
waxy line with these. I can also make like
tiny little lines. I cover a lot of
area here if I use the side of this.
Let's dip it in water. Dip it in water and we'll get a little bit of a creamier
texture that's fun, right? And then if we dip just the
end of it in water, Yeah. You'll see that you get a lot of nice texture on
the edges there. So that's actually really cool. Let's dab a little bit of water on our brush
while we're at it, and let's just
smudge across here. I really like doing this
with the neo coolors because even after you wet it down, you'll still see a little
bit of the original texture of the neo coolor you can actually pick
up a little bit of color when you're smushing
it around and then use that to make some more marks
and some more textures. It's pretty cool. Let's
rent our brush off. And now let's pick
a colored pen. Pencils. So I'm going to just
pick a dark cadmium orange, which is number 533. These are my favorite
color pencils, again. So I can do a lot of different things if I hold
these in different ways. So if I want to be
really up tight with it, I can get some really
nice uniform marks, and these are really
just honestly fun to draw with this way. But I can also
shade on the side. Which is really handy. This
is like with the light hand. Then if I go with
a heavier hand, you can see I can get
much more pigment, which is nice to know. I can also try to just hold
the pencil like on the end, so I'm not going to
grip it too tightly. If I do that, then I can try to make Sa, I'm drawing a bird. And I want to do some
feather details. It can make some really
nice wonky shapes. Oh, my d broke. This is kind of, like, you know, the danger with the
luminant spencils, is that they're very soft. So it's really easy if you're pressing down too hard
to maybe break the lids. But then you can just use
that edge to make some more, like, really cool
textures and stuff. So all sorts of, like, fun ways that we can use these. So I'm hoping that for
the stay one exercise, you're going to take
at least 5 minutes to do this. Preferably longer. But, if you're easing into
a sketchbook practice, I think it's a really
good idea to start easy. So start with 5 minutes
and see where it goes. All right, so let's
start layering on this side and kind
of see what happens. So over here, we've already
added a little bit of water. Kind of see what happens there. I've got this Burnt
Sienna eco line, and I'm just going to draw a couple lines down each
one of these colors here. We can kind of see what happens. So we can kind of see like, how much transparency
we're getting, how much layering there is. I'm going to dab my
brush and water again, and I'm just going
to run it down the edge of this second
line that I've drawn here. Let's see how those
blend together. The different layers. And again, you'll see my scotch book is already starting
to buckle here. So, I use water sparingly
as much as I can. But in this case, I think
it's really important that we experiment a little bit to kind of see what
layers over what. So let's pick. Let's go with a darker
pencil for this. This is my dark sop green. So let's see how this
layers over Eco line, and it actually layers
so well over Eco line. It feels really good
when you do this. Like, it's just it's kind
of nice glide to it. So cool. Yeah,
that's really nice. And then we'll see
that like it does the same thing here where
we added water on the edge. It really layers very
nicely there as well. This is a little wet still
this layer Vico line, but everything layers
really nicely, and we can know, again, we can scribble
on the side here. And get a lot of
different texture and because you see I'm holding the pencil back a
little bit further. It's getting a little wonkier, which I personally enjoy. That's pretty cool. All right. So let's now take a
look at our crayons. Since we're already
in this green range, let's pick this baby. This one is Jade Green, and let's just see
what happens when we just draw over the
existing colors. You can actually layer that over the illuminates just fine. Now, these are not
totally opaque. As you're drawing,
you'll see that it looks different
on different colors, on different base colors. It's fun to experiment. Thought I would just stop and notice right here where I've added this water to
this area of eco line. Look at that nice little splashy watercolor effect
that we're getting there. Then this line is bleeding into this line and giving us
a really nice effect. So These are all things to make note of as you
are testing these out, like, what happens,
when I layer things. What happens when I add water. What you know, thing layers that over one thing and it doesn't layer
over another thing. So let's add some water. So let's let's do some little marks here
and see what happens. So we'll just do some of
these little guys right here. And I'm kind of this is one of my favorite ways to hold my neo coolors
instead of like this. Hold it like this.
Because again, it just lets it be
a little wonky. And I think that's
fun. All right. So we've got our little brush, and let's grab some water
and see what happens here. We'll just use a
little bit more water at the bottom to see
how much it blends. And then at the top, maybe we'll do a little
less scrubbing. So here, we'll just
run that across there. And then down here, we might scrub and blend a little bit. Well, that's really nice, isn't it? That's a nice texture. Again, we're just going
to run the water a little bit here and then down at the bottom, we'll
sort of scrub. And this is actually, again, it's a pretty cool texture, and you'll see
that we're getting some really nice lines and blends as we go through
here making these marks. So that's actually
really satisfying. Let's take a look at
what happens when we layer the same colors again. This is the Apricot. Do we get any more darkness
if we layer those together? And this is the yellow ocher And just like with
using a lot of water, Layering a lot of eco line brush pen on this paper is something
to do with caution. Let's look at the
other side here. So you'll see here
we're starting to get a little bit of bleed
through here from our water. That's fine. That's
actually why we don't very often use both sides
of the sketchbooks. I have a lot of,
like, blank backsides in my sketchbooks because
I want to make sure that, you know, illustrations
aren't bleeding through. Still want to have
fun too. All right. So layered all of those things. Now, let's go back and let's pick a lighter colored
pencil and see what happens and also a lighter luminance and
see what happens. So I'm going to pick
up this yellow. Let's layer it here on the ends, kind of see what happens
on the eco line. So actually see that
with the lighter colors, you're not going to
get as much contrast, but you still get
some nice blends. So I think that this is
really fun and nice to know. This is a fun way to
start your sketchbook. I think this is so fun. Let's see. What else do
we want to test out? So that was a lighter
color of neo coolor. Let's also try a lighter
color of pencil. So I'm again going
to pick a yellow. This one is medium
cadmium yellow, number 520, and let's
see what happens. Let's go back over here. I don't even know if
you can really see that on camera, what's
going on there. But we're kind of getting a really nice layering effect
there, really nice blend. Well, obviously,
this one, you're not going to be
able to see really well because it's darker yellow. And then let's go
down here and see. Again, you get sort of
like a glazing effect. So that's actually cool too. All right. All right. So this is your first
sketchbook spread. I'll finish. Take a minute
to notice what you like. If there are specific marks that you want to
commit to memory, so you can come
back to them again. Textures, color combinations. And if you feel like it, do more spreads like this. Test out different
ways of layering your materials,
try pencils first, and then put markers
on top of them, let's do that real quick
since I mentioned it. So we've got some
pencil right here. So we can see what happens if we lay your marker
on top of that, which is actually kind
of a nice effect. So I'm glad I mentioned
that as an option. Yeah, sort of come back and
add some extra layers here. So that's kind of cool. But yeah, so just pay attention to things
that your light. You like things that
you're curious about, shapes and textures
that are interesting, different colors that
are interesting, different spots where
you've maybe tried to add a little bit of water to your sketchbook to see what happens. You know, there are all sorts of experiments and fun
things to take note of. So as we head to
the day two lesson, which here is my reminder to you that I know you probably want to rush through
all these lessons, but I really recommend doing
this over the course of a week and setting a
calendar for yourself, like an appointment for yourself to day and do a
brand new lesson. So I hope that you will notice things that
you like about this. Make note of them as part of your simple writing
practice for this. And then let it marinade. Let it sit until tomorrow. Come back tomorrow, and
we're going to be doing the lesson on shapes
and patterns. We're going to be using
some of the things that we learned from this
mark making lesson. So Before we sign
off on this lesson, I just want to show you a
couple of things that I like about the marks
that I've made. So first of all, I really love the soft edges that you get from adding a little bit of
water to the eco line, and I really love layering eco line on top of Eco line and then adding
a little bit of water. I think that's just such like
a nice watercolor effect. It's really beautiful. I love the contrast of this dark sap green with
this yellow ochre. I think that's
really satisfying. I also think this little section right here is really satisfying. Like the lighter sort of
peachy colored background. Actually, it's Apricot. And then another layer
of it right here, the yellow pencil, or I'm sorry, the yellow neo coolor
and then we've got the blue neo coolor with a little bit of
water right here. So that's really nice. I'm going to keep that
in mind for sure. I think that might be useful
as I work on my flowers. And then I just really like this little green
section right here. Just the really sort
of, like, earthy greens with the pops of
yellows and the blues. Looks like a little landscape. So those are things I'm noting. I'm also kind of remembering, like the different textures
and shapes that I made with, like, different
brush strokes here. I hope you enjoyed
this first lesson in our sketchbook practice. I can't wait to hang out with you again
tomorrow when we're going to be doing a lesson on shapes and patterns that's
going to build on this, and it's going to be really fun.
12. Day 2: Shapes and Patterns: Hello, artist, and welcome to
Day two of Sketchbook SDs. Hopefully as Day two. Hopefully, you did
this yesterday, and you can come back to it today and take another
look at it and make note of anything
else that you see that you like
or don't like or, you know, that you're
interested in bringing into your work as you progress
through your sketchbook. In today's lesson, we're
actually going to be thinking a lot about shapes and
patterns, which is exciting. So I am going to
We just pen down or clip down both
sides of my s book. And now is actually
a really good time to be looking at the reference photos that
you got with this course. So you got a PDF that you downloaded at the beginning
of the course, hopefully. It's got all of these
different flowers in it, just isolated, different
flower shapes. We've got, as you get further back in here, some
sort of, like, meadows and landscapes
and macro shots. Just a whole lot of,
like, floral inspiration. And then at the end, I've
added some leaves and foliage. For those of you who
feel a little bit more inspired by those things. So what I want to do as I
get started with Day two, Again, we're thinking
about shapes and patterns in this lesson. So I'm keeping in mind what I learned yesterday about
textures and shapes. But I also am going
to be thinking more specifically about
wild flowers today. Now, I'm not going to be drawing flowers from the
reference photos. I'm actually not going to
be drawing flowers at all. What I'm going to be doing
is I'm just going to be concentrating on creating
some bold shapes on my sketchbook page, and then I'm going
to layer some marks and some textures and
some patterns over that. Um, this is just, you know, another way for us
to explore before we begin creating art more, like, final art in
our sketch book. And if you're wondering if this is indicative
of my process. Often, it really is. I really spend a lot of time in my sketch books exploring all the things that
I'm sharing with you, exploring shapes and lines, and patterns and textures, and different ways
of doing things. If you watched my
sketchbook tour from earlier in this class, you'll see that my sketchbooks
are really full of unfinished thoughts or just like little bits and
pieces of thoughts. So that's kind of where
we're at right now. We're just kind of
getting a hold on the language of what
we want to draw. What we want to say as artists, what we want to put down on
these pages, and, you know, we're picking the
way that is going to feel that's going to bring the least
amount of friction. There's so pressure in
this because, like I said, we're not picking this
up and drawing flowers, like, write the second. We're kind of easing into it. So what I want to
do right now is I'm actually taking
a look at my PDF, and I'm just going to
scroll through here. And as I scroll, I'm just
going to make note of some things that I noticed
as far as shapes go. So one of the first things I notice is these yellow Tandies, have these really nice
sort of circular shapes. So I'm actually not planning
this spread at all. I haven't practiced it, so Um, we're just going to see
what happens as we go. So I'm going to go ahead and start with these yellow Tansis. I'm not really looking at
them for direct reference. I'm just thinking of
Okay, yellow dots. So that's what I'm
going to do first. So I've grabbed my light
yellow eco line brush pen. And I hope this shows up
on camera because this is a very yellow yellow. I think it's okay. Yeah. And I'm just going to draw I'm actually going to
draw a cluster of dots because in the
reference photo, the tansy in, like,
a little cluster. You can choose any
shapes you want. You don't have to be
inspired by this tansy. You can be inspired by
anything in the PDF. You can be inspired by
anything in your surroundings. You don't have to be drawing wild flowers if
you don't want to. U I'm going to draw a
couple more over here, so we kind of have like
a balance on the page. Now, you can see from yesterday, a little bit of lead through is happening
on the page here. It's fine, though. It
doesn't really bother me. So let's go back to our PDF. And let's see if anything
else pops out right away. I actually really like this. These little leafy shapes
right here on this vetch. So let me Let's just draw
some random shapes. I'm actually just going to use my dark sap green pencil here. Let's just start drawing in some shapes that echo
that vetch that we saw. And let's do one over here to to kind of balance
out the composition. Let's have it. Let's have
a cross that circle. That's nice. All right. And now I want to draw in those sort of like
oblong leaf shapes. So Let's see what we can do
with the brush pen here. I am just varying the
pressure on this as I go just to try to get
like a leafy shape. And these aren't perfect. They don't even really
look like leaves, but That's not the point here. The point here is
that we're exploring shapes and patterns and
a little bit of texture. And we're also just
getting more in touch with the materials
that we've chosen. You know, if you're using these eco lines for
the first time, look, look how juicy that is. You're just getting
used to, like, the flow of these
pens or markers, getting used to how they
layer over everything. Well, that's fun. See, I like this already. This is, I like these
screens with these yellows. And these are all things
that I'm just sort of like tucking away so that I will have them when I'm ready to make something
more finished in my sketchbook or make a finished illustration
somewhere else. Let's see what else
we have. Oh. So I really like the shape of these. I like the sort of like Almost like a cup
shape of the whole flower, and then I like the shape of the individual petals as well. So those are fun. I'm going to grab an orange because I
don't have this color. Remember, I picked my
color palette first. So I don't actually have
this sort of, like, burgundy color available to me, which is frankly fine. I don't think that's a big deal. So I want to definitely draw L et's just draw some petals in the general
shape of these flowers. Oh, wow. I really like
that shape a lot. Hm. That's nice. Okay. And let's do a
smaller one down here. I like when I'm drawing
shapes like this. I like to actually just
leave the marker or the pencil or whatever down
on the paper the whole time. Just use it pushes me to make things maybe a little quirkier. Then they would be otherwise. All right. That's
actually pretty cool too. I'm actually going to do
a couple more of these. I feel like things are looking
a little too even if I do three of those as well
as three of the vines. I'm doing right across the
bleed on the sketchbook here. I love sketchbook spreads
that go all the way across. I think that's fun. Now
that I'm looking at this, I kind of like this little
like swoohy angle motion here. So I'm just going
to build on that by adding these little shapes here. Again, this is not anything. I'm not trying to draw flowers. I'm not trying to make
anything really beautiful. I'm just kind of exploring and seeing where
it goes as we go. So let's have another scroll, and let's see what
else we like here. There's a lot that I like.
Honestly, they're flowers. There's so much that I like. So it's actually
really hard to pick. I love these shapes. Um, I actually I love these
little flowers right here. Oh, look at this. So, I don't
know what plant this is. I'm usually better at plants, but I love these little, like, heart shaped sort of leaves. So let's add some of
those in. Let's grab. This is one of my
favorite Ecoline colors. This is bronze green. Oh, it's so good. So let's just grab a few of these little heart shaped
petals, petals, leaves. I'm going to start
just placing them ad. No real rhyme or reason. Let's just add a
whole bunch of these. That sounds fun, doesn't it? All right. Those
are really cute. Now, if you're looking at
these and you're thinking, Oh, but in the photo, they have tiny stems on them. We're going to be going
back and adding in some patterns and some line
details and some textures. This is just about creating some bold shapes on your pages. Also, we don't have to follow these photos exactly
as they are. We're just going to be
making it up as we go, learning what we like,
and exploring that. I really love these with the different kind
of oval shapes. So let's include some of
those in our sketch layout. And I wonder what
color we should use. Feel like we've got a
really good balance so far. So let's actually do these
in a couple of colors. So this is a yellow ochre, and I think I'm going to do one that sort of runs
right here to start with. So I'm actually just
going to start filling in shapes and I think I'm going
to switch colors as I go. That sounds fun. So we
started with yellow ochre. Now we're going to switch
over to deep yellow. This is a favorite yellow
of mine, for sure. And you'll see there, I've got some nice
mixing going on there. That's another thing
that I love about these eco line brush pens is
that they really mix a lot. You just get so
many fun effects. So is this light orange?
I don't know. Let's see. I can't tell if that's the
color that are used or not, but we're just going to go with it. It doesn't really matter. It's not the end of the world. If we use a color that
we've already used. And then let's grab this one we definitely
have used, I think. This one is deep orange. I think that's the one
we've already used. Or maybe it was the
lighter orange. Yeah. Maybe use this one yet. Which is a shame because
this is a great color. Oh, that's so pretty. I love that. I really love this. This is really fun so far. I hope that you're
having fun, too. I hope that you're
drawing along with me and having a lot of fun with. So I want to add in a
couple more of these. Hm. So I think that I
might do one right here. Let's grab our
yellow ochre again. And let's Just
start these shapes. I love taking a flower and just abstracting
it into just it's, you know, little
shapes, little details, and it doesn't necessarily
have to look like the flower. Now, I'm going to scribble
my marker here a little bit. As you'll see here, the tip is a little stained where it
mixed in with that green. So I'm just kind of scribbling a blow up at the top of
my page to clean it. Can do this on another
sheet of paper. If this makes you feel panicky, you just scribble on
the page that you're working on. You don't
have to do this. It doesn't bother me. So
I'm totally fine with it. Alright, I really like these. So I do want to do one more, and I think I'm just
going to have it kind of run this way across the page. Yeah, so let's turn our
sketchbook a little bit. I don't know about you. But I sometimes forget that I can turn my
sketchbook or, you know, whatever I'm working on,
because I, you know, I have been a photoshop
illustrator for many years. And, photoshop, I work on a
sintik, which, of course, I can turn it, but
it's not the same as, you know, turning
a piece of paper. So I'm kind of out
of the habit of it. And that does solve
that mystery. This was actually
the light orange. Now, we've got the colors next to each other. You can see. Anyways, I do sometimes
just forget the simple act of rotating your
sketchbook or your paper. Can just be so powerful and
can just make your life a lot better than it maybe
otherwise was going to be. Oh, these are so fun. Okay. So let's see where
we're at with this. I feel like we maybe
need to add something in here because I think like this part of the page
looks kind of bare. And it can be. You know, this isn't a finished
illustration or anything. So it actually can be bare. Let's see what else
we can put in here. Shape wise, that
looks really good. I'm just kind of
flipping through Our different options
from our reference pack. There's so much
good stuff in here. I actually think I'm going
to go back and use these. So like this flower
shape right here. I think I'm just going to
do it kind of scribbly, like the flower shape is. I think that's a really I
think that's a fun idea. So I am going to go back
to our original yellow, which is this light yellow, and I think I want the size of the shape to be
between this and this, and I just want to use them
to fill in some space here. So I just kind of
scribble. That's nice. Down here, we'll do one and we'll just have them
overlapping a little bit so we can see what kind
of effects we get because I really liked it
when those overlapped. Okay. Fun. Then we'll do maybe one here. I picked up some of that
green. That's nice. We'll do a little one here. And then I think just
one here is really good. Okay. So we need
to take a second, and we actually need
to let this dry. Because again, if you
are trying to use your crayons or your
pencils or wet marker, it's going to behave a
little differently than, you know, it would otherwise. So at this point, I think I'm actually going to
use a little bit of water. While we're here
because that was one of the things I liked yesterday. So I've got my quarter
inch square wash brush. I'm just going to dip it in
a little bit of water and then dab it on a
towel because again, this sketch book is not
a watercolor sketchbook. It's not actually made for this, but it can handle a little
bit of water, which is nice, especially with these
eco line markers because they are so pigmented and if you add
just a little bit of water, you can get some really
gorgeous effects. You see down here at the bottom, the brush is dry. I'm actually getting
a dry brush, texture, which is nice. I'm just going to do this
on this specific part of this page because I don't want to I don't want to be waiting forever
on this page to try. Okay. I think if I just do
these little bits here, I think this can dry while we're working on some
of the other pages. Now you'll see here because I used a lot of water
on this first one. I really lost a
lot of definition. That makes me sad. I'm actually going
to go back in with some markers and see
what we can pick up here. This is already wet. I'm going to get some
different effects by going in here
with my markers. This is just another
really fun way to explore shape and
texture and mark making, see what happens when
I layer this in. Now, because this is wet, and these markers are very,
like, you know, juicy. We actually don't want
to do too much of this layering because the
pages will begin to pill. I don't know if you
can see this in the video, but,
like, right up here, the paper is starting to, like, come away a little bit. So we want to make sure
that we're not being too hard on our paper. So this one I added
too much water to I do like these
shapes right here. Actually, I really
like this one, where you kind of have this
dry brush sort of thing, so just very little water,
I think is the way to go. And then I also love this. It has a nice amount
of water as well. All right, so now it's time
to jump in and start adding some patterns and some lines and some shapes to
this page that shapes. We've already got
shapes, textures. We want to add
textures. All right. So I'm actually going to
start with these yellow dots, which were some of the
first things that we drew. And I'm thinking back to what the reference
image looked like. But I'm not actually looking at the references at this point. I've turned off my iPad and
set it off to the side. At this point, I'm just
trying to remember what I saw as I was being
inspired by these shapes, and I want to start
filling these in. So with the Tanss, for example, I know that I'm going to start filling them
in with circles. I'm using a dark cadmium
orange karen luminous pencil. Look how pretty that
looks over those. Oh, I was actually going to fill this all the
way in with dots, but now that I see just
the center, I like that. And then that'll give us
some room to play with some more cool
textures and lines. That's exciting. Yeah, we'll come back to that and fill
in a little bit more. Now, since we're on day two
of this sketch book course, your goal for today
is to work in your sketchbook for 7 minutes. I've obviously already
gone longer than that. So don't feel like you need
to fill up this much space, give yourself
permission to do what feels good for you instead of feeling pressure to do
exactly what I'm doing. So if you need to work less time on this page, then
definitely do that. Your goal is 7 minutes. I am very distractedly, going
to go longer than that. So I know I said we weren't actually drawing
specific flowers, but I couldn't help it. I really wanted to turn
these into flowers. You know, so that's
what we're doing here. We're making these
little flowers. You see, I got this
little boop here. That's fine. That's not
the end of the world. So that goes behind there. Another one here. Those
are kind of cool. So let's think about
these guys right here. I think I'm actually
going to pick up this dark sap green
pencil that I love so much and just make them
sort of like I don't know. Maybe they're just little leaves floating through the
air on the breeze. Or maybe they're just fun
shapes that I like to draw. I think it's fine either
way. That's nice. Pretty. Oh, I forgot
this guy, didn't I? I bet you saw the
items I was drawing, and you were like,
She's missing one. Alright. We'll get that guy. That's pretty cool.
Alright, I love that. So now, this is dry. Yeah, this is dry, but we actually need to deal
with these as well. So I actually want to grab. I wonder what color we
should use for those. I really like this orange. This is, um Oh, this is a neo Color two pastel. It's number 50. I'm not sure what color it is. I think it's
actually just orange or it could actually
be flame red. I love flame red. So I am going to sharpen
this really quick. This is a Fiskers, crayon sharpener that I use
for my neo coolor twos. It works really
well because I like my neo coolor twos to be
fairly sharp when I use them. So that works well for me. So I am actually going to
do a pattern on these. I'm going to draw in stripes. I really like the look of
this orange on orange. Again, just making
note of that for future reference in just for this sketch book series
and also just for the future. I like this this color
combination lots. This is one of my favorite bits of pattern in my sketchbook is adding stripes and
dots to things. Now, you might find that you
like something different. You might find that
you like drawing organic shapes or squiggles and wiggles and
things like that. What whatever feels good to you is what you
should be doing. You don't have to
worry about what I'm doing or what any other
artists are doing. You just have fun being you. That's one of the cool things about a sketchbook is like this is if you're a
professional artist, if you're working illustrator, if you work with
clients or customers. A lot of your art
is going to have some other people's
opinions involved in it. That's sometimes hard.
It's nice to have this one space where you know that it's just
for you, and no one. No one else matters right now. This is your sketchbook. That's all that matters
here. It's just that you are having fun and
exploring your art. So let's I wanted to add
a little stems here. We're drawing like a pseudo
flower garden at this point. Not actually based
on any flowers, but this is good information
to know as we go through the lessons over
the next seven days and do a lot of experimenting. This is how we get to know what we're going
to end up drawing. Because we're not
going to end up drawing on day seven
from reference photos. We're going to look at the
reference for inspiration. Of course, we love that. But we're not going to be
staring at the reference, we're not going to be
letting the reference loord over our creativity. Let's keep that in mind now. All right. So I want to do a couple more
things on this one. I want to add some lines to
these yellow tansy dots. And I actually think
I'm going to pick. I'm going to use
this Karen Dash. This is a jade green. I've also got a
pencil over here that is cobalt green that I think would be
really cool for this. But I don't know.
I just very often like the wonkiness
of the neo coolors. Oh, look at that.
Isn't that fun? Yeah, I kind of just love
how this line is a little more uneven than if I was
using the colored pencil. It's actually one of
the things I love about the No Color twos
period is that it kind of forces me to not be as
uptight as I naturally am. And I actually don't
say uptight as, like, a negative thing. Like, I think in general,
it's not the worst. But when it comes to art making, I think it's fun to let
go of the perfectionism. I love this, though. I love this yellow with the orange centers
and the blue lines. Like, I love it. So again, making note of that is something that
I might want to come back to as you know, I
progress through here. So when I finish this drawing in my sketchbook and
I go to, you know, my writing exercise, this is one of the
things that I'm going to note that
I really like. I like this color
combination a lot. Love this combination
of, like, you know, a circle shape and
tiny little dots in the middle and then
stripes on the outside. I think that's
actually pretty cool, and that's something that
I can definitely use. Now, I've grabbed the
cobalt green pencil, and I'm going to try to add some little like petal bits here, you see that I have
actually kind of given up on the
idea that this is not a flower garden because it is obviously a flower garden. We did start with some,
you know, bold shapes, and now we're just
adding textures and details and kind of
seeing what happens. So, you know, you might want to you might be using
different materials than me. So if you are Make sure that you're
looking back to your day one exercise when you need inspiration
and that you're thinking of the
different ways that you can hold your
pens and pencils. I forgot another one here. That's okay. Cross it
over there. All right. And now I think I'm
actually going to hang onto this guy. Actually,
you know what? I'm going to use this guy. This is a number 229, No Color two. It's
already kind of sharp. So I'm actually going
to use it to add some details onto these flowers. So let's, I don't know. I'm kind of nervous
about this choice here. But this is a sketchbook, and this is part of the fun
of a sketchbook practice. You know, you're trying things that may not
necessarily go well. And if they don't go well, which I kind of at about
this choice right now. I'm not sure that it
was a great choice. But, like, if it
doesn't go well, then it's cool because I
can try something else. So I'm actually going to pick up this vermilion
instead and see if I have different feelings if I use it to add some
details to this flower. You know, this happens
with sketchbook practice, and this happens with art. Sometimes you're cruising along, and everything is
going really well, and you're really happy with how everything is turning out. And then you make one choice. It goes a little sideways. Not that this has gone sideways, but I actually think
that I like these better when they're
just the dots when they don't have
these details in them. So, you know, that's just
a little something to make note of as I work on the next
lessons in my sketchbook. So let's turn this. I'm trying to think
if I should try a different color instead, or if I should just
commit to this one. Just for fun, let's
try the pencil. So this is my dark
cadmium orange, luminance, and I'm actually
just kind of kind of hold it. In weird. Again, because I'm trying to let things
be a little quirky. I'm trying to uncover what happens when I don't
hold on so tightly to the art that I'm trying
to make and instead just wander along the path of what maybe the
art wants to be. Maybe where it wants to go. Okay. Alright. So that's it for D two's shapes and
patterns exercise. I hope that you enjoyed this. I hope that whatever you
are creating so far, you've enjoyed the process. You don't have to
love the outcome, but I really hope that you can
get to the place where you really enjoy the process
more than anything. And then, of course, take
a few moments as you wrap this up to go through
your writing exercise and to make note of the
things that you like, and also make note
of the things that you maybe want to work
on in the future. All right. So, again,
I encourage you to do these exercises,
just one per day. So you've got plenty of
time to marinate on this, and then when you come
back to it tomorrow, you will have new eyes, fresh eyes, and you'll see some things that maybe
you missed before. So give it a day. I'll see you tomorrow.
And for Day three, we're going to be doing
some contour drawing.
13. Day 3: Contours: Hello, artists. Welcome to day three. In this lesson, we're going to be doing
some contour drawing. So I'll show you what I'm
talking about in just a second. We're going to be doing some
regular contour drawings and then some blind contour
drawings. This is day three. So if you're working up, if you're stepping up your sketchbook time
every day this week, today, you'll be
spending at least 10 minutes on this exercise. So I've actually pulled
up a reference photo from our bunch of this I forget what kind of flower this is because I'm recording, so, of course, I can't remember. But we've got a lot of different
angles with this flower, and I think this is going to be a really cool one
to experiment with. Now, the gist of a
contour drawing is that you are drawing
by keeping your pen, pencil, marker,
whatever, on the page. You're not lifting it up at all. So there's one version
where you can look back and forth between what you're drawing and your
reference photo. And then there's another version where you look at
the reference photo, you do not look at
your drawing at all, and you kind of
see what happens. So we're going to
do both of these, and then hopefully that'll
inspire you to get going. So I am going to
choose material. I actually really like the
Karen dash neocolors for this. But I'll show you example. Examples of a few different
materials as well. We'll do one of each. So I would actually suggest doing testing on each
of your materials, and then whichever
one feels like most, you know, intuitive
and fun for you. I would do more
examples with that. So, again, I've got my
reference photo here, and I'm going to be doing a
contour drawing right now. So I'm actually just going
to be looking back and forth between the reference
and my page here. And I'm not going to be lifting
my crayon off the page, and I'm actually
going to hold it. I like to hold them
this way because it gives me even less control. Which, again, for a person who really
likes to be in control of everything and tends to get a little easily
uptight in her art. This is a really
good exercise for me. It's really enjoyable. It doesn't make me
feel panicky at all, which has taken a
long time, honestly. But, yeah, I have come across all sorts
of, like, you know, good ideas that I don't
think I would have come across if I had not allowed myself to be a little messy in my art sometimes
and try some new things. These are fun. Oh. See, this is where
the fun comes in. So again, looking back and forth between my drawing in
my reference photo and I am not picking my crayon up at all
and just tracing back across. Oh, I'm going to put
this one on the side. Actually, it's on the opposite side on the
reference photo, but I don't want to
cross the page here because I want to be able to
use it again in a minute. Okay, so fun, right? This, to me, is always
really exciting because, I'm uncovering
some, wonkiness and some quirkiness that I probably wouldn't
uncover, otherwise. So this kind of forces me
to explore a little bit, which is very fun for me. Alright. So I've picked up
aluminuus colored pencil now. This one is a number
850. It's Cornelian. This time, I'm going to just be looking at
my reference photo. I am not looking at my hand. So you're looking at my hand. I'm not. And I am choosing a different
reference this time. So Let's see how this
goes. All right. And this is a funny exercise
because I'm telling you the temptation off
the page I felt that. Temptation to look
and to see what's happening is so
strong. Oh, gosh. I just I don't know. I feel I feel very
tempted to look, but I'm not going to go back across for the last leaf
shape. Oh, you know what? That's actually
not bad. This part actually went pretty well. Compared to the reference photo. This is hilarious, but
I also kind of love it. I feel like there's, like,
some magic happening here. So I'm going to
go ahead and turn to a new page of my
sketchbook here. I'm going to pick another
reference photo and I'm going to pick my trusty
Bronze green Eco line pen. And we're going to start. Let's do another blind contour. I think that was
actually really fun. So let's do another
one of those. I'm actually going to pick this. We did this one first,
and then this one. So I think I'm going
to pick this one. Um because I think it can go across this double page here, and that's going
to be really cool. All right, again, I'm going
to do a blind contour, so I'm actually not looking
at what is happening here. I actually Other is the gutter. And then let's just try
to get those shapes in. There's one that goes across. I can't really see what
my marker is doing, but I really feel like
I'm probably pushing on it a little bit
hard. Sorry, marker. Okay. Okay. I just
feel like this is. This is so funny because, like, in your head,
you're just like, Oh, no. This has gone sideways, but you also can't see. It's done. Okay. Okay, well, that actually is not quite as sideways as I
thought it was going to be. So I feel like that's pretty
pretty exciting for me. All right. So that's going to be it for day three of
contour drawings. Now, you can keep
going with these. I actually encourage you to keep going with these.
Don't just try three. So like, of I started
with the neoclor. I tried luminous pencil, and then I did the marker. I actually like the
marker the best. It just felt really
nice to draw with, you know, they're just so soft. Um, so it felt really nice,
and then I don't know. I just there's
something satisfying about this whole layout
here, so I love this. As always, I just want to remind you to take
a few minutes to do your writing exercise
about your experience today. Make some notes of what you like and then make some notes of what you'd like to explore
in the future, as well. Spend at least 10
minutes on this. So you can actually do quite
a few contour drawings in a ten minute period. So that's very exciting for you. So, hey, I'll see you tomorrow. For Day four, we're
going to be working with some blobs and lines, which is going to be really fun.
14. Day 4: Blobs & Lines: Hello, friends, and welcome to our Day four Sketchbook
Seeds Exercise. Today, we're going to be drawing some blobs and lines
in our sketchbook. This is going to be
a really fun way to get to know some
of the flowers that are in our reference photos and some of the things that, you know, we think we
might be inspired by. Now, you actually
don't have to draw the same things that I'm
drawing. I hope that you don't. I hope that you explore things in this reference packet that are really
interesting to you, or if you don't find anything interesting in these flowers. I hope that you dig up your own reference and
explore the things that feel exciting
and curious to you. So we are going to do an exercise that
I call blobs and lines. Um, you remember when
we started this, I mentioned that we are not going to be doing any sketching, so, which I know was weird
for a sketchbook course. What I basically mean is
that we're not going to be doing any, like, pre drawing. So we're not using any graphite pencils to sketch anything in. We're actually just kind of
like free wheel in here. And this is going to be an exercise that
you're either going to think is really fun or it's
going to drive you batty. So I think that you're going to think it's
really fun, though. So I'm actually going to focus on this flower, first of all. I'm going to show you a
couple of examples of this. It's just a really fun exercise. So I'm going to start by laying
down some blobs of color. And I'm going to
be doing that with my neo coolor markers because, you know, they're
really juicy and fun. So I'm going to start
with a deep orange, and my intention is to capture
these shapes right here. So what I'm going to do is I am looking at this right now. Thinking about what
this looks like, thinking about how these
connect to the stems. And yes. I'm doing as much as I
can to remember that. And now I am setting my
reference photo off to the side, and I'm not looking at them. I want to. I really want
to, but I'm not going to. So I'm going to use
my marker here. And I'm just imagining
there's a stem right here. So I'm going to use
my marker to draw in some blobby shapes. I think. There were
three stems of these. I'm going to make three
stems cause I like, like, odd numbers
of things in art. And I actually
don't think this is right shape wise to have
them going down both sides, but I also don't
care because it's my sketch book, and I
can do whatever I want. And if I want them to look
like this, that's fine. I try to do a little
bit of lighter. Yeah, that was not
lighter. All right. So that's cool. Oops, made
a little smudge there. That's okay. We'll survive it. Let's grab our reference again. Oops. So yeah, that's fine. That's my interpretation.
So, down here, these little guys are just kind of like standing straight up, like a little row of
like Cyprus trees. So I'm going to draw
these in now using my I'm actually going to use the dark green or deep
green because I love it. Reference photos
off to the side. Not looking at it,
really want to. And now I'm just
going to draw in these shapes. Oh, that's nice. Just going to kind
of draw them in in a way that feels possible. Yeah. We're going to do a couple of different
versions of this exercise. So you get to explore with it a little
bit more because we don't always have to be drawing these single line
shapes like this. We can draw some
different shapes. This one's really
satisfying, though. I feel like the line that
it makes is really nice. We'll run that one off the page. And now this guy
is going to need one kind of hat intended to make this
a double page spread, but this is where we're at. I like those shapes a lot. So I'm making note
of that. All right. Now Let's bring these
babies all together. We've drawn some blobs, and now we're going
to bring it all together with some lines. So I'm actually
going to stick with my neo Color two crayons because I know that I will
get a less perfect line. So I'm going to start right here and run a stem to
connect these petals. Alright, I think
that these have, like a stem on the bottom. Hm. Um, It's pretty nice. Let's connect all
that. We'll connect this one. Now this guy. Let's run a stem
here, skip there. Then we'll connect this stem
over here. That's cool. Now we'll just run a
line down the middle. Again, we'll skip there. Run this down, and then we'll
connect this guy over here. All right. So I I want to at this point, I can actually go in
and just give this a little more depth, why not? Let's do that while we're here. I'm actually going to grab
a yellow pen or marker. And since we've already
started with this idea of these shapes,
let's stick with it. And let's just fill this in. We'll do maybe three or
four of the yellow ones. Fit in here. Then
for the yellow ones, let's go ahead and
connect these. Let's pretend those connect
to the orange stems. Cool. And this one
is on its own. All right. And now let's go
in with a different green. Let's pick this bronze
green, my favorite, and let's add in some more of these cool
little leaf shapes here. Let's layer this while
we're doing this. Let's layer our colors and our neo coolors let's
just see what happens. Those are a little
close together. I'm not actually a huge fan
of that, but I tried it. So now I can go back to
having them not connect. Maybe add one out here. Drapes off the end of the page. All right. And
then let's connect these as well with our Karen. I'll just connect
them to their stems. Alright, so that's kind of fun. I really find these shapes to be really satisfying these
little sort of leaf shapes. And I actually I don't love the shapes of
the orange ones, but I really kind
of like the yellow, which were very similar
to the leaf shapes. All right, so this
is the reference photo that we started with. And this is what we ended
up with in our sketchbook. And this is because we're not drawing directly
from these photos. We're really just
trying to pick up some information when we
look at the references and then impart that on
our sketchbook in our own way instead of just trying to draw
from reference photos. So let's do one more of
these really quickly. And I think let's go back to
the tansy. I love this one. So Yeah, I'm just going to
draw this set of circles. We're going to set
that off to the side. This time, I'm going to
start with this number 20 Karen and I'm
just going to use the same spread here and let's just draw
some circles for tans, leave the centers
a little empty. Let's draw some blobs. These are fun. This is like a fun little bouquet of flowers. Let's add some color
variation in here. I'm picking up my what
I think is a flame red. And let's add some dots
in the middle here. Kind of remembering
that color combination that I did on day two with
the yellow and the orange. They look like eggs right now. Let's also. Let's draw
in some circle shapes. Well over here. Vals. Let's
go and fill those in. L et's make some
blobby circle shapes. Okay. Now, the tansy
is, I remember, have kind of like a stiff
sort of stem that come down, and then they have almost
like a ferni leaf. So let's try to do
that leaf first, and then we'll
draw the stems in. So it's actually kind
of similar to this. I think we can kind of
do it in a similar way. Maybe show another side of it. Again, we're 100% not trying
to be realistic here. We're just trying to
explore some shapes and some colors and some
textures and some lines, and just have some fun with it. All right. So I do like that. So I think also the
tansis kind of have a little bottom part
to each flower. I mean, if they
don't, they do know. Or these do because they're
not actually tanss. These are whatever
I want them to be. And whatever flower you're
drawing in your sketchbook or whatever thing you're
drawing in your sketchbook, you can draw it in
whatever way you want to. No rules. All right. And now let's connect
the stem to the leaves. And I think maybe these
connect to a main stem. Again, I actually don't really care what's
supposed to happen. I'm 100% just drawing this and whatever way feels
intuitive to me. And sometimes that is
not going to work. Sometimes it is going to work. I actually find this to
be really satisfying. So, you know, again, the practice here is to draw in shapes without looking at your reference
photo for too long. So you can take a look at your reference photo when you start. So in this case, we've got our tansy here. I was just really kind of
looking at the shapes of the flowers and the stems. You can see that I didn't
really get it quote, right. But you can see that
this is definitely sort of inspired
by this for sure. And these leaves are
inspired by these leaves. So when I look at the reference
photo, I actually see, I don't know if you can see there's some really cool little, color variation in
the stem there. So I actually want to
do that real quick. I'm just going to take
my orange neo coolor and just kind of layer it over. Just as a visual
reminder to myself of, like, Oh, hey, I saw
this and I liked this. I'll just run a little
stripe down there. That's pretty cool. I don't
want to go too crazy with it. Again, I love this
color combination. I'm very happy with it.
Very excited by it. So for today's drawing exercise, I hope that you are having
lots of fun with the blobs. I hope that you are going to give yourself
at least 15 minutes on this exercise if you're
going on the step by step method of building
your sketchbook practice. So give yourself at least
15 minutes, if not more, because I think that as with
most of these exercises, like, you're just going
to have a lot of fun. You're going to want to go
for longer than 15 minutes. I know that I definitely do. So don't forget your
writing exercise. Pick out some things that you
enjoyed about this process, pick out some things
that you would like to explore a little
further in the future. Again, I hope you're doing these exercises like
one day at a time, so you have time to marinate on everything that
you've done so far and sort of collect your thoughts and learn what you like and what
you don't like. Um and come back to these
with fresh eyes each day, because I could
come back to this tomorrow and see
something that, like, I absolutely love and want
to check out further, or I can come back
and see something, like, Oh, like, that
definitely did not work. And that's fine, too. That's
good information to have. So I will see you tomorrow for day five of Sketchbook sets. We're going to be talking
about negative space, which is if you remember, from my polar bear
Sketchbook tour, negative space is
one of my favorites. I'm really excited to
share it with you, so I'll see you tomorrow for our negative space exercises.
15. Day 5: Negative Space: Hello. Hello, artists. Welcome to Day five
of Sketchbook Sets. Today is one of my
favorite exercises. One of my favorite
sketchbook exercises. I talked about it
47 times so far, especially during
the sketchbook. And that exercise
is negative space. So, let's take a look at
our reference real quick. So I'm actually going to pick this clover as my
reference photo this time. And what I'm going to be doing because I'm drawing
the negative space, I'm not going to be
drawing the flower. I'm going to be drawing the
shapes around the flower. And then after I filled that in, I can go back in and
draw the flower itself. Now, the reason that I
love to do this is just really because you've heard this over and over
again in this course, working in negative space just helps me make
it a little weird. Just It helps me come up with
designs and layouts that have little bit more zing than what I would just
normally naturally draw, which, again, you know, I've said it 1 million times. I'm kind of, you know, like, tightly wound as a person. And that feeds over into
my art. It has for years. So it's really important for me to find ways to loosen up, and I don't want to say
force to encourage myself to try things in a
different way that I wouldn't necessarily kind of, like, lean towards on my own. So, I am going to be looking at the reference photo.
It's off to the right here. Let me ski it over a little bit. I think you might be
able to see it this way. It's the clover design that's in your reference photo, PDF. And again, I'm going to be
focusing on negative space, so I'm just going to
be drawing everything that's outside of
the flower first. And then I'm going
to fill it in. Again, no sketching. We're just going to trust in
the process and really just embrace the knowing that we're going to get more
interesting results by not sketching first. So for this one, I do recommend choosing
a single flower or, you know, something
like this clover, one of the flowers on
an isolated background, so you can really see the shapes of the outside of the things. Now, this is going to be a should be at least a 20
minute exercise for you. If you get it done
faster than that, go through it again, for sure. Alright, so I am going
to be looking at my reference photo
as I go this time. And I'm going to start with my I'm going to start
with ego line brush pens, and then I think we're
going to layer on some neo coolor after that. So I'm going to start
with my bronze green, and The hard thing for me when doing things like this is remembering the stems
of the flowers. That's always tough for me. So we'll see how this
goes. All right. So we've actually got
three flower heads here. Just kind of do the
outside of those. Get in there. And let's go
ahead and get the other one. And I'm just focusing on
what's outside of the flower. So you can see my shapes are already gone a little bit weird. That's okay. And
I'm not going to draw all of the leaves that
are in the reference photo. I'm just going to do my best
to get as many as I can. So I'm going to
start with this one, just kind of getting
a stem on it. Yeah. And then as we get down here, we're going to have
some leaves as well. So this one, let's
draw the stem. First. Okay. Now I'm going to start drawing
some leaves on these two. So if I draw a leaf here, I'm actually going to switch. I'm going to switch up
my color as I go here. So I don't actually know if
this is going to work at all. But let's see. All right. So I'm going to start
blending my collars together. I hope that it's reassuring
to you to see me kind of fly by the seat of my pants. As I go through these exercises. Just know that
they're not actually planned in advance
because I really I mean, the exercises were planned, but I didn't really have any practice or
anything like that. So I'm really, very
much just kind of, like, again, flying by the seat of
my pants at this point. I have a general idea
of what I'm doing. But as far as, like, you know, having tested out collars beforehand or anything
like that, p. Absolutely not. Just a Just seeing what happens here. So this and let's
do a leaf here. See, this is a tricky
part, and look, I just messed up. That's okay. I just messed up a little bit because I close this
off, and that's okay. We're going to live with this. It's going to be fine, guys. It's going to be
fine. We're just going to pick it up down here. A little bit. You know,
we'll just pick up the stem shape down
here. There we go. And then we'll start bringing
in some more leaf shapes. And I've kind of blended
my markers together now. I actually think that
I might go through here and add a little bit of water to these
here in a second. I think that sounds fun. Outside of that
leaf shape there. I still got this guy up here that we actually haven't
done anything to, so that's going to
be fun to get to. And I want to do one more leaf. On more leaf right here. Okay. And now let's go back in. You know what I was going
to add a through color, but I just I I'm not convinced
that's a great idea. At this point. Just not
convinced it's going to work. And this, I think is going to be enough
color for the background. I don't want to forget
that I also am going to be adding colors to the
flowers themselves. So I'm trying to keep that
in mind as I go along. So I'm just using
the bronze green. And this is deep green. And like I said,
here in a second, I'm going to start adding
a little bit of water to this page just enough to kind of blim these edges because I think they're a
little rough right now. All right. So I've also closed this stem
off accidentally, so it can't meet up with
its friends over here. Which is fine. You know, I I kind of like
that you're seeing an exercise that maybe
hasn't gone perfectly, and we can fill in the blanks
as we go through here. Alright. So this is my negative space. Done. So again, this is my
flower that I'm working with. And I'm just sort of
picking, you know, my own colors because I don't I don't have any of
these colors in my palette, which is absolutely fine, and I love it. Now, this might be a
little bit too much water on this brand of Sketchbook. But the worst that's
going to happen, is the color is going to bleed through the back of
this page a little bit. And that just means that when we flip over to the next spread, just we just won't use
the back of this page. So it's actually
really not a big deal. Now, I'm just dipping
my brush in water and then tapping it
off on a paper towel, so it's not like, you know, fully the
wettest brush on earth. And I'm kind of doing
a little bit of, like, a scrubbing motion. I'm really mean
to my brush, all, so I just know that
and accept it, especially for my
sketchbook practice. I'm kind of mean to them. Not mean to them. I just, you know, I like dose. I don't like to fuss over whether or not I'm
treating material correctly. We're doing the right thing. I just kind of like to
get in here and make a mess. And see what happens. Times what happens,
does that make a mess? And I say, Okay, I learned. You know, what I
don't want to do or I learned what I need to
pay more attention to. And that's kind of what's
happened here is I've learned that I do need to pay a little bit more attention. W I'm working on this, but we're going to save it. It's
gonna look amazing. It's going to look
really good. All right, so I'm going to go ahead and add a little bit more color
to the background. So I'm going to
grab my neo colors. And this is actually
still pretty wet, but I think that's
going to be nice now. I don't want to press
too hard again, because this paper is wet. I don't want to tear the paper. I'm just being mindful of that. I'm just adding some yellow into some of these green spaces here. Just to really
almost burnish it. If I hadn't been so
irresponsible with my water, I could go in and add some more water over this neo coolor layer
that I'm doing. But because I've already added quite a bit of
water to this page, I don't think it's
safe to add more. If you're using a
skatch book that is, you know, a little sturdier, Then, by all means,
go in and add another layer of water over this and kind of
see what you get. Isn't this an awesome texture, though? I love this texture. Let's go ahead and use this
light olive on some of. Do we love that? I'm not
really sure that I love that, but I've started it, so I'm going to add just a
couple of little spots of it. And then I'm going to go back
in with a different color. Sketchbook practice, y'all. This is what we
do. We try things. We see that they
don't work, and then we commit to trying
different things instead. All right. So this
is Jade Green. This is one of my favorites. And you'll see that layered over this deep green eco line. It actually kind of looks blue. I'd actually
kind of like this. This kind of looks like reminds
me of a map of the earth, you know, with all
the blues and greens. That's really satisfying. Just keep filling
in this space here. Just to give it a
nice cohesive look. Now, once this is dry, we might go back in and
add some extra layers. But we'll see what it
looks like when it's dry. Honestly. That's the real test. What it looks like
when it's dry. Alright. So gosh,
isn't that pretty? I think that's so
pretty. Now. Alright, so now we're going to go in
and start adding in some of our flower details. So I think one of the first things I want to do is just fill in the flower shapes. So I've got an act. No color two, I'm
actually going to leave some of the
white halo around my flower shapes because I
think it's going to provide a nice level of contrast between the flower shapes
and the background. I like that. You don't have to. You can fill in all the way
to the edge if you want to, but I just really
like that contrast. Let's go ahead and add a
little bit of water to these. Now, you might remember with
neocor the only way that you can layer pencil or marker over them
is if they've been, you know, wet like this. It takes away some of the waxins and spreads out the pigment. So that's why I want to go ahead and give those just a little bit of go over with The water. All right. For the leaf color, I'm actually going to
pick up this jade. This jade green again, or am I? Hm. I don't know what
I'm going to do here. Again, this is not planned. So I'm actually grabbing this cobalt green. So
I do this a lot. I'll draw something on this
page, and then on this page, I will scribble and test
colors and all that fun stuff. So that's kind of
what I'm doing here. And yeah, let's just color
in our leaf shapes here. Again, just leaving that
little bit of a white Halo. And this is still drying. So we'll come back to
the flowers in a minute. I'm not trying to make
this perfect at all. This is just a
learning exercise. Actually, it's kind of a
relaxing exercise because to me, when I'm doing a
negative space drawing, there is a lot less pressure to make things look or
feel a certain way. I really lets me just sort
of get into the shapes and the textures and not
really worry about the whats or the
house. So that's nice. I am going to go ahead and
start drawing in the stems. I'm going to give a little
base to the flowers here, even though the real clover
doesn't look like that. That's fine. I don't care. I'm just going to draw through here this area
where I messed up. I'm just going to go ahead
and draw through its. Then same thing here.
I'm going to go ahead and connect these stems. This one. Let's go ahead
and connect that too. We'll just run it under there. And then let's add a little bit of a
pattern to these leaves. We'll do a center stem
on each one of these. This is still kind of wet. So I'm trying not to
put my hand in it. Yeah, we'll just do a
little center stem here. And clovers have actually
got this sort of, like, V shaped pattern
in their leaves. It's like, I love these. This is is one of my favorite
things about clovers. Obviously, the little
flower heads are adorable. So that's a plus
about being a clover. But I also just love. I think that this leaf
is really interesting. It's got really interesting
markings on it. That's really cool.
I also need to do, I think a little bit more
marking detail on the leaf, but I'm going to change it up. I'm going to bring in
this dark cadmium orange. Our leaves actually orange? They're not in this
case, but we don't care. We're going to do
whatever we want, and I think that bringing in a pop of color is what I want. If I don't like this, not a big deal because
it's my sketchbook, and I can get away with doing whatever I wanted
my sketch book. Actually do kind of like this. But as we have established, I'm a sucker for an orange
blue color palette. And these greens are
kind of blue greens. So this is obviously right
in my wheelhouse. All right. So let's those are kind of dry. I think we're going
to get away with it. I think they're dry
enough because we're actually just going
to use another ops. We're actually just going to use another neo coolor I want
to get kind of the shapes of a clover without being
too too fussy about it. So I'm just going
to do these lines, which you think back to day
one, we already practiced. The different kinds
of marks that we could make with these neocolors. And this is where that
practice is coming into play because I already know that I like making
marks like this, and I love how
this flower looks. So good. I just Yeah. I love the style of sort of deconstructing nature so that you're not trying to be
too realistic with it. You're just trying to
say, here's a cool thing. Like this, you may not recognize
that this is a clover. Immediately. But you might
also look at it and say, Hey, it looks like this
person had a lot of fun. And that's actually
what I'm here for. I'm here in my sketchbook
practice to have fun, and I'm here hoping to impart a little bit of this upon you as well.
Because it's fun. I love it. All right. So let's do. What else can we do here?
Let's do a couple of buds. These are these
aren't real flowers, so we can We can fudge it
a little bit, friends. Alright, so let's do five. A good rule of thumb
when you're drawing things is to have an
odd number of them. So like, these leaves here,
there are six of them. I really should have
had seven of them. The flowers, I've
got three of those, and then these
little flower buds. I'm going to do five of them. So having that sort of odd number gives you a
really pleasing visual. If you have even
numbers of everything, it's actually less
balanced to the eye. Isn't that weird,
that you would think that It would make more sense to your eyeballs to have things be even numbers because that's equal
amounts, basically. But it turns out, Oop, your eyeballs really like to see odd numbers of things.
Alright, I love that. Let's go in and let's
add some more leaves. Let's do it. Let's fix it. So I'm actually
just going to draw some line leaves in here. All right. And that
puts us. I'm going to try to do a better job
of keeping these even. So that's three. Let's do
two more and offset this. I like it when a line art shape crosses another piece of line. It doesn't really seem
like it should work, but it does. I'm a liar. Let's put two more in
here and it feels better. I'll do one here, and
then maybe one up here. So we'll lead the
eye all the way up. Now, let's go ahead and put
our little V shape in here. So the leaves are
married together. And I think this might
be it for this one. I don't want to go too much further because I don't
want to damage the paper. Yeah, I actually love this. I think a hindsight, I
may not have gone as crazy with the
background as I did. And actually, This
is a step green. Yeah. Let's just color
over this a little bit. I was going to leave it.
Now, a caution about coloring over spaces where you
have used neo coolor twos. It will clog your
marker a little bit. So when I'm doing this, I will have a scrap piece
of paper or I'll just use the side of my sketchbook over here so that when I'm done, I can scribble my marker a
little bit and make sure that it doesn't have any waxy
build up on the marker tip. So you don't want to ruin it. And of course, like,
now that I started covering up the lighter colors, I'm like, Oh, did I like it? Did I like the lighter colors? All right, so I'm going to take this marker and just kind
of scribble over here. I just want to make
sure that I don't have any waxy build up from
picking up these crayons. And I actually like
this a lot better now that I added more of
a solid color background. But I don't regret going
in with the lighter colors first just because I think it was just a really
nice base for this, and I think it gives
me an added layer of tee and interest. So let's do a little
side by side. Comparison of the inspiration
and the sketches. So I've actually learned a lot here that I will
carry forward maybe into our Day seven sketch
book illustration. So I love these leaves and
this color combination, and I actually really love these flower shapes right here, too. So that's something for
me to keep in mind. I do love this background, but I'm not really
sure that I will do that for the final, like, full sketch at the end of this session.
I'm just not sure. Or the day seven session. I mean, So, that's it for today. I hope that you again, spend at least 20
minutes working on this exercise, if not more. And then don't forget to
do your writing exercise. Don't forget to take a few
minutes to look at what you've done and make
note of what you like, what you maybe don't like,
what you can do better, if you come back to this again. And then I will
see you tomorrow, and we're going to be actually sketching a little bit for the
first time in this course.
16. Day 6: Sketchy: All right artist. Welcome to
Day six of Sketchbook seeds. So today, we're actually
going to be sketching. Now, remember I said no pencils, no erasers, and we're
sticking with that. So we are actually going
to be sketching with, like markers with pencils
and with crayons instead. But we are actually
going to be looking at our references and drawing things directly from
those references. We're going to be thinking
about the work that we've done over the last
previous five days. So we're going to be keeping
in mind things like how we which shapes we enjoyed as we were working
through these exercises, what kind of textures
we want to bring in. We're going to think
about our line details, our compositions that we liked
in the last few exercises. And what we really want to do, though, is keep it loose here. So this is going
to be an exercise that I hope you'll
spend 25 minutes on. And you'll probably use several
pages of your sketchbook. So I'm going to
take a quick flip back through my exercises. Just to kind of pay
attention to, like, anything of interest to me. I know that I loved these
flowers as I went through, and I actually loved
this tansy shape, so this is something I might
use in my piece tomorrow. I really loved these
contour drawings a lot because they
looked a little wonky. So that's something that I'm
kind of keeping in mind. Like, I kind of like how these
look a little off kilter. Actually, like how this one sort of runs up the side of the page, and then I like this
action right here. So that's something
to keep in mind. That one's fun, too. Of course, I love these leaf shapes and, you know, back to the Tanses
again, which I really like. And then from
yesterday's session, I love these clover
shapes as well. And you'll also see from
yesterday's session that the the paint marker blood
through the page a little bit. I'm not super fussed about it. I don't think it's the end
of the world, honestly. So let's choose some reference
photos, first of all. I know I've kind of been
living on this page, but obviously, I put my favorite
reference photos first. I definitely think that's
what happened here. So I'm going to
have a quick look at this flower shape right here. I really liked these
flower shapes, and I think I want to draw
them just a little bit. So I'm just going
to use my marker. And Again, I'm actually just treating
this like I would treat a pencil if I was actually sketching something to kind of learn a
little bit about it. I'm actually just loosely
sketching the petal shapes. And I'm sort of, I would say
roughly following the photo. Let's be honest, I'm never
really following the photo. I really like these little like feathery leaf situations here. This one has feathery,
not really feathery. Reminds me of dill. I like the leaf on a
dill plant. It's cool. Now, you might want to switch. Oh, this is a good page. Should have started
with this page. Yeah, you might want to
switch up your materials as you go or you can stick with the same thing
if that feels better. Let's do this cosmo here real quick. Give it
a yellow center. And then let's grab my trusty
deep cadmium orange pencil, and let's start
drawing the petals in. So this has got eight
petals. I do one. It's kind of got
these little, like, uneven edges on it, which
is weirdly satisfying. So 'cause it's eight petals. I'm gonna draw
four on each side. And then I'll fill
in the extra spaces. Now, that's not as crowded
as an actual cosmo. Cosmo. Is it the single of cosmos when it comes to flowers? I know. It doesn't really
matter, does it? All right. I'm going to grab a
marker and just give this guy stem as well. This is just a good chance to get to explore, see what's up. These have very similar. Oh, those were actually cosmos
that we drew in the last. This is also a cosmo. Just seen from a
different angle. Which I don't know. What does that say for
what we're going to be drawing tomorrow or what I'm going to be drawing tomorrow? You know, I give you all this
reference material because I want to make sure that you can find things that feel
interesting to you. Again, you know,
if at any point, you get through here
and you're like, I'm just not really
I'm not really into any of the stuff that
you're having draw stuff. Feel Freda, get in there with
your own reference photos, look up some stuff
that you like. Oh, okay. Well, I
don't like that that's not in line, but that's fun. I'm just dipping
my neo coolor in water and rubbing it
on the side here. I'm getting a
pretty cool effect. I'm getting a pretty
cool texture here. Cool texture warning for
anyone who knows my work. You know, I love textures in my digital art and
my sketchbook practice. Oh, that's fun.
That's really nice. That's an exciting
little discovery, friends. I love this. Now, if this dries a little
bit before we're done, I might go in with the
dark orange cadmium pencil and add some lines through here. I think that actually
might be kind of nice as well. All right. So let's sketch one more flower. I'm going to do one
more right here. I think yeah. Let's stick with the
blues in the green. So I'm going to draw
this black eyed Susan. I think it is. Yeah, it's
a black eyed season. So I'm just going to add the
little center shape here. Just sort of roughly
block it in. You can do as many of
these as you want to. If you want to draw through the entire the whole
reference thing thing? The whole reference PDF. Feel free to do that. I'm going to dip this
in the water as well. Let's see if we can get
some cool cool effects. Dipping neo coolors and water is equal parts satisfying
and cracking because what are
you going to get? What's going to wind up
on the paper? We'll see. You'll see here that
it's like smushed in with that green
leaf next to it. That is absolutely fine. I actually really love that. That's really
pretty. I love that. Let's go a little
off Kelter here, and let's pick up our deep
orange marker to do this stem, which I'll go down here. Let's carve it around so we
stay on this one page here. If I want to do more flowers, I'll continue with three or
four more over on this page. Been through any of
my other courses or heard me talk about
my sketchbook practice, that I call these getting
to know you sketches. So in all of our
other exercises, we're really exploring
the materials more than anything else and
how they work together. But in this one, we're really getting to
know the flowers and starting to maybe
ponder what we're going to be drawing in
tomorrow's exercise, which is going to be to draw
an entire spread of flowers. So we'll talk a little bit
more about that tomorrow. I have thoughts
about it already, but I want to let this
marinate a little bit and come back to it
later. All right. So again, this is day six. So hopefully you're
up to spending about 25 minutes in
your sketchbook. And don't forget to take a few minutes to
let this, you know, settle on your
eyeballs and think about what you like
from this exercise and what you might like
to carry forward into your art practice and into your sketchbook
practice as well. So I will see you tomorrow
for the final day, our final Sketchbook
exploration exercise.
17. Day 7: Wildflower Meadow: Hello, artists. Welcome to Day seven
of Sketchbook SDs. This is going to be your final
exercise in this course. Today, I hope you'll commit at least 30 minutes to
working on this drawing. So what we're actually
going to be doing today is filling up a double page
spread in our sketchbook. With a wildflower meadow. You are welcome to flip through the reference
photos for inspiration. If you just want to have another glance through and think about the things
that you liked. There are some, wildflower meadow landscapes
in here as well. So you can get some inspiration of how things might look if
you're going to lay them out. I'm actually thinking that I'm going to have
something sort of like this with just a mix of flowers kind of going
across both pages, and I think I'm going to
do a white background. I'm very tempted to
do that sort of, like, dark, greeny
background from J five. But I'm not sure if
that's what I want to do. So we'll think on it.
We will think on it. But yeah, have a flip through the PDF and kind of
get an idea of what you want to focus on as you work on this
wildflower meadow. Before I get started, I'm
just going to flip through my sketchbook and take a
look at some things I liked. So one thing that I
know that I liked, I think I got a little crazy with color as I
went through here. So, I actually really love these specific
colors right here. I think that they are amazing. These sort of, like,
really pretty, like, blue green colors. Big fans of those.
Always and forever. And forever. The
blues and greens. So, I'm kind of
keeping this in mind. Like this paired with
this dark sap green. I kind of want that to be like a main color
combination situation. And then I just
want to, I think, bring in some oranges and
maybe a little bit of yellow. So basically, I
want to stick with the color palette
that have kicked. That's it. That's the note. And also, just kind of thinking
of things that I liked, like, layering some of these markers and some
different textures. Really thinking about
this spread a lot, because it has a lot
of things that I like. It has these flowers
that I like, these little leaf
shapes that I enjoyed. I actually really
like all of these. I think that this
is going to figure heavily into my last piece. Now, that may not be
the case for you. You may have done this exercise and not have found anything. You may have done all
of these exercises and not really
found anything yet. So if that's the case, flip through the reference
materials again, take a look at them and see
what you're inspired by. Those are our contour drawings. Isn't this satisfying to
look through just like a few days of drawings
and just kind of seeing, like What is interesting
and what isn't? Like, what kind of
sticks with you? I just think it's fascinating. It It'll never get old to me, flipping through a
sketchbook and seeing all the things that
I've worked on over days and weeks and months. Like, it's just It's so
cozy somehow. All right. So in terms of composition, I think I'm actually going
to start up here and sweep down to shorter flowers.
That's my plan. We will see how
that goes because I would say that I
historically have a tendency to start with ideas for how things are going to
go in my sketchbook. And then they do way, which is absolutely fine, and it is the fun of
doing a sketch book. So I am just
starting to block in some of these flowers
that I really liked from the day to exercise. I had to think back on
what day it is. Okay. So again, I'm going
to keep in mind that I always want to have
odd numbers of things. So I think that I'm going
to do three of these. And let's just stick
with these colors. I'm going to do my best to not go too crazy
on the colors. Even when I have a limited
color palette like this, I mean, this is technically just three colors
that I've chosen. I still manage to
work in a lot of color variation by choosing different greens and
different oranges, different yellows, which is actually a good thing,
most of the time. But every now and then, I just find that I let
color overwhelm me. Especially in my sketchbook, I kind of let it be
in charge instead of making sure that
I'm in charge. All right. And then let's do the last one right here when we make it a little bit smaller. And if you remember
from day two, I actually really liked adding a little bit of water to these. I kind of like the way that it kind of smushes the
colors together. So we're going to do that. Now, you can get this, you know, the cool thing about the eco line brush pens
is that they are, you know, very watery, so you get a lot
of cool effects. You can really get
these effects with any water based marker. But I've actually found that eco line just a
little bit better with it. It's just a little more flowy. You just almost get that sort of watercolor
esque feeling. If you can get enough water
without your pages buckling. It's really satisfying for me. And you might like
other markers. Just absolutely fine. I'm just here to, like, guide you along in starting
a sketchbook practice, or restarting a
sketchbook practice, whatever your case is, I'm not here to judge your
choices in materials. Oh, gosh, that's really
nice, though, isn't it? Heck. Just kind of softening
those edges a little bit, just really really makes
a difference for me. Just kind of given this a
little bit of a shape. No. Alright, those are
looking really fantastic. Now, I remember from D two, I actually added some line art to them that I did not like. So I think I'm just
going to be layering on some more marker
colors there instead. I think that sounds
like a good plan. Now, I am going to go
ahead and add the stems, even though they're a
little wet, it's fine. I'm just going to use
my eco line brush pen here to add in some stems. And let's add in. Let's add in a little
leaf shape here. Is this a correct leaf shape
for this type of plant? Who knows? I don't know. But it's a leaf shape
I like to draw, so we're going on with it. It's what we do in
sketchbook practice. We just go with it. We
just see what'll happen. Now you might notice that
I've switched from using a binder clip over here to just using the elastic
from my sketchbook. I just prefer that sometimes. But it does kind of leave
like a white border on the edge of your sketchbook
on the edge of your page. So if that's something
that bothers you, be mindful of it otherwise. Go forth and have fun. Alright. So let's draw some
more flower shapes. I really want to bring in, I really liked that cosmo
shape that we did yesterday. So let's go ahead and let's add a little flower
center right here. And then we'll do
another one down here. We'll do two down here. Then let's take let's take our Pach color
and dip it in water. Then let's start drawing
petals this way. Instead of yesterday, we drew in the petals
with a pencil, and then we went in and did
this to add some texture. But I thought it might be
nice to do this first. And then go in and draw in our details when it
dries in a few minutes. It's actually kind
of dry already. Oh, yeah, there we go.
That's nice. That's fun. And then down here, I think maybe we'll
just go a little bit smaller on the petals or not. Or we'll just do whatever the
neo color says we're doing, which is making them
a little bit bigger. You'll see here
it's going a little sideways across the gutter. That's on me for
drawing it like that. No big deal. No big deal. Sketch books are
all about learning. None of this has to
be anything other than a delightful
learning experience. All right. So again,
I'm grabbing a marker, and I'm just going
to add a stem. So we'll take this
guy do this way, who go behind this
otherther flower. Isn't this cute already? Really? Next to birds and maybe sometimes
insects weirdly enough. I just love drawing
flowers in my sketchbook. It's just really relaxing. And like I've said, all along, I think it's really
fun to just, like, deconstruct shapes, and just
kind of see what happens. So I really like this leaf shape. This is like a cross between maybe like a dill plant and then the leaf shape that we did from the vetch
the other day. I'm going to add an extra stem here going off the
side of the page. Feels like a feels like
a thing I want to do. Because I want to add some
more of these little leaves. That's why that's the
whole reason that we're drawing this stem off
the side of the page here. Then let's go over here
and add some little boop. Let's row one that
goes across here. Then let's do one that goes up. Isn't that fun so
far? All right. So we've got a little
bit more space that I'm going to
want to take up here, but let's check. These are dry. So again, I do remember
that I did not like drawing in the details, the shapes here. So I thought instead
what I might do is use my little brush as
almost like a stamp here and just kind of stamp
in some co variation. An We'll do some more here. Fun. And now let's switch
to our darker color. I actually, you can't see this because of my camera angle, but I'm really cont myself rather than rotating
my sketchbook, which would make
a lot more sense. But we're in it now. Just keep. Now, on my practice exercises, so the previous six exercises. I really have a tendency to
sort of push it a little bit, like really layer
everything, try everything. And that's because it's, you
know, all about exploration. This, at this point, I'm actually I don't
really want to say, tone it down, but ale bit. I'm trying to just be a little bit more thoughtful about what I chose for each little
flower section. Instead of doing everything. Just trying to be a little bit more intentional with things. That's not dry. It's a good way to discover that is not dry. Alright, I'm actually
going to leave these flowers for now because as my hands will
tell you, they are not dry. So instead, let's go
ahead and Alright, I really kind of want to
add in some of those, like, circle flowers, but Hm. I'm actually not 100% sure how it's going to sit
with this layout. You know what? Let's do it
anyway. Let's do it anyway. So I'm actually just
going to go in with my marker and start
drawing in circles. Let's fill in the extra space with these circle flowers that I made on my second
day's exercise. They were just really
satisfying, I felt. And I just have a good feeling
about adding them here. Or maybe I just
have a good feeling about wanting to add them here. I really want to add them
here, so I'm going to do it. It's my sketchbook, and
there are no rules in my sketchbook except
that I'm here to sketch, and I'm here to
follow the what if. So, again, if you take nothing
else from this course, I hope that you take the
what if along with you. Just be a little bit curious. Alright, so let's go ahead and I'm going to add
some stems to these now. I'm just going on real light
with my eco line brush pen. It's one of my favorite things about a brush marker is you can really it's a little
weird tangent there, but we're
going to let that go. Yeah, I just love
that you can get all different effects with a brush marker depending on how hard you press
down, how you hold it. Of course, I guess
that's actually true of a lot of
the materials I've showed you over
the last few days. I guess I like materials
that kind of do like, you know, the heavy lifting that you can do a
lot of things with. I think that seems
to be the theme. All right. So that's nice. I kind of want to add in some
of those cute little, like, heart shaped leaves
that we did at first, but I'm not 100% sold
that it's a super idea, so just not going
to do that yet. These are dry enough to draw on, so I'm going to go ahead and start adding centers to these. And I'm just doing a series of, like, open circles
for these centers. I'm also trying
to not mess these up because they are
definitely still wet. But it's our sketch
books. I was fine. If I was going to make this into an a illustration or a
painting, oops that's very wet. I would definitely
be more mindful. But very often when
it's in my sketchbook, that's a time for me
to let go and not worry about getting
things just right, and instead just worry
about showing up and having this fun experience. All right. So my neocor has dried. So I'm just going in
with my colored pencil and just drawing in
these cosmo shapes. And obviously, when I use
the names of actual flowers, I'm using them very loosely. We are not drawing
realistically at all. Rather than drawing more
details with the pencil, I'm taking this number 50. I'm just going to add a
little bit of texture. I'm actually going to go in. I want a little bit more
contrast with this green here. I'm actually going
to go in and add some dark green to the center of the I just want to balance out this darker
green a little bit better. See that looks better already. Right now we only had it in these couple of
leaves and stems here. I wasn't very well balanced. I wasn't working for me. A, I do like that. And I think I think I'm going to add in
some of these heart shaped leaves that I liked
so much from the first day. But I'm trying to think of a way to do it where it's not going to overpower everything. So we'll do Let's do
some trios of them. As like little accents, pieces. Yeah, that's good. Then let's add one
down here, I think. Let's see what that looks like. If we get our dark
sap green pencil, we want to do that?
Yeah, let's do that. We'll connect these into one little section's
see we'll go over here. This one will go over
here. Probably could have ought that out a little
bit better right there, but I think that's okay. I actually do still want
to put some over here too just so it's got a
better flow, I think. So let's All right. So I'm going to add
a few more of these. Now that I started
adding them in, I actually want to add in some
different colors, I think. I think they just do
a really good job of filling in some space. P. Who doesn't love he
shaped flowers every I think that might be it. We're going to add on
some stems for those. Hi, I'm just having one
final look and seeing if there's anything else that
I really want to add. I will be honest.
I'm very tempted to add something else
to these flowers. I just I really feel like
they want some more cont. I know I really didn't like the sap green on the last one. So I'm gonna go rogue
here on my color palette, and I'm going to use this
Holbein colored pencil in luminous opera, which is, like, a bright pink. So, I'm gonna go a
little rogue here. I'm gonna break my own rules. But I love this
luminous pink pencil. Oh, Well, it just broke on me. So obviously, I'm not meant to use it since this
lead just snapped. Alright, so I'm gonna take that as a sign from the
universe that I am not go to use the
luminous pink pencil right now. Absolutely fine. I accept that. However, I'm still going to go in and add
some more to these flowers. So instead of the pink, I'm going to go with my
cobalt green pencil, and I'm just going
to go in and fill in some ovals just to bring in
some more contrast, I think. I really think that's what
these flowers are missing. I really wish that
they were pink. I really wish the
universe hadn't conspired against my
beautiful pink pencil, but that's okay. That's okay. This is what we do on our
sketch book practice. We embrace the art of the pivot. So I intended to use
that pink pencil. It didn't work. And instead, I'm using this cobalt green, which is honestly
absolutely fine. And I'm just adding a little
extra layer of pattern here. And this is one
of those learning moments for my illustrations, you know, So I work
on kids books, and I also make
art for products, like creating cards, T towels, stuff like that, that I license through
various companies. So, you know, even though my sketchbook practice is just for showing up and exploring, I'm always learning things that I will inevitably take into book illustration or creating
an art print collection or, you know, anything for
any of my clients. So drawing this pattern, on this flower shape is really just like one of those
moments where I'm just like, Okay, like, I'm making note of this because I
know that I like it. And I know that I want
to come back to it. So I'm actually
going to finish off by just adding a few more of these random random
little circle shapes, I think, to fill in
some of the blanks. All right, so I'm actually going to call it quits on this. I feel like it's in a good spot. I feel like if I
take it any further, I'm going to overdo something. This is I don't know. I'm really trusting
my gut on this. So I hope that you get to the point
where you can also trust your instincts on something
and not stop because you're fearful that you're going
to mess something up, but stop because what you
have right now feels good. And that's awesome. All right. So let's do a quick flip back. Through our seven dies. So we started here
doing experiments with layering and
textures and mark making. You'll see that I
carried these marks through to the final art. I carried a lot of the neo
color wet techniques over. And yeah, also carried,
like the sort of, like, water on eco
lines forward. This from the second
day, actually really ended up inspiring
my final piece, because exploring these
shapes and patterns and lines really helped me uncover some different flower
shapes that I really liked. Like these ended up in
my final art today. This heart shaped thing.
I'm actually kind of sad. I didn't include
these orange flowers, but it's okay. There
wasn't room for them. But I did include this
flower, which I really liked. We learned a lot on
contour drawing day. This is such a fun way. Contour drawing
is such a fun way to loosen up when
you're feeling like, you can't draw anything or you're feeling really
uptight about your drawings, do some contour drawings. Will not look good. So it'll just make you really
comfortable with the fact that, you can show up and make messy, playful art, and it's
still really fun. It doesn't have to
be disappointing. So contour drawings are fun just to do pages of.
Let's see. What else? These leaf shapes, I really loved and kind
of carried forwards. I'm actually kind of
disappointed in myself for not doing this background
in the Day seven piece, but I also think that
if I had done it, it would have really
kind of distracted from the delicacy of these flowers. But I love doing
backgrounds like these, and I will definitely do
them again. Sketch day. We learned a lot on
this day, this flower. We carried forward into the final illustration and
these leaf shapes as well. Again, I wish I'd kind of brought that into the final day, but I think that overall
our final illustration, sketch, painting,
drawing, whatever. It's really satisfying,
and I can actually see taking this and letting it
be the basis of S Lake. A collection of greeting cards or a design for a t towel
or something like that. I feel inspired by looking at this to
take it even further. And that's what I hope a sketchbook practice
does for you. I hope that it will
just take you along a path as you follow the tiny
seeds of your art practice, and I hope that you
won't just you know, I hope you'll have
fun, obviously. I hope that sketch booking will be an enjoyable experience, but I hope that it will also
give you the courage and the confidence to try things in your
regular art practice, you're working for book
clients or art licensing, or you have your own art shop, I hope that the things that you learn here make you a better artist in the rest of
your art life. All right. So head on over to
the final lesson, and we're going to
do a little wrap up of sketchbook sets.
18. Keep On Keeping On: Hey, there's Sketchbook artist. Congratulations on
your first seven days of sketchbook drawings. I hope that you had fun and learned some
things along the way, even if the things
that you learned were things that you
don't want to do again. I hope that you've learned
to enjoy the process, let go of any expectations
and outcomes. Just kind of follow the
what if of making the art, because that's what
your sketchbook practice is really all about. And following that what if is
how you're going to get to being a more competent
and courageous artist. So I hope that the seven days of sketchbook practice is
the first of many days, months and years of
sketchbook practice for you, and that eventually, you've got, a big stack of sketchbooks, too, so you can look back at them and see the progress
that you've made as an artist and all things that you have learned
along the way. So I hope you keep sketching. I hope you keep making art, and I hope you keep having fun.
 Stephanie Fizer Coleman, children's book illustrator/bird artist