Transcripts
1. Introduction: Hey, guys, thank you for joining me in this fun session on sketchbook explorations. Now this one's quite special because I love holding sketchbooks. But then that's what what this class is about. It's not about holding, but it's about creatively filling those sketchbooks. So I have tried to include some very basic exercises in case you've never doted before. And then there are five fund projects, including both doodles and watercolor backgrounds. So in case you want to opt out of those watercolor backgrounds, then you can just go ahead with the doodle itself. And in that case, all you need to start with this class is a pen and a paper. It's as simple as that. So I hope you enjoy this class, and I hope it gets you kick started on a creative journey. So we'll see you in the next session.
2. Sketchbook Therapy: now, before we start this last I cottage care a bit about sketchbooks that I have. Why I chose is as a double first last and also my general general view on keeping sketchbooks as a regular practice. So, personally, I do in Laura's case books because I am still Cherie harder. So I just hold all fancy sketchbooks. But I hope that all the years thes sketchbooks have helped me immensely in developing a style on. I always have these fees. When I am continuously sketching patterns are bring chloral dude, it's etcetera and thes sketchbooks. I have bean there all the time. Also, when it comes to an expensive people, if I'm leaving down the people, I have this sort of pressure going on in her mind to get this right and that a lot of times it just cosmic creativity. I know it's not trying to think off things like that being an artist, but it happens. But when it comes to sketchbooks, I have observed that I'm much more free and I'm not so worried about the outcome because it's gonna stay in the sketchbook. It's It's for me. It's my personal election, so I really feel that sketchbooks give you that freedom and they do help you in getting back on track when you're lacking expiration as well. So a lot of times I'm just not sure what to grow on. I feel through these sketchbooks and, uh, this always something that helps me get back on track. That's exactly the reason why I justice as a topic, because having sketchbook having regular practice helps immensely. As an artist, it helps explore your creativity and that this, like I said, that this is possible to you. So there is no pressure on you to get a trying. They could be so many field on them to the sketchbook. And that's booking because at least you tried at least something that you did well, would that be? So I have all these kids, but sometimes I focus specifically on one medium. Sometimes it makes on. Like I said, I have freezes. So there's this sketchbook, which is all about watercolors and this lot of patterns and really wanted a list. So maybe Alexis know the little patterns, some future class, and this one here is a washed. It's mostly quashed back into you, and then there was This is that I mental wearing and just a ruling in can water. Hello, Laura. Administrations. So this sketchbook was witness to that, And I have an incomplete one here, so maybe I'll go back to this Sunday. So I hope you enjoy this class. I hope you find some inspiration, and this puts you on track toe some regular sketchbook practice, so see, in the next class.
3. Materials Needed: now coming to the materials of this class. There's no such restriction on any type or brand off materials that you need to use for this class because this is all about exploring your creativity and helping you start that creative journey. So don't worry too much about what you're going to drawer duty on. Just that If you're going to try out the watercolor backgrounds with me, then you need ah, watercolor people sketchbook. So this here is Rece troll artist watercolor sketch book, which is 300 years 700 was important. Now this is needed only if you're going to try outdoor, it'll backgrounds. You can opt out of that and you can simply try and do the patterns. And for that you can do with any normal sketchbook as well. This one here is 110 GSM. But like I said, you can even go for the print of people. So it it really doesn't matter. Now if you're gonna try out the water colors, you can use any set that you have even the student great ones. Because since this is just a sketchbook exploration and this is your own art collection, you really don't have to worry about the brand. But if you're using this, wouldn't red ones make sure that you leave the opposite side blank? Because the Eastern read quarter colors are chalky, they may leave a small. They made much the opposite side, so just take care. If you're using this with great watercolors, in this case, for brushes, you need a flat brush, and a round brush size would depend on the size of people that you're using. And here I am using. The artisans are brushes, but you can go with anything that you have now. When it comes to pence again, you can use any brand of men that you have just be sharing a few of the brands that I frequently use. So all of these are waterproof pigment liners, so there's Unit Ball, Sakura Micron, Bruce Trow and Fabric Castle. They come in various NEP sizes so you can explore different thickness off the lines, so it's usually mentioned on the cap, so it risque tells you how take your name is on again. Since he's a waterproof, you can use any kind of watercolor techniques on them. Apart from this of since we're going to try out the Galaxy background. We need a few or bake pence something like a metallic pen or a white gel pin would do. This is again optional only if you're going to try out the galaxy background. Otherwise, it's just fine. But these metallic or abatements our super fun. So maybe do try exploring them later on. Now, once again, just start with whatever you have. Don't worry too much about the brand or the type of the supplies that you have. This is about having fun exploring creative diesel Just let's get started.
4. Basic Doodling: So let's get started with some very basic excises toe. Help you kick start this creative journey. So even if you have never done any kind of doodling or any patterns, it's perfectly fine. We'll start with simple straight lines. They need not be really street. Just try the best you can, and the next one would be circles again. No need to draw a perfect circle. Just try to get this motion the Sikh, off into your muscle memory. So it just has to be simple random circles. That's it. So once you're okay with these two, like the straight line and the cough that circle, you could cry and build upon these so you can try the street line in tow. A triangular pattern like this are simply use it as a filler by making the small triangles , so we'll talk a bit more about fillers and mean elements later on. Now, another pattern that I really like and I feel is very helpful in developing the circle of muscle memory is this one. So it's just a co v v V thing, but it really is helpful in getting the motion. Right now. You can use TheStreet lines are these curves in various other elements that we're gonna try out. For example, In the sleeve, you can use three straight lines to fill in the details. Just make sure that you start at a single point and follow the shape of the battle. So it should not be this random straight lines. It should have some sort of a rhythm to it, which can come by simply following your overall shape of the battle. What? I'm trying to see where here is, for example, this one. If I just grow random lines like this to fill in the details, it is not going to give you a good picture. So try toe, create that balance that rhythm in your composition, so so that it looks good. Overall, we talk a bit more about this again and sometimes, but and again, once you have the circular motion and please, you can try out some leaves, which are again great for both main elements and Phyllis So tryout, creating some small shapes like this and just filling it up with the lions or circles again . These are some very basic exercises that can help you get started on, but If you already doodling or drawing, then you can just use this as a refresher. So let's get started with the main elements on the Phyllis in the next class.
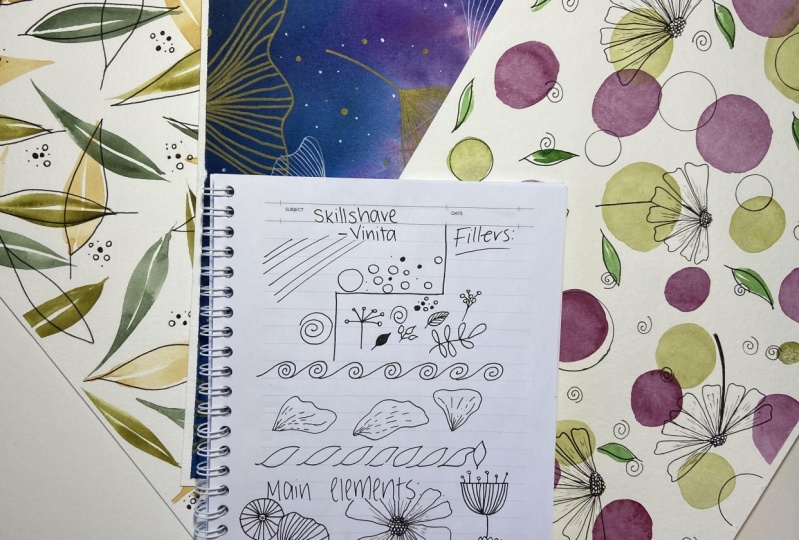
5. Main Elements & Fillers: Now I divide my major elements in tow. Either fillers or you mean admits vein elements are once that are prominently there in your composition. While everything is the small metals are small stuff that you put in between these mean elements are pillows. So I usually over one or two main elements and then fill up the remaining space with fellas . So I'll start with this in Kalief, which is kind of my favorite. It's like therapy. It's just amazing. Getting lost in the deal's off these patents. Like I said before, try to follow the overall badly golf or with sheep of the battle. You don't want it to look unnaturally, and I'm just trying to fill in a little bit more detail over here. Okay, I'll stop it that now let's try some florals as well. I'm starting with the central part over here, and then I'll be filling up the battles leader. Now the pens have to follow this circular part, so if it is starting out, just tried doing this for the pencil and then draw the petals first. Also, you have to take care that the stem matches dissenter many times. We don't really bother about this, and it Florals just look wrong. So just take a little bit extractor that you stand matches the exact center now filling in the DPS again. If you feel that your hand movements is being restricted because of the ankle, just keep rotating the people sketchbook. I know this is a very simple thing, but a lot of times we just forget things and people doodling in an area which is not comfortable earlier than non physical, because right away that and tried to keep repeating your people so that your hand is that comfortable, cynics tell Cry another floral, the stain starting Myths center and then trying this food so and then we started. The pedals can also produce some back pedals just like this. Then we add the details. Can we just following the shape off each badly and just letting the lines all the talking and trying to add a little extra edge to each of these petals that there's a visible separation? Keep rotating as soon as you feel that you have just getting restricted, try to be patient and not rush this because, he said, it's a lead of meditative practice. Make sure you give this time, make sure you just enjoying the process and not trying to rush through it now. I just had some details to the center, just trying to fix the edges and then the back. Please. Let's start with another floral. It's quite simple. You just going through again. Draw so so that we have an overall. She you just be in this the first few times when you just started. Once you start trying these flowers, you would be good without that auto mastery certain. So don't worry if you are doing it too sweet four times perfectly fine. Like I said, it's all about building the muscle memory, so just try and little as much as he can. Now that the first layer is done, I just pad the back. Now that you're done, really, just add a few more details. I'll start with center, leaving the centre blank. Just added a few details around Oh, for the petals. I'm just doing simple daughter lights, - so that's done. Now we try a little simple floor. You think a mix off the Seiko that we tried all you on simple street lights create something like a bird. - So another simple pattern. I call this the amoeba, but it is just fun. It is something which you can pry out and looks really good. If you drank it out with a white or in a big Ben on a narco background, look super fun. This is just an adult. Now, after this will be covering the fillers. So since these are your mean elements, you're gonna be using the's predominantly. But whatever species left is going to be filled with some simple elements or maybe a shorter version off the same element as well. So it's check some fillers now. So I am What are we sharing? Some very basic pillars that use on Duh. This will be a part of the projects as well, out with my favorite, the landlines. Now you can do this in a couple of SMEs, but this is the simplest re that I really like that this is just then there, Cisco, which we practiced earlier in four section where we were just building up muscle memory. Also, some simple things like lords or leaves leaves are again, if you ready, can try them out in different ways on, and they really add to the overall composition, so it helps in having these figures. It may not be any specifically she really your composition. Like, for example, if you're doing florals in. Still added, these girls are trying. It looked good. As long as it goes, everything goes along with. You can also try some simple Berries like this or us more leaf fragments. So it will cry and mix and match these in our projects along with mean elements on it, So see you the next last.
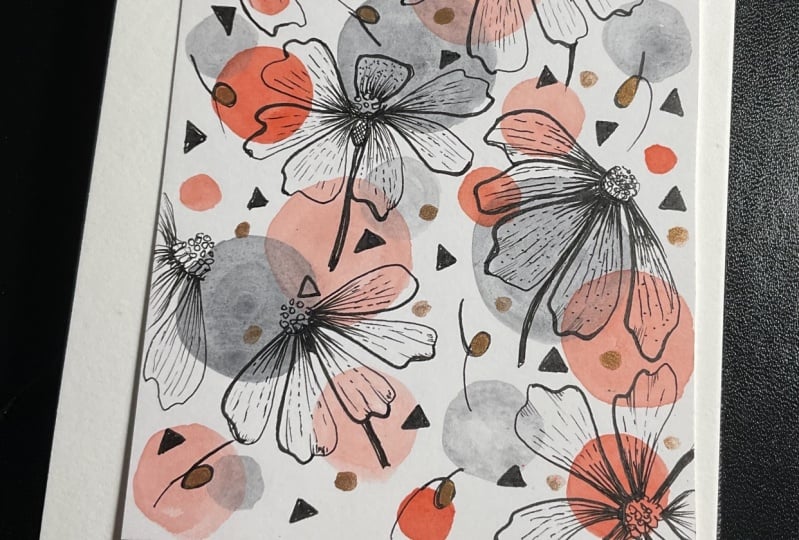
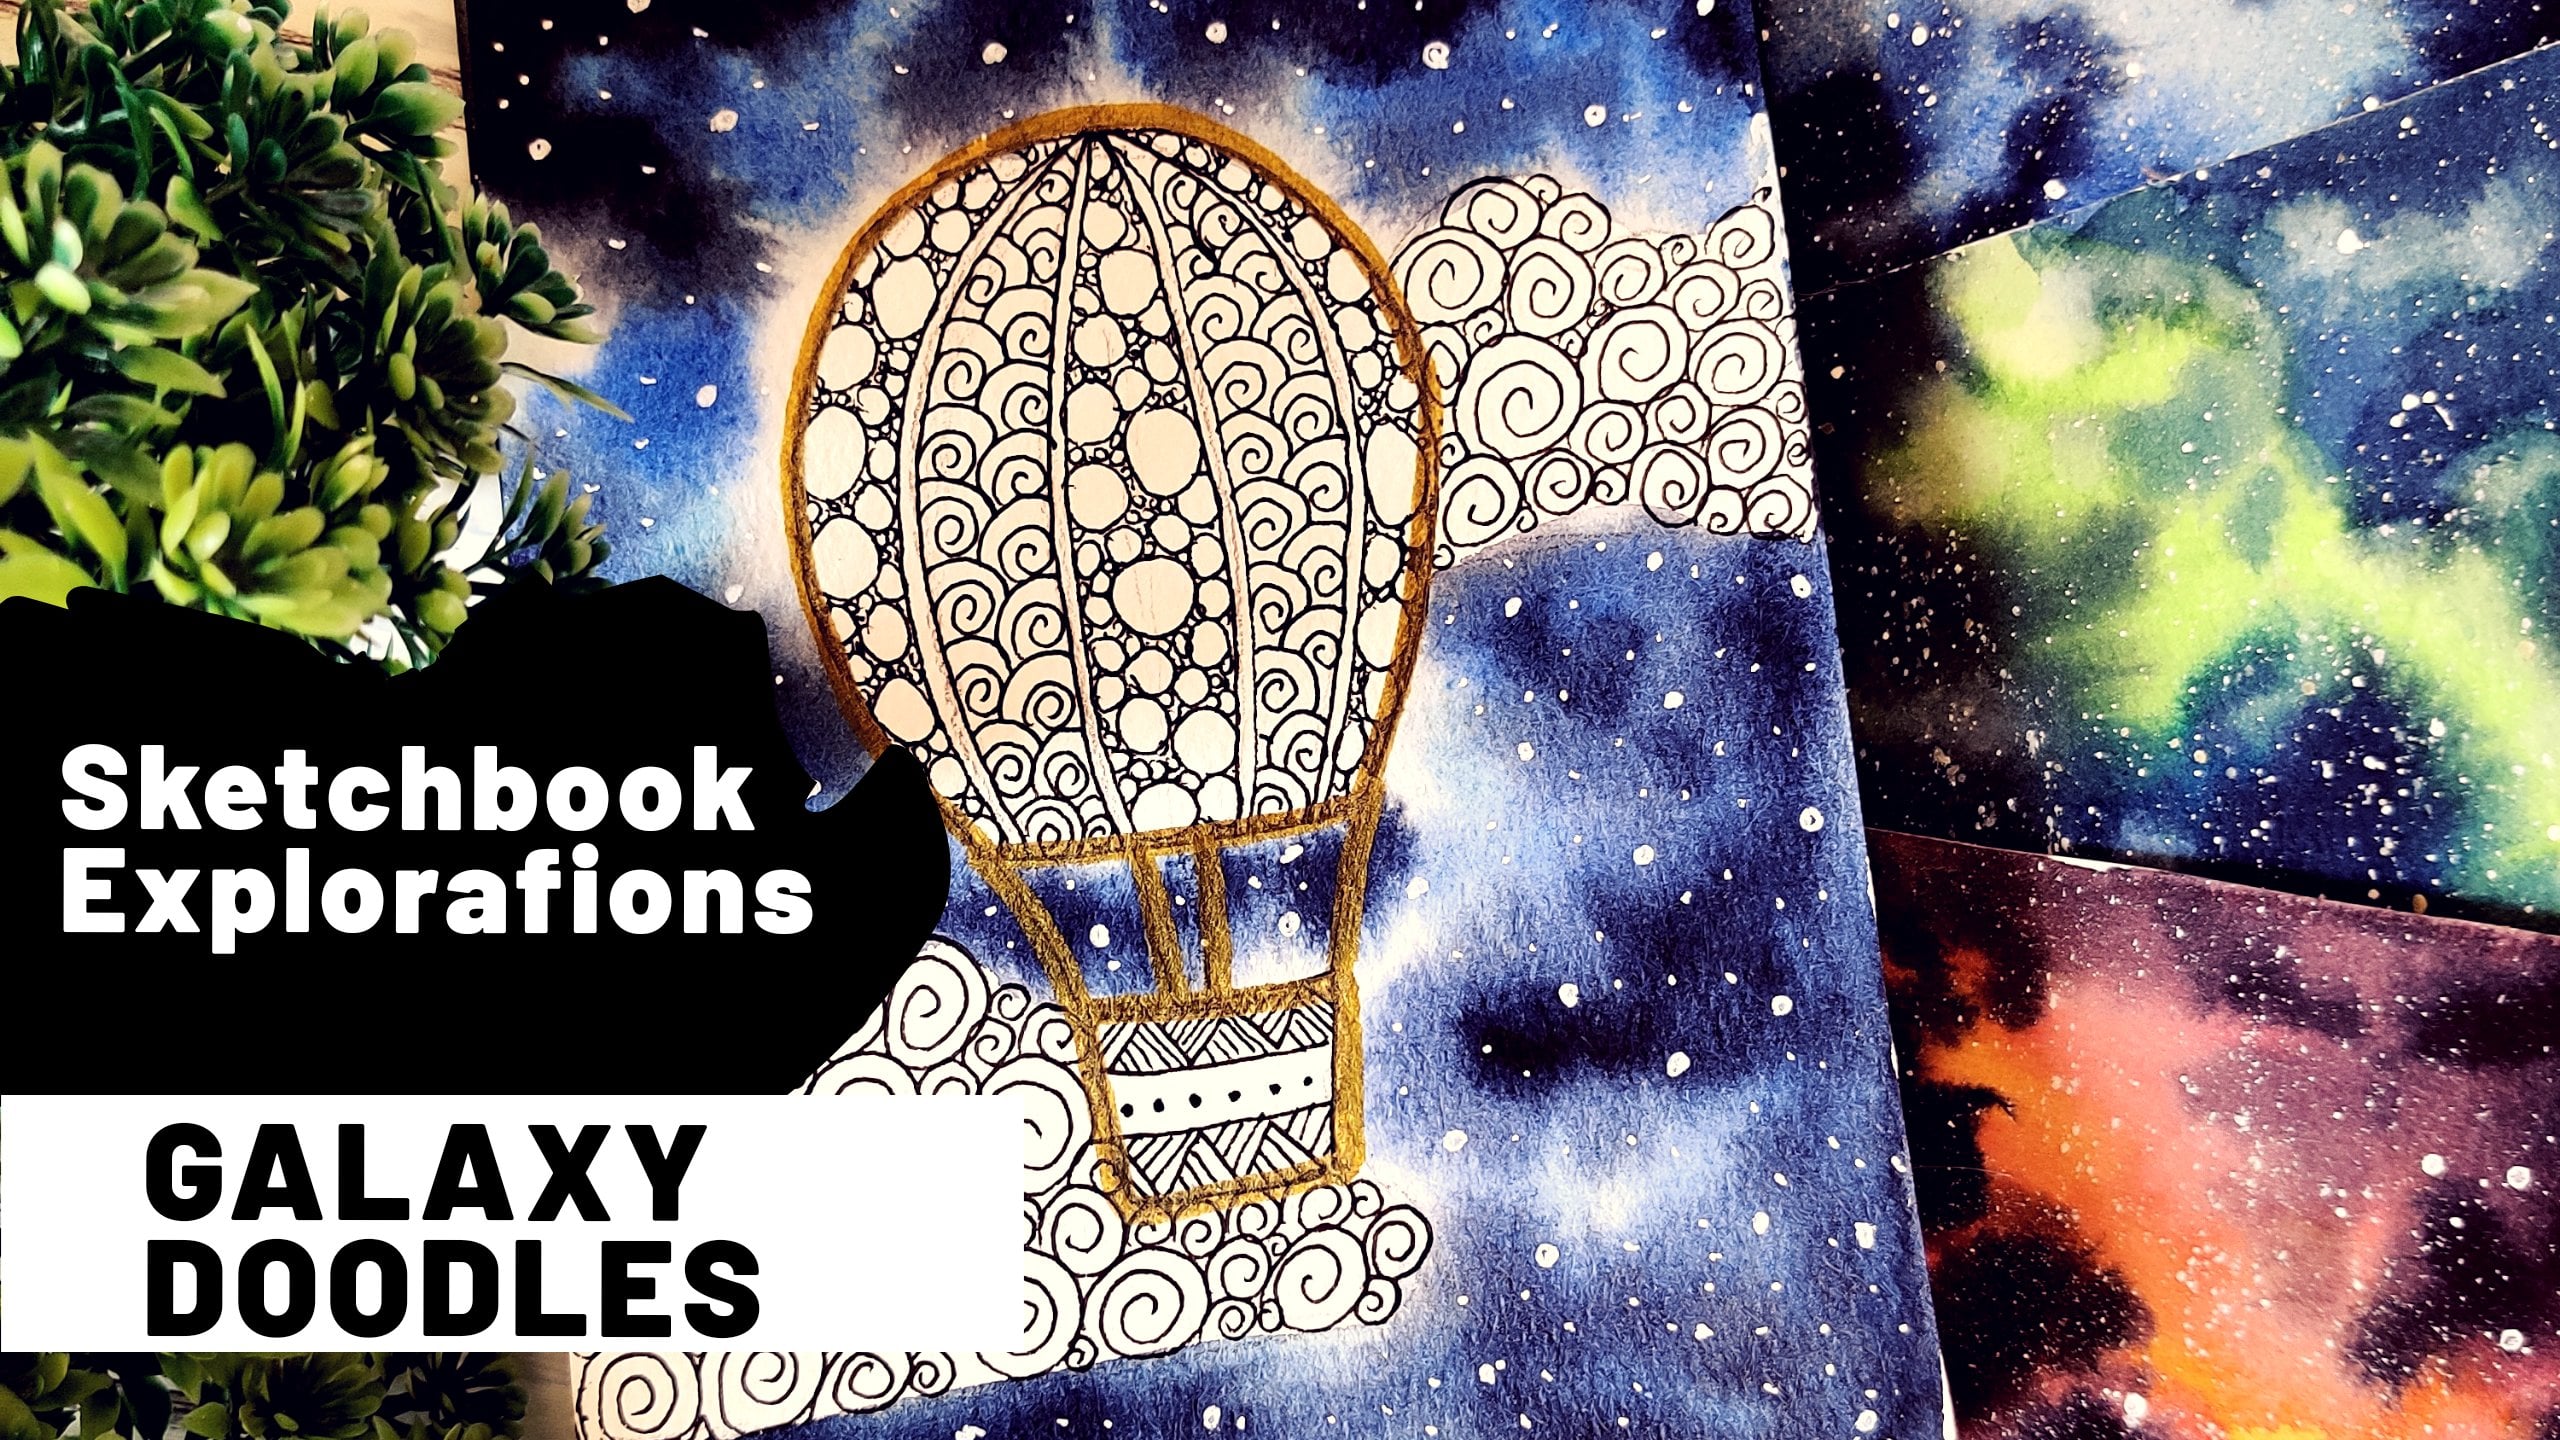
6. Project 1 : Background: So let's start with our first project. Now, In this one, I'm gonna be creating some circles in the background. So I'm choosing some nice, warm colors for my project. And I'm using this round brush to create the circles. So just like what we did with the pen for the lines and see strokes, you can cry out the same for the brushes as well to get ah, hang off, how to draw circles, etcetera. But then again, don't first too much about creating the perfect circle. It's all about enjoying the process. So just take, take some fun colors that you really like and go for a vibrant background that you can You'd love to do it alone. So I kept the redux as it is, I am not a done this in time lapse because I really enjoy the process and I also enjoy watching such videos. But in case you're getting ah, finding interpretive, just ah, speed of the video, you can do that from settings and you can just get to the next part. - So now we wait for this to dry completely before I start with the next one. Now that my people rece try. I will start with my next colors. I'm choosing a nice pink maroon ish pink for this again. I'll be drawing the circles now Try toe, overlap some of the circles. So I'm not trying toe. Keep them entirely separate. So, like you can see, I'm tryingto overlap the pink ones with the yellow base and then try to fill in some smaller ones here and there. Also, you could try varying the values off the water color. So here I'm taking a slightly pigmented color has compared to the previous ones where I was taking much more water. This just add to the overall effect off the pattern Almost done with this one. Now, let t people try fully before we start with the jury part.
7. Project 1 : Doodle: So now my people has completely tried, so I'll go for one of thes Florence. Like I said, I'll be starting from this point. Now if you've just started doodling and you're not comfortable going directly with the pen , you can definitely first draw the outline of the pencil and then market with a pen. But it since this is just a sketchbook exercise, don't be too worried about getting it right, and I think you can go directly with the pen is well, even if it goes wrong, there's no harm you can. It's just creativity building exercise evil, marking the details. You can also go for ah different or rather smaller depend toe get final lines. I'm just using the same pen to do it over here, but if you want toe, get the details exactly right, you can definitely go for a smaller depend. So maybe I'll place my next element somewhere here, so I'll be first off finishing all the main floral doodles, which is like my main element, and then I will work on the fillers. - Once again, make sure that the stem matches the center. If it's not so, then the overall floral would look really off. So I just tried toe make that invisible marking towards the center. - So I took a predating my sketchbook Lord, in case I don't find the angle to be comfortable now we'll start with the fillers now for Phyllis and go for something. Really? Basically a because the floral itself is quite prominent. Sir, Just go for these pilots, - I feel that still looks quite empty. So to see the background and I would like to add some more colors, so I'll just add it. Using this freshman, you can again go back and use watercolors as well. If you're pigment, Linus are waterproof. If the bend that you used is what approved in it, there's no issue. Or you can go and add the detail to the marker pen is well, like I'm doing. Like I said, this this just came to my mind while I was doing, I finished the composition and I was like, Something is not right here, so I wanted to add it to the season. But this this is how it is. Usually I the ideas come in when you're actually working on the doodle. Now I peed the urge to add something board. So let me let me that need price and leaves with this Marco pen is well, so this one here is a gamblin mark open, but if you are to calligraphy than any brush, been that you have woodwork or like it said, you can simply go back to your watercolors and fill it up. I feel it's looking much better now off it all the added fillers and color so you can do this. As for your liking, like if if you felt that leaving that I'm t space was looking good enough, you could have stopped at that point. Or if you feel like you can feel it even more, and that's that's the fun about it. Like with the same patterns with these same Phyllis, each of us could go for something entirely different because there are so many color combinations available for the background. There are so many patterns that can be mixed together, so that's that's really the fun about it. So that's our first project. Now let's move on to the next one
8. Project 2 : Background: So starting with our second project now here, I'm going to be using this flat brush for the background so you can again use any flat brush that you have on take some fun colors that you like. So I have started with this nice green and I'm just throwing street lines again. They need not be exactly street. Just, um really flatlines would also work. Leave some gap in between because we're going to add another color over here. And he let this try now that my background green has right, I'll start with the next color, have taken this blue over here and again. I'm overlapping the shapes so you can also be in some in between like this. But make sure that few off your shapes overlap because it just gives the feel that everything is connected. - Now again, I let this one try. I'm thinking off adding another color. Just a few horizontal lines. Maybe so Let me just wait for this to dry first. Now that our background is completely fried, I'll start with the horizontal lines that I was talking about. I'm just taking a dark maroon color feet for this, and I'm just during these short horizontal lines. Just adding some drama to the overall composition can. We will have to wait for this to try before we start with our duty.
9. Project 2 : Doodle: you know, my background is completely try, so I'll start with the daughter. Now I'm going for this full floral pattern. Now here, you see that half of my floral is outside the people. But that really doesn't matter. I'll just fill in the overall outlines off all the florals first, before filling in the details. This helps because your hand is set in a certain motion when you're drawing thes florals. And if you draw all your means first, it is kind of easier to do it that way. - Once all you mean patterns are done, then we can start with filling in the details to each one of them. So now that my placement off all the main patterns is already done, I will start with my deep ears for each of thes. - So I'm just having a little bit more detailed words ascent over the petals ASAP. Reading just gives a nice effect of the flu, and we are done with our main pattern now to start for with Phyllis, I think I'll go for something like Levi pattern over here. So I'll just start from here just one more here on day. I think we should be done. Then again, I I think we can add some more color or some more fillers over here. So I'm gonna be using this golden Oh, Ben, that I have metallic Ben. And I'll just add a few sheeps here and dead and again to add a pop of color. I'll use this. Gradually roll pen. Add a little bit off my prince to this overall composition, - and that's it. That's a second project done. See in the next one.
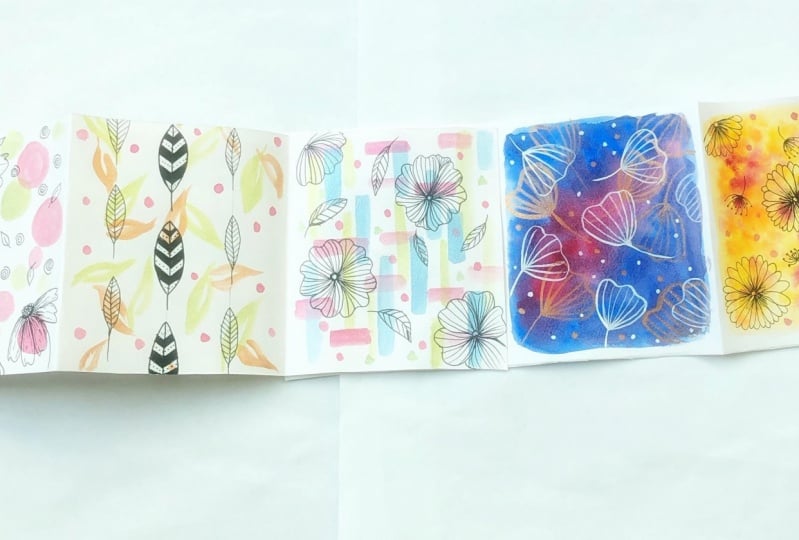
10. Project 3 : Background: now, the next project that we're gonna try out is believes so I'm using a round brush to create thes leaves. Now there's a simple technique that you can use if you are unfamiliar toe creating leaves you using watercolor, start with a fine dip and then just dab. You brush president for the full length and then lift it up slowly. So this one being a long round brush, it's fairly easier for me to create this pattern. The size of leaves would depend on the size of the brush you have. Since I'm using this longer version, I'm able to create these long leaves. But you can go for something like a small leaf, a swell and again, a friendly reminder. Choose nice colors that you really like, because this is your sketchbook. So make sure you're having all the fun that you can now and wait for this to dry. Now that my paperless price, I'll start with the second layer, and for this I'm choosing a nice sap green. Then I'm gonna be following the same motion and filling up more leaves for the background, - and again, we have to wait for the people to dry
11. Project 3 : Doodle: Sanoma people is completely try, so I'll start with the patterns. Now I'm gonna be making some markings over here with a pencil because I'm trying to show you a bit off The monotonous pattern that I was talking about in thes monotonous pattern can be made fun. So I just wanted to show you an example of that Subsys run lines over here on. Now we will doodle some leaves. So having all these crisscross leaves at the background going for a similar one in the foreground with the doodles would have it would have looked pretty cure tick. So that's the reason I'm going for something a bit more systematic on and uniform for the doodle part in this one. - See here, Upton one set off leaves Now between these will go for these bigger leaves. Now, let's start filling up the leaves. So I'm going for some some very simple details. - Now for the bigger leaves. Let's try out something fun. So I'm just making the marking first and then we'll fill up the Bratton in sight. - Since this area is quite large, I'm using a rush in to fill it up. You can continue using the same plan. It just takes a little bit more time. But if you have a freshman than it's just more convenient to do it this way. - Now , as always, I would like to add some more color to the background. I'm using this beach colored Ben and just adding some simple dots here, and there looks a little bit empty to me. It could be because these leaves look toe flat, so I think I'm going outline these leaves first. So I'm using the same brush went well, plane and I just had a few more dots here and there within the leaves to give it some life, - and that's it for this project seeing the next one.
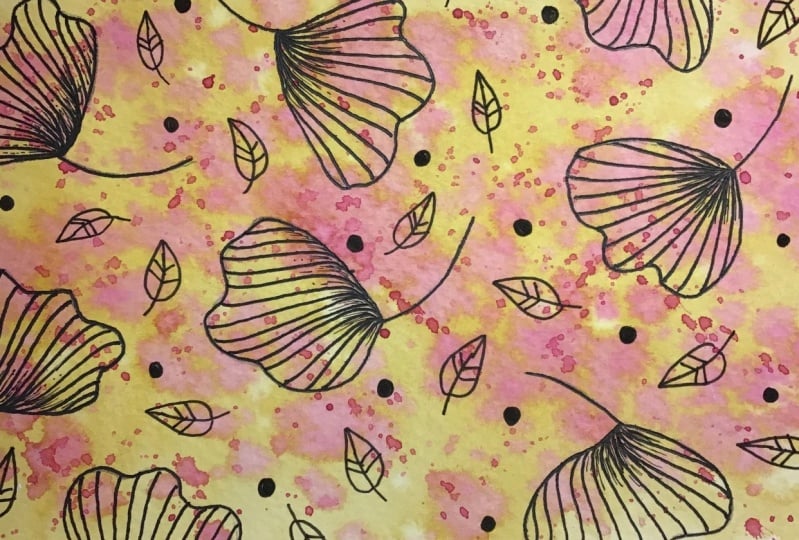
12. Project 4 : Background: So for our next project, we're going to use some really warm colors and a full background. So that's the reason I have saved the sides, because when you're coloring the whole page in a sketchbook, this John said, the color stretch to the other sheets on the white that I have just sealed all the edges. Using this masking tape again, I'm using a very warm yellow and going for a direct of it on drivers. I didn't read the people first because I wanted a very warm poppy background. So I'm just putting the color directly onto the people and don't believe the wash is not perfect. And there are streets in the background because we, as it is, are going to have some more layers on this on also the duty so that it's gonna cover up all of your imperfections in the background. Now, while this is still wet, where I'm gonna do is I'm just gonna splash some red color onto this red, pink maroon, whichever you feel like I'm just gonna drop it like this. So since my people is really vet, the color is going to spread on its own, so I don't really have to do much. I'm just gonna be spring a little more red over here, and once it is slightly pry pick up another load off pigment and splash some more. And then we wait for this to dry completely before we start with our duty.
13. Project 4 : Doodle: now my paper is completely try so we can start with the doo doo. I've also taken all the masking tape. You can believe it as it is, if you like that way. Now I'm going for a full floral, somewhat like a DZ floral over here. So we'll be taking a different approach in this class as compared to what I shared earlier. So let's try out filling up East Rural with the details as we create the pattern itself. So I'm gonna be doing the other florals in a similar manner here . I'm tryingto very the size of the floor. So this one is quite because compared toa the central floor and that's it all. I mean, elements are done now for the Phyllis and go for the standing line pattern. - Now let's add a pop off white. So I'm just gonna be adding some right dogs here and there. I really like how fun and warm this looks on, but then again, you can go for any colors he likes. If you are into cool colors, you can try a cooler background as well, and that's it. See the next section for our final project
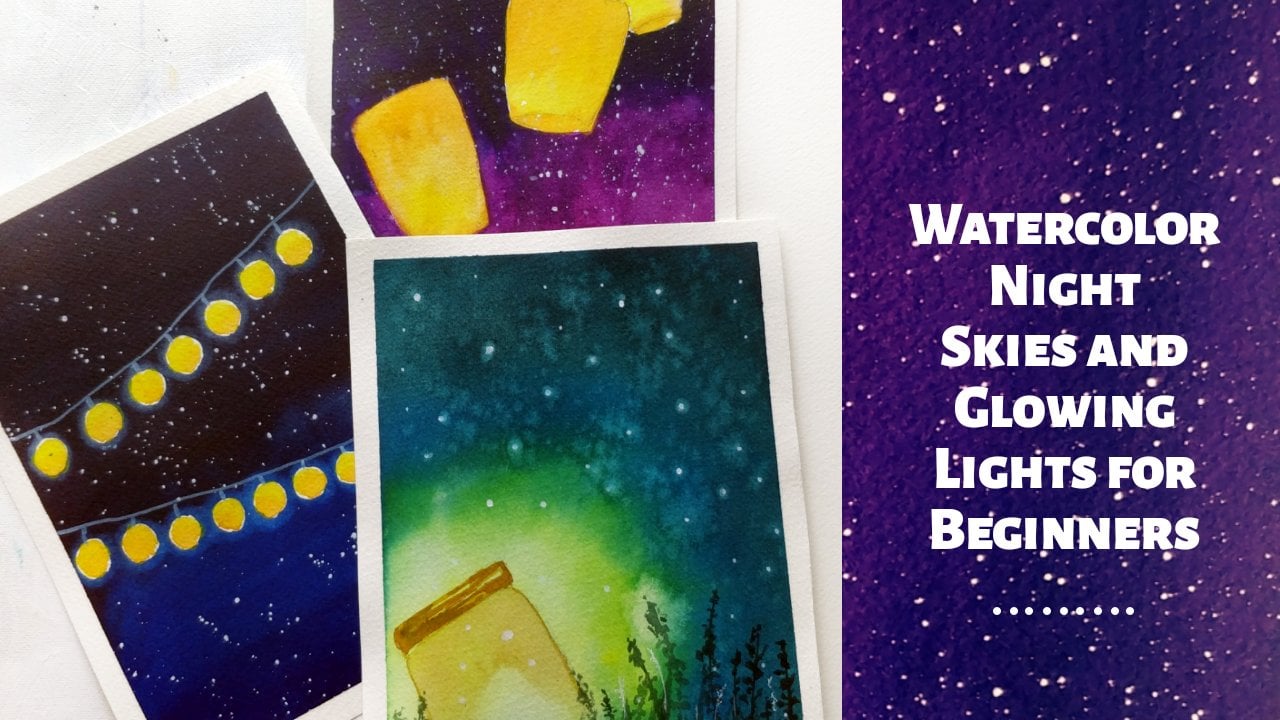
14. Project 5 : Background: now for a final project will be creating a darker background, somewhat like a galaxy on. Once again, I taped my paper completely. Now, this time round, I'm betting the people first because I want to create a kind of flow in the galaxy and since will be blending a lot of colors and, like last project. So I'm starting with a nice pink at the center. Then we'll be adding some blue around it, since the paper is where the blending will happen on its own. Also, you can keep rotating the people, moving the people to let the colors flow in different directions, adding a little bit more pink here and there. Now I'll start with the Doctor shade of blue and we'll fill up the remaining area. - I'm going for a second layer off the dark pink over here, and if you feel that at any point, the blending is not happening because your people has become dry, just use a clean brush toe. Blend the colors together. Now for the edges, I'm gonna be using a much darker blue. I'm shifting the paper a lot so that it keeps moving. It keeps, uh, blending the colors in different direction, - something starting more color over here because you watercolors cry much lighter than what you see right now. So I'm just making sure that I my background, is still dark enough. And once again, if you feel that the blending is not working from, please just use a clean brush and blend it now, really wait for this to dry completely.
15. Project 5 : Doodle: look, you know, my background is cry, and as you can see, it is a much lighter version off what we had. Bean did. Now I'll start with my doodles. I'll just being some fun Gingko leaves. I'm using a metallic pen overhears. I'm planning to do a mix off golden right for this total. First finish off all my gold leaves. - Now I'll start with the white ones can keep overlapping your patterns because it gives a nice connected feel to it and make sure you follow the call off the leaf while filling in the details. Now that we're done with this, let's add some fun dots here and there. - I think I'll also add the golden dots and that's it. That's a final project. I hope you guys enjoyed this.
16. Thank You and Beyond!: so thank you so much for joining me for this class. I hope that you enjoyed it. I hope you learn something new and that these projects helped you start with your creative journey. If you try out the projects, please do upload them in the project section. And also, if you're on social media likes instagram or Facebook, you can find me there as that crazy doodler. So if you do upload the projects there to tag me out, love to see it on, share it on my profile. This will Andi. Yeah, that's it. I So I do hope that you continue doing some sketchbook exercises because thes really help in bringing out some discipline and regular practice to your art. So wishing you all good luck with your creative journeys and see you soon. Bye bye.
 Vinita, That Crazy Doodler