Transcripts
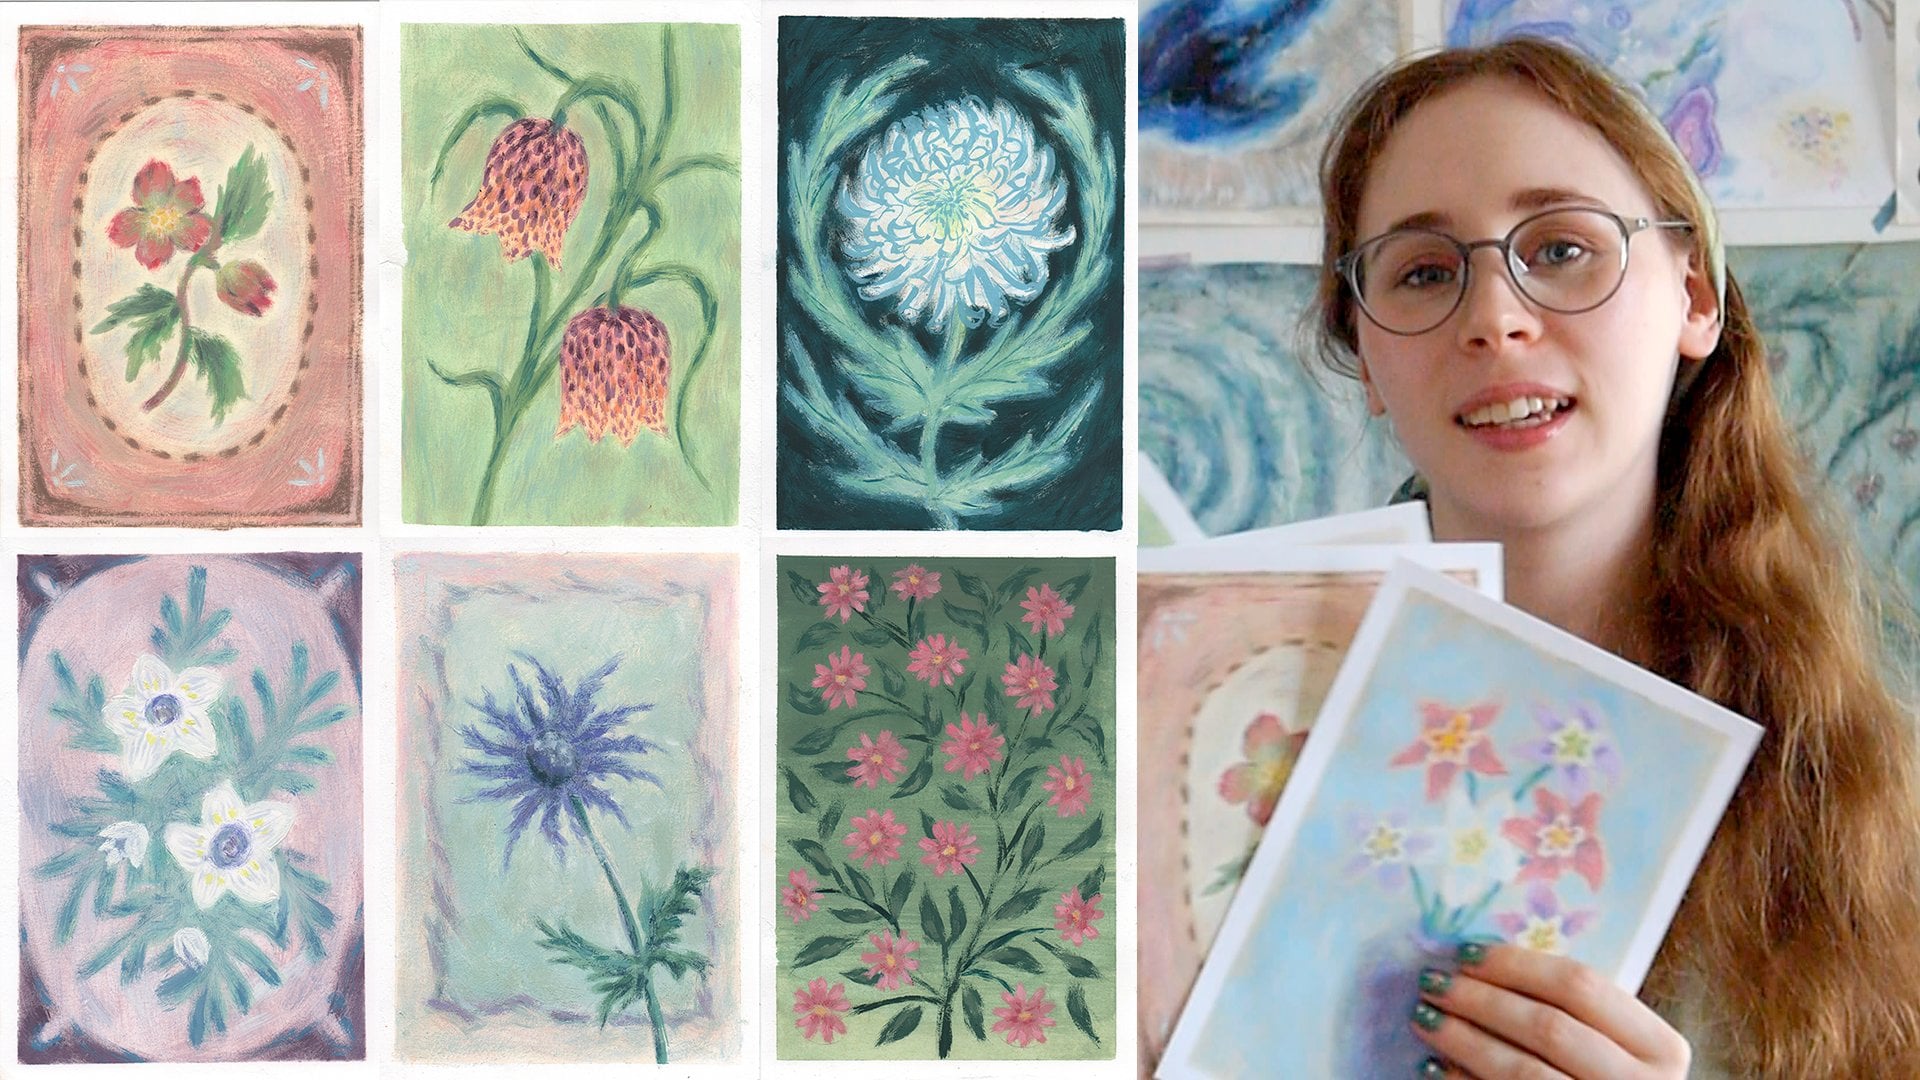
1. Introduction: Hi, I'm Poo corn. I'm
a fine artist and an illustrator with an
education in printmaking. And although right now I primarily work with
oil paintings, I do plenary studies and
then create exhibitions, as well as calendars, prints, cards and
everything in between. Everything I make starts in the same place in my sketchbook. At the beginning of every year, I feel the same mix of emotions, definitely some excitement
and then some uncertainty. I know that I want to continue granting in the year ahead. Otherwise, as a creative, my soul would just
perish from desert. But I also don't want to feel overwhelmed or afraid
of a blank page. What I really want is a clear starting point and
a sense of excitement. And that's exactly what
this class is about. In this class, you'll use
your sketchbook to find your artistic direction for the year ahead by
exploring new ideas, experimenting and having fun. We'll work through
a series of small, bite sized exercises
that will help you start painting
without any pressure. This class is for painters and visual creatives who want to reconnect with their creativity, spark new ideas, and begin
the year with confidence. No matter what
materials you use or what point you're at in
your artistic journey, I'll show you how I gather
my scattered ideas, turn them into clear
starting point, reflect on my past work, and choose what I want
to focus on next. Don't need to be perfect
or highly skilled. That's something we
develop in the process. All you need is a sketchbook
and a willingness to begin. By the end of this class,
you'll have a set of sketchbook pages you can
return to throughout the year. You'll have a clearer
sense of direction, and most importantly,
you'll have the momentum to keep
creating and painting. So let's get started
and explore how to make the beginning of this year
of creating truly exciting.
2. Your Class Project: Class project. Thank you so
much for joining this class. I'm really happy you're here. In this class, I'll
guide you through a simple sketchbook pase
process to help you find creative direction
for the year ahead. You can paint along
with me or just watch and come back to the
exercises later. Both approaches are
completely fine. Instead of one big project, we'll work through a series of small manageable exercises. Each lesson focuses on just one step so nothing
feels overwhelming. We'll start very simply
and build from there. By the end of the class,
you'll have a set of sketchbook pages that
reflect your ideas, your interests and
possible directions you want to explore next. Something you can return to
whenever you feel stuck. I'll be showing you my own
process along the way, but I encourage you
to adapt everything to your own materials and style. There is no right or
wrong outcome here. The goal is to explore
and just get moving. I'd love for you to
share your work in the Student Project Gallery
when you feel ready. It's a great place to reflect
on what you discovered, and it's always
inspiring to see how differently everyone
approaches the same exercises. I also regularly check the gallery and enjoy
giving feedback. For now, let's keep things easy. In the next lesson, we'll talk about
materials and get started with the
very first exercise. So I'll see you there.
3. Materials & Supplies: Materials and supplies. Let's talk about materials. For this class, I'll be using a sketchbook with
the care paper. The particular brand of the
sketchbook doesn't matter. I usually don't choose
sketchbooks by the brand at all. To be honest, the
crappier the sketchbook, the more likely I am to
work in it because it takes the fear of
mistakes go away. I don't know if it's really
likeable to you or not, but this to me. Choose a sketchbook you
are not afraid to use. I'll be using a pencil and an eraser for sketching and
the gouache set coloring. That's why I also need a
palette for mixing colors, a few brushes, mostly
smaller sized, some water and a cloth. The gouache set I'll be using is the HiimiGag gouache set. I also use simple
hair clips to make my sketchbook pages
flat. And that's it. Nothing complicated.
And as well, you don't need to use the
same materials I'm using. If you prefer colored
pencils, markers, watercolor, or something else entirely, that sparks joy
for you right now. In this particular moment, feel free to use that
instead instead of Gouache and all of the
exercises in this class. Flexible and work
with any medium. For example, if your paints are packed away or hard to reach, don't bother. Don't
worry about it. Choose the most
convenient materials you already have nearby. What matters most here
is not the tools, but simply just starting and then moving
forward, you know. So don't make it too
complicated for yourself. This class is about getting ideas moving, loosening it up, and getting your
imagination gears turning and your
creative juices flowing. Not about perfect results or not about perfect and special
supplies and materials. Once you're ready, we'll
move on to the next lesson, where we'll start creating
your inspiration map and begin exploring new
ideas in your sketchbook.
4. Let's Create Your Inspiration Map: Create your inspiration map. I know you're probably
excited to start painting, and we'll get there very soon. But before we pick
up our brushes, it helps to give ourselves a
little sense of direction. Something simple we can return to while we work
for this exercise, all you need is a pencil and a piece of paper or a
page on your sketchbook. Your inspiration map is
simply a list of things you enjoy painting or feel drawn
to painting in the future. There are no rules here, and there are also
no wrong answers. Since this is a quiet
and personal exercise, you don't need to judge these
ideas or organize just yet. Just let them appear
on the page first. Writing your painting in spools. Right now, you need to write
down all of the things that you like to paint or would
like to paint in the future. So I'll show you a little demonstration
here on a whiteboard. You don't have to have a
whiteboard, of course. It's totally optional if
you have one, you're great. If you don't just write them
down on a piece of paper. And right now, I'm
going to show you a little brainstorm activity that you can do to come up with new ideas or ideas that you know of but just don't
really write down. So you need to write
all the things that you enjoyed painting
or drawing this year. So for me, that would be trees. I like to paint trees, and I would like to continue
painting them. Then I would like to paint
more roots of the trees. I like to paint
stars and planets. And now you can see that
it's getting a little bit harder to remember
things that I like. Okay, I like some wooden sticks. I like to paint high lights
on the water surface. I like to paint plants
and some unique flowers. I like to paint vases, Mm hmm. But just try to continue, and I'm trying to
push myself as well. And speaking of art, you don't have to write
only the things, you know. You can write emotions. You can write down
the art directions. For example, I like
art nouveau style. So that's what I'm going
to write down next. And I like to paint those
decorative frames around the paintings or they have really beautiful jewelry
that inspires me a lot. So that's something I would
like to paint more of or just try out the style
a little bit more. I like medieval. I really
like Celtic cart, as well. It's really similar to Art
Novoa and medieval style. So I think I can come up
with a few more things. Speaking of the sea, I really like seashells. And I love painting spirals. I like to paint water
droplets or bundles. It's a lot already, but you can continue
writing them down, writing the things
that you like to draw or paint just during the maybe your day or week and see how many things
you can come up with. For example, some of the other things that I would
like to paint next year, and I haven't painted
this year would be and maybe I would like
to paint more birds. Bird. I definitely would
like to paint more bugs. I really like mot. Just insects. I think now it's enough of the things that I was
able to come up with. There are definitely more, and there were definitely
more things that maybe I would like to
try to paint next year. That's okay. For now, it's definitely good enough. Once you have your list, take a moment and look at it, you've created the foundation
of the rest of this class. If your page feels short or
messy, that's perfectly fine. This isn't meant
to be complicated. In the next lesson, we'll take this inspiration map and use it to choose a color palette. One of the most
enjoyable parts of this process. At
least I think so. See you there.
5. Setting Up Your Sketchbook: Making Color Swatches : Up your sketchbook and
making the color swatches. Let's finally jump into
the process. How exciting? So what we're going
to start with is by clipping the sketchbook
with page binders, but I don't have page binders, so I'm using these
hair clips instead. And that will work
perfectly fine. I just look a bit weird. But yeah, we'll begin with a simple warm up color
smaches and keep in mind that this is not about making everything look perfect. It's just about getting
first pencil marks on the page and first paint strokes and getting familiar
with your colors. For this exercise, I'm
choosing eight colors, but there's no rule here. You can do fewer or more colors, whatever feels right
for you today. Maybe you would like to
paint only with five colors. Maybe you would like to paint
only with black and white, you know, it doesn't
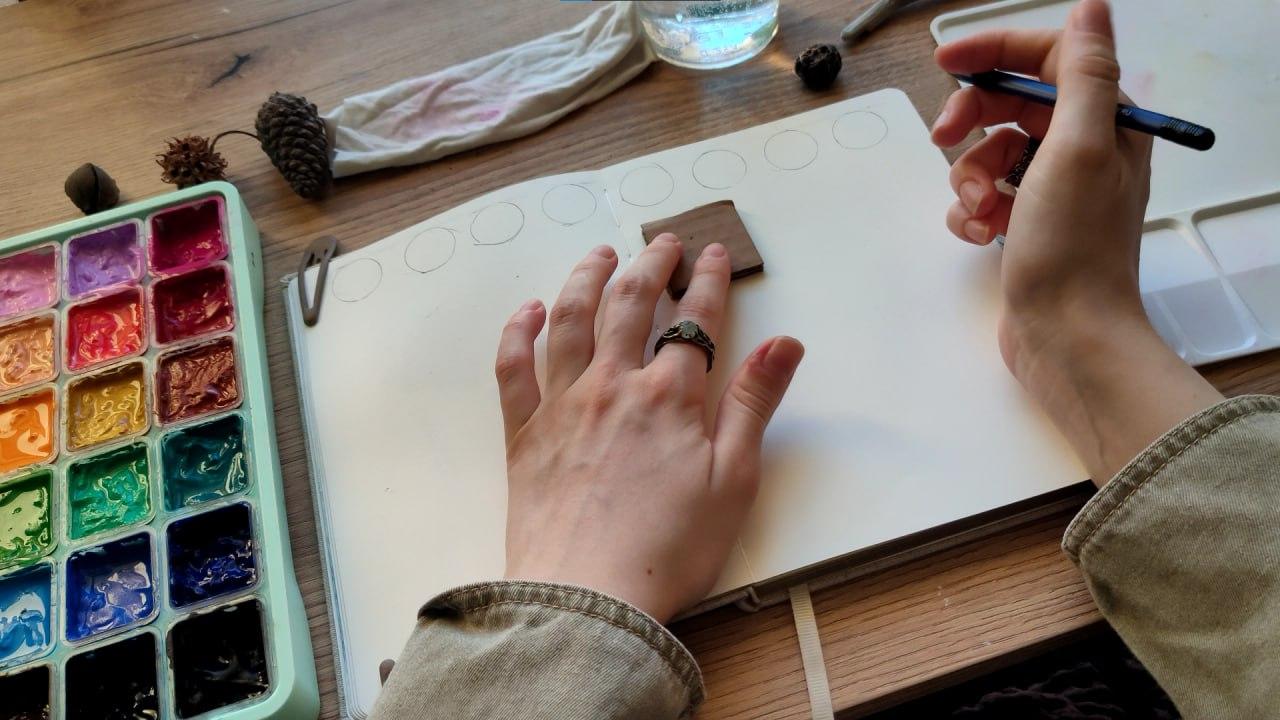
really matter. For me, I prefer eight colors. And to keep things simple, I'm using a small bottle
cap to trace circles, but you can draw squares, blobs, or free hand shapes. That doesn't matter as well. This is just a tool to
make starting easier. At least it helps me. So I'm using this bottle cap to trace these little circles, and it just makes the
process faster as well. I'm placing my swatches
on the top of the page, but you can draw
them on the side or anywhere that feels right. While I'm drawing these shapes, I'm trying to keep the pacing
similar from the top of the page and the same
distance between each circle. So this is a pretty
easy exercise, so after a couple
minutes, we're done. Great job. Now let's create a layout for the rest of
the sketchbook pages. So I'll see you in
the next video.
6. Designing the Layout: Designing the layout. Now, let's finish setting up the layout
of the sketchbook pages. So next step is to draw
these rectangles right here. My idea is to create these
rectangles that we could fill, and I counted the
centimeters right here. It will be probably
inches for you. Depends on the size
of your sketchbook. But I made these squares
from the cardboard. And basically, what
I need to do is just to trace as many of these
rectangles as I can. To keep things consistent
and as well simple, I'm using a small
square cut out of cardboard and tracing
it onto the page. You can use any size that feels right for your sketchbook. I chose squares four
by 4 centimeters. You'll see the size and
inches on the screen. But keep in mind that
the exact measurements don't matter here because
it's not methods. I'm not going to test you. There is no wrong
way to do this. Your sketchbook
page just needs to feel inviting to begin your
drawing and painting session. And to me, unwinding
feels the structure, you know, starting
with something, at least with just
simple square shapes. I'm dividing my page
into nine squares, leaving a little space between each one so the
page can breathe. This spacing makes the page feel lighter and
less overwhelming, at least in my opinion,
but you can use a ruler to divide your
page into nine squares, and that will be
perfectly fine as well. You don't need
hardboard for this. You can draw squares or
circles or rectangles. You can do a free
hand or with a ruler. The shape doesn't really matter. What matters is creating small contained spaces
that make starting easier. As well, I recommend stopping
at nine shades per page. This doesn't make the process
too long and not enjoyable. In my demonstration,
you will see me working across two pages
with 18 squares. But for your own sketchbook, one page is more than enough. To give you some numbers, sketching and painting the whole spread
of the sketchbook. So 18 squares took me
around 1 hour to complete. So if we cut it in half, that would be only 30 minutes, which is more realistic. And I think it's not du or link as well. But
you can choose. If you want to, you
can paint 18 squares. If you'd like to paint
only for 30 minutes, choose nine squares or shapes. You can choose whatever
shape you'd like, as well. Once layout is done, you'll have a clear structure, small spaces to paint in, and a bit of room to write
notes or observations later. But now we leave that
writing space empty. Maybe on your sketchbook, there will be no empty
spaces left. That's fine. Maybe you'll draw more
squares or more shapes. That's okay as well. You can adapt this exercise to
your own sketchbook, to your own practice. To your own liking. I also
have my list of ideas nearby, the same one we created
earlier because we'll be using it
in the next step. Great job finishing your layout. Now let's mix our color
sketches and start painting.
7. Mixing Your Color Palette: Mixing your color palette. Finally, some color. This is where things
start to get exciting. And this lesson we'll mix or choose a simple color
palette to work with. I'll be using wash for the
demonstration purposes, but feel free to use
any materials you like, like watercolors,
colored pencils, markers, or even just one color if that's your wife for today. This exercise works
with anything. Choosing colors can feel
overwhelming at first. I definitely understand that because there are so many
different options and it's easy to feel
like you need to make the best or the right choice. But here's good news. There's no right or
wrong palette here. We're not trying to
reinvent the heel here. We're simply choosing colors that feel good to us right now. Remember, you can always change
your color palette later. This is just today's
starting point. So rest your instinct. I usually like to start
with a neutral base. So beginning with
the beige color. It's a color I return often too, and it gives me a calm
foundation to build on. From there, I'll add a few more colors that feel
like I belong to get there. I really didn't know that I like some greens and
some beige colors. So those are colors
I would like to mix, starting with the
lightest color. I know that I would like one
color to be really beige, but to the neutral side. So I'm using some burnt
umber and earth yellow. Because I know that I absolutely love the combination
of these two colors. But you can experiment
and just have fun. You don't have to know the colors that you like.
It doesn't really matter. You can look up different
color palettes. And this is how
I'm going to fill in the rest of these spaces. Next color I would like
to have probably be just brown color with a little
bit of beige added to it. Let's mix the rest
of the colors. I definitely know that I would like a lighter green color. Something like this, then
I would like to have just a little bit tiny
bit darker color. Probably something like this. Then I know that I
love blue colors. And you don't need to make
a palette similar to mine. You can choose your
favorite colors or even create them in
achromatic palette with different shades of purple. It can be whatever combination
of colors you like. Trying to make it more neutral tone down color more like gray. Perfect. Maybe even a little bit of earth yellow kind of gray color. Sure. And then one
darker blue color. Amazing. And maybe
some maybe the color a bit more like a
swampy green color. Sure. And then one kind
of color I would like to make a bit of a pinkish. I'm gonna mix it to the side
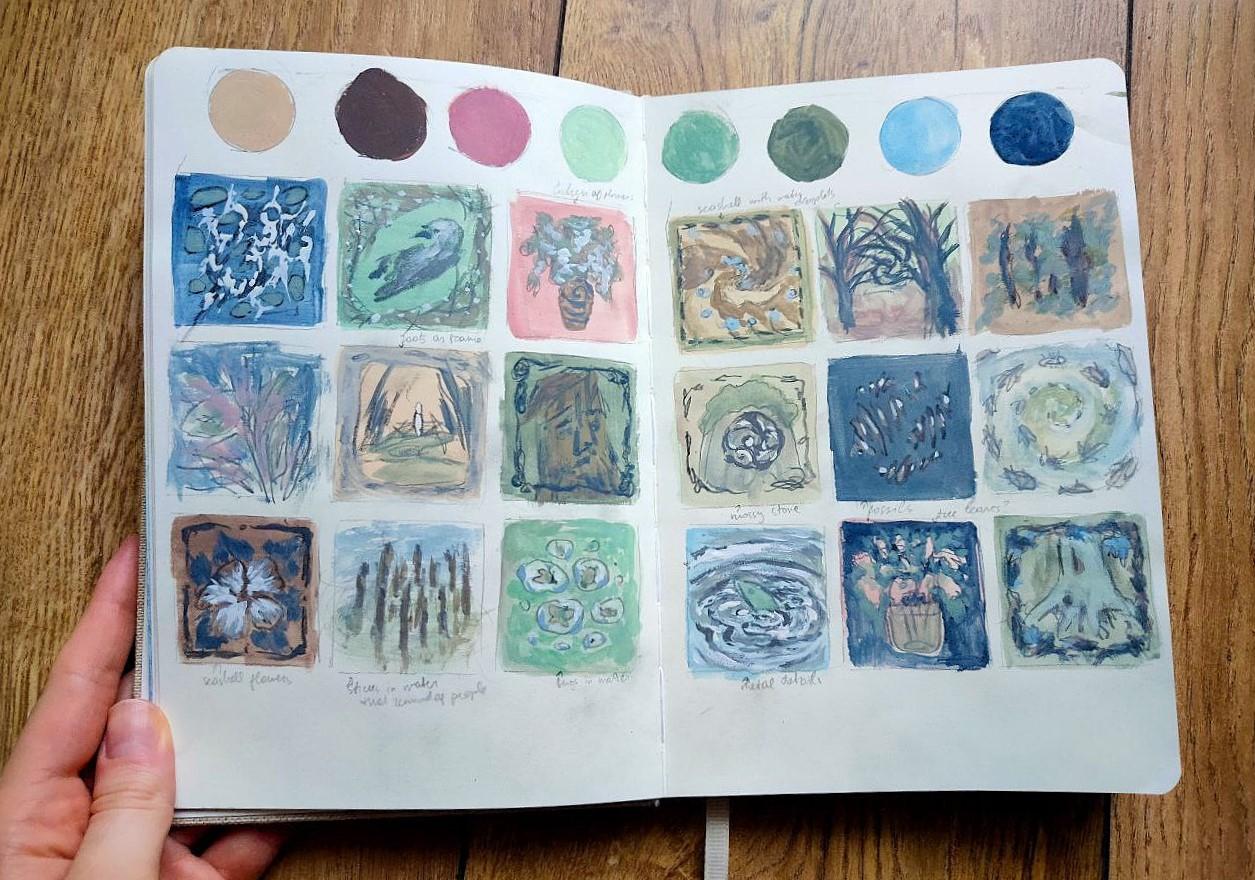
to not make it really dirty. Maybe a little bit of purple. Looks beautiful. I'm gonna
add just a bit of a fun tit. Sure. Perfect. Now, let's fill in all of these
paint swatches. I usually paint my swatches from lighter to darker colors, moving from warm
shades like yellow and pink to cooler ones
like green and blue. When I'm mixing and
choosing colors, I like to include one
really dark color and one really light color. And then a mix of in
between colors and shades. About half of them
are warm toned, I would say, and a
half are cool toned. I think it really helps to have the color palette
right in front of your eyes because I believe
it's parks inspiration. Once your color
swatches are finished, you'll have a palette that
feels familiar and inviting, something that makes you want to paint and feels
just like you. In the next video,
we'll start filling the squares with the base
colors, and I'll see you there.
8. Filling In the Shapes with Base Colors: Filling in the shapes
with base color. Let's start filling in
our shapes with color. This is one of my favorite steps because it's simple,
fun and satisfying. Now with the leftover paint on my palette I'm
going to fill in these squares. Not all of them. I'm going to leave some empty, but let's just start with
painting them one by one. I'm coloring the shapes
in random order, using the colors from my
palette and any leftover paint. There's no strict plan here. I know that I'm keeping
repeating that, but I'm just enjoying
the process. But why do we need
to color them in? You know, why can't
we leave them empty? Filling in shapes does
a few important things. First, it completely removes
the fear of the blank page. Once there's color on the page, it really feels alive and
not intimidating and fun. Second, it's sparks imagination. You might see a pink square
and suddenly think, Wow, a beautiful butterfly
would be great here, or notice a blue shape
and imagine water or sky. The ideas start
appearing naturally, and finally, it's just fun. This part is very
meditative and calming, and it helps you build momentum without
unnecessary pressure. I'm filling most of the shapes
using my chosen colors, and for any remaining ones, I let myself play freely. Since I chose eight colors, and presumably you did two, if you're painting
only nine squares, you'll need to paint each
square with one of the colors, and the remaining
square can stay white. Experiment a bit more and paint a base color using multiple
colors from your palette. If you're painting 18 squares, you can repeat the colors twice and leave two
squares weight. As you can see in
the demonstration, I'm using gouache in a
similar way to watercolor. I add a lot of water to help the paint spread
faster on the paper, and you can absolutely fill these squares with a thicker layer of paint if you want to. It just takes a bit
more time to mix this paint on your palette and then carefully fill
in all these shapes. So I don't see the need to
make it all look perfect. That's why I'm using
this watercolor mixture. I really believe
there's no need for perfection here since these are just sketches and an even base layer
doesn't bother me at all. It might even help
fide perfectionism. For this task, I'm
using a flat, soft, medium sized brush because it makes working with edges easier. Sometimes I add a
second layer of paint if the color
feels too sheer. But again, I'm not aiming
for perfection at all. It might help to fill in
the squares following the order of your
color swatches. But as the process went on, I noticed myself painting
more green squares than any other color probably because green is
my favorite color. So I instinctively
return to it more often. And, you know, there's
nothing wrong with that. If you want to, you can
leave some shapes empty, or you can leave all the shapes, all the squares empty
without a base layer, or you can paint them
all in one color. It's all completely up to you, up to your preferences. You can paint them
however you want. I'm just suggesting a guidance. Make it easier to
make it more fun. But you can choose
your preferences. If something sparks more joy, then you can definitely try out this different method and maybe color all of these
squares with pink color, and I'll be absolutely happy to see how these squares look like. For one of these squares, I layer two different
colors to spice it up a bit and make
it more interesting. Because at the end
of the day, why not? Right? Let's experiment
as much as we want. So if you would like
to experiment as well, you can layer two
different shades from your color palette, one on top, another and see what color mixture or maybe some kind of gradient
would be fun as well. But this time, I'm not
doing any gradients, but I think it sounds fun, so maybe I should
try it another time. Once these shapes are filled, we'll let the paper dry. And in the next video, I'll
talk more about how to create new ideas while the
sketchbook spread is drying. Great work. I'll see
you in the next video.
9. How to Generate New Ideas: How to generate new ideas. In this video, I'll
show you how I brainstorm new ideas using
the inspiration map. The one we created earlier. This method is very flexible and that's what makes
it so powerful. Your list can include very specific things like
object, places or materials, but it can also include
abstract ideas like emotion, moods or themes like love. Time or humanity. What we'll do is start
connecting these ideas. You can combine two things or even three or four things and see what new images
or concepts appear. There's no pressure
to be a genius. We're simply letting
these objects, these ideas meet each other
and seeing what happens. Now I'm going to show
you a little method. Of how to come up
with new ideas. And here is just a little
short demonstration of how I come up with ideas. Basically, when you have all
these ideas written down, what you need to do next
is to just combine them. For example, you know, let's combine spider
wraps with spirals. Great. So probably will draw
a spiral and then maybe make a spider wrap out
of the spiral and maybe you'll paint your
spider right here. You know, this is just
an easy method of how your brain will be able
to come up with something new from the things from
the things you like, and from the things you enjoy. And you can just experiment, for example, birds and stars. Great. Maybe you paint a bird. I know it's an ugly bird, and maybe it's scaring a
planet or it's caring or maybe this bird could hold this
little huge star in its mouth, you know, and maybe
they're drowling in space. You know, this is
just a simple method. And you can do as
many of these kind of connections as
you're able to do, for example, vase and maybe this vase has some
fossils in it. And then and then maybe
you'd paint some, like, old flowers from different areas of our
planet, something like that. And it's just so fun. You know, you can do as many
connections as you'd like. For example, you can
connect stars and bugs and just paint huge bugs on planets
or something like that. And I understand that these
drawings right here are ugly, but this is just a
method of how you can create something new from
the things you like. So basically what
I'm trying to say is that those are
the things you like, and these are probably these things could
describe your art style. So basically, you are
trying to continue this idea flow on how to push
your R style further. You don't have to paint things. You can paint motions, but you can paint people. But this is the same stuff. If you wrote down
some colors as well, you can just connect
different colors. Maybe you like green and
maybe you like beige and try to come up with something green and beige, you
know, something like that. Just try and continue with this method and come up as
many ideas as you'd like. That's basically the and
I think it's really fun, but I'll see you
in the next video. So let's continue painting. In the next video, I'll demonstrate this
process step by step, showing you how to
take your ideas from my list and turn them into simple sketches inside the painted squares
we prepared earlier. This is where the ideas
really start to flow. So I'll see you in
the next video.
10. Sketching New Ideas (with No pressure!): Sketching new ideas
with no pressure. I'm glad you're here. Now we're
ready to start sketching. All of the painted
squares are dry now, so I'll begin filling them in with simple pencil sketches. And this is not about
making finished drawings. It's just about exploring
new and exciting ideas. In this stup I'll
show you how I create new ideas using the
inspiration map. Even though I can't
see your list, the process works in a
similar way for everyone. And please remember there
are no wrong ideas here, as there are no wrong
colors or wrong supplies. Every sketch is information. Some combinations
will surprise you. So will feel exciting, and some you may
not enjoy at all. And that is valuable
information for you. Notice what feels natural, what feels fun, and what you'd
like to explore further. Just take a note on all of
these ideas while you're drawing them and your emotions towards these ideas as well. One thing that often
feels tricky at first is choosing a
color for each idea. What we're really doing here is connecting three things at once, two prompt from your list and one color from your palette. So try to let that guide you. Let that surprise you. There's no need to overthink it. I don't want to repeat myself, but there is no wrong,
no choice here. Make whatever choice feels
comfortable or ate right now, and then you'll see the result, and based on that result, you come up with some
valuable information for you. And take this
slowly and remember that these sketches are
just stepping stones. In this demonstration,
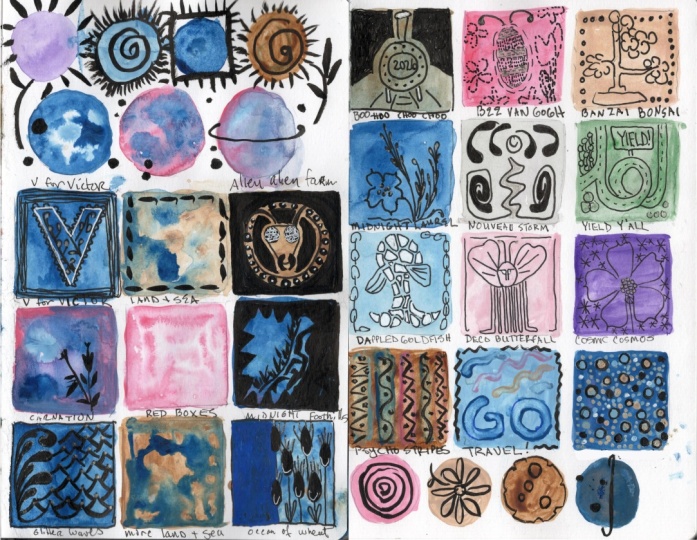
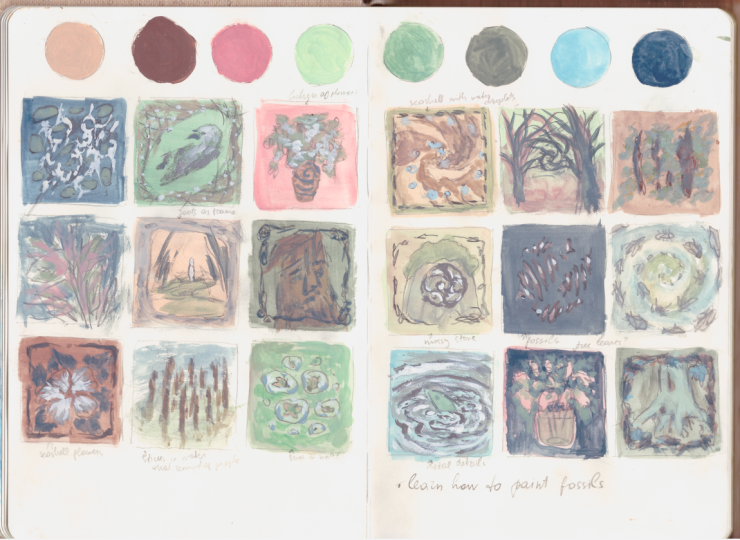
you'll see me creating the first sketches. In the top square, I chose to paint trees and
combine them with spirals. In the middle one, I try to combine stone with Celtic art. Don't think that's
my best attempt, but that's okay. I'm moving on. And at the bottom, I'm thinking about
different ways I could paint vase with flowers or
leaves or something else. As you can see, I'm not
drawing these sketches in a particular order
from right to left. I'm jumping to whatever color feels exciting to
me in the moment. But you can absolutely follow a more structured path moving from one color to the next from right to left
or top to bottom. So that you feel in every
square without trying to avoid certain colors you
might feel unsure about. In the darker square, you see me painting
some unknown shapes. And these are meant to be
bones like fossil bones, although they don't
look like that because I'm not using
any reference images, and I don't know how they I don't know how
to paint fossils, and as you can see, that's okay. That's fine. I still know what my idea was for this
particular sketch, this sketch is primarily made
for me and my art practice. Your sketches are made for
your art practice as well. If you don't want to, you
don't have to show them. In the top right square, I'm drawing some sticks but in even at the beginning
of the process, I already know that not all
of these will be equal. Some will be stronger, and some will be weaker. And that's completely okay. And below that, I'm sketching
bugs inside a spiral. We're just walking,
walking in a spiral. You might notice that I'm repeating some prompts
multiple times. In this example, I'm
repeating the spiral, but each drawing looks very different from
the previous one. Well, at least a
little bit different. And repeating prompts
is totally fine. I think we all have
certain objects or themes that we return
to again and again. Those are your safe prompts, the ones you could happily paint for the rest of your life. And there is nothing
wrong with that. On the contrary, you
could say that this is how your personal
art style evolves. At the bottom, I'm
drawing an art nova frame with three
roots in the middle. I think this one is
one of my favorites. But I think I painted something similar
previously before. This is actually a common
pattern I've noticed. When I've done studies
of certain objects like dries, for example, those ideas tend to pop
into my head first when I'm brainstorming and
thinking of new ideas. I think this shows how
practice really matters. When you've spent time observing
something from nature, using references and learning
how it looks and feels, that knowledge naturally
shows up in your work. Now you see me drying a fish in the water surrounded by
some water splashes. As you can see, I'm not spending more than a few minutes on
each sketch before moving on. And for this idea, there's nothing particularly
extraordinary yet, but it gives me a
great starting point. I can already envision
ways to push it further, for example, adding more color, maybe experimenting
with texture, or I could make the fish
silver or the water metallic. And these little sketches
give you space to play and expand later
if you'd like to. And here you can see me drawing
the inside of a seashell. And here's another spiral. This is definitely a
shape my hand feels comfortable drawing
over and over again. So now the challenge is to
make it more interesting. I decided to add some
seashell patterns, and I added water droplets. It still feels a bit simple
to me, but that's okay. If I want to, I can
always explore it a bit further on another
sketchbook page. Now I'm drying water
droplets with bugs inside. This green color
reminded me of a leaf. One thing I noticed
about this exercise and something that bothered
me a little at first, and I'll be honest with you, is that every idea
lives inside a square, which limits the composition. But if you think of these
not as finished pieces, but as idea seeds
that can grow into something bigger
and bigger plants into beautiful flowers, it becomes much more fun. Imagine it like a
box of candies. You can open your sketchbook, pick an idea, and then explore it further
on another page. And you can try to
find compositions, colors, or even materials. I think that sounds really fun. And then you see me
sketching a face. The idea here was that it's
a face carved from wood, and it's like a spirit of the forest or
something like that. I usually don't paint people, even though I studied portrait and figure drawing
a lot in school, sometimes it affects
my confidence when I compare
myself to others to other artists when I'm
thinking that I'm not painting more human figures or
portraits in my paintings. I moments like that,
I remind myself that this is just the
current season of my art. I'm allowed to paint
what I enjoy right now, and my themes can always
change over time. Next, I tried another
version of a vase, and this time, a brand new
idea came up into my head. What if instead of flowers, there was a lichen. Somehow I got obsessed with lichen while I was painting
all these sketches. And then you see me
drawing a strange frame. And my idea was that
these are tree roots, and in the center, there's
a landscape with a person, a bridge and more trees. Something creative,
something weird, you know, maybe not that weird. None of my these are I think none of them
are truly weird. You might also wonder
why I'm painting frames. Normally, frames come later into the process after the
painting is finished. And maybe when you're trying
to decorate the space and you're already hanging
this painting, that's when the frame
matters, right? And this is one of
those discoveries I made while exploring
my own art style. By the way, if
you're interested in diving deeper into that topic, I talk more about it in one of my other
Skillshare classes, and I think you
could enjoy it as well if you like this exercise. Here, I'm drawing a spider rep as a frame with a
bird and gee center. Some ideas are harder to
develop without references, and that's totally
fine, as well. You can absolutely use
references if you'd like to. For example, in this case, I'm drawing a bird. And looking bird
references would help me, but it's my conscious choice to work without references.
It's intentional. I think it gives your brain
a bit more of a workout, and I think that's great, right? At this point, you see that it's getting
harder to come up with new ideas because you can
see me painting sticks in a puddle that resemble human figures
arranged in a circle. Yeah, that's it's completely okay if coming up with
ideas feels difficult. You need to remember that IDs don't have to be great as well. Sometimes it's a stopping
point for you to come up with new ideas because you think those are not
going to be good. Those don't have to be good. You can simply enjoy the process and treat it like
a great workout. And especially, you can
congratulate yourself for showing up because you probably never knew what this class
is about before, and you took a risk, and you showed up, and every step brings you closer to building a stronger
art practice. And how amazing is that? Now I'm drawing a flower, but the idea is
that the petals are seasho I think my days
can be very simple. And that's perfectly
fine, as well. At least that's fine with me. What matters is that we've
done something important here. We filled a page with ideas that didn't exist before.
Can you imagine that? There are no drawing marks on this page previously before. So we did a great job. So cool. And lastly, I'm
drawing some strange, abstract shapes
because my brain has officially turned into
mush at this point. You've done a wonderful
job getting this far. And the next video will
turn these sketches into little paintings by filling in each square with colors.
I'll see you there.
11. Painting Your Little Idea Squares: Painting your little
idea squares. Now we move into more intuitive
part of this process. Finishing your sketches
and painting your ideas. Using your sketches as a guide, start filling in each
square with color. You can follow the palette
you created earlier, or you can adjust it and
experiment as you go. I won't show you all 18 squares
because painting them all together took me about
35 to fteen minutes. Instead, I'll show you my favorite nine squares
that I created. I think by the end
of the process, some of the squares
might feel finished while others may feel
unfinished by the end, and that's completely okay. Both are equally useful
to you as information. As you can see, I'm starting with painting the tree roots. I'm mostly using up the paint I mixed
earlier on my palette because this saves
time and it also helps to keep the color
palette cohesive. As you can see, I'm not using
very thick layers of paint. I'm watering down the
gouache quite a bit, which makes the process faster, especially since
I'm not trying to paint every individual
shape perfectly. What I personally
believe is that the exact color you choose for particular detail or object isn't that
important here. These are just sketches. You can always withdraw
them later or try different colors on the next
page if you're not happy. So trying to not get too
stuck on the color choices, one reason I really like
adding a base color first is that it feels like the job
is already halfway done. At least from my perspective. From there, you can experiment
with different techniques. For example, painting around an object with a darker tone like I'm doing with
this particular sketch. I also want to
remind you to take your time with the
step and enjoy it. These small squares are like tiny idea seats or like candy. Each one holds a
different possibility you can play around with. Later, if you like
any of the ideas, you can develop them on a larger scale and
add more detail, more color, and just work on them for longer
periods of time. For some sketches, I'm
not adding many colors, maybe just a lighter tone and
a darker one for shading. For others, I'm playing with
some colors a bit more. Personally, I think this is my favorite part of the process, coloring in all the shapes
and making the final touches, knowing that almost all
the squares are filled, this step might take
longer or shorter for you, and, you know, that's
completely fine. As you can see, I'm
carefully adding details and sometimes even changing the
original idea with color. For example, in this case, I change the cup webs
into a bird's nest just by shifting the color
from white to brown. By the end of the painting, I realized that I've been using the same small soft bristle
brush the entire time, even though I have a whole
range of brushes nearby. I think that's just a part
of the process getting caught up in the work and forgetting about everything
else in the world, including your entire
collection of materials. And to be honest
with some sketches, you might look at them later and not even know what
they're supposed to be. And honestly, I'm here. I don't think I always
knew what I was painting, either. That's your worry. And that's perfectly fine. This stage is all
about experimenting. And I keep reminding myself that it's all about
having fun as well. With a small soft brush, I'm able to make these
paintings quite detailed, maybe even too
detailed, to be honest, since these are just sketches
and these don't need to be overly refined or
detailed. So be careful. Don't overdo these sketches. When I'm choosing
colors for each object, I usually start with
things I already know how to color and how
they should look like. For example, I know wood is
brown and lichen is green. So I begin there and
then fill in the rest of the elements using
complimentary colors on my chosen palette. I also work in layers,
and for some sketches, I wait for the paint to dry before adding
highlights or shadows. But I painted this way, only a few of the
sketches from all of my 18 sketches I have here. I think coloring in all the shapes probably
takes the longest time from this whole process
of sketching and painting and doing
everything in between. I think coloring them
in takes the longest. I try to use only the colors on my palette for all the objects
inside these squares with just a few small additions
of other colors for my paint set because this helps to keep all the paintings cohesive. And with that, I finished
all 18 sketches, and this is how they turned out. They remind me of chocolate
wrappers in a box. Some of these ideas I like
so much that I really love to paint them on a
larger scale and right now. Beautiful work. You now
have a page full of painted idea blogs you
can return to anytime. In the next video, we'll look at how to reflect on this work, how to notice what you
enjoyed, what didn't resonate, and how to use this
information to shape your creative direction for the year ahead.
I'll see you there.
12. Identifying What to Learn Next: Identifying what to learn next. We've come so far already. That's great. Now
we'll spend some time on one of the most important
parts of this process. Reflection. This is where
everything you've just done starts to make sense
and turn into direction. Reflection simply
means noticing. What did you enjoy painting? What felt difficult? What would you like to
understand better next time? Taking a few minutes to
reflect helps you move forward with clarity instead
of feeling overwhelmed. It turns scattered experiments
into a clear path. And makes it much easier to
come back to your sketchbook. I'll show you a simple
brainstorm activity on the whiteboard, but you can write this
directly into your sketchbook, identifying what you
need to learn next. In this video, I'll
show you how I think of the painting process and
how I could improve it. So these are all these sketches that I've painted right here. And basically, we need to
do the same thing as with it when we were writing down our list of inch potens
and you just need to write down all of the things that you think you could
improve next year, that you could try
painting, drawing, creating that you would
like to explore more, research more, and that would inspire you and that would make your painting
practice better. Of course, I'll dram straight
on my particular sketches. You can write them down here
just below your sketches or on the next page of your sketchbook.
We're just somewhere. It doesn't matter. And I think the most complicated part right here would be identifying
these learning, I don't know, mistakes that you make and painting
mistakes that you make. The most difficult part is to identify the places
you suck, basically. It's difficult to
tell from sketches, but I think these are the moments when
you have your idea, and without looking at
any inspo pictures, you understand that H actually, actually, I, I would
like to paint. For example, I would like
to paint an elephant, an elephant on the
moon or something, and you draw let me try
to paint an elephant. I don't think I really painted a lot of elephants in my life. But, for example,
you are trying to remember how an
elephant looks like, and then you realize, huh, So basically, those are the tension moments when you want to
paint something, but you don't know
how it looks like, and you can't pull
this information from your brain because
it's not there. So these are the
points you need to identify and write them down. And for me, looking
from these sketches, I definitely don't know
how fossils look like. I'm not gonna lie. I like fossils, but I
never painted them. I never, never looked at them long enough to remember how
fossils should look like. So when I'm trying to
draw or paint fossils, I can just draw some lines
and think, ah, yeah. This is how fossil should
look like, you know? Um, definitely it looks
ridiculous, right? It's not a fossil, but I would like to include
fossils in my paintings. So the only way to
understand how I need to paint them
is to research, look at the photos, go to the museum. And just paint from references. And especially what helps, you can make some copies
of other artists. For example, you like
some art style or you like some brush strokes, and you would like to create them recreate in your paintings. Write down artists that you
would like to copy from, and it really helps to have these references and try
different techniques. For example, you would like
to include some lettering. In your artwork, and
you understand that, yeah, my lettering is
really, really bad. Let's you can see that my
lettering is bad, as well. And this is the point
I'm identifying for myself to learn more on
this topic next year. Let me write down all the
things that I need to learn next year or things that I
would like to copy as well. For example, I would
like to paint some art. No. Well, frames, I need to
learn how insects look like. And you can write
down the things like working on your contrast or working on your layout because my layout is
limited, as well. It's really centric, and I
could work on that as well. And you can write down the
things that you would like to maybe look at in the museum
or something like that. I would really like to
see or make a copy, like, paint some Celtic card. And you can continue
writing them as many things as many things as you would like to
try to paint next year. It's okay if it's not gonna be possible to
paint all of them. I don't know if you have 1,000 things you'd like to
learn. But it's fine. Write them down and
you can come up with more detailed plans for your
list of things, for example, for seashells, you can write down that
you'd like to paint for seashells to learn how
to paint the seashells. And you can write, I don't
know, Baltic seashells. Japanese seashells, and
so on and so forth. And then when you accomplished
all of these things, you can just cross this point from your list of things
that I would like to learn. And I think it just makes
this process exciting. And you don't have to learn all of these
things in the year. That's totally fine, but I hope you enjoyed following along my thought process and you've written down a lot of
things that excite you, and that will bring you joy and something to strive
forward next year. So I'll see you in
the next video. Great job taking this step and thinking intentionally about how to grow your art practice
over the year ahead. In the next video,
I'll share you a few helpful
thoughts for moments when you feel stuck or
unsure on how to continue.
13. Where to Look When You Feel Stuck (my favorite resources) : Where to look when you feel
stuck my favorite resources. I want to show you a few
of my favorite places to find richer and more quality,
more personal inspiration. The first one is the library. Libraries are
powerful because they hold information most
people never see online. And you don't need to
look only at art books, look at books about
plants, old architecture. Anatomy, folklor,
materials, or history, pay attention to
shapes, textures, and details, not just
finished artworks. This kind of inspiration
quietly changes your work sometimes
without you even noticing. If you don't have an
access to library, the next great place
is a bookstore. You don't need to
buy there anything. Just spend some time
flipping through pages and letting
your eyes wander. Another favorite of mine
is museum websites, especially the Metropolitan
Museum of Art. It's a great place. They have an
incredible collection of objects you can
explore for free, like ceramics, textiles,
metalwork, jewelry, paintings. These are amazing sources
for color palettes, surface details, and motifs. Then there are online
spaces like Pinterest, which can be useful if
you're intentional. You can even use tools like HGBT and you can ask
these questions. What teams connect these
ideas? What am I missing? What could push me
outside my usual bubble? I know it's controversial, but think of it something like something that will
push you out of your bubble. And finally, one of the most important
places are real museums. If you visit one, take photos. Even if you think
you'll remember later or find better
images online, you probably won't you often
forget what moved you, and a photo helps you remember the exact object or feeling that caught your attention because inspiration fades so quickly. So capture it while it's
alive while it's there. So take 100 photos. So these are my
favorite places to look when I feel stuck. I hope this inspire
you, as well. So I'll see you in
the next video.
14. Thank You! Let’s Keep Creating Together: Thank you, Let's keep
creating together. Thank you so much for spending this precious time with me and learning so many
important skills. I hope this has a
little spark in you for the year ahead
and that you now have a gentle starting
point that gives you the confidence to continue
creating and painting. If you enjoy this class, a short review is always appreciated because
reading your reviews helps me improve
and come back with even better classes
for students. And if you feel like you'd
benefit from a longer, more focused painting session, you can also work
with me one on one. Can do additional fun
exercises or work together on a full painting,
whatever you'd like. And if you have any questions, feel free to reach out in
the discussion section. I'm always happy to help. Thank you again for
being here with me, and I hope this year brings you so many beautiful
moments of curiosity, of creativity, of joy and fun, and I look forward to creating with you
again. Bye bye for now.
 Policorne, Illustrator & Fine Artist