Transcripts
1. Introduction: Hi, I'm Nadine. Thanks
for joining me today. This lesson is going to be
a bit of a follow on from the one point perspective class that I did a little while ago. We're looking now at some
two point perspective, but because I like
being simple and quick, we're going to keep this
really, really easy. So we're just going
to paint a couple of little houses
next to each other. I'll spend a bit of
time going through the actual drawing,
getting your, horizons right, seeing
what happens when you move the building above and
below the horizon line, looking at what
happens when you're moving the vanishing point. And then we'll do a
really simple sketch and a really quick painting because I want you
to see that you can be really fast and loose and still pay attention
to the perspective, but you don't have to be really tight in the painting to
get the perspective right. Now, because we are painting really quickly and
really loosely, I've got a whole lot
of different versions. And right at the
end of the lesson, I put up a picture of all
of those, and actually, I've got one that
you can download threat from the Skillshare site as well that shows
all my different versions of this
little painting. And I've also included
a little snow scene in that just for fun,
just because we can. So like I always, if you get to the end
and you're happy, I'll get you to pop a
picture of your painting up on this project section
for me to have a look at. It's always fun for me
to see what you've done. And particularly with
this one where it is messy and I don't mind
what colors you use. I'd be interested to see what you all produce. So
let's get started.
2. Materials: So we'll go through the
materials for today's class. So first up, I'm painting flat on a board,
not taping it down. I'm painting on arches,
cold pressed paper. It's 300 grams. You'll need a pencil
and an eraser. And in terms of the paint, I'm keeping it really simple. So I'm just using three colors. I find that particularly
in painting loosely, if you stick to a
limited palette, you're less likely to make
mud and get into strife. So you can use whatever colors you like. It really
doesn't matter. I'm using some paro
red, some Hanze yellow, and some Palo turquoise
all from Daniel Smith. Now, I'm only using two brushes. The details of these are
in the material section. So I've got a big one
for getting around the main shapes
and then just this little one for the detail. And these are both synthetics. Other than that, you'll
need your palette, a jar of water,
and some tissues, and I think that's all. Oh, and I'm not giving you
a reference photo today. This is just from
your head, so I don't want you to get
too stressed out. It may also be useful
to have a ruler, depending on whether
you want to free hand your straight lines or not.
Okay, so now we'll get going.
3. Basics on 2 Point Perspective Moving the Horizon Line and Getting the Roof Right: Before we start doing the
sketch on the watercolor paper, I want to go through a
few little explanations of what the drawing is
going to look like if you sit it on the horizon line, if you change the
vanishing points, if you put it above or below the horizon line just before we actually get to the exercise so that you have that
clear in your head. So the one point perspective class that I did for this one, we start with a vertical, sorry, horizontal horizon line. So that's my horizon line. Then I'm going to
pick two vanishing points instead of one this time. And they can be anywhere
you like for E's. We're just putting them
at either end here. Then I'm going to
arbitrarily decide where my corner of the building
is looking down the street. So I'm going to decide that's
the corner of my building. Now what I need to do is join my vanishing point to the top of that line on either side. Then that's my right
receding area, that's my left receding area. Now I want to decide how wide this building
is going to be. If I just whack a line in here, maybe I'll make the building
a bit bigger on that side. That is my basic building shape. Now, obviously, I
would be doing this in pencil and I would be
rubbing out all these lines, but that's so that you
can see what I'm doing. What happens if I put that first vertical line
above the horizon line? So let's have a look at that. So if I pop my vertical
up there, again, I have to join to
my vanishing point. Put in my verticals.
Now what happens? This line has to join to
this vanishing point. This line has to join to
that vanishing point. I'm going to make it
easier for myself. So that one to that one. That one to that one. Now what I'm seeing is I'm looking up and seeing
the bottom of that box. You should be alarming
if that was a building, but I'm sure there are places where it's like that. All right. Then what about if I put the look when you
actually use a rule, you get a really nice
straight line below. Now we're going to go
below the horizon line. Now that goes to that,
that goes to that. That goes to that. That goes to that.
Again, deciding that's the edge of my building. That's the edge of
my building there. This line has to go to
that vanishing point. This one has to go to
that vanishing point. Okay, so now I'm looking down at the top down at the top of
the buildings and maybe I do a class where we're
doing a city scene where you're flying up high, looking
down at the buildings. That's what happens if
you change where you're putting that vertical
on the horizon lines. So I don't want to have
floating buildings. I don't want to be
looking down at the top, so I'm going to be sticking
with this one here where we're looking straight
on at the building. Now, when we get to the sketch, I want to put a roof on this. To do that, I want
to find initially where the center of this
face of the building is. To do that, I'm going to pop a line from corner
to that corner, one from that corner
to that corner. And that tells me that that
is the center of my building. So I can draw a line
through the center, and that will give me the
right scale for the roof. Now, how high this roof
is, doesn't really matter. I can put that wherever I want. I could
put it down though. I could make it
really, really tall. I've settled somewhere
in the middle. So this corner is going
to join to that line. This corner is going
to draw to that line. Then I need to put the
rest of the roof in this vanishing point joins
to the top of the roof. The only other line I
then have to put in is this one on this side. Now, to do that, I want to go from this
point up to the roof, but I need it to
match the same slope. I'm just going to pop, slide my ruler down, and there it is. That's my basic shape.
4. Basics on 2 Point Perspective Windows, Doors, Roof Line and Moving the Vanishing Point: Okay. So I've drawn
up another one, so you can't see quite
so many lines on it. Now, what if I want to
put in windows and doors? So windows and
doors on this side, I need to follow this
vanishing point. On this side, I need
to follow this one. So if I make a mess
and just show you, I'll just draw in some doesn't really matter
where I'm just randomly drawing myself in
some lines all going back to that vanishing
point. That's my roof. Here, if I wanted a window, I'm going to decide maybe
I want it that big, then this one that big. These lines have to follow the lines that I've got going back to
the vanishing point. Same thing down if I wanted
to draw a door in the middle. It has to follow the
vanishing point. The line goes back to
the vanishing point. So that's how I would do it. Now, you can and as it did in
the one point perspective, if you're going to do the
same size windows going back, there is a way to make
sure that you get those all equidistance and
following getting smaller. I'm not going to bother with
that because, you know, it doesn't really matter whether how big or small
these windows are. I can vary. So I'm
not going to get too hung up on the size
of those windows. Now, when I'm looking at this sign, if I
want to put, say, another door in here,
if I want it to be the same size as
this door, same height, what I want to do is draw a vanishing line to line down
to my vanishing point here, and then the height
of that door would be this following that
line. Same up here. If I wanted those windows
on the same floor, I guess, I would go from where it
intersects that vertical there, back to my vanishing point, where it intersects there,
back to my vanishing point. And then that height, those windows would
be the same height. So I'm not going to get too hung up on that when we
actually do the painting, but that's how I would do it if I really wanted
to pay attention. Now, the only other
thing I want to show you. Any other thing? No, two other things.
What if I want to put a overhang on this roof? That's what I want
to show you next. Then we're going to move the vanishing points
and then we can actually start with the
painting. All right. Okay. So here is my roof. What if I want to put in
a bit of an overhang? So I want that to come
down a little bit. To see how far it then
matches on the other side, I need to use the
vanishing point here, so it would come down to there. So that Eb would come all the way down there
to match this one. To then get it to go
back the other way, I use this vanishing point. Oh, to come back. And then I need to match. My roof line needs to come down. Now, my roof line has to
intersect this point here. So when I do my diagonal there, that's where it
would come through. So that's how I would
get that overhang in. All right, one more thing to show you and then we can start. The only other thing
I want to show you is what happens if we
move the vanishing point. I'm just going to
move one of them. So I'm going to give
myself two horizon lines. I'm going to keep the vanishing point on
this side the same, and I'm going to keep the face of the first vertical the same. But in this one, I'm going to put my
vanishing point here. This one, I'm going to put
it all the way over here. I could put the vanishing
point over there. It doesn't matter, just means I'll be
drawing on my board. So it doesn't matter if
it goes off the page. But here then, when I draw my building in, probably. That might be I might make it easier for myself
and use my roller. If I keep the face of the
building there the same width. Then I'm going to
pop my roof in. There's roughly the same height. What you should be able to see is having the
vanishing point out here makes that
angle slightly less. Here, it's a really sharp
looking down that way. Here, it's a little
bit more gentle. I'm seeing more of the face of the building than
I am in this one. So that's all that's
going to happen if we shift this
vanishing point. So what we're going to do is
make it easy for ourselves, not make it too tight because
drawing everything in here then gets a little bit tricky. We're going to make it nice and wide so that we've
got room to move. So we're going to go somewhere
in between these two. Alright, so now that we've
gone through some of that, let's get on to the sketch
for the actual painting.
5. Sketching Up: So see how I go
trying to draw with this ridiculously small pencil. Here's my horizon line. My two vanishing points. I'm going to pop the corner
of my building here, join my vanishing points to the bottom on the top
of each of that line. I'm going to make my
building about that big about that wide. For the roof line, joining to my corners to find my midpoint. Vertical, that's
going to be my roof. Now I'm going to
bring my overhang just a little bit down now, which means for the other side, it's going to come about there. Then I'm going to pop my roof line in and then
work out where these go. That's the corner
of my building. Okay. Pretty tight. Yeah. Okay, that's my roof there
and my line back. That way. Okay. Then for the
windows on this one, I'm going to give myself
a bit of an idea. I'll pop in a couple here. I might change my mind
when I'm actually painting let's see how I'm
not too bothered by that. I don't know that I'm
going to pour maybe. Trying to decide
whether I bother actually drawing
anything on this side, maybe I'll just pop
the one in there. I'll think about that
while I'm painting. Now, that's my basic
house shape in. I'm going to pop
another one. I've got paint on my fingers. I'm going to pop
another one here. To get my roof in, diagonals. I'm not going to put the
overhang on this roof. I'm just going to keep it simple and then I'm going to draw back back and back to
the Spanishing point. So that's my basic sketch in. I might back off a couple of those if I
can find an eraser. Yep. I'm going to back
off a little bit. I don't need to rub it all out, but I'm just going to
make that a bit tidier. There, I'm kind of going to leave those points there in case I need to sort of
refer back to them. I'll let myself see those. Alright. So that's a sketch. Now we're going to start
with the painting.
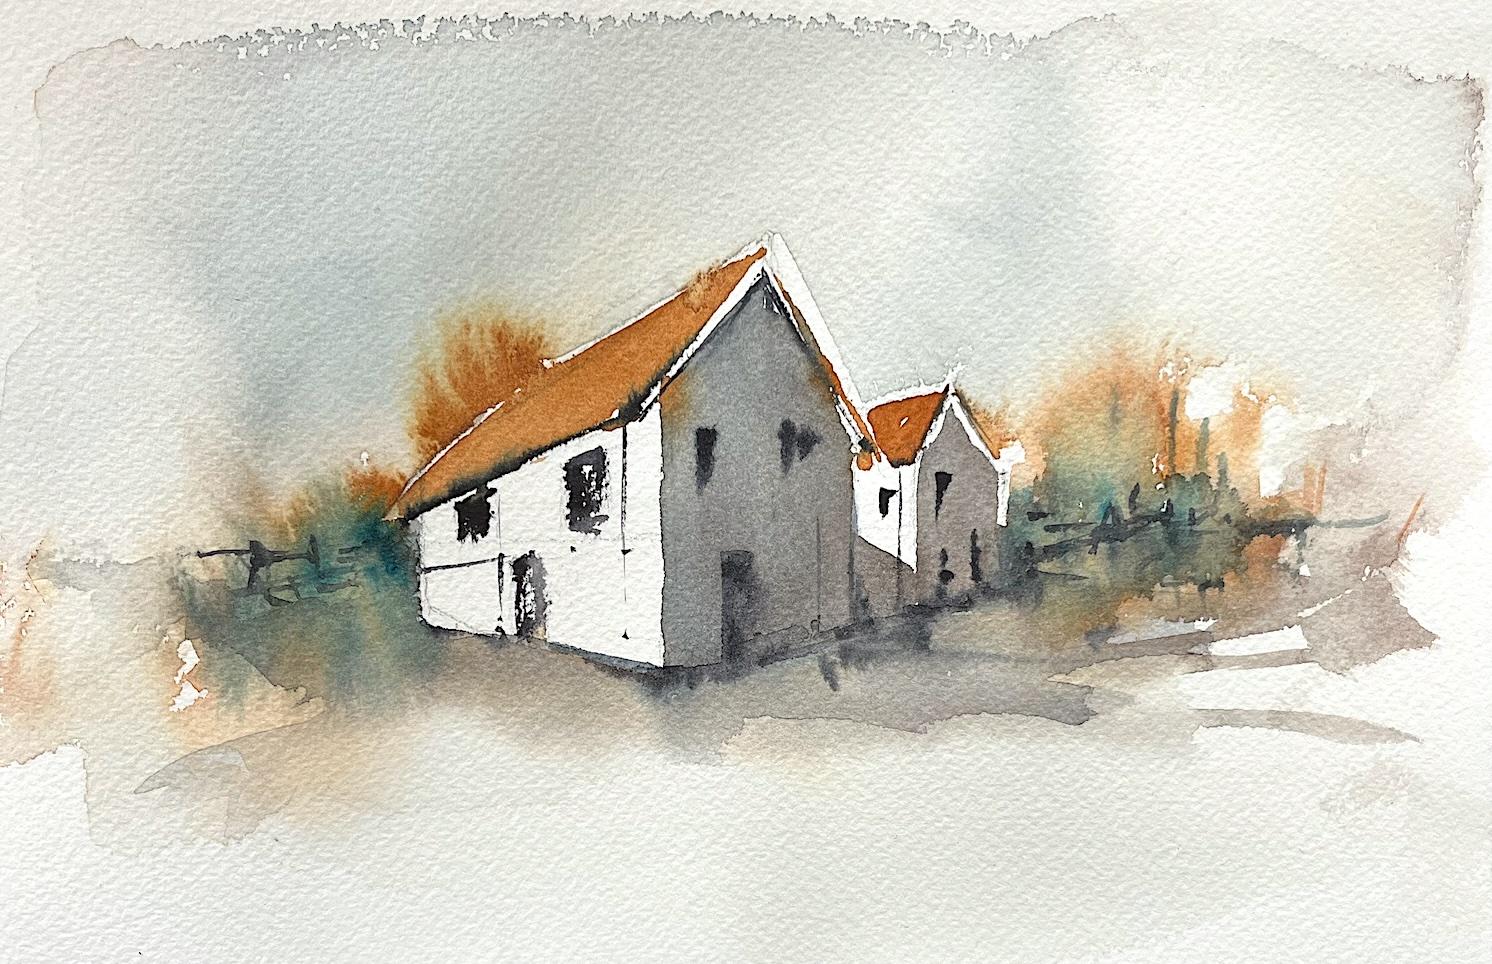
6. Getting the Paint On: Okay. For those
paying attention, this isn't the same
sketch as the one that I just did because I didn't
like how it turned out. I just sketched up another one. Happily this one goes
better. Clean brush. No, that's not a clean
brush. Clean ish brush. Well, you'll be able to
see where I'm going. So I'm going to do is
I'm going to paint down first with water. I'm going to chisel out shapes. So around the roof lines, going to keep it a bit
messy on either side, but I'll paint through
the sky there. I want to reason my
rooms quite warm, so I'll keep it reasonably wet. Alright, so if I hold up. You can see there's a reasonable amount of water on there. Alright. So then I'm
going to take I want, like, a bit a bit of
a brownie orange. So I'm gonna take a bit of
my yellow, bit of my red. I've got a hunts yellow pile
red lo turquoise in here. Maybe a touch of the turquoise, let's see what color
that is nice and red. I'm going to take that
and I'm going to paint in the roof and I'm not going
to worry if that bleeds. I'm going to come and pop
to my hand on the side, pop that side in coming
all the way down. I went to the effort to paint those eaves in, so
maybe I'll put it in. Then you might need to change to another paint brush to
get that roof in I'll see if I can get it in this one. Then while I've got
this color on my brush, I'm just going to
move a little bit around into that web
page, letting it do. Same thing. Don't
want that a bit too. I'm just going to put
some water on that. I don't want it to be too
defined in there. Okay. So you can see, although I paid all that attention to the
lines in the drawing, I'm still being
really rough here, but I've got the general, you know, I still have the
general shape in there. Now, I'm going to keep
the face here clear, white, but I'm going
to paint this side in. So I'm going to do that in
a bit of a purply green. So I've got some Palo
turquoise and some mypyle. Let's see what color that is. Bit too black, a bit more green. I don't mind that. So
milky consistency. I'm going to come
under the down. Oh, that wasn't very straight. And again, I don't care
if I've got bleeding. And then I'm going to also pop a touch of a shadow down there. I'm going to again throw some of that paint around either side. I don't like that one. I must set up a bit. You can also use
a spray bottle if you want to make
things move a bit. I tend to get water
everywhere on my computer and all sorts of places I don't want when I use a spray bottle, so I don't tend to do it. And then I might pop a
little bit of that ph. Oh, clean my brush. Maybe two things of water. What I was going to do
is put a little bit of the green in the sky. The autumny this one. So my paper, because I'm a
wasa my room's really warm, my papers drying really quickly. But I just want I want messy nonsense kind
of stuff all around here. I want that wet in wet. I'm just going to throw a bit. Messy is fine. Now, before that's fully dry, I'm going to grab smaller brush, this one, and I'm
going to pick up really solid Pyl red
and halo turquoise now, creamy toothpasty
consistency paint. A really nice strong dark. I'm going to pop
in some suggestion here of the windows
and the door. I'm keeping it messy, but following that
vanishing point. Then I'm going to pop in a
couple of downpipe things, maybe one there, maybe
a little line there. So don't draw a full line. We're just giving a
bit of an indication. I don't want a line
that goes all the way. I'm going to pop a little
bit under the eaves. Okay. Keeping it really messy. I'm going to pop
in that dry page, a little bit of a line there, a little bit
of a window there. I'm now kind of
feeling out where that line going back to that vanishing point was just to reestablish where my ground is. Then I'm going to
pop my brush on the side and just pop a
little bit of nonsense in. Now, I want to pop a couple of those little
windows in here while it's wet. At the moment, it's a
little bit too wet, I'm going to sit here
for a minute and just see how it goes. While that's drying, I'm
going to pop a little bit of my pal turquoise in either
side, let it bleed a bit. Just nonsense, doesn't really
have to mean anything much. Pick up a bit of my dark. I'm just throwing
cauliflowers are fine here. I'm just whacking a little
bit of stuff in letting my changing the angle of my brush and not
overthinking it. I might pop a little bit of dark in maybe some different
kinds of straps. I'm just popping
in some nonsense. All right. Let's see
how we're going. So if I try and yep,
that one's stuck. So my brush is on the side. This one's probably a
bit wetter. That's okay. So I just want the
suggestion of it. Now, this little hole there might be hurting
me. Close that in. And maybe this little
hole here is hurting me. Just close that in a bit. Alright, I want a bit
more nonsense here. I think I want a little bit
more of that orange in there, so I'm just going
to while it's all wet, just throw a bit of that. In maybe maybe I want a little bit of a pipe there and maybe to show
just chiseling out, putting a little bit
of a dark there to show the two buildings. Maybe you need to
leave that dry. I probably I'm going to
let that dry for a minute. I think I'm probably
going to extend a bit of a shadow here. G to come out of that for
five and just let that settle in and we'll come back
and see where we're at. Come out and let that dry.
7. Finishing Off: Okay, so we're dry now. I'm just going to chuck a
couple other little bits in. So I want to tidy up here. So I'm just going to grab
a bit of one of my mixers. Let's see, one of these. I'm just going to tidy up. That side of building. So I've just grabbed
a bit of paint. I'm just closing in that gap. Right. And then is that my
vanishing point? Yeah, okay. So I feel like now
it's my big brush. I'm just going to
pop a little bit. I've just painted a
little bit of water. I'm just going to pop a bit
of a shadow and a bit of stuff just to get that
to sit in a bit better. I'm just going to
I just feel like I need something there. Okay. And maybe I want. Where's my Ah. Maybe I need a little
bit of something. You know, fence
eline or something. Kind of closing in the
painting a little bit. Okay. And then I just want to if any
of these have disappeared, and then I'm just
going to restate maybe another little line there. Just restate a couple of those. Dark and I really don't want to do more than
that, I don't think. I mean, you can put
whatever detail you like, but that's really where
I'm going to leave it.
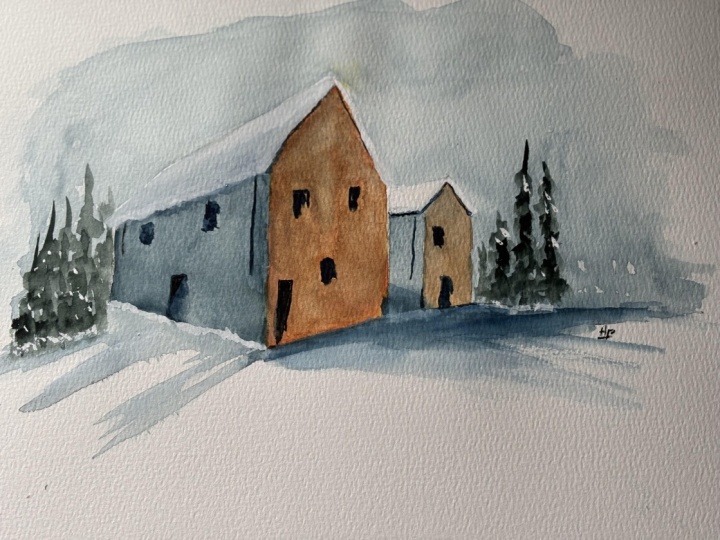
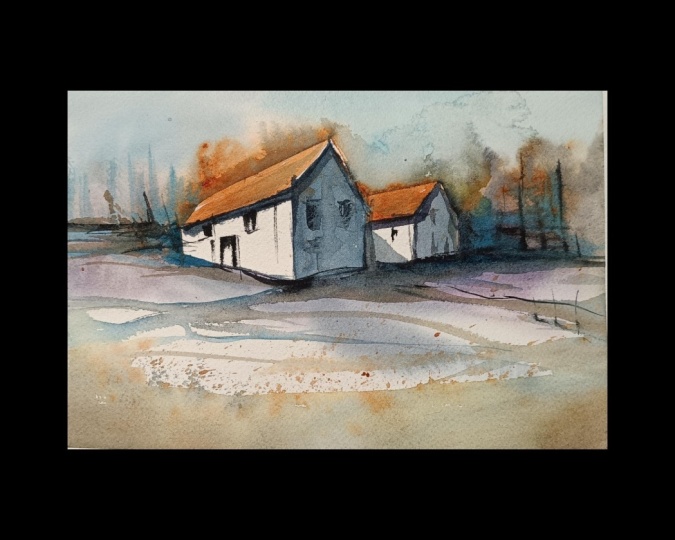
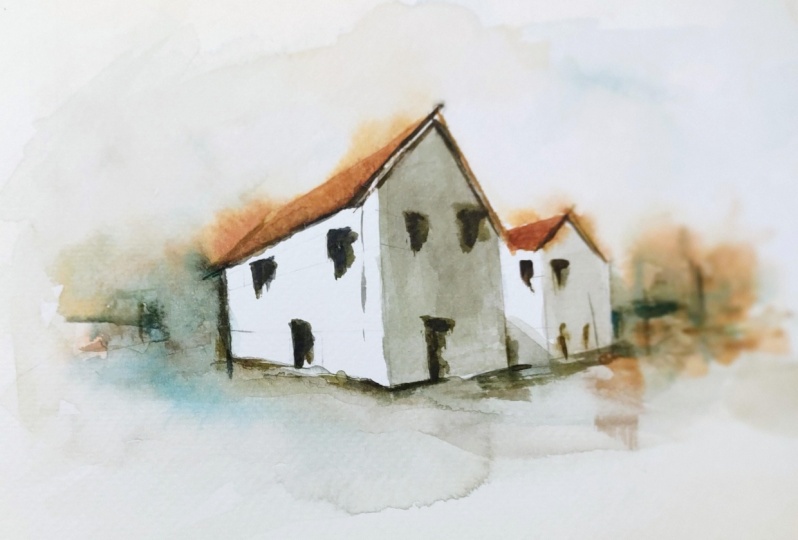
8. Signing Off with Some Different Versions, Including Snow: Okay, so I hope that that was nice and fast for
the actual painting, maybe not necessarily
the drawing, but hopefully you've got an idea of a better handle on the
two point perspective. Now, as always, when we're
painting loosely like this, it'll look different
every time you do it. And these are some
of the ones that I did while I was deciding what colors and what I wanted
to do for the lesson. And the other thing
that I would say you can have a play with this
is I know some of you, it's nearly Christmas,
some of you in Northern Hemisphere
and got snow. So you can switch it around. And if you leave your roof white and the foreground white, you can actually switch it into a little snow scene
where you've just got some trees and you've
got snow on the roof. And if you make your
little eve line wriggly, it looks a little
bit more like snow. So you can have a play with
that kind of thing, as well. So if you're happy
with what you've done, pop a picture up on the project section form
and have a look at. Always love giving feedback, and thanks for joining me.
 Nadine Dudek, Professional Watercolour Artist