Transcripts
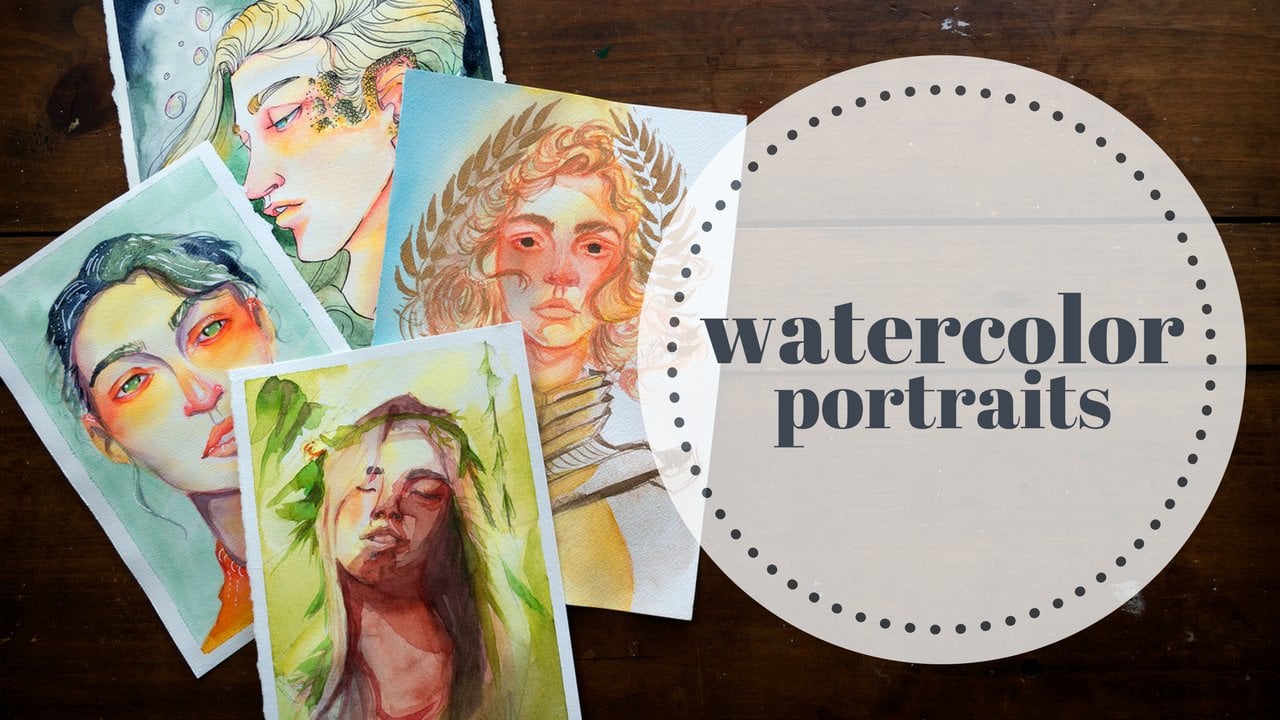
1. INTRODUCTION: Hello. My name is Aaron Duncan and I have created this skill share class to share with you my method for creating simple, dreamy watercolor faces. In this class, I will walk you through how to sketch a face with the facial features in proportion. We will look at mixing colors to create flesh tones and shadow tones. And then we will use watercolor to create the contours of the face, giving it shape and depth in a simple, dreamy, fluid style. A word of warning painting faces is highly addictive. It is a lot of fun on the faces of beautiful and interesting in the pages of your sketchbook, so let's get started.
2. Materials Required: materials that you'll need for this class. Ah, some sheets of copy paper. We'll do our final piece of watercolor paper, but you'll want to do your practice drawing of your face on cheap copy paper. You'll also want a sketch pencil. I prefer to use a to B or four. Be something nice and soft and a little bit dark. My favorite pencil is this palomino black Wing. It responds really well to pressure, and it's just a great pencil. But you just use whatever you have, and then a razor will probably be helpful. A swell. You will need some watercolor paper. I'm using cancer one medium cold press watercolor paper. In a three, you can use a fore that will be fine as well. As long as you have a good what? A color paper that will be able to take the paint and lots of water. Next up, we're gonna need water color paint. Here is a selection off some of the watercolor paints that I have. There is a cheaper Moammar studio set here with the round pans, or there are Windsor and Newton artists colors. They come in little tubes, which have squeezed in here, all the koi watercolor set. I'm going to use a Daniel Smith palette that I put together because it is my favorite. But anyone off these sets of watercolors would do Start where you are. Start with what you have, and that will be perfect. Now it's time for brushes. I'm gonna be using three different sauce synthetic watercolor brushes. The first is a size eight round brush and will use this to do our initial color washes and spread around larger areas of paint. The second is a size six for slightly more detailed shadows. On the third size is a size two round brush on. This is for the finer details. These are all fairly inexpensive brushes, nothing too fancy here. Next up, I'm gonna recommend that you work with a nice big jar off fresh, clean water so that up brushes and what are always feeling clean when we use thumb and some kitchen towel for blotting water off your brush or dabbing any excess paint or water from your painting
3. Draw A Face: Basic Proportions: there are so many ways to draw a face on, I'm going to share with you my way of drawing a simple, stylized, feminine face. Take your copy paper and your sketch pencil and draw yourself a nice round egg shape about the size of your palm. You want to give yourself lots of room to work here. Draw a vertical line through the center of your egg and a horizontal line through the center of your egg. Then, looking at the bottom half of your egg, draw another line halfway through that, and then through the bottom half of that, draw another line halfway these other main markets for your features. We're going to draw in the eyes with two curved lines. It is important to leave an eyes width between each eye, and you want to make eyes fairly large so that you have room to work inside them. Now we'll draw in the irises. These are the colored areas and right in the middle of the iris. We draw a small round pupil, but don't color it in. Now we're going to define the I lead a gentle, curving line that starts narrow the inner eye and moves wider at the outer eye. It cuts through the top off the iris, but it doesn't cut through the pupil. You draw too small half circles at each inner I, which are the tear ducts. On the bottom of the eye is an upward curving line that doesn't quite meet at the outer edges. The next line down represents the bottom off the nose. So imagine you have a circle there but only draw in the bottom of it. The next line down represents the curve underneath your bottom lip. We are actually going to draw in the line where the two lips meet, so we start by during a small, gentle curve in the middle, and then we mark off the corners of the mouth, which are roughly in line with center of the eye. So we put a dot underneath each eye, and we draw a kind of wavy line, which gently gently curves up. Next we do the Cupid's bow, which is a very small curve, and bring that down to meet the corners of the mouth. There you are. You now have the mouth with just a suggestion of the bottom lip. Now I'm going to mark in the ears. The top of the ear is aligned with the eyes. Eyebrows begin roughly in line with the inner eye, and you draw a gently upward sloping line until about 3/4 of the way across the eye, and then you slope the line down. Now we're gonna add in a neck as well. On the sides of each neck are generally in line with center of the eye. So that is our basic face. Practice it and practice it until you feel confident to draw it on your watercolor paper.
4. Mix A Skin Tone : after you have practiced drawing your face on copy paper, feel free to go ahead and draw your face on your watercolor paper, and then we can begin to color in the face with a flesh tone. The first thing we're gonna do is get a nice big jar of fresh, clean water to use on our number eight round brush to get started. So to make a flesh turn, we are going to use yellow, read a little bit of purple. I find that this works really, really well. So I'm going to show you the colors that I'm using on my page here. Please don't worry. If you don't have the exact same shades of red, yellow and purple as I do, just use what you have and you will be able to get a lovely, neutral flesh tone. So I've got a little bit of housing yellow on my red. Here is a crimson red, and I'm going to add this purple here, which is actually called Moon Galore and is one of my favorite colors. So I'm gonna mix these three colors together. I'll start by taking a little bit of the red. I'm putting it into the yellow. So this gives us our basic orange. We don't want too much red because ready is a very overpowering color. So we get a lovely orange here on, then I will take my purple on, bring that in, and then see how it neutralizes it on. Kind of makes it earthy. There we go. That's exactly what we want. So this is our doc flesh tone. Now, as we move this color around the face where we paint it, we're gonna want a lighter version of this as well. So to get that you just get lots of water on your clean brush and spread it out blended out . There you go.
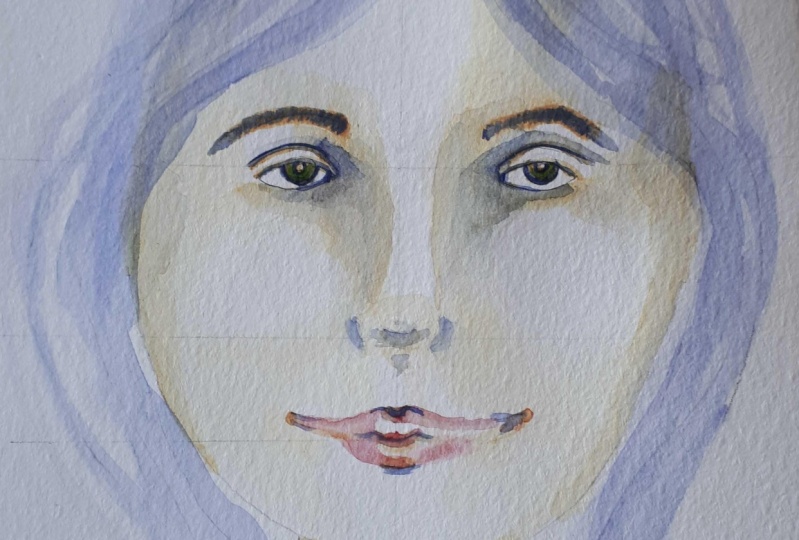
5. The First Colour Wash : before we start painting, it's important to remember that there are certain areas off the face that we do not want paint to go on. These are areas of the face that we want to come forward. They are parts of the face that protrude, so the light hits them, and that will help us to create contours of the face. So these areas, we're going to leave white the areas that we don't paid out the middle of the forehead, the bridge of the nose, the apples of the cheeks, the middle of the eyelids and in the middle of the brow bone underneath the eyebrows. Also try to leave the area above the top lip at the chin. Okay, we're ready to start painting. Get a decent amount off paint on your brush and apply it to the inner eye on either side of what would be the bridge of your nose. The face that we're painting is looking straight at us, so that means that those shadows will be symmetrical. They'll be basically the same on each side. So what I do is I start by applying to the inner eye and then spread it at blended out from their using a wet, watery paintbrush. Take lots off clean water on your brush on, begin to spread that paint out around the face but trying not to get it. All the areas that we decided to remain. What now, if you do get them on those areas, have Sophia grab a tissue, a dab it off and then blend again. Entities as simple as that spread it down the bridge of the nose and come out a little bit at the bottom where the ball of the lawyers would be. Spread it around under the eye across the eyebrow area and then all the outer eye of each side of the face. There is a lovely bit of shadow on both sides. Blend those shadows down along the face, as then do under the ball of the nose and in between the lips and at the quarter of the mouth, be there where the dark shadows will be underneath the lip and at the chin. There we are. Now, I'm just going to use a clean paintbrush with water on it to push on, gently spread this paint around the face, creating shadows and avoiding the areas that we want to leave wise. If you feel that you've covered up too much of that white space, then have no fear. Grab a tissue and just dab it off and then use your clean, watery paint brush to blend and gently spread it around again until you feel that you have a nice contour to that white space. After this, we're going to let it dry thoroughly before we move on to the next coat off flesh tone.
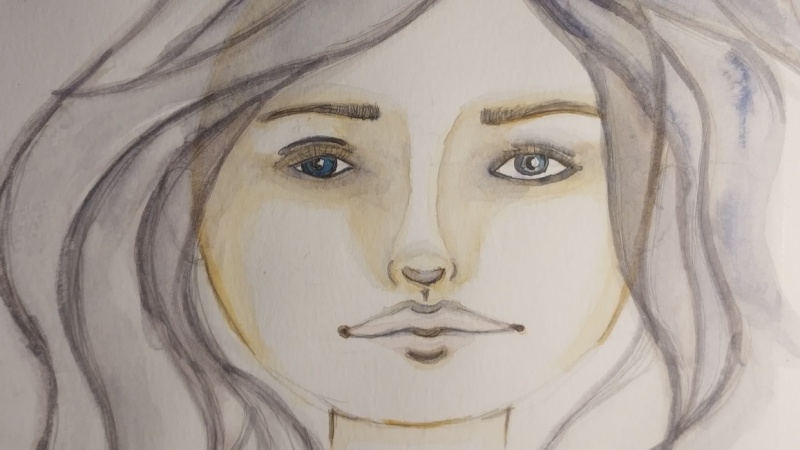
6. The Second Layer: Now that the first layer of color is dry, we're going to go ahead and put another layer of skin tone on top. That is basically all that we do. When we're building up the contours of the face. We just keep adding depth to the shadows. So I stopped in the corner of the eye on all the outsides of the eye again and using my lover's six brush. I'm just bloody out that color. I just have a bit of clean water on the brush, and I'm pushing it around and gently blending out. We work through the shadows exactly the same way that we did in the first layer. We started the quarter of the I. We blend it down through the sides of the nerves, through the outside, edges of the eye on the sides of the face and using a lot of water on that, but on the brush, just blending it through and blending it through under leaf and nose. And I'm actually going to use my brush to kind of fall the top of the circle over the nose here. Now I'm going to go down to a size two round brush. Sorry, that I can do the delicate thin parts in between the lips, and I just want to do the Cubans bow on the very corners of the mouth. Those dark areas there notice that I never actually do an outline of the whole mouth because that line can sometimes be way too harsh and just make it stand out and not feel dreamy and not kind of feel fluid. So I'm outlining the sides of the face, and now I am going to try and define the eyes a little bit more with this number to brush. These are the eye lids I'm defining here. I've got to go ahead as well and do the upper islet the little circle at the very in 1/4 of the I, and deepened them up and try and blend in a little bit more shadow there. Basically, I'm just trying to emphasize those crevices in the corners of your eyes where its darkest. And I find that when you do that, that kind of makes the eyes deeper there, and the white bits around the face really pop out lots of water on the brush and just blending out the color. I'm going to define the eyebrows a little bit. Don't worry if your eyebrows on exactly the same, nobody's eyebrows are exactly the same. It really, really doesn't matter, and I'm gonna get some depth. Ive to the bottom of the lowers blended out, and there is a little dick under your nose that leads down to your lip. So I'm going to start to emphasize that a little bit now. And don't forget the neck because it helps, even though we're only doing faces just to have a little bit of neck peeking out there. Now I'm going to define the iris, which is the colored area of the eye on the people in the video. When I do the pupil, if you look closely, you'll see that I'm just leaving a small circle at the side of the people that still white . I'm not coloring in the whole pupil. This is because I want to leave a little bit of light in the eye. Don't worry. If you do pain or great, you can either dab it away with the tissue and start again. Or just leave it and we can fill it in with a bit of white paint later, but we always want to keep a little bit of white in that I It's very important for bringing life to the eyes as each area of paint dries. I just come back and go over the top of it again just to help define it. And this is basically all waiting to do for our second layer off skin tone, and now we get adding some much darker shadows.
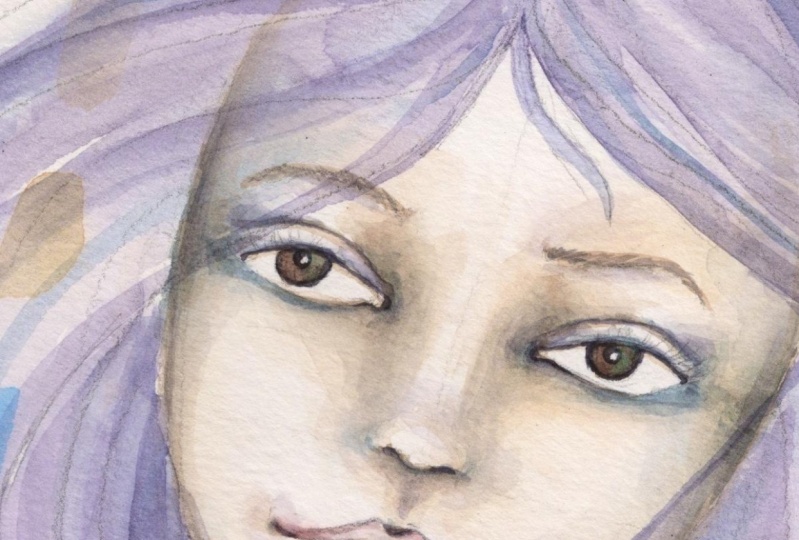
7. Dreamy Blue Shading: when that second layer of skin tone is completely dry. You can use at a raiser tour about some of the pencil lines if you like, or you can just leave the lip. Sometimes I find that having pencil lines and showing your workings in your journal is beautiful. Okay, so now we are going to create thes shadow colors for the face and for the shadows because this is a dreamy face. I'm going to use a kind of blue turn, but I don't want to use a bright blue strike for my watercolor palette. I want to kind of mix it up so that it's a mawr neutral, softer tone. So I've got this a light cerulean blue, and I'm mixing it with the purple that I used for the flesh tone above. Uh, that has given me a sort of kind of stoolie, dreamy oceanie balloon. Anyway, I like it. I'm gonna call it Dreamy Blue, and this is what I'm gonna use to full my deeper shadows. So to begin that we're gonna take up number six brush and get some paint on their on again , starting at the inside corner of the eyes. This is where I always start. It's like we basically do the same thing over and over again, gently building up layers, gently blending them out. It's really quite meditative, and I'm just popping the blue in there and then taking a lot of water, a lot of nice clean water on the brush on blending it out on following the creases of the eyelids around the I just the same way that I did with the previous layers down the size of the nose and using lots of water on the brush to blend that out. I'm still making sure that all the areas of the face that we defined as white are remaining crisp and clear. And whites I'm just taking mawr and mawr of this blue and building up those deep shadows over and over again. Once you get into the swing of things, you just keep going and going. You lay on your blue, you get lots of clean, fresh water on your brash and you blend it out. I'm blending around down the sides of the nose around where the nostrils are and lots of water on the brush here so that it kind of blends into the cheeks without forming a harsh, harsh line all the outer of the I once again, and from there lots of clean water on the brush to build that shadow down around the face and up around the side of the forehead. Ah, good tip to remember is any color that you used to create the shadow. Be sure to add that same color to each place where you have a place to shatter on the face . So if I put blue around the eye that I also put that blue around the nose and at the edge of the lip and under the chin, and this helps to bring the piece together and create unity, and that if I was to add a touch of green to the I to the shadow around the I that I would also put that green around the side of the nose and up at the Cupid's bow and under the chin. Now, before I go any further, I want all of this layer that I've just painted on to be completely dry, so I'm using a heat tool to dry it. You could use a hair dryer, or you could just let it sit for 10 15 minutes until that paper is dry so that the next layer that I used to really define those creases in the eyelids does not so kill and disappear in the wet paper it actually lays on top after painting in the dark blue on the creases. I've got lots of fresh water on my brush, and I'm just blending out the blue again, just the same ways before blending it out around the sides. This time I'm filling in the outer side of the eye, but I'm also blending it out to meet the side of the face. It kind of reminds me of putting on makeup and doing a smoky eye. If you've ever done that sort of thing, it's really fun, except with paint you blended out with lots of water on your paintbrush.
8. Define The Eyes And Lips: it is time for us to bring our eyes to life. To do that, I'm gonna use two colors of brown as shown here in the swatch that I'm creating. Eyes are made up of lots of different colors. Actually, even if your eyes are brown, you have lots of different colors within their. But I'm going to concentrate on using two colors a brown on a green. And I'm gonna mix these two colors together inside the iris part of the eye. So taking a very little bit of brown on my paintbrush, I'm filling in the iris area and making sure to leave that white spot within the pupil Nice and clean and crisp. And what and the same with the other. I We already need the little of bit of paint on the gentle ist lightest touch. Now I'm going to take the green and because I only little lead a little bit, I'm literally just taking it from the swatch on the page and dotting that green inside the iris as well. Now we're going to start to define the bottom lip, using the same red Crooms and color that we used to create the skin tone, starting in the middle of the bottom lip with a very, very water down red on your brush. Start to define that curve of the lips very gently. You want to fill in the shadows around the edges of the bottom lip, but leave a strip of white through the middle. Then we will do the same with the top lip, placing the red at the deepest, darkest parts. That's the corners of the mouth, the middle where the lips mate on the Cupid's bow tips and then use a sort of clean water down paintbrush to gently spread that paint across the lip. So you're just creating very, very delicate shadows, and you still have a lovely bit of white across the fullness of the top lip and across the fullness of the bottom lip, and then make sure it is completely dry. When the paint is completely dry, we're gonna go back to working on. Our iris is with the purple color, so most irises have a kind of strong dark line around the outside. So I'm feeling in that line, and I'm also using that dark color to fill in the pupils, still remembering to leave a nice spot of white in those pupils that bright, clean white dot inside the eye inside the people makes such a difference. Without it, the eyes just won't have any life with the same purple. I'm going to add some depth into the eyelid where it cuts across the iris and make sure that when you come to the end, I you go around those small circles you've made in the very, very increase of the I. And then using clean water on the brush, smudged out those lines a tiny bit that you just created. You want a really light touch here, Not too much water. Be as gentle and delicate as you can. And I'm also going to define in the creases off the upper lines of the islands and really give them a little bit more length and bring it round into the in the shadow of the I smudging it out. It really is like doing eye makeup. This is just clean water on the brush. Now I'm gonna use this water down purple tone to add some fine lines to the eyebrows. This is all with my size to round brush and as I said before. When you use a color in the shading, continue to use that color throughout all the shaded parts of the face, so that I want to bring that color into the dark areas of the nose. And now I am going to just add a little more depth to the lips following this same motions that I did when I first created the shadows in the lips. Start by placing the color at the darkest points, the bottoms of the lips, the middle on the corners of the mouth and then gently sweep. Yeah, just using a bit of clean water on your brush, but not too much water.
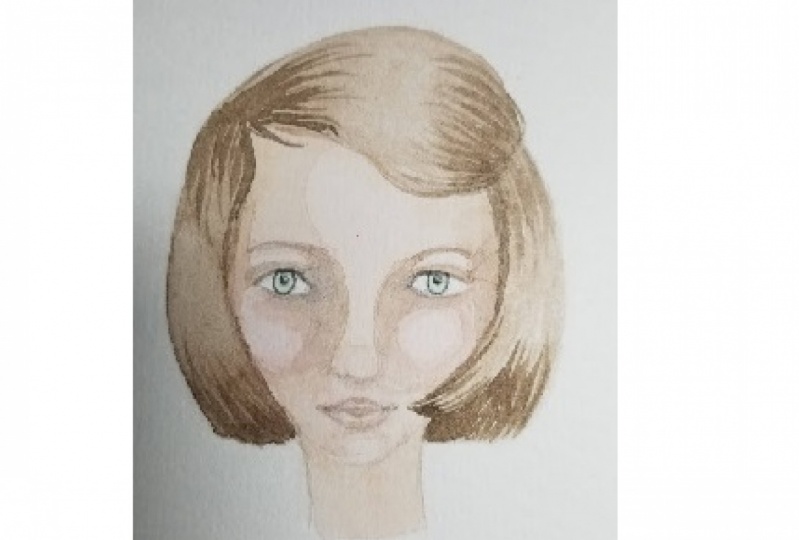
9. Dreamy Hair: my friend. You have come so far on this journey off painting a watercolor face and you should be so proud of yourself right now. And you should be excited because we are doing the hair. And so much about a dreamy face is creating dreamy hair. Now, hairs starts at the crown, which is the very top off that egg shaped face we have made. And with our hair, we are going to bring it down across the forehead and sweep it around the face so that we are framing the face with our wispy hair. Dreamy hair, I feel needs to have movement, and it needs to be kind of wispy, as if the wind is whipping it around a little bit. So I'm putting some large sweeping curves in it, and at the top, you must ensure to bring it up over the crown shape so that you feel in the space where the head is using a large number eight brush with some watery purple on their I'm keeping my wrist and arm very loose in order to make these low, sweeping curves in the hair. And what you don't want to do is try and define every little hair. What you want to do is try and create swathes of hair. You want to define sections of the hair that actually curve. You also want to make sure you leave lots of white space in the hair. Hair is darker at the very crown, and then it lightens up as it comes around. It is darker where there are narrower sections of hair, and then it lightens up where the curves wide and up. It is darker, close to the very sides of the face where we frame the face. But we do want lots of different areas of dark and lies. Now I'm putting a little bit of dark here, where it would be sort of underneath the hair into the sides of the face on using water to spread that down. In actual fact, I think I created a little bit too much darkness there. So I'm gonna use my tissue to dab at it and lighten it up. It can be really helpful to use a photo reference for doing hair just so you can see the way that the sections move and curl. You could do a Pinterest search for dreamy hair or something like that. Just to give you some ideas to work from Now that this is dry, I'm rubbing out some of the pencil lines on. I'm going to add in, I think a layer off blue. I just want to add some highlights. Give it definition. Give it a bit more death. So using my number six round brush, I'm coming in with just a few more sweeping lines off blue.
10. The FinalTouches: Our simple, dreamy face is pretty much finished now, but I'm gonna come back in with my sketch pencil just to add in some of the fine of finer dark lines in the creases. I just can't help myself. I love the contrast and the texture off a bit off pencil on top of the water color. So I'm going to draw in some of the finer, deeper, darker lines with a pencil. And, of course, if I do that on the I, I'm also going to do it gently around the nose and also in the deep creases around the lips . Oops, everywhere where there are dark shadows, I'll repeat the technique that I've used. I also like to use my sketch pencil to define some of the shadows in the hair and just separate the sections of hair from one another. Definitely don't use too much, just a little touch here and there where sections of hair fold over the other. It's really helpful. I could do this with a very fine paintbrush, but I actually really like the contrast in texture of the pencil. Now I love to show you guys how I do eyelashes because I think they are unimportant finishing touch. We definitely don't want to draw away the eyelashes, but we do want to draw some. So I like to start in the middle off the island and draw a small lash that goes straight up . Then we do curve lashes on either side that curve out and their head back in their thicker at the bottom and figure at the top on. They'll just gently curved outwards. Make sure you do some that are a bit longer and some that are a bit shorter. You want to be very feathery and fine with your pencil. You don't wanna have to draw in hundreds of eyelashes. You just will endure a few dotted out at random spaces at different lengths, curving outwards and back in again to the middle. And so that's exactly what I'm gonna do here with this. I on my sketch pencil, just very faint, gentle lines to represent the eyelashes. They stopped. Think of the bottom and they move it thinner at the top. This based out on their at uneven heights. And those, my friends, are the finishing touches to our simple, dreamy watercolor face.
11. Closing: thank you so much for joining my simple, dreamy watercolor faces class. The project for this class is to follow along with the lessons and create your own simple, dreamy watercolor face on, Then upload a picture of it to the project gallery. That would be amazing. I would love to see the work that you do. Also, if you have any questions, it'll then please head to the community page and I will try and do my best to answer any questions that you have. Please do follow me on skill ship and that way you can stay up to date with any new classes that I create or resource is that I might add, Thanks so much. Bye.
 Erin Duncan