Transcripts
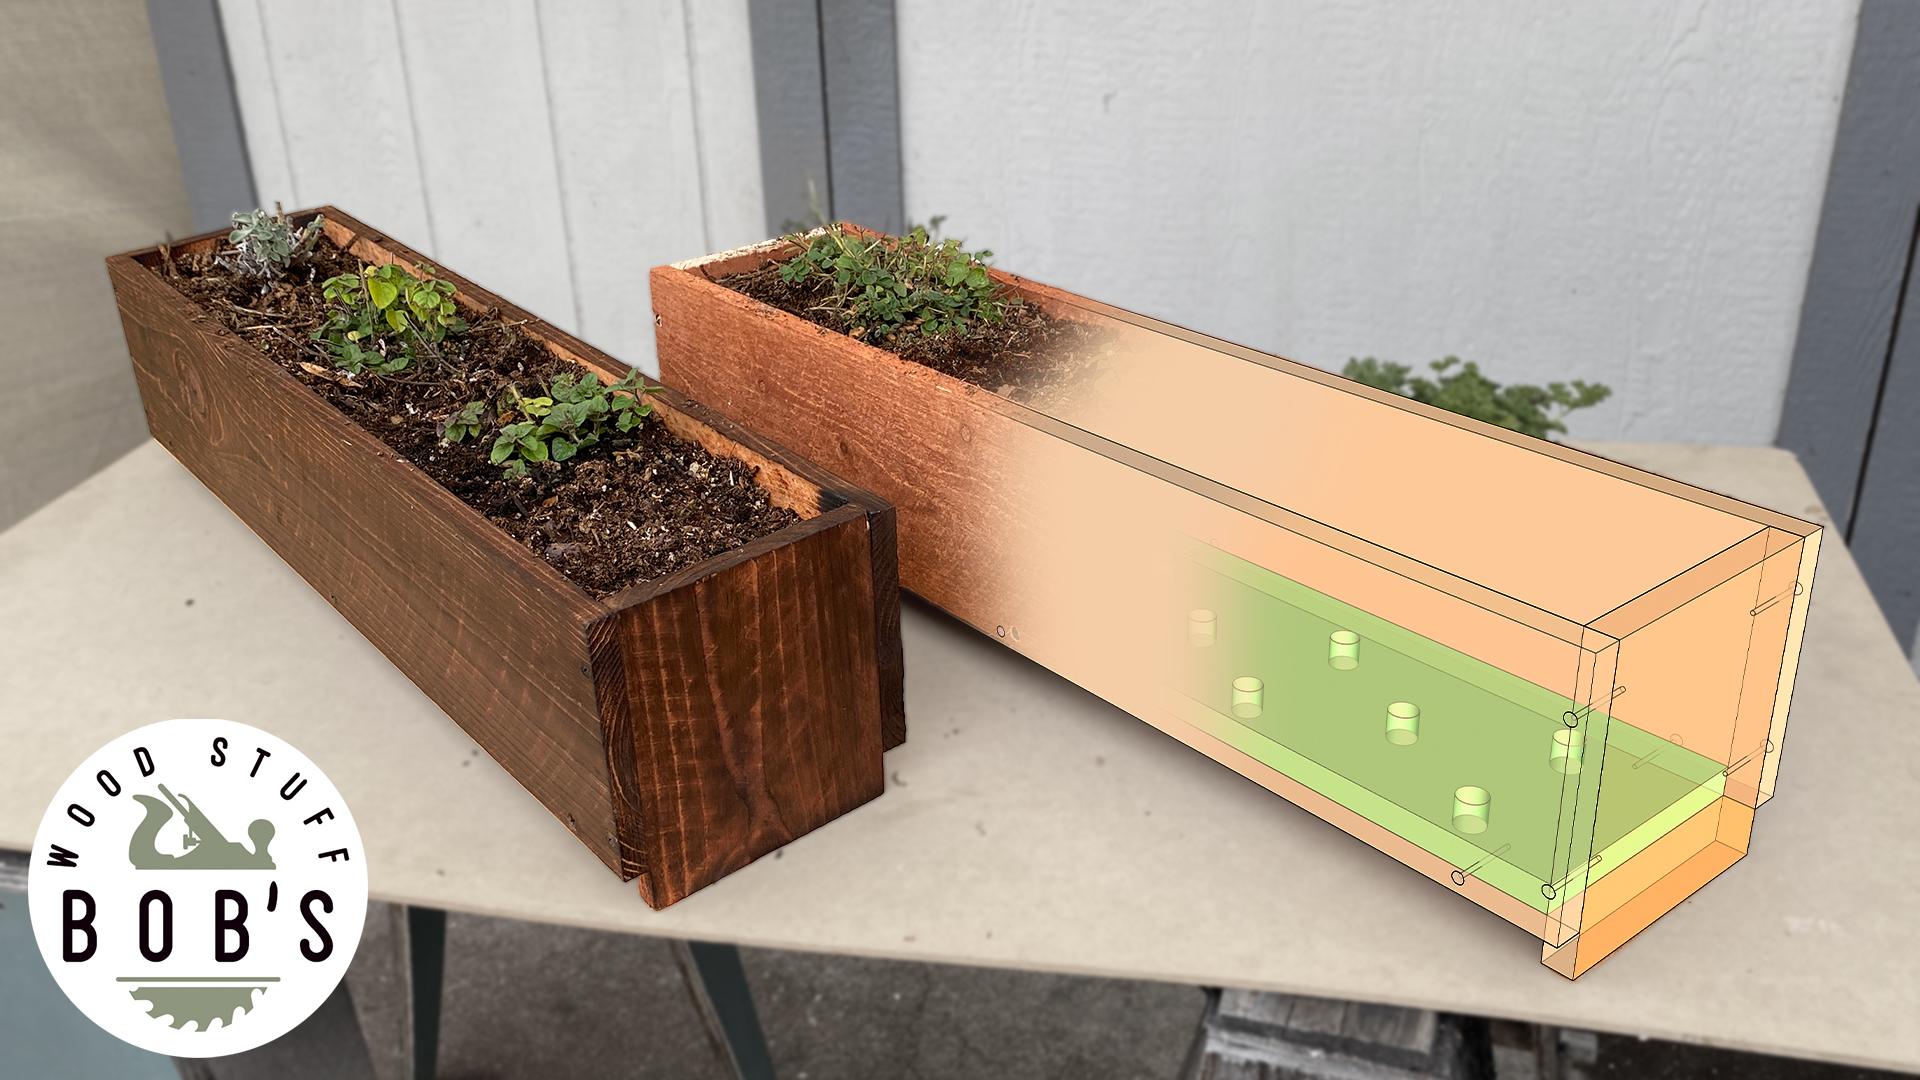
1. Introduction: Hi there. In this tutorial I'm going to show you how to build these two very simple herb planter boxes using only three fence boards. This is a great project for a beginning woodworker or someone who just wants to make a quick weekend project so you can start planting the only tools required or a drill and any kind of saw. In the video, I show how to make all the cuts using a table saw, a miter, saw a jigsaw, and a Hansoft. You only need one saw for this project, but I wanted to demonstrate on various tools. So people see that they can do it with their own tools. Toward the end of the video, I show how to finish one of the planter boxes using a shoe Tsugi ban technique. You burn the wood, which gives it a nice color and preserves it. This is optional because cedar is already wrought and pest resistant. Makes sure to download the plans from the class project section of this tutorial so you can follow along and make your own. A little bit about myself, I'm a woodworking teacher and a content creator. I operate the channel, Bob's would stuff on YouTube where I've published dozens of videos about making, woodworking and DIY projects. This is a great quick project to do. So grab some fence boards, some screws, and I'll see you in the classroom.
2. Cutting the Side Pieces: The first step of the project is to take two of these fence boards and cut them into four pieces that are 28.5 inches long. I'll take one of them and just set it aside because I don't need it right now. There are several ways to cut this fence board to length and it can be done with any saw. But I'll start with the miter saw because that one's the quickest and easiest. Make sure that you're wearing eye protection and hearing protection while using the miter saw, it's very loud and it can shoot things towards your face. So take one of your fence boards, place it on the miter saw, and start by cutting off just the very end of it. A lot of fence boards are not super accurately Made. It might not be straight or it might be a little bit damaged. So I always want to cut off just a little bit on the end. Now that the end is cut off, I can measure 28.5 inches from the end. Make a little mark and an X on the waste side of that mark. Then I'll bring the blade down, keeping my finger off of the trigger. Well, I'm doing this and I'll line up my saw blade on the waste side of the line and then make my cut. So this is one of the 428.5 inch pieces I need to make. I'll just use this and trace it, mark my other ones, which is a little bit faster and more accurate than using the tape measure line and up on the right side using my finger to tell when it's totally flush. And then strike a line across here and mark my waist aside. For the next cut, I'll be using a hand saw. Take a saw horse and put your board on top of that. If you have a clamp, was a really good time to use it. I'll go ahead and mark this line in ink using my square. So it's a little bit easier to see on camera. And I'll place my saw on the waste side of the line. This Saw cuts on the push stroke. So I'll start my cut on the corner. Trying to correct as you go to get closer to that line. Make sure I'm still on that line there. It's not looking too pretty, but it'll work. I don't want this to snap off too hard because I'll be using this piece so I'll support the weight. And then saw through the rest of the fibers. I'll switch to the table saw to demonstrate another cut. Makes sure that you're wearing eye protection and hearing protection when using the table saw. I'll take out my miter gauge. This can also be done with a crosscut sled. Make sure the gauges at 90, and then raise the blade up just above the height of your board. This board is a little bit wet, so I'm actually going to wipe some wax on my table saw so it slides more easily. Just take some paraffin wax. And I'll make my first cut. Once again, just taking off the very end of the board. Then I'll take that first board that I cut and use that to mark my line. Make sure to use the first board and not the second board. Because if you messed up at all on the second board, that error will be compounded onto the third board. Then I'll use my square to wrap this line around so I can see it against the blade. And I'll do the same thing for that fourth piece. So I'll take that first piece, not the third one. Trace the edge of it. Wrap my line around, and then make my cut. What I'm doing is I'm matching up the tooth of the blade on the waste side of my line. So I wanna make sure that the whole tooth is on the waste side, and I keep half of that line. I'm going to split that line in half.
3. 3 Cutting the Legs: Now using the remaining pieces that you have from those two fence boards, you're gonna cut four pieces that are 6.5 inches long, each. I'll switch to the jigsaw just to show you how to do it with that tool. So I'll take the board, set it down on my saw horse and measure 6.5 inches from one end. And as always, I put a little x on the waste side. Then I'll take my combination square. You can also use a speed square for this. And I'll bring that line all the way across. When you're using the jigsaw, make sure to have eye protection and hearing protection. Make sure your line is hanging off the edge of your saw horse so you don't cut into the source. And then clamp it to the source. And then place your blade on the waste side of the line and just make your cut. If you have a speed square, this is a good time to use it because you could place the speed square like this. And, but you're saw up against it and you'll get a totally straight line. Or you could just free hand. It is not a big deal. This is not a speed square and this is a combination square. Then you can take that first piece and use it as a guide to mark your second piece. Put an X on the waste side and make another cut. For the remaining cuts, I'll use the miter saw because it's the fastest way to do it. I'll take my first piece that I cut, butted up against the end of their trace a line, put a x line up my blade with the waste side of the line. Once again, keeping my finger off of the trigger. Well, I'm doing this. And then make my cut. And I'll take that first piece again. Trace it. Put an x, get the blade on the waste side. Now that I have these four pieces cut, I can move on to the next fence board.
4. Cutting the Bottom Pieces: I'll start once again by cutting off the very end of the board because I want a nice clean surface. Then I'll measure 27 inches because I need to 27 inch pieces. And I'll marked by line and put an x. And I will trace that board for my next cut trees. The board put it x.
5. Assembling the Planter Boxes: Now that all the pieces are cut, I'm going to start assembling the planter box. Take the 27 inch piece and place it down on your saw horse like this. Take one of the 28.5 inch pieces and place it against it like this. Use a scrap as a spacer block to make sure that you have one board width between the end of this and the end of this. And then do the same thing with the other 28.5 inch piece. Then use a clamp and clamp them together on the front. And on the other side. If you have a second clamp while you're clamping it, feel with your hand on the bottom part to make sure that this is flush with the back of this. Then stand the whole thing up vertically. So it's easier to drill. If the boards aren't totally lined up. For instance, this is not flush with this. You can nudge them into place with a hammer. And I'll grab that scrap block again to make sure that there's enough space on both sides. Looks good and I'll start drilling my holes. There's going to be three screws in this and the middle one I want to be exactly in the middle. So I will measure where the middle of this is, what should be 14 and a quarter. And then I'll measure from there, half the thickness of the board. The board is five eighths of an inch thick, so I'll measure five-sixteenths off of there. This will ensure that I go into the middle of this bottom board. Now I need to pre drill the holes. When I need to do is find a drill bit where the size of the shaft is equal to the size of the shaft of the screw. So I want just the thread sticking out like it's doing. And I do this just by eyeballing it. I'll check that in my drill and go ahead and drill a pilot hole. Because the shape of the screw has a flared bottom on the head. I need to counter sync it. And I could do that by using a counter sinking Bit like this one that will make a flared opening on the whole that I've just drilled. Or I can use a drill bit like this one that has it built in, which is the fastest way because you only need to drill once. Or if you don't have either of those, you can just use a large drill bit that the end is larger than the screw head, which I'll do that 1 first. Now go ahead and drill in this screw. I'm using an impact driver, but you can also use a drill for this. I'll do the same thing on the other side in the middle. Then I'll use my combo counter sinking and drill bit. Then you need to remove one of the lamps or move it down slightly so you can put some screws in the top part. And I can remove that clamp. Then I'll flip it over and do the other sides. Now that these sides are attached with three screws, I need to attach the end pieces, which are the 6.5 inch pieces. I'll flip this whole assembly upside down so that the bottom, which is this part, is facing on the top. Then I'll take the 6.5 inch piece and squeeze it in here. It should fit in there. It's a little bit tight, so I'm actually going to loosen these screws just a little bit. I'll nudge this down with a hammer. Then I can clamp it right in the middle and continue to nudge it as needed. Then all screw these screws back in. And I need to put in two screws on each side to secure this end cap on there. So I'll pre drilled them. These ones I'm not measuring. I'm just eyeballing to make sure it's right in the middle and I don't want it right near the edge. I'll move it in by about an inch. The last step on the planter is to drill a bunch of holes for drainage. I'm using a five eighths inch spade bit, but you can use any kind of drill bit. Now you should have one completed plantar box that has little feet to keep an elevated which makes the drain is a lot better. I'll go ahead and make the second one in the same manner.
6. Flame Finishing with Shou Sugi Ban: One optional step after you've assembled your box is to finish it in the show Tsugi Ben style, where you burn the outside and then use a brush to get off all the chart areas. This protects the wood and also gives it a nice looking finish. I'm using a Burns automatic blow torch, which originally came with a canister of map gas. But I'm using camping propane because it is a lot cheaper and it burns at a lower temperature. Also keep some water nearby so that if it starts to set on fire, you can spray it. You don't want to move it around too much because it can get splotchy. What you wanna do is do slow, steady strokes. You get a nice even burn instead of spots here and there. Normally it goes a lot faster than this, but this wood is pretty wet. My burners getting really cold from all of the expanding gas. So I'm going to let it warm up for a little bit because it doesn't seem to be working right right now. This will get your hands dirty, so be prepared for that. And then the last step is to brush it off with a wire brush, which gets rid of all the charge stuff and creates a nice texture. Make sure your strokes are going parallel with the grain because these will make scratches, then you can see and it looks bad if they're not going parallel with the grade. These planters both turned out really great. I'm a huge fan of the show Tsugi bands style because the color that it gives the word, but I think the Cedar color is also quite nice. Thank you so much for watching my tutorial and I'll see you next time. Bye.
 Bob Hoellwarth