Transcripts
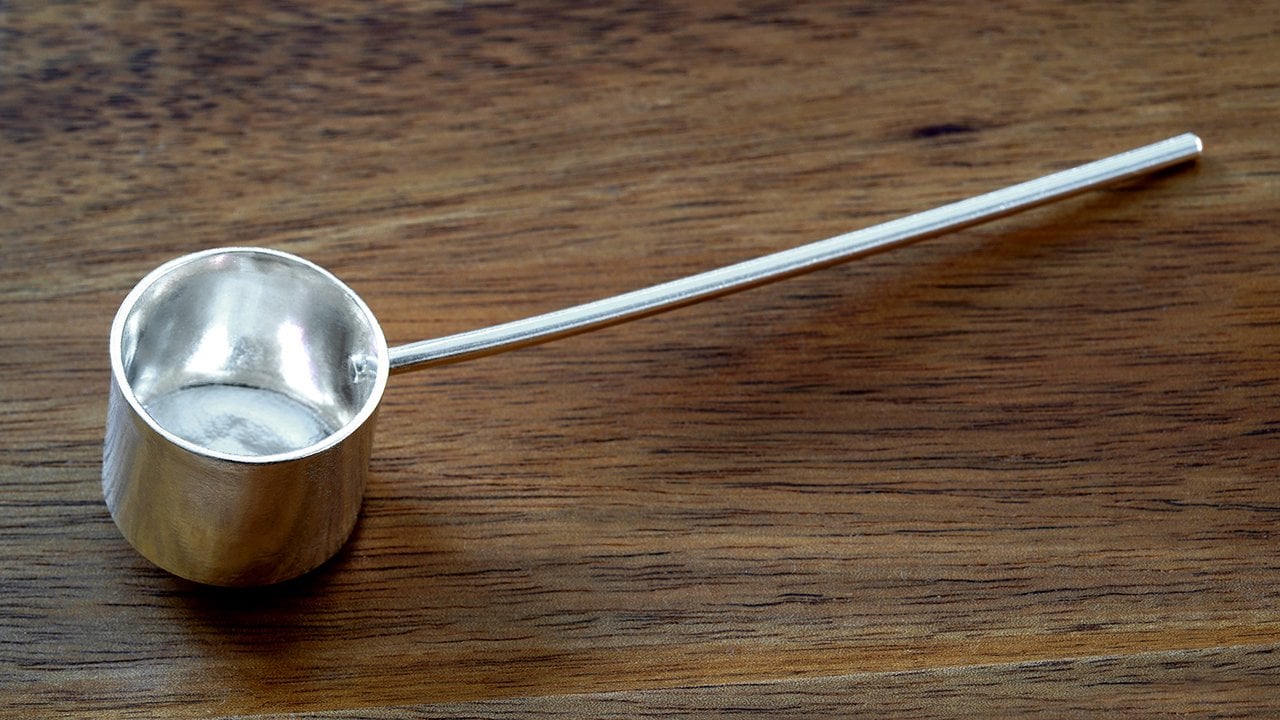
1. Making Seasoning Spoon in Solid Sterling Silver: Would you like to
learn silversmithing? Do you want to have a
seasoning spoon make of solid sterling silver
to spice up your life? In this class, you will learn basic silver smithing skills, making a simple seasoning spoon. Before taking this class, it will be very
helpful if you have previous experience of working
with silver or copper. If you have never worked with silver before, I have your back. Simply watch my two other
skillshare classes. We'll give you all the foundation
knowledge for this one. Throughout the entire process, I will share with you
lots of my personal tips and in depth details
of jery making tricks. Based on my over two decades of firsthand experience working
with precious metal, everything you learn
from this class is universally applicable
to any jery making or silver smithing projects
you are working with at the moment or
going to do in the future. We are going to use solid
sterling silver in this class. But all the skills you learn in this class can be
used in copper, brass, and solid gold. The materials and
tools you need in this class have been
listed in the PDF file, which can be found in the
class resource section. The templates you will need can also be found
in the same place. If you have watched
my Youtube videos or Instagram Wheels, you will see lots of
short videos showing my making process without any explanation of why I
was doing this and that. On skill share, I
share my reasons for every single
step. My name is Yi. Join me in this class and I will walk you through
every single step of the entire making process with my in depth
personal thoughts.
2. Class Project: The class project is to make
a silver seasoning spoon. The entire two list and the scoop template can
be downloaded from the class resource section to help you track
your making progress. I have also included
an outline of the steps you can follow
to make your own spoon. You can find that in the
project description section. When you're making your spoon, don't forget to snap some pictures of the
making process and show off your finished spoon in the class project gallery
or on social media. We would love to see you having fun in the making process. By finishing this project, you will have a handmade
seasoning spoon in solid sterling silver. Each of the upcoming
classes explains every single step in the making process
with full details. Let's get started.
3. Safety Video: Before we start safety, first, let's quickly go through some potential danger when working with precious
metals and jewelry, making tools and how
to protect yourself. Silver melt at 961.8
degrees Celsius. Be careful not to burn yourself after our object
is heated with a torch. When either melting
scrap or soldering. If you want to move
it, make sure to hold it firmly with
a pair of tweezers. Or simply leave it in
place until it cools down to room temperature before touching it
with your bare hands. When handling tools
such as jeweler saw files and drills
all have sharp edges. Always be careful
to avoid injuring yourself when using any drills. Make sure your fingers
are not behind the drill. Always wear air
protectors during hammering or when
loud noise occurs. Make sure to have an
extractor fan to suck away the dust and debris during the polishing
and cleaning process. Always make sure your
work area is well ventilated when using any kind of gas or chemical in
the making process. The safe typical I use in all my videos is mixed
with table salt, rice vinegar, and tap water. For some people, this mixture might cause skin irritation. I would suggest using a pair of bamboo chopsticks and
rubber gloves to handle it. In this case, always make
sure to wear a pair of safety goggles to
protect your eyes from metal dust particles or flying debris through
the entire process. If you have long hair, it is
really important to have it tied up to avoid getting
caught in any rotary motor. Remember, it's super
important to stay safe. Now let's get started.
4. Cutting the Pattern: In this lesson,
we're going to make the pattern of a spoon
in sterling silver. We will learn how to turn a random piece of silphur
into the shape you want. This is a piece of
recycled sterling silfur I have left over from
another project. It is thicker than we need for the spoon
I'm going to make. It is too narrow for the
spoon pattern and it is not in the shape
of a spoon basically. It's not fit for purpose. We are going to transform
it into a flat spoon shape. First, we're going to change
its thickness and width, soften this piece of silver. We heat it up with
a kitchen torch for how long to heat
it and how to heat it. Please refer to my
other skill share class called Silversmithing
for beginners, making a silver coffee
scoop from scrap. It covers all the details, which I won't repeat here next. To make it wider and thinner, we put it through
the rolling mill because it is long enough. We just need to make
it a little wider. We feed it through the rolling
mill in this direction. We are aiming at No. 0.9 MM thick. If we were to change its
thickness for more than 1.5 MM, we will need to soften
this piece of silphver. Again, as this is not the case, I'm going to keep rolling
till it reaches ne 0.9 MM bit by bit. Our silphur is going down
to what we are looking for. The spoon pattern is
provided in a PDF file. You can find it in the
class resource section. You can simply download
it and print it off. After that, we cut a piece
of double size tape big enough to cover
the spoon pattern and stick it on the
back of the paper. Cut the pattern. Now
using a pair of sess, peel the plastic off. We are going to use
this sticker to guide us when cutting
the sterling silver. I can put this sticker in the middle of this
piece of silver, but I would like to
stick it in this corner. In this way I will have a bigger piece of blank
silver for the next project. To get the shape out, I'm
going to use a jewelers. So if this is your first
time using a jewelers, so please see my
skillshare class jewelry making for beginners making
color pencil jewelry at home. It shows how to
set up a jewelers saw and how to use it
in an efficient way. The trick to cut it as
precise as possible is that instead of cutting
on the black line, we guide the saw blade right
next to the black line. In this way, we can still see the black line to
guide our cutting. Here we are, clean
of the silver saw dust and we have a flat
silver spoon shape. If I flip it over, you can see the pattern is very close to
a perfect circle. That's exactly what we want. In this lesson, we
have learned first how to transform a random piece of silver to the
pattern we need. Second, the trick of how to cut the precise shape
using a jeweler sore. In the next lesson,
we will learn how to open holes on
this spoon shape.
5. Opening the Holes: In this lesson,
we're going to open two holes on the flat pattern we made in the previous class. There are two dots on the
side with the paper sticker. They show where we need
to drill the holes. This is a metal scriber. First, I use it to make a mark in the center
of the two black dots. This will be the guide
of my next step. We want both holes to
be one MM diameter. However, we will start by drilling the holes
a smaller size. The reason for that
is this will give us a chance to move the hole
if it is slightly off line. Keep watching and I
will show you how. Here I use a No. 0.7 MM twist drill. Place the tip of the drill into the mark we make with describer. And push the drill gently. There are two tricks
in this process. First, keep the drill
perpendicular to the silver plate. Second, try not to push too hard when we feel the drill
is cutting into the metal. That's enough. Now we have
both holes at No. 0.7 MM. The paper sticker has finished its job at this point and we can take it off after
the paper is removed. We can see the holes
are not in the line. This is a very
common problem when drilling holes in
such a small size. Let me show you
how to correct it. First, put the silver plate on a flat surface and then
we use the wrong ber, slightly bigger than the
hole we need to correct. In this case, I'm using
a 0.8 MM run ber. Place the wrong Ber
on top of the hole we drilled earlier To
enlarge the hole. In this way we can adjust the position of the
hole to where we want. Two tricks here. First, keep the speed of the wrong ber high. This will prevent
it from spitting. Second, hold both
the silver plate and the hand drill tight. This will give you full
control in the process. Now you can see both holes are aligned in
the center of the plate. Next we use a one MM twist
drill to make the final size by jelling the holes from a smaller size and enlarging them to the
final size we want. Here are our perfectly
lined up holes. In this class, you
have learned first, how to open holes on silver. Second, how to correct the holes if they
are not lined up. In the next lesson,
we are going to make this into the
scoop of our spoon.
6. Forming the Scoop: Here is the flat spoon pattern we make in the previous class. We are going to form it
into an evenly domed scoop. As usual, before changing the shape of any
piece of silver, we need to soften it. I'm using a kitchen porch here to heat up
our silver plate. Once it cool down to
room temperature, we can move on to the next step. The main tools I'm using in this lesson are a
apping block and the largest apping punch in this set for the apping block I'm using the second
largest hole, which is on the other side
from the biggest one. Place the silver plate into the hole and then put the
punch on top of the silver. Before hitting the punch
with a hammer safety, first, make sure to wear a pair of good quality
air protectors. Hit the end of the punch gently with the flat
side of the hammer. The trick in this
process is to move the silver plate around
to get it evenly domed. I normally skip
the entire process in my Youtube and
Instagram videos, But here as you're going to
learn how to make this spoon, I'm showing you the whole
making process in this way. You know, if you don't get
the result in under a minute, it's totally normal because it is handmade. It
does take time. Well, this is our evening
dome silver scoop. All the time we spend on hitting the punch gently is
totally worth it. In this lesson, you have
learned how to form a flat piece of silver into
an evening dome scoop. In the next lesson,
we're going to adjust the edges of our scoop
to make it smoother.
7. Smoothing the Edges: Welcome back up to this stage. All the edges were finished, roughly by the jewelers handsaw. Earlier in this lesson, we are going to make
the scoop as close to a perfect circle as possible and all the
edges smooth to touch. Here I'm using a cut
number zero hand file to adjust the circle. Just eye boy, the trick
when filing a circle, instead of taking
a straight cut, we move the file
along the curve line. We want to take off all the
handsaw marks on the edges. This is a handmade spoon instead of a cold precision
machine cut circle. We are giving our scoop a
lovely warm human touch. For the three straight edges on our little
rectangular handle, we file them straight as
the edge is quite rough, it's normal to get
stuck to begin with. After filing it a few times, it will become smoother. Once the shape is right, we can change to use a needle file to do some
small adjustment like this. Keep checking to see which
parts need more work. Up to here, all edges
are looking good, so we can round the two
corners up on the scoop. This diagram shows
my way of filing the 90 degree angle to a round the corner
in an efficient way. First, we always start by moving the file straightforward to
get off the sharpest angle. Then we move on to take
off the other two corners. Move the file straightforward. Finally, as the corners
become less sharp, we can use a rounding movement
to create a smooth corner. This is how our scoop
looks at this stage, even and all the
edges are smooth. In this lesson, you
have learned first how to use files to take off the sore cut edges on a circle. Second, an efficient way to run a sharp corner
to a smooth one. In the next lesson,
we are going to make the handle for
our seasoning spoon.
8. Making the Handle: We have the scoop ready. Now we need a handle. This is the piece of
sterling silver ingot from which I'm going to
make the spoons handle. I show the details
of how to turn sterling silver scrap into
a piece of ingot like this. In my other skillshare class, silversmithing for beginners, making a silver coffee
scoop from scrap. I won't repeat that here. That class also shows
all the details of making a wire
out of this ingot. As I'm making the handle
from this piece of ingot, I'm going to quickly recap the main points in
a few sentences. The key ideas are, first, make sure to soften the
silver once for every no. 0.5 millimeter. It goes down when using
the rolling mill. Second, keep checking the
size of the silver wire. Third, soften the
silver after every one to two holes that it is
drawn through the draw plate. Fourth, take it slow. Now the wire measures
two millimeter diameter. That's the size we need
for our seasoning spoon. Measure it at 11 centimetres. Cut it with a snipper. This will be the
handle for our spoon. It has a slight curve. We can simply adjust it by
bending it straight like this. Make a mark at
half a centimeter. With a permanent maker. This is how much the handle
will overlap with the spoon. This mark will
give us a guide in our next step when
making the joint. Here is a six by
six CM steel block. Use the same hammer
we use earlier to flatten this half
a centimeter end. Make sure to hammer both
sides to make it even. Keep checking and hammering
until it reaches 3.4 M. D. Here we use a pair of
pliers to bend it straight and file all the
sharp corners of in the way I mentioned
in the previous lesion. One of the ways to
tell if it's smooth enough is to touch all the
edges with your fingers. If it's touched smooth,
it passed the test. In this lesson, we have recapped the key concept of the
wire making process. And learn how to
flatten the end of the handle to make the
joint for our spoon handle. In the next lesson,
we're going to drill two holes to match the
holes on the scoop.
9. Matching the Holes: This is the scoop
we made earlier. We have drilled two holes
for the joint previously. This is how our handle will
overlap with the scoop. In this lesson, we are
going to drill two holes on the handle to meet the two existing
holes on the scoop. First we mark at
two MM away from the end of the handle
like this in the center, away from the edges
on each side. This is where our first
hole is going to be, make a dance with
a metal scriber. This is where our
twist drill will go. If this is your
first time drilling free hand, he's the tip. I'm pushing the scriber
down as hard as my two hands can to make the
dance as deep as possible. The deeper the Dan is, the less chance our twist
drill will slide here. You can see the
mark I have made. Let's drill the hole
here. I'm using a No. 0.7 MM twist drill. The dance I have made is where the tip of this twist
drill should lend. This is our first
hole on the handle. Next, we enlarge the hole with a one MM twist
drill like this. There's no problem to make this hole meet the
one on the scoop. Finding where to drill the second hole is a
bit of a challenge. This pin measures no. 0.83 MM diameter and 11 MM long. We bend it at four MM away from one of
the ends like this. Use this pin to go through both holes to make
sure they meet. Hold the pin there with
our fingers like this. And push the scriber
into the second hole on the scoop until the tip of the describer reaches the
handle on the other side. Next, swing the handle
left and right like this. You can feel describer is scratching some
lines on the handle. Now we can take
everything apart. If I swim in closer, you can see where the
scratches are on the handle. This is the center of the lines. Mark it there with describer. That's where we're
going to drill for the second hole with a No. 0.7 MM twist drill. Let's have a closer look
at these two holes. Enlarge it with the
one MM twist drill. In this lesson, we have
learned first how to prevent skidding when using a twist drill to drill
into metal free hand. Second, how to drill a pair of holes to meet the existing ones. In the next lesson, we're going to bond the handle
onto the scoop.
10. Bonding the Handle: Now we have all the holes ready. In this class,
we're going to bond both the handle and
the scoop together. These two holes are quite
close to each other. This is the L shaped
pin we make earlier. We need to bend it to
a U shape like this. Try to make both sides
parallel to each other. It looks like we need to
bend it a little more. That's it. To push the pin in, we need
the help of the players. In this way, we can put the scoop on the
back of the handle. This is how it looks
from the front. We can use the tip
of our pliers to flatten the U shaped
pin like this. Then we can turn to the back. What we need to do now is
to fold the end of the pin down as they are in a straight
light next to each other. We need to push them a
little bit sideways in opposite directions
in order to be able to fold them flat to
the spoon. Like this, I'm pushing one of the ends down onto the back of the scoop. Now it's the other end. This is how it looks
up to this stage. By squeezing the pin, I'm making the bond tighter. I'm not too worried
that the ends of the pins are
sticking out too much. We will cut the excess
length of later. Regarding how much
we need to cut, as far as there is
enough length left to hold both the scoop and
the handle. That's fine. Here I'm using a marker to show how much I'm going to cut. Make sure the tip of the snipper does not touch the scoop. Otherwise it could
scratch the surface, squeeze it one more time
to make the end of the pin as close to the
spoon as possible. In this, you have
learned how to use the pin to bond both the scoop
and the handle together. It looks very nice, but it's not finished. In the next class, we are
going to permanently bond the scoop and the handle together by soldering
the pin onto the spoon.
11. Making it Permanent: Our spoon is held tight together with a tiny
pin at this point, but the pin can become loose with the wear and
tear of daily use. In this lesson, we're
going to make the bond permanent by soldering
the pin onto the spoon. Before beginning, we need to have a small cup of water ready. I will show you later
what this is for. Here I brush some flux
paste onto the joint. We need to make sure
the paste touches all the gaps between the pin and the surface of the
spoon on both sides. Why? Flux helps our soda flow. As we want the solder to fill up all the gaps between
the pin and the spoon, we need the help of
flux to guide the soda. Too much flux won't hurt. This is easy. Soda,
We need two pieces, each about seven MM long, one for each side. Putting soda into
place. Heat is the tip. After the place is
covered with flux, we heat up the spoon
to dry the flux. Before putting the
soda onto the spoon, we dip the soda
into the flux dish. If we put the soda onto
the spoon when the flux on the spoon is still wet,
this is what will happen. The soda will fly away
as the flux drive. Once the flux on
the spoon is dry, we put one solder on the
gap between the pin. Soda flows towards heat because the spoon is much bigger than the
handle and the joint. It's right next to the scoop, focusing on heating
up the joint. And the scoop, it's enough to direct the soda to
melt into the joint. Once it melt, we turn to
the other side and repeat. On this side, we put the
soda rind next to the pin. You can see I'm
holding the torch, my left hand, and the
soldering pick with the other. If the solder doesn't
go as I want, I will use the soldering pick to guide where I want
the solder to go. Like this, I may not
need the soldering pick, but if I do, it would
happen in just a second. Having a soldering
pick ready to go will always come in
handy In this case, you can see the soldering
pick is really helpful. At this point. The
spoon is boiling hot. We quickly pick up the
spoon using a pair of tweezers and dip it into the glass of water
we prepare earlier. Repeat this for the handle. This will harden our spoon. This is how our spoon looks. Now in this lesson, you have learned how to burn
the handle and the scoop permanently by soldering
the pin onto the spoon. In the next lesson, we're
going to clean up this spoon.
12. Cleaning the Spoon: This is what our
spoon looks like. The pin has been soldered
onto the spoon permanently. Gaps between the pin and the spoon are all nicely
filled up with soda. However, the end of the
pin is a bit sharp, is the end of the handle. Also, this entire spoon is
covered with fire stain. In this lesson,
we're going to sort all this out and give it a
shiny finish In the end. When cleaning the
spoon or any jewelry, the principle is to start from some B media and gradually
move on to something smoother. I'm using a number hand file. First we file the end of
the handle flat like this. Then we file of the
sharp corner on the edges by moving the
file at a 45 degree angle. Make sure to keep rotating
the handle in this process, touch the end of the handle with our fingers if it's
touch smooth job done, this is how it looks, close up. Next we're going to file
the end of the pin smooth. Keep testing it
with our fingers. I noticed that the little
handle on the scoop has some sharp edges and we
need to make them smoother. However, we don't want to
touch the edge on the scoop. Let's have a closer look
at the cut number zero. Hand file teeth are covered on three sides but
one side is blank. This will be quite handy
when filing the edges on the little scoop handle as we can face the blank side
towards the scoop. In this way, we won't accidentally file
the scoop by chance. Do this on both
sides of the scoop handle to make sure
it's touched smooth. When doing this, if we face
the blank sides towards us, we won't accidentally file
the skin of our fingers. If you have long nails, this will prevent it from filing off the edges
of your nails. The bottom of the scoop
is still a bit rough. It's not too bad on the
inside of the scoop. So I'm going to use a cut
number four hand file to take off some of the rough
surface on it like this. Next, I move onto a nylon buffing ball to clean
both surfaces of the scoop. The scoop is done,
but now I notice there is a rough surface on
the handle next to the joint. I use a crossing needle file
to take off these marks. This one is cut number two. It's pretty nice. Now, before
giving it a shiny finish, let's remove all
the fire stained on the scoop by merging
it in warm pickle. I talk about this pickle mixture in my coffee spoon
making classes, so I won't repeat
it all again here. Leave our spoon in the
warm pickle for 30 minutes and rinse it thoroughly
in tap water. Here's the final stage. We put it in the
barrel tumbler to let the staining steel beats give
our spoon a shiny finish. Our spoon will also get
hardened in this process. Simply get the spoon
out after 45 minutes y rinse it again in tap water. This is our beautiful,
shiny seasoning spoon. In this lesson, we have learned the principle of finishing
a handmade object. In this case, we started
with a flat file, then move on to a
nylon buffing ball, and finally, finish it with the tumbler by using
shiny stainy seal. Coming up next. Final thoughts.
13. Final Thoughts: Thanks for finishing all
the lessons in this class. Through the project of making a simple seasoning spoon
in solid sterling silver, you have learned how to
drill holes free hand. How to match two sets of holes. How to use flat files to clean
edges in an efficient way. How to burn two pieces of silver permanently by
using a simple pin. All my personal tips and
tricks you have learned in this class will serve as the foundation for many more
advanced projects to come. If I have to sum up the one most important takeaway
from this class, it is to be patient
for each simple step. Once you have more experience, your speed will pick
up as time goes. If you have made your
own seasoning spoon, I would love to see
your process pictures and finished spoon posted
in the project section. If you want to see mine, please follow me on Instagram or my Youtube channel on which
I post brief steps of complicated making processes for my personal jury making and silversmithing tips and tricks. You can only find them
here on skill share. I'm making more classes like
this to share more in depth personal thoughts based on my over two decades of
firsthand experience. I will see you in
the next class.
 Huiyi Tan, Gemmologist, Diamond Setter, Jeweler