Transcripts
1. Welcome + Supplies: Learning to shade a
sphere might seem simple, but it's one of the
most powerful skills you can build as an artist. Because understanding
how light interacts with form is the foundation
of realistic drawing. Once you can shade a sphere, you can start to shade anything. In this class, we'll slow things down and
walk through how to shade a simple sphere using ink and
directional mark making, also known as hatching. This is a real time
follow along video. No time lapses and no rush. You and me drawing
together at a gentle pace. Whether you're new
to ink or just want to build more
confidence with shading, this class is designed
to help you feel relaxed and supported
as you practice. We'll look at how
light affects form, how to plan your hatching lines, and how to layer marks to create smooth transitions
from light to shadow. I'll guide you step by
step, and by the end, you'll have a beautifully
shaded sphere and a better understanding
of how to use ink to create depth and
volume in your drawings. All you need is a pencil, a pen, some paper,
a circular object, or compass, and a
few minutes to slow down and draw with intention.
Let's get started.
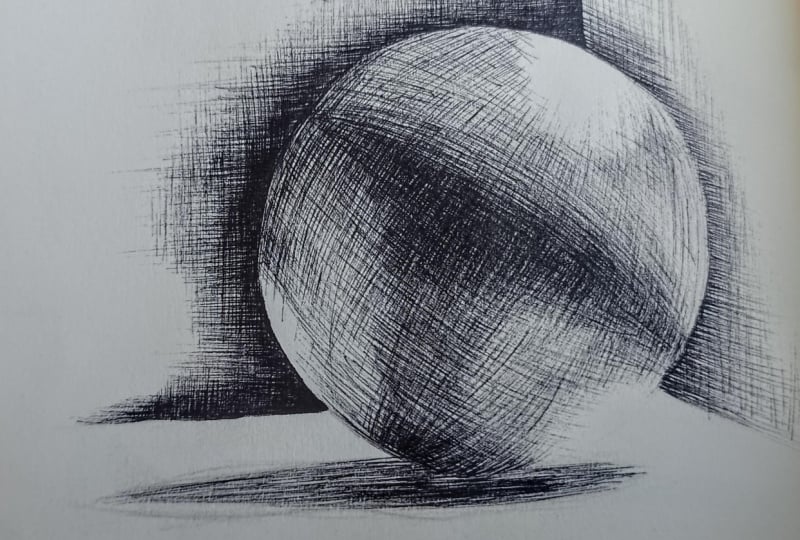
2. Step 1: Draw A Circle In Pencil: I'm going to be working from
this reference photograph, which is a royalty free
photo from Unsplash, which I've linked to
down below if you'd like to follow along
with the same image. So first, we are going
to draw our circle on our paper so you can draw around your circular object or use your compass to
create a circle. And making sure that you have enough space to consider the shadow underneath
your sphere. So you may want to figure
out if you want to use your paper in a landscape
or portrait orientation, depending on how
big your circle is, thinking about this shadow here, this one that goes underneath. Doesn't matter if it goes
off the edge of the paper. But actually, if I turn
my paper landscape, I can actually fit
the whole shadow in, so it may look a bit more
natural if I do it that way.
3. Step 2: Observe Your Reference: So one of the big challenges with drawing from
an image like this is that it is so simple that our brain thinks it knows it. It goes, Aha, that is just a sphere or a
ball with a shadow, and it kind of fills
in the gaps for you without allowing you to really carefully observe where the shadows are and
how to apply them. So before we begin, I
want you to just spend some time looking at
this reference photo. And it can actually
help if you want to, to turn it upside
down just so that it feels a bit more different. It can just slightly confuse your brain
and just prevent it from jumping in and telling you exactly where
all the shadows are. But we're just going to spend
some time just looking at it and observing where the
different types of shadow are, where they're darkest, where they're lightest, and
what the shapes are. So what we're looking
for are the areas of shadow and the shapes
those shadows are making. And this takes a little
bit of focused attention because this is a white sphere
with a white background, so it's all quite subtle. But if you really look for them, you can see there is a
very strong diagonal line, for example, across here. I'm going to draw on this photo. I don't know if you'll
be able to see it, but there's quite a strong
curved diagonal there, which is sort of the border
for this shape of shadow. And there's a kind of
squashed oval here, where that really light area is. And we've also got a couple of other squashed ovals here and here are very
light areas, too. There's also a very strong, very squashed oval making up the shadow of the
sphere on the table, but we need to look a bit harder for the nuances within
all these shadows, too. So what we're doing
right now in looking at this image is
mindful observation. So we're not just
taking one look at it and deciding that the light's coming from
the top right, and there's a big shadow
going across the middle, but we're really
taking our time to observe carefully the nuances
of shadow within that. And this takes a little
more time and patience than we may sometimes allocate to observing our
drawing subject. But trust me, this will lead to a way more successful drawing when we come to start
drawing in a moment. So within that light area, I'm also noticing some
difference between the very lightest area and the
area going down the sides. So you can see there's
sort of here and here. It's kind of almost a
crescent moonish shape where that is a bit lighter. So it's the lightest, and then
it's a bit lighter still, and then there's a sort of
darker band in the middle. Here leading to this
quite strong diagonal. So if we sort of start to define those shapes
on the photo, this is going to help us when
we come to start shading. So I would say that the
very strong dark shadow is almost in a triangular shape. It's a bit softened
on the edges, but I can simplify that into
a sort of triangle shape. And I can also see that where those two lightest areas are, there's an area around
those where you would say it's they're slightly
different shapes, but they are sort of light, but not as light as the
very sort of bright area. There's a similar
subtle difference in the shadowy area, too. So if we define those
shapes on our photo, this can be quite helpful when we get to the shading part.
4. Understanding Directional Mark Making: Now, I just want to explain what directional mark making is and why it's so important. Now, directional mark making very simply is
marks, in our case, shading lines, which go
in a direction which helps to communicate the shape
and volume of an object. Now, one of the
biggest mistakes I see with beginner
drawers is that they approach a drawing like this and use shading lines which
go in a direction, which, let's call
it, could be random. So they might shade kind of straight across from left
to right, for example, and what that does is it
kind of confuses us because the direction of those
lines don't really help to describe the
shape of the object. When we come to start shading, I want you to imagine that
this sphere is made up of, let's call it a wire frame. And that frame can act
as a template for how we should be directing
our hatching lines. And if we do that, we will way more successfully communicate
the object's form, and the whole thing will
look more three dimensional. So I'll show you what I mean just by sketching
it on the back. So say this is our sphere. The thing that I often
see beginners doing, which can really flatten something that
they're shading is they'll do hatching lines like
this, which are straight. You know, it's something
that we've been taught to do is to create these sort of
straight hatching lines. But it just doesn't help to
describe the overall shape. So if we imagine that
our sphere is made of a wire frame. Like this. When we
then start shading, if we can follow the
direction of these lines, this is going to help us
far more successfully communicate the sort of shape and volume of
this particular object. Now, thinking about
our specific reference because the photo is
coming from the top right. If we just tilt our frame
toward the light source, it's going to mean that our
directional shading lines will more easily align with this very strong diagonal line that we have going
across the center, which is going to make things a bit easier when
we come to shade. Now, when you're thinking about a wire frame on an object, we've also got to bear in
mind some other things like perspective and how we're
looking at the object, whether we're at eye level
with it or looking down on it. With this particular image, our eye level is quite low. We can tell that from what we
can see in the background. And so this line here, it actually makes sense. If we imagine the back of that, if we could see all
the way through it, the way that that is positioned, actually will work pretty well. So what we're going
to go for, say, the light source is
coming from up here, and you can see that
line is curved. That actually makes
sense with our eye view. So the wire frame. So our eye level might
be somewhere here, and that's where it
would be straight, and it's going to
get more curved. As it goes away from us. Like this. So you can
see that the curve here that is pretty
much going to align. It's pretty much going to align with this
very strong shadow. So that's going to be helpful
when we start shading.
5. Step 3: Sketch A Wire Frame On Your Circle: So thinking about starting
to do a very light sketch now of that kind of wire
frame on my example, I'm not going to draw both sides of the wire frame
as if you can see the front of the sphere
and the back of it just because it can get confusing
because those angles change. I'm just going to
draw an axis line, so that reminds us where
the light is coming from. And it's this particular line, which makes a lot of sense. If we could see the back of it, it would be kind
of going that way, but I'm not going to draw that. And as we get towards the top, those lines will get slightly closer together and more curved, and they get straight in the middle because
our eye level, you imagine we're looking at
this sphere at eye level, we can actually see that we're
very low to it because of the way that the angles of
the background are shown. So our eye level would be
about here on the sphere. So we're going to
have a straight line. Around here. And then it will start
to curve the other way. Think of it a bit
like a beach ball and you've sort of got the idea. We can also think about
the other axis as well. So if we're thinking about that would be our straight line. That's where our kind
of eye level is. And we would have this sort of effect from our beach ball. So more spread out
in the middle. And as they go
towards the center, they get a little closer
together nearer the edge. Something like that. I hope you can see
that on camera because I've drawn
it in quite lightly. It doesn't matter
how many sort of horizontal and vertical lines you draw on your wire frame. We're going to erase them later. So try and keep them
nice and light. These are just there to act as guidelines for the
direction of your shading.
6. Step 4: Sketch The Shapes Of The Shadows: So now we have our framework
lightly sketched in. We can also sketch in the
shape of the shadows and highlights that we've
just identified when we were mindfully
observing our reference image, which will give us
a really clear map to begin our shading. So we've already got this it's that curve line that is the very dominant
shape across there. We've also got that
area of very light. Got another area
very light here. And then we've got the
slightly larger sort of mid light areas. I must say the darkest area really sort of almost
forms a triangle. Feels quite triangular there. And I also want to sketch
in the shape of the shadow, as well, which is underneath. So Quite elongated. Because we're almost at
eye level with the table, that shadow is
very, very narrow, and I may not actually
use them very much, but I'm just going to
put these lines in which show where the planes of the
well, let's call it a room. It could just be a box that this hemisphere is
photographed in. But I just want to have
those to refer to. That's actually a
little bit too angled. It's almost horizontal,
but not quite this one.
7. Step 5: Add First Layer Of Shading In Pen: So one thing which is really, really important when you're
approaching a drawing like this is to not outline
your circle in pen. Now, this is something
that we often instinctively do because
it's the edge of our object. But this immediately
flattens it. And we're hoping
to make this look very three dimensional,
by the way we shade it. So please avoid outlining
your circle in pen. So I like to start with
the lighter areas first. Very lightest areas,
I'm just going to leave completely white
the color of the paper. So I'm going to start with
these sort of shapes that aren't these three ovals here. I'm going to take my pen,
and I'm not going to be just shading these areas
because with shading, we can layer it up. So I'm going to be shading
everything except this oval, this one, and this one here. And I'm going to start by using these lines
from my wireframe, because they are the
directional lines. So I'm stopping at the edge
of those light shapes. So we obviously have two choices here of which
direction to go in, whether we're following the horizontal or
vertical grid lines, and either of them will work. There is sometimes one direction which would be in some ways easier or more clearly describe the form of the
object we're drawing. If there doesn't seem to be one way in particular,
just pick one. It really doesn't
matter which one. So you may need to keep
moving your paper around to get these curves in a way that's feeling
comfy for you to draw, 'cause usually you want your
hand to be inside the curve. For the darker shadowy areas, you'll be using both directions. But I would just start with
one for the lighter areas, and then we'll build
it up gradually. So I'm keeping my
lines quite light, and they'll be reasonably
spaced apart, too. Of course, the closer
the lines are together, it gives a darker effect, which will suggest
darker shadow. So they will get closer together near the
sort of edges of the sphere to help suggest that depth and where the
shadows become darker. Remember, you can always
build up more shadow, whereas you can't remove
it once you've inked it. So start gently.
8. Step 6: Add Further Layers Of Shading: Next, I'm going to look for
the slightly darker areas and introduce more shading, which is still going to
follow this grid structure, but it could be that we begin
to use both directions, and the lines could also start getting a bit closer together. So I've got this sort
of lightish area. So the bit that I want, there's kind of a sort of crescent here. So I'm going to
start using it makes more sense to me to use
this direction now. And when you start shading. You do want to be aware
of the grid underneath, how the direction of that is working because it will impact on the directional mark making will impact on how three dimensional everything
is looking. So because the shadow is coming down, I'm
going to keep going. And this is where the shape
is getting more straight, and then it's going to start
curving the other way. So this is why I
only drew the front of my wire frame because if you've got
all of it drawn in, it can get a little
bit confusing at this stage when you've got
so many overlapping lines. I'm going to keep working
like this until I've got the darkest shadowy
parts of the sphere. Once I've inked this, I may
need to go back to some of the lighter areas to add
a bit more hatching. And at that point, I may
also want to rub out my pencil marks just to make it clearer how that is looking, how the tonal values working. So I'm coming back
now to work on the middle and this much
darker shadowy area. So the shadows are not harsh really anywhere
on my sphere. So I'm trying to although I'm working with those pencil
shapes that I drew, I'm then sort of trying to
blend them a bit by not making the sort of edges of the shadows feel too harsh or a
particular shape. And So keep going back to your original photograph just to keep observing
because obviously, when we started observing
and finding the shadows, we just simplified
those into some shapes. But if you look, there
are nuanced areas. So this is there's
kind of a little bit of like a very faint
shadow in there, so I'm just going to
add a bit of that. Something to look out for is the very edges of your sphere. So because we don't want
to outline your sphere, which will kind of flatten it, we do want to make
sure that where we begin any shading
lines and hatching, they're quite
accurately on the very, very edge of that pencil line because it will just really help to describe that kind of
circular shape later. So if you feel like
you haven't quite got some of your shading lines
starting on the very edge, just go back and just
pay attention to maybe starting filling in those gaps, if you have some gaps between where a shading line starts and the very edge really will help to make it feel more
complete and three D. So at this point, it
can be helpful to erase some or all of your
pencil marks from the sphere. Just leave the shadow and
the background marks in just so that you can
clearly see the effect that you're creating
because sometimes when there's a heavy
buildup of lots of different marks and also the
very edge of your sphere, it can be hard to sort of
check whether it's working. So I'm just going to erase
my pencil at this stage.
9. Step 7: Shade The Shadow Under The Ball: So now I want to tackle
the shadow under the ball, and this is another
area where choosing the right direction of our hatching makes the
world of difference. I often see beginners shading in all sorts of direction
within shadows. And honestly, it can end up ruining an otherwise
really awesome drawing. So my best tip for shading with shadows is to use mostly if
not all horizontal lines. Now, the reason
shading shadows can be so tricky is that
we need to have a really good grasp of the
perspective going on in the image to get any other directional
marks to feel right, whereas horizontal lines
will always always look right because they
make the object feel grounded on the surface. So be careful to pay
very close attention to the point where your object
and its shadow meet. We need to really
closely observe here because sometimes
the light patterns here can be surprising. You notice, for example, that there's a really,
really dark bit. But there's a tiny, tiny gap that there's only actually
a very small amount where the very darkest
bit underneath that sphere hits the very
darkest bit of the shadow. Notice within this shadow
that there is also a darker area and a
slightly lighter area, too. So this should affect how closely together
your hatching lines are. The other thing we can try to represent in our drawing
is where the shadow is defined with a clear
and harsher edge and where it's more
blurred and subtle. So you can see it's very
clear and defined here, but much more subtle
at the other end where it's further away from the
object and light source. Where it's more blurred, we want to use slightly
different lengths to our lines to
create that effect, whereas the more defined
clearer edge will have a more obvious shape
to your shading. So something else to bear
in mind for straight lines, the other thing that
can come up a lot that I see with beginners, especially is that in trying
to draw a straight line, you end up drawing
a curve line in shadows because it's
our natural shape, especially if we're leaning
our hand on the table. It's like a pivot and it
creates this kind of arc. So if you just lift
your wrist off the table and just try and
draw a really horizontal line, it doesn't need to be perfect, but you just don't want
that repeating curve to every line that
you do because it will end up making everything
look like not quite right. Now, the shadow is very dark, so we're going to end up with
a lot of horizontal lines. I'd need to define and do a bit more shading on my sphere because I've realized that
it wasn't quite dark enough. Oops. That was the wrong angle. I'm paying really close
attention here to observing So you can obviously do
shorter horizontal lines as well if you need to sort
of create more of a shape.
10. Step 8: Shade The Background: So, background, this
is another area, much like the shadow
that can really spoil otherwise great
drawing if you shade it in random directions. And it can also help to really, like, make your
drawing pop as well. So it's quite important. So in an image where you
can't see a horizon line, denoting the edge of
the table or surface, which we do actually have here. It is in the shadow,
but there's actually two horizon lines because
our object is in a corner. But if you don't have
that, I would always use vertical lines when
shading a background, possibly adding in
some horizontal ones as well if you need
to make it darker. Now, in this image, we can actually see a corner. So there are two kind
of planes to consider. They're not perfectly
horizontal. They're going at slightly at slight angles
to the horizontal. So we can use both
vertical lines and lines which are parallel
to the planes shown here. So lines parallel to this one, for this part of the background, and lines parallel to that one
for this part of the back. Bear in mind that the
plane on the left is darker than the
plane on the right. So your shading
should reflect that. Now, I don't want to completely fill my paper with shading, but just having
some shading around the object can just really help to make it pop out
from the background. Specifically, where I'm thinking about is in the areas
where I've left, the object completely white, so we don't have that
definition of the circle. Pay particular attention to the shading lines of the
background there being exactly at the right spot to describe that curve
and that shape. And remember, do not, under any circumstances,
outline your sphere. That is totally going to ruin your shading effect
at this point. So I'm actually I can still very faintly see my pencil line, even though I have
rubbed it out, and I'm going to start at that pencil line and
make the lines go up. So we're using
doing it this way, starting at the
sphere and going up. I've got more control then
over where those lines begin. No, I just need to tidy up that edge because I just missed a bit of the shading there. So I'm going back in
to do a second layer. And this is actually the
darkest part of the background, so I will want to have
some other lines as well, which are going to be
parallel to this one here. Now, this one is very
close to the horizontal. So I'm going to
be making it look pretty much pretty
much horizontal. So again, I'm going
to go in really carefully to that edge between my sphere
and the background, just to make sure that I'm treating the
shape very carefully. And that's where that
hits my horizon, so I need to be very careful here between my light spot
and that horizon line. So my background is
darker than my sphere, so I'm working in
quite a few layers going horizontally
and vertically. And I'm just being quite
careful near the sphere itself. I mean, it almost looks solid
in some places where I'm building up so many layers
of shading, and that's fine. You have to be quite patient
with this style of shading, because it can take
quite a long time to build up the tonal
values that you need. Okay, so for this other plane, I just need to adjust that pencil line because
I think I've drawn the angle a little
bit too sharp. It's a bit more it's a bit closer to the
horizontal than that. Something a bit
gentler like this. And I'm going to create this slightly lighter in
tonal value than this side. You can see there's a bit
of a difference there. I'm going to use that
as a starting point. I'm just going to need to
re sketch my circle edge in just to help me get those finishing points
off just to help me get the starting points
of my shading lines.
11. Step 9: Review + Refine: So when you've got to
a point like this, it's a good idea just to keep having another look
at your reference photo again because it
will start to become clear where you need to maybe
make some little changes. So for example, I feel as though I need to darken down
this middle shadow, this sort of triangular shape in the middle because
it's actually, I think, even darker
than the background. And at the moment, it's
looking a bit lighter. So I'm just going to
add another layer of hatching into there. To hopefully get that
darkening down a bit. And it's really just a
case of just tweaking now. We've got the structure
in, we've got the shape. We've got most of
the shadows in. So now we can just
refine and make it all come to life. Right
12. Wrapping Up: Thank You!: Okay, so here we go. I hope you enjoyed
this and found you were able to relax through the drawing process
and really get into the mindful
way of observing. If you enjoyed this course and want to continue your
creative journey, head over to my
website at melride.co dot K to explore
my free resources, join Melmil for my value
packed newsletter, and to learn more about nurture my upcoming immersive
signature program. Thanks for joining
me, and I hope I'll see you again soon. Bye for now.
 Mel Rye, ✎ Artist + Educator