Transcripts
1. Welcome!: There are a range of techniques for working
with measuring and proportion depending on the type of reference you're
working from. Being able to understand and use these is the key
to being able to make that tricky transition
from drawing from your imagination
to drawing from reference photos through
to drawing from one or a small collection of real
objects in front of you. Once you can do that the world really is your oyster
in drawing terms. I'm really excited to share
these skills with you. [MUSIC] Hi, I'm Mel and
I'm an illustrator, artist, and a
qualified teacher with over 15 years experience in
teaching others how to draw. Learning about measuring and
proportion is without doubt the skill which will have the biggest impact
on your drawing. If you are a complete beginner, this class will give you a great foundation in all things, measuring
and proportion. If you have a little
drawing experience or you're pretty
comfortable with drawing from reference
photos but find it difficult to transition
to drawing from life, this class will give you some real tools to
help you do that. Or it may be that you're pretty
comfortable with drawing but you'd like a refresher
on some of the basics. I think this class will be
a great fit for you too. We will begin by going over the fundamentals
and theory of what measuring and
proportion in drawing is and why it's important. Next, we will use the grid
technique to work from a reference photo to produce a drawing with
accurate proportions. Then we will progress to
working from a single object using the viewfinder technique to help us draw this accurately. Finally, we will
move on to tackling a simple still life using a variety of citing
techniques to help us achieve
realistic proportions. Along the way, I'll
be giving you a ton of practical tips
like how to construct a still life and also how to check and correct
your drawing when something isn't quite right. So by the end of this class, you'll have so many
new drawing skills. You will be able to draw better than before you
started watching it. If that all sounds good, let's get started. [MUSIC]
2. Class Project + Overview: [MUSIC] In this class we
are going to work through three different approaches to using measuring and proportion, which are best suited to three
different reference types. This class is divided
into three mini-projects. In the first project, we will work from a
reference photo and use the grid technique to
construct our drawing. Because our subject won't move, this is a great
opportunity to really delve into the fundamentals
of measuring and proportion, and practice all those theoretical
massive related things which can feel a bit overwhelming when we're
working from life. In our second project, we are going to work from
one single object and use a viewfinder to help us make the transition from
the reference photo. This allows us to
transfer some of what we've just practiced
in the grid technique, but make the transition
to real objects. Don't worry I'll answer all those questions that
you might have like, what should you choose to draw? How are you going to stop
your viewfinder from moving? Our third project tackles
a simple still life. In this project, we'll
be using a range of citing techniques to help us
put the drawing together. Don't worry if you haven't heard of this technique before, I'll be explaining
everything along the way. But once you understand citing, you can pretty much
draw anything anywhere. This is what we're
working towards. The three projects
build on each other in terms of skills and complexity, so I would recommend that you watch through them
in order so that you don't miss out on something fundamental which is
covered earlier on. Each project is divided
into two videos. In the first video, we will cover the
theory and I'll explain the technique and go through any preparations
you need to make, and in the second video, I'll demonstrate the
technique in a demo video. I've structured the class with these three separate projects
around each technique because I often see one one
these techniques taught really well but it's
often in isolation. Learning sighting
techniques is great, but if you haven't had the foundation of
working with grids, it can seem like a
really huge leap and it's quite easy
to feel overwhelmed. Conversely using the
grid technique is great, but it doesn't really help you if you want to work from life. My hope is that in learning
these three approaches, you will have a range
of tools to draw on whatever type of reference
you're working with, and I also hope
it just gives you the confidence to start
drawing from life too. This class is suited
to complete beginners, it's helpful if you're
reasonably comfy with drawing basic straight and curved lines and simple geometric shapes. If you don't quite
feel there yet then I'd recommend
checking out my class, learn to draw a beginner's
guide to sketching anything, which will give you those
foundational sketching skills to help you feel more confident
coming into this class. For your class project, you're very welcome to share 1, 2, or all 3 projects. It would be great to see your reference alongside
your drawings. Don't forget to take a photo
of those to include too, particularly if you would like some constructive feedback
on your drawings, in which case, it will be really important that I can see
what you were working from. When you're ready to
upload your class project, head over to the projects and resources tab and hit the
"Create Project" button. Here, you can add the contents of your project, adding images, which could be photos or
scans of your drawings, as well as your references and some text to reflect
on the process. Once you've added content there, you can also give your
project a title and cover photo to polish
it all off beautifully. Don't forget to hit "Publish" once you're done
and you can come back anytime to edit or
add to your project. I know that it can be really scary putting your work
out into the world, particularly when you're just
starting out with drawing. But I would encourage you
to be bold and share, sharing your work and getting
feedback from others is a great way to accelerate
your progress. When you post your
class project, if you would like
constructive feedback on how to improve your drawing, please indicate that in
your projects and make sure that you have included photos
of your references too, so that I'm able to provide
that type of feedback. Alternatively, it may be
that you prefer to share your work more as a celebration
of what you've achieved, and if that's the case, fantastic I'll be right
there high-fiving you. I highly encourage you to take a look around
the project gallery and just drop a few likes and comments on some other
student projects too. An encouraging
comment has the power to absolutely make
someone's day, so don't miss that opportunity to spread a little bit of joy. In the next video, we're going to go
through the tools and materials you'll
need for this class, so when you're ready
join me there.
3. Tools + Materials: [MUSIC] Here are the
materials you'll need to complete all three
projects in this class. You need a pencil. We're not going to be working
with tone and shading so any color and hardness
of pencil will be fine. But it's helpful if it's
erasable so that you can adjust your drawings as
we go through the class. I'm going to be using an HB. We'll be using your pencil in
Project 3 as our guide for the sighting techniques so it's helpful if your pencil
isn't too short. If it is, you might
want to bring along another straight-edged
object like a paintbrush, a knitting needle,
or even a stick. You'll also need some paper. It doesn't need to
be anything special. cheap printer paper
is just fine. In the second project, when we come to
make viewfinders, it's helpful to have a
slightly heavier weight of paper or card to make
your viewfinder from. Just so it isn't too floppy, but sticking a
couple of sheets of thinner paper together
can also do the trick. You'll also need an
eraser and a ruler. You'll need a pair of
scissors or a scalpel and cutting mat to make
your viewfinder whole. When we make our viewfinders, it's also helpful to have
some thread and sticky tape. If you don't have any thread, dental floss would be
a great substitute. Basically anything thread-like. Grab your supplies
and join me in the next video where
we'll cover some of the theory and fundamentals of measuring and proportion.
See you there.
4. About Measuring + Proportion: [MUSIC] Proportion refers to the size relationships
between different parts of your reference and
measuring is the method by which we can work out what
those relationships are. For example, the
bottom of the spout of this jug falls at the
halfway point of its height. Knowing this will
allow us to create a drawing of it which
is in proportion. One of the key things to
understand about proportion is that it is about
size relationships, not just size so you
can make a drawing which is tiny or huge
from the same reference, but the proportions
would be the same. Learning to measure
will enable you to achieve more
accurate proportions in your drawings to
make your drawing more closely resemble
your reference. It is an incredibly
important skill, and I would say it is
the skill which will have the biggest impact on
the quality of your drawings. Of course, not everyone wants to draw realistically
and in proportion to the reference
and you can make some incredible art by breaking all the rules of
drawing in proportion. But I strongly
believe that it is a skill you need
to understand and master in order to be able
to push it and work with more stylized or exaggerated
proportions successfully. Like Picasso said, learn
the rules like a pro, so you can break
them like an artist. In order to understand
proportion, we need to understand ratios
and simple fractions. If you're panicking at the
mention of those words, please don't worry,
we're going to go through it step by step. First, let's explore
what I mean by ratios. This is a square. The width and the height of the square are the
same measurement, so we would say that this has a proportional ratio of 1:1. Now, I'm going to create
a rectangle made from three squares stacked
on top of each other. This would have a
proportional ratio of 1:3. Note the width is first, followed by the height, second. A rectangle which is only one square high but four square's in width would therefore have a
proportional ratio of 4:1. When we come to drawing, it is highly unlikely
that our proportions will fall so neatly into
these square units. It's far more likely you might encounter something like this. Say a rectangle
which is one square wide by two and a half
squares in height. The proportional
ratio here would be 1:2.5 even this is
probably not exactly how neatly things will end up and we'll need to use
our judgment to make some approximate
measurements and use some very simple fractions. Let's have a look at an
example and revisit our jug. Say we are trying to
find the height of the jug relative to its width. First, we need to
measure the width at its widest point and see how many times that
measurement fits into the height. We can see that the jug is not quite as tall as
double the width. How tall is it? This is where it's helpful to
use very simple fractions. I like to use quarters because I think they're
pretty easy to work with if we divide our unit of measurement in half
and in half again. You can just do this by eyes so you don't need
to use a ruler. We can see that the height
of the jug is somewhere pretty close to one and
three-quarters the width. Knowing this will be
enough to give us a pretty good shot at drawing
this jug in proportion. You can use smaller fractions, such as 1/10 if that's
something you feel comfy doing to get a more accurate
measurement if you want to. But I tend to find
personally that working with quarters is something
that my brain can handle. I feel happy to estimate
them by eye and they give me a result close enough to make a drawing which
is in proportion. Now that we know our
proportional ratio of this subject is one to
one and three-quarters, we can transfer
those proportions onto paper to begin our drawing. Whether we're drawing in a pocket size sketchbook
or a huge piece of paper, those proportions will be the same because they are
relative to each other, not relative to the paper
that you're drawing on. Now that you understand
those basic principles of proportional
ratios and fractions, we're almost ready to dive
into our first project. Before we do that, I just
want to mention that no one measuring strategy is perfect and they will
all have faults. Which is why I think it's
so important to learn a range of measuring
strategies so that you can draw upon the
techniques which best suit your reference and there may be some techniques that
you prefer over others. Just like any other
drawing skill, it does take a lot of
practice and patients to master measuring and
drawing in proportion, so don't be disheartened
if you find it difficult or if it just doesn't
quite seem to fall into place at
the first attempt. This is normal, so
please don't give up. We'll be looking at
some different methods and more examples through the class so you'll get a lot more comfy
with it as we go. Let's dive into Project 1, drawing from a reference photo
using the grid technique. Join me in the next
video when you're ready.
5. Project 1: Drawing From a Reference Photo Using a Grid: When you're starting
out learning to draw, using a reference photograph is a great way to get comfy
with some of the basics of measuring and proportion
before you progress to working from life because your
reference won't move or change. For the first project
in this class, I'd like us to work
from a reference photo. If you have a still-life already set up that
you'd like to draw, then you can, of course, take a photo of that. I've provided some examples in the class resource you're
welcome to use too. Your image could contain one object if it's
fairly complex, or more than one object, but I wouldn't use more
than three so there's enough going on to give us some measurements to work with. But it's not so complicated
that it becomes overwhelming. Also try to use a
reference photo with very little or
ideally nothing in the background so that you
can clearly see your objects. Another benefit of using a photo as a reference is
that we can draw on the photo to help us translate what we can
see to our drawing. We can practice particular
curves or angles, for example. So if you're able to
printing out your reference, it's preferable to working
from it digitally. I would always
encourage you to take your own photos to draw from. They don't need to be
anything fancy and you probably already have something suitable you could work with. Alternatively, if
you need to find a reference photo
from elsewhere, take a look at those I've
provided in the class resource, or try some royalty-free image-sharing sites
like Unsplash. That way, you won't
find yourself in an awkward situation if you draw from another
image you find online, which you don't have
permission to use. The first step of this
process is to draw out our grid onto
our reference photo. We first need to
measure our photo. I tend to find that using
inches works pretty well to give us pretty
decent size grid squares. If we're working with an A4 or roughly eight by 11
inch printed image. This should work pretty well, but you can make
your grid really using any unit of measurement
you feel comfy with. It's really important for
this technique to work well, that your grid squares
are actually square, so they have a proportional
ratio of one-to-one. It's not impossible to work with rectangles with the grid method, but it does make it really quite easy to make a
very tiny mistake, which can be quite
difficult to fix later if your proportions are
just a little bit out. I recommend sticking
with squares only. We want to round our image to the nearest grid square to
make things a little easier. We don't want to be drawing, say a third of a grid square. Hopefully, your image will have enough background to be able to lose a little bit without
it affecting the image. Alternatively, you can
always add one grid square if you need to do that to keep all your image in the frame. Now you can use your ruler and pencil to carefully mark
out your grid squares, making sure any bits that you're cutting off don't
affect the image. Using a set square or
just the corner of another piece of paper is
a great way to make sure that you get a nice
90-degree angle to make sure your grid is nice and even
and not skewed or wonky. If you don't have a
printer to be able to physically draw on your photo, you can draw your
grid digitally. In the class resources, I've provided a PNG file grid, which you can save and import into whatever digital
program you use. Or you may have your own
method of making a grid. Just remember to make sure that your grid squares are square. I've also provided a couple of examples in the class resource, which already have
a grid drawn on top of them just in case you don't have a printer or the means to add your
own grid digitally. I would encourage you
to draw your own grid though if that's at
all possible for you. Just so that you
get the practice in applying these skills. Once we've got a grid
on our reference image, we can then draw out a grid of the same proportions
onto our paper. The grid on your drawing
paper does not have to be the same size as the grid
on your reference photo. It just needs to have
the same proportions. That is, it should be
the same number of squares wide and high
as your reference. But those squares could
be bigger or smaller. This is the beauty of
the grid technique. It's a great method to enable us to plan at a size
we're comfy drawing in for end results
which could be much larger like a
mural, for example. Once you have decided what size your drawing
is going to be, measure the height of
your drawing paper and divide that by the
height of your grid. That will give you the
maximum proportional scale you can work with. For example say my
drawing paper is 25 inches high and my
grid is 10 inches high. I know that I can
make my grid up to 2.5 times larger on
the drawing paper. Do the same with the width of the drawing paper and the grid just to make sure that proportionately your
paper will fit the grid. Then I tend to round down to the nearest whole number to
make things nice and easy. Say my height gives me a
proportional ratio of 2.5, but the width of my paper
is a little different so that gives me a
proportional ratio of 2.3. I would go with a ratio of two. Which means I know that the height and
width will fit onto my paper if I make my grid
squares double the size. If this feels a little
bit complicated, the easiest option would
be to draw your grid at exactly the same scale
as your reference. You could use the
same sized paper as the photo is printed onto. But these techniques are
really helpful to come back to later if you want to scale
your drawings up or down. Once you have a grid on
your reference image and a grid of the same proportions
on your drawing paper, the rest is pretty
straightforward. We can use our
reference like a map, identifying where
specific points of our reference are located. This is how we can create a more accurate drawing
of our reference with more accurate and
realistic proportions than we would achieve
by eye alone. There are a couple of
different ways you can go about the grid technique. You can either go grid
square by grid square, or you can use the grid to find the main landmarks to help us
sketch in the whole thing. We can use those
principles we discussed in the previous
video of looking for the fractions in each
square to determine exactly where on each
line our subject sits. If a particular grid square
has a lot going on in it, you can divide that
grid square up further to help you locate
the various markers. Now it's your turn. What I'd like you
to do now is to choose your photo reference and decide how large your drawing paper
is going to be t0o, and bring those along to the
demo video coming up next. I'll be using this
reference image, which is included in the class resource if you'd
like to follow along with me. When you're ready,
join me there.
6. Project 1: DEMO: [MUSIC] In this
video, we're going to use the grid technique to make a proportionate drawing
from our reference photo. This video will be sped up in places to make it
easier to watch. Please pause it
whenever you need to if you're drawing
along with me. First I need to
measure the height and width of my reference. I'm going to round that to
the nearest whole number. You want to take it
at its widest point. Of course, make sure
you can fit it in. It looks like it will be
seven inches in width by say nine inches in height. That's going to allow me
to create a grid over my object without
cutting anything off. If you're not sure how to start, I generally start
with the height. It's going to be
nine inches high. Try and center your measurement. Then I'm going to take
it over to this edge first because it's closest to this edge and I don't
want it to get cut off. I'm going to try and
keep that ruler as parallel to the edge
of the paper as I can to make sure that it's a nice fairly, and straight grid. We're going for nine inches, so I'm going to put marks
at each of the inch points. That's going to form where my grid squares are going to go. You can see it's slightly wonky
to the edge of the paper. It doesn't matter if
it's a little bit out. What you don't want is
a very slanted grid because you can end up getting
slightly skewed squares. As long as I keep these at
90 degrees, it won't matter. Can use a set square
if you have one, to get a really nice
90-degree angle. If you don't have a
set square you can use a spare piece of paper which
hasn't been cut by hand. If it comes out of a pack, then you can be sure
that it's going to have a nice 90-degree angle. I'm going to use
that piece of paper, line it up with the line
I've already drawn. Then I'm going to use that. I know that that line is now a nice 90-degree angle from
the first line that I drew. Now I can use that top line and put my markers on
there every inch. That's going to be
seven inches wide. I can do the same
thing again to make sure that this angle is
a nice 90-degree angle. It's going to look slightly not straight to the edge of the paper, remember, because the first line that I drew was not totally square
to the edge of the paper, but as long as your
grid is square, that is the most
important thing. Hopefully, if I've done
all my angles correctly, this should measure exactly
seven inches across, but just to give myself
the best charts I will use the edge of that piece of paper
again to try it and make sure that angle is a
nice 90-degree angle. You can see I'm lining up the long edge against the
pencil line I've already drawn. Now, all we need
to do is connect these measurements so
that it creates our grid. I'm pressing quite hard
with my pencil to create my grid lines really
so that it shows up well enough for
you to see on camera. But you can make your
grid quite light. Now I'm going to draw out my
grid on my drawing paper. I'm going to draw my
grid at the same size as my reference because that is usually the size
that I draw it. But if you want to go
bigger or smaller, remember to keep the grid
the same proportions. The same number of grid
squares high and wide. Keeping those grid squares
perfectly square to make sure you don't get any
distortion in your grid. Something that I quite
like to do so that I don't get confused about how many squares I've got
and which one I'm using, is I do quite like
to number my grid. Again, I'm going to
be pressing quite hard with my pencil to make my grid quite dark
so that it shows up well enough for you
to see it on camera. But when you are
doing this yourself, I would recommend that
you draw the grid as lightly as you can so
you can still see it, but then it's nice and subtle so that your drawing
is the thing that's going to be standing
out not the grid. I've drawn my grid out
on my drawing paper. Before you actually start
transferring the drawing, it's a good idea to double-check before you
begin that you have actually got exactly the same
number of grid squares wide and high as you've started
with in your reference. I also quite like to
number my grid squares, because I think it can be quite helpful when you're looking for something in the middle to help you reference
getting the right one. Now I'm ready to start
transferring my image. It doesn't really
matter where you start. I feel as though I
want to start with this big shape because it's
quite dominant on the image. I'm going to start
with this bit up here, which is in a Grid
Square 3 and 1 here. This is why it's great to have a printed out image if you
can because you can put a rough marker halfway point of that grid square to give me a sense of where to put it. I'll do it again here. That's maybe quarters
on the next line. It's a little bit
more than that. That can help to
putting those markers on the lines and knowing
where they hit each line. It can really give you
enough information to have a really good shot at
drawing this in proportion. The next one is going a bit in. I'm putting these marks
in really lightly because these are what I call anchor
points or reference points, a bit like marks on a map. Once I've got an idea
of the whole shape then I'll go over it again
with a more fluid line. I'm starting out by almost transferring where
these things are. This grid square, I've actually got quite a lot
going on in there. I'm going to actually divide it up in half to [NOISE]
make four grid squares. You can do that if you
find that helpful. You can do it by eye, you don't need to
measure each time. It's going to help us to locate. [NOISE] As you're using your grid squares to
locate the points, you might feel as though your drawing doesn't
quite flow yet. That's quite normal with this technique because
it's almost like we're creating a dot
to dot of our drawing. Then once we've got
enough information, we can use more fluid lines and strokes to make the drawing
look a bit more natural. Don't worry if it's looking
a little bit disjointed. It often does at this
stage when you've got lots of location points in because we got lots of little points in our drawing and not really much
flow at the moment. I think breaking these
more complex objects down into grid squares is a very helpful way of cutting down the overwhelms when you look at
the whole picture, you can think, gosh, I
don't know where to start, but having it broken
down into grid squares, it makes everything
feel a little bit more achievable because we don't have to think about the
whole thing at once, all we have to think about is
one grid square at a time. If you want to, you can break
that grid square down into more grid squares as well
if there's a lot going on. It can be a really great
way of training your eye in observation as well because very often we think we know what
the object looks like, but actually, when you start really looking and
comparing and measuring, it's not actually very often exactly as
we thought it was. There's quite a lot going on here through this spout area, so I'm going to divide
up my grid squares a bit more to try and
locate these parts. You can choose to use this grid technique as much
or as little as you want to. It might be that you
want to use it to work out roughly how big
the largest shapes are in your drawing. That might be enough, and then you might want to
freehand drawing the rest in. Or it might be that
you would prefer to construct the whole
drawing by locating how all the different parts are proportionate to each other and measuring them and
each way can be fantastic. It depends what
appeals to you most. Lots of ways of using the
grid technique depending on how confident
you feel and how you like to use the measuring. Now I've used my grid to map out the proportions
of my kettle, so I know where everything is. I've tried to use it to
measure most things, but not absolutely everything, so I want to leave a
little bit of room to sketch myself and use my own artistic
license if you like. Everything is
looking a little bit sketchy and a bit disjointed. I'm going to go back
in with my pencil and I'm paying less attention
to the grid this time. I'm looking more at the
overall shapes and forms. I'm going to try and
complete the drawing, so It feels a bit more natural by joining
together some of those shapes where I've put several points on a
particular shape. [MUSIC] Now it's your turn to complete your sketch using the
grid as your guide. Keep checking back on
your reference to check your marks against it and see if they're
in the right spot. Keep reworking your sketch and erasing any
incorrect lines as you go to eventually end up
with a final light sketch. If there is anything
that you would like me to check or if you would like me to give you feedback on ways to improve this drawing, it's helpful to keep the
grid on your drawing. Don't forget to
include a copy of your reference photo
with the grid on it, in the class Project 2, so that I can see what
you were working from, which will enable me to
give you that feedback. If you're happy with your
drawing or you don't necessarily want that
type of feedback, then feel free to
erase your grid. Congratulations, you've
completed an accurate drawing from a reference photo
using the grid technique. In the next video, we'll move on to
explore how to use a viewfinder to draw
an object from life. When you're ready,
join me there.
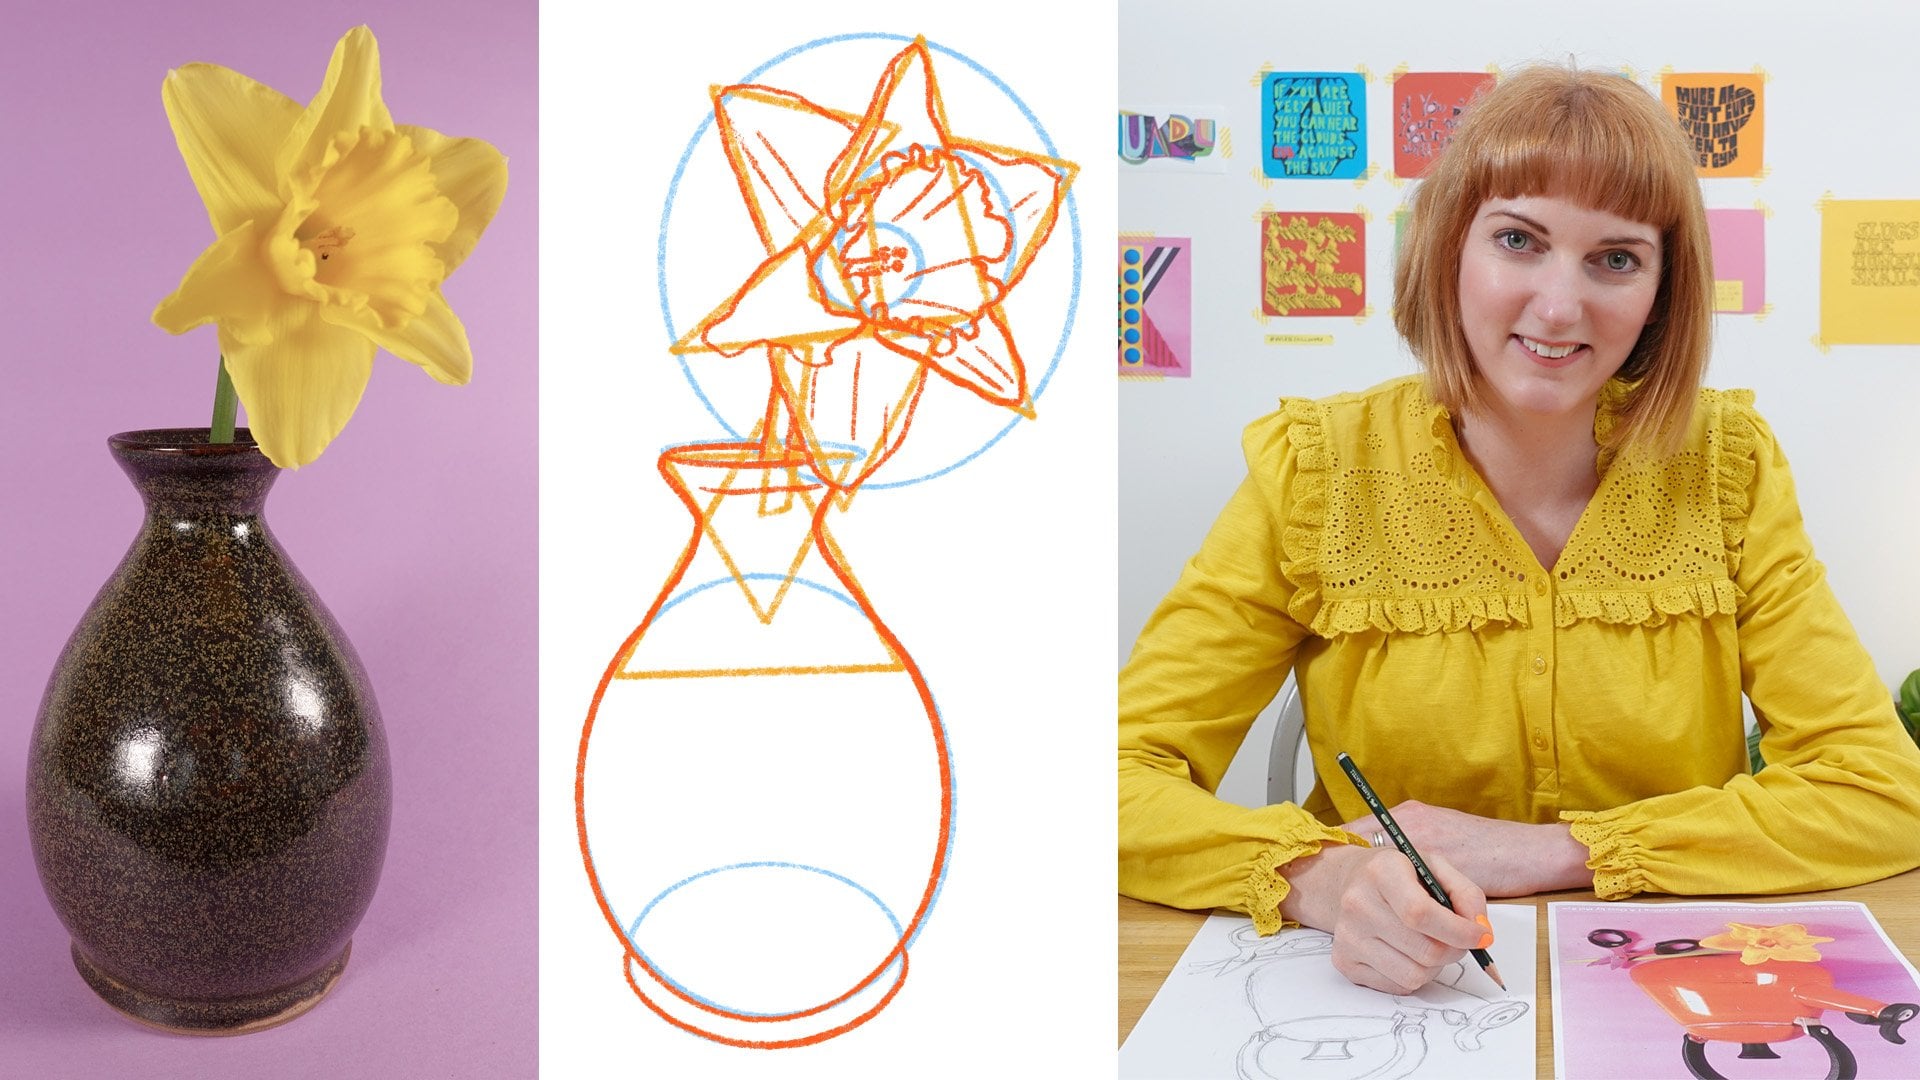
7. Project 2: Drawing an Object From Life Using a Viewfinder: [MUSIC] Drawing from
life can feel like a big step when you're
learning to draw if you've been used to drawing from reference photos or
from your imagination. The way we are going to approach this next
drawing is to use a viewfinder to draw a single object or a simple collection
of objects from life. A viewfinder is just
a piece of paper or card with a hole cut
in the middle of it, and it's a fantastic
way to bridge the gap between working
from a grid with a reference photo and using sighting techniques
to work from life, which we'll be doing
later because it uses elements of both
these processes. This is a great
transitional method. Viewfinders can be as simple as a piece of card
with a hole cut in it through to pre-made sets of transparent or adjustable
grids which you can purchase. I'd recommend experimenting with making your own viewfinders before making purchases to see
if you like the technique. Viewfinders can help us to
see our subject more clearly, removing the distractions of what is happening
in the background. We can also use our
viewfinder to help us frame interesting
compositions. You can even create
viewfinders in different shapes to make
really unique drawings. Once you've mastered
the principles, there is a lot you can
do with them as a tool. Before we make our viewfinder, it's helpful to think
about our drawing paper. For example, if you
tend to draw on rectangular paper or maybe you love working in
a square format, then create a viewfinder
of those proportions. I tend to work on
international paper sizes, mostly A4 or roughly 8 by 11 inches like the paper I
used in the first project. So I'll make my viewfinder
suit those proportions. I have a piece of thicker paper, which is the size of
my drawing paper. If you don't have
thick paper or card, try gluing two sheets of
thinner paper together. This is helpful so that
the viewfinder is rigid enough to keep its shape once
it has a hole cut in it. I'm going to make my
aperture or the hole in my card half the size
of my drawing paper. This is mainly so that the structure will
be strong enough so it helps to have a decent
border around the edge. But you don't need
the aperture to be as large as the drawing
because you can move the viewfinder closer
to you or further away to adjust the framing and
relative size of your subject. The easiest method to do this is to fold a spare
piece of paper of the same size in half and draw around it on
your viewfinder. In the same way, as
we round it down to the nearest grid square for our grid method in
the first project, we also want to
round down to make a nice even number of grid squares with
our viewfinder too. I'm going to measure
my aperture box and adjust it so that
it's a little smaller. I'm using inches again, so I'll round down
to the nearest inch, marking points at
one inch intervals around all four edges. Before I cut out my aperture, I'm going to draw some grid lines over the aperture that I'm
going to cut out. This is going to help me locate those grid lines once
I've cut this hole out. I'm now going to cut
the aperture out. You could do this with a scalpel in cutting
that or with scissors. You don't need to keep the bit that you're
going to cut out, so it doesn't matter
if you need to cut into it with your scissors. Use some length of thread across the aperture attached
to the sides with tape. I would just recommend doing one piece of thread at a time. You try and stick them
all down at once. It can get a bit
tricky with the tape. It just allows you to
really accurately line up those pieces of thread
with the marks that you've made on the edge
of your viewfinder. If you don't have any thread, anything string-like would
work perfectly well, so dental floss or
string, anything really. This is why it's so helpful to have those marks on the edges of your viewfinder
holes so that you can line your thread up
with them really well. I've got my long pieces in, and now I will do
my shorter pieces. [MUSIC] You can see now why it's important that our
paper or card that we're making our viewfinder
from is reasonably thick. If this was very thin, it would be really hard
for the viewfinder to keep its shape and for those pieces
of thread to stay totter. Hopefully, it's worked out okay with what you have at home. Another method for
making a viewfinder, which if you don't have
these materials to hand, you might have some
clear plastic, and you can draw out a grid on some clear plastic with
a permanent marker. That's another great way
of making a viewfinder. Now you have a viewfinder made. You can draw out a grid of the same proportions
on your drawing paper. Remember you can make
it larger, smaller, or the same size as your viewfinder grid so long as the proportions
stay the same. Make sure you have
the same number of squares wide and high
as your viewfinder. The principle of using a
viewfinder is very much like the grid technique we
have already practiced, but the grid exists in space and is in front
of a real object. Of course, the first
step of the process is choosing our subject to draw. Ideally, you want to
choose an object which has a reasonable
amount of complexity. It's quite interesting to draw, and you can easily identify
the main shapes too. For example, a simple plant, a shoe works well after the cup or glass with a couple of pens
or pair of scissors in it, which are probably
objects you can pretty easily get your
hands on at home. Next, we need to set
up our subjects and our viewfinder so that we get a good composition when
we're looking through it, and this can be the trickiest
part of this technique. We want the object to take
up most of the grid squares. If it's too far away and
it's tiny in the corner, it's not going to be
very easy at all. Think about adjusting
the distance between your object and your viewfinder to make it
fill more of those squares. In an ideal world, you don't really
want to be holding your viewfinder as you draw, just because it's very likely that you'll move
during the process of drawing and this is what
can make things so tricky. You might need to use a few
piles of books, some mugs, to lean your viewfinder against, and maybe even some sticky
tape to keep it in place. What we're aiming for
is that you can sit in a comfy position
for drawing and can see through the viewfinder to the subject without
needing to move at all. You want to be able
to keep your body as absolutely still as
possible so you're just moving your eyes to
switch between looking at your drawing and
looking at your subject. As soon as you start moving
your head or your body, you'll run into some issues
because your view of the objects through the
viewfinder will change, which will make things tricky when it comes to start drawing. It can take some time to work out the best
setup for this, but it is absolutely worth spending the
time to get it right, because if your
setup isn't right, it can really knock out
everything else later. Once we get to actually drawing, the process is very much
like those skills we have already practiced
within the grid technique, although there are a couple of additional tips I'll walk
you through during the demo. Now it's your turn. Make your viewfinder based on the proportions of the
paper you are drawing on. Don't forget to scale down to the nearest grid square and draw a grid out on some
drawing paper too. Choose a subject and then spend some time trying
to get your setup right to minimize any movement at all in your body or head. Pause the video here until you've got all
those things ready, and then join me
in the next video, where I'll walk you through the viewfinder method in a
demo video. See you there.
8. Project 2: DEMO: [MUSIC] In this video, we're
going to use a viewfinder to draw an object with
accurate proportions. I have made my
viewfinder proportionate to the rectangular paper
that I usually draw on and I've drawn out a grid exactly the same size as my viewfinder on
my drawing paper. I've spent quite a long time
working on my setup to make sure that my object is filling
most of my grid squares, and I don't need to move at all in order to switch
between looking at my drawing and
looking through my viewfinder at my object. Before we start, I'm
just going to show you exactly what I can
see from my eye view. You can see that I have set up my viewfinder so
that my objects, which is this fairly
simple plant, is actually filling most
of the grid squares. There are a few grid squares around the edge where the object is not touching them, but it's filling
the whole thing. I set it up on this lamp. It's actually really
handy because that's enabled me to keep the viewfinder still and
get it to the right height. If you look down here, I can actually look at my
drawing paper without actually having to move my
body at all if I'm angled between my viewfinder
and my drawing paper. That's how I've
set everything up. Before we begin, just notice how you're
sitting or standing to draw so that if you
move as you're drawing, you can find your way
back to this position. Just notice if you're sitting up straight or leaning
back into the chair, if you're sitting in a chair, or maybe you're leaning onto a table in front
of you a little, just try to make a mental
note of where your nose is in space as you are
setting up to draw. For me, my nose is pretty much in line with the
very edge of my table. That's going to help me relocate back to the same
position if I move. The other thing that
you should do before you start to draw is just take a quick photo from your
eye view on your phone. This can be helpful
if you need to adjust your setup if you
find yourself moving, but it's also really
helpful to be able to add this into
your class project alongside your
drawing particularly if you would like me to give you any constructive feedback on how to improve your drawing. I'm just getting
lined up to take a photo from my eye view. Just notice as you take your phone camera
closer to your grid, notice how the object
looks like it shrinks, and as you bring
it further away, it fills the grid squares more. Try to take a photo from
as close to your eyes as you can because that's
how it will look to you. [NOISE] Now, we are set up. We can pretty much
approach this drawing exactly as we did with
the grid technique although one tip I would
have for starting out is to just choose which eye
you're going to close. Now, if you look through your
viewfinder at your object, you will notice that depending on which eye
you're looking through, it will look slightly in
a different position. If you close one of your eyes, make sure that that is the eye that you're going to
close all the way through as you check
from your reference. I'm going to keep my
right eye closed. First I'm going to try and very quickly locate the
main shapes in my object within
the grid just to help me reset my
position if I move. I'm trying not to move
my head very much at all just only to switch between looking at my object
and looking at my paper and I can see very quickly that I can get the position of the pot
just really loosely. Not accurate at all. I'm not worried about the
shapes because I'm going to refine those later and that is going to be enough
for me to relocate my head if I start to move. Now I can start to sketch in
a little bit more detail. I'm doing this really lightly
so that I can draw over these guidelines with more
detail and accuracy as I go, but these first lines are just really helpful in helping me to relocate my position as I start drawing and inevitably
start moving as well. Because the leaves are quite
complex in my subject, the key landmarks I'm
working on sketching in and locating first are
the stem and the pot. For example, the right
edge of the pot is just falling into that right-hand
column of grid squares. If I look and see that the
edge of the pot has moved into the second column
of grid squares here, I know that I need
to slightly adjust my position to bring
it back again. I find it helps to
work quite quickly because the longer you
spend on the drawing, the more you might
move your position. Working quickly just minimizes
that amount of movement. I pretty quickly sketched
in my main shapes. I'm just going and refining now. I'm referring to my
viewfinder in the grid a bit, but less so for positioning things and more ready
for making sure that I'm getting
the right shapes because it's quite hard to do everything through
the viewfinder from start to finish for
the whole drawing. It's a great method
to just lay down everything to make sure you've
got things in proportion, but there comes a point where
you get tired of closing one eye and you really want to just refine how
things look so far. That's where I've got to now. You'll probably find
that the longer you spend on your drawing, the more when you look back
through the viewfinder, it will feel like it's not in the same position
or it's moved more. That's just because the longer
you spend on your drawing, you'll probably be moving
more and twisting your body. You won't even be aware of it, but you just can't help it. When that happens, my
advice would be don't erase everything and start again because you could keep
doing that endlessly. Just really try to
relocate what you first put down on your grid
squares into the same place. Closing one eye remember to keep closing the same throughout. Just try and relocate it back
to roughly where it was, but just trust those first marks that you put down because although we're checking and correcting in terms of location, you will have got it
right the first time and it's quite easy to feel like you need to keep starting again if you find that
everything has moved, but just really trust those first marks
that you put down. [MUSIC] Once you have got to a point where you've got a sketch of
your object you're happy with in terms of the
outline and proportions, you can finish it
off as we did before using a more defined
line drawing. Again, whether you want to erase your grid lines may depend on the type of
feedback you want. Leave those grid
lines in if you would like me to review
your drawing looking for areas to improve not
forgetting to submit the photograph as well in your class projects that you
took from your eye view. Well done. You've just
completed an accurate drawing from real life using the
viewfinder technique. In the next video, we'll move on to explore one last approach to
measuring and proportion. When you're ready,
join me there.
9. Project 3: Drawing a Still Life Using Sighting Techniques: [MUSIC] Welcome back. For our next project, we're going to be working
from a simple still life, which is a collection of more than one object and we're going to be using
sighting techniques. Sighting techniques are ways of using our sight to measure the proportions and angles of our subject and translate
them onto our paper. We're leaving the grid behind and we'll be relying on our eye, our straight sided
objects such as your pencil and our thumb to do the measuring
for us this time. For the still life itself, I'd recommend finding
three or more objects from around your home of
medium complexity again. We're just working with
line drawing in this class, so won't be introducing
shading or texture. Really think about the
complexity of the overall forms, for example three oranges together is not going
to present us with enough complexity to be a good subject for
working with proportion. But you wouldn't want three
very intricate objects together either because that could feel very overwhelming, so aim somewhere in the middle. It can be a nice
exercise to gather together lots of objects
from around your home, which you feel have interesting forms and then try just arranging them together in different ways in
which you feel that's going to make a nice and
interesting drawing. Here's some tips
which can help to make successful
still-life compositions. Odd numbers of objects
tend to look more natural together and are easier to
arrange than even numbers. Try three or five
objects together. Use a variety of
heights and sizes of objects to keep your
composition interesting. When arranging them, think
about trying to create an overall shape with
your group of objects. Triangles or L shapes can
work particularly well. You're looking for a
natural flow of the eye. Sometimes it can help to have a stack of books to
help you achieve this. Certain objects could be placed higher in the
composition than others. Creating a still life is an
art form in its own right, and it can be a great
opportunity to try things out before you
commit to drawing them. Take your time and
have fun with it. The key thing with using sighting techniques
is your setup. We need to reduce any
movement at all in our body to ensure that what we're
seeing is not changing, we need to sit or stand in a very grounded and
comfortable position. If you're seated,
you want to have your weight evenly distributed, sitting as squarely as possible. We need to keep our
torso still and our arm completely straight
with your elbow locked? Twisting our torso
or bending our elbow can drastically change
any measuring that we do. You will also want to
be using just one eye, all the while we're using
sighting techniques, it doesn't matter which one, as long as you keep using
the same one throughout. Ideally, it's also
helpful to elevate your drawing surface
a little using a board or piece of
card and some books, or a spare chair, so that you can easily
see your subject and your drawing at the same
time without moving. Ideally, we want our
drawing surface to be perpendicular to
our line of sight. This is because if
our drawing is on a flat surface in front of us, it can tend to become
a little distorted. When we were using the
grid in project one or the viewfinder with a grid
in it for project two, that grid helped us stop any distortion
that might happen. But now that we don't
have that grid, it's much more important that we don't get that
distortion from having our paper going away
from us on a flat surface. There are three different
sighting techniques that I'll show you, which are proportional
measuring, angles sighting and plumb lines. Depending on what
you are drawing, one sighting technique might be more suitable than the others or you can use all three of them together when you come to
construct your drawing. I'll be showing you how I use them in more detail
in the demo video. But here's an overview of
how to use each technique. Remember the example
of the joke we looked at right at the
start of the class, and we worked out It's
proportional ratio by comparing its
width to its height. This is the
fundamental principle of proportional measuring, and we'll be using
our pencil and thumb to measure
those distances. We'll start with a smaller
measurement first, so the width in this example, to find the width, hold your arm out straight. Being careful not
to move your body. Close one eye and
position the tip of your pencil in line with
one edge of the object. Don't forget to do this
at its widest points, and then slide your
thumb to the spot on your pencil which
is in line with the other side of your object. Without moving your body at all, now rotate your pencil
to see how many times that width measurement
fits into the height. This is exactly
how we worked out our proportional ratio earlier. Once you know this, you can plot out the
width and height of your objects on
your drawing paper. You can then use the
same technique to work out other relative
measurements too, such as the length or
width of the spout relative to the width of
the whole object and so on. Don't worry if this
sounds a little daunting, we'll go through it
together in the demo video. Angle sighting is a method of determining angles
in your drawing. These might be angles of particular surfaces
of your objects, like the slope of the edge of a kettle for example
or we can use angle sighting to
determine the angle between two different
points in your composition. The method of
determining the angle is to use your
straight edge tool, such as your pencil, and one eye, remembering to keep
your body still and arms straight
as we did before. This time, instead of using
your pencil to measure, you can hold your pencil
out in front of you, tracing the angle of whatever it is you're
trying to measure, such as the slope
of this kettle. Once you have that, there are a couple
of ways you can transfer this to your page. If your setup allows
you to move your arm freely and you can hold
that pencil still, you can just carefully
move your pencil to your drawing paper without
changing that angle. You can see exactly how that angle should
look on your drawing, if that's not possible or
you find it quite difficult to move your pencil without
the angle changing, then you can imagine a clock face and
determine which number your pencil would be pointing to if it was a hand
on your clock. This can take a bit of
practice to get used to, but can be an incredibly
useful technique to use. Particularly if you're drawing
something with lots of straight lines and angles like a pile of
books for example. Traditionally plumb lines were a piece of thread with
a weight attached to the bottom and these
could be used to determine true vertical
lines when drawing, we can use plumb lines
without the need for thread and weights just
by using your pencil, gripping it very lightly from one end should allow
it to hang vertically. Why is this helpful? Taking a vertical line through the middle
of your subject, it's helpful to see
exactly what hits that plumb line and at
roughly what points, which we can then check
against your drawing. I also like to use the plumb
line a little bit like a scanner sweeping it from one side of the
composition to the other. It can help to check that the plumb line is hitting
certain points of our composition in the order we think they are
on our drawing, and we can notice where
two or more parts of the composition are aligned
to each other vertically. We can also use our pencil in
this way, horizontally too. It's a great way to check the relationships
of where things are located vertically
and horizontally in relation to each other. Now it's your turn. Have a play around
with your setup and where to place yourself
and your still life, so that you can see it easily, and your drawing paper
with minimum movements. Remember to try to raise
up your drawing surface so that it's perpendicular
to your line of sight. We are going to be
needing to extend your arm out straight
towards your still life. Make sure it's far enough away from you to
accommodate that. Once you're set up and
still-life are ready to go, join me in the next video, where I'll demonstrate how to use these sighting techniques to work from a still-life for our third project.
See you there.
10. Project 3: DEMO PART 1: [MUSIC] Welcome
back. Just a recap, as we begin this lesson, you should have a still life
arranged and be sitting or standing comfortably
in such a way that you don't need
to move very much, if at all, to switch
between looking at your still-life and looking
at your drawing paper. Ideally your drawing
paper should be at roughly 90 degrees
to your sight line. If you imagine some lines
coming out of your eyeballs, ideally you want to raise that
drawing surface up so that it's at 90 degrees or
there and thereabouts. You should also have
enough space to stretch your arm out straight
with your elbow locked. If you haven't done that yet, pause the video and get yourself
setup and ready to draw. Before you begin, I
would recommend again, just taking a quick
snap on your phone of your eye view of your still
life for two purposes. Firstly, so that you can
realign yourself if you find that you have moved a little bit through
the process of drawing. Also it's very helpful to add in your class project
alongside your drawing, particularly if you would
like constructive feedback. Please try not to draw
from your photo as it really defeats the
techniques and skills that we're
working towards. Just keep that photo
for those purposes. There are a few different
sighting techniques that we're going to try
out with this project. But it's important
to understand that these techniques can
be mixed and matched, and you don't have
to use all of them. Some people like to use these techniques
having already drawn out a rough sketch in order to check and correct
their drawing, whereas others like
to use them to plan out the drawing
before they begin. It's not a
one-size-fits-all approach, but hopefully some useful
techniques that you can experiment with yourself
to see what works for you. The first and most
important thing that we'll establish is the proportion or ratio
of the whole still life. How high it is compared
to how wide it is. Don't forget, we'll
be measuring this at its widest and tallest points. We're going to draw a box of exactly those correct
proportions on our paper first. I'm just having a quick check of my still life, first of all, to work out if it's wider than it is tall or
taller than it is wide. This is going to affect
the orientation of how I'm going to arrange
my paper to draw on. If your still life is
taller than it is wide, you want your orientation
to be portrait, but if it's wider
than it is tall, then you want your
orientation landscape. It sounds really
obvious to check this and most people would
just do it automatically, but it's surprising
sometimes that you can think that a still life
is a particular proportion. If you end up trying
to draw it on the wrong orientation of paper, it can inadvertently makes you squash things to
fit them on the paper, so it's something that's
really good to check. My still life is taller
than it is wide, so I'm going to stick my
paper portrait on my board. Bear in mind that when
citing the proportions of your drawing paper now have nothing to do
with our drawing. The box that we're about
to draw, in effect, acts as the edges of
our drawing paper. You could think of it as your drawing paper instead
if that's helpful. There are two ways
that you can approach finding the ratio
of your still life. What you're looking at
now is my eye view. I am going to use my pencil to find the proportional ratio
of my composition. I've got the tip of my pencil. The widest point
of my composition is the heel sticking out. I'm not going to use this block that the
boot is resting on. I'm just going to draw the
three objects basically. That's the widest
point on the left, I'm going to slide my
thumb to the right. Now, I think actually
if we have a look, the paintbrush is actually
the widest point. I need to just adjust where
my thumb is a little bit. That's the width
of my composition. Now without bending my
elbow or moving very much, I'm just going to rotate my pencil from the very
bottom of my composition, which is the toe of
the boot going up. We can see that that one unit pretty much in line
with the base of the plant, the pot edge, which is quite
a handy thing to know. I'm going to move the
pencil up again to line up my thumb with that spot. We can see that the
whole composition is just over one-and-a-half
pencils high to one wide. The proportional ratio is 1-1.5. It's unlikely that your
proportional ratio is going to be a
convenient full number, so we do need to think
about fractions. Usually quarters is enough. For example, your still
life might be one unit wide by one and
three-quarter units high. You might need to practice
this a few times, and it's not a 100 percent
accurate way of measuring, which will get you
a perfect scale, but it should get you
pretty close to having the right proportions
once you can do this whilst keeping
everything still. The other approach to finding the height to width ratio is to find a slightly smaller unit of measurement within
your composition. For example, I could use the width of the
white plant pot. We can then use that
and repeat it to see how many times that fits into
both the height and width. Again, you may need to use fractions as we did with
the other technique, but the overall effect
should be the same. The drawback of
this method is that there's a bit more error likely because you will have to move your sighting stick more
to find the measurements. But some people like
to do it this way. I'm showing you my eye view
again and I'm going to show you how I would
find the height to width using that second method. Using that plant pot as
our unit of measurement. I've got my pencil lining up
with the left side of it and my thumb has slid on my pencil
to the right-hand side. Let's see how many
times that unit of measurement fits
across the width. We've got 1, 2, I'd say that is between two and a quarter
and two-and-a-half wide. I'm going to write this down. Just because it's
quite easy to forget. Let's do the height. I'm going to just reset my
unit of measurement again, which is my plant pot. Let's just double-check
that again, so 1, 2. That's looking closer
to two-and-a-half. Now to me, I might
have moved slightly. Let's just move and see how many times that
fits into the height. We can go from the
toe, 1, 2, 3, 4. Say that is about four
and a quarter high. Once you know the ratio
of your height to width, we can draw that box
out onto our paper, which your drawing is
then going to fit inside. Bearing that in mind, try and draw it reasonably
large on the paper. I'm just going to
double-check my measurements again just because I've
turned round to talk to you. I think it was around one. It's pretty much the width of
the pencil actually, 1, 2. One-and-a-half. I'm just going to have a look at how my pencil's
working on there. In actual fact, you
can use the length of your pencil if that's
something that feels helpful. I can see that I can
fit one pencil in width easily and one-and-a-half
pencils in height, but I still have a
little bit more space. I'm actually going to
make it a little bit bigger than my pencil is. I'm going to put a
halfway point there. That's going to give me
my quarter measures, which might be helpful later. Let's see, that's a
half measure to there. You can see that that is
pretty much as big as I can fit my proportional
box on my page. It doesn't matter if
you have gone a bit small or you might find it easier to use your pencil
as your actual ruler, if you like, to get
those measurements on. But this now gives me, this is one unit wide
by one-and-a-half high. I can now draw a box. My still life should
fit within this box.
11. Project 3: DEMO PART 2: It can be helpful to think
of this process a bit like sculpting from a
block of wood or stone. This rectangle that
we've just drawn is the size of the
block we start with, and now we need to take a few more measurements
to identify where to cut some chunks away so the
shapes can begin to appear. Next we'll be
looking at measuring the large main shapes in our still life and the
details will come last. When I took my
first measurements, I found that the
proportional ratio of one-to-one with exactly where the bottom of my
plant pot is touching. I know if I put a line in
my composition about here, that's where that plant
pot is going to be. I'm going to put just a
very loose shape there. It may not actually
be at the right spot, but it's good to map in roughly where things are
going to go to start with. What I want to do first
before I start sketching in lots of things is actually think about where our
center line would be. I'm going to use a
plumb line to think about which objects fall on one side of that and
which fall on the other. I'm going to find the
width of my composition, again, and I'm going to
find where half of that is. I'm just doing this by eye, not actually
measuring it as such. I'm just estimating roughly
where the halfway point is and see exactly what is on one side of that
and what's on the other. Now, very helpfully, the plant stem is just to the
right of that plumb line. If I draw a line in my
composition down the middle, I know that my plant's stem is just to the
right of that line. What else can I identify
from that line? Well, actually, this area here, this part of the boot
where the laces are is pretty much dead center and that's also quite a
helpful thing to know. I'm going to just
sketch that in, might not be in the
right position yet, but it's just a
case of trying to map out where things are. I think that's pretty much mostly what I can see
from that center line. One other thing is that
I can see that it's not the lowest point
of my composition. I can see from my center
line that actually the toe of the boot is going
a bit to the right of that. I know there's going
to be a shape that shoe is going to be coming
down, something like that. That's enabled me to start
mapping a few things in. I can also use a
horizontal plumb line. It's not technically a plumb
line when it's horizontal, but it does the same thing. Thinking about that first
marker that l found, which is where the top
of the plant pot stops, it'll be quite useful for me to see if I'm looking at
half that measurement, what's actually hitting
that half line? It's a little bit than using
the grid technique in a way because we are almost creating
a grid in a way in space. I can see that the base of the plant pot
sits just above that. I'm going to put a mark
here just to suggest that. That's quite handy,
that the heel of the boot starts on that line, that's sitting somewhere
there and I can see that it's going through the
paintbrush pot as well. The paintbrush pot is
somewhere around there. It's helpful to use quota
units of measurement as a smaller measurement to
start mapping out some of the smaller items
in our composition. For example, if you
get your width, again and you measure by eye
l'm finding half of that, then I'm going to find half again to find the
quarter measurement. I'm just going to see if there's anything which actually is exactly one-quarter
because it'll be quite helpful to
know that information. From where I'm looking at, the width of the heel of the
boot is exactly a quarter. I haven't done it
quite big enough, so I know that I can
make that a bit bigger. It's helpful to know that information
because then when I go back to my composition and
I start measuring again, I can use that heel of the boot as a unit of
measurement for some of the smaller items rather
than trying to go from the large unit again and
go in half and half again. Once you've found something that works as your quarter unit, you can then use that to plot in some of
the smaller items. Just a tip, when you're
doing angle citing, if you are using your pencil to transfer
that measurement, it's helpful to have
a spare one actually. I'm going to transfer the angle of the white plant
pot to my drawings. I'm very carefully
trying to not move it. Then you see the thing is
if you have a spare pencil, you can then just trace that
rather than have to take your pencil off
the paper and try and remember the angle by eye. Angle citing is really
helpful for me at the moment for determining the angle of these
paint brushes. At the moment, I'm just putting
in a line which tells me what angle they are resting at before I
actually draw them in. One of the things that
I'm finding really helpful that I'll
keep going back to is knowing where that center
plumb line is because actually there's a
few other things that I've just used it for. For example, l can see that the detail on the shoe is helpful to know
exactly where that's lining up with the center line. Once you found those
central lines, you can keep returning to them again when you want to
check another object. When you're at this stage, I would recommend
keep everything very, very light because you won't
get it right first time, and it's a process of drawing and checking
and correcting, which we need to keep going
back to again and again and gradually the correct drawing
will start to emerge. But it does take
quite a few go's, even if you're very experienced
and you draw a lot, it's just not normal to
get it right first time. Just don't be disappointed
if you feel like it's not looking very good at this stage, that's
quite natural. It should look a bit rough, and really just like an outline of where things are going, gradually the drawing
will start to emerge.
12. Project 3: DEMO PART 3: I've sketched in a few
parts of my drawing, I've got that feeling that something is not right about it. There's definitely something
that's not in proportion. This could happen to you
during this process, or it might be that you're
just drawing something in a more natural way and you just feel like
there's something off. We can actually use those sighting techniques
to do some checks to help us identify what parts of our drawing isn't
in proportion. I'm going to show you how
I would go about that. I'm going to use my camera
to give you my eye view. Here's what I can see. You can see this is the
view of my still life, then if I just twist here, here's my drawing and there's definitely something glaringly
wrong with my drawing. I'm pretty sure that I have
a clue as to what it is, but I'm going to show
you how I would check. I'm fairly confident that the overall proportions of
the whole thing are right, the height and the width. I'm pretty confident that this white plant pot
is in the right place, in the right proportions too, because I measured it first off. One of the things I'm going
to try is this technique, where using plumb lines, which could be vertical
or horizontal, I'm just going to do a
bit of scanning to see what is hitting my
pencil and when. We've got plant, plant, plant, which I haven't
actually drawn in yet. When it gets to the top of
this white ceramic pot, actually seeing here that the label on the back of that boot is pretty much in line with the top of
the white ceramic pot. If I twist around my drawing, we can see that that
is the huge problem. The boot, I've definitely
not drawn it tall enough. This is a great exercise in working out what
needs correcting. That's something
that I can correct. As you keep scanning
down, again, you can see that the very
end of that paintbrush, the tallest paintbrush
is pretty much in line with the white part. Again, I haven't actually
drawn it in yet, I've just done a suggested line, but I know that it
is going to need to be a bit taller than
I've drawn that line. Scanning down, down, down, down, and I can see here the
corner of the boot where the laces start
is pretty much in line with where that
paint brush is. It almost looks like
it's leaning on it. You can see that I need to
resolve how that is here. Again, I haven't
drawn that in yet, but I can see that
it's going to need a little bit of
correcting that's going to need to come up higher, which will make sense as I've
drawn it too low anyway. You can see how just
using your pencil to scan almost see what is
in line with what, it really does help to work out, what part of your
drawing needs reworking? You can do that horizontally
and vertically as well. It's a really helpful
tool and it's a really easy way of just checking with what
you've already got, what it is that actually
needs adjusting. You can keep using this
process throughout and don't feel disheartened. If like me, you've used those measuring techniques to plot things in and then find that something
is very much out proportion like
that boot was very out of proportion because that is what the process
is all about, it won't all match up
perfectly the first time. I think with the
other techniques, with the grid and the
viewfinder technique, it's much more likely
that it will be pretty accurate first time because you have that grid
system to work to. Whereas with sighting techniques
and working from life, you have to work everything out and as you go and
things will be out of proportion and they
will be wrong until you work on correcting them. It's just something to bear
in mind because it's quite easy to find something that's very wrong in your
drawing and get very disappointed and disheartened
and want to give up, but it's completely natural. The important thing is to try
and identify what is this, not working and try
and correct it. [MUSIC] I'm going to stop this drawing there. I feel as though there are still some areas that could do with more refining that aren't
quite perfectly in proportion, but I'm happy that it's
in proportion enough. Congratulations, you
now have a sketch of a still life having practiced a range of sighting techniques. This is a huge step, particularly if you
are new to drawing. Don't be hard on yourself. Remember that it will take some practice to get used
to using these techniques, so try not to be
too judgmental of your drawing and really celebrate this huge
step you've just taken. Join me in the next video
where we will discuss what next steps
you might take to continue your drawing journey.
13. Next Steps: [MUSIC] Now that you
have the skills and knowledge to practice measuring and proportion in your drawing, I would highly encourage
you to keep practicing. Practice often. As with any drawing technique, the more you practice, the better you will get. There are no shortcuts
to gaining these skills. They can only be strengthened
through practice. Gradually, you'll find
that you need to use them less as your observation
skills will become sharper, or you might find that you
use them more to check your drawings rather
than construct them. Remember to be kind to yourself as you're
learning to draw. You will 100 percent make
some terrible drawings, I can guarantee it, but those terrible drawings make the best learning opportunities. Try to objectively analyze
your drawing to determine what aspect of it isn't working so that you can
learn from it for next time. There are tons of ways
that you might like to progress your drawing
skills from here. You might like to learn
about perspective, which is a great skill for introducing more depth
into your drawing. You might enjoy delving
into mark-making to add texture or shading to add
tonal value to your drawings, which can make
your drawings look more rich and three-dimensional. Learning about composition
is a great skill to add to your toolkit as it can make your drawings feel more
dynamic and exciting. Of course, then there is the
wonderful world of color, which can give you
endless directions in which to develop
your drawing practice. This is such an
exciting journey and I can't wait to see
where you take it next.
14. Thank You!: [MUSIC] Thank you so much for spending time drawing with me. I hope you now feel
able to create a drawing with more
accurate proportions. These methods help to give
you the confidence to make the transition
to drawing from life. To recap, getting to grids with proportional ratios and
simple fractions are the two key theories
to understanding all three approaches to
measuring and proportion. Using a grid is a
great technique to use if you are working from
a reference photograph. Creating a viewfinder can be a great transitional
method to create more accurate drawings
if you'd like using the grid method of measuring
that you working from life. Sighting techniques will
allow you to progress to drawing any subjects
anywhere from life. Remember that those
three different sighting methods can be mixed and matched to suit
you and your subject. If there's one thing that you
take away from this class, I hope it's the confidence
to try drawing from life. It's a huge and important step in your learning
to draw journey. I can't wait to see
where it leads you next. I would be thrilled to see
your class projects and hear about your experiences with
the different approaches. If you feel comfy sharing, please do post to
class project with us over in the Projects
and Resources tab. Remember you're most
welcome to share 1, 2 or all 3 projects. If you'd like constructive
feedback on your drawings, please indicate that in your project and remember
to include photos of your references as well as your drawings so that I can give you that
type of feedback. If you'd like to hear about
my new classes, competitions, and giveaways, then make sure you're following me
here on Skillshare. If you'd like to
hear a little more about projects I'm working on, behind the scenes, freebies, and other fun things, then you might enjoy my
quarterly newsletter. If you share any of the
work that you've created from my classes on social media, I would love to see them. Please use the hashtag, MELRYESKILLSHARE, and
don't forget to tag me. I'd love to connect there too. Thank you so much
for being here. I hope that I'll see you in
another of my classes soon. Bye for now. [MUSIC]