Transcripts
1. Class Trailer: [MUSIC]. I've always been
interested in quilting, but never really made one
until 2020 rolled in. All of a sudden, quilting has become an essential creative
practice for me. I finished five quilts
between March and October, along with so many
other quilted objects around the house. [MUSIC]. Quilts are stories, it only gets richer by the day. Anywhere from the
maker's first touch of fabrics to years or
even generations of memories after a quilt is made and every
stitch in-between. [MUSIC] Hi, my name
is Esther Nariyoshi. I am an illustrator based in the US and also a top
teacher here on Skillshare. Normally I teach
illustration-based classes but if you haven't
figured it out already, I also really love quilting. In this class, we're
going to learn how to quilt one of these
blocks together. I'm going to show
you a few tips on how to select your own fabrics. I will also show you steps
on how to cut your fabrics. We're going to go over to our sewing machine and learn how to sew one of these
blocks in two methods. This class is designed for students who are
new to quilting. We will cover the
fundamental skills you will need to complete this block. This class is not about
science or precision, it's about crafting as a creative expression from
one hobbyist to another. The only required skill
you'll need is to know how to sew a straight
stitch on your sewing machine. I will provide a
PDF guide that you can download from this
class that covers all the key points we talk
about in class together with one coloring sheet that you can use to plan out your quilt. By the end of the class, you should be able to
know how to sew one of these blocks and then maybe turn into a pillowcase or if you have a few
minutes to spare, you can totally make a few of those and put them
together as a baby quilt. The skills you pick up
from this class can be easily applied to many
other sewing projects. It's such a great
feeling to have handmade items around the house. What a gift it is to have
a creative practice that allows your mind to wind down and relax at
the end of the day. I hope this class
opens a door to a new world as
quilting did for me. I hope you are on board. Let's get started. [MUSIC].
2. Tips For Fabric Selection: I think fabric stores are one of the most
dangerous places in the world because you can
never come out empty-handed. We can always think
of a project later. This is just the little
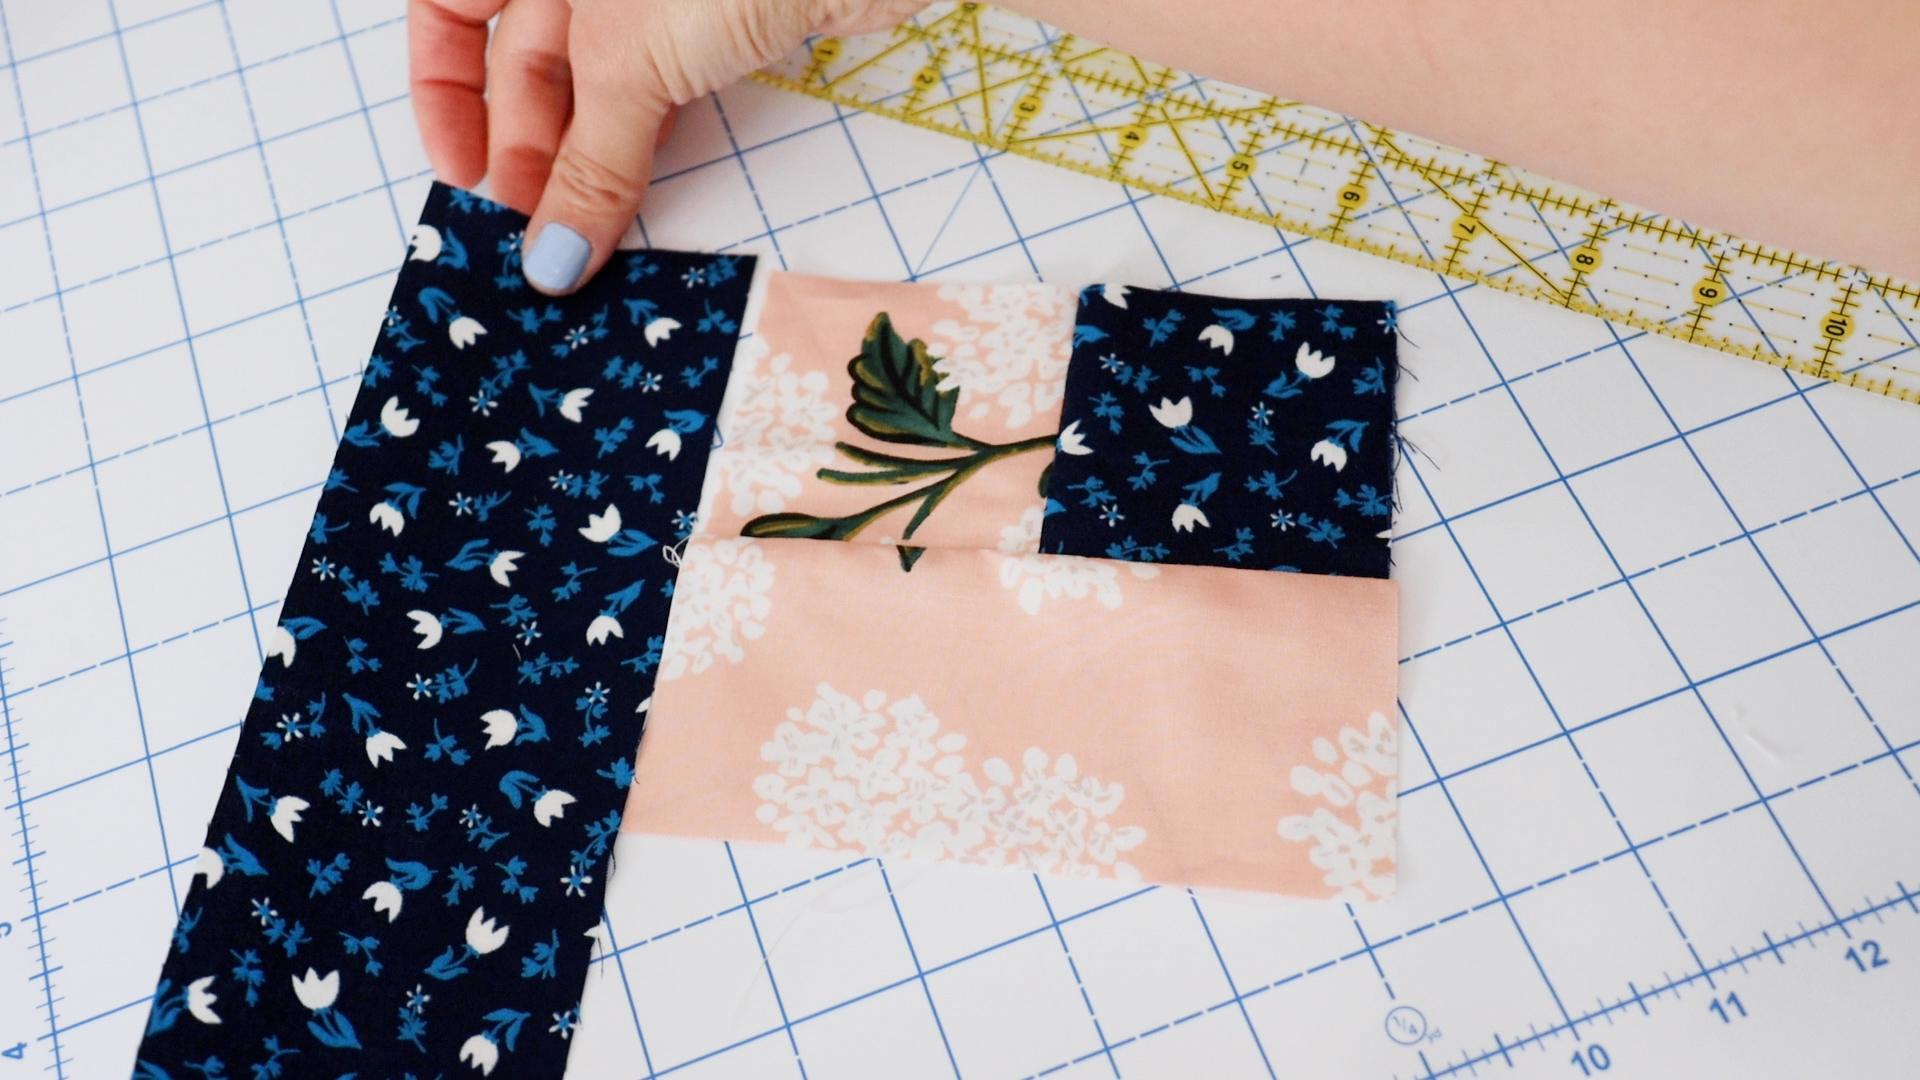
task block that I made. All we need for
this little block is three colors of fabrics. Let's have a quick
overview of our colors. In this particular case, we have our color A, color B, and color C. Next up, I will walk you over
some of the ways that I use to choose the
colors of my quilt. There are certainly other
ways to approach the process. My goal is to give you some initial inspiration to
get the process started. I promise I won't go
super technical on you. But I will talk about
the color wheel. This is a color
wheel which you can find easily by a quick search. It's basically a rainbow of
colors arranged in a circle. We'll need to borrow
your hand to do a pair of bunny ears with me. I know it's a bit silly, but essentially this helps
us to narrow down to a smaller range instead of looking at the whole
rainbow of colors. For example, if you were
to stop right here, you have some red, some orange, and
some orange-red. These are great neighbors that
work well with each other. Like this color group
that I pulled together, they are all on the warmer
side of the color wheel, which will make a great
fall-themed color group. They also beautifully vary
in saturation as well, which creates
additional contrast. Similarly, we have a
cooler group over here. There is a light blue, a sky blue, as well as a dark blue with a
slight touch of green. Now I'm going to show you some other examples with prints. I put each group together based on general
color temperature. They all fall more or less
into the bunny ears method. As you get more comfortable
choosing colors, you can also expand your
angle to include more colors. Like the example in this group, we have the range expanded from yellow all the way to red. They work in harmony
with each other instead of competing
like a capella. The next group is also
very interesting. It's on the colder side
of the color wheel. The first two prints are not designed by the same designer, but I feel like they do
work well with each other. The first print is
designed by Dylan M., who is also one of my favorite
Skillshare teachers here. Her print has a creamy
color as a background and also has blue clouds
sprinkled here and there. The general size of the motifs
are on the smaller side, which provides great contrast
with the print next door. Interestingly, the
second print has blue as a background and has
white as an accent color. In terms of scale, it's much larger than
our first print, which provides great contrast. Last but not least, the dark solid blue pulls
everybody together. Since we're talking about
composition and scale, let's check out this group. The first and the third print come from the same collection. As you can see, there's a
great color harmony already. In scale-wise, they also
complement each other, so they're not competing
for your attention. I just added a
simple cream color to break it up a little bit. This is one of the advantages of choosing prints from
the same collection. Ideally, the surface
designer has already worked
through the colors, the scale, and composition, and all that good stuff, so your fabrics look
great next to each other. This little block also has prints from the same collection, so the color B, which is the smaller
l in the middle, and the color C,
which is the frame. They both come from
the same collection, so it makes pairing
a lot easier for me. Like I said earlier, there are definitely
more than one ways to choose your fabrics. For example, I have a very interesting
combination over here that I want to
talk you through it. In this color group, we have a bright red and white
with some gold metallic, and two shades of green. If we take out our color
wheel as the reference, you will discover
that the red and green are on the opposite
side on the color wheel. There are by no means
next-door neighbors. But also when I look at
the red and the green, I think about Christmas and all the joyful emotions
that come with it. Even though color-wise they
are not close to each other, but thematically these colors
work well with each other. Because I believe human minds are wired to look for meaning. Quilting or creative expressions in general is storytelling. If the color story
makes sense to you, I'd say go for it. Hopefully, you're inspired
to select your own fabrics. Think about the person that
you're giving this cloth to. It could be yourself
or your loved ones, friends, or it could
be a total stranger. Think about the stories that you want to tell through this, or what experience do
you want to offer? Do you want to use fun fabrics that kids can stare
at it for hours? Or do you want super bumpy textured fabric that you can run
your finger through? There are many factors that you can take into consideration. Just have fun in the process, and I will see you in a bit.
3. Essential Materials: In terms of materials,
it's very simple. I intentionally only
included the essentials so you don't feel like
you have to get everything before you
even get started. First, what we need is
you're cutting tools. I'm going to use my rotary
cutter and a quilting ruler. I will say that the quilting
ruler is very central because quilting rulers are different than regular rulers. There are in general, thicker than regular rulers. The thickness will hold the rotary blade steady
when you cut through the fabric and that's very important for safe
and precise cutting. When you cut through
your fabric, make sure you cut away from
your body and of course, we need our threads. It can be synthetic or cotton, whatever that is
accessible to you. Underneath everything. I have my cutting mat. This is just to protect the
surface that I'm cutting on. You might have
noticed that I have the little white squares
under one of my rulers. These are just basic
first aid fabric. It's fabric with
adhesive on one side. This provides a
bit of friction so that my ruler
doesn't slip easily. Of course, we have our fabrics and our sewing
machine right here. You can't really see the sewing
machine in this section, but I'm pretty sure you will
see plenty of it later on. Next, we're going to move
on to cutting our fabrics.
4. Cutting Fabrics: In this lesson, we're going
to cut our fabric together. I think it might not
be a bad idea to watch the lesson from the beginning
to the end before you cut, especially if this
is your first time. It will just help you to
mentally prepare what to expect. This is a quarter of a yard. The shorter side measures
about nine inches wide. It extends through
the entire fabric, which has about 42 inches. This particular fabric
has prints on it, which means that it has a pretty sight and
also a backside. If you are using a
solid color fabric, both sides look the same. Before we start cutting, you want to make sure there's
no hard deep creases in. If it's necessary, it might
be a good idea to use your dry iron to press
it down on the creases. My fabric seems to be fine, so I'm content with just
stroking with my hand. Once it's flat, I'm
going to fold it again and then cut
through the four layers. If all possible, give your rotary
cutter of fresh blade. It may not be a big
deal administratively, but he makes such a
difference when you cut through fabric
with a fresh blade. It feels like butter and plus it's safer
when the weight is sharp because you don't
have to use a lot of effort and it just does
what it's supposed to do. When you buy fabrics
from the store or online it usually
comes with salvage, like this little edge over here. It gives you the information
about the designer, about the fabric manufacturer, the colors, and the
collection name. I have folded my fabric
twice over here. It is very important that the two folds are
parallel to each other. Feel free to use the
quilting ruler to make sure that the two-fold lines are
parallel to each other. All right, with that being taken care of, let's start cutting. Our job right now is to find
one horizontal line from the ruler and align that line to the fold
line at the bottom. It does help if you have
another set of ruler. So what I'm going to do here is to put my two rulers
back to back and use the ruler on the left as a
guide to make sure the bottom of my fabric fold line is perpendicular to the cut
line I'm about to make. Once things are lined up, you can get started. I am right-handed, so I am
going to use my left hand to hold the rulers in place and then make a
cut line on the right. It is super helpful if
you're blade is very sharp. In this way, you
don't have to exert yourself to cut through
the layers of fabrics. Right now I'm cutting
through four layers, but I usually cut through six or even eight layers at a time. Our little block doesn't
have a lot of cuts, but when you follow a
more complicated pattern, it is really helpful if you can batch cut a lot of
layers at a time. I also like to have a tiny jar within reach to basically hold all my scrap fabrics over time when you cut through
different colors of fabrics, this little jar can
be really pretty. I also like to save a
slightly larger scrap fabric, which is bigger than my thumb to avoid nesting and bunching. I will show you all the details when we get to the
sewing machine. So now we have a clean
edge on the right. I'm going to start
making my cuts because I am right-handed, so I am going to rotate
my fabric 180 degree. I do want to be
careful when I do that so the layers of
fabric doesn't shift. After we made the rotation, that clean edge would
be on the left. So I'm going to carefully align my ruler to the left edge. My ruler happens to
be three inches wide, which makes it super convenient. If your ruler is larger, you want to make sure
you count three inches from the right to the
left to make your cut. Again, you want to cut
away from your body. If this is your first
ever quilting experience, you may have to remind
yourself every time you cut, but once a good habit is formed you don't even
think about it again. Now we have a three-inch strip. What I'm going to do next
is to cut off the salvage. Find the two ends of the fabric and align the two layers well, and then align the bottom
of the fabric with one horizontal line from your ruler and then
just make the cut. So this is how we
cut our fabric. We're going to
repeat this process to cut all the
pieces that we need. If you need all
the measurements, feel free to refer to the PDF from the
class resource area, and I will also keep it on
screen for you to refer. The process is
essentially the same. Just remember if your fabric has a lot of wrinkles
and creases, feel free to give
it a quick press to make sure it's
relatively flat. By the way, all the pieces
have the same width, which is three inches. For color A, we
need three pieces, which is these guys, and for color B, we only need two pieces. The rest is for color C. I'm going to play some music
for a quick minute with all the measurements on
the screen so that you can gather all your
materials and start cutting.
5. Block Construction Walk Through: [MUSIC] Now with all the
pieces ready to be assembled, let's talk about colors one more time before we head to
the sewing machine. We will start with the color A, which is the little square, and then grow an L around
it where the color B. Then go back to color A for a bigger L. Then last
but not least, we will add a frame
with the color C. That's what we're
going to do next.
6. Common Issues and Fixes: [MUSIC] In this lesson, we're going to talk about some common issues
and their fixes. On the table, we
have three samples. The one on the left is what a healthy seam line
should look like. This stitch length is
pretty even and there's not a whole lot of creases
created by the stitches. The tiny waves can be
ironed down pretty easily. The second sample has a lot of ruffles created by the stitches, this is because the thread
tension is set too high. You can see the ruffles on both the front side as
well as the backside. To fix that, you might
want to take a look at your sewing machine manual
and to dial down the tension. You may need to experiment different numbers in order to see what works best for you. As you might have guessed it, the next example
shows you what that looks like when the
tension is too low. You may look okay
on the front side, but the stitches appear
to be a bit wobbly. As you flip it over, you will see this super
long thread that has been very loosely held by
threads from the other side. If we compare this one
with the healthy one, which is the one on the left, the healthy one looks
like it has dashed lines. There are tiny gaps in
between each stitch. That is because the thread from the other side is pulling
the front side down, and you should look the
same when you flip it over. When the tension is too low, you can see the
thread is not being pulled down and this
is from the backside. [NOISE] There is
another scenario that I come across quite often. It is called nesting
or bunching. It usually looks great from the front but when
you turn it over, you can see this thread mass
like bird nest on the back. Fortunately, there
is a very easy fix, so what I will do
is to grab some of my scrap fabric,
usually the salvage, I'll have my sewing
machine sew over this piece of fabric
first and then use this as a handle to pull my threads away from
my actual fabric. So it has less
chance of creating a nest on my actual quilt top. These are the common issues
that I face when I quilt, I thought it would be helpful to talk about it beforehand so that you have extra peace of mind when you head
to the sewing machine.
7. Sewing Method One (Cut And Go): In this section of the class, we're going to put
all the pieces together with our
sewing machine. But before we even turn
on our sewing machine, let's talk about seam allowance. Seam allowance is
the distance between the sewing line and the
edge of the fabric. It's common to use a quarter-inch as seam
allowance for quilting. I'm going to show
you what I mean by using this quilt block
that I have tested. As you can see, we have a white sewing line and the distance between the line
and the edge of the fabric, it's about a quarter-inch. Go ahead and grab a scrap
piece of fabric to play on your machine to make sure the seam allowance
is a quarter-inch. If you have been
sewing for a while, you may have heard some people
say scant quarter-inch, it basically takes
the thickness of the fabric into
consideration and make the seam allowance slightly thinner so that when you
fold over your fabric, you don't lose the
length of your block. But as far as our
class is concerned, we're going to use just a
straight, a quarter-inch. I'm going to use a warmer
palette for our demonstration because it contrasted the
colors around it better. Both of our prints
have the print side, which means that there is a
right side and a wrong side. We want to fold the pretty side, the print side,
facing each other. Then just sew a
quarter-inch seam. This is pretty fairly straight. Just a line on our fabric. We're going to use a
little scrap fabric to avoid nesting. I'm going to set up
my needle first. Right now over here, I have a quarter-inch, which means that the distance between the needle on a
plate is a quarter-inch. I'm going to put my little
test fabric underneath and go over a few stitches. Then I'm going to
raise my needle bar and the presser foot. What I want to do is to just
pull my little fabric over. By doing that, I also
have my threads, both of the threads pulled over. Then I want to align the right side of the fabric to the right
side of the presser foot. This is pretty good. I have my stitch length as 1.8. It's on a tighter side, but that's how I like it. I'm going to start sewing
this straight through. You should have a little
square and a little tail. I'm just going to cut it off
on the side of my machine. You can use this for
the same purpose next time as well so I will
leave it on my machine. Right now, I'm going
to hand press it. What I'm going to do is to leave the darker side
of the fabric and then just gently flip it
over and then press down. I'm not trying to
stretch my fabric. I'm just creating a crease. Like how you fold paper. Gently press it down. There are two ways
to press our seams, some people like to open them. This one will actually
give you a flatter seam. But I like to press to the darker side because this will make your quilt a bit
stronger once it's done. It does have a little bit of
[inaudible] You can tell. There is a bit of texture, but I think it's
pretty charming. The next thing we
want to do is to align this with this fabric. This is the color B. What we're going to do is
like what we did before, flip it over to make sure the right side is
facing each other. The right side are facing each other and we want
to align the top. And then I have already pulled my little
thing right here. I'm just going to
stitch it over. Make sure the right
edge of my fabric, align with the presser foot. I'm going to stitch through, cut my threads and then
cut that little tail. This is what we got. I'm going to do the same thing. I'm going to flip it over and then just gently,
gently press it. Sometimes people like
to set the seam, which just mean that you
can have your hot iron, just press your seam down
to set the seam in place. But our block is small enough, so I like to do it
at the very end. This is our growing block. We have color A, color B. Now we're going to
go back to color A, find the shorter one, and then attach
to the left side. Just flip it over. I can already feel that it flipped over as
the seam travels. I'm going to adjust it to
make sure it stays the same. And then have the darker
side up facing up. Then gently, gently flip it over and press it down
just using our fingers. You can use an iron if you want. But I think this block is simple enough that we can
do it at the very end. Let's go to this
bottom portion of the L. This is the last
piece of our fabric A. Same alignment. This time I'm going to
sew it with the seam facing up so I can keep
an eye on the direction. You're free to adjust it and stop the needle at any point. It's not uncommon to see your precisely cut strips
peek over like this. This is because fabrics
has their own thickness. When we fold the seams over it loses a small portion
of its length. Some people use a
scant quarter inch, which means that
the seam allowance itself is slightly smaller
than a quarter-inch, but when you fold it over, you precisely lose
a quarter-inch, which basically means
that your seam allowance is maybe two threads smaller. But as far as our
class is concerned, we're going to stick to
a quarter-inch seam. We're going to cut this. We're just going
to cut it off and put it in our little jar
and then keep on going. Next step, we're going
to attach the sides. This is going to be
the 10.5-inch strips. We should have two of them and we're going to attach
them to either side. The process is
completely the same. Just make sure your
seam allowance is consistent throughout. If you feel the block
is too big to handle, feel free to use a clip or a pin to hold the
fabrics together. One or two should be
sufficient for our project. Then add another
clip here just to hold it in place and
then do my little. Raise your needle bar
and press your foot, pull it to the back, and then feed my block. When things are just misaligned and you can just tip over
your fabric a little bit with your fingernails
and [inaudible] scooch over. Take your fabric
to scooch it over. Similarly to the previous block, I will flip my seam to
the less bulky side. Just push it a little bit, and then just press it down. Now here is the upright version and we're going to attach
to the right side. This should be the same process. Sometimes I like to use
the presser foot as a pin. When I lower the presser foot, it will hold both layers
of fabrics together. Then I will work on
the alignment for the rest of this section
with pens and clips. It's almost like having another hand helping
me to hold it. Let's take a look. On this one, we can flip it over, press our little seam. This one needs a little
squaring as well. When I was cutting my fabric, I saw that I actually left
a bit of salvage over here, but I know for a
strip like this, I will probably end up
scoring it off anyways. I just loved it that way. Now that is square
and similarly, we're going to take care of peeking fabric on
the other side. Now we have just one
last bit to attach. We're going to do the usual, to attach to the bottom, start from your top. I want to do it on both side
and you can start doing your binder clip and
then scooch over. Make sure things
are not buckled. Let's get started. One last bit. Once both sides are aligned, we can bring our last section of the block to the
sewing machine. This one is going to go pass two seams so slow down
when you are closer. There is something so therapeutic about the
sound of a sewing machine. It's a tangible sound
of a creative act. So musical and very
relaxing at the same time. That is our little block. Next up, we're going
to bring it to the ironing table
and make it flat.
8. Sewing Method Two (Cut As You Sew): [MUSIC] In this lesson, we're going to talk about an alternative approach
to building your blocks. Over here, we have a beginning
of a new quilt block. I have a three inches
by three inches, two blocks sewn
together and underneath instead of having a
precisely cut rectangle, I have a long strip. This is still three inches
tall or three inches wide, but this tail drags on. What I'm going to do next
is to cut this strip and to make sure my new cut line align with the edge of the
fabric over here. So this method is
basically cut as you sew. I really like it
because you don't have to do all the
cutting upfront. You can just visually see where the fabric needs to be
cut and sew as you go. The only downside about this method is that
you have to switch between sewing machine and
cutting-table constantly. But honestly, I
don't really mind. To use this method, if your strips run short, you can just sew a
quarter-inch seam over here and then press it. So that's what I'm going to do for the rest of the blocks. [MUSIC]
9. Pressing with An Iron: In this lesson, we're
going to talk about how to press your quilt
top to make it flat. I'm using a mat on
my regular table, but you are welcome to use whatever surface
that can take heat. You want to set
your temperature to the appropriate range
for your material. My fabrics are made of cotton, so I have already preheated
my iron to the cotton level. Pressing a quilt is
different than ironing a shirt because when
we press a quilt, we don't want to have the iron move around
on top of the quilt. We want to press it
down straight because when we move our iron
on top of a quilt, it will stretch the fabric, and we want to keep it as rectangle or
square as possible. The motion is straightforward. Lift your wrist and put it down. The goal of pressing
is to make sure our seams are as
flat as possible. Apply a bit of
pressure on one seam for a few seconds before we
move on to the next one. Also, you may want to turn
off the steam option from your iron so that it
doesn't warp your fabric. That's pretty much
it for pressing. Now we have a finished block. In the next lesson, we're going to talk
about what's next.
10. Next Steps: The project for [MUSIC] this
class is to make one block. If you have already done
that, congratulations. This is a really big deal. I am super proud of you. From here, if you're
going for practical, you can use the same sewing
method to make a pillowcase, or if you're going
for conceptual, you can buy a large frame
that is big enough for your block and frame it on
your wall as a piece of art. Or you can even use washi
tape to tape it to the wall. For those of you who are
curious about next steps, if you were to take your block and turn
it into a baby quilt, I'm going to speak
through some of the steps on a very high
level in this lesson. Each step I'm going
to mention in this lesson may take
hours for a first timer. In our resources area, you can download
a PDF guide that will give you some of
the basic instructions. If you are going to
make a baby quilt, you will need three kinds of fabrics and one yard for each. In addition, you will need
some fabrics for binding, which I will leave all
the specific measurements in our PDF guide. For the fabrics for our blocks, you will need to
cut all the fabrics into three inches strips. For the binding fabric, you cut it into 2.5 inch strips. We're going to use the second
method which is cut as you sew to finish
our baby quilt. If you look at the instruction, we will need 12 blocks, six of them are will
have darker frame, and six of them will
have lighter frame. I really recommend you to take advantage of the
coloring sheet so that you can use the actual colors of fabrics
that you have chosen, which will make your quilt
assembly a lot easier. You can just go ahead
and make six of darker frames and six
of lighter frames. Once you have 12 blocks, you can really play
with the composition. I really encourage
you to play with the composition so the
result looks more fun. Then once you are
done with the result, you can go ahead and put
all the blocks together using the same piecing
method that we have covered. Because our class focuses
on making one block, I will not spend a whole
lot of time or walking you through every single details
of making an entire quilt, but I will give you
a bird's-eye view of what are the next
steps, what to expect. Once the quilt top is made, which is all the 12 blocks
being sewn together, that is called a quilt top, you will need to make
a quilt sandwich, which is three layers of things. The top layer is your quilt top, and the second layer
is called batting. I almost always use cotton, and the third layer
is called backing. It's usually just one
single pattern of fabrics. Depending on the
size of your quilt, you might need to
put two pieces of fabric together of
the same pattern. The batting and the
backing fabrics are usually larger than
the quilt top. Maybe leave four inches
margin on all four sides. Sometimes things shift when
you are stitching through multiple layers so
you will not run out of the backing or the batting. Once you have the three
layers on top of each other, just use your hands
to make things flat to make sure you don't
have deep creases. Now the next step,
it's called basting. There are different
methods of basting. Some people use spray, some people use large stitches. I like to use pens
for my basting, and they're generally about 4-5 inches apart
from each other. The purpose of
basting is to prevent your quilt sandwich from shifting as you stitch
through three layers. Once you're done with basting, the next step is
called quilting. It is actually stitching
through three layers. Depending on the batting
that you purchased, it will ask you the maximum length between
each quilting line. Usually it's 4-8 inches apart, do not go larger than that. I like to have my quilt
lines really close to each other so that the quilt will not go undone after many washes. Once the quilting is done, you can use the
same cutting method to square off your quilt. This basically means
that you cut your quilt into a rectangle so that
you can start binding. The very last step is to attach the binding to your
quilt's rectangle. Like I said earlier, this is a very high
level overview. Speaking from my own experience, I'm not a very patient person, but I really enjoy
making quilts. It will be the time well-spent.
11. Final Thoughts and An Encouragement: If you have never
made a quilt before, this process can seem
really intimidating. I want to encourage you to just go ahead and
take your first step, and then the next step. Think about one small
step at a time. Don't think about a giant
quilt of king size. It is pretty overwhelming
to think big. This is a time between you
and your sewing machine. This is time to watch your favorite show or listen
to your favorite podcast, and just let your mind relax. My kids have never
complained that the stitch length is not
perfect on their quilts, or their quilts are buckled, or the stitches aren't straight. They have never
complained about that. If you were to come
to my house today and look super
close to my quilts, you will discover tons
of so-called mistakes. At times when you make quilts, it may feel frustrating to not have things look
the way you want them to. But really at the
end of the day, it is the memories that you made with the quilts
that matters. Don't let the voice of perfectionism stop you from
making your first quilts. In the next few minutes, I will share with you a
short interview that I had with the mysterious
six-year-old. I hope you find some humor
and encouragement there. What are quilts? They are things like blankets. What do you like about them? They are pretty. What's your favorite quilt? My quilt. Can you describe to people who can't see what
your quilt looks like? It's pink and white, and it has green and it
has some other colors. It's made of fabric. Does it bother you that the stitch length is not
consistent on your quilt? No. Does it bother you that some
stitches are not straight? No. What do you like about quilts? They keep you warm, but if you're not wearing
your short sleeve, it is a tiny bit cold. If you were to make
a quilt of your own, what does it look
like? Can you tell us? Pink. One last question. What do you want to say for people who are
scared of quilting? To try it, before you
say you can't do it.
 Esther Nariyoshi, Teaching Illustrator based in the US