Transcripts
1. Class Introduction: [No Speech]
2. Drawing the Simple Motifs: Here we are inside Procreate. Let's get started by
creating our Canvas. Hit plus and new Canvas. I'm going to go
with 4,000 pixels by 3,000 pixels with
the DPI being 300. It doesn't have to be square. As long as it's a rectangle,
you should be fine. Then once we're in, I'd like to turn on
the drawing guide, which will give us horizontal
and vertical reference. I'm going to turn it on, and you can also add
it your drawing guide. You can change opacity, thickness, great size,
as well as the color. You can just drag on slide. I'm going to hit done. Now I have some reference
on my canvas. I'm going to pick a
color that is nice and bright and a brush
that I like to use. I'll go with this
textured brush tip from my calligraphy brush set. The reason is that
it will give me a nice solid line without
losing the textures. You can pick whatever you want. I like to draw. I
feel like I have a tendency to tilt
upwards as I draw. So if I were to draw
a straight line, I will tilt my canvas instead because we
have the grade line, so I can still know
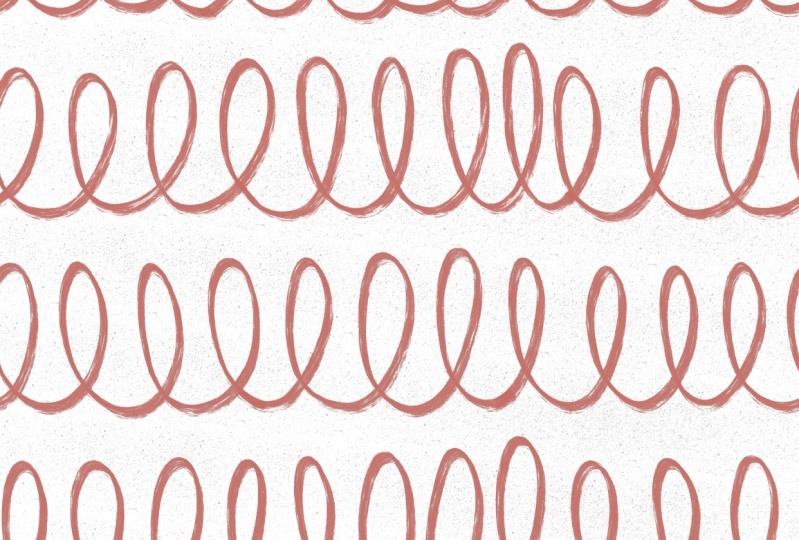
where the level is. I'm going to draw
a short squiggle. What I mean by short is that my squiggles head and tail will not touch the
edge of the canvas. I just do this. And I will stop short
just right before. I'll explain why later. Similarly, I'm going to do another one just
right underneath it.
3. Making The Repeating Tile: The secret of seamless
repeating pattern is that the left edge
matches perfectly with the right and the top matches perfectly with the bottom edge. We're going to do that
in our next steps. Over here, you can see we have our squiggles in one layer. I'm going to create
another one on top and then just drag and drop the
color to color the canvas. The exact color
doesn't really matter, but I do want to turn down the opacity so that I can still
see what's underneath it. This layer is more
or less of a guide. I'll show you in a second. For the next step, I'm going
to duplicate both layers, and I will move the motif just right in between the solid. If you look at
your layers panel, you should have a
solid layer motif, solid, and another motif. We're going to select both of the top layers and then
move them to the side. Tap on this arrow icon. And make sure you have
the snapping turned down. I have both of my magnetics as well as snapping turned down. I'm just going to use my
fingers to move it to the left and then select the bottom two and then
move it to the right. You should feel a snap
when the two edges touch. So I'm going to delete
these two solid layers because we don't need them anymore and they have
finished their job. And then we want to merge these two layers to
take care of the gap. Basically, what we
have done so far is to shift the whole
motif to the left, but by the exact size of
the width of your canvas. So now I'm ready to bridge
the gap between the two. I still have the right brush. I'm just going to
finish the loop, connect the left to the right. If you feel like your
angles are weird, you can erase it and then
draw again to smooth it out. Same thing here.
This is good enough. Maybe a little bit
too sharp here. I'm just going to finish the curve a little more
smoother. There you go. Now we know our left tile
exactly to the right. So the edges match. Now we're going to
use the same method to take care of the
top and the bottom. Duplicate the motif, and then create a solid layer,
lower the opacity, duplicate duplicate
the solid layer, and then move one of the motif
in between the two solids. Then we want to select
the top two layers. Typo selection, and
then just move up. The bottom two layers
and move down. Now we can delete our solids. Technically, we know that the left edge matches
with the right, the top matches with the bottom, and we can change whatever
that is in the middle. I'm going to scooch up this
squiggle line just a little bit because the gap between this one and the one above seems a little bit larger, selected, and move it up. Because the left edge and the right edge are
moving at the same pace. I'm not too worried about
the edges won't match. Then maybe I will select this role and then move
it down, just a tiny bit. There you go. I want to make sure the movement
is exactly vertical. Now we have a repeating
pattern of the motif.
4. Adding Background and Texture: If you want to be fancy, you can add a nice
background color. At this point, if you want, you can turn off
the drawing guide. I'm just going to turn it off, so you can see it
without the grid. You can even add some
sprinkles in between. Maybe I'll go with
this nice blue, and I'll choose something
that is very subtle. From the gentle speckles. There you go. It's
really, really subtle. If I zoom in, you can see the particle size
is really small. If you're adding
on another layer that has really big motif, and you want to go through the same process to make sure it's repeating left to
right and top to down. But because of my particles are really small for the
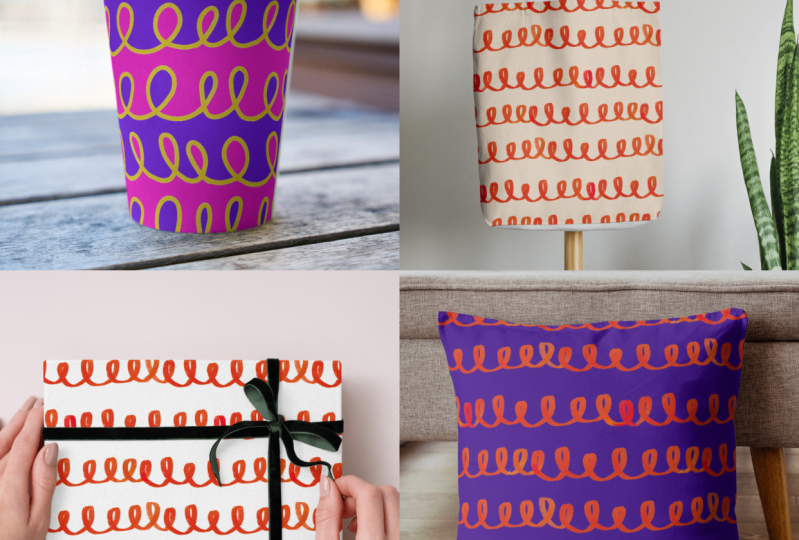
gentle speckles, I don't worry about a tiny one get cut in half by the border. For the next s, we want to share it either as a JPEG or as a PNG. And now, you got
yourself a pattern.
5. Test Your Patterns: In this video, I want to
show you how to quickly test your pattern tiles and save the preview
right on your iPad. First, you want to take
a screenshot of this, and then go to your photos app, either Lum press the URL
or Lum press this QR code, which will take you to
the default browser. If you have the P created open, you want to put it right
next to your browser. I have all my motifs
compressed into one layer, and I'm just going to
drag and drop here, right on the browser, and you
can adjust the scale here. If you like what you're seeing, you can also download your
preview right on your iPad. Just tap on this button, and you should be able
to either download or print by hitting
this share button. Don't forget to
bookmark this page, so you can come back to it whenever you're ready
to test a new pattern.
 Esther Nariyoshi, Teaching Illustrator based in the US