Transcripts
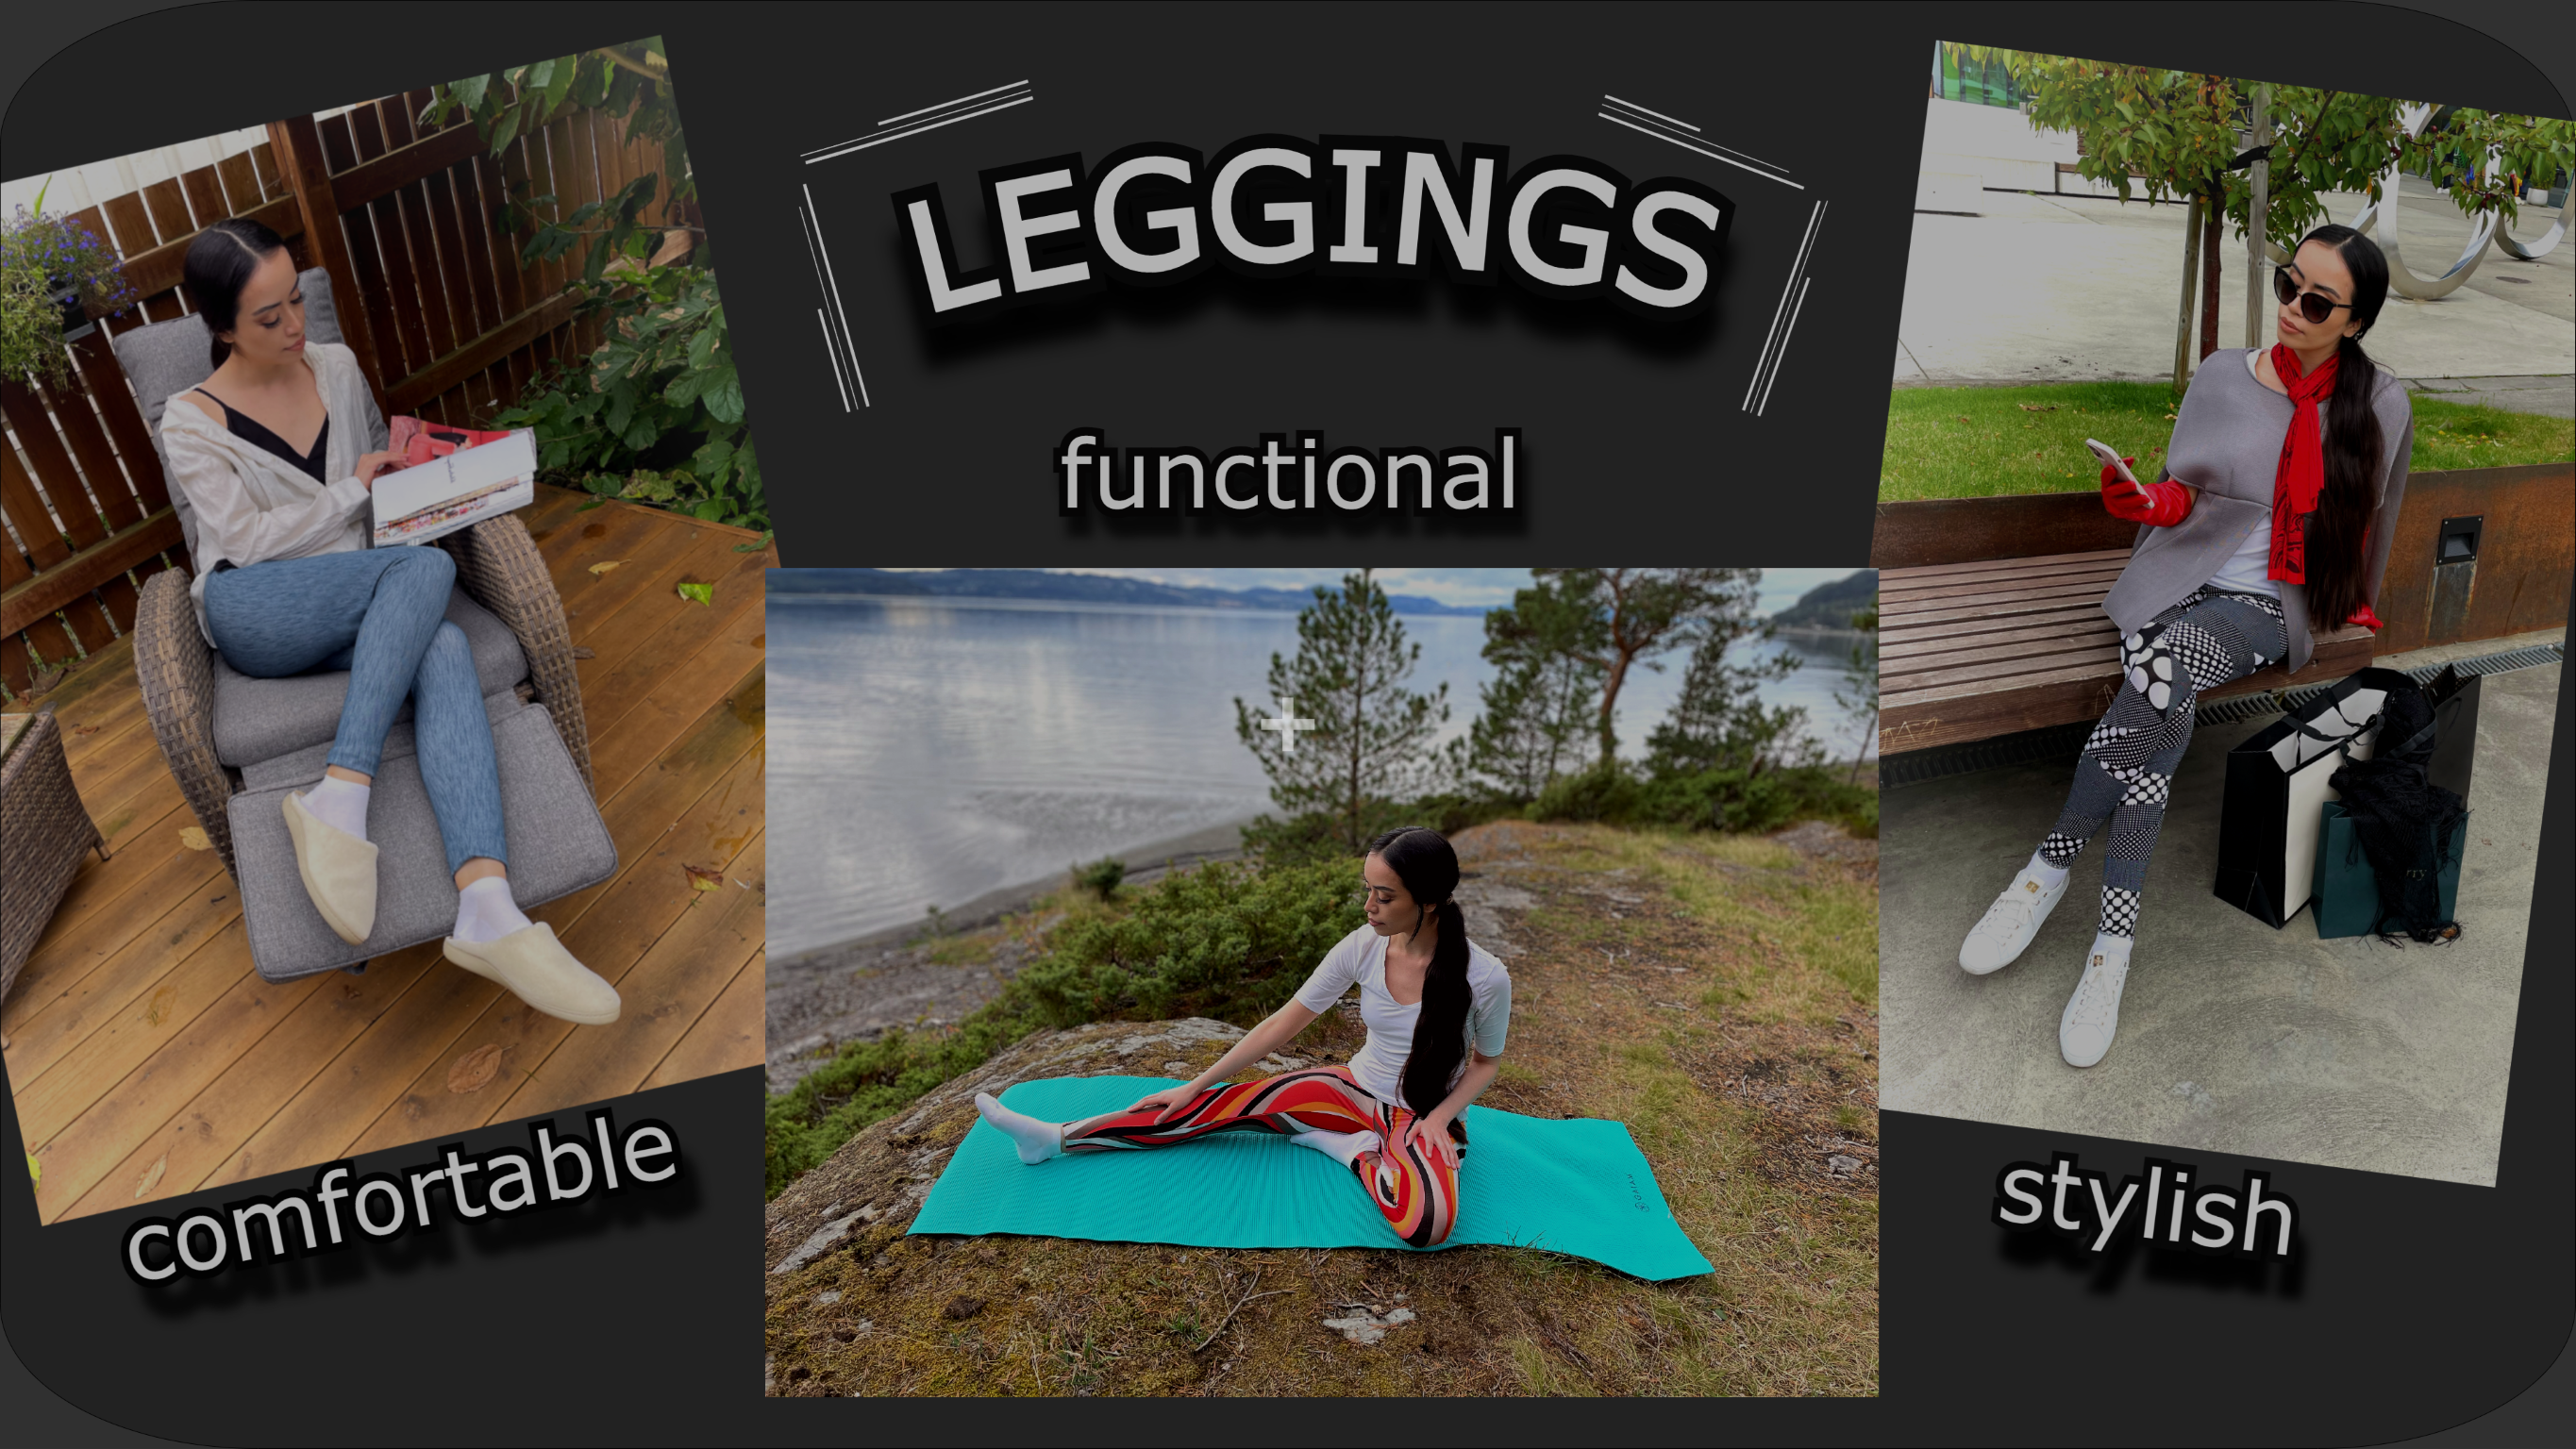
1. Lesson 1: Introduction: We are all unique and is crowded world living busy and changing lives. Many of us have to be in so many different places during so many different things in a single day. But still we want to look good and feel comfortable, no matter the situation. Is it even possible? Well, I found a solution that really works for me. I'm a freelancer and a mother of two very active kids. So mydata schedule can be quite hectic from having business meetings to take an extra trainings in your tutorials or sewing, or maybe the same day and with very little time in between. Vp suitable for all those so different situations with very small variations, yes. And my solution, if I just love them, they are so versatile and comfortable. I wear them daily and I can get enough of them. And they are so easy to, so it's crazy. I still remember my first pair of leggings. I was quite skeptical out and lay them it afraid that I would not be able to make them just because they look so well fitted. But after us, so my first pair, I became addicted to leggings and started to, so a lot of them in so many different fabrics from light Teddy him to bamboo, the body, yes, there were even very normal. And even now when I see a very interesting stretchy fabric, I make a pair of legs from it. It's so fun. And it's enough to change the top or the jacket and you end up with a totally different look. And it really doesn't matter your aim to resize or occasion. They can get a new one anywhere, anytime. In my opinion, they are one of the most versatile garment, functional and super comfortable. You can wear them with relaxant, bomb or walking your dog. They can be read a train, your well-being, out shopping or meeting your friends, and incredibly comfortable writing, training. No matter if you do some yoga or Pilates or just going for a brand, you just have to choose the right fabric that if presents the Dead Sea it. My name is Talia. I'm a fashion designer and the Sony instructor. And I want to show you today how easy it is to make a pair of leg use that actually fix you. No matter how much we saw before, how much or less experience you have with some tips and tricks you will be able to make this leggings little Baikal probe. The course has the beggining crews. It, I make this PDF pattern in 12 sizes from teenagers to analyse. I use my own side is charged, so it's easier to find your own size, no matter the continent you're living in. The only thing you need to know in choosing your size is your measurement for waistline and flips. This will make the fitting much easier. What do you do for this project? Who wells and definitely sewing machine. You could write without it, I will not guarantee a perfect look. Then fabric as true to one. Depending on your size, you will need 1.51 meters yards or so. You need some the elastic band on matching thread, stretched sewing machine, needle and good Caesar in salad deans. For the pattern. The, the printer to print it out some tape or paper blue and pen marker to make any adjustments. The adjustments if needed. But a little advice about the fabric. I always encourage my students to test the pattern and make all the adjustments using a piece of fabric. For example, you could use some old straight to bed sheets and long skirt or whatever is big enough to feed the baton. And very important in massless treated. Otherwise it would be very difficult where that. So make your favorite beverage, grab your things, and let's get started.
2. Lesson 2: Preparing the PDF pattern: cut & glue the general pattern, find your size & adjust the pat: We started this project with preparing the pattern. But before printing out all the 20 pages, please print first, just age 17. And so you can check if your printer is perfectly calibrated. To do that after printing the page 17 year-old, see a rectangle on the bottom of the page. So take a measuring tape and see if your length is 13 centimeters or five inches. If it is, then you're good to go. If not, take your printer settings, page size, which should be a four, and so on. When everything looks okay, print out all the 20 pages. On page 18, you have an overview of how your pattern should look like. It will be composed by three long rows of six pages each. So plays the pages in the right order from one to 6 first and start cutting. I recommend to cut just one side of the page and leave the next one so you have something to glue on. Try to match the small triangles and the pattern lines as precisely as possible. I also recommend using a tape instead of glue so you can easily remove it if you need to readjust the pages. This is how your first row should look like. And then the old three of them. Now take the first row and the cutoff just alongside that will be connected to the next row. Do the same with the second one. If you do it correctly, all the paid pattern lines should match perfectly. If not, remove the tape and reposition the pages. So in the end you'll have a perfect continuous line all around. Now. And the next step is to take your own measurements and adjust the pattern if needed. Take a measuring tape and a whole lid around your waist line just above the belly button. But don't pull too tight and try to breed our nature Early. My model has 74 centimeters for the hips, standing with your feet together, rub the tape around your hips and the round is part of your rear. Tried to hold a tapes trade all around. And of course take the measurements directly on your skin for a better fit. Okay, My mother has 88 centimeters. Now, let's identify your size. My model has 70 force in the members for the waistline, so I choose size number 4, and it has 88 centimeters on the hips. So I circled around size six. It's a very common to be in-between two sizes as this example. So we need to do some small adjustments. First, you should identify the color of your size. In my case, I have the green line for the hips and the blue one for the waistline. What they need to do is to make a smooth transition from the blue line to the green one. Drawing a new line that should be a little bit curvy. That's why I don't recommend you to use a straight ruler for this. Our bodies have curvy lines or pattern lines should be also a bit curvy. You can use a pen to do that until you are pleased with the final shape line. And then take a marker in the darker color to highlight your new pattern line. This way, it is much easier to cut precisely or size and not cutting another one by mistake. Believe me, it's very easy to do this mistake and a lot of people are doing it. So take your time and highlight all your new pattern line with a marker. If you didn't any adjustments, I still recommend you to use a marker all around your pattern size to avoid any mistakes. Try cutting exactly through the marker line that the pattern has 1.51 centimeters, meaning five-eighths of an inch sewing along ones included. So you don't need to add anything else. After cutting the pattern. It should look like this and it's ready to be used.
3. Lesson 3: Cutting the fabric: Now that we have finished the pattern, we go further to cutting the fabric. On page 17 on the bottom, you will see a rectangle which will help your testing how strategy or fabric is. If you don't have enough stretch, then your fabric will not be suitable for this project. So please times the fabric before cut it. Let's see how to do that. Hold the fabric like this, and then stretch it out to be suitable for this project in your fabric should stretch at least as long the rectangle is. If it's stretching even more than, it's even better. Now on page 20, you will find the cutting instructions or recommendations. So if your pattern is in-between size 19, then you can fold the fabric into, place the pattern on top. For a size 10 to 12, you will need to keep the fabric flat and content as shown in the picture. As my model is in-between size 46, I will fold the fabric. When you are folding the fabric tried to do it in half by holding together the bowl. Through ages, it is very important that the both ears of the fabric are perfectly flat on your surface with a no folds or wrinkles. Being a stretchy fabric, It's also important that a surface you're working on is big enough for your fabric. You work on a small table, then some corners of the fabric and hang over it and pull the fabric creating creases or distortion. So I would recommend you if you don't have a big table, just place the fabric on the floor. Much easier this way. Now that you have folded your fabric, place the pattern on top of it. You will see a transversal line where it says the most stretched this way. So place the pattern with that line across the most straight direction of your fabric. If you don't test this, you can cut the fabric wrong way and the legs will not be stretching off to be wearable. And then you're gonna see a long perpendicular line, which is called the grain line. If you're not familiar with this notion, that's okay. Just play the patterns so that line is parallel with the ROI edges of your fabric. To do that, take a measuring tape or a piece of ribbon or yarn and make sure you have the exactly the same distance between the green line and the voyages of your fabric. When everything sits perfectly put some weights on the patterns, start to paint around. Make sure the pattern doesn't move while you are doing that and the fabric is perfectly flat on the Earth's surface. Use as many bins as you want to secure the pattern on top of your fabric. But really, it's a known age exaggerate with this, I think it's enough to leave about 10 centimeters in four inches in between Europeans and try to place them around the age of the pattern. This way the paper will stay put much better while you are cutting the fabric and start cutting. Tried not to move the fabric wildcard in it. I did that just because of my camera angle, but I don't recommend it. If you use a Bigtable, just go around it while cutting. And same if you're using the force for this. After you cut around the fabric, you need to mark the notches. Then notches are the small v-shape symbols on the edge of the pattern that will help you match the pattern pieces. To mark them, just make a small cut in the middle of the V, but never cut further than that Lee, otherwise, you will end up with some holes in your project and we have monthly don't want that double-check that you made the marks through both layers of your fabric. And a 0.5 trillion mark, all the four notches through both layers of your fabric. Go ahead and remove gently all your pins. And we have finished the cutting part.
4. Lesson 04: One way of sewing the leggings (recommended when sewing for the first time): Let me show you one way of solving this leggings that I recommend you when sewing them for the first time. So after cutting around your pattern, you end up with 20 mirroring pieces of fabric. Take one of them, no matter which one and a folded into. Look for your notches, make sure they are perfectly on top of each other and puts your first theme there. Continue to Peano round, but check every time that both layers of fabric are perfectly flat and align. Again, you don't need to use a lot of pins just enough to hold the fabric in place. And we are going to so this line first. But before that, we didn't need to prepare our sewing machine because we are working with a stretch fabric. We need to use a stretch stage. The most common one though, that all the modern sewing machine have is this exact stage. I recommend you to try these settings first on a small piece of your fabric. And if you are not satisfied with the stage, you can readjust the settings. Now remember I said that the pattern has 1.5 centimeters sewing allowance included. Look on your sewing machine and see if you have any marks as I do. If you have, then hold the edge of the fabric right on top of that line while sewing. If you don't have any marks, you can make your own lawyer needle measure 1.5 centimeters or five eighths of an inch on the right side of the needle and draw a line on your sewing machine with a regular pen or a water erasable pen so you can clean away that line after sewing. But another method I recommend to my beginner students and one of their favorite is placing a colored tape instead of drawing a line. Guide you while sewing. It's actually much easier to have control this away by holding the edge of the fabric exactly on the edge of the tape. So no matter which option you prefer, just go on. And so that long stitch line on both pieces of fabric, exactly in the same way. Do the best you can take your time. And so as precisely as possible, double-check all the time that bold layers of fabric are perfectly aligned. And don't forget to lock the stitches in the beginning and the end by sewing a little bit back and forth, crowd the threads and check if you're a stitching line, it's still a stretch. A very important step in sewing is ironing. I recommend to do it after every stitch you make. These will give you that clean need professional look in everything you're sewing. So go ahead and and I were in your stitching line with steam if possible. The steam actually does the trick. It makes the threads and the fibers of your fabric to blend nicely. Now how do we treat the row edges in Reddit where almost all the clothes are finished with overlook stitching. But if you don't have an overall machine, you can as easily just uses the exact Caesar or just leave the edges like they are. Because stretch a fabulous don't necessarily need that final treatment. Okay. So you have so in a both pieces of fabric in the same way, pick one of them, doesn't matter which one and turn it inside out and then put it inside the other one so you can match the stitch line and the place up being the right through that stitches. Make sure you open a sewing alarms on both layers of fabric and place the penis in the middle as this. If you don't open the row edges of the fabric and you can get an uncomfortable bulk right between your legs, head, we don't want that. Then go on and paint around the rest of the edges as I do. When you do that, again, make sure both layers of the fabric are perfectly aligned on top of each other. Look up there, not just to end plays up in there. Now you can, so this new line around, again, remember it reinforced the stitches to lock them in the beginning and then at the end and hold your eyes on the sewing allowance, which should be 1.5 centimeters or five-eighths of an age. Double-check also that both layers of your fabric our line while soloing and remove the pins before they meet the sewing machine needle is just savor this way. Take your time and so the best you can, paying extra attention on the curvy side of the fabric bases. Goleta be slowly there just to be sure you are sewing with the exact sewing allowance all the way around. Cuda threads and iron that you stitch line, treat the role had j's in the same way as before with another log machine as six oxidizer or just leave them as they are. If you choose a single axes or trend not cut too closely to your stages, I would recommend to cut somewhere in the middle of the royal pages maximum five millimeters or a quarter of an inch away from your stitches.
5. Lesson 05: Sewing the elastic in the waist: Now the next step would be sewing the elastic band in the waistline. For a perfect fit, I recommend you to take some elastic band and wrap it around your waist line. Tighten it to be a little close to your body but not too tight. It should feel comfortable. See that I'm overlapping the edges of the band because we need some sewing allowance. Take the elastic band and make a circle of it holding the same amount of overlapping as you had on your body. Play some pins to hold it in place before sewing. This time I adjusted the sewing machine with a wider is exact, but you can keep the same settings as before if you want. And so the voyage is, it's more secure if you so to rove stitches and the ends of the elastic band will sit more flat this way. Remember to lock the stitches again by sewing a little bit back and forth and stitch it should look like this, quite strongly locked. Now we need to divide the circle in four equal parts like this. And you can put some pins or just a market with a pen. Usually the elastic circle is smaller than the upper parts of the leggings. And the idea is that the elastic band should fit in DNS, the circumference of the leggings or waistline. Okay? So we marked four equal parts of the circuit. Now, take that leg ends and take out the leg you put inside of the other. Remember that we are sewing on the wrong side of the fabric. So be careful and do not turn the whole leggings with a right-side up. They must remain with the wrong side facing you. Now we have to divide the upper part of the leggings two into four equal parts. To do that, plays the both stitches perfectly on top of each other and then make a mark or put a pin like this on both sides. Take the elastic circle and place it with the stitches on middle back like this and then match the rest of the pins or marks. Don't remove both beans in the same time. You use the pain from the elastic, for example, and place it on top of the pin that divides the fabric. Be careful and hold the fabric flat around the elastic, so the dividing points are matching. Use as many pins you like to hold the elastic on top of the fabric. You might need to stretch the elastic a little bit to fit the whole circumference of the upper part of your leggings. Before starting to solely elastic, I would recommend you to change the settings on your sewing machine a little, increasing the width of your zigzag. This way it will look much better and the elastic will be more stable inside the leggings. Try to so as closely as possible to the right age of the elastic band. You might need to stretch the elastic while sewing, but try not to stretch the fabric under. I know it sounds difficult, but do the best you can. Remember this is your first pair of leggings and you are learning right now. So with practice comes perfection. Take your time. We arranged a fabric under the elastic and held the sewing machine to do his job. But pulling the elastic and fabric gently towards back. Keep your eyes on the edge of the day elastic and try to hold it align with the fabric. It's okay. The fabric will show a little bit under the elastic as long as it is not so much. I would say to three millimeters or 1 eighth of an inch would be a maximum. When you are approaching the middle front and back stage line. Slowed down and rearrange the sewing allowance. Those row edges of the fabric must be wide open under the elastic band, the final elastic case, or will it just look much better this way? Otherwise, you might get some bogs which are not so pretty. When you arrive to the point you start at the solid a bit over the first stages and go back on it. This way you have locked your stitches quite strongly. To make the elastic case it just fully elastic towards the inside of the leggings and put some pins to hold everything together. When you fold it to make sure that the fabric is perfectly flat and there are no wrinkles or creases. Put as many patients as you think you need. As long as the elastic case looks perfectly flat. Again, when you arrive the middle front and back stitch lines, open the sewing along before folding the elastic over them and place a pin right through the stitch line. Check again the elastic case to look nice and flat. Next, we're going to sew exactly on top of the previous stitch line, which means the left side of the elastic band. While you are doing that, keep pulling the fabric that is under the elastic so it stays perfectly flat while sewing. This is quite important. And many people make mistakes on this stage because if you are not careful, you will end up with some ugly creases on your elastic case which are widely visible. So take your time and so as nicely as possible. In the end, the elastic case should look like this and still be very stretchy.
6. Lesson 06: Adjusting the length according to your body: The final step would be adjusting the length according to your body. Let's see how you're doing that. Take the leggings and you unfold the edges as much as you like, you decide the final length. If you want them to belong, then they should stop on your ankles. But many people like to have them much shorter above the n goes. When you are satisfied with the land, put some pins and take that I can sit down and carefully so you don't miss any of those pains? Van measure up. How much did you fall inside and not it down. This would be your Soyinka loans for the hub. Now you can remove the pins and turn the leggings inside out because we are working with the wrong side of the fabric up. So fold again the ham and remember to open the sewing allowances. So when you do that, take a measuring tape and measure up exactly how much you fold it before and paint around. Make sure the haem is even by measuring the same folding allowance all the way. You use as many patients as you like, take your time because this step is also important if you want a nice and even ham, to make the job even easier, take your Iran and press the ham with some steam if possible. This one to make a nice crease on the edge of the ham and also makes the fabric to sit nicely folded. For sewing the Hamon, I would recommend this settings on your sewing machine is so your hand would it be stretching off? If you're a sewing machine that has the free option, go ahead and use it remote storage box and put the fabric around the free arm, which will allow you to stitch the area cylindrically. Depending on how much did you fold it, you can decide the distance between the edge of the ham and the stitch line. I would recommend a minimum of one centimeters or three-eighths of an inch to maximum 2.5 centimeters or one age. After deciding that, tried to sew around as even as possible and check that the sewing allowances open flat under the fold log of the stitches and cut the threads. You're a ham should look like this and be very stretching. Take your Iran and press the ham again with some steam to make the stitch line nice and smooth.
7. Lesson 07: Another way of sewing (tip for making a perfect hem): Let me show you another way of solving the ham. But for this, you need to know already how much you will fall the hand before starting to saw the leggings. So take the initial piece of fabric that hugest finished cutting and prepare the ham during the fabric with the wrong side out foliage. As much as you know, you need measure around to have an even at him like this. Then take the iron and steam over to create a nice deep crease. Double-check that you have the same length all the way and start banning. Use as many pins you need to hold that folded edge in place before starting to. So the ham, I would recommend these settings on your sewing machines so your hammer will be stretched enough. Depending on how much you have folded, you can choose yourself the distance between the edge of the ham and the stitching line. As I said before, I would recommend a minimum of one centimeter or three-eighths of an inch to maximum 2.5 centimeters or one inch. After deciding that final guiding line on your sewing machine or make your own one, as I showed in lesson 4, and tried to so as even as possible, held the sewing machine in the beginning by grabbing and pulling threads towards back and pushing gently the fabric under the presser foot. Keep your eyes on your guiding line and the edge of the fabric white is sewing. Stop anytime you need to rearrange the fabric under the presser foot. And this is essential for having a nice, clean and professional look. You don't need to rush. Remember that this digital light would be quite visible. So do the best you can to make it nice. And even. Now, take your Iran and press carefully the stitch line with some steamed create a perfect straight ham that should look like this, straight and neat. After that, take the fabric and fold it into right sides together, meaning the wrong side of the fabric is facing. You. Hold both layers of the fabric perfectly on top of each other and start upping. As you can see, my first bin is very close to the edge of the fabric. That's because I want those two layers, the stay put while sewing. Continue to pin all the way up as we did in lesson 4. D4 is starting to so I would recommended these settings on your sewing machine. Now plays the fabric under the presser foot, keeping in mind how the sewing allows us, as in lesson 4, It's very important the way you start sewing now. So lower the presser foot and then the lower than needle with, which should go exactly through the edge of the ham. Whole died the threads and tall and gently towards deck while starting to so you don't need to lock the stitches now, we are coming back to this later. So keep sewing, holding your eyes on the edge of the fabric and the guideline to have a nice straight stitching line. After that, not that threads you have started with 23 times going to be enough. Then take a regular sewing needle threaded and make 23 stages to hide the threads into the sewing allowance. Gently pull the threads before cutting them. And your headline should look like this. Thank you for watching and please feel free to contact me if you have any questions. I'm here to help you hope to see you soon with new exciting projects. Bye bye.
 Delia Iorga, fashion designer & sewing instructor