Transcripts
1. Introduction: Hi there. My name is Chad trough Crippen. And you are watching how to rig an, animate a character inside of Adobe character animator. Now, Adobe character animator is an animation software that's unlike any other. You essentially can set up your characters to be controlled with a microphone, a web camera. Or you can use Dragon and other properties to control the character using your mouse and keyboard. You can even set things up so that they play live and you can add actions as the timeline is moving along. So you can create a play of sorts or a live action event using the software. Now, my specialty is more in just traditional animation. And so I don't really take advantage of those live features. But if you're looking to set up a character using this software to figure out how to lay out your layers as an example, or what to tag, or how to embed certain functions within others in order to get the software to recognize what you're doing. Then this is the course for you. And there is a little bit of a barrier of entry for this course. Not only will you need Adobe character animator, but to take most advantage of the software, it's also recommended that you have a web camera so you can control the action as well as a microphone. So that way you can automatically lip-sync and do other things that are tied to that voice functionality. So if you have adobe character animator or you're interested in the software and you don't know quite how to set up a character and you're looking for help, then this is the course for you. By the time you're done with this course, you will have a complete character rigged and ready to go. You can then from there, learn about behaviors and other techniques to enhance this further, which I will have a follow up course on here soon. So with that said, I hope you're ready because we're about to get started. And once you do finish this class, be sure to share your work with your fellow students. I love to see what you guys come up with, especially with all the creativity you can embed with this type of software. And so it'll be awesome to see that. And it'll be awesome to see others provide feedback on your work. It can help with the creative process as well. So with that said, I hope you're ready because we're about to start rigging our character in Adobe character animator.
2. System Requirements for Character Animator: When it comes to working with character animator, There are a few things you'll need to get the most out of your experience. First, you'll need a subscription to the Adobe Creative Cloud. This'll give you access to not only character animator, but Photoshop and other useful software for when it comes to working this way. The other thing that's recommended is a microphone and a web camera. You can control your character using these two devices. And if I come over here, I'm on the record tab. This is where you'll gain access to your camera and microphone panel. And if I click on this, it will detect the web camera, which I'm just using a built-in web camera for this. And you have your microphone down here. So you can see by turning on this web camera, we're already controlling the character in a variety of ways, and that can all be dictated. And we'll show you all that in this course. But also if I turn on the microphone, you'll see here now that he is talking based on the mouth poses I have provided in that rig. So right off the bat you can see the web camera and the microphone are big elements when it comes to animating inside of character animator. Now, the other thing you can do, let's say you have multiple devices. You can always come up here to your preferences. For the Mac, it's on character CC. I believe if you're on Windows, you'll find Preferences under the Edit menu. So I'll just go ahead and choose preferences. And here you'll see we have access to the audio hardware settings. This allows us to come in and choose which piece of audio hardware is being used to track my voice. You can see it's currently set to Built-in Microphone. And that's just a built-in hardware for the MacBook. But I could drop it down in shoes. My tutorial microphone that I'm currently using if I wanted to. So again, when it comes to animating and character animator, and if you want to have the most success, it's important that you have your hardware setup and ready to go before you begin the animation process.
3. Setting a Rest Pose: Now that you know a little bit about the hardware requirements, especially the camera and the microphone. I want to cover how to set a rest pose when working in the software. Now, I might not say this all the time throughout the course because it does become second nature when you're working this way. But you'll see here where we have the camera and microphone panel. It says, look at the scene panel, then click the set rest posed button below. So whenever you turn on your camera, it's best to set your rest pose and the rest pose as the default pose for the character. And it's best to always just follow the directions when doing this. So all I'm going to do is get my head into position kind of within that circle as you can see, I'm going to look at the scene panel, which is the center panel. And then we're just going to set our rest pose. So let me look. And now the rest pose has been set. You can see that the pupils are now acting a little bit differently hopefully before they're kinda glitchy, but now they're more in line. You'll also notice it's kinda hard to tell because the lighting on this particular shot, but I actually have red dots on my eyes, as well as my eyebrows and my nose and my mouth because it's tracking all of that now with the rest post setup. And so again, this is great if you want to have more control over what you're doing. And if you want those refined motions, be sure to set the rest pose. So that way character animator knows where to start.
4. Playing with the Sample Files: For this video, you have access to quite a few exercise files. And each lecture will have what you need for that particular step. But one thing I want to note, usually when I do a course like this, I will give you the file to start with at the beginning of the lecture. So I'll say I'm working off of 06 Chad character animator. And in my other courses, that basically means you're starting with the file, I'm starting with, and you get the follow along. But because character animator likes to auto save every step, it's a little bit harder to do this. And so for this particular course, any of the exercise files I have open will always show the final result of that step. So if I say open up 06 and let's start building. If you open up 06 on my files, you're going to get the final result of 06 versus the start. And so if you really want to have this offset so that it works, you can always just go back to the previous file and then fall along that way. Also note, you might be able to backtrack through my history and dissect all the steps that way as well. Ultimately, I want to give you the best chance at success. And so I tried to split everything up into as many files as possible, including the PSD files. I tried to do different phases of the rig even though if you were working in real life, you might just override all those settings on one PSD file. So anyway, there's a lot here and hopefully it will help you out as you learn the software.
5. Designing Your Character: For this video, I am working on my iPad Pro. The reason is because whenever I design characters or even props and backgrounds, I use my iPad to do the artwork. And so when we talk about rigs, I'm going to go from the standpoint of your bringing this over from another application, such as procreate or really anything that you can draw and can be used to create your rigs. The ultimate goal you have to keep in mind is you need to get this file either over to Photoshop or Illustrator. Just as long as you're able to do that, how you actually design the character is completely up to you. And again, in my case, and in the case of the people I work with, we love designing and procreate, which is an application specifically for the iPad. If I come over here to my drawing folder in tap on that, you'll see I have procreate within the list. So I can tap on that to go inside. And here you will view the character we're planning to use for this course. Now, with procreate, you can design using layers, which we have plenty of, and how you design your layers and how you situate them does come into play when rigging. And we're going to cover that more in the next video when you get your items over to Photoshop or Illustrator. But here I just want to show you what a structure can look like when you're designing in procreate or another application before bringing it over to streamline it for character animator. You can see under my layers, I have a group labeled Chad, and under that we have heads. And then we have all these main body pieces. So we can go through here and see we have different hand poses and all sorts of different interactive elements that we can add to this rig as we bring it into character animator. And it's even set up for the head turn because we have three different head phases we can implement in and that can be tracked using our camera. And one of these also has phonemes built-in right here under mouths. If we tap on that and move down, you'll see we have phonemes here ready to go. Now once again, the way character animator tracks phonemes which are called wisdoms, I believe in character animator, it uses its own naming system. And the same goes for everything. The way character animator will interact with your elements just depends on what you assign. But just know if you do have your own naming system for the mouths, you will have to get familiar with the VCM system in character animator, you'll have to maybe assigned certain things or double up on other items just to make it all work. But again, we'll get to that here in a moment. So anyway, the point of this video is just to show you, you can design your character basically any way you see fit. And once you have it set up, you'll want to come over here. In the case of procreate to the Action menu. And then under share, we'll want to tap on PSD. This can take a moment depending on how big the file is. And once you get the setup, you have the ability to save it. If you have your computer on AirDrop, you can also just drop it right over to your computer. And you can also of course put it into your iCloud files Dropbox. However, you have your file set up on your iPad. So in my case, I'm just going to save to files and we'll put it inside of our tutorials here. So I'm just going to come down here to my tutorials under Udemy. And I'll just put it in there for right now. And of course, this will be a work file for you to access as you continue with this course. So with that said, we'll pause and I'll see you in the next video.
6. Combining and Streamlining Layers: For this video, I am inside of Photoshop working off of a one, chad start dot PSD. Feel free to open up this file if you wish to follow along. What we've done here is simply opened up the PSD file. We export it out from procreate In the previous video. And so here, when we look at the layers, we're going to see everything intact. And this is great because it allows us to design the characters the way we want. Group everything, and isolate important parts. And then we can reassemble inside of Photoshop so that it's easier to work with in character animator. So the first thing I wanted to do is look at the heads. You'll see that the way this was designed and this was brought over from another artist. And this might be something that you will encounter when you are working with other artists. They might not be as privy to how character animator functions. So you might be required to go in and make changes. So here we have three head phases for the side, front in three-fourths. And you can see it looks like this. And that's great because character animator allows us to implement head turns. But for the sake of what we're doing. And to keep things easier, I'm going to remove two of these head poses to start. So that way we can focus on the other parameters of this character. And then we will implement head turns later on so you can understand how all that works. So all I'm going to do is select both of those and then choose to delete them by hitting the delete key on the keyboard. So now we're left with head three-fourths. I can come in and just double-click on that and rename it to head and then hit Enter. Now we'll take head and bring it above so that it's inside the main chat group folder. And then we can click on heads and then hit Delete on the keyboard to remove it. So now you're left with the new folder. And inside that folder you're going to find your eyebrows, eyelids, pupils, eyes, and hair. Underneath that, you'll find mouths. And these are all the phonemes or visit comes as character animator likes to refer to them that we can use to automatically lip-sync. And then down here we have what is called head three-fourths. I'm just going to double-click on head three-fourths right now and rename that to background. And then hit enter. Now, we will have to modify how these layers are going to function. And we can do that in the next video. I'm just going to collapse that folder for right now. And we'll come over here to the other folders. So here you have front hands and we can enable a swap set inside of character animator for us to switch between hand poses, which is great, and that will work for our purposes. But once again, we're going to have to set this up a certain way so that it's easier to work with. So to begin that process, let's create some groups for our limbs and for the body. I can collapse back hands here just so I can see all the main layers. At the top, we have front arm and front hands. And then we have front foot, front leg, body, back, foot, back leg, back, arm, back hands. So to start, we're going to click on front arm holding Shift, and then click on front hands. And then just come down here and click on the group button to group those items together. For right now, I'm just going to come in and rename it to front arm and hit enter. And you'll see if we expand this, that we have those two layers inside. So now I'm just going to keep going. We'll, we'll go with front foot and front leg. Create a group. Double-click to rename it to front leg. And then we have the body, which I'm going to put into its own group. But let me just move on for right now to back, foot and back leg will select those, group them together and name it back leg. And then you have back, arm and back hands. Group that and name it back arm. So there you go. Then you have your back hair and back hair three-fourths, which can't go inside the head group because if we were to do that, it would overlay above the body. So if we go like this, you can see it's going to look like that. So we might have to do something with that, but for right now we're just going to leave it. And we'll see if we can work with it inside a character animator. Nonetheless, thing I'll do before we wrap up this video is click on front arm holding Shift, and then go all the way down to back hair and click on that. And then come down to the group button. Create a group double-click. And we can rename it to body and then hit Enter. You can keep the background data if you wish. While we work in character animator, you can turn it on or off. Ultimately, it's up to you. But for now we'll leave it in in, I might end up removing it near the end, but it also allows us to see the character easier as we work. So there you go. We've gone through the process of starting to streamline or layers. There is more we can do, but for now, I'm going to pause and up next, we're going to continue modifying this character in Photoshop.
7. Creating Independent Groups: For this video, I'm working off of O2, Chad independent groups dot PSD. Feel free to open up this file. We're now going to take this to the next step and start labeling certain layers as independent and grouping further so that character animator will have an easier time with everything that we are assembling. So the first thing I want to do is come up here to my layers. And you'll see we have the main layer, which is Chad. If I double-click on that, I can rename it. And I want to come over here to the beginning before the C and put down a plus sign and then hit enter. So why did I just do that? Well, whenever you put a plus in front of a group within Photoshop and you intend to bring it into character animator. And this also applies for illustrator. It will target that group as independent in character animator, which means it's going to animate differently. It's not going to be attached to the main layer. However, it will still have influence. And it allows you to target specific body parts that make them look more natural, essentially. Now, you can toggle this on and off inside of character animator. But I feel it's important to show you how you can do it all. And so once we get to that phase, I'll remind you that again, adding the plus sign is the same as toggling it on and off in character animator. So you also have some other considerations to make when doing this. For instance, if you want to control the eyebrows and the pupils in the blinks, you need to set those up differently as well. Here we have the front eyebrow and then you have the back eyebrow, which is essentially the left eyebrow and then the right eyebrow. So what I'm going to do is create a group and we'll name it plus right eyebrow. And we'll do a second one. Double-click plus left eyebrow, and then hit enter. So once again, here is the right eyebrow, which is front eyebrow, will just click and drag and put it into that group. And then you have back eyebrow or left eyebrow, which we'll go into that group. So now you have something that looks like this. And we need to do the same for the eyes as well. So we're going to have to do this a couple of different things here. So you have your eyelids separated out, which is good. And we will use this as we move forward. We'll also have to create a blink phase. So we have that, but then we have our pupils on the same layer, as well as our eyes. And what we need to do is separate out these two so that we have the left pupil in the right people and the left eye and the right eye. And that's pretty easy in this case, since they are separated in it will allow us to easily select. So let's just start with pupils. I'll click on that and then come over here to your selection tool. And I'm just going to click and drag on any of the pupils so that it's selected. And then use Command X or Control X if you're on Windows. And then to paste in place, use Command Shift V or control shift v if you're on Windows. And now I can come in and rename this one too, right pupil or R-dot pupil, just temporarily. And then right down here you have the left pupil. So we'll come in and rename that to L dot pupil. Then I'm going to create two groups. Will put left pupil into one, right pupil into the other. And just so we don't get confused, we're just going to double-click and rename group to, to write i with a plus in front of it. So right i and then hit Enter. Come down here to group one for left eye, and of course rename it to plus left eye and then hit Enter. We'll have to do the same for the eyes. So click on the eyes layer and then using your marquee tool does come in and select one of the eyes and then use Command Z or Control X if you're on Windows, and then Command Shift V or control shift v if you're on Windows to paste that nu i. And once again, this will be the right eye. And I can just name it right i for right now, or r dot I, just to stay within my naming conventions. And we will rename eyes then two l dot i, just like that. So then we can take R dot i and bring it into the right eye layer just like that. And then left, I can do the same. And we'll want to make sure that the ordering is correct. So I'll bring left eye down like so, and then write I down like so as well. So this is starting to look better. We do have some more work to do, but I will pause the video here and up next, we will keep working with this Photoshop document.
8. Assembling the Eyes: For this video, I'm working off of O3 Chad building iss dot PSD. Feel free to open up this file. What I'm going to do now is build the eyes up more so that they work in line with character animator. You can see we started this process by putting in the right eye and left eye folders and making them independent with the plus sign. We now have to go through this and add another layer to each eye. The eye is act as a switch of sorts. Whenever you blink, it's going to switch to a blink phase. The pupil will track the actual pupils on your face and move around. And so you'll have to target those as independent since there'll be moving separately from the actual I layer. So I'm just going to come in here and renamed some of these things. We'll start with the right eye layer. I'm just going to rename it to write eyeball and then hit Enter. And then coming up here to the pupil, I'm going to hit the plus sign and then type out right pupil. So now that will be independent and it will allow us to control it with our eyes. And then we're going to need the blink phase. But let me come down here and also rename these items on the left i, so plus left pupil. And then we have left I. Now let's go through and create the blink phase. So first I'm going to locate the front eyelids. And we'll start with what will be the right eye. And I'm just going to duplicate this layer. And to do that, I'll just click on the layer and then use Command C, Command V, just to copy and paste quickly. And then I'm going to bring the front eyelids into the right eye. So the Blink phase is going to be ONE thing. And I'm going to zoom in by holding Alt and then using my mouse wheel. And what I wanted to do, since the eyelids or on its own layer, is I want to create two separate layers for this. So we'll be using the same method we used before where we select part of the layer. In this case, I'm just going to select only around the top eyelid on the front eye lids layer inside the right eye. And then we'll use Command X or Control X if you're on Windows. And then Command Shift V, or control shift v if you're on Windows to replace the lid. So now you have those two lives separated out. Now, I'm just going to come in and we're just going to do some basic editing here to make this lid look like it's blinking. Starting with the top lid. I'm just going to nudge this down a little bit like so. And then we'll come over here to the other lid. And just bring it up a little bit. I'm going to have the top lid go down more than the bottom lid going up. So we'll just come in and we can kinda come down like this. So it looks something like that. So now making sure we are on the appropriate layer, I'm just going to grab the eraser. And we're just going to come in here and just shave this off a little bit like so. It doesn't have to be much, but just a little bit like that. And then we'll do it on this side as well. So just kinda looks like that. So if we were to hide these other items such as the I, you're gonna see it looks like this and it's looking pretty good. Of course we could go in and do some more things with that, but I think it'll work for our purposes. So with these two layers, I'm going to click once on front eyelids holding Shift, and then click on layer one, right-click and then go all the way down to merge layers. And this will put that on one layer, as you can see. And I'm just going to double-click on layer one and rename it to write, blink, and then hit Enter. Now, since these eyes are similar, when I'm going to do is just copy and paste, right blink. And then we're going to bring it down to the left eyes group. Then using the transform tool, I'm just going to come up here and move this over like so. And using my arrows, I can nudge it into place. And then using Command T or control t to transform. I can come in here and just shrink this up a little bit so that it fits within the eye. And doesn't have to be perfect, but that's pretty close. And then we can hit Enter. And I would say that's looking pretty good. So now you have your eyes set up for blinks. The final thing you'll have to decide is if you want your eyes by default to be completely open or if you want them to have their eyelids. I think in this case, I'm just going to keep the eye is completely open without any sort of eyelids in place. And that will just be easier for controlling my eye gaze. But we could also experiment with adding eye lids in if we feel it's needed later on because we can always come back to this. So for right now, all I'm going to do is just make sure that these eyelid layers are out of the equation. And I can do so just by clicking and dragging and putting them outside where the background is. And we'll just keep those hidden. And if at any time we need them back, we can always refer to them. So there we go. We now have the eye blinks in place and our eyes should be set up for animation inside of character animator will pause the video here and up next, we will set up the eyebrows.
9. Assembling the Eyebrows: For this video, I am back in Photoshop working off of O4, Chad building browse dot PTSD. And here we're going to create three phases for the eyebrows, similar to how we created three layers for the eyes in the previous video. So looking first at the right eyebrow layer, I'm just going to come in and drop that down. And we'll see we have in here are eyebrow and if I hide it, you can see it's right there. What I want to do is double-click on that layer and rename it to neutral. And then hit Enter. We can re-enable it and we can see it. What I want to do is create three phases for each of these. So we have neutral, angry and worried. So what we have going on with our eyebrows right now is pretty neutral. And I'm just going to leave that as the neutral phase. Next, we're just going to copy and paste a new layer in double-click and we can rename it to angry and then hit enter. Let me hide the neutral eyebrows so it's easier to see here. And I'm just going to zoom in by holding Alt in using my mouse. We'll now on the angry eyebrow layer, I'm just going to use Command T. And we're just going to rotate this. And since it's angry, we're going to rotate it down like this, about 25 degrees. And then we can move it down a little bit like so. And you can also, if you want to work with the shape of it, you could change the shape of it entirely. You could do all sorts of different things. It just depends on how you want to approach it. In this case, I'm just going to go with a simple change and leave it at that. And I want to come down now and do the same thing for the left eyebrow. So first I'll double-click on back eyebrow and rename it to neutral. And then we will copy and paste and then rename this one too angry. And then we will hide neutral. And then we'll use Command T once again to transform. And I can rotate this down again about 25 degrees. And then we can bring it down like so. Position it like that. And then hit enter. So now you have something that looks like that and that looks more like an angry pose. And again, as we work with character animator, it'll actually track your eyebrows so you can have him look angry or worried depending on what your eyebrows are, the actors eyebrows are doing. So we're just going to do the same thing for worried, except in the opposite direction will be moving those eyebrows. So once again, I'm just going to copy and paste my neutral position. We'll rename it to worried. And I'll start with the right eyebrow for this. And we're just going to grab this and rotate it and the opposite direction. So it'll kinda go up like this. And we won't go as far. We won't go 25 degrees, maybe close to 13. And then you can raise it up a little bit. Perhaps like that. Maybe just bring it back a little bit. So something like that should be fine. And then hit Enter. And again, just come down here to your left eyebrow. We're just going to come in and repeat that process so that we can check this out and see how it looks. Just rotate it like that. And then you can bring it over and just try to match it as close as you can with the other eyebrow. Hops down a little bit like bat. So does rotate it and try to match it with the other eyebrow. There you go. So you now have your left eyebrow and you're right eyebrow. And each of them contained all three poses that you'll need for when it comes to animating expressions inside of character animator.
10. Overview of the Rig Tab: For this video, I am inside of character animator, and I'm looking at the Start tab. When you open up character animator for the first time, chances are you'll end up here. And it's a good place to start if you are new. And if you're looking for more help, Let's say you're working with my course and you want just a little bit more. You can come down here and look at these template puppets. And you can follow the directions on these replacer items and then you can have a working puppet in no time. But hopefully what I show you here will also help. When you create your first puppet. The thing we want to do is come over and click on the new project button. This will allow us to create a new project and I'm going to add this project to my tutorials. So I'll come down here just by my Udemy folder, go into my exercise files and we're just going to name this one 06, chad, character animator. And then I will hit enter. Once the file is saved, you'll be brought to the record panel. Now the record panel is where you animate. And so it's kinda weird that it brings you here immediately since we don't really have anything to animate with. So we're going to forget about the record panel for right now and simply jump over to the RIG tab. Here is where we can set up the rig. We can bring in our Photoshop document, start tagging, adding handles and behaviors, and whatever else we want to do before we jump to animation. When you're on the rig tab, you have access to a few different panels. The project panel triggers in history, the puppet panel, and then the properties. You will first want to start with the project panel because we need to bring something into work with. Use command I or control I. If you're on Windows to import. And I'm just going to jump over here to my exercise files. And we're going to locate O5, Chad ready dot PSD. That's a file we created in the previous section. And we can go ahead and click import. This can take a moment, but once it imports, you'll see we have the name of the file on the project panel, and it has a puppet icon next to it, indicating that this is a rig. You'll see now, once we click on this item, we get access to the Properties panel. It shows us the puppet location. So if we click on this, it'll bring up the PSD file. And then we could go in and make alterations if we wish. We could also change the source of the file. Let's say you update the file when you want this file separate from the other, you can click on this and relocate that new source file. Now, if you plan to work with the same file throughout, you can turn on auto sync with artwork, which allow you to make changes in Photoshop or Illustrator. And then those will update in real time once you've saved those documents. So you can work seamlessly between Photoshop, Illustrator and character animator. Having them both work together so you can create the perfect REG. And then you have your puppet mesh, which allows you to view the mesh shape and change the shape as well as adjust the expansion. And we'll get more into that as we continue. And then on the bottom you have behaviors. Once again, we'll get into that in a separate section. So to do anything with this puppet, you'll need to double-click on it. So double-click. And it's going to bring up the puppet than on the interface. Here. If we move to the puppet panel, you'll find that we have our layers, just like they were inside of Photoshop. The only difference is there's no plus sign next to the names that we assigned. That's because the plus sign is now the crown. And you can see we have a crown on chad because we added a plus sign to Chad in Photoshop. And if it come into the head, you'll see that the eyebrows and the eyes are also independent. So we can go through and click on any of these layers. And it's going to give you different properties. So the Chade-Meng group layer won't give you much else except for some transformation Layer Properties. You'll see right here. And you can come in and adjust the location as well as a say's rotation, opacity and even the blend mode of the rig. So this works again based on the layer that you have selected. Let's click on the head and let's say for whatever reason you decide that you want the head to be bigger, you could go back to Photoshop and enlarge the head. Or you could come here and just quickly enter in the values that you want. Change the size of the head to whatever you want. And then you can then grab it and move it around, reposition it, get it where you need it to be. And it's cool that you can go through that process and rearrange outside of Photoshop. So really you do have options when it comes to making those changes. I'm just going to go ahead and use command Z to undo until I get back to the original position. We also have some independent options right down here. And we'll cover that as we continue. Again. We talked about independence with the crowns and the plus signs, and that will all soon make sense as we start to touch more on that. And then when you select a layer, depending on the layer you have selected, you can come down here to the tags. And this allows you to assign your different body parts. So for your eyes, your blinks, your eyebrows, your face, your mouth. And we can even assign the head turns and the mouth poses are the victims right down here. In addition to any body movements for like a walk cycle. And then we have physics and modifiers for our handles. And then we have our triggers and behaviors below. So again, there is a lot here. Hopefully you're not too overwhelmed yet. We are going to break this down piece by piece. Just know that this is how the rig panel works and all the information for the reg you need is here. One final note. You'll find your tools on the bottom. So here we have the preview of the rig of course. But on the bottom you have your selection tool, your hand tool, your zoom tool, and then all the handle tools you'll need to modify your puppet. And when it comes to your layers, you have a bird's eye view of how many handles, behaviors, and triggers are assigned to each layer. And again, all of that will make more sense as we continue. But that is a basic overview of the rig panel. Hopefully by going over this video, it'll help you when it comes to navigating the interface as we start to build this puppet.
11. Exploring the Record Tab: For this video, I'm working off of 07 Chad character animator. Feel free to open up this document if you wish to view the result. I now want to jump over to the record tab and just briefly show you what that is all about. And again, we will go over all of this in more detail. But I think it's important you understand the basics before you dive in. So once you've rig, you can go over to record, which is essentially the animation phase. Here, you'll have access still to the project panel, as well as your history, the timeline, and he controls you set up, and then the properties, and then a camera and microphone. Because with character animator, you can control your characters with your face and voice. Right now, you're not seeing anything. The whole thing is blank. And that's because we need to create a scene. Once you finish your puppet, or at least once you get to the point where you want to test it out or try out different features and record. Just come over here and click once on your Puppet, and then come down and click on add to new scene. This will create a new scene and place your puppet inside. And this can take a moment depending on how complex things are. So once you have it in, you'll see we have access. Two more options. So once again, now looking at the project panel, we have a scene in addition to a puppet. And you can tell the difference between the icons and of course the labels. But also we have a timeline. And we have our puppet on the timeline, which means we can add multiple items to the timeline. And once we start to animate out, we can drop this down and gain access to all the subcategories of animation. So we can control the eye gaze, the head positions, the phonemes, all that can be broken down after the fact, and that will be on the timeline. And he controls you. Setup will be accessed here so you can control the puppet in real time as we animate on the timeline if you wish. And in the middle, you have your seam panel, which of course previews what's going on. And then you had your timeline controls so you can play what you've done so far, which we have no animation. You can stop it. You can go back one frame and you can also rewind to start. You can change the playback speed and hitting record will record any animation that you plan to do with your camera or your voice or whatever you do with the controls. And then up here, we have our camera and microphone. You can turn this on or off at any time. And I know I touched on this a little bit in the intro, but once again, just turn on your camera and you can see it works right there. My cameras little bit lower, so I have my monitor up here, so I might be looking up here more. But as you can see, as I'm doing all this at the puppets are already starting to move. Now it's not perfect. We already have a glitch with the eye. That's probably due to how I named somethings. We also have just some other things not working quite how we probably wants. And that's completely normal when you get a puppet and it's not going to work right, right away. And you can also turn on your voice, which if you have any phonemes mapped, it should pick up your voice and then the character should talk. But again, we need to get to that point. So I'm just going to turn those things off for now. And on the bottom here, you have access to your scene properties. So if we click on the puppet, you'll see we get access to the behaviors for that puppet. Again, we'll talk about that. But if you click off so that there's nothing selected, you get access to the scene itself. So here you can go in and enter in your values that you want for this project. And I'm just gonna do this right now. I'll come in here and enter 1920 by 1080. And it's going to make this a 1920 by 1080 production so that it's an HD quality video. You can also increase or decrease the duration, and I'm not sure how long this is going to be yet. It will also automatically update as we add different audio and stuff that can track that. And we can change the frame rate as well. But in this case, I'm just going to leave that 24. So now, when it comes to the rig itself, we could click on this or come down here and click on the puppet on the timeline rather. And then come over here and you'll see we have our scale under transform. I'm just going to bring the scale down so that it fits within the tin ATP composition. So that way as we continue to work, nothing will be cut off. And you can also resize as I showed you in the rig panel. And you can do more specific layer transformations that way. Here we're only controlling the main rig and it's only being affected during the animation. So there you go. That's a little bit about the record panel. That way you can navigate it a little bit easier. We'll pause here and up next, we're going to jump back and start building our rig.
12. Tagging the Head and Mouth: For this video, I'm working off of 08. Chad character animator. Feel free to open up this file if you wish to see the funnel result. We now need to go in and start tagging the rig. And this essentially means we need to pick out the layers and the pieces of those layers and assign them to certain behaviors. Within character animator. You can automatically do this while designing your rig by renaming your layers, certain names. And we already started that process in the previous part. As an example, we have a group called head. If I come up here and click on head, we're going to bring up the properties. And if we come down here to tags, you'll see we have that diagram of the face. And notice how the outline of the face is in blue. That's because we have the head selected and because we named it head. Character animator knows to take this layer and assign it to the head. The same goes for your eyebrows. You can see it's highlighting the eyebrow here, and then the left eyebrow, your right eye, and then your left eye. The only problem though is when I set this up, I did it differently than how character animator like subtract it. You see, I put right eyebrow as the eyebrow that we're seeing it, it's on the right side of the screen. But character animator thinks of right eyebrow as the characters right eyebrow. So I could go in and just adjust this. I could click on this eyebrow instead and then just deselect the other eyebrow. Now you're labeling will be a little bit different. You'll see here that it says left eyebrow when in fact it's the right eyebrow. And you can go in here and right-click on this layer and rename it then too, left eyebrow. And when you do that, you'll see that. Let me just grab this and move it over. It's showing the original layer name right next to it. So when you change the name and character animator, you're mostly doing it for your own reference. And that's okay. So I'm just gonna do that really quick. So that way it's not too confusing. I'm just going to rename this one then two, right eyebrow. And then we'll do left eye, right eye. And the right eye. There we are. And again, it's a small thing. You don't have to go through the process of renaming it that far, but I think it'll help. So now we come back here, we look at his left eyebrow and it's masked to the left eyebrow on the face. We go to his right eyebrow and we want to make sure that it is linked to the right eyebrows. So we can just click on it to do so, and then click on the other eyebrow to de-select that. Then you have your left. I come down here and we're just going to reassign it to his right eye so that it matches the face. And then just click off that other eye right there. Make sure we click off the face. We don't want that. And then for the right eye, you can see it's right there. So we're just going to come in and click on that right eye to highlight it. Mixture we click on it. It sort of highlights when you'd go over it. So that's an indicator if you're clicking on an or not. There you go. So now you have those assigned. But when it comes to sublayers, you're going to have to make sure that everything is assigned as well. So the eyebrows should be OK. We have those assigned as angry, worried, and neutral. And character animator is going to know what to do with that. So what we can do here is move over to left eye. And if we click on write blink, you'll see that it's assigning it to that blink right there. I'm just going to come in and make sure it's on the eye we wanted. And then just de-select that. Go to the pupil. Again. We're just going to swap that side really quick since I renamed these wrong. And then we have the right eyeball. The eyeball is indicated by this line on the outside. So you're just going to come in and click on that outline on the other side, just so he got it assigned properly. And then we can click off that side. So now we're just going to go to the right eye and repeat those steps. But there is going to be a catch here because I didn't name this last layer properly. In fact, it didn't name right blink properly either. It should be left blank. But because we went through and rearranged our eyes, that blink is actually associated correctly. And then you have the left pupil, which would actually be the right pupil. This commit in reassignment. And then your left eye. It should be this, that should be the eyeball. And then this should be the i. So the right eye is indicated by the circle and then the left eyeball is indicated by that line. And you'll see that I accidentally named it left i instead of eyeball, which is why it was grabbing the eye outline. But you want the eyeballs to be tracked by that meter next to each i. So then with that, we can close those up. The Harris fine, because it's its own thing. We can assign that separately. And then you go to the mouths. First, let's click on mouths. We wanna make sure that the mouths group layer is assigned to the mouth itself. So we'll click on mouth. That way it's now assembled. Then we can come down to the mouth phonemes and start applying these. So it's just a matter of starting with the bottom here. We'll start with rest. And you just want to match the mouth pose with what you see here. Now once again, had we gone through in renamed all these, how they're displayed here. So if I put rest as neutral, it'll automatically tag it so you don't have to go through this process. But we're just going to put in neutral. We can also put in smile. And then we will also put an m because all those match that pose. So now we can just hide that and go to the next one, which is ETC or et cetera. And that's showing the teeth. So we just want to put that on D and S. We can hide that and move up to e and see what it looks like and then just match the poses. So this one is going to be E. And given how it We have everything named, I'm just going to come in and put it to R. As well as now I could go back through and design different mouth poses for these. But for the sake of the tutorial and just to show you, you can combine more than one. We're just going to go this route. Now. We go to AI. And that's just a wider mouth, so we'll put in for that. And we should be good there. Move over here to l and th, and we should only need to apply L for that. And then over to o. Once again, we'll put in o for this. And we can also put in surprised since that's close. And then you have Q UW, just come in and apply it to W0. And then the FV pose, come in here and just assign it to f. Now we have a couple more here that my artists added in. We have frown and then we have grin. And if we look at these, we can see what they look like. Now with grin, maybe I will assign that to smile. Thinking about it now. And then just come down to rest. And then de-select smile unrest. And for frown, we're just going to leave that off. Since we don't really have a use for it, we're just not going to assign it and it will never appear for us then. So now with the RIG properly tagged, at least for the face, you'll find if you go to record, that it's going to react differently than it was before. So let me go ahead and just click on the camera here. And my eyes are kinda moving up and down because I'm not really, I didn't really set my rest pose or anything, but you can see already that we're not having any issue like we were before with that, I kinda glitching and going up and down. And that's because we assign the eyeball properly to that outline of the eye versus the eyeball. And if we turn on the audio, we should see now our character talking because we now have those phonemes assigned or the museums, I should say, assigned for the character. And there you go. That's all you would have to do. Again, my characters gaze is a little bit off. If I come over here and set the rest pose, you can see now things are looking better. I can control my eyebrows. That's looking good. And just by default, we have a lot of things working here, except for my pupils. I think it's because I cameras at an angle, but I think it's working okay. And we can look at that more as we continue. And I might actually adjust my camera and reposition that desk just so I can get a better view. But anyway, as you can see, just by applying those tags, we were able to make the character work much better just by making those changes. So I'll pause the video here and up next, we'll keep working on this rig.
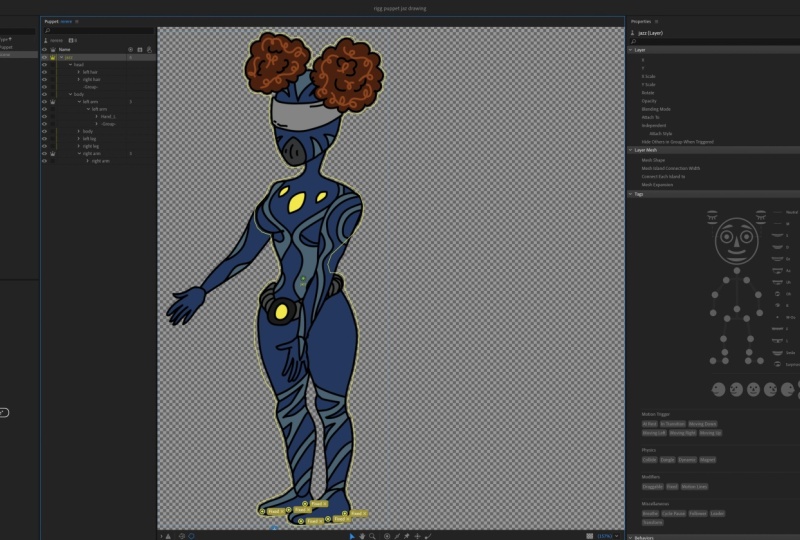
13. Placing Pins: For this video, we're working off of 09 Chad character animator. Feel free to open up this file. What I want to do now is assigned some pins to my character. So first, let's jump over back to the record panel. And it just going to prepare here. Now if I go through and I start to move around, you'll see that the character is doing some kind of crazy things. The bodies bending at a really weird angle and it just doesn't look back grounded. So what I want to do is come in and play with this so that we can ground the character, makes sure that the feet are planted on the ground. So that way when he bends, he's bending from the feet or from another portion of the body. So let's come back here to rig really quick. And if we come down here to the bottom toolbar, you'll find we have some different handle tools, as they're called. We had the handle tool itself, the stick tool, the pin tool, the drag or tool, and then the dangled tool. We want to locate the pin tool first. So I'll click on that. Now. I want to click on the Chad layer where you apply handles will depend on how they are affected. So if I apply pins to the entire Chad layer, the entire Chad layer will be affected by this anchor point. If I apply it to my legs right now, it will react the same because the legs are not independent. Meaning anything that goes on with the main layer will also affect the legs. And right now, I want that to happen because I have no plan to move the legs until later on. So by clicking on the chat layer and it is going to come down here, zoom in a little bit on the feet, just by holding an Alton. Using my mouse wheel. I'm going to assign three pins to each foot. So there's 12 and then three, and then 123. Now, I'm going to simply jump back over here to record and see how this looks. So we have the seen preparing. Just give it a moment here. And then if we start to bend, you'll see that the character is now bending from those feet. We can go back and forth and it looks like he is anchored in much more than he was before. Now, of course, we still have some issues going on with how everything is moving here. And my camera, of course, is still not quite right because I'm looking down and every time I look up, my character looks up because I'm looking at the monitor and that's how that's working. But everything else in terms of movement is starting to look a little bit better just by placing those anchors. And you could keep doing this if you wanted to. We could come back here to the Chad layer. Once again, come up here and I could apply a pin to the head. And then we could also apply a pin to the arm. So now if I come back here to record, we're going to see this update here first. Can take a moment depending on and now if I start to move, you can see that those areas are locked. The head is kind of going back and forth in a weird warped motion because the top of the head is linked and it can't go anywhere. So it goes just beyond the feet. You can apply this to any where you feel you need to have something stick. Let's say you have a character reaching for an item on the table and they pull back and you want to have that squash and stretch effect. You could for a moment have that pin there and the rest of the body goes back, but the pin keeps the hand from moving. So those are just some things you could do. And again, you can play around with this on your own time. As for what we're going to do for now, I'm just going to come back here to those pins. And you can remove pins easily just by clicking on them and then hitting delete. I just want to keep the pins for the feet. I can hold in space bar and click and drag to move around on this as well when zoomed in. And we're just going to come up here to the head and remove that fixed pin as well. So that way we are just locked to the feet. So that is how you can anchor in place pins inside of character animator.
14. Adding Dragger Handles: I'm back inside of character animator, working off of ten Chad character animator. We now want to add some drag or handles to this rig. And drag or handles are essentially how they sound. You can place hot points on the rig that can be dragged using your mouse. So you could use this to move arms or different body parts or props or whatever you want. First, make sure you're on the rig tab. And I want to come over. And let's start by clicking on the Chad layer, because that's where we assigned our pins. You'll remember. Now I want to come down and click on the drag or tool. And let's say we wanted to drag the arms so we can control them. I can add a drag or point to the back arm. And then the front arm. Once we do that, we can come over here to record. And now the scene has pop back in. Let me just reset my pose really quick. There we go. And as you can see now, if I were to come in and start just moving this around, it's not going to really look all that good. You can see that it's pulling and it's dragging, but it's doing some weird stuff. And it's not quite working the way we want because that's not how arms should bend and it's simply how we have everything set up within the rig. So let's go back here and take a look at what we can do to correct this. So first, let's come down here and I'm going to click on these draggable handles and remove them from the main Chad layer. I'm going to place these on their own individual layers. So let's go down here to body. And where we have front arm. I'm simply going to click on that layer and then click on the hand to insert a dagger. Then we'll come over here to the back arm and do the same thing. Now, let's go to record and we'll see how this looks. I'm going to turn off my camera here for a moment and my audio just so hopefully it plays a little bit quicker. My computer's experiencing some slowdown. And now if I click and drag, you're going to see it doesn't really do anything different. So even when we go in and isolate those things, it's still not quite right. So what can we do? Well, this is where independent layers come in play. In independent layer basically isolates that layer from the entire rig. So that way you're not influencing the body when you move the arm. Let me come over here and turn on the crown for back arm as well as front arm. Because that's going to create independence. Now, come back here and hit record. And we can see what this looks like. So now if I click and drag, you can see it's doing something different. But it's still not quite working the way we want. Maybe there's a little bit there, but it's simply not enough. So now if we come back here to rig, what else could we do to help this? Well, when it comes to rotating objects, in this case an arm, it's best to establish the pivot point from where you want it to rotate. As you can see when I have back arms selected because this has tagged, you'll see we have this origin point right here. And this allows us to place the origin and habit hinge from a certain point. If I click and drag on it, I can bring it up. And we're going to get a colored interface with our character. You can see when I am on the arm it's yellow, but when I pass over the body or anything else, it turns green. What this means is if we bring it up here to the shoulder and it's green, we're going to attach this independent layer to the body at the shoulder. So once I release, we have now stapled this independent arm to the shoulder. Now let me come back here in record again. Let's take a moment here to repair to scene. And then if I click and drag, you can see it's starting to act a little bit better now. It's still not a 100% perfect, but we're getting closer to where we want it. So what's still wrong? Well, let's come back here and click on the back ARM. You'll see on the layer properties we have attached to and it says auto, and that's because it's automatically attaching to the body. It's independent. But the attached style is currently set to weld. Let's go ahead and change that to hinge. Now, if we come back and hit record and click and drag, you can see it's acting much more naturally. Now it's still not perfect. It's not really bending the way we want, but it's getting closer. So let me come back here and repeat that process. For the other arm. I'll just click on front arm. And I want to grab that origin point and bring it up and attach it to the shoulder. Just like that. And making sure we're still on that front arm layer. Come over here to the properties and change it to hinge. Now go to record. And once a prepares, we can test this out again. Once again, this arms doing that. And this arm is doing this now. Again, it's a little bit more natural. But it's still not quite right. But we're getting there. So what we're going to do is pause the video and up next, we'll keep refining these bends by rotating limbs and adding in Sticks.
15. Rotating Limbs for Different Bends: For this video, I'm working off of 11 Chad character animator. Feel free to open up this file. We now want to experiment with how the arms are bending. I'm currently in the record panel. If I come down and then my arms, you can see that it's doing this and it looks okay, but it's not a 100% there yet. So we can come in here and play with this and see how it's looking. So let's come back here to the RIG. What could we do to enhance this a little bit more? Well, let's try rotating the limbs. I know that sounds kinda weird, but it actually helps. So we'll start with the front arm first. And I'm just going to click on the front arm and come in and rotate this so that we are at about 26 degrees. And then I'm going to hit V And my keyboard to bring up the selection tool. And then I'm just going to move it back into place, like so. Now we want to make sure we get this lined up. If I zoom in here, you can see that we have this shading and we want the arm to match that as close as possible. So I'm going to grab the front arm once again. And I'm just going to move it a little bit over like that. And I can click off to see what it looks like. And perhaps just back a little bit more. And then we should be OK. So probably something like that. Okay, that's close and that should work. So we have that now set. And we're going to do the same for the back arm. I will expand the back arm first and then click on the back hands. I just want to come in with the selection tool again and click and drag and just move the back hands up so that they are closer into the sleeve. Then I will click on the back arm and we will rotate it 26 degrees in the other way. So we're at that angle. And then I can click and drag and just bring this over. And again you want it to attach to the body so you can bring it over like that. About there should be good. And then you can release. Now the other thing that can adjust how the arms bend are, where the draggable handles are, but also where the origin point is. So if I click and drag on this origin point, I'm just going to situate it so that it's closer to the left side. And I'll do the same for the draggable point as well. And I'll click on the front arm and do the same. I'm just going to move this draggable point down a little bit like that. And then the draggable hand point can come over like so. So now if we go and record, this, does give it a moment. And I come down here and click and drag. You can see things are starting to look better. We have a slight issue with the shoulder here. It just sort of pops out a little bit sludge as pop back here to the rig really quick. And I might have moved that origin point a little bit too far. I can just click and drag and maybe move it back like so. And maybe even come down and just move the arm back a little bit more like that. Now I can record. Try it one more time. Click and drag. And that's looking a little bit better. There is a small piece here where the arm intersects with the color. We could actually create a separate peace with eye color and overlay it. So that's something we might do as well. But for now I think this should be okay. We'll pause here and up next, we'll move on to using the stick tool.
16. Refining Limbs with the Stick Tool: For this video, I'm working off of 12 Chad character animator. Feel free to open up this file. But I want to do now is experiment with the stick tool. If I come back here and hit record, we can see what the animation currently looks like. So if I click and drag on the arms, we can see how they bend and how they currently move around. And it has this nice, sort of springy, cartoony look. And that's fine. If you want that, that's awesome. But if you're looking to refine the bends a little bit more, let's come back here to the RIG. And starting with front arm. I'm going to come down here and click on the stick tool. Now, I can come up and starting at the top point, I can click and drag and just move down to about the center of the arm. And release. Moved down just a little bit and then click and drag to come down to the hand to finish. And that's all you need to do. So to sticks a little space in between kinda where you think the elbow might be and then finish off. So now if we go to record and we click and drag, you can see now that the arm has a much more definite bend to it. It's easy to see where that Ben takes place and how it's controlled. So let's come back here. And we can do the same now for the back arm. Come over here to your back arm, grab the stick tool and just come in and you're just going to place your two sticks down with a space in between. Then go back here to record, just to check it out. Click and drag. And you can see now that we have that bend in place. And it's looking good. So again, if you're looking to add some definition to your bends, such as a limb for an elbow or anything to that nature. Be sure to check out the stick tool inside of character animator.
17. Adding Physics with Danglers: For this video, I'm working off of 13 Chad character animator. Feel free to open up this file. We're now going to talk about danglers, which allow us to add a dangle physic to the rig. A great way to demonstrate this is to apply it to the hair. So whenever the head moves, you have some residual animation as the hair reacts to that movement. So in order to do this, the first thing you need to do if you want something to dangle to make sure that it is its own independent layer. You can see right here we have the hair. We also need this to be in its own group. Otherwise, this will not work. And we'll also need the back hair to be in its own group as well. So we're going to go back into Photoshop and make that correction. So here we are looking at that rig. I'm just going to come over here to my layers. And where we have back hair in front hair. I'm just going to create two group layers just like this. I'll name the first one, back hair one. And then the second one will be back HER2. We can put this one into there and that one into there. And we'll make sure that two is underneath one. There we go. Then you want to do the same for the front hair. I'll come in and create a group. I'll just name it front hair and then I can drop it into that group. Now, if I were to save this file, it would auto sync inside of character animator. But since I'm doing a tutorial and I want to give you every step possible so you can dissect it. I'm just going to save as, so I can create a new file. And I'm going to come in here and rename it to 14. Chad. Hair grouped. That way we know what it is. And then I can hit save. And then okay. So we now have a new document ready to go. I'm going to go back here to character animator. And again, if I were doing this in real life, so to speak, I would just save the file and update the reference. But let's come over here so that way you can see how this works. Two, I'm going to click on the puppet inside my project panel. And you'll see we have the puppet source located right here. I'm just going to click once on the source, locate 14 Chad hair grouped and then replace it. What's great about this is they won't retain all the changes you've made to the rig, but it just going to update what you made changes to inside of this new Photoshop document. So you can see if we come back here to the chat group, that all of my fixed points are still there. If I go to the front arm, I have my sticks and my draggable points still there. The only thing that's changed now is you'll see that back here, 12 are grouped as well as front hair. So with those groups now, I can turn on independence for all of them. So now with them independent and I'll start with the front hair. I want to take this group and make sure I'm on this selection tool and find its origin point. And I want to attach it to the head. So you can see it's right here. We're just going to come in and I'll attach it right about here. Should be fine. Now, I can come down and select the dangled Tool. And I'm just going to come in and place down areas that I want to dangle. So these two pieces for sure. We could do one up here if we wish, but I think I'll just do these two pieces and see how it goes. Now, I'm going to do the back hair. So I'll come down here to back hair one using the selection tool. Just bringing your origin point and make sure it's attached to the head. And then grab the dangled Tool. And I'm just going to come in and add some dangle handles to this clump of hair, will do like three in this area like that. Then go over here to back HER2 and you're just going to repeat the process. Makes sure once again that you have this assigned to the head. Then you want your dangle tool to come in. And we're just going to apply these dangle points just like that. So now, just to note as I'm doing this, you'll see that each of these back hairs have a three next to them, next to handles. And I didn't mention this before, but as I add any handles, you'll see that that number updates in real time showing you exactly what you have going on in each layer. So now, once we have that set, we can jump over here to record. Now you're not going to see much until we start adding some movement. So I'm just going to enable my camera here. And I'm just going to move my hair back and forth, or head, I should say. And as you can see this, the hare is actually moving in real time. We're going back and forth, back and forth. And you can see that there's a slight dangle to it that's occurring, which is really cool. Now again, you could do this more drastically and we're going to look at how you can make those changes as you go. But for now, I think this is going to work for our purposes. And hopefully, you understand that you can easily make any part of your character dangle. For instance, we can make the eyes dangle if we wanted to, or you just have to assign that Handel and make sure that they're independent. And make sure it's attached to the area you want it to dangle from. But ultimately it's pretty easy to set up.
18. Conclusion: And there you go. You now have a character rigged up with some basic functions inside of Adobe character animator. From here, there is much more you can do. You can add multiple characters. You can build more advanced animations. You can apply more advanced techniques to get more of a specialized look to what you're doing. And so much more. And I do have a follow-up class coming soon on this platform that will cover these advanced techniques to help polish up your rig further. But I'm hoping at this stage, you have a rig that functions, that detects the your voice so that it can lip-sync. That can be controlled with the camera using your head, with dragons, with your mouse and the other techniques that we covered here. And again, be sure to share your rig with the class. If you want to animate out a quick sequence, you can upload it as a video or an image sequence or just some images if you wish to see how it all pans out, I would love to see what you come up with. And you can even save your work until the next class, until you get a little bit more under your belt, until you learn how to personalize this a little bit more, and then you can share your work then as well if you wish. So with all that said, I hope you found this helpful. I hope you found it fun. And I look forward to seeing your work, and I look forward to seeing you in the follow-up class to this. Thank you for watching.
 Chad Troftgruben, Freelance Animator and Screencaster