Transcripts
1. Class Overview: Hi guys. Money, Miss Chad. Traffic Urban and you're watching how to design three D sets inside of Mojo Pro 12. I've been using Mojo for about five years now, and animating with software like Flash and after effects for 15 16 actually might be 17 years. I've been doing it since high school anyway. I haven't really fully explored the three D elements of Mojo until more recently, and I find it to be a cool way to work. Not only can you design three D sets that are nice and dynamic, you could even design props, texture them out and rotate them and take pictures of them. And use those as two D assets in your cartoons so you can use it as a way to speed up your workflow. But also to add a little bit of visual flair to what you're doing will begin this course by sketching out a scene. It's important to understand what you plan to do before you dive in and start building three D objects. We'll also ready up a mojo document and then draw out some two D props to prepare them for three D conversion. Well, then, talk about converting vectors to three D and death sorting. In addition to setting up your three D objects, including the floor, your background elements and, of course, the main foreground elements will then move over to creating and applying textures to our objects and laying out the scene further. Then we're going to animate will animate out certain set pieces, including the lava Bubbles will have some steam or smoke shooting out. And then we'll animate our character, jumping from rock to rock, interacting with the environment, and then finally will talk about adding some atmosphere, including clouds, blurs and blend modes. And then we'll export our work out for the world to see. By the time you're done with this course, you should have a strong understanding of how to build three D sets within Mojo and animate your cartoons within them. I hope you're ready because we're about to get started
2. Prerequisites for this Class: for this course, it's recommended. You have basic knowledge of either animation or mojo. I am going to go pretty slow with this, and I will try to explain everything as thoroughly as possible. However, I'm not going to spend a lot of time on basic functions of mojo. For instance, I will expect that you know what the ad point tool is, or I'll expect you to know how to copy, using command, see or control. See, so just as long as you have some basic knowledge of the software, you can definitely dive in and start working with this course. If you don't have that knowledge, I have plenty of mojo videos on YouTube, which will allow you to get speed and learn the software. And there's also a number of awesome mojo courses from other authors on you to me as well, So be sure to look at all of that before you dive in. But again, I think you'll also find that the learning curve of this course is very light
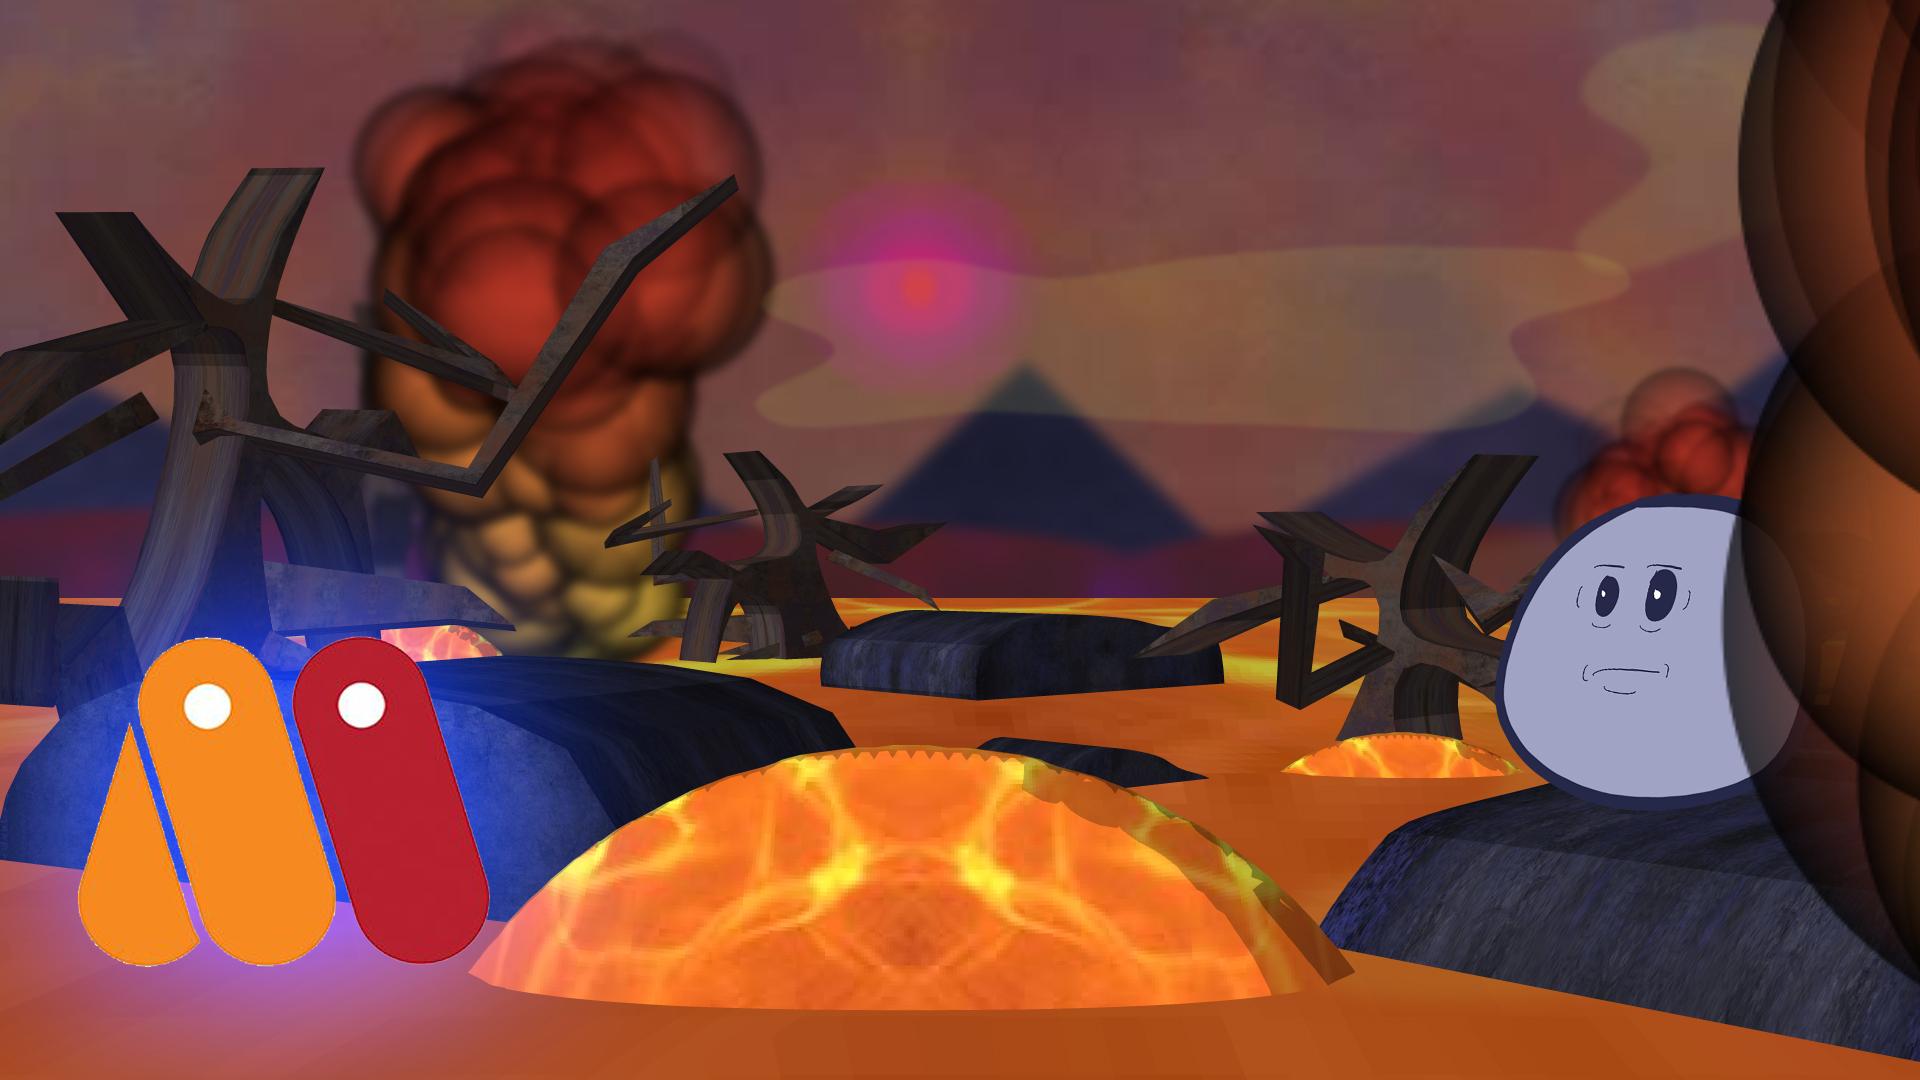
3. Sketching Out Your Scene: before we dive into Mojo and start building our three D set. I wanted to take a moment and talk about sketching things out, or at least putting in some pre planning or a little bit of thought before you dive into the three D elements of Mojo. Now you can do this numerous ways. I like to just sketch something out really quick and by really quick I mean really quick. You can see that it's quite messy, and it might even be kind of hard to tell what's going on. But what's important is it works for your own purposes, and by looking at this, I'll be able to map something out for us as we continue along. But if you have the ability to get an IPAD app, I did this one and procreate, and I was able to use vanishing points to help set up some sort of perspective, which helps, especially since we are building a three D background. But you can just sketch us out on a piece of paper if you wish as well, wherever you want. Ultimately, it's best to have some sort of idea of what you want before you dive in and start designing things, especially in three D inside of Mojo. And for this particular course, this sketch will be available to you if it's any use for you, and I will be making use of it as we go over to Mojo in the next video.
4. Readying a Document in Moho: we're now inside of mojo, and we need to create a new document so we can begin the process of building the set. You can do this by going up to your file menu, or you can use command end or control. And if you're on Windows, you may also find that you have a sample file visible. When you launch Mojo, you can just close out of this and make that new document. So once you have the documents set up, the first thing we want to do is go into the property's because it's important with any animation that you set up the resolution and the frame rate ahead of time. So that way, everything properly lines up as you continue along. If you try to make these changes later on, it can lead to conflicts. So let's go ahead and just go to those properties and again by going to your final menu, you can go to file and go all the way down to project settings or shift command P or shift control P. If you're on windows, once you bring this up, you can see we have access to the dimensions. We can also go through the process of picking on a template if we don't wanna put in custom values. But here you can go through and choose all that as well as your frame rate, which is right down here. So for this tutorial, we're going to use the 10. 80 HD TV 9 20 by 10. 80 template, which is 9 20 by 10. 80 at a frame rate of 24 and the end frame will probably change. But we're going to just leave it for now and we'll move on to importing our sketch so we can click OK, in the second part is to import, so we'll use command shift. Why? Or control shift. Why? If you're on windows, this will bring up the general import window. And if you can't remember that combination, you can also import by going up to file import and then right here you have access to a variety of different import types. Now, command shift. Why is going to do a general import which will just allow you to bring in anything that mojo kin recognize? So we want to go in and find that sketch that I made in the previous video I can come down here to my course and go into my exercise files. It's called Seen sketch dot p and G. Just locate that and you now have the sketch brought in and it should fit the entire canvas because it's the same resolution as the document we just set up. So now we have that in place and we can use it as a reference. Now, one more thing I'm going to do and I'll start doing this as we go throughout. The course is I will save this file and I'm going to save every single file as we go. So that way you can check this out every single step of the way should you need it. So here, we'll make sure we have a new folder for this, and it will be more organized. I'm sure once you are looking at this settles, make it exercise files, and this will be importing sketch, and I'll even number it for you. So that way, you know, it comes first within the list of exercise files. So there you go. So we will say that if you want to look at what I did here, you can check out this file I just saved and up Next will move on to drawing out Are vectors in mojo.
5. Drawing a Tree: for this video. We're working off of a one important sketch dot mojo. We have our sketch on screen, and we want to go in and start building the set pieces or props or whatever you see here on the sketch. Now the easiest way to do this, at least from my experience, is just a dive in and start getting your shapes down using the ad point tool. So let's come down here to our layers, and I'm just going to take layer one and move it up. So it's above the sketch. We'll keep the sketch below everything else, since that is our reference. And here I can tap once on layer one and just name it to tree for right now. That might change as I start to build things up and things get more complex next while on that tree layer and on frame zero, come over here and grab the ad point tool. You can use a on your keyboard if you wish, and since we named this tree, we're just going to focus on this tree right here to start. It looks dead and not very great, and that's fine. So we're just going to dive in and make it look worse. Well, since you know it's supposed to be debt, so we're going to start at the bottom and click once and then hold down the mouse button, which will allow you to drag two points or at least one point, connected to another like this. And we're just going to bring it up and try to connect it with these sketch and you can see we now have two points set down, and we can continue to do this so we can click and drag on that next one and bring it up. And you can see we now have some different things going on here, and we can just kind of keep going and filling this out. Now, if you want to put the branches in on one layer, you can and I think I might. So I'm just going to come down if it doesn't look quite right. We can always play with that after we apply the three D settings, but we'll just play with this. Go up and you'll notice right now that everything is kind of rounded. I'm going to adjust that here in a moment. We're just getting all of our points in so that we can then do what I just said with the clean up. So come down like this and we can take some liberties. We don't have to follow the sketch exactly. It's kind of keep coming down like that. And when I go to that first point and release, we have created an enclosed shape. The next step is to come in and make some of these points more pointy. We can use the selection tool for this, the select points tool, and we can come in and start selecting areas that we think need to be jagged. Now what I'm going to do is select a bunch of points at once, so we'll select that one holding shift. Select these two holding, shifting Just keep shift held down as you go through and select these end pieces. We'll start with this and see if we need Teoh do anything else now. I accidentally selected that one there, but that's OK. We'll just run with it for right now. So now once you have your points selected, you can come over here to the curvature tool, click on it or use see on the keyboard up here, you can adjust just how rounded things are based on the number. By default. It's at 0.3. If you want things to be completely jagged, you can tap on the peak button just like that and you'll see that it makes everything to zero that is selected. And now you have jagged looking points and he can do the opposite by clicking on the smooth option. So that's looking pretty good. But I'm going to come back in here now and just make some quick corrections. I can come in and adjust the branch a little bit like that. Maybe kind of have it sticking up. Like so. See, this one's a little bit too pointy, so I might adjust that. But we'll come in here right now and just try to get these looking as branch like as possible. So there we go, and we do want a little bit of roundness in some spots again, this branch right here, it's not quite where I want it. If I hold shift and I right click and I drag to the right, I can zoom in and remember. Right click also allows you to click and drag to move the canvas arounds. That's how I'm navigating. And I'm just going to come in and add in another point. You can come up and we can just sort of adjust it like that. And that's looking okay for right now so we can just zoom back out and there we go. Now we could add some more details to this. So maybe I will do that really quick. Just add some secondary branches and such. So once again, using that ad point tool, I will start with one of the points here on this main branch and just kind of come out like this and down. And we'll keep going just like this. Just try to make smooth, nice, clean points, and you can set this up ahead of time so that it's more pointy when you're drawing. But I like to have it rounded first, and then we can doom or adjustments as we get closer to the end here so we'll do. One more could have come out like that, just make it a little bit crazier. And there we go. So now, once again taking the selection tool, I could just come in and select the areas by holding in shift that I want to cover here and we have a few here. So just come in, get all those points selected, go to your curvature tool. I'll use see on the keyboard to access that. Come up here to peak. Turn that on and you can see what this looks like. Now again, if it's too extreme, you can go somewhere in the middle. You don't have to always peak every single thing. But I think we can make it work like this so it might pique that one right there. You can see we have kind of a weird issue right here. So all those come into that one, you will peak it off really quick. Anything that looks a little bit better, we actually look a little bit better if I come up like that. There we go. And again, it's just sort of feeling things out. Now again, I have my own art style and things are a little bit cartoony, and I do certain things, and that might not appeal to you. And that's completely fine, because you can come in with your own style and you can adjust these things anyway, you see fit, and I think it'll make again a nice presentation when you're done. I think it will surprise you when you start to put all the three D elements together. So on the bottom here, I'm also using the curvature tool. I'm just coming in and seeing what Peak looks like, and I actually think I am going to do that. Those three points in the bottom where it's going to peak them out and kind of place him like that. The last thing I want to do is fill this whole thing in. Now it's made up of a few different parts, so we'll have to come in with our lasso tool in order to make sure that everything is filled in. So we have the select points tool selected, and at the top you'll see there's something called last So mode, so make sure that's enabled. This will allow you to do a free hand selection with the tool. We're not going to come over here and just make a free hand selection. So using that tool, we can come in and you can see I am selecting and I'm just going to select all the way around this first branch. Now, if we come down here to the create shaped tool, you'll see I currently have both selected, which means if I create a shape, it's going to take the Phil and the stroke colors. I currently have a signed plus any of the with properties and apply it to this particular object, and that's completely fine. However, I think I'm just gonna go with Phil for this just to make it a little bit easier and then come over here to my color swatch and we can pick our color here something brown for right now to be closer to the grey area. We'll go with something like that and click OK, and once you have your color and you have Phil selected, you can click, create shape and that will fill everything in. So now we're just going to go through and do that for all these main areas really quick, so create your shapes, get all that filled in, and then we can just create shape. And also when you are using the create shaped tool you can select, I kind of forget about that sometimes you can use even Laos. Samonas. Well, so as you can see, I'm still just using the create shaped tool and were able to go in and just lasso and create shapes without having to jump back and forth, which is actually really nice now using the lasso tool once again from the final part, I was going to come in here and select the main part of the tree and keep those separate branches out of the equation. So it's come in like that, come over here to the create shaped tool. You can see we've selected that whole thing now and we can choose to create the shape with the same fill color that we use before and you can see. Now we have something like this Now you might have a little bit of issue here, but we can just kind of come up there and reconnect that to make it look more like it belongs. And you can go through and correct any issues that you feel her necessary to correct. Sort of like that. But that gives us an idea. We now have a very basic tree that we can convert over to a three d object So will pause here and up next. We will keep working on this set building up our assets.
6. Drawing the Rocks: for this video. We're continuing to work inside of mojo. I have, Oh, to designing assets dot mojo opened up and ready to go. So that way we can continue to build up these assets. Now we have the tree that we made, and we have some rocks here, as well as some other background elements such as Hills, Mountains, the son. And, of course, we have the ground. Or, in this case, what will be lava. So there's a few more things to design, so let's just get right to it. I'm going to create a new vector. We can name this one rock and then hit Enter. Now I'll just come over here to the draw shaped tool and grab the oval from the list. No, I can come in making sure I select a letter grade color. Maybe something like that. Click OK and auto fill is currently turned on. We don't want the strokes turned on, and it can come in and just start filling things out. Once I apply that oval, I can come in and add some more points with the ad point tool and then using the transform points tool, we can add a little bit more of a shape to this. So it's not just a round object come down like this and just, I think, some small modifications. They don't have to be major just to again, helped by adding a different shape to this. Come in and just kind of go like that. There we go, and I'm going to do the same now for the other rocks I currently sketched out. So new vector layer. Name it rock, too. Draw out a shape. Take your at point tool. Come in, modify just like that. And you know you can be creative and do whatever you feel is necessary to get the shape of the rock, and then we'll do at least one more. Maybe we'll do two more, so we have Rock three again. Just drop that out and then we'll do one more and we can place this one down here because I had sort of an indication of one. So once again, we can come in just kind of draw something out like this just to have it there. Now you'll notice that this rock is in front of the tree, which is how it should be But we also have one rock right here that's in front of this branch, and that's fine. We can arrange these things right now if we wish. But when we bring everything into three d, it's going Teoh change the way we work anyway. So if right now this is more of a matter of just getting the shapes down, and then we're going to rearrange later on in three D space, so we'll pause here and up next, we'll keep building up the two D assets.
7. Drawing Other Scene Elements: for this video. I am working off of 03 designing assets part two dot mojo. So feel free to open up this file. If you wish to fall along, We're now going to lay out the rest of the major assets and we might come back and do some or two d design work as we fill things out in three D. But this will set us up for now so that we can move forward with the next phase. The first thing we want to do is established the ground because we do need, of course, that ground or lava for this shot, I can come up to my new layer button and shoes vector from the list, Nimet lava and then hit Enter. Come over here to with a fill color and we can choose something orangish for right now again, this is all going to change when we get to the texture ring phase. But for right now, we can just add this so that we get an idea. I can select the shape tool and then choose the rectangle from the list and then come in and then just draw out the rectangle like so and I'm going to place a blow. Everything else just for right now. Then we need the mountains, the hills and the sun or whatever this is. Maybe we're on an alien planet, and that's an alien moon. Not really sure, but we do need those assets. So let's make a new layer. And we can name this one mountains using the ad point tool. I can come over here to the fill color and just for right now, because I'm not 100% sure how I'm going to color everything yet. Let's make these maybe a darker red come in the background. It's dark red like that, and I can come in and just place these points down. Now again, we have, like a wavy looking line here. I find that changed that it's going to come in right now and play something down like so. Then I will use command A to select all the points on that layer hit, see to go to curvature and then hit the peak button to bring everything like So now I can come in. Maybe I'll make this one little bit shorter, and then this one's higher up, and then that would kind of be somewhere in the middle. Not really a big deal, just as long as we have the shape in place. And if we were to do a scrolling background, we would want more mountains. But this should be okay for now. So we're just going to highlight those and then used to create shaped tool and then use the created A button with that tool to set up the mountains. And we have some hills as well, in addition to the sky and the sun so we can make that new vector and rename it two hills. Grab the oval tool from the draw shaped tool. Come over here to our fill and we're just going to change the color a little bit. Maybe something more of the yellow side, and then we'll come in and we're just going to place hills like this beneath the mountains . But they're also overlaying the mountains as well. Then will come down here, make a new layer. We'll name this one sky and then come over here to our fill, and I'm not really sure what I want the color of the sky to be right now. Maybe I'll make a dark purple for right now that might change. Everything might change. It's sort of a process you feel as you go, but at least you'll get to see the change as I do it. So we're just going to come in here and put that sky down. And we can place that below everything else so that we can at least see what's going on. And then the final thing was the sun or the moon or whatever we had in the sky. Since it's a dark purple sky, maybe it's not a son. Maybe it is a moon. Eso will come in and just name this one son or sky or star, I should say, And then come over here to the Oval Tool. Three. Pick a lighter pink for this, and we can just kind of command and draw it out like that. Just bring up like so again and does not look very impressive right now. But it's all a matter of laying down the basics first, before we can go in and start building Mawr things in. So now that we have the basic in the main foundation down for the two D assets we can move on to setting up the three D space, playing around with that and making decisions from there.
8. 3D Conversion and Layer Order: for this video. We're working out of 04 going three d dot mojo, and we're looking at the two D seen that we quickly put together in the previous lesson. So now it comes down to creating three objects and assembling your scene. But not only that, assembling the scene so that it's easy enough to work with him. Manipulate because sometimes when you go from two D to three D inside of Mojo, things could get a little bit wonky, and it can be hard to tell what's going on. So just as long as we have everything properly set up, we should be good to go now. The first thing you want to keep in mind when doing this is you should always or at least I recommend you should always make a group layer when assembling a three D scene. If you put all of your three D assets inside of a group, it will make controlling the scene easier, and it essentially gives you access to a second camera. So what we'll do right now is click on the sky holding shift click on Rock four, and then we'll right click and choose group with selection. So now this will put everything into its own folder. I'm going to name it seen and then hit. Enter. So now in two D, if we grab this and moving around, it's grouped, which is nice. We can go in here and work with everything else individually. So now the next thing you want to do is convert everything to three D. So we'll double click on rock for That's going to bring up our layers settings. Now on the far right. On the top is a tab called Three D Options. So tap on that in here you can see we have three D conversion set to none. Let's go down and change this to extrude, and for right now we're going to come in and remove the silhouettes. Materials increases because sometimes that doesn't quite work how we want it. And it can lead to some weird coloring issues when you have three D objects moving. But we'll keep shading set to tune right now again, that's something else we might change. Not really sure yet, So now before you go in and apply this, we want to come over here to our layers and make sure we select them all just by clicking once on Rock four, holding in shift and then clicking on sky. Now I guess my options didn't quite saved. That's okay. Just make sure it's set to extrude. Your edges are turned off and it set the tune. And once you're good, you can click OK, and they should now apply the settings to all the layers. So here we're looking at a scene, and it looks terrible because all we see is the sky. What's going on? Well, it's the way it's rendering things out and also the layer ordering. When you're working in three D Space and Mojo, you can work with three D two different ways. You can keep the traditional way. It's using layers, and it kind of uses it as a hybrid so I can come in and I can move things around. But ultimately, because the sky is extruding out, I'm assuming we're not able to quite get it. Now if I come in here and I put the sky and from the sun, you can see now we're getting different results. So right away it's a bit of a mess, but one thing we can do to help us. At least this helps me. Once you have everything established in a group is to double click on that group and then you want to tap on depth sort at the top. And here you can see we have some options and they're all turned off. Let's enable sort layers by depth and then sort by true distance. And then we can click. OK, now you'll see what happened was immediately it shifted on my layers. And all this means is now when I'm going through and I'm trying to reorder my layers. Let's say I want rock to above sky. I can't do it. You can see no matter what I do, I can't get that layer to go above the sky in the layer ordering. However, since we're now on depth ordering, if I take the transform layer tool and I come up here to the Z property, you can see as I start to bring it out in three D space. It is now going above the sky, and if I go back in three d space, you can see now it starts to go down the list. So essentially you're now able to take all the layers that you have and move them around. And wherever you move them is where it's going to order them because now it's working properly. Within three D space. The only issue we really have right now is nothing is how it should be. The rocks, the sun and especially tree are all miss shaped. They're not quite how we want them yet. And of course, the depth is all wrong. The mountains should be way out in the distance and these are all things weaken Dio. So we'll pause here and up next will move on to those steps.
9. Arranging 3D Floor: for this video we're working off of 05 arranging set dot mojo, and here we are once again looking at the three D set or in the process of building. There are a few things we can do right off the bat to help set up this three D scene. The first is to figure out the ground because right now it's not currently set up in three D space properly. We wanted to go back into the background and at any time. If you want to see what's going on with all this, you can use the orbit tool just by clicking on this. You can come in and click and drag, and you can see exactly what this looks like. And right now, it's not looking how we wanted to look. But that's OK, because we're going to change that right now so I can click on Reset View to bring it back to default, and I want to find the ground or, in this case, the lava. So once you locate that, let's come over here and grab the rotate layer X y tool. Now, if I come in here really quick and just hide some of these things. You can do so by clicking on the eyeballs next to any of the layers. I'm just going to hide everything in that folder except for a lava. And here we can come in and play around with this and get an easier view of what's going on . So if I come in and start to rotate it like this, you can see now we're actually putting it into the background and placing it so that we can create a proper three D environment. Now, when I release will get some numbers up above for the X and Y rotation. And really, we only need to worry about the X rotation. So let's put it zero for Y rotation in the negative 94 X that will bring it to a perfect 90 degree turn. And once again, if we used the orbit tool, you can see it looks like it's being placed further into the back room now, especially if we bring back, let's say, the sky, you can see the difference. So let's re Centerview, And when we reset the view, we can move the camera around. Or, as I said, the scene folder acts as a camera itself. So if I were to bring just everything back here really quick, we can see here. If I grab the scene folder and with the transform layer tool and move it around, we could essentially create a camera, and we can use the X Y rotation to do the same thing. But what we really want to do here is focused on the lava being correct. So all we have to do is come over here to the lava and with the transform layer tool selected, which is him on your keyboard, we're going to holding shift, which will lock the access in which we can move this layer and then just move it down. Like so until about. Like that Now it's not perfect. We still have some work to do. We need to determine the height, but by doing this, it gives us a starting point. So from here we can come in and start to play with different things, particularly the scale. So with the transform layer tools still selected, if you look on the top in the center, you'll have scale for X, y and Z, and here we can come in and play with this further. Now we want the lot of the go way out into the distance, and so right away we might want to come in and play with the Z properties on this or the X properties, depending on how you've moved this around or I guess, the white properties in this case. So if we come in, we can expand the why property out. It's going to go further than into the background, and I'm not quite sure how far I want to go yet, but you get a preview of what's going on as you make these adjustments. So I put the why all the way up to 20 and you can see it's going back into the distance now . If I were to come in in a Justin of these other things, like if I wanted to adjust the height, I could, and I still might do that, I'm not quite sure how high up I want it yet, but for the X value weaken, blow it out so that it looks like it's going to cover the screen. So once again, if I were to come in and hide all these other things going on, You'll see here what this is starting to look like. Now if you want to go by the sketch and we definitely can, we can grab that lava layer now with a transformed layer tool holding shift and then just move it up so that it goes about like that. Now you're going to run into this issue where we're seeing the front of the lava and that's OK. We don't have to bring it all the way up. We can and then go in and make modifications to the size if we wish. But here I think just having it right about there is fine. We don't have. They have it exactly in the center, and we can make adjustments as we go. But now what this will do. You can see we have a rock here. I just brought him rock, too. If I take the transform layer tool and just use the Z properties to bring it closer, you can see I have now the ability to bring this down, and it will hide within this three d layer, which works because we are creating lava or liquid or something, where we're going to have certain objects submerged within it, and so having this effect set up can help us achieve those results. So with that said, I'll pause the video here so it doesn't get too long and up next, we'll keep constructing this scene.
10. Setting Up Background Elements: Now that we have the ground assembled, we can keep working on building up this scene. So the first thing we're going to do is bring in the background elements and this includes the sky, hills and mountains. Now, when I started doing this originally, I brought all these in and made them three d. We really don't have to do that in this case now that I'm thinking about it because they are in the background and really they have very low priority when it comes to what's going on in the scene. And so we're probably not going to catch that their three d at all. All that should be focused more on the foreground elements. So in this case, we're just going to take the sky, the hills and mountain. I can double click on mountains, go over here to my three D options, and I'm just going to turn it off and let's make sure we do that for the sky, hills and mountains. And then we can click OK, and that will bring everything back. Now we'll have to adjust the sky in the hills properly within three D perspective. So we're going to take the transform layer tool and click on the sky and then using the Z property. We're going to push this back until it goes back behind everything else. And you'll know when this has happened when it goes behind the lava layer on the folder itself. Because as we push these things back, that will change the layer order based on the depth sort we have established with the scene folder. So once you have that set, you might have to come in here now and adjust the size of this so that we can fill up the whole screen with that color. Now we're just going to do the same for the mountains and hills so the mountains can come next. We'll just hide the hills for a moment, and using that Z property will just push it back. So right about there should be fine, and then we can come down like this. And as we can see, I guess I was wrong. It's not quite behind the lava something. Just push it back a little bit more and we can see it's now going behind the sky, and we might have to make some adjustments with That's we can come into the sky and then push that back a little bit. Maura's Well, there you go. So now you're starting to get this, just fill up the screen a little bit more, and since the mountains have been pushed further into the back, we might want to come in and add some more mountains. So we can easily do this by using the ad point tool. I'm going to turn sharp corners on with the ad point tool. So that way we can just quickly come in and make these points. I'm just going to add a few points on each side here and then take the transform points tool. And then once again, we can come in and start to move these things round and just reshaped the mountains, Get it how we want it. And I guess we probably don't need that one point there. It's not the end of the world, but I can come in with the transform points tool and just click on it and then delete it. And perhaps this extend that one a little bit like that and coming in, I can keep going here so I might just go like this. I just had a little bit of variety. They don't always have to go down all the way. So something like that and like that and that's looking pretty good. I would say again, it's not the best thing in the world, but it will work for our purposes And then we want to grab the hills and do the same thing . So we're just going to push that into the background and try to get it in front of the mountains. So just like that, and then we can either ADM or of these, or we can just kind of come in and stretch it out and place it down like so. So now you have that working for us as we continue now. The other thing you can do, and it depends on how you plan to work with the camera, and that is make the sky stationary. So, for instance, if you have a lot of 30 movement going on and we are moving the camera, you can see eventually we're going to bypass the sky and you're just going to see, you know, the white edges of the canvas. Let me just undo that so one way you can fix that is to come over here to the sky and double click on it and you'll see on the bottom where it says options. We have immune to camera, but it's great out. The reason for that is because we have it within the depth sorting layer. So what we can do is take that sky layer and bring it outside of that group. Now it will allow us to come in and turn on immune to camera and then hit, Apply or okay, so once you do that, now, the sky is outside the scene. But that's OK because we wanted to just kind of be everywhere at once anyway. So if we come in now and we move this around, you can see that the sky does not glitch out on us, so to speak. Or we see the white edges or anything like that. So with that now established, I'll pause here and we'll move on to the next step as we continue to rearrange the seat
11. Setting Up Main Objects: we're now working off of 07 or ranging set part three dot mojo. And we now have everything set up to the point where we have the floor. We have the background elements. So now we want to work on arranging the set so that we have something to work off of when it comes time to animate. Now we can use the sketch for this so you can see we still have that original sketch within the layers. If we bring it up above, we can kind of get an idea of what we originally had in mind. Now the thing is, we can turn this off and turn it back on. It kind of is a pain to do that, but that is what I'll be doing for right now to kind of go in here and just reference that . But we can also we just use our own sensibilities as well and arrange as we go, we'll figure it out. So when I'm going to do here is just come in and bring everything back and starting with rock, too. I can take the transform layer tool and just kind of bringing over like this and If I once again bring back that sketch, you can see I had a rock here on the bottom, left to start. And so that's kind of where I'm going to go with this. So we'll place that rock close to that point, and if you want, you can come in and rotate that rock as well. Let me make sure I'm on that layer when I'm doing it, just to add a little bit more depth to it if you wish, and you can rotate it and you can also come in. If it's too wide or whatever using the Z properties, you could adjust the width. This way, we can also adjust the height as well as the with going out that way. So again you can play around with this and get it where you want it. But we'll just put it right there for right now. The next item on my list I'll just go down the list. Here, in my layers, is the sun, and I actually forgot to include that in my last video when working with the background elements. But it's not a big deal, cause I'm just going to do it right now really quick. Well, let's go in and turn this off of three D and click OK, and just push that into the background in goes far as it wants because the sky is outside of this. But we'll put it just a little bit past that mountain right there. And then I can come in and just resize it a little bit like so and place it over like that . And we might work with that as we go. But we'll see. So there you go. You have your son now. Next is the tree. This might take a little bit of work because we have to come in and rearrange some things, particularly with the width in the branches. So we'll see how this goes. But let's just bring it up and closer to us so we can get a better look. So it kind of looks like this. I'm going to come in and scale this down, will just zoom out. We can grab this, and it might also be easier before you re size to use the set origin tool or O on your keyboard, and set the origin on the bottom where the trunk is like that. So now when you come in and resize and rotate, it'll go from the bottom, just like that, which will make the process easier. So there we go. You can kind of bring it up like this and submerge it in. Now, if we come in and rotate this, you'll see the treat looks like this. And it's not probably the best looking thing in the world. We can kind of arrange it like this and still kind of looks a little bit wonky. So we may have to come in and make some adjustments to the tree, and we can do that by adding in additional three D objects to the tree. But for now, I'm going to just leave this here and we'll move over to the other three D objects. And then we'll put this into its own video where we modify the tree. So we have our rock there. I actually have two rocks are here. So let me see what you have going on here. That rock I can come in and shrink this down and get it into position where I feel it needs to go. So maybe about right there come in rearranged things a little bit, and of course we can adjust the width in all that, get it submerged, and that's looking pretty good. So we'll put it about like that. Maybe, just like this there. So there we can come down to the Third Rock. Read up like that, and we can kind of leave it there. Maybe we bring it more into the foreground. Not really even really sure yet. And we can continue to play with this for a long as we need to, but I think I actually will put it more in the background. So tell you about like that just sort of offset. Maybe even a little bit more pushed out. There we go. Then you have the lava, which is fine. And then you have the hills which we worked with, and then you have everything else. So we might want to come in and Phil things out a little bit with more rocks in scenery pieces. But first will want to modify the tree so that it looks more appropriate in three D, and then we can go to the next step where we add more variety using different pieces, so we'll pause here and up next we will work on the tree
12. Modifying the 3D Tree: in this video we're working off of 08 modifying tree dot mojo. So feel free to open that up if you wish to fall along. So with this tree, we need to make some modifications so that it looks less awkward. No, we could go in and make everything separate in terms of the branches, but I think we'll start with this and just build it out and see how it goes. And then if it still doesn't look quite right, we can think about modifying those branches originally. So the first thing I want to do is right. Click on the tree layer and then choose group with selection. So now we have a new group player with the tree, and we can actually come in here and name this one tree. And I'm going to take the origin for that tree grew player and attached to the bottom where we have the origin point for the tree on its own layer or close to it. So now in this new group player, we're going to come in and make a new vector, and I'm just going to name it Branch. Now we'll take the eyedropper and select the color for the tree and then coming up to the ad point tool or using a on your keyboard. You can come in and start sketching out a branch, so it doesn't have to be anything elaborate. It can look similar to the other ones that you have designed. So maybe something like this. Oops. We don't want to attach there. We want to go down and then over like this, and then come in like So Now we will create a shape using the create shaped tool, and we now have a new branch from here. I'm just going to come in and modify some of these points just like that so that it's a little bit skinnier. Now we'll go down here to that branch, go to the three D options, and we will extrude it and we will turn off the edges for it and then click. OK, now we can take the rotate X Y tool and come in here and start to rotate it out and then try to piece it in with the tree. So right now it's too far back. I want to bring it out in front so we can come up here into spring this out a little bit. And the other thing we can do to each time you make a group. If you wish for it to fall along like we are with a scene where everything is depth based, you'll want to double click on that group, go up to depth sort and then turn that on and then click. OK, so now, as we move the branch, once we actually get past the point where the tree is, it'll actually reflect that within her layers. So just like that. Now, of course, this isn't quite working because the branches way out of proportion. So we're going to come in and we will reduce the Z property to, Let's say, 0.1, and we can look at these other properties as well. But I think we can leave this pretty close to where it was. I might modify. Why a little bit and maybe just punch out X slightly. Now, taking that rotate X y tool again, you can come in and try to lined this up, and we can bring it up so that it looks like now it's a little bit more. Three D. So you attach that branch to the tree and we can come in here and just rotate the tree really quick and you'll see Now we have that going on. So the idea is to go through and add a bunch of branches to this. So that way we have more of a three D look occurring and not only just having branches but varying branches of size and rotation and all that stuff. So I'm going to pause here for right now, and in between videos, I'm going to just add in a few branches to the tree. And again, I'll be using the same exact method I used here. You might even find duplicating the branch from here so we can come in and duplicate that three D branch, and then we can move it around with our tools here. So come in and here you go. You move this around, you can modify it, rotated, do what you need to dio. So between videos, I'll do that, and you can do it as well. But you can also just catch the next exercise file where we will have all the branches in and ready to go
13. Creating Textures: for this video. I'm actually on my iPad pro, and I'm going to go inside of procreate and show you my process of creating textures for three D mojo objects. There are many ways you can go about doing this, but I find that using this app or an apt with a symmetry feature can help when designing your textures because it will create a seamless loop if needed. So I'm on my ipad and I'm just going to go into my drawing maps and then choose procreate from the list. So here, if you've never used procreate and if you have an ipad pro, I definitely recommend you pick it up. It is an awesome application. You can see I have my projects here inside of procreate. And if I tap on tutorials, I can go in there and you can see the sketches I made, but also the textures I made as well. So, for instance, I have a texture for the sky, the lava, the trees, the rocks and a couple other things. So if you come in here, you can see here is the lava texture. And this works because it mears itself all the way around, so you can see that on the top and bottoms of this. They are darker. And so then, if we were to stack this one on top of this one, it would look like a mirror, and it would just continue to seamlessly wrap around. And so that's why we're going to create the textures this way, as opposed to just painting one image now to do something like this. It's quite simple. I will come back out here to the gallery really quick so I can make a new document in procreate. So I'll tap on the plus button and I'll go with the square canvas. That way all sides are equal, so we tap on that and go inside. Now the next thing I want to do is enable my symmetry guides so I can do that nearing effect, and this is easy and procreate. Just go to your actions panel end under canvas. You'll find drawing guide tap on drawing guide to enable that, and then you'll want to tap at it drawing guide to go inside. Now here we have a two D grid isometric perspective, and then, on the end at the top, you have symmetry. So once you tap on symmetry, which is the option you want, come down on the bottom and you'll see that we have four buttons. The 3rd 1 in is called quadrant. Tap on that, and we're now splitting the screen into four sections. If you're having a hard time seeing the grid, you can always come up to the top and adjust the color of the grid by using your slider right here. So make it dark blue, so we haven't easier time seeing it. And once you're done, you can tap done on the screen. No, let's go over here to our layers really quick. I just want to note that Layer one is marked as assisted, which means that it will take advantage of the symmetry guides as we move along. Now, if you make a new layer, you'll have to turn assistance on Ford. If you wanted to adhere to the guides, just so you know. And I'm not going to do anything elaborate here. But I will just pick a color to show you how this works and a brush so we can just come in and use carbon stick that works for the char coals, and we should be set so again with symmetry guide as you start to paint in. You can see that when I place my brush anywhere, and I start to just paint in its smearing it on all four sides. And that's what's great about this. So you could come in and you can design your texture anyway. You see fit, and you don't have to worry about the texture, not looping correctly if you have a big object and you have that texture going all the way around and styling, so this is a great way to cover yourself with that, and with procreate, I could do an entire course. I'm procreate because it's so involved in really, really a good program. But you can come in here and do all sorts of different things with your color blend modes and your opacity. And really, you have a lot of control. Not to mention you could take this over to photo shop and make any final corrections you wanted to before you bring it over to mojo. But ultimately, once you finish that up, you'll just want to come over here to your actions panel and then you can go to share, and then you can tap on P and G and you can share this file. Then, with either your computer, you can see my Mac book pops up through airdrop or weaken saved to the photos app we can save to our files whatever you want to do. So that what you can get this file over to your computer. But just so you know, for this course, we will be using these textures and they will be provided for you. So you can see we have all sorts of different ones and you'll find them inside of the exercise files. So that way you can follow along with the next video.
14. Compressing Textures: after you design your textures, especially if you're doing it in procreate like I did in the previous video. Once you import that file over or the files you'll see in my file browser here I have one called untitled artwork, and that was brought directly over from procreate. There's one problem with this, and it's because of how big a made the file, but also just the details involved in the compression. You'll see that it's close to six Meg. Now again, that's not the end of the world, but mojo kinda has a hard time dealing with really big textures. And so it's with in your best interest, once you import these files in that you go through the process, such as going into photo shop and starting to compress these files so you can see right here. I just brought in a few different files and all I did. We just go through the process, for instance, with this one of going up to file export and then export. As from here, you can quickly go in and adjust the settings. For instance, if you have no transparency is going on, you can make it A J peg, and that will already knocked the file size down considerably. But also keep in mind that we are using a pretty big texture for this and so we can come in here. You currently set to 100 but you could drop the scale that down to 50% and that will also help with the file size. So by going in and adjusting not only the format but the quality and the file size, you can then adjust just how much data is compressed within this. And I recommend once you do this, you save these so that they are under a Meg each, and it might not be possible for all of them, but I was able to do it, so I think you should be able to as well. The rock is a little bit bigger, but that should work for our purposes. So again, in your exercise files, you will find these compressed files so you don't have to worry about doing this yourself. But just know when it comes time to design your own sets on your own, you might want to consider compressing your textures before you import them into mojo
15. Applying Textures: for this video we're working off of 09 adding textures dot mojo. Feel free to open this up. We're back inside of mojo, and we're going to begin the process now of adding textures. The first thing you want to do is just figure out where you want to start, and there's really no right or wrong, although I will caution this. The reason why we haven't made more trees yet is because the process of text oring is a little bit cumbersome. Or at least it can be if you have multiple objects on screen and you need to apply them. So if we were to duplicate this regular brown tree and we have five of them and we modify it, we put it all around the landscape. When it come times a texture, you're gonna have to go to each tree and color each branch. So here it's just easier to texture the 1st 1 and then duplicate and modify. Afterwards, we'll start with the sky. You can use the layer selector to select a layer. If it's easier for you to do that, and once the sky is selected, come over here to the select shaped tool and then click once on the sky. Now you'll want to look at the style panel and under effect. We have image texture, so just go down and select that option. And here we have the ability to click select texture. When we do this, it will browse to the computer and you'll have to locate the file and in this case were inside exercise files, and we want to grab sky and then choose open. So now you can see the sky is in place. We wanted to tile. That basically means repeat. If we don't, we might run into some issues, so we'll just leave it as repeating and then click OK, and that's it. The sky now has a texture. You can zoom out and you can see it looks good because of the way we designed that texture of the mirroring effect we use with the symmetry guide. Everything loops seamlessly so we don't have any weird borders going with that texture. So now it's just a simple matter of going through and picking out what you want to add next so we can keep going in the background and just moving forward. We'll click on the sun and then use the select shaped tool to come in, grab that image texture, browse and will locate son dot p and G and then shoes open. Now, this time, because of the PNG file and because of the way we designed this, I'm going to enable through transparency. That way, all that transparency will show up with the texture and will be Let's see through it and see the sky a little bit. So once you have that, you can click OK, and that's looking pretty good. Also note. You can adjust the texture the way it's laid out by grabbing these handles and moving them around. And I think I'll leave this as it is right now, and I can't seem to actually grab this one of the moment for some reason. But we're OK with that. I just want to point out that typically not sure why, but you can grab and move these around. So now, continuing on, we're going to go to the mountains and we'll click once on the mountains with the select shaped tool, and then we will apply the texture once again going into the exercise files, locating the mountain texture and then choosing open, making sure it's set to tile. We can click. OK, then there's the hills. We'll have to do these a little bit differently because they are each being selected as individual shapes, as you can see. So we'll just select one of them and grab that texture. Come in here, apply hills, and then click. OK, now we're just going to come over here to that next shape. Grab the eyedropper. You can use L on the keyboard if you wish, just like that. And then we can just keep going here. And you can go in and select the texture if you wish. But this should allow us just to come in and quickly apply it so that we don't have to worry. So there you go. You know, have the hills in place up next, we can move to the rocks. So we'll just kind of grab each rock here. Here's rock one. We can come in in ad that image. Just locate rock dot jpeg and we can end it in. And we can just keep going here, locating all the rocks that I want here. So there is that one I think I have one rock here that's actually hidden in below everything else, and I think that's rock for So I think that's why I'm getting confused. But here are the rocks that are visible. I'm actually going to go down to rock for for right now and just remove it, since we're not using it at the moment. And if I need another one, I can always duplicate another one. We're now going to focus on the tree, so we'll click on the group player for the tree mixture were inside, and we're going to come in and start selecting each individual part of the tree in applying our texture. So once again, just come in. There you go and you can apply it. Now I'm going to be honest. I did this a little bit backwards while doing this tutorial. Typically, I texture things while their two D before we jump to this part because, as you're going to see as I start to try to play around with things, this main parts okay, but you have to click on a very specific part of the three D object in order to texture it . So it's going to be a little bit challenging, but we should be able to get to work. See, I had to kind of click a couple areas to get that piece selected. And I can just come in with my eye dropper and get that. And again you might have toe there you go click on that part to come in fill in end and it just takes a little bit longer and you might also find rotating. It can also help. But again, if I were to do this anyway, that's a little bit more efficient. I would just make sure I texture it while everything is to D. So that way you don't run into this issue. Were you having toe try to click on stuff and try to get it to work? Because sometimes it's just little bit finicky, and we also have to keep in mind that mojo isn't really made for three D. Like I'm doing, it's possible to do it, but really, it's more for two D animations. So what we're doing here is kind of different compared to what you would use typically with software anyway. As you can see, we almost have these figured out. So I'm just going to finish up text oring those last three branches and let me just add the lava while we're looking at this. So the last one would be the lava. You just come in and we can have that texture. Select it, choose lava and then click. OK, so now we have something that looks like this. So between the videos, I'm just going to go in and rotate this a bit and color in those last two branches with the texture. So for now will pause and up next, we'll move on to filling out the rest of the scenery.
16. Duplicating Trees and Rocks: for this video we're working off of 10 adding trees dot mojo and we're back inside of mojo Between this video in the last, all I did was just take my time and zoom in and make sure that all the branches have that texture applied to it. So there you go. Everything has its textures. So now we're going to move forward and continue building up the scene. To do this. We're just going to duplicate this tree and modify it in. Place it elsewhere within the environment. And we'll do that a few more times just to add some variety will come in here and we can duplicate that tree group layer, and we'll have tree, too. Then we can take it and move it out like this. So now what we can do first is come in and make sure that Anchor Point is situated. Since its three d, it's kind of hard to get it situated sometimes exactly where we want it, but now all I'm going to do is just rotate this a bit, so it's a little bit different like that, and then I'm just going to move it over and sort of place it in the lava. Now I might make it a little bit lower just again to add that variety. The other thing I'm going to do is come in and modify this big branch because it is quite obvious. And we have that big branch right here. So I just want to make it look a little bit more varied that this is something a little bit different. So I can just come in really quick and make that modification. So something like that should be fine. And again, hopefully the audience isn't paying too much attention to the background, but they're more focused on the action going on in the foreground now. You could also go in with this tree if you really want more variety, and you could just modify all the points for the branches and for the main structure of the tree. Whatever you want to dio again, it just depends on how meticulous you want to be with this again. If we go in and just use some rotation modification, it's probably going to be enough. But there's nothing wrong with playing around with these things to make it look more varied . So there you go. We're now going to do this again, in fact, will probably do it like three more times, at least just to have something in the background so well, duplicate tree one yet again and taking the transform layer tool. We're just going to push it this time further into the distance until it reaches the hills . So something like that and then we can move it over, perhaps something like that. Make sure it's actually visible and then come over. No, I can try to set that origin point again, but since it's three D, it's kind of hard to tell sometimes. But we're just going to come in here and do a quick rotation, and we're just going to bring the tree than back and then over again just to give it a different look. And I can put it even about even with the original tree. In fact, just to add a little bit more variety, why don't we come in here and reduce the size of the ex a little bit and maybe increased the why? So it looks something like that and we can just stick it over, like so then we'll do this yet again. Come back up here to the original tree and we're going to duplicate it. And just coming over this time will place one that's closer to the foreground, and we'll try to modify that anchor point again. Can be kind of tricky to do so in three D, But I'll come in about like that, will try it and then bring it back and then try to move it down. I want to place it so again it's in front of the screen a little bit. So we have some branches just kind of sticking out like that again to show that there is depth going on within the scene and we have other things in shot. So there you go. You have that and we might modify it. I'm not quite sure because we will have our character jumping on this rock in the foreground, and we don't want the tree to completely block that, and so we can play around with this and move it exactly where we feel the need to move it. But that is situated and let's go ahead and just do one more here. Tree number five and we can come in and Let's modify this one a little bit. Actual Disused. The X here. Sometimes it's easier when resizing your three D objects just to use the numbers on the top with your scaling. At least that's what I have found, and we're just going to do a couple things with that one and actually might be a little bit to squish ins. We might just bring it back a little bit like that. Maybe just have it stick up a little bit. And you know, I'm going to even duplicate that one that we just made and bring it out a little bit more. It just kind of have it sticking out like this. A little bit end, I guess. A little bit tree happy here. But we'll do yet another one. We'll put that one more back here, so it's kind of like this. Get it back into the distance, started. Get back a little bit more past that rock. There we go, something like that, and again it's off screen, so we shouldn't have to do too much with modifying it, but that should work for our purposes Now. The other thing I might do really quick is add one more rock you can see. We have one rock here there and then went out in the distance again. The goal is to have the character jump in and go on this rock, this rock and then a foreground rock. So let's click on one of these rocks. This one will work and duplicate it, and we're just going to bring the Z property up so that it's closer to the screen. Bring it in a little bit like so, and I can also work with the tree I have in the foreground right here that's close to this rock. But the other thing I'll do is also come in and modify the way this is looking because I wanted to look different. So anything I can do here just to kind of add Cem differentiation to it, and we don't want to look abnormal, but maybe something like that just to have a little bit of alleged, and that can kind of help again with the shape and everything else. So now, looking at this, I might go in and try to find that other tree. I just added that one right there that's kind of meshing and It's actually not too bad. We could have it sort of on the Rock if we wanted to. But many what I'll do is just push it a little bit back. So it's behind the rock. This and kind of like that. So we just had a little bit more of something to that. Now I'll do just one more rock. This will be really quick. We will duplicate the original and then bring it up again. And then this time I'm going to shrink things up just a little bit like that. And then I'm just going to bring it down. So it's barely sticking up and then maybe even bring it back a little bit like that. So you just have something sticking out. But it's not enough to jump on. It's just add a little bit more variety to the shot. So there you go. You now have more trees and rocks within the shot. Making it more complete will pause here and up next, we'll start animating the lava and bubbles
17. Animating Lava: for this video we're working off of 11 animating lava dot mojo. Feel free to open up this file. If you wish you fall along, we're now going to animate the lava, just moving up and down a little bit. That should help with some of the movement, but also help complement the bubbles we plan to add later. So to do this first, make sure you are on the lava layer. Then we're going to advance one frame on the timeline, and then we will click once on frame one to insert a key frame for the Transform Layer Channel. Now I'll jump to frame to and holding in shift. I'm just going to click and then move this down a little bit. It doesn't have to be much so if we go back and play this, and it might be kind of hard to play because of the three D nature of this. It sometimes has a hard time playing things out, but what you can do if you are having that issue is either preview the animation by making a preview render. You can do that by going up to file and then going to preview animation or you can do what I'm doing right now and just scrub forward on the timeline to kind of see what's going on again. Mojo isn't quite supposed to work this way. Or at least I don't think it's supposed Teoh. And so there are a couple of little glitches that happen along the way, and that's part of the reason why we keep the texture size low. So there you go. We have that. Now we can go to, let's say, four seconds in on frame 96 and I'm just going to copy and paste the first frame of this movement and bring it back. So now you kind of have this down and up motion, and we wanted to repeat. I'm not sure how long this scene is going to last, but I can highlight that frame right click and then choose cycle. Now, when you choose cycle, you are setting up a loop essentially, and you have the option to choose how you want it to look back. We're going to go with absolute and we'll choose to for the number, and then we can close that. So, as you can see, we have a green arrow going all the way back to two. So what this means now is even past that last key frame. It's still going to continue to move no matter what happens. Unless, of course, we were to create a new key frame for this channel that will disrupt the loop. So there you go. You know, have some animating lava going on. Nothing too fancy. But it does add a little bit of something, too. What we're doing here so will pause here and up next. We'll move on to adding some bubbles.
18. Animating Big Bubbles: for this video, I'm working off of 12 animating big bubbles dot mojo. Feel free to open this up if you wish to follow along. Now, as I continue, there are a couple things I want to point out, and this is just kind of weird. But I've had to go out of full screen mode because if I go into full screen mode, I get this weird graphical glitch where I have two things going on at once and it disabled some tools. I guess so. I'm not even gonna deal with that where it is going to go like this so that it works again . I'm using a beta builds. That could be the reason. But anyway, if you have that issue, if you're having a duel, slider image and your can't modify the way the Grady instead working, then you might just want to go out of full screen. So anyway, that aside, let's continue. I want to now add some big bubbles so that we can help with the animation of this scene. So we'll go over here to the scene group layer and make a new vector, and we're just going to name this big bubble and hit Enter. Now, before I draw any thing, I'm going to grab the eyedropper and select the lava. So that way we can use the law of a color and the texture for the bubble. So let's come in now and click and drag and draw out an oval that looks like this and release. Now I can take the select shaped tool, come in and modify this Grady int or the way the texture is looking just so. It's not so yellow. We have some yellow, but not as much we can blow it up to about right there. Then we can come in and move the bubble closer. If we wish it could move it in and out. However you want to do it now, the last thing I want to do before we animate is double click on Big Bubble. Go to three options and we're going to choose inflate from the list and we will disable the edges and then click. OK, so now if I were to take this and move it down, you can see that it is in fact, a three d sphere. So what we can do here? Its first I'll come in and shrink this down just a little bit. So it's about like that and we'll start right here and I'm going to place the oval underneath the lava end. Perhaps at about one second in, I will simply move it up like so and then at two seconds in, I can move it back down and then we can just have it repeat from there. In fact, we might want to have the same position for frame one and for frame to. And if that's the case, we can move this one down a little bit and then copy and pasted over to frame one. So that way they are the same and it's completely hidden. So you have something like this going on now, also at frame 24 or one second in. I'm just going to come in and squish things up a little bit like so and up. So now it kind of looks like it's going up like that. And then when it goes down, of course, once again we want to be the same as frame one. So it kind of goes like that and then down and like your lava, you can come in in cycle. This sold us choose to cycle both key frames at an absolute value of two. So that way you can see it's just going to keep going up and down like that, allowing us to have something more going on with the shot so we can come back here to frame zero. I want to right click on the Big Bubble and group with selection. I can rename Layer 19 two Big Bubble yet again, and then come over here to the vector that we just made and rename that just like double clicking and typing animation and then hit Enter. So now what we have done is given us the ability to move the bubble around without disrupting the animation so we can duplicate Big Bubble. So we have Big Bubble two and we can just kind of look at this animation here really quick , see how it's going and let's go and take this and we can move it a little bit into the foreground. Let's see what happens. We put it there. That's what you're looking pretty good. I like it right there. But the one thing I do want to dio we don't want them both going up and down at the same time. We can change that by coming over here to the sequencer and then locating Big Bubble two and then simply dragging it to the left a little bit. So it starts since a little bit offset. And since it's looping, it won't matter, is just going toe loop. But it'll start in a different position, so you can see it kind of goes like this now. And if you want, with this big bubble to you can also adjust the size with that group without disrupting the animation. So he wanted this one even like a little bit bigger. Even like that, you could come in and just make sure it's on frame one when you do it. So just kind of looks like this and it's a little bit different. So now we can do that in a few more spots. Well, just duplicate the original once again and we can move it into the background just a little bit and maybe over so we can take a look and see if we can see it and it's right there and it's looking good. I will come in once again with the sequencer and go to Big Bubble three and just offset it slightly so that it's just moving a little bit different than everything else. And you can if you wish, even go into these so we could go into big double threes animation, and we could extend the animation out so we could highlight Frame 18 in 40 two's key frames , holding Ault and just bring this out a little bit. We could even adjust that, so it's at a different speed now. As you can see, it's slower. And so that's another way to add variety as well, so we could go into Big Bubble two, grab that animation and just offset it slightly, maybe just even by a few frames. So now it's kind of looking like that, and it's definitely offset compared to the other one. No, we can just do a few more. So will grab Big Bubble again, being unframed zero and I can come in and just push this into the back, see what it looks like. I can't really see it right there. That's OK, I might have. It's too far in the back. It's going to see here can bring it over a little bit using our X, and it's kind of hidden back there. It may be behind my hills to sometimes It's kind of hard to tell. Might just bring it up a little bit more like that. And I think it's now in a better spot, but again, kind of hard to see. Sometimes I get to play around with these things, obviously, as you can probably tell, until you can kind of get exactly what you want. And I might go in and just making sure I can see this. Bring this up just a little bit. There we go. There it is again, sometimes can kind of hard to tell words at, but if we put it there, you can see now we can definitely see it. It's looking better, and in fact, I'm going to reduce the why value to zero. So it's a little bit lower. In fact, maybe I should make it even lower. So let's go to negative 0.3 and try that and see if it's too low. Might be a little bit too low. All right, let's go. Negative 0.1. There we go. We can see the little bits poking up. Yeah, let's keep that zero. Sometimes you have to play around with these things until you can get it exactly how you want it. Now it's going to that fourth bubble, and then we can offset it. So it's not going at the same speed or at the same time. And that's looking pretty good. So I might pause here and between videos, I might add a couple more bubbles. I'm not 100% sure, but I believe you understand the process now how this can operate, so I'll pause here and see you in the next video.
19. Importing Particles as Image Streams: for this video, I'm animating off of 12 animating small bubbles dot mojo. So feel free to open this up. If you want the reference, there's a couple things I want to point out before we add in these small bubbles. First, I went ahead between two videos and jumped into after effects and rented out a really quick particle effect here. That kind of looks like smoke. You can see if I play it out. It just looks like that. Nothing too fancy. You can create particles that are similar in mojo. However, I find that making particles and after effects is just easier. And I get the results I want. If you want to do it through mojo, all you would have to do is come over here and make a new vector layer and we can put it inside the scene, Come down, find that new vector. You can come in and draw out your oval or whatever shape you want. And then you're going to make a particle and we're going to place this inside the particle and you can see now as we go in, you can see it starting to enemy it out. You could go in and then adjust all of your particle settings here in the layers settings and get it exactly how you want it. So you can see it's looking like that right now. So I remove that particle for now. Since we're not going to use it, I'm going to jump over here to my import window by going to file and then choosing import. Make sure this time you don't use general Import. You want to use image sequence because I exported that smoke out as a bunch of images. As you can see right here inside of your exercise files. We have access to the smoke folder, and then here we have a bunch of images making up the smoke. So to select an image sequence, all we have to do is click on that first image and then choose open. So now we have the new particle on our documents, and I can rename it the smoke and then using the tools I haven't Mojo. I can go in and start to move this around. So I'm thinking of coming in here and just putting some stuff in the background, mostly so we can kind of have it in the back room like that, and I might duplicate it in at it in a few more spots so we can come up and just come in here. Let's make sure we locate smoke and we can duplicate it and then move it over. Even behind the mountain could work. We could shrink it to make it look like it's more in the distance. Or we can even move it back into the distance, more kind of like that and just sort of have it like this. And then using the same techniques we used for the bubbles. We're just going to come in and adjust a smoke so that it's a little bit offset from the other one like that, and we're just going to go in and add a few more smoke layers so it is coming in. I can move these in a little bits, perhaps place this one close to the screen. But I am going to adjust the size to about half of what it originally was so about, like that and move down and we can place a smoke about right there, so it's in the foreground and it's looking like that and we have some different things going on. Of course, now we could continue to add more to this if we wish. But I think just having these three for now should work. But feel free to add more and do whatever you want to do with this. So will pause here and up next. I'm going to add in the animation for our character.
20. Animating Our Character: for this video. I'm working off of 13 animating guy dot mojo. Feel free to open this up. Now before I dive in and start an inning out my character, I'm going to set him up inside of a new document. First, just to make things a little easier, I'll use command and or control. And if you're on Windows to do this and next, I want to use command shift, Why to import. And I'm going to come down here and locate the guy folder and just double click on that and then grab every single phase I have here for the guy and bring him in. Now, I'm not going to spend too much time on this animation process for the character simply because this is a background course. This is just sort of to bolster the background and all I'm going to do. Just come in here in highlight all of these right click and then choose group with selection. And then I could name this one guy and hit enter. So now we have that and I can right click on guy and then choose convert to switch. So now what we've done is made it so only one of these images is visible at the same time. So we can copy this layer by going up to edit and then copy Layer and then come over here to animating guy. And we're just going to paste him in. There he is. So it's go down here and locate him, and I'm going to place him. So he's on this rock now again, remember, the two D and three D doesn't work quite like it should in mojo, but we're gonna have to just basically overlay it. So he comes out to about here, let me go 3.3 2.4. Getting closer, 2.5 so well at 2.5. Overlay him over that rock, so he'll be right about there. And so the goal is to have him come in, bounce here, bounced there and then bounce over there. So let's get that motion in verse, and then we can focus on changing the way his face is moving. So let's jump to frame zero. Insert that key frame, and in fact, I'll go to frame 24 insert a second key frame. Now I'll go back here to frame one, and we'll grab the ball and just move him up like so. And I want there to be a few moments of silence or just stillness before we have the character come in. So looking at this, I'm going to push his next key frame out to two seconds instantly come in and paste the original on the one. So that way we have a second of just the landscape animating out. And then you're going to have the character come in now to make this a little bit easier, I'm going to hide a lot of stuff. Otherwise it's going to slow down quite a bit. In fact, I'm just going to come in and hide everything except for the rocks and the character. So keep those rocks there in the character again. We're just going to hide everything else. They should hopefully help speed things up a little bit with what we're doing, because again, we do have a lot of elements coming in here, and it's starting to slow down the workflow, so just get all those things hidden. In fact, I'm not sure why I'm doing this. Hide all layers and then come over here and we're just gonna reveal than the rocks. Make sure you reveal the folder and your guy command and make sure all the individual layers air selected. If you do the height, all thing, there we go. Okay, Dokey. There's Iraq's. So now we have that, and it might make this whole process just a little bit easier. So we have the guy come in and we need that to go a little bit quicker, Okay, A little bit slower. So we have that and I'm just going to get the main motions down. First we take a moment and then he's going to jump into the distance. So we'll go to 48 just right now and have them jump over here again. We want to make sure it's still over. Laid will move it until it is no longer over laid. So right there at 0.95 for the Z property. So you gonna have this going on right now? Comes in and we want that Z property to be a 2.50 for this one as well. I might accidentally just moved that so comes in like this weights and then he's gonna jump over there. Obviously, we're going to speed or slow things down here as we feel appropriate. He'll wait a moment and then he's going to jump over to the foreground. So we'll just come in and bring this up. Looks like it's over laid. So about right there. In fact, we might want to move him up just a little bit more, just in case. There we go, so we could actually have him go right here and we'll have the camera move with him to kind of kept help. Capture all this. And once again, I accidentally had this key frame selected while doing all this. So he's supposed Teoh go into the distance and be at 0.95 right here. I keep forgetting Teoh de select my key frames while I'm doing this. So down, over and then over this way. So right now, obviously it's not looking like anything, but we have the main motions down and it's just a matter of coming in here and making those modifications. So first we want around the South, and I'm just going to attempt that by rounding off that path, so it kind of comes in like this and we'll have a look around and he's gonna jump up again . Can't will issues the up so it's blink, blink and then one more over here. So in the air again, There we go. So jump, jump, jump! Then we need to add more finesse to this as well as some physics. We just look at this speed one more time. Speeds, actually, not too bad. I think the speed is getting there. But what we want to do now is when he comes in and lands so right here on frame 36. I'm going. Teoh, come in here. Let's say starting at frame 24 I'm going to stretch him out just a little bit. And maybe you just moving back a little bit like that. So it's gonna come in end. We're going to rotate him up a little bit like so and then over here and rotate him back. It kind of looks like this and he's gonna land at frame 35 and at frame 34 we're going to compress him in just a little bit and just nudge him down a little bit more. So it's kind of like this. We can also have a rotation like that. And then at 36 we're going to squish him down. So just like that and then we're going to keep going. So when he comes up like this, we're going to you stretch him out and then he's in the air like this. We're going to stretch and rotate, and then we will rotate again. And, of course, adjust the size as he tends to come down like this, and then we'll have him land and can rotate back like that and then squish down. So it's sort of like this. No getting closer, still have some work to do. So then we're gonna have him come out of the squish and then go up, and once again we're going to rotate so up like this, rotate over and then down in squish. And then I think I'm gonna haven't go up and rotate and squish in, and then we'll have him rotate again and come down to face the obstacles that he just went through. Try that again. So blink, blink, blink. So we're getting there. It's not looking 100% yet, but we just have a few more modifications to make, and I think things will start to look better. So we'll pause here, in, up next will finish modifying this character.
21. Polishing the Character: for this video I'm working off of 13 polishing guy dot mojo between the videos. All I did was go through and just tweak the animation a little bit so that the rotation and everything is a little bit more spot on. And so what I want to do is just to finish this up is going and add the switches for the ball, so we'll start here. And when the ball first comes down, let's go ahead and try switching this to center just to see what we can do here or front. I should say so. It's called front. You can see him come down and perhaps right before he lands right here, we'll have him look more to the right so we can come in here and what we'll do is right click and center right and then right click and then center right to when we get to that point. So it kind of looks like that and then we'll go to more frames and then just go to right so it looks like he's kind of twirling a little bit while that's working out and then we have them kind of shoot up again and So at this point, we'll have him rotate again. So we'll start and we'll have him go right to go a few up and then go right one a couple more up front and then left one and then left to and we'll leave it right there. And then as he starts to go up again, we'll start to go back. So left one front right about here. We can haven't go to the right a little bit and then perhaps a little bit more. And then he lands. And we can, of course, set that too, right? Right. When he lands, you will have him flip up. And I want him to look the other way so we can have him go up like this and about right there. We're just going to once again scale this back. There we go. There we go. So now we come back and play this out. We can see that there's a little bit more movement now when it comes to this and that last one might be a little bit, uh, too slow. So what we could probably do here you just move in and just adjust these so that they come a little bit sooner. It's all just come in picture that is up like that. We got that one mixed up. So we go like that and then we can come in you like that. There we go. So it's a little bit quicker that works. So we now have that set up in a game. We could do much more with this character. We could have a blinking When he hits, it makes impacts and all sorts of things. But I think it will actually just work for our purposes, since again, we are trying to just animate this out and create an environment and not so much work with the two D animation aspects, so we can pause the video here and up next. I'll move on to adding a little bit more atmosphere and exporting this out.
22. Animating the Camera: for this video I'm working off of animating camera dot mojo. Feel free to open up this file. Since we are working with this and it's in a three D environment, we might as well add some camera movements to help bolster what's going on. So let's go ahead and just go to frame one, and we can keep this current frame since we're establishing the shot. But what we could do is once our character comes in, let me insert a key frame at Frame 24. So he comes in. We could at this point zoom in a little bit on him if we want, so we can come in and just kind of go like that. So you have sort of this going on now. So the lands and then we could follow him from here if you want. So there we go and it goes all the way over there. But we can just take the camera and use that Z access to fall him along, go like that. So you're sort of now going like this. That and then we're going to do one more where he lands over this way. So about like that We gotta be careful with that tooty because you could see it was kind of overriding in a little bit. But then we can kind of go like this and then he lands and he's good now when he lands, I could also kind of do a a zoom out a little bit. This kind of get the original camera angle back so he could have zoomed out, and then he's like that. So there we go. We now have that three d shot established. The other thing we might want to do at this point is bring back our layers. So that way we can see what's going on. Since we're just animating with those rocks right now, you can see now I can come in here and get a better look at this so it starts and we can't really see due to that tree. So that might be something we might want to consider. Removing that foreground tree entirely might not be a bad idea. So it comes in, goes like that this and that in that now there are a couple more issues we have to work with. You can see when we zoom in as an example. We have the hills and the mountains, kind of popping out of the fire. And so what we could do in this moment just to make sure that everything is working, is we just grab those mountains in those hills and we're currently on frame 51. And that's okay just so we can see what's going on with this air. And we're just going Teoh, try to move everything back. So let's actually start with the hills. We don't want it all on the same plane so we can just push it back until it's no longer where the lava is, and we'll do the same now for the mountains. We're just going to go in and push those back so that they are behind the hills. And that might also mean we have to make some adjustments to how these look so I can just bring that out and I will bring the hills out as well. So something like that, And finally, since I am on frame 51 I'm just going to copy those key frames over to frame one and paste and make sure you do the same for the mountains so that way. Everything's more lined up, so now we can come in and we can do this three D adventure. Now there is one more problem I'm noticing, and it's that this tree right here is in the way and not a big deal will just come in and move it. So once again, let me locate that tree. At this point, I'm starting to wonder if I should have a different naming system for all my stuff because it's starting a little bit complicated but will just come in here and use the select layer tool and grab that tree. And again, we just want to push it out of the way we could, probably since we removed the foreground tree. Maybe we can push it more over here, or I do like that tree there. Maybe we can put it sort of like this. So it's a lower and we can kind of see how that looks. He doesn't quite clear that branch, so what I could do is just take that wrench and modify it. So it's kind of like that. So he goes over it and then he's there Now, once I do all this, I need to go back on that layer for the tree and copy all those manipulations I made and bring them back to the start here. And you want to do the same for the tree layer itself. So that way it's underneath like that, and we can come in now we have this whole thing going on, and the only other issue I see here is with that smoke. It kind of doesn't look right when he's over laid. So all I'll do is come over here to that smoke layer again. It might be easier just to take the layer selector, and we're just going to push it into the foreground a little bit more so that it's definitely overlaying like that. And once you do that once again, just copy and paste that key frame over the one so that where the smoke is, where it needs to be originally. And so now you have something like this going on now, and that smoke could also possibly be moved over maybe a little bit, just so it's not blocking him as much see, kind of come in like that. So there you go. You have that jumping around and he's ready for action. So there you go. There might be one more modification I need to make. I just noticed that background smoke is kind of floating out in the air, and that's probably due to the fact that we adjusted the hills and in the mountain and not a big deal. We're just going to bring that down a little bit and maybe just make it a little bit bigger like that. And, of course, once again, make sure it's on frame one when you're doing this, so it looks like that it looks like it belongs and everything is looking good. It looks like there might be some overlaying issues with that lava. It looks like it's kind of popping in and out of the environment as it moves. You'll see right about here. It looks like it's behind the lava and we don't want that. So once again, I'm just going to try to move this so that it will stay consistent like that and we can come over and just move it in and just kind of keep moving until it's all situated and there we go. So that's looking better. We could probably do some more stuff with this, but I'll leave it here for now and just add some final touches and then we can export it out.
23. Adding Clouds: so we have completed this scene, but there are a few more things we can do to help enhance it. So first I want to come over here to the scene folder and I'm going to go ahead here. And first let's remove that fourth tree. I had hit it, but we no longer need it, so we might as well just get rid of it. But besides that, I want to come in and make that new layer and I can name it Cloud coming here with my ad point tool. And I'll just start to fill in some points here, making sure I'm using not sharp edges for this command and is create like a wavy looking what could be a cloud, something like that. I will then select this and then using the yellow color here, just come in, click OK, and then we can go ahead and create that shape to apply it. So now we can do either one of two things to make this more transparent. You can come over here to your colors and lower the colors like this, which might be useful for our case because it allows us to see the effect in real time. You can also adjust the layer so that it is trance parents. But you can't really see that in the editor until you render things out. So we can then come in with these clouds here and start to move them into the environment where we want them. So we could move these, for instance, Back right here. I could then make a second cloud here. Let's go ahead and do that and kind of put that one down. Did you bring it up a little bit so that it's past the mountain right here? But we can also come in and shrink it up like so. And you can even go in and modify the shapes. If you wish completely up to you. And I was going to do one more, we'll do that. We can scale it like this and out like so, so that it's overlaying everything. Now we're going to move these really quick, So I want to disable the channel for the camera, and I can do this by clicking once on that green button next to the channel on the timeline that will mute it. And so that way I can just see everything without the camera moving around. And we want to come over here to our clouds. In fact, since everything is getting a little bit complicated, I'm just going to type in cloud into my layers panels that we I can access all of these and we're just going to go to the end of the animation here, which is actually about 120 frames in. I'll make sure I mark that and taking that background cloud, in fact, we could take all the clouds of a wish We could just move them and they're going to move at different speeds because of the way everything is Pai relaxing due to the distance, but can kind of go in like that and move them. And we can now go back here to the channels and see what we have going on. So let me just see select that and you can see now we have some clouds moving. It's kind of hard to tell the exact speed, just due to the fact that we do have a lot of stuff going on on screen, and so it can be kind of difficult, but I think it's going to work out for us, so you have that going on
24. Using Blend Modes and Blurs: another thing we can play around with since we are working with different effects. Here is the blend modes, and it can help, especially since we're sort of an alien landscape. And if you want to change the color palette just a little bit, so what I'll do here is make sure I have a clean slate when it comes to searching. That way I can see all my layers and I want to make a new vector inside of the scene. So has come in and make that new vector, and we're just going to name this one filter, and we have to draw it out so we can bring it to the forefront. So it's in front of everything, so I'm just going to come in here and grab my colors using my draw shaped tool. I'll choose a dark red actually thinking about this. Let's go to the effect and choose ingredient here. Under Grady INTs, we'll choose our type to be radio and for the White Center. I'll come in here and we'll make it orangish. Something like that. Click OK. You can't allow transparency if you wish, but for now I think I'm just going to leave this and then using that filter layer, I can come in and draw out this layer. Now we need to bring the layer above everything else, and we can do this simply by bringing the layer outside of the folder. You can bring it up using the Z properties, but really, there's no point we can just kick it outside of that folder and bring it up like this. And so that way it doesn't get tracked by the camera either. And now we can bring it into the forefront. Like so now, double click go into our blend modes here and we can choose, Let's say, multiply. And I'm going to bring the opacity of this layer down to about 50 and apply and then hit. Okay, now, if we were to test this filter out and you can't probably tell. But the blend mode did kick in. I think I just had a little bit too light. So let me just go back in there and let's go back to 100% that way. We haven't easier time seeing this and try it one more time. So, as you can see, things are a little bit brighter by going with this option. And as you continue to play with your different settings, you can go in here and you can adjust all your different blend modes, and you can figure out what works best for you. What's cool is you can build these blend modes up and use multiple layers to do different things. It works very similar to after effects and photo shop in that regard, where you can go in and do those things. Now, for this particular course, I'm actually going to remove the filter. I don't really feel there's a need for it, But again, if you want to have that filter on, you can do it and play with those options. Now. The final thing I would recommend when it comes to working with this scene is softening up some of the imagery, especially the stuff in the background. Now. You could do this by going in and turning on death of Field inside of Mojo, but it's a little bit hard to control, especially with all the varying elements going on on the scene. So I'm just going to do something really simple. We could go in and animate out the blurriness, depending on where he is based on the camera distance. But here I'm just going to go down and locate the mountains and the hills as well as some of the background elements, and we're just going to blow them out a little bit. So I will start with the mountains. That's probably the obvious choice. Will just double click to go in there. End. I want to come over here to the Blur radius option, and I'm not quite sure how this will look. So let's just set it to 20 to start, and we can take a look at how this will show up for us. Now. I am going to hide some things here. Just make this a little bit less of a thing That way. It doesn't take forever to render out, and we can kind of get an idea still of what's going on. So will this come in here and we'll try that will hide some of that stuff and we'll see how it looks. So we'll run to this out and you can see now that the mountains are definitely blurry, maybe a little bit too blurry, and that's OK you give us an idea So now we can go back, go into the mountains. Let's not go back to about, let's say 13 and hit OK and then for the hills we can make them, Let's say at around nine and hit OK and then we have the lava will leave that, as is we have a background tree. We can put that to, let's say, eight hit. Okay, that one's not too far in the background, but we could come in any way and maybe put a three on that tree and for the clouds. I do want to blur those out, so find your clouds and I'll set that to 10. For each of those. The sun can also stand to be blurred out. A bit ends when I want to do is make sure I have all of the cloud selected as well. So come in here and just make those blurry. Now, as you do this, it's going to add more to your render time, just so you know. But again it's worth it to me. And honestly, this is something I actually usually end up doing inside of after effects. I like to do all this effects work near the end inside there. But as you can see, you can do this stuff in mojo. And as I read this out, you can see that the hills and the mountains and the sun and a few other elements are blurred out and ready to go. So what I would do here now between this video and the last is go through and make sure that everything that needs to be blurred out is like that big piece of smoke and the one in the distance. And I think everything else is probably OK. So once we have that, we can move on to exporting this out for the world to see.
25. Exporting Your Work: for this video we're working off of 16 Underscore exporting dot Mojo. Feel free to open up this file. If you want the reference here, everything is pretty much complete. We could go in and do more, but I feel for the sake of this tutorial we have achieved what we set out to Dio. Of course. Make sure before you export out you turn on the camera movements. So that way we're not having that turned off. We have the whole thing exporting out and complete end. Good to go. Now, if you plan to take this to the next step inside of, let's say after effects and you want to you export out all of your items individually, it is recommended that you use layer references for this. However, since we went ahead and did all the rendering and everything inside of mojo, we're just going to render this out as a video. So that way we can share it or we can integrate it into our cartoon. So we'll go up here to the file menu file and then export animation or command e or control E. If you're on Windows here, we can start at one and go toe 1 20 And that's exactly how much animation we have. It's five seconds worth. Well, just choose an MP four format that way. It's a lower file size, and you haven't easier time looking at it, and everything else should be fine. So now we'll come in here to the exporter and choose a folder to render this out. I'll put it inside the exercise files, and we can set that up and we'll just go ahead and name this one final Render because that's the final render for this tutorial. That way you know what is inside of your exercise files so we can go ahead and hit OK, and it's going to come up and it's going to start rendering now. This can take a long time again. We do have quite a few things going on here, and it might take a little while for the software to get it all figured out. So right now what? I advises that you just have patience. Step away for a little bit, do some stretches, grab a coffee, go for a walk, talk to a friend. Whatever you want to dio, just relax and try not to think too much of this cause if you do, it might drive you crazy because it's taking so long to render. But it will render, and once it's done, hopefully you enjoy the result.
26. Final Thoughts: so to wrap up, I just want you to know that there's a lot more you can do with three D design inside of Mojo. This is a very basic example. I went through it pretty quick, but the results are actually pretty good for the amount of time I spent on it. Now, when it comes to my own personal workflow, I typically do not stop here. I'll go further with it, and I'll take it into after effects, separating out the layers from Mojo and then rebuilding the scene in after effects and adding different elements and filters and, of course effects to enhance the scene even more. And so, if you're interested in that, I might do a follow up course where we take this scene into after effects to do all that. So until then, keep practicing inside of mojo. Keep building your scenes and keep animating. Thanks for watching, and I'll see you next time
 Chad Troftgruben, Freelance Animator and Screencaster