Transcripts
1. Introduction: Hi, my name is Mary Rose. I've been sewing for
over ten years now. And one of the most
intimidating aspects when I first got started was learning
how to use the searcher. I first got my surgery to so
exclusively knit fabrics. I love the idea of
having something too quickly and professionally
finished my seams. And I thought it
would make my sewing like ten times faster. However, after
getting my surgery, I developed a phobia about it. I kept it with the same thread. I rarely change any of the settings and I just used it for chain stitching alone, which is fine, but I was barely tapping
into its potential. In this class, you will learn all the parts and accessories
you need for your surgery. How to thread the machine,
basic operations, stitches, advanced stitches, and the most important cleaning and maintenance of your machine. So at last you many
years to come. So this class is perfect for anyone looking
to buy a surgery for the first time or someone
who already has a surgery. And they're trying to figure out how to use it for your project. You simply have to
create a sample swatch of any of the stitches you are able to accomplish
in this class. I've provided a stitch, a diary to help
catalog and record the settings in any notes
for your specific machine. This really helps my process
and will help you going from setting to setting
a lot easier Up next, using my machine as an example, I'm going to cover
all the parts and accessories of the searcher.
2. Parts & Accessories : Using my machine as an example, I'll cover all of
the basic parts and accessories that
come with the searcher. Here on the side of the machine, you have the cord in
on an off switch. The cord is attached
to the foot pedal, which gauges the speed that you saw and is used
down at the foot. Here at the front, you
have the tension dials. The two on the left are for
the needles and the two on the right are for the upper
and lower looper thread. Moving onto the back
of the machine where the thread tree is that holds the thread here on the
little thread holders that you may need to move to
keep the thread secure. That doesn't fall off as you. So the lever on the side raises and
lowers the presser foot, which is connected to
the shank in the back. The presser feet are removable, interchangeable, creating
different stitch options. Here on the inside you have the knives that
I'm pointing to. Those can be changed with
the normal screwdriver. There are two blades, the upper and lower, and it cuts the fabric as you. So here are my needles with the model on the screen
easily removable. Here on the right is the hand wheel that is
turned towards you. You will use the iloc to
change the needle's position. Here is a little storage
component that unlocks the free arm so you can do
things like sleeves easily. Coming down to the
left side panel where you can
disengage the knife. You can see that up
here the knife will no longer move and then
change things like length, width and stitch
differential feed ratio. Here's opening the front cover. All of these internal
mechanisms you'll have to get comfortable with
when we thread. Here's a lesser known component. Then I'm changing the position for called the stitch finger. This can be removed to get specialty stitches
like the rolled hem. Standard practice
for chain stitches is just to keep it
inside the machine. Tweezers are the most important accessory for threatening. Keep them on hand at all times. Here are the detachable
presser feet. My machine has three options. You might have
something different. I'll be showing them
multipurpose foot later. Here are my basic
tools is screwdriver and then the Allen
wrench for my needles. Make sure you keep
something sharp on hand. The cut the thread, scissors or snips do well. Something you may need to
purchase at some machine oil. I'll be demonstrating
how to use this in the machine maintenance
and cleaning section. You will also need a
dusk brush of some sort. Artists brush work well too. Here's an optional accessory, a vacuum attachment to suck out the dust
from the machine. I just attach this
to my normal vacuum. Alright, Those are all of
the parts of the surgery. In the next lesson, I'm going to walk you through the entire threading process.
3. Threading: Welcome back. Now we're going to
thread the machine, makes sure you have
your tweezers. I'll be showing you
the fourth red option. If your machine is threatened life mine simply
cut the threads at the top and then you'll want to change the tension this to zero. This makes it easier to simply pull the thread out
of the machine. Raise the presser foot, move the needle to
the highest position, and then slowly turning
the machine on. Pull out the thread. Go slowly and stop. If you feel any tension. When you're done,
check the inside of the machine for any
broken threads to remove. And don't forget to
turn off the machine. Next you want to change the machine tension back to
four all the way across. This is the standard
starting position for the basic chain stitch. I'm going to be demonstrating
threatening with all four threads to start raise your needle
to its highest position. And now you're going to thread the upper looper or
the third one across, start by pulling
the thread through the thread tree and then
follow the numbers. Release the tension disk
with three as you pull it through so it will be
properly installed. Now you will follow the
guides inside of the machine, 56.7 on the hooks. And then using the tweezers, you want to push
the thread through the upper loop or
towards the back. Now for the thread through 56.7, carefully and then
pick up your tweezers. You can use a three letter or a magnifying glass to
help this process. But you want to carefully push the thread through
the upper looper, makes sure the presser foot is raised because
you're going to want to pull the thread back and
under the presser foot, giving yourself four
or 5 " of clearance. So you don't actually, um, thread the machine. Up. Next, we're going to
thread the lower looper. This is in the fourth position. Pull the thread
through the Fred tree and then to the die number to release the tension this
and pull it tight through. Just like before, you're
going to hook in 56.7. But unlike the last one, there is a new mechanism
that blue arrow, it comes out and you
will hook it and then pull the thread
through the lower looper. Now I'm going to demonstrate hook the threads like before. Following the blue
line this time. Give yourself a lot of thread
clearance, pull it taut. So you have some working thread. And now you want to pull out that blue arrow
lever right there. Then I'm pointing to and then in the back there's a
little latch that you want to hook the thread
on right back there. It's a group that
thread fits perfectly. Use the tweezers and your finger to create some
tension on the thread. Latch into that lever
and push it closed. It's a little
difficult sometimes. And now you're going to
thread the lower looper, making sure you're pulling
it straight back in through. So it's under the upper looper. Do not criss cross the threads
or you'll have to do it. Again. It can be a little tricky, but just slowly pull it through
and out through the back. Just like before. Try not to catch on
anything and give yourself some extra thread
at the back and pull. Now we just have the
needle to thread. You're going to start with
the one on the right, which is in position two, and then the one on the left, starting at the top,
you want to thread it through thread Stan
and then through the guide and release the tension disk and
pull it through. Following the arrows,
you just want to pull the thread through four
and then around the five, pull some extra thread
and then pull it through that little guide in
the front of the needles. This helps keep it in track. And then you just want to push the thread through
the right needle. It can be a little tricky. Take your time waxing
the thread can help. In just like with
the other threads. The goal is to pull
it back in under the presser foot to join
the rest of the threads. Makes sure all of the
threads are together. And then we can move on
to the final left needle, goes through the top,
through the guide and pull it through the
tension just like before. Then you are going to
simply do the same, pulling it around the number five and into the guide
right there in the front. Be careful the thread can
get tangled pretty easily. And you just want to push the thread right through
that left needle. Again trying not to
twist or not the thread. Once you get it through,
you just want to pull the thread slowly
towards the back. And on the right under the presser foot joining
the rest of the threads. Now we're going
to make sure that all the threads are secured
behind the presser foot. And we can turn on the machine
and test a chain stitch. Slowly press down on
the foot pedal and let the machine work
to create the chain. If you do not get a chain, cut the threads and try again. Now trim it leaving
three to 4 ". Now your machine is
ready to join me in the next lesson where I cover
a basic machine operations.
4. Machine Operation: Welcome back. Let's cover the basic operation
mechanics of the surgery. I've set my machine onto
the standard settings. You may want to change
the stitch length and width based on the stitch style or the
thickness of the fabric. Here is a stitch width with
five being the standard. R stands for rolled hem, which we'll cover later. It does take a little
muscle to move the levers, but you should rarely need
to change the settings. This disengages the knife. It will stop it
from moving as you So last thing to cover
is differential feed. Differential fee refers
to the feed dogs under the presser foot
that pulls the fabric. The searcher has two
sets, front and back. This lever changes the speed
of just the front feed dogs, which changes the ratio
of speed between the two. When set at one, both are moving at
the same speed. Less than one slows down the front feed dogs
stretching the fabric as you. So this is good for lightweight
fabric that puckers. When you move it to
greater than one, you will gather or
ruffle the fabric. This is great for a uniform
gathering of the fabric. However, if you were sewing with stretchy fabric, that gets wavy, you might want to
use a higher value, prevents the stretchy
fabric from being pulled as the stitches made, which is what creates
the way the effect. I know this sounds a
little complicated, but all you have to think
about is low equals slow, which equals pool and stretches. And high number equals
fast, which equals rippled. Tension refers to the color
number dials on the front. This is both the pro and
con of using a surgery. You have so much variability, you can create
different stitches and techniques just by
changing these numbers. But it tends to be a
little troublesome. It can take time to learn the placement and
tension for all four and figure out how each individual tension
affects the whole stitch. The loopers are what
you want to adjust first, let's do a test. Make sure you have a tail
chain of three to 4 ". Lift the presser foot so the swatches right under
an up against the blade. I like to look at
the notch on my foot to eyeball where the
stitches will start. Gently press on
the foot pedal and the machine will pull
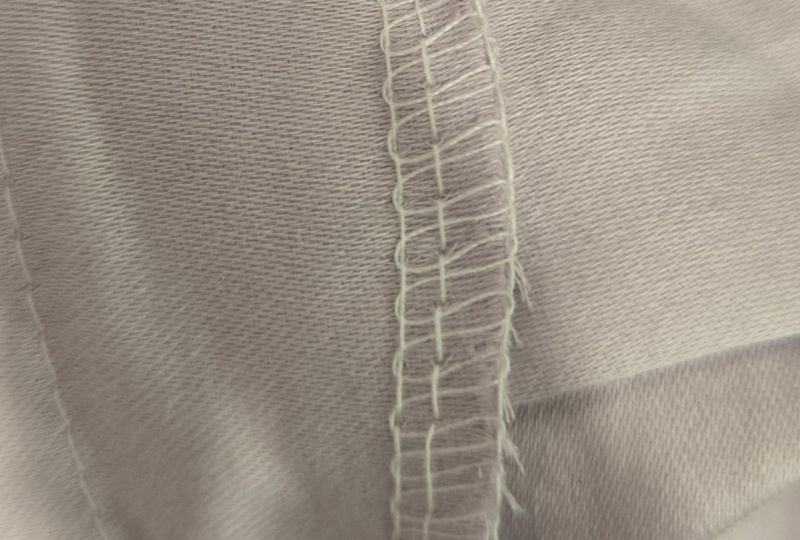
the fabric for you, cutting the edge as you go. The thread should be at the top with both loopers
on equal sides, with a seam in the middle
and at the bottom. If one of the sides of a
looper thread is pooled, you need to adjust the tension. I'm going to lower
the looper tension to give an example of
what that looks like. As you can see, the looper
thread is hanging off the top of the edge and there's a
lot more loose and unruly. So the tension definitely
needs tightened. Next, I'm going to
show you what it looks like when I increase
the tension. Here's the result. You can tell that the looper
threads are a lot more ten. It looks pretty good. I could even say this
is a good result. But the back does
look a little pinch, which is how, you know,
it's a little tight. Finally, I wanted to show
you an imbalance examples. So I've loosened the
lower loop or again, and we can see what
that looks like. You wouldn't think it
would be very obvious, but you can see that the
blue threads is little peeking out over the edge
just show it's a lot looser. And it just seems like it's imbalanced with
the front stitch. Now I'm going to show a
final example of them, even in a little tighter to
get that perfect stitch. Here's the balanced stitch. The stitches right
up to the edge. There's no puckering, no loose threads in the back looks
is balances the front. You may be wondering, what
do you do with the tails? You just cut them off? No. You don't want to just cut them off because they can unravel, use them for a check to
lock in the edges or weave in the tail with a tapestry needle or
something equivalent. It can be a little challenging, but it's nice if you have solid surge edges like
for a napkin e.g. to get that clean finish. But most of the time I'm just
going to surge right over the tails of my other seems
try to keep them locked. But this is a great method. If you have raw corners. After you weave it through, you can take the
snips and snip off any remainder and extra
secure it with the fray, check if you want, but it's good to go. I know the surge edge can
look very intimidating, but it's actually
not that hard to remove the surge stitch. You want to focus on the needle threads at the
bottom and in the middle. I just wanted to go and create a section where the
threads are ripped out. And then once you do that, you can open up
the seam and start tearing out the stitches across. Don't worry about
the looper threads. You just focus on
the needle threads. They hold everything together. Once you get rid of
the needle thread, the looper thread will
just follow this side. Just keep pulling and cutting the needle thread to
unlock the stitch. Once it's open, it
looks a lot like a regular seem and
then you can just pull off the remainder thread. Now let's talk about three
thread applications. First you want to change the needle so there's
only one left. I'm going to remove
my left needle. I'm just using the tool, loosening it and
gently removing it. It can be a little challenging, but removing the presser foot
really helps this process. You can also try to remove
the needle wallets, threatened by lifting
the presser foot, moving the needle to
the highest position, and then carefully
cutting that thread and removing that needle carefully use your tweezers to
pull on the thread. You'll just want to
make sure you get that left thread and
it may get tangled, which is why I don't
always recommend this. It can be challenging to not mess up the threading
of the machine. But if you can successfully
remove the thread, then you just remove the needle
like I showed previously. Use a test swatch to
test and make sure that you got the threading correct
and nothing is broken. The same principles
apply as checking the tension as when
doing the fourth red. As you can see, I have
the loosen things a little bit to get
the perfect tension. But now I'm doing my final
example with it dialed in. And I can show you what the three threads
should look like. Very similar to the fourth row. You're just missing
that middle stitch. That middle stitches
now the bottom stitch, as you can see, now that you know
how to chain stitch, meet me in the next lesson to learn three additional stitches.
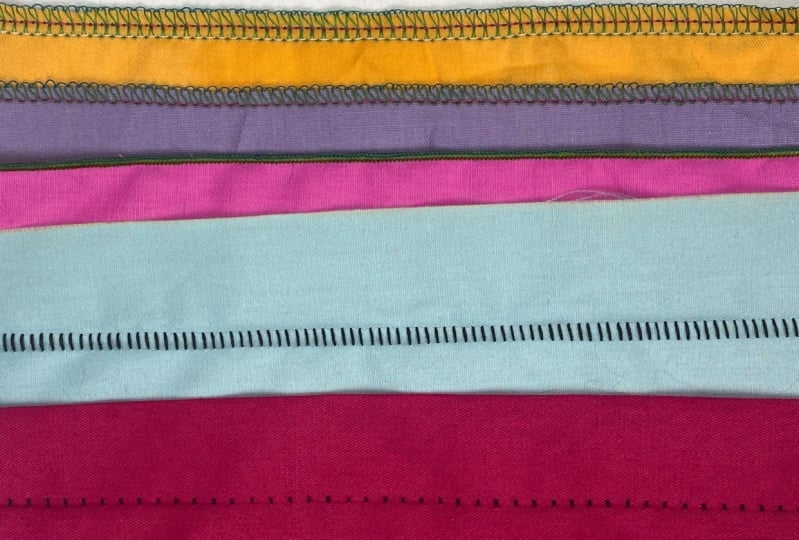
5. Specialty Stitches: Welcome back. In this lesson we're going
to learn three new stitches, flat lock, rolled
hem, and blind him, which is what we're going to use this multi-purpose foot next, this might be called
the blind him or multi foot for your machine. But either way, the main
feature is the screw that changes where the guide goes so you can make
precision stitches. Now you're going to
turn off your machine, raise your presser foot. Now there's a little
black lever behind the presser foot that you
just want to press and it will fall down and
you can remove it, store it safely, and get
out the multipurpose foot. You'll notice the
bar at the back, that's where it's going
to attach from the shank. So you just want to
visually place it under using the right lever
to raise the foot. When it's lined up, hold that back lever
again and then put down the presser foot and it should snap into place and
you're ready to go. Now the change the tension
for the blind hem stitch, I'm only using the right
needle and you want to lower the tension 0-2 for the
upper loop or five, this seven for the lower
loop or two to four, take a folded hem, turn the wrong side
of the fabric out, fold the fabric ones, and then back onto itself. The machine will
stitch along the edge, just catching the
fold which will look invisible when unfolded. Here it is again, take the fold and turn
it over on itself. This is the wrong side. Make sure your hem is
even all the way around. You may want to pin and measure to keep this fold consistent. For the example, you
just want to keep your eye on the fold
and the needle. We're going to be placing this under the
multipurpose foot and adjusting screw so the needle
just barely hits the fold. The closer you are to the folds, the more invisible it
will look on the outside. So this may take a few tries to get the most invisible stitch. Now you just want to impress
on the foot pedal and slowly let the machine
take the fabric, keep your eye on the fold. So it stays right
next to the guide so that your hem stays
consistent throughout. My favorite part
about this stitch is that the knife
cleans up the edge, creating a really nice
clean finish on the inside. Leave a bit of a chain and cut. Here's the result. You just want to unfold
and press out the same. So I think we need to try again, since this looks more
like a flat box ditch, need to get closer to the fold. I dialed in my foot to be
even closer to the fold. You can see the needles just
barely touching that fold. So hopefully we'll have a
very good blind hem resolve. Here's the finished product. If this was matching thread, I think it'd be
nearly invisible. So, yeah, this is why I
really loved this foot. It's great for blind
hymns of all types. The next stitch is called
the flat lock stitch. I don't recommend this
on fragile fabric. It is a great option for the seamless look of
body suits or swimwear. The recommended settings for my machine or a needle
tension of zero to two, upper loop or four to five and the lower looper
of eight to nine, also a length of two to four. I'm keeping it on
the standard length. For my example, I'm only using the right needle
with three threads. So you want to take a fold and you're going to stitch
along the folded edge. This would act as a
decorative treatment. The second option is
to take two pieces of fabric or a fold and create a seam as a piecing technique, for this, you would want
to disengage the blade. But for my example, I'm just going to show
you it on the fold. Place the folded edge under the multipurpose foot and
adjust the gods so that the needle is
around an eighth of an inch inside of the folder. You want the loopers to be hanging off the
edge of the fabric, giving it room to turn. With the needle in
the right position, you're gonna get a
narrow ladder stitch. If you want a more
wider decorative look, use the left needle. Here's the final result. You have to pull it out to
get that ladder stitch. I do think I want to try a second pass because it
seems a little tight. But that's what it looks like. The front and the back. I'm adjusting the guide so the needle will come in a little bit more and giving
it a second pass. Same thing as before. Making sure I'm keeping the
fold up against the guide. Here. You want to make sure that the loopers are off of the edge. This will give you turning room. You can see that here. When you unfold it, the stitches will come flat
like the first example, you have to tug a little bit. Pressing it out with
the iron really helps. But the lower needle
tension is what makes the ladder
stitch possible. The final stitches,
the narrow rolled him. It's very useful for
finishing off then Ghazi fabric or creating
decorative edges. You do need to change the
settings on the side panel, but just to the our settings, which means rolled him. So both the length and the width change it to the R and
you're good to go. For my attention settings, I'm changing the
right needle to form. The upper loop or two is six and the lower looper
two, three-and-a-half. This does not mean these
will be your settings. So tests with your machine. Removing the stitch
finger as necessary to complete the thin
rolled him look, raise the presser foot and lower the upper looper into
its lowest position. Then you're safe to remove
the stitch finger by pressing the lever and it will
just pop out like that and store it
for safekeeping. I also need to remove my
multipurpose foot and replace it with a universal foot for the rolled hem stitch. Place the fabric onto
the foot and lower the presser foot and let
the machine do the work. This stitch is a lot slower
than the other stitches, so don't get frustrated and try to keep the fabric straight. Here's the results of
the first attempts. It seems that the blue
thread is a little loose. It doesn't seem
as Titan uniform, so I'm going to
give it a second go after tightening the loopers. This is the result E1. It looks very clean and uniform in both sides look
exactly the same. When you think
decorative thread, it really creates a
beautiful Bound result. I love using this as
a decorative finish. Here's the first
and second attempt. I definitely needed to tighten the tension on the loopers. After doing these
decorative stitches, make sure you return
your machine to the normal settings
so you don't get confused when you go
back to it later. To replace this stitch finger
lower the upper looper, raise the presser
foot and hold in that lever as you insert
it where the colors match. Once you've placed that
back in your machine, you want to go back
to the side panel in switch the settings back
to the normal settings. Mine are boxed in and black, five with three links and keeping the
differential fee that one. Alright, Those are the
specialty stitches I wanted to show you today. But keep your eye out for
any other presser feet that might've come with
your machine like the gathering foot tape, foot, piping foot or
Perl sequence foot. We're not done yet. Stay tuned for the next and
maybe most important lesson, machine maintenance.
6. Machine Maintenance : Welcome back. Now, I want to show you how
to change the needles or possibly install them
for the first time. Surgeries utilize two needles. You want to change
them every couple of projects or if a needle breaks, you just need the tool to loosen the screw to remove
them and replace them. I'm using my universal needles. I'll put the model on the screen recommended
by my manual. I just use my finger, but there are needle
holders that you can also use the whole
the needles in place. Righty, tighty, lefty, loosey. And try to be careful not to
drop them in your machine. I like to remove
the presser foot to give myself some
more working room and then toss the
old needles and replace them with
brand new ones. You want to be careful that
you're paying attention, that you're putting the
needle in the right way. There is a rounded
side and a flat side. The flat side, as you can see, goes away from you. So I like to look at the eye of the needle to make sure I'm putting it in the
right direction. And then you want
to go one at a time using your fingers to
hold them in place, the left needle will be
slightly higher than the right. And I just want to
hold them vaguely in the right place and then Use the Allen wrench
to tighten them. When you tighten the needles, they will walk in into
their correct position. So don't worry too
much about getting them exactly in the right place. Once they're secure, give
them a little tug to make sure they're not going to come out and you're good to go. Now for changing the
blades, as you can see, you just need a
basic screwdriver to loosen the upper
and lower blade. The main feature is
making sure that you keep the alignment correct
when re-install the blades, you can see there's about a millimeter of distance between the lower blade and
the stitch plate and you want to make sure
that stays consistent. Here are some replacement
blades I purchased online. You just want to make
sure you don't lose the original washers that
came with the machine. I've only had to replace my blades twice in
the last six years. So it's not a common problem, but I wouldn't be mindful
of sowing over pins because that can make
your blade stall quickly. Alright, let's talk about the most important thing,
machine maintenance. Just sewing a single
project can make my machine dirty enough
to warrant cleaning. You'll want to remove
all the threads first, just like before cutting them. And then changing the
tension to zero and slowly and carefully removing any excess threads
from the machine. They can get a little tangled. So tweezers might be helpful. There we go. You'll want to
unplug your machine so you don't cause any
accidents while you're on the inside and start to remove pieces like the
needles and the presser foot. To remove the presser foot raised the lever
and you just want to press that back switch on the back
of the presser foot, which we'll drop it
down and you can store it away for safekeeping. For safety reasons, you want
to disengage the knife. And now let's first
clean the tension does get five to ten pieces of thread or a paper towel and swipe it
in-between the desk. For me, I always get
a lot of cat here. I do this around monthly so the disk don't get
blocked by PFAS inland. Looking inside of the machine, I want to remove the
stitch fingers so I lower the upper looper
to its lowest position, raise the presser foot, and then press that lever there. And it will just pop out and store with the
sich finger removed. We can now remove the stitch
plate with the screwdriver. There's only one screw on my machine and it's
pretty easy to remove. Just don't lose it. Moving the stitch
plate can be a little tricky because it gets
cotton everything, but just try to move it towards the side and it should be good. Here's what the stitch plate
looks like on my machine. Refer to your manual. I'm going to show you how I clean and oil my machine next. So you'll need the dusk brush
and starting from the top, I just want to brush down all
of the big pieces of fuzz. I'm going to finish
this off with the vacuum, but for now, I'm just trying to get most of the dust and
all the nooks and crannies into a large pile at the bottom of the machine
to just suck it away. While it might be easier, I don't recommend Ken error because that can push the dirt and dust back into the mechanisms of the machine
where you can't reach it. Now I'm going to take
the vacuum and just suck away all of that extra dust. This is an attachment
that goes to my regular vacuum and
it's pretty easy to use. It's nice I can
get it all the way back into the all the
notes and crannies. This type of cleaning
needs to happen after every major
project because the nature of the
searcher creates so much Lynn and all of
that cleaning though, removes the oil which the moving parts need
to work properly. So that's why we are no oil are machines just as regularly. You can get machine oil easily and just want to put it
in the moving parts. Based on your manual, you can see the three
areas that I like to select and just put
a drop or two on those areas for the piston you
want to oil both above and below because you
want it to work into the mechanisms so it
gets fully incorporated. After you're done with the oil, you want to use the hand
wheel and move it towards you to really get that oil
inside of the machine. For me, my machine
stopped making a weird clunking noise after I started regularly oiling it. Now return everything
to the way you found it starting with
the stitch plate. Turn the screw and tighten it. In next step, return the
stitch finger to its position. Make sure you lower the
upper looper two lowest position before you try to
return the stitch finger, press that lever and it should
go right back into place. Return the presser foot. Remember to hold
that little latch on the back and it
will snap into place. Now you want to return the
needles one at a time, being careful not to drop
them into the machine. In with that. That's everything you
need to know to keep your machine working
for many years to come.
7. Class Project : For your project, I don't
want to overwhelm you with something complicated that
requires a plan or supplies. I simply want you to spend some time getting to
know your machine. All I want from you
is a sample swatch to show any of the stitches
you are able to accomplish. Just the basic chain stitch is perfect if that's what your
machine is capable of, extra points if you try all different types of
stitches I've shown or show a different comparison of tension settings
from beginning, the end, showing how you dial in your machine for
specific type of fabric. That is also something that you need to practice
and practice, practice to get right. Remember to download
and print out or use digitally
the stitch diary so you can document all the settings and notes
you need for your machine. I created this PDF, so it's really easy to
use and to keep close at hand so you can keep
using it in the future. For me, it can be
challenging to talk myself into using my machine and
changing the settings for fear, I'll mess it up somehow. Nested Shari helps
cushion the anxiety I feel when I have to change
the settings on my machine, it makes it a lot easier to have everything I
need at a glance. So make sure you fill
it out correctly for your machine so you can always call back to
it when you need it. Please remember to post your projects in the
project gallery section. It's a great place to ask
any questions or show any finished projects
you were able to accomplish after
taking this class. Thanks for making it to the end.
8. Thank You: Congratulations, you've finally made it
to the end of the class. You are now a surge or master. In this class, you've learned all the parts and
components of a surgery, how to thread the machine. The basic operations
of the machine, and including
specialty stitches. Remember, you can always
refer back to this class when you need to clean your machine or when
you're trying to stitch, you haven't tried in awhile, like the flat lock or
rolled hem stitch. So keep your manual handy and remember that you
are going to have to learn the same
things over and over again before you're
comfortable with it. And that's okay. I know getting comfy with a
new machine can take time. If you have any
questions at all, make sure you ask them in the discussion section
of this class. I'll be there to answer
anything you need if you liked this class and want to see
more related content for me, hit the Follow button
up next to my name and you'll be notified
of any future classes. Please feel free to
leave me a review and let me know if you
enjoyed this class or what I can improve this
type of feedback helps me create better
classes in the future. I would love to see your example swatches or respond to any questions
you might have. So please upload your swatches
to the project gallery. Alright, thank you so much
for taking this class. I'll see you in the next one.
 Mary Rose, Illustrator & Designer