Transcripts
1. Intro: Are you an artist or
a graphic designer? And do you want to sell your art as digital
products are mine, then I have the perfect
course for you. I'm NGO camp. I'm an artist and a
graphic designer, and I create watercolor art, fonts and illustrations for products and companies
all over the world. I've been selling my
designs online since 2012 and I can help
you do the same. Now in this course, we won't be going over how to create the
digital products, but we will go over
which products you could make and how to
prepare them for sale, how to test out the market, how to launch a product. We will go over where to
sell them online and we will focus on the marketplaces
that have worked for me, like Etsy, Creative Market, and of course, your own webshop. I will help you with this
journey and show you the exact steps that
you need to take.
2. Which digital products to make: Today we will be looking into which digital products
you can make. Now, before you can choose which products you want to make, you'll want to figure out who you are as an
artist or designer. Do you want to create art
like watercolors or line art? Or would you rather
focus on graphic design, logos or wedding invitations? Or what about creating
more than one thing? Like I do? I create watercolor,
our illustrations, and also graphic design like
logos, fonts, and templates. In this class, I will help you choose which products to make. When thinking about the
products you could make, it's important to
consider your skill set. What are your talents? What are you experienced in? Start by focusing on the things that you already
know how to create. Focus on the product so you can already make with
your current skill set and slowly work your way into diversifying
your products. I'm sure that you
can do more than you think you are capable of. Another way to think of possible
products to offer is to take a look at artists or designers that you
follow on social media, especially those
artists that you admire and you seem to
have a similar audience. Take a look at the shop
section of their website and take a close look at
the products they offer. Take note of the products
that you love and those you think would be a
good fit for your clients. You may also want to consider
your client's needs. If you have an idea of
who your ideal client is or the type of buyer
you want to attract. Then you'll want to create digital products that they need. Products that feel
some kind of gap that solve a problem for them
or make them gain time. Or simply because they do not have the talent to
do what you do best. These are some of
the main reasons people will pay for
your creations. Keep in mind who
you're selling to. Ask yourself the
following questions. What does my target client need? What type of products could
I create to fill their need? For example, my ideal client
is a female graphic designer that is also a
stay-at-home mom who only might have an hour
to work at a time. So if they're looking to create a new logo for themselves
or for their client, I offer a range of
products for them, like a fresh new font
or some botanical art. They can easily
create a new logo. And if that's not enough, I use an offer pre-made,
ready-to-use logo templates. So all they have to do is add their business name and
their logo is ready. Another great way to find
new products to make is by looking at trends on
social media and Pinterest. I know you might be thinking
that you want to stay away from what everyone
else is creating. But if you want to run
a profitable business, you also need to keep a
pulse on what's trending. Keep a lookout for popular
styles, colors, or fonts. Now this is what
people are buying. So you might want to
keep that in mind and combine it with
your own style. Now, I wish I could predict
or even create new trends. And sometimes you are able to do so when creating
something new. Some popular trends at the
moment, our watercolors, even though I don t think this
will ever go out of style, just like jeans or
white T-shirts. And we're also seeing lots of neutral shades and new
tones at the moment. We're also seeing Cera
fonts combined with signature font and lots
of botanical accents. Now let's look at
what brings you joy. The process of creating products should be exciting
and enjoyable. So don't forget to ask yourself, what are the products that
you enjoy creating the most? What brings you joy? Find out which products
you really want to create and which fit your style. Being able to put
your heart and soul into product will
definitely show, and it's highly
probable that these will end up being
your best products. For this class, I would
like you to create a list of possible products
that you can make. You can use the printable
worksheets that can be found in the download
section of this class. It presents a range of digital
products that you could make and allows you to take off the ones that you
want to focus on. There's also a blank
section where you can add products
that are not listed. Some ideas for new products
are pre-made logos, patterns, social media templates,
wedding invitations, fonts, watercolor
graphics, or mock-ups. Finding products to make is about finding those
products that strike the right balance
between what your clients want, what you enjoy creating, and what your skill set
allows you to create. The most important thing you want to keep in mind when making new products is to find out what your client
wants and needs. What is the one product that
is going to save them time? People will pay for convenience. Whatever saves them time
will also save them money. My final tip is to not spend too much time finding
the perfect products. Start with what you
already know how to create and just list
them in your shop. By doing so, you will be able to get valuable
feedback and find out which products resonate
most with your clients. And in turn, you
can focus on those.
3. Preparing digital products: In this class, we will be going over everything you
need to consider when preparing your
digital products in order for them to be
ready to sell online. Now, when creating
digital products, the first thing you
need to think about is what file types
you will provide. These needs to be digital files
that buyers can download. So if you've created art work, you will have to scan
and digitize them first. Now here's an example
of the files of my latest watercolor
collection, floral vines. Here you can see I have
four different folders. This is the final folder
that will be zipped and then upload it to the different
marketplaces for sale. I have a folder with the work files or
folder with a promo, images and videos, and then
also won with preview images, which I'll show you later. First, let me show
you the final files. First of all, we got illustration
folder here you can see all of the different
illustrations that I've added to this product. These are all PNG files, and I like to keep them
as high as possible and at least a thousand
pixels at 300 DPI. I've also got a folder with all the different
watercolors that I have. These are also PNG, so I've removed
the background and then I've got the
arrangements that I've added. I made these in
Photoshop with all of the different
illustrations on the watercolor elements
and also the wreath, which I also love to add. Then let's go back. I'll go to the work files now, let me show you what the
workforce looks like. So this is the PSD file that
I use to create the breeze. I added all of the
single elements here and then I use
them to create reads. I also used the
watercolor elements to create different reads with and let me
show you the size. It's 5 thousand by
5 thousand pixels. And then resolution is 300 DPI, which you will need if you want to be able to use it for print. So all of the final files
are always 300 DPI. Okay, so let's recap. Your final files need to
be high resolution at 300 DPI and at least around
thousand pixels in size. My advice is to add
more than one file type so viruses are able to use
them in more than one program. Keep in mind that not
everyone works with it. Okay, So if you offer vector
files for Illustrator, also be sure to add PNG files so buyers can use them in
programs like Word or Canva. Or if you offer peace, the files for
Photoshop also offer JPEG files that can be used
in almost any program. Most marketplaces allow you
to upload one file only. So you will have to zip your files before
you can upload them. Also keep in mind
that each marketplace has a different file size limit. For Creative Market,
this is four gigabytes, which is quite large. And personally, I try and
keep my products under 500 megabytes so buyers
can easily download them. The file size limit for Etsy is quite a bit
smaller as you can upload five files that are no larger than 20 megabytes each. So in total a 100 megabytes. Now let's take a look
at our preview images. In this folder, I have the preview images that I upload two different
marketplaces. And then in this folder, I also have preview images
which I use for promotion. Let me just show you real quick. I also created some short videos that I can use for stories on Instagram and
some longer images that I also use for Pinterest. And then for these
preview images, these are the ones
that I will use for all the different
marketplaces like Creative Market and Etsy. And I create them in Photoshop. Some marketplaces have
a different file size for the preview images. A universal size you can
use is 2 thousand by 1338. And then I use 72 DPI, which is low resolution
as you only need them for the web and they
don't need to be printed, so I just keep them small. So this is my PSD file
and what I do is I create different folders for all of the different
types of images. So I'll have a folder
for the cover. Four different mockups
like this card, and then a collage
or wedding invites. And then what I do
is I build them all here in Photoshop and then I save them as a JPEG when
creating preview images, there are three different
types that you must include. First of all, we've
got the cover image. The cover is the heart
and soul of your product. This image is what will attract buyers to click on your product. So add a title and tagline and images that describe exactly
what your product is about. Also makes sure that the
title and images are large enough when viewing
in a small thumbnail size. Next, we've got mockups. Using mockups are great way to show how your
product can be used. Depending on what type of
product you've created. You can display on different
mockups like stationery, mood boards, or wedding invites. To create your preview images, you can create your own
photos or mock-ups, or use free stock
images from Unsplash or mock-ups that
you can purchase from sites like Creative Market. Last but not least, you should add one
or two images of everything that is
included in your product. Keep in mind that some buyers, they don't read the
full description. So to compensate that
you can use texts in your preview images to
highlight important features of your products like vector and PNG files included or compatible with
procreate only. This is great for buyers who
do not read descriptions, so they are still able
to see what's included. The title of your product. You'll want to add as many
search words as possible. When bars search for products
within a marketplace, the titles are an
important factor as to how high your product
will rank in search. You'll want your
products to show up as high as possible, right? So try and use words in your titles that buyers
will use in the search bar. An example of a poor title
is peachy fields the dreams. Now, this may sound like
a beautiful title to you, but it really doesn't describe
what the product is about. It's better to use
keywords in your titles. For example, pink watercolor
flower illustrations. I know this may sound
a little boring, but we'll rank much
higher in search. Next, let's take a
look at descriptions. Keep your texts short
and to the point, wires do not like to read, so do not write a
lengthy description. I like to use one or two
sentences to talk about the inspiration
behind the product and what they can expect. And then next, I like
to use bullet points on the exact files that are
included in the download. At the end of the description, I will let them know how
this product will make their life easier and
invite them to purchase it. To make your product
rank higher in search, you should add tags or keywords when you
upload your product. These tags are words that
describe your product and are used so buyers can find
your product via search. I keep my most used tags
in an Excel document so I can easily copy and paste them when I upload
a new product, use specific words to describe what your
product is about. Examples of tags are watercolor, illustration, wedding,
romantic, wreath, or green. For more elaborate products like pre-made logos or seen creators, it might be helpful to add
instructions to your products. This is a great way to minimize support questions
from buyers to you. This may seem like
obvious steps, but throughout the years, I've had lots of basic
support questions. A few questions you could
answer are how to unzip files, how to use the product, how to change the colors. Another important factor to consider is the price
of your product. You do not want to
underprice your product, as it may seem like it has
less value or lesser quality, but you also do not
want to overwrite it as buyers might find a
similar product for less. What I usually do is take a look at what similar
products are priced and then I price my own product at the higher end of
the average price. Once you've taken all
of these elements into consideration and apply
them to your product. Your product is ready to be uploaded to
your online shops.
4. Test out the market: Testing the market is
a great way to get a feel of the market and
the types of products that you could
create when creating your first product starts small. Create a product that does
not require much time or effort so that you
can test out the market. You don't want to
spend all your time creating an elaborate
product just to find out that it
doesn't resonate with your audience and that
it's not selling. Create an MVP. Mvp is a minimal
viable products. So the purpose of
building an MVP is to launch a product quickly
without a lot of effort, with a small budget. So this will allow you to collect valuable
feedback for the product before you can expand it and create more of
that type of product. With the help of an MVP, you can test out
different marketplaces. So you can also find
the right audience and the buyer is
for your products. This concept will
save you lots of time and help you figure out
where to focus your energy. When I first started out, I made a wide range of products
like icons, printables, clip art, font, watercolors, and patterns to test out
which products sold best. Now, I wouldn't
recommend spreading yourself too thin like I did. And if you want to test the market and try out
different products, then start by creating two
or three different products in different categories to
see which ones sell best. Now let's take a look
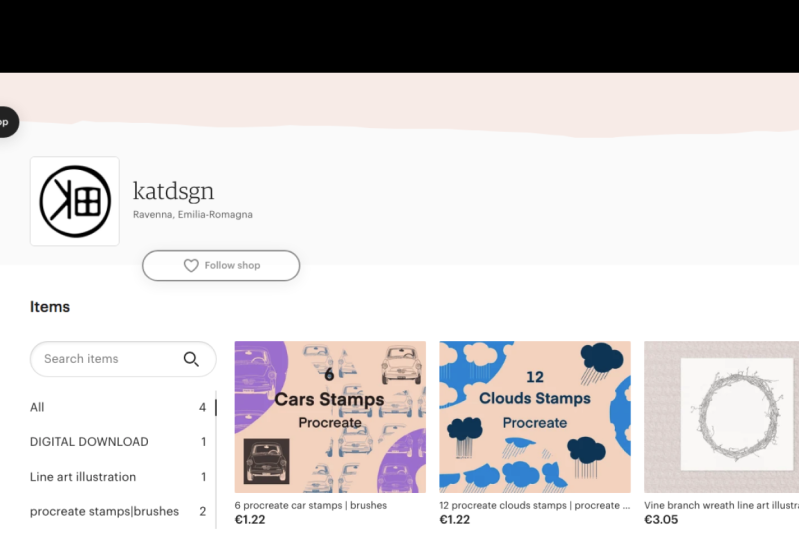
at my Etsy shop. Here you can see I have
different categories with different products. Here. You'll see I have some fonts. I have watercolor graphics, I have botanic illustrations. I have mockups, pre-made logos, and then a bunch of different categories
for my SVG files. When I first started out, I tried making few
different products for all these different categories
to see which sold best. Then in each category, create a few smaller
products like these hand lettered
quotes or these mockups. So first you can create smaller ones like
these ones here. And then if you know that a
certain type of mock-up is selling well then you can create a whole bundle of it
like this one here. Another example of
smaller products are these illustrations
like these wreath. Or you can even bundle a few illustrations together
like this floral set here. Then once you've
tested the market with several smaller products and you know which products to focus on, you can start creating
bigger products. Think of ways your buyers
will be using your products. If you're creating a
set of illustrations, think of ways you can add value. For example, this set here. What I did is I created some single illustrations
and then I use them in Illustrator and then
I create arrangements with them and race with
them that looked like this. This way you're adding
value to a product. So instead of only offering
the single illustrations, you can create ready-to-use
designs like arrangements, borders, or even patterns. Another example of adding
value to a product like stock photography is to
create mock-ups with them. So add a PSD file
with smart objects so buyers can easily add
they're designed to them. So to sum it up, create small products in
different categories so you can test out different marketplaces without spending
too much effort. This is the best way
to save your time and help you figure out
where to focus your energy.
5. Which marketplaces to sell on: An online marketplace
is a website where individual artists
and designers can open up a shop and
sell their products. Choosing the right
marketplace for your products will
depend on the types of products you make and where your ideal
client is a buyer. I have tried dozens of different marketplaces to test out where my products sell best, and I wouldn't advise
you to try them all, but you might want to try out several marketplaces
so you could find out where to
focus your energy. When selling your
digital products online, buyers can purchase a license that gives him the right to use your product for
them to design with or create physical
products with. A license will
define what a buyer can and cannot use
your product for. On most marketplaces, like Creative Market and
design bundles, you will have to use the
licenses that they offer. So before you start to sell your work on a
certain Marketplace, you'll want to
familiarize yourself with their licenses on Etsy
and on your own webshop. Even create your own licenses. When creating your own licenses, start with the basics like a commercial license and
an extended license. You don't have to cover
each and every scenario, and you can always
edit your licenses depending on questions and
feedback from customers. Each marketplace specializes in its own products and
has its own audience. I will go over some of the different marketplaces
that I have tried and share my experience in which
types of products are most popular and what
type of buyer they have. Etsy is most known for their handmade
jewelry and products, but it is also a great place to sell digital products on Etsy. Smaller products at a
lower price, sell best. Products that are
popular or clip art, SVG files, fonts, pre-made
logos, and printables. Typical buyer on Etsy is female between the
ages of 18 to 35, a crafter, stay-at-home mom, and a small business owner. Creative Market is one of the most popular
online marketplaces for selling digital products. Creative Market offers
a wide range of products like fonts,
watercolor, graphics, mockups, templates,
patterns, web themes, and also stock photography. Their audience includes
over 6 million members of both males and females. Graphic designers, freelancers, companies,
and business owners. Design bundles, also
known as font bundles, is a marketplace for
hobbyists and professionals that is known for offering
design deals and bundles. Product types that
are popular on design bundles are clip art, SVG files, and fonts. They're typical buyer is the
male crafters, freelancers. As small business owners. Envato has irregular
marketplace where you can sell your products and they also have a subscription-based site, Envato elements were buyers
pay a monthly fee and are able to download
the digital products that are available
on their side. Product types that are
popular are web mockups, templates, seen, creators,
logos and fonts. The typical buyer on
Envato are male and female graphic designers
and business owners. The hungry jpeg is a
marketplace that offers bundles and products from
individual shop owners. They offer products like fonts, graphics, and SVG files. Their main audience
are female hobbyists, crafters, small business
owners, and designers. Spoonflower is a print on-demand site that prints custom fabric, has a shop owner, you can upload your digital patterns and buyers can purchase
physical products. You will have to order
your own patterns before you're able to sell them. Spoonflower prints your patterns
on fabric and wallpaper. And they offer a wide
range of products for home decor such as bedding, towels, pillows, and curtains. Spoonflower has a female
audience made up of crafters, stay-at-home moms, and
small business owners. Society six is a print on-demand site where
artists can upload their artwork and buyers can purchase physical
products like wall art, furniture, apparel,
cases, and home decor. Society six has a diverse
variety of buyers, including both
males and females, that are interested in purchasing unique and
creative products. There are so many marketplaces where you can sell your designs. These were some of
the marketplaces that I've personally had
experience with. If you want to test out
other marketplaces, then take a good look at
their terms and licenses. You'll want to make
sure that they do not require exclusivity and you are free to
sell your products on other marketplaces as well. Also take a look at the types
of products they offer and what audience they have to see if your products
might be a good fit.
6. Launch a digital product: Hello, this is Angelica with a class on launching a product. Let me start by saying that launching a product will
not be done in a day. You might be thinking that once you've finished
your product, that your work is done. But I have, there are still
a million things to do. In fact, when I
create a new product, like a font or
watercolor collection, it will typically take
me three weeks to create and then one whole
week to launch and promote. In this class, I'll share
with you the steps that I follow when launching
a new product. Creating a launch checklist
will depend on the type of product that you make and which platforms
that you sell at. And some of the
things that I add to my checklist or optional
like hosting a giveaway. But I like to keep this on
my list as a mental note. Now, let's go over some of the things that you could
add to your checklist. Number one, prepare
your digital files, create all the files in high resolution
and then zip them. For some platforms like Etsy, I like to create smaller
products as they sell better than large
collections and the ETC. File size, you are able to upload it smaller compared
to other marketplaces. Number to write the
descriptions for your products. You could also use
the descriptions as part of your blog
posts later on, your newsletter and your
Instagram captions. This will save you so
much time on work. Number three, create all of the preview images
for your products. For the product images, I make them two thousand
and five thousand, three hundred and
thirty eight pixels. And then for Pinterest
and Instagram post, I create longer preview images
at 1500 by 1200 pixels. And for Instagram
stories the size is 1920 by 1080 pixels. I make them all 72 DPI
and low resolution. Number four, add products
to marketplaces. Once you've prepared
your product, you can upload it to all the platforms that
you sell your work. This could be your own shop, Creative Market, Etsy,
or your face bookshop. Number five, share
on social media. Once you've uploaded
your products, pursue on all of
your marketplaces, it's time to share
it with the world. While working on your product, you can start introducing it to your audience by sharing your
process on social media. This way, you can start talking about your new product along before it's launched and let people know
that it's coming. When announcing a new
product on Instagram, I like to spread out my post
and post one image a day. I usually dedicate a whole week of sharing my new product. It could be a combination of pre-built images that I've
prepared for the product. Or if I have any process videos of me making the
artwork or design, I'll post those as well. And make sure to use
Instagram stories. People love watching stories. And you can talk
about your product, you can demonstrate it and then share how will be
helpful to them. For Pinterest, I used
to when to schedule all of the images
that I have prepared. I also share any work
in progress images or videos that I shared
during the process. When linking to your products, make sure to use
affiliate links if you have any affiliate
programs that you're in. And then for Facebook, I'll post the same content
that I do on Instagram. If you have a business
account on Instagram, you can automatically post on your Facebook
business page as well. You can also share
your product in any Facebook groups
that you were in. But makes sure that the group
has the right audience for your product and that self-promotion is
allowed in that group. Number six, write a blog post. You have your own blog. It's a great idea to write a blog post about
your new product. It doesn't have to be
a very long blog post. You could just share a bit of your process behind
your product and then make sure to include beautiful images of
your work in progress. And the end result. And don't forget to share where this product can be purchased. Number seven, newsletters. Create a newsletter
for your subscribers. I use this same content
that I used for my blog post to
create my newsletter. That way you can write your text once and use it over and over. Number eight,
giveaway, launching a new product is also a great opportunity for
creating a giveaway. This will help spread the word and then
attract new followers. I like to create a giveaway
on Instagram and then also share it to my
newsletter subscribers. Number nine, backup your files. Once a product is completed
and I finished promoting it, I'll backup all of the
files on my hard drive. This is the very last step, and then I can move on
to the next project. For the class project, I would like you to create
your own launch checklist. You could use the
printable checklist that included in the download
section of this class. Or you could create
your own checklist. It's important that your
checklist works for you, your product and the
platform that you sell on. Like I said in the beginning, launching a product will
not be done in a day. And there's lots of
things that you need to prepare and due to launch
and promote your product. Creating a checklist and then using it when you
launch a product, it will help you
save time and make sure you don't forget anything. So what do you say? Are you ready to
launch that product?
7. Sell on Etsy: Etsy is an online
marketplace that allows individual sellers
to open up a shop. It's mostly used for selling vintage items and
handmade goods, but it's also a good place
to sell digital products like printables and clip
art at two charges, $0.20 per listing plus a 5% transaction fee
when an item cells. So that's a really nice
amount of earnings. If you asked me to sell on Etsy, you must create an account before you can open
up a store front. Once you have an
account on Etsy, you can open up a shop. So click on Open your Etsy shop. It'll be in the right
top corner here. Mine says shop manager because
I already clicked on it. Then it will take you
through the sign-up process. First of all, you want to fill
out your shop preferences. Then you can go to the next tab where you can name your shop. Enter the shop name
that you want, and then click on
check availability. As you can see, it's not
available because they already have a shop that's
called Angelo camp. So if your name
is already taken, you'll have to
choose another one. You will give you some fun
suggestions down here. Let's just choose
this one for now. And then you can go to the
next tab, stock your shop. You'll have to add
at least one listing before you can proceed
to the payment options. So click on this plus sign here. Creating a new listing. It's pretty straightforward,
so you just have to go through
each of the steps. Let's start by adding a photo. So these will be
your preview images. Already prepared. Some preview images.
These two here. And then this is my high resolution file which
will upload at the end. I'm going to choose these two. The dimensions need to be at least 2 thousand
pixels wide for Etsy. I'm going to choose that. If you'd like. You can
also adjust the thumbnail. You can make it bigger, but mine is already good, so I'm just going to
leave it at that. And Etsy also has a new option
where you can add a video. I do not have a video
for this listing, but if you do, you
can all go upload it. And then down here
we're going to add our title for this wreath. I'm going to name it floral
wreath, wedding clip art. So I'm using some keywords that potential buyers might use. Then fill out this section here. Who made it? I did. It's a finished product. And I recently made it. Now for the category, I am going to choose clip art. Then this one in digital. For the primary color, I'm going to choose black. I do not have a secondary color, but you can add that as well. Then here you can
choose for the subject, you can select up to
three different ones. See, I've got flowers. I'm going to add this one
as well, plants and trees. You can also add a
room if you like, but you don't have to. Next, you've also got some
other options which I'm not going to fill out
because they're more suited for physical items. The options you see here, they also might be different depending on which
category you chose. Then for holiday. I'm not going to
choose anything here. For occasion. I might choose a bridal
shower or let's see, what else do we have? Wedding. I like to
choose wedding because I like my clip art can
be used for wedding. And then for the
renewal options, I'm going to leave
it at automatic. So you're listing
will expire after four months if it
hasn't been sold and you'll have to pay
an additional $0.20. I like to choose if I want
to relist it again or not. Then for the type here, I'm going to choose digital. Now let's add a
description here. I'm just going to keep
it short for now. Just a little description
saying what they're getting and then which
exact files they will get. Then I'm going to
scroll down here. You can choose a section. If you don't have
any sections yet, you can just create a new one. Clip art or illustrations,
whatever you like. Then these are very important. These are the tags you've
got 13 which you can add. Etsy you advise is to use a combination of tag words
that virus might search for. So you might want to
add a combination of, let's say Laurel clip art. Then hit Enter. Another way to see what
viruses are searching for is to go to the
main page on Etsy and then go to the search bar
and type out a search word. As you can see at C
will auto populate common search words that you
can use to add to your tags, like Clip Art flower
or clip art watercolor if you're creating the
watercolor listing. So these are all
common search phrases that Etsy buyers
are searching for. Here's another one,
flower wreath. I'm going to add that one. Or let's see What about
wedding illustration. And then keep going until
you have all 13 filled out. Here. You've also got the materials that you can add
which is optional. I'm not going to add that. And then let's add a price. Then for the quantity, since it's a digital file, buyers can purchase it
over and over and over. So I'm just going to set up
at the highest which is 999. If you'd like, you
can also add SKU, But I'm not gonna do that. And you also have options
for personalization. So if you're selling
like business cards, you can add a field for wires so they can add their details. I'm just going to leave this off because it's a one-off purchase. And then here you're
going to upload your high resolution file. So I have a PNG file. I'm going to choose that one. So this is the file
that buyers are going to buy and then they're
going to download. So this needs to be the
high resolution file. If you have more than one file, you can zip them first. And in total, you can add five files with a
maximum of 20 megabytes. Once you're done, you can
hit Save and Continue. And there you have it. Now
you've got your first listing. Now you can move on to
this next tab here, how you'll get paid. Here, you can fill
out all your details on how you want ETC, to pay out your earnings. And then you've got this tab
here, set up your billing. This is the information
that they need from you for how to pay
your Etsy bill. Your Etsy bill will be all the
fees that you need to pay, like the $0.20 for
each listing and the additional 5% for each
sale that you make. Then once you filled
everything out, you can open up your shop. So once you've opened
up a shop on Etsy, you'll need to fill out
the details of your shop. I'm just going to show
you on my main shop here where I've already
got everything filled out. So what you can do is go to your settings and you
have some options here. You can click on about your shop and you can add
different shop members. Or you were story here. Or go to Info and appearance. And you can upload
your shop icon, you can edit your shop title
and your shop announcement. And over here it says policies, but this is not the
place to edit them. Here. You can also change your
shop name if you like. If you want to see
what your shop looks like, then click here. And if you click on
this little icon, you'll also be able
to edit your shop. I find this the easiest
way to change things as you have a clear
view of your shop at, you know exactly what
you're changing. So here you can add a banner
or you can change it. Here. You can also edit your shop icon and you can see exactly
what it will look like. So here you can also edit
your your shop title. Then if you scroll all the
way down to the bottom, these are just all the
reviews that I've gotten. Here. You'll find
the about section where you can add a video or five different images that tell us a bit about
you and your shop. And then down here, you can add a bio and
your social media links. And here you can also see the sharp members see
how it's the same as when you went to the
settings over here. And then scroll down even more. And here you can see
are sharp policies. Click on Edit mindset
to accept returns, contact me within seven
days of delivery, and then ship items
within 14 days. This is just standard. You have to set
it even if you're just selling digital products. I've said it too. I do
not accept cancellations. And then the following
items that can't be returned is digital downloads. Down here, you can also
edit your privacy policies. If you need help
with writing them, then click on this
link right over here. Next we have the frequently
asked questions. Now, here is where I add all
of my terms on my licensing. I've added different
sections for my SVGs or my my graphics, and also for my fonts. Because I have different
products in my shop, I'll have to specify my terms for each of
these different sections. If you want to add a
section like I did here, all you have to
do is add effect, and then you can add custom. And then you can
add a title here. And then you're turns
and then hit Save. Also, if you're
selling in Europe, are selling to Europe which digital products they can be purchased all over the world. You'll need to fill out this
information here as well. So your net ID and then
also your business address. And that's it. You can go to view your shop. I'm just going to leave. I'm not going to save any
of the changes that I made. And then this is what
your shot looks like. Now let's take a look
at the products and prices that do well on Etsy. I've found that smaller products under $10 or even $5
sell best on Etsy. This doesn't mean that you
should lower your prices, but instead make your products smaller so you can offer
them at a smaller price. My most popular products are
the ones around two or $3. Like these SVG files. And let's see. The single illustrations. These reads, these as well. These are all under
$10 and the cell the most examples of small
digital products or clip art, SVG code files, printable, wall art, printable planners,
and coloring sheets. Once you have your shops setup and your products
are all uploaded, it's time to market
those products. You'll need to spread the word your shop is up and running, so share it with
your audience on social media and on Pinterest. Another great way to market your products is
to use Etsy ads. So your products will be
placed higher in search and you will pay each time a buyer clicks
on your products. So for example, do you see
these products up here? I've just searched for floral illustration and
you can see ad buys. So these will look
like regular products, but if you see this tag, then you know that it's an ad. So these will be placed
higher in search. Now to set up your ads, go to your shop
manager over here, and then go to the
marketing section and then click on Etsy adds. First you'll want to go
to manage your budget. You can start with $1 a day. I've mindset to 1 fifth. And then when your budget
is spent for the day, your ads will not be shown
again till the next day. But this way you will know exactly what you're
spending each day. Next, you'll want to choose which listings that
you want to promote. Click on Manage
advertised listings. Now, all you have to do is click on the checkbox right here. And you can also
filter by section. So if I want to
choose this one here, I'm already promoting
that one here. I'm going to click
on this one as well. So what I do is I don't promote my best sellers because
they're already selling, but I also do not choose the products that are
not selling at all. I've found that products that aren't set on
selling at all, they won't sell even
if you promote them. Instead, I choose products that are selling
every now and then, but that need an extra little
boost. Click on update. And that's it. Your ads
are now up and running. And down here you
can see your stats. So here you can see
what you're spending. This is what I've been
spending in the past 30 days. And then here you can see
what I've earned from my ads. Here you can see how many
orders I've had from ads, how many adclicks and how many views I've had
in the last 30 days. And if you scroll down
even more down here, you can see the status of
each individual listing. So you can see which
products are doing well. And if I see a product that
isn't doing well, Let's see, like these ones down here, you can see they have less
views and less sales. Then I'll stop
promoting these ones. Now let's take a look
at customer support. Customer support is a big
part of being a shop owner. When a buyer contacts, you, try and respond as
soon as possible and definitely no
longer than 24 hours. And always be kind even if they have a complaint
or respond to my clients within an hour and sometimes even within
a few minutes. Let me show you how when
you're in your shop manager, go to your messages, then click on combos. All safe replies. Here you'll find all of the replies that I've
saved in the past. You can add your own new one
here by clicking Save reply, and then enter a title here. How to download. And then enter your message
here, etcetera, etcetera. If you want, you can pick a
category which I never do, but you can if you like, and then hit Save. And these are all the
replies that I've saved. If you want, you
can edit them by clicking this little icon here. As you can see, I have quite a few
save messages for all their frequently asked
questions like how to download the files or
how to unzip files. And I also have a standard reply for requests for custom work. This saves me so much
time and I can reply within minutes
through the app on my mobile or even on my desktop. Those were some of
the basics of Etsy. There is so much more to learn and that's he has a
seller handbook that covers everything you
need to know about setting up your shop
and enlisting products. They have detailed
tutorials and how to set up your pressing taxes and how
to promote your products. I will leave all of the links
below in the description. If you need help with
anything specific.
8. Sell on Creative Market: Creative Market is an online
marketplace where you can sell your digital
products like fonts, graphics, photography,
and other digital goods that can be purchased and used by other designers
and companies. When selling your products
through Creative Market, you will earn 60% of each sale. This may seem like a steep
price to pay at 40%. But Creative Market is a marketplace with
an enormous reach. They have over 6
million members, which is a huge
audience that you most likely will not
reach on your own. If you sell your products
through Creative Market, you'll be able to set
your own prices and still be free to sell your products on
other marketplaces. Creative Market is by far my favorite and most
profitable marketplace where I sell my work. I applied for his shop
back in 2016 when it was still pretty new and there weren't a lot
of shop owners. It was also the time when font creation was
hot and happening. So when I created my first font, I was in the right place
at the right time. This made my shop
a huge success and I've focused most of my energy on creating
products for Creative Market. I do have to say that these days there are a lot
more shop owners, talented designers, that sell their products
on Creative Market. So the competition
is a bit higher. To become a shop owner, you will need to
apply for a shop. Creative Market does not take applications lightly
and they want to see high-quality work that is suitable for their market
and their audience. You'll need to have a
portfolio where they can view examples of your
creations and products. You can link to a portfolio
like Behance or dribble. But I highly suggest you link to an existing shop like Etsy. You can show Creative
Market that you have the skills to create
digital products. They want to see if you
were capable of creating products that are a right
fit for their marketplace. So take a look at the types
of products that they offer and see if
yours are a good fit. Once you've been accepted
to Creative Market, you will need to fill out
the details of your shop. So go to your shop profile. And then up here you can
add or remove your banner. And then if you want to
edit your shop settings, click on this one here. Here you can add a shop name
or a message to your buyers. And then over here, you can add all your
other profile info, like your image, your
username, your email address. You can also add your
social networks, like your Pinterest
and your Instagram. And you'll also need to fill in your payment and tax setup. This is a very important step as great of market
needs to know. If you have a tax
treaty with them. If you're like me and I
live in the Netherlands, they do not withhold
any extra taxes and I will have to
file for taxes myself. Now let's take a look at
how to add a new product. If you want to add
a new product, go to products, and then
click on Add a product. Fill in all the information like the title and description. And here you can upload your images or you can
also embed videos. Once you upload your images, you can drag them
to reorder them. Next, we have the price. If you choose a category here, I'm going to choose templates
and then choose logos. You will see that
Creative Market suggests surprise for all the different
licenses that they offer. These are a good indicator of the price that you could
set your product to. Click on the More
Info to see all of the details of the
different licenses they offer. These are the three
licenses that they offer. So they have the personal, the commercial, and the
extended commercial. And below each one you
can read the details of what is and what
is not allowed. Also, if you scroll down, you will find the specifics
of each category and they answer commonly asked questions
about these licenses. Licenses can be very tricky. So if you ever have
any questions from buyers that you do not
know the answers to, you can always ask
Creative Market support to help you clarify. Now let's go back
to our product. Here you can upload
your zip file. The maximum is four gigabytes, but I like to keep mine under 500 megabytes so buyers are
easily able to download them. Then if you scroll down here, you can add which programs
is it is compatible with. So I have uploaded
some pre-made logos. So I'm going to say it's
compatible with Photoshop. And I've also added
Illustrator file, so I'm going to
check that as well. Then here you can
add a property. Mine is 300 DPI and the
Illustrator files are in vector, so I'm going to choose
that one as well. Then down here you
can add the tags. Tags are important so your product can be
found in search. So you want to add
commonly used words that you think buyers
might search for. I have an Excel file where
I keep all of my tags. So I'm just going to
choose this one for logos and then copy and
paste them right in here. Another way you can
find tags to add is by typing out a word
in the search bar. I'm just going to type out logo. The search bar
will auto populate commonly searched words that creative market buyers
are looking for. So you can choose these as well. I'm just going to
choose logo template and then type it out again. And then choose logo bundle. And then once more logo design. Or you can try another
word like template. Then let's choose
template bundle. Creative Market does
not have a limit, so you can add as many
relevant tags as you like. Now when you filled
everything out, your product is ready. Switch it from draft to live. Click on Save All Changes, and then it's live
in your store. Creative Market is geared
towards helping shop owners being successful
and build an audience. Let's go over some of the ways that you
can promote products on Creative Market and become
a successful shop owner. Gaining followers specific
good way to promote your shop. If you go to your profile, you can see the amount
of followers that you have and the amount of people
that you are following. You can gain new followers
by offering free goods, sending shop updates, being
active in the forums. I'll explain those
more later on. But even though Creative Market has all these ways to
promote your shop, you'll need to help
spread the word yourself by linking to your Creative Market shop on all of your social
media platforms, or by sending newsletters
to your own audience. Now, let's take a look at the
Creative Market homepage. Getting your product on the
homepage is the very best way to get your product C. And there are few different
ways to do this. First of all, there is
the staff big section. This is also referred to
as the handpick section. In this section, the staff picks their favorites of
all new products that have been uploaded. The only handpick the best. So make sure you
create great products with at least five
preview images. Also regularly
upload new products so you have a better chance
of being staffed picked. Next, we have the popular products section
where they showed the best sellers of the
graphics and the font section. These are two of the most popular categories
on Creative Market. The bestsellers are based
on the amount of earnings your product makes and
not the number of sales. So having a higher priced
product with fewer sales, it will rank higher than a lower price product
that has more sales. Creative Market also offers free goods each and every week. This is a great way for them
to attract new members. And it is also a great
promotional tool for us shop owners. Once you have a few
products in your shop, you could offer one of
them for free so you can gain new followers and
promote your work. You can do so by going to your product's page and
click on offer a free good. Here you will find
the specifics of which type of product
you are able to submit. And down here, you can select
one of the products in your shop and then click,
Submit free goods. With over 7 million members. Newsletters are a
highly effective way to promote your products and get them seen by potential buyers. Creative Market sends out
a newsletter almost every single day and getting your products in
these newsletters, it's no easy task. There are a few
different ways to get your products into
their newsletters. One is by offering a free good. This newsletter gets
sent out every week. And they will also send a weekly newsletter with new products that have
been staffed picked. They also have a
whole newsletter dedicated to popular products, which is based on the
shop owners that you follow or products
that you have viewed. If you upload a new product, you can send an update to
all of your followers. By sending a product update, you can set it to new product. Or if you've updated
your product, you can choose that or you
can choose the discount. Creative Market does not yet have the ability
to add discount. So if you want to
run a discount, you will have to lower
your price yourself and then add a sharp update
to let your followers. Now, you can also see all of the shop updates from shops that you are
following here. A great way to connect with
other designers who are also potential buyers is by
being active in the forums, help answer any questions
others might have and keep in mind that what you
say reflects your shop, so always be friendly and
helpful in the community. This will help you gain followers
and get your work seen. The affiliate program is a great way to earn
some extra income. You'll need to apply
to become a partner. So each link you share from Creative Market will have your
partner code and you will receive a percentage for every new member that signs up and makes sense
through your link. I mainly use the
affiliate program to promote my own products. As this means, you
will receive an extra 15% when a new member purchases your product
through that link. Once you've been accepted
to the partner program, you can scroll down and
see promotional tools. You can, for example, embed a product or a collection
to your blog or website. And they also have
banners you can download, which you could also add to your side when
sharing products with affiliate links that
I have found that the best way to share them
is through Pinterest. If you go to a product
on your computer. So not on your mobile and
use the Pinterest button. It will automatically add your partner code so you can easily share images
to Pinterest. As you could see,
Creative Market has some really great tools to
help you promote your shop. They are constantly
testing new features on the homepage or new
promotional tools. So stay up-to-date by reading their forums
and their newsletters. I will also leave
all of the links below if you need any more
help on this subject.
9. Sell on your own website: Hello. This is angio camp with a class on creating your own website. Creating a website is important to establish yourself
as a creative. Not only will it make
you look professional, but it will also help you show your brand and
what you stand for. In this class, we'll go over some important factors
that will help you create your own site and help you choose the right
platform for you. Your website is your own space and your chance to
share your story. And it is a place
where you can send potential clients that are interested in
getting to know you. I know that creating
your website can feel overwhelming and
you might be thinking, do I really need a site? My answer would be
yes, of course, but take it one step at
a time and start small. It's great to have
your own website, but you could easily
use Instagram with the link to your Etsy
shop when you first start out. My first slide was a
blog where I would share my photos and
photography tips. And throughout the years, it changed into an
art and design blog. It wasn't until I was selling my work on Etsy and
Creative Market for several years that
I branched out and added my own web shop where I
sold my fonts and graphics. Like I always say, start small and then
grow from there. When creating a website, you could start with
a few standard pages, like the homepage and about
page and a contact page. That's all you really
need to get started. And as time goes by, you can expand and add a blog
or a webshop to your site. Let's go over some of the pages and content for good website. First of all, we
have the homepage, which is the most important
page of your website. You will want this to be the
showstopper of your site and the best representation of
you as an artist or designer. Share your story through
texts and photography and add the most important
things you want visitors to see
to your homepage. Visitors want to
get to know you. So also add an About
page where you include a few personal
or fun facts. This is also a great
place to share your skills and what
you love creating. Be sure to add a
contact page with a contact form or an email address where
people can contact you. And on this page
you can also add your social media accounts or where people can follow you. Back page. It's optional
and you can add this later on or even add them
to your contact page. You can answer frequently
asked questions that visitors might have about your
product or your business. For example, you create custom work or how do I
download my purchases? Adding a portfolio
is also optional, but if you do add one, just keep it simple. You do not need an
extensive portfolio page when you first start out. It could be as simple page with a few words about your
style and your work. And of course, beautiful images of your artwork
or your designs. Not everyone will want to
add a blog to their site, but you might want to
keep it in mind as it is a really great way to get
traffic to your site. I'll use my blog for occasional tutorials are
tips that I want to share, and these are really good source for visitors through
Google Search. Adding a webshop was the last thing that I
added to my website. And if you're not ready to
sell on your own website, you can simply add
a link to the menu, to your Etsy or your
Creative Market shop. And that way visitors are still able to see what
you have to offer. And in time, you can
add your own webshop. And if you do,
don't forget to add your licenses and terms
for your products. Last but not least, you'll want to add a
cookie consent banner, and a privacy policy
to your website. Don't worry, you can easily
find a standard text or a privacy policy
generator online. And depending on which
platform you use, some even have a
standard template or a plug-in that you
can use for this. When choosing and
doing your research in which platform to
use for your website, you'll want to think about what you will be using
your website for. Do you want a basic website
or do you also want to add a blog or add a web shop where you
can sell your products. Another important
factor to consider is the file size limit
for digital products. I found that
WordPress.org to have the highest file size
limit at a 128 megabytes. Another really important factor
to consider when choosing a platform is to see if they have the ability to charge VAT. If you're selling to the EU, you will need to charge bed. This is something that you
really need to talk over with your accountant or someone
that is specialized in it. As the rules may be different depending on which
country you live in. Once you've thought
of all the features you will want for your website, you can compare the
different platforms and see if the features you
want are available. Pay attention to things like
pricing, themes, plugins. Features like the ability
to add a webshop or a blog. If you're indecisive like me, then you could sign up for a free trial version
for Squarespace or for Shopify in order to
get a feel for the platform. And then once you're ready, you can choose the platform
that fits your needs, your budget, and that feels
right and intuitive for you. Now, let's take a look at the types of platforms
that we can use. A few well-known platforms
for creating your website or WordPress, Shopify,
and Squarespace. Let's take a look
at them one-by-one. Wordpress is the most
known platform there is. They have two different
versions you can choose from. First is WordPress.com. Now, without getting
too technical, this is the version where you do not have to worry about
hosting yourself. This version also
comes with a free plan where you can set
up a basic website. But the free version does have its limits when it comes
to customizations, choosing a theme, and you cannot add a custom
site name to your site. So you will always have
wordpress.com in your site name. You can choose to upgrade to the paid plan and then add a
custom domain if you like. The second version
is wordpress.org. For this version, you will
have to take care of your own hosting with a site like
Bluehost or GoDaddy. And this is what I
use for my site and I love that it is so versatile and you have the ability
to change or add almost anything through
themes and plug-ins. For example, if you want to
add a shock to your site, you'll need to install plug-in WooCommerce,
like I'm using. The downside to hosting
your own website with WordPress.org is that it does have a steep
learning curve and it can be quite advanced
for a beginner. You have to be sure to have all your plugins and
database is updated. And sometimes this
can break your site. Some other options that
are more user-friendly. Our Shopify Squarespace. Squarespace is an all-in-one platform where you don't
have to worry about hosting and backing up and there are no
plug-ins necessary. They provide lots of different features
like modern templates, custom domains of blog
integration with Instagram, sending email campaigns, and also the ability
to add a shop. Shopify is also a
user-friendly platform that is perfect for creatives who want to sell
their work online. They have really
lovely templates that are geared
towards e-commerce. And they also had the
ability to add a blog. They will also take care
of things like hosting. And their aim is
to make sure that your site is always up and
running and working smoothly. For the look and feel
of your website, you'll want to use the branding that you're using
for your business. You might also want to take
the class on branding. If you have not done so yet, you'll want to keep your
brand inconsistent. This means using the same
font, the same colors, and photography that
you use throughout your other social
media platforms and print designs like
your business cards. When it comes to your website, I have found that the
theme that you choose less important than how you customize
it and make it your own. Adding beautiful photography is the easiest way to
make it your own. So I would definitely invest your time in this or
or hire someone to take photos for you for the
texts on your website, right? Short and simple sentences. Don't use overly
complicated words. Just use the language that you would use to talk to a friend. If you're fun and quirky, then use that in your texts. If you're calm and serene, then use that in your words. Use one or two fonts and then use them consistently
throughout your site. Make sure your font
styles and your sizes, colors of the fonts
are easy to read. Only use a script font
for headers are quotes, and then use a plain
readable font for the body. Use two or three colors
for your website and use those throughout
the whole website. Keep it simple and
do not go overboard. Let your designs and your artwork be the
star of your website. Make the design of
your site appeal to your ideal clients while also being a reflection of
you and your style. If you're looking to
attract high-end clients, then make sure your website
looks elegant and high-end. And if you have a
bubbly personality with a similar audience, then make your site
fun and bright. Having your own website
will help you establish yourself as a professional
business owner and creative. It will be your space where
you can show your red, your talent and share your
story and your passion. Your website will always
be a work in progress. And even though this may
sound like a bad thing, it will never be finished. Knowing that you can always
change or adapt things later on helps keep the pressure from having to create
the perfect site. You know how they say done
is better than perfect. Well, this is the
perfect example. One of those projects
start with what you have and then you could always
rework and add to it later. Your website will change and
grow with you throughout the seasons as you grow as
an artist or a designer to.
10. Bloom Creatives art courses: Would you like to learn how to grow florals and paint with watercolors than the bloom
craze is the place for you. I will be your Art
teacher, Angele Kamp, and I will teach you all
the basic Art skills of drawing and painting
with watercolors. I will guide you through
each RPs step-by-step, and we'll create
beautiful florals and botanicals together. Are you ready to start creating? Then join your bloom
Creatives today?
 Angèle Kamp, Artist & Graphic Designer