Transcripts
1. 1.0-Introduction: Hello and welcome to my online course about working with selections and layer masks in Photoshop CC. My name is work time and I've been teaching about Photoshop for over 12 years. In these comprehensive course, I'm going to teach you everything you need to know about grading fast, accurate, and easy selections, and how to apply those selections to working with layer masks. These techniques are essential if you want to combine several images into a single composite. If you want to extract the subject from the background, or if you just want to limit your editing to a single part of an image. And I will show you how to do so quick and easy with olive Photoshop, CC's and newest features. Every video comes with an exercise file that you can use to put what I teach you straight into practice. But you will find that the techniques I showed you can be applied to any images in all situations. Thanks for signing up and let me know what you think of the course in the comments.
2. 1.1-Rectangular Marquee: Creating accurate selections in Photoshop is one of the true core skills of working with the program because using selections, we can isolate subjects from a background or we can limit editing of an image to a specific section of that image. So that's what we will be looking at in this chapter. And we will be looking at most of the selection tools at our disposal and also looking at why certain tools are better suited for certain projects. We are going to get started with the rectangular marquee tool. So I've opened the exercise file for 0.1 rectangular marquee. And the Marquee Tools are the second group of tools in the left toolbar here. Now, when you activate the rectangular marquee tool, you can simply click and drag on your canvas to create a selection. So that's what I'm going to do. I'm just going to click and drag and I'm going to hold the mouse down to show you some shortcuts we have at our disposal. Initially, you can draw freehand. So you can draw a rectangle of any size and any proportion. If you hold down the Shift key, you constrain the proportions to a square. So every side is as long as every other side. Something that's also very useful using this tool is the ability to move it as you are still drawing it. Because you will often find that you start clicking and dragging in just the wrong position. So being able to direct opposition is very useful. Holding down the space bar while I am still dragging them are key allows me to move the mark key to the desired spot. So when releasing the space bar, I can again influence the size of the marquee. And I can try to get an accurate selections of one of these squares, which is actually a light projection at an art installation in Amsterdam. And there we have our original marquee. Now, when you put the mouse cursor inside the Marquee, you are able to move it. So I can just click and drag and move the marquee over to one of the other rectangles. If you click and drag outside of the original Marquee, you will delete the old marquee, so the first selection will disappear, and all that will remain is our new selection. So every time you click and drag in the default behavior of the tool, you will delete the old selection and just leaving the new one. Now, every selection tool has several different modes that we can use, and you will almost always find those here at the top-left. This tool is currently set to new selection, which defines that behavior. If we enable add to selection, the second icon here, I can draw an additional marquee and the original Markey will remain. And now I will have to mark keys here. So I've expanded my selection using this mode. You also have subtract from selection. So the third icon, once I enable that, I can click and drag a marquee again. And now when I release the mouse, the part of the marquee overlapping with this new selection will disappear. So now I have removed that section from my selection. And the fourth setting is intersect. So if I enable that and click and drag, all that will remain is the area that intersects with my current selection. So releasing this, I now have 2.5 mark key selections over these rectangles. So those are the different modes of this selection tool. And you will find similar, or you will find similar modes on every selection tool that we will be using in this chapter. A couple of handy shortcuts. If you press Control D on Windows or Command D on Mac, you will remove the the active selection. You can also go into the select menu and then choose Deselect. But as I'm sure you've figured out, by now, I am a big fan of using keyboard shortcuts, and I advise you to use them because it increases your efficiency with the program greatly. And it also feels a lot nicer to use the shortcuts to just fly through your edits and fly through the program. Now, you might end up in a situation where you want to re-select your selection. So you want to recall a selection that you've made previously. On Windows. If you press Control Shift D, you reload the previous selection. And on Mac that would obviously be Command Shift D or Control D to deselect and control shift the two reselect.
3. 1.2-Eliptical Marquee: The second tool we will be looking at in this chapter is the Elliptical Marquee Tool, which allows us to draw elliptical selections or oval selections using the same keyboard shortcuts as we use with the rectangular marquee tool. Now, to activate the Elliptical Marquee Tool, you can simply right-click or hold the mouse down on the Marquee Tools, and that will open up the other tools in this tool group. You will also note that there is a shortcut associated with these tools, the M key for marquee. And that means if I press the M key, I activate whichever Marquee Tool is at the top currently. And if I press Shift M, I will switch to the other marquee tool. So now I have pressed Shift M to switch to the Elliptical Marquee Tool. And again, this tool just allows you to click and drag to draw a selection. And let's say, and I've already done it here. If I want to select this circular swing set here where my kids are swinging. And this is an image that I shot with my drone, DJI, maverick Er2. You never want to start on the edge of the ellipse that you want to select. Because if I click and drag here, you will see that the ellipse falls into the shape that I'm trying to select. So you always have to kind of visualize the square box or the rectangular box in which this ellipse would fit. So I would look where the vertical and horizontal lines would intersect. And then I would start clicking and dragging. And then you see that I can end up with an accurate selection of this area here. And if you want to correct the position of the marquee the same way as you would for a rectangular marquee. You can just hold down the spacebar and move the mouse to relocate it. Holding Shift, you draw a perfect circle. So you can also use that. And once you release the mouse, you have your first selection. And again, these selection tools have these different modes here at the top. So I can draw a new selection. I can add to my current selection. I can delete from my current selection or subtracted, or I can intersect with the current selection. So if I choose Add and then click and drag another Markey, I can also select the circle surrounding this little swing set here. And if I choose subtract, I can draw another ellipse within the original ellipse and then de-select that specific area. So click and drag, and I'm holding Shift now and releasing the mouse. This area is now de-selected. So that's how these different modes work. And you will find that almost every selection tool, at least that we find in the toolbar, has similar modes. I can press Control D to deselect, or I can go into the select menu and then choose de-select. And I can always reselect it using Control Shift D. And that only works mind you if you have not resized or cropped the image. So that's one little caveat concerning that shortcut.
4. 1.3-Single Row Marquee: If we look in the group of the marquee selection tools by holding the mouse down on them or right-clicking. You will see that there are two other tools which do not have a keyboard shortcut associated with them. The single row marquee tool in the single column marquee tool. Now, these allow you to select a single row or column of pixels in an image. And it might be difficult to think of a practical application of these tools. But I'm going to show you one that I like using in my edits nowadays. So I'm going to select the single row marquee tool looking at the exercise file 4.3, single row marquee tool. And what I'm gonna do is click in this image somewhere between the model here and these two spots on the divider of this road. This is an image I took with my cell phone, by the way, as part of a project. And I'm just going to click here and it's going to mark selection of one row of pixels. So zooming into the image, you will see that only one row of pixels is selected. And I'm just going to press Control 0 to zoom out to fill my screen again. Now, I'm going to copy this single row of pixels to its own layer by using the shortcut Control J or Command J on the Mac. And I'm going to just call this line. And now I am going to transform this line to fill the image all the way to the bottom. So I'm going to press Control T to transform this layer. I'm going to drag the, grabbed the transform point here at the middle. And I'm just going to hold Shift and drag this down so I can transform it disproportionately. I'm gonna release the mouse and then the Shift key. And you don't really see anything happening yet. But you will once we click on confirm here. And that has transformed this single row of pixels into a rectangle of pixels going all the way down, making it look like the road. And these light trails are disappearing to the below. Then I'm going to re-select the background image by just clicking on it in the background layer. And I'm going to click once more, right where this divider starts. So I'm just going to click here and create a selection there. And I'm gonna do the same thing. So I'm going to press Control J to copy that selection to a new layer. I'm going to call this line two. And I'm going to transform this using Control T. If you don't like that shortcut, you can always go into the Edit menu at the top and choose Free Transform. I'm going to hold Shift and I'm just going to drag this all the way to the top and release. And this time I'm going to press the Enter key to confirm my transformation. So now we've created this image. And I think in the final result that I ended up posting on Instagram, I cleaned up a lot of the background elements and I worked on the blend between these different planes a bit more. But I personally really like this effect. And if you're working with light trails, for example, it can have some really interesting results.
5. 1.4-Lasso Tool: The next tool we will be looking at is the Lasso Tool, which is part of the third group of tools here at the top left of the toolbar. And we are going to use this to create a selection around the opening in the roof of this bird observatory, which I also shot with my drone. So the Lasso tool is right here, the third one from the top. You can also press the L key to activate the Lassa tool. And I'm just going to zoom on this image using Alt scroll. The Lasso tool is a tool that allows you to just freehand draw a selection around an object or an area. And it's very difficult to do this accurately if you are not using a drawing tablet, which I am not, I prefer using a mouse and keyboard. Some people prefer to use a drawing tablet, but I am simply unable to make that work. So I just prefer using a mouse and keyboard. But using a mouse, a mouse, it is quite difficult to draw an accurate selection around something. So this tool is usually reserved for situations where accuracy is not that important and you just quickly need selection of roughly a certain shape around an object or an area. So using this tool, I'm just going to click and drag around this opening in the roof. I'm just clicking and dragging, clicking and dragging. And then when you release the mouse, it automatically draws a line to where you started drawing the selection, and it closes it and loads it as a selection, as we can see with these marching ants. And again, this tool has four different modes. New selection, add, subtract, and intersect. So let's say I want to bring this to the edge of the selection a bit closer to the actual hole instead of this whole wide area here, I'm just going to enable, remove from selection or subtract from selection. And I'm just going to click and drag an additional more key, let's say around this area. And that brings it closer to where I actually want it to be. And let's say I overdid that a little. And I now want to add to my selection again. I just enabled add to selection and I draw another line around this area. And as soon as I release the mouse, it is added to the selection. So if you need a quick and dirty selection within an image, this is something that you can use and you can also use the Marquee Tools for that. But it, it very often happens that you want a selection like this that is not a rectangle or an ellipse. And in that situation, the lasso tool would be my recommendation.
6. 1.5-Polygonal Lasso Tool: In this lesson, we will be looking at the polygonal lasso tool, which allows us to draw more accurately around objects in our images. You will find the polygonal lasso tool by holding the mouse down on the Lasso tool and just choosing the second tool here, the Polygonal Lasso tool. And using this tool, I'm going to create a selection around one of these domino blocks. So I'm going to Alt scroll into this particular block. And how this tool works is you just click on a point and it sets it as the start of our selection. And when you move the mouse, you will see that it draws a straight line to another point that I can define. So I'm going to use that to just click here on this corner of the domino block. And for this I'm going to use a shorter line and then there's going to be a longer one. And for angles like this, you can just use shorter lines. And it doesn't have to be pixel perfect for this specific example. And then I'm going to use a longer 11, shorter one or two, then just click on the original to close the selection. And you will also see a little circle next to your mouse cursor indicating that you are about to close the selection. So this allows you to select geometric shapes that are not rectangles or ellipses pretty accurately. And I find myself using this tool when I really need to get the fine details of a selection, because you can just zoom in as far as you want and put the points wherever you need them. So I'm going to de-select for now using Control D or Command D on the Mac and show you some handy shortcuts associate associated with this tool. I'm going to start my selection and let's say I click in. I just continue this for a little bit and let's say I click in the wrong spots a bit further on. You can delete the last point you made by using the backspace key. And you can do that until you end up at the beginning of your selection. You can also cancel the selection outright by pressing the escape key, and that just removes the frame that you were drawing currently. Well, you can also do is temporarily switch to the regular lasso tool and that's a shortcut not many people know in my experience, if I want to draw a more seamless edge around this corner, I can actually hold Alt and then click and move my mouse to temporarily switch to the regular Lasso Tool. And releasing Alt. And releasing the mouse actually sets it back to the polygonal lasso tool. So you can always switch between the regular lasso tool and the polygon or lasso tool by using the Alt key and holding that down. Now, let's say I just want to close my selection, even though I'm not quite finished yet, I can just press the Enter key and it just draws a straight line from wherever the mouse cursor was at that time. And as any other selection tool, it has new selection, add, subtract, and intersect here at the top.
7. 1.6-Magnetic Lasso Tool: The next tool we will be looking at is the Magnetic Lasso Tool. And I have a bit of a strange relationship with this tool because I don't like it. I never use it and I never encounter a situation where I would prefer the Magnetic Lasso Tool over the other selection tools at my disposal. Yet, I've been teaching about Photoshop for about 12 years and I keep running into clients who rely on this tool above any others. So I'm going to show you how it works. And I'm also going to tell you why I personally don't like it. And you're just going to have to make that decision by yourself, whether you choose to rely on this tool or the other tools that I will show you as we go on. So the Magnetic Lasso Tool is in the Lasso Tool Group, so I can switch to it by pressing Shift L. I currently had the Polygonal Lasso Tool selected. So the next tool in the list is the Magnetic Lasso Tool. How this tool works is it finds lines of contrast to stick to as you drag your mouse along the edges of a subject. So that's what I'm going to do for this building here. And I'm just going to click and drag along the edge of the building. And if you are following along and doing this yourself, you'll notice that the selection line or these anchor points stick to the shape that we are trying to draw. And as we go on, you will see that we get c. This is part of the reason that I do not like this tool. I just change my zoom level to get a bit closer. And as I zoomed, obviously my mouse moved and it attached new points here that I do not want. So right now I'm pressing the backspace key to delete those points so I can keep dragging. And that's the thing about this tool, at least to me. It keeps putting these points where I do not want them. The number of points is also often an issue. Like sometimes there are too many, sometimes there are too few, and you can actually change the settings up here, the width, for example, to get different results. But the other selection tools at our disposal are just more reliable than this. And I have all these extra points here that I really didn't want in my original selection. I'm going to have to delete all of these or get removed them from my selection, which I could do with these different modes that this tool also has. But I just do not like using this tool. I think there are much better ways of creating fast and accurate selections. So you're free to experiment with this obviously, and I'm sure there are situations where the tool does produce good and reliable, which is also important results. But to my findings, there are, is almost always a better way to create a selection outside the Magnetic Lasso Tool.
8. 1.7-Quick Selection Tool: The Quick Selection Tool which we will be looking at in this lesson, is actually one of my favorite selection methods. And we will find this tool in the fourth tool group from the top. So I can just right-click on this icon where it says Object Selection and then switch to the Quick Selection Tool. Now, something you should know about this tool is that it is a brush tool like many other tools in Photoshop, such as the Spot Healing Brush, the clone stamp, the regular brush tool, the eraser tool, et cetera. And brushes have certain settings that you have to be aware of. First of all, they have a size property, and the size property is displayed in pixels here at the top left. And you can extend this little drop-down and you can change the size here. But that is not the best way of doing that because of how this specific tool works. See, this tool looks at the pixels that you click on and select adjacent pixels that look like those pixels based on contrast, color, and brightness. So it's basically finds the edges of the objects that you click on it to create a selection. And in that context, we want our brush to be large enough to quickly work within whichever subject we are trying to select. And we want it to be small enough to stay within the silhouette of that subject. So we want to be able to neatly, yet quickly draw within the lines of whatever we are trying to select. So if we use this menu here at the top, I am going to have to increase the size, but I don't know by how much I should increase it. So I'm just going to put it at 50. And then I have to move my cursor back to the Canvas to see how large my brush it currently is and how much larger or smaller it should be. So to change brush, brush size, I'm going to learn you a shortcut and later a different shortcut, which is used for every single tool that is based on brush mechanics. And those are the square bracket keys of your keyboard. And on most QWERTY keyboards, you will find those to the right of the P key. And the right square bracket increases the size and the left square bracket decreases the size. So at a full-screen zoom control 0, I am just going to use brush size at 90 pixels. And I'm just going to click on the hood of our model here. And as you will see, the selection grows to encompass the entire top of his hood. So I'm just going to click a few more times. And you can also click and drag using this tool. And as you see, the selection keeps growing. Two, whichever area I am currently touching. And just to show you how this works exactly, I'm going to zoom in on the hand here, which is currently not selected. And I'm going to decrease the brush size using the square left bracket or left square bracket. Because brush size does not scale with zoom level. And I'm just going to put the edge of my circular mouse cursor right outside of what is currently selected. So just overlapping part of the hand. And as I click now, the selection immediately grows to select most of the hand. So that is how the tool works, like if you touch an object by clicking and dragging, it will find the edge of that object and place your selection. So as I'm going on, I keep varying my brush size to paint over different areas of the image. And as we can see, as I increase the selection along the hand here, we also get some areas that I do not want selected, like here at the back of the shoe or hear some of the floorboards are selected, which I obviously do not want. And as you're building the selection, you will see a plus sign within our mouse cursor. And that is indicating that we are currently adding to the selection as any other selection method that we've previously looked at, this tool has different modes. It has new selection, add to selection, and subtract from selection. Now, with this particular tool, I tend to stick away from, stay away from these icons because you can just quickly switch to the ultimate mode by holding the Alt key or Option key on the Mac. So currently I'm holding the Alt key and my plus sign, it turned into a minus. And now I can click outside of the model on the area that I do not want selected. And it's going to change the selection and basically push it back in. So to select, we worked from within a subject to its edges and to deselect, we work from outside of a subject towards its edges. And I'm just gonna do the same thing here. And for this part, I'm going to decrease my brush size quite significantly. And then it selects too little because I want this part of the shoe as well. So if I click on it again, it's going to expand again, but not to the same extent from which I corrected it. So this tool basically learns from what you are doing, not in An artificial intelligence sense, but it basically decreases the band of contrast that it is looking at to build your selection. So as you make these corrections, it starts to improve. And we are going to be spending a lot of time refining selection such as this in later videos. But what you should know about this tool is that you basically don't want to do your entire selection in one go. It's always a good idea to regularly release the mouse button. So that gives you a reset point. Because let's say if I remove the selection and I increase my brush size again, and I'm making my selection here. And then I run into a problem here. When I go over a shoe and I go way outside my subject. Now, I could use Alt to correct this, but it would be easier to just not make this mistake in the first place. So now if I use Control Z, I have to start all over again. Because the clicking and dragging and creating this initial selection was one action and Control Z and does your previous action. Now if I've clicked several times, like if I release the mouse button at certain intervals, and then I make such a mistake, I can just use Control Z. And all I have to do is this area again. So it's always a good idea to regularly release the mouse as you are creating selections such as this. And if you really are working on some finer details, it's actually a better idea not to click and drag, but just click and grow the boundaries of the selection incrementally.
9. 1.8-Select Subject: About two years ago, Adobe introduced select subject into Photoshop CC, I believe it was the 2019 addition. And while I was not very impressed with it initially, it has seen dramatic improvement over the last year and a half or so. And I find myself relying on it more and more to create fast and accurate selections. Select subject is basically an automatic selection. So it looks at the image and makes an estimation of what the subject of the image is, and then puts a selection around it. And you will find this function when you have certain selection tools active, such as the Quick Selection Tool or the object selection tool, or the magic wand tool. You can also find this function in the select menu here at the top, and then you can choose subject. For now I'm going to activate the quick selection tool, and I'm just going to click on Select Subject here at the top. And Photoshop is going to do some calculation and it is going to put a selection around my subject, my son here. And as I zoom in, you will see that this selection is pretty damn accurate. So we have these extending hair lines out of his hood. And if we look here at the arm and the sword that is holding, there are some smaller issues that still need fixing. And here at the bottom of his shoes, we also need to correct for the shadows. But overall this is an excellent place to start. And that is what I use this function 4. So I just click on this button. Photoshop makes a relatively good initial selection, which I can then use the other selection tools on to keep working. So to get to the preferred result. And I'm just going to show you the selected mask function, which we will go over in detail in the next lesson. But if I click on Select and Mask here, and then I switch the mode to black and white, the display mode. And there we see the actual contours in black and white of our selection. You'll see these really fine details that would be very difficult to select manually using any of the selection tools without refining the selection initially. And this selection has not been edited. This is something that photoshop created completely on auto mode using select subject. So I am, I find myself using this function more and more because it's just a faster way to get where you want to go. So for now I'm going to click on cancel here at the bottom right. And I'm just going to zoom in on a sword where I saw a couple of problem areas. And with the quick selection tool active, I'm going to decrease my brush size using the left square bracket. And I'm just going to click a few times to add this area to my selection. So in the next video, I will show you how to remove little details like this. But this is a very good starting point for improving our selection. So this tool is basically an automatic selection. And I recommend trying it and see if it works for you and the types of images that you work with. But if you work with a lot of models, let's say I give you do a lot of portrait photography. This is a very reliable tool in my experience.
10. 1.8-Object Selection Tool: In the October update of this here, photoshop has seen some drastic improvements to the object selection tool, which I'm going to show you in this video using the file 4.9 objects selection. And I'm just going to activate the object selection tool. And when you activate this tool, you will see some new options here in the Options bar, which we are going to look at in a little bit once we actually get used to using this new tool. So as you mouse over your image, photoshop will actually highlight the subjects that it detects. So if I hover here over the leftmost model of this image, I can just click once and it's going to load a selection of my model. And this selection is deadly accurate. This is better than what you would get with the Quick Selection Tool, for example. And the preview is actually not that accurate because as you can see, as I hover over the model, you'll see some splotches on her skin here, which wouldn't be selected by our initial impression. And if I hover over the model here, you will see that the left side of her face isn't highlighted in blue, indicating that it won't be selected. But once I actually click on the model, you will see that she is actually completely selected and that part of her face was also part of the selection. So this mouse over just gives you a very quick instant preview of how your selection is going to look. But the actual selection is a lot more refined once you actually click on the model. There are some issues. Sometimes, for example, if I look at the model on the right here and I click, then you will see that the part below her chin and above the address here is not selected while I would have is selected when I wouldn't have wanted that to be part of my selection. But for that then I can select the subtract from selection setting. And I can just click and drag and it's going to de-select whatever I had selected there as the subject. So this is really quick and easy and I'm actually kind of a fan of how this work works. And I'm just going to show you how the rest of the new settings work here. We have a checkbox for object finder. And if you disable this checkbox, it actually resets to working like it used to work in the previous edition. So now I can just click and drag a marquee around whatever I want selected. It's going to look within that marquee to find my subject. And it does have to actually be an Add to Selection mode while it was still in subtract from selection. And there we go. Now, it did forget her watch here, so I'm just going to add that to my select selection using the Quick Selection Tool. And now going back to the Object Selection tool. So real enabling the object finder, we have some options here. We can actually reset it to its default settings. We can refresh it. Then we can click this button to show all objects that are currently being detected in the image. And note that this is not like a final preview of it. Then we have some settings here for objects. Subtract that we can auto refresh it or manual refresh it. We can choose the overlay color, the outline of our subjects, the opacity of the overlay, and whether the overlay is shown automatically or not. Here we can switch between a rectangular select or a Lasso Select. We can set it to sample all layers. We can determine whether the edge should be hard or soft. We can give it. There'll be some feedback with this button. We can go into Select Subject like we were able to do previously. And we can dive straight into Select and Mask. And going into Select and Mask. This also has an object selection tool, including the object Finder. So you won't just find it within the default workspace and Photoshop. It's also added to the select and mask workspace. So that's a quick overview of this new version of the object selection tool. And I can see myself using this quite a bit.
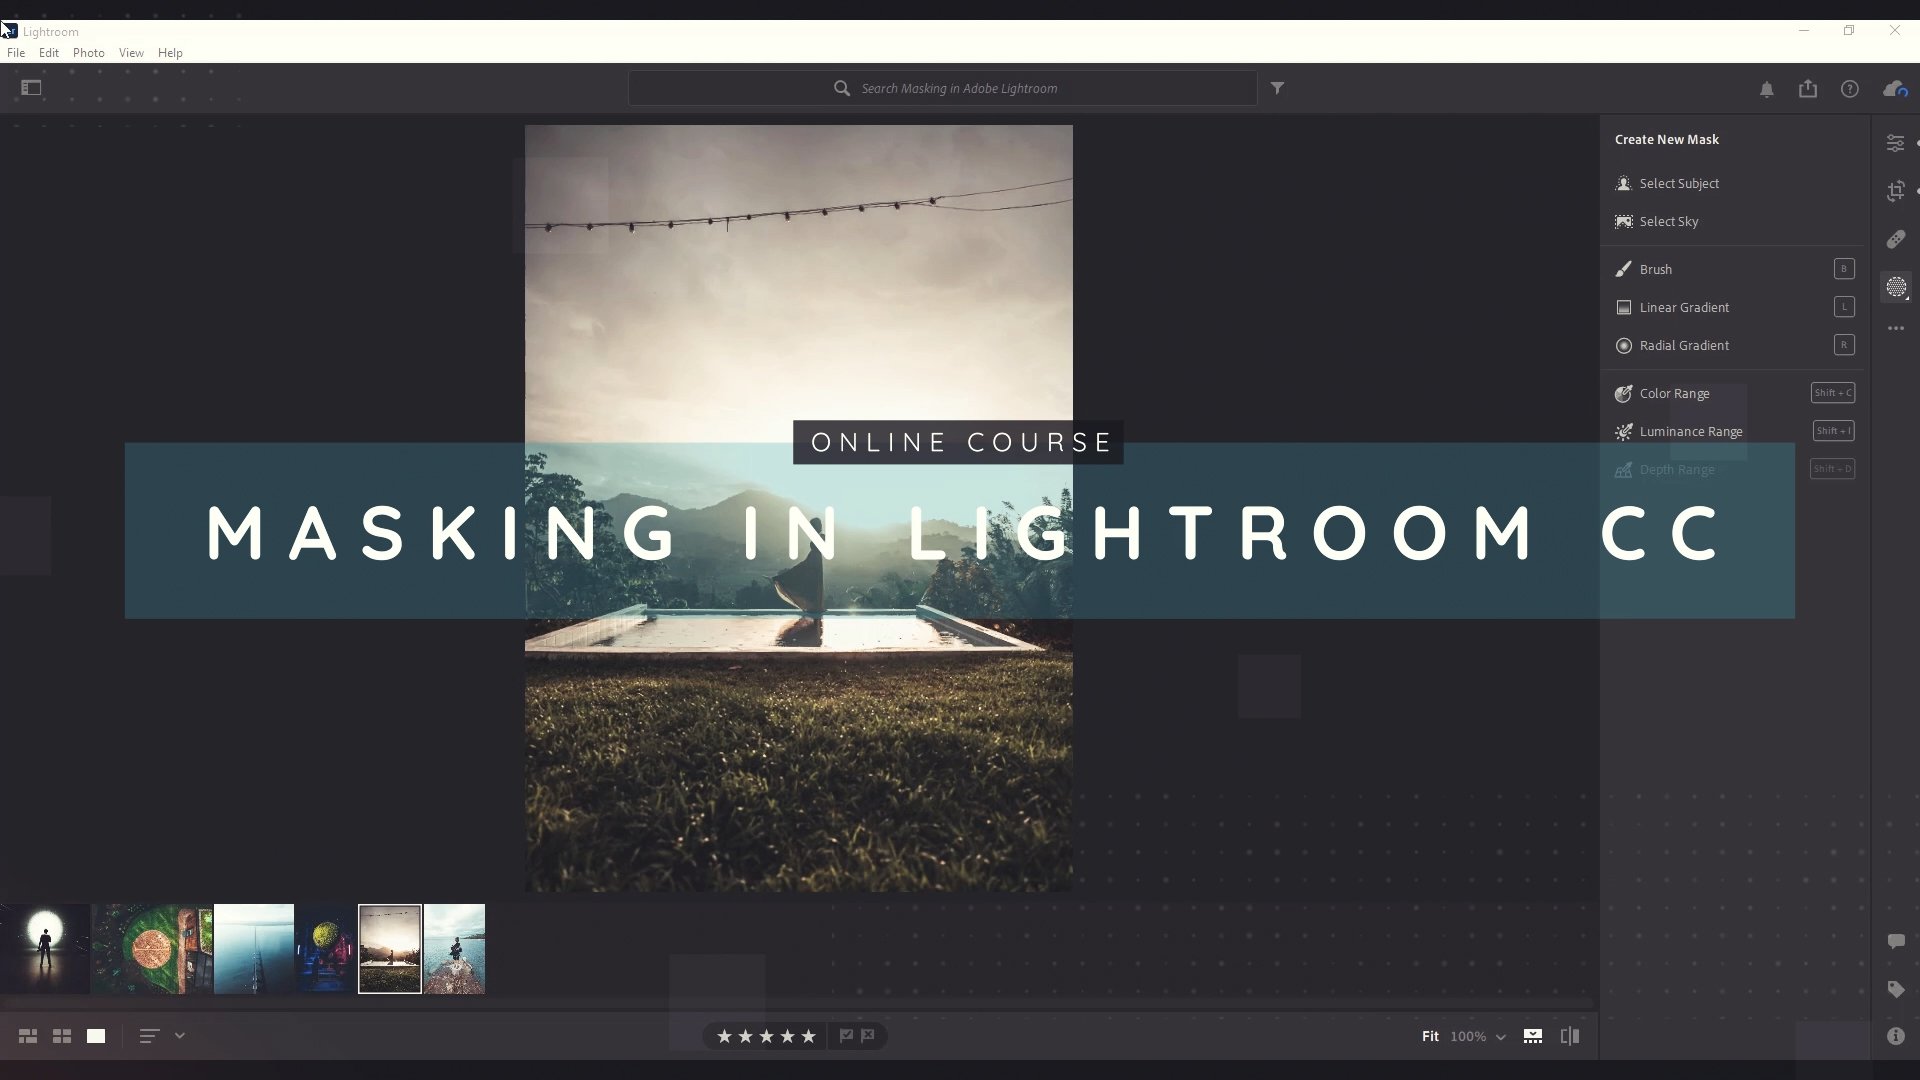
11. 1.10-Select and Mask: The select and mask workspace allows us to improve our initial selections by playing with certain settings and by using certain tools. And we briefly ended up in that workspace in one of the previous videos. But right now we will be looking at the different settings you can use to improve your selections. So I've opened up four-point 10, Select and Mask. And I'm going to create an initial selection here by going into the Select menu at the top and then choosing subject. And that's going to create roughly the same selection as we had previously, which is pretty accurate as a starting point as pointed out earlier. So without going into any improvements here with the Quick Selection, like our previous example, I'm just going to go into the select menu here again and then choose, Select and Mask or shortcut Alt Control R. And that brings us into Select and Mask. And initially we will see our selected subject against this checkerboard background, which indicates transparency in Photoshop as we've gone over previously. Now, here on the left we have some tools which we will look at in the next video. This video, I only want to talk about the settings here on the right. So initially, we can determine the view of our subject, and the view is currently just a transparent background. So if I extend this menu by clicking the down arrow, you can choose marching ants, which just displays it as a selection as any other selection, you can set it to overlay. And that overlays this red color on everything that is currently not selected. You can choose on black or white. And if I close out of this menu by clicking outside of it, you can see that I can also increase and decrease the opacity of this overlay. So I can really see the contours of my selection. So if you want to edit out a subject out of a light-colored background, you would use on black, which allows you to see the light contours around the edges of our selection. And if you want to edit out some, someone or something out of a dark background, you would use on white, allowing you to see the contours of that background. So for now I'm just going to leave it to on Black. And I am going to take the opacity of the overlay down to about 80 percent. So here we have the refined mode and you can set that to color aware or object to wear. And it also gives you a short explanation of what this actually does. You can change it to Object Aware mode, which gives you this pop-up. And it is possible that you wind up with a very different selection at the end of it. But my selection here seems pretty similar. So this is more suitable for selecting hair or complex background and color are aware is more suitable for simple or contrasting backgrounds. So I'm just going to stick with color aware for now because it seems to have similar results. And then we have the edge detection. And this is a smart process which basically looks at the edges of your selection and tries to decontaminate it. And to demonstrate that, I just want to zoom in on the head of my son here. And I'm just going to increase the radius slightly. And what you will see is that we get a softer feather along the edges of his hood, at which I can visualize a bit better by changing the overlay to black and white, decreasing the radius to 0 again, and now increasing it to, let's say three pixels. So this is our before, and this is our after. And it has produced a more accurate selection at the top here at least. Because often what you see with using edge detection is that you get de-selected areas within our subject. And that's something I do not want. So I'm just going to decrease the radius again. And then I see that they're still there. And that with the radius, I actually had a better result. So I'm just gonna set it to three for now. There's also a smart radius, which is an automated process. And it tries to get the best results based on the image. So I can leave that on or I can turn it off. The results weren't drastically different. In this case. Here we have a slider to make our selection more smooth. And that is going to remove some of the jagged edges that we see along his jacket and his pant legs. So if I increase the smoothness and I'm just going to increase it too much. So you see what's happening at, it just kind of makes the edge blur together. So a low smoothness means lots of contrasty edges. And a higher smoothness indicates a smoother edge along our selection. Now the feather is basically a blur for our selection. So if I increase the feather, you will see that the edges blur and you get partially selected pixels outside and inside our subject. I never really use this. I tend to prefer to stick to using the other settings and, or the tools that we have on the left here, which we will look at in the next video. But it's something you can use to feather a selection. If, for example, want to select something that is not in focus, that this can help you get a better as around that, that you can also increase the contrast, which is another way of decontaminating the edges of our selection. And let's say we increase the smooth ER, the smooth value doesn't discriminate between pixels that you do and do not want to select. And you can eliminate some of the problem, problems that leads to by increasing the contrast of the selection. So I'm just going to leave it at 20 percent. And you can also use Shift Edge to shift the edge of our selection into our subject or outside of our subject. So moving back to the top here, you'll see that if I shift the edge, it will push the selection inwards. And if I change it to the right plus 100%, it increases the radius of our selection. Now, I'm not actually a big fan of what the smooth did with the top of the hood here. So I just change that back to 0. And I am going to display the selection on overlay mode for now. And this is looking pretty good. So now we're going to look at what we can do with this selection that we currently have. If I extend the output settings here, you can see that we can output the selection to an actual selection just like we've created with many other tools previously. We can apply this selection as a layer mask, which we will be looking at in the next chapter. We can put it as a new layer, a new layer with layer mask, a new document, or even in a new document with a Layer Mask. Now without going into what a layer mask actually is, because that's something we will be talking about extensively in the next chapter, I usually choose new layer with layer mask because that allows you to create these selections non-destructively. So I can always go back in and edit what is actually within the layer, shown within the layer or not. So I'm just going to choose new layer with layer mask and click OK. And then when we look at our Layers panel, the background layer, the original is currently hidden. So the I here is deactivated. And we have a new layer here at the top with a layer mask attached to it. And I'm just going to visualize that a bit better, better for you by increasing the thumbnail size by clicking, right-clicking within the layers panel and choosing large thumbnails. And as you can see, within this layer mask, everything that is filled with black is currently hidden and everything that is filled with white is currently visible. And that is the essential inner workings of layer masks. White is visible, black is invisible. So it outputs, outputs our selection to a layer with a Layer Mask. And the next video we're going to go over the different tools of the select and mask workspace. So let's get working on that.
12. 1.11-Select and Mask 2: In this video, we will be looking at the tools that the select and mask workspace offers us. So I'm just going to quickly activate one of my selection tools by pressing the W key on my keyboard, which switches me to the fourth group of tools, the objects selection tool in this case. And I'm just going to click Select Subject here at the top. Now, with this initial selection, I can just go to Select and Mask. Note that you don't have to actually do this stuff first because Select and Mask also contains a button at the top for Select Subject, but I prefer to get started here. So I'm just going to click Select and Mask here at the top. And I'm going to leave it at this red overlay currently. So I'm just going to choose Overlay and leave it out read. And then we will look at these tools here. We have a Quick Selection Tool, we have a Refine Edge brush tool, the regular brush tool, an object selection, the lasso tool, and also the polygonal lasso tool. Actually note that we do not have the Magnetic Lasso Tool. And then we also have a hand in the Zoom tool. But for those, there are shortcuts, namely the spacebar to use the hand tool. So we'll bring that down switches to the hand tool and Alt scroll for the zoom tool. So we can use these tools to further refine our selection. So I'm just going to zoom in on the sword and I'm going to switch to quick selection. And it is currently set to add to selection and its size seems to be adequate for the area. I want to add some just going to click on the sword a few times to increase the selection. Now note that I went a bit too far and I painted over this area in between. So I'm just going to Alt click on this area a couple of times with varying brush sizes to paint the selection back and cure at the bottom, it is actually better to switch to the brush tool because I want to make these lines around the shoes a bit more neat, a bit more clean. So I switch to the brush tool. It's currently set to add to selection. And using this, I can just paint across the edges of the soles of the shoes to add those to the selection. And I can also do that for these areas. So this doesn't look for edges or any difference. In contrast, you can just paint straight over what you want to select or deselect, and that is what the tool will do. And then I'm going to look at the top here. And I'm also going to use this tool to paint over this little area. And then I would like to increase the selection of these outline hair's a little bit. And the best tool for that is the Refine Edge tool. So this is going to look at what's inside and outside of our selection and kind of calculate an average of what should and shouldn't be selected. So using this tool, I'm just going to click and drag along the edges of these hairs and release the mouse. And then we see that we get a bunch more hairs added to our selection. And I can demonstrate that a bit better by switching to the black and white overlay. So we have a lot more bushy hairs around his hood selected currently, so this would be a better result. And then I see that I am missing a little bit here. So I'm just going to switch back to the regular brush tool and just paint in these pixels. Now, let's say I went too far and I selected an area that I did not mean to select. Obviously I can use Control Z or Command Z on the Mac to go back a step. But I can also just hold the Alt key and then just paint over what I do not want selected. And then release the Alt key to, again, add to the selection. So you can use these tools to create far more accurate selections. And if you use these in addition to using the settings here on the right, you can really quickly get accurate and fast results.
13. 1.12-Selecting Hair: In this video, I want to give you another example of how well Select Subject actually works in many cases. Here I have a photo of a motto in a forest from the mind, Dominique. And I'm just going to click Select Subject to create an initial selection. And when you look at the selection initially, it seems very jagged, like there are selections or partially selected pixels that I do not want my end result. But once I click on Select and Mask here, and I show her in overlay mode. So I set the view to overlay, which allows me to quickly see which pixels are selected and not selected. You will see that even these out flying hairs are very accurately selected. And there are a couple of areas where I would like to improve, such as between her hair and her arm here. But for that I can just use the either the brush tool or the quick select tool. And then just Alt click or Alt click and drag over what I want to deselect. Now, there is another button here at the top four refine hair. But in my experience, unless the image purports a certain preconditions, it doesn't really work that well for better results. Like I'm currently very happy with my selection here. But if I click on refining hair, hair, you will see that it removes a lot from the selection. And this is a very good result. And even if I switch to object to wear and click on Okay, it has improved like it's better than it was, but I'm still missing this whole bottom section of her hair. Even if I click on Refine here now, I will not get those details back. So I prefer to use the standard automatic selection and then incrementally improved by using the Quick Select tool and the brush tool. Or you can use the Refine Edge brush tool, which we went over in the previous video.
14. 1.13-Quick Mask Mode: In this video, we will be looking at Quick Mask Mode. And Quick Mask Mode is not a selection tool in and of itself, but it's something that we use to refine our selection we already have. And for that demonstration, I've opened 4.13 Quick Mask Mode, which is a photo of my daughter I took here on the water, water side. And I'm just going to click Select Subject here at the top to create an initial selection. And that's selection is missing some areas such as on the umbrella that she is holding up. And it also selected a bit too much. This would, in the background of this Bannister, and also little too little of her shoes. Now, I couldn't use the Selection tools that we've already gone over to improve the selection, for example, the Quick Selection tool. But I'm going to show you how to do that using Quick Mask Mode. To get to Quick Mask Mode, I can just press the Q button on my laptop. And you will, this will look familiar if you've seen the previous two videos where we worked with the overlay in selected mask. By the way, you can also get to this mode by clicking this little icon underneath the foreground and background color in the toolbar. Now, in Quick Mask Mode, I can work with white to add to my selection, with black to subtract from my selection. So I'm just going to activate the brush tool, just the standard brush tool, shortcut B. And I can use the bracket tools or the bracket keys on my keyboard to increase or decrease its size. I can also right-click to get to the size and hardness properties. I'm going to teach you a shortcut right now, which I use every day and which works for every single tool. That is a brush tool in Photoshop, which I find very intuitive to change the size and hardness of a brush that you're using. So on Windows, I'm going to hold down the Alt key and then I'm going to hold down the right mouse button. And now I can drag right to increase the size of my brush and drag it left to decrease it. And I can drag up to decrease the hardness of my brush and down to increase the hardness of my brush. So now you have a visual reference point relating to the brush settings, which I find exceedingly useful in most cases. And it's also a lot faster than using the bracket keys. So you can just visually determine how hard and how large your brush needs to be to perform whatever action you're doing. And this is very useful because as stated earlier, a lot of the tools of Photoshop such as the quick selection, the brush tool, the Spot Healing Brush, the clone stamp, et cetera. They're all Brush Tools and they all work with this shortcut. So for this particular task, I would like a small hard brush and I want to paint with black to remove this Bannister from my selection. So I'm making sure that black is set to my foreground color. And then I'm just going to click and drag along this edge to remove it from my selection. And initially this doesn't seem like a very accurate way of doing this. But you can actually zoom into the pixel grid and use a one pixel brush to determine exactly which pixels you want selected and which ones you do not by switching between black and white. So currently I'm using black to subtract from my selection. And I'm just going to change my brush size slightly again. And I'm not doing this in one go mind you I'm releasing the mouse button very often as I go so that I have a restore point to which I can revert with Control Z or Command Z on the Mac obviously. So I've added these pixels to mice or removed these pixels from the selection. Now here on her tights, she, we have some unselected pixels which I would like to select, some just going to switch to white as the foreground color. And I can use that by using this little elbow arrow where the four and background color are. Or I can use the x key on my keyboard. And I'm just going to click and drag over these pixels to add them to my selection. And I'm not gonna do this to accurately. This is only for demonstration purposes, apigee, obviously. So I'm just dragging over these pixels. And I also want these pixels. And the pixels. Okay? So, oh, I accidentally dragged out the window. Now I can move that to the top here and use white to paint in her arms to actually add them to my selection. As you see, Select Subject didn't do an excellent job of it, to be honest, in this particular case. And I'm going to use black to de-select these and white to select these. And I'm just using the X key to switch between black and white. And now I'm going to use a slightly bigger brush and white as the foreground color to add the umbrella to my selection. And it's not going to be too accurate unless I really take my time and zoom in and just do this on a pixel by pixel basis. But this is just to demonstrate that you can make it as accurate as you want. I can just zoom in on the edge of my umbrella and then choose white and just paint in these pixels, but not these pixels. So you can make it as accurate as you want using this particular method. Oh yeah, the shoe, I'm just going to add this to my selection with a slightly larger brush. And now, when we exit Quick Mask mode by pressing the Q key, again, we have this selection. So quick mask mode is a way that you can edit in or out pixels from your selection to get the desired result. And it basically works the same as painting in these pixels in Select and Mask Mode. But I just wanted to demonstrate that you don't need Select and Mask Mode to perform this kind of edit because this function has been in Photoshop since before I started using the software about 15 years ago.
15. 1.14-Magic Wand Tool: The magic wand tool is a tool that most Photoshop users are familiar with, and it allows us to create selections based on color and contrast between colors. So here in exercise file 4.14, magic wand, I'm going to hold the mouse down on the Quick Selection Tool. And I'm going to select the magic wand tool. Now at the top here, this tool also has similar settings to the other selection tools we've already looked at. We have new selection, add, subtract, and intersect. We can select a sample size which at currently selects a single point that we click on. And the others create certain grids around the point that we click on to extend our selection. The tolerance is how many lighter and darker values will be selected once we click with our mouse, which is set to 32 by default. So the lower this value, the narrower, narrower the range of pixels that are to be selected is. Then we have anti-alias, which when you use selection tools like this and also when you look at text, anti-aliasing is a thing. And basically it kind of makes the edges of selections and of texts less jagged. So it becomes smoother. So that's something you want to leave on by default. And there's another checkmark for contiguous, which means that it will only select pixels that are in one uninterrupted area. And because this is enabled currently, once I click here on this top left segment of this heart, it will not select any other parts of the heart, even though they are within the same tolerance of the pixels that I clicked on. So here is my initial selection, and I can obviously click on another segment of the heart, which will move the selection to there because currently new selection is on. So if I change this to add to selection, the second mode, I can just click on the different segments of the heart to add them to my selection. But this can be a lot of work and I would prefer to select the heart in its entirety with one click of the mouse. So currently I'm going to use Control D to de-select or Command D on the Mac. And I'm going to disable this checkmark for contiguous. And then I'm going to up the tolerance just a bit because I saw that some of the darker shades of orange of the heart, we're not selected initially. So I'm just going to change this to, let's say 42 instead of 32 and press Enter and then click on the heart. As you see, we have a nearly perfect selection of all the pixels that are actually part of the heart. Now, if I also want to select this bar here, just going to click on this again and again, or click and drag over it to add this to my selection. But what you will see is that her face is also starting to be selected. So I should have actually enabled the checkbox for contiguous again, to limit the selection to this area and not these areas of her face which I do not want to select. And I could change this tool currently to subtract from selection. But the quick selection tool is actually more suitable for this. Because I don't really want to de-select based on color. I want to just deselect this area. So I'm going to switch to the Quick Selection Tool. And I'll make sure it's about 40 pixels in size at this zoom level. And I'm just going to Alt click on her face to push the selection outwards. And there we have it, our selection. So the magic one tool allows you to select based on the color values of the pixels and the differences between them by changing the tolerance values. And if you want to select one area of an image where the color is contiguous, so it's all together and there's no interruptions between them. You can enable contiguous. And if you want to look at the whole image, when you use this tool, you de-select this particular checkmark at the top.
16. 1.15-Color Range Select: Another method of using color to create selections is a Color Range select. And I actually prefer this method over using the magic wand tool because it's a better visualization of which pixels will be selected and which ones will not. So to demonstrate this, I've opened 4.15 Color Range dot JPEG, which is essentially the same image as we saw with the magic wand. And in this image I'm going to go up to the Select menu and then I'm going to choose Color Range. And this is our initial view in this panel. Basically, the black pixels are not selected. The white pixels are selected or going to be selected once we click Okay, and the gray pixels are partially selected. So now when I click on this heart, you will see that we get most of the heart, but some pixels will not be selected and some will partially be selected. Now, I could change this in two ways. I can increase the fuzziness, which is basically the range of pixels that the program will be looking at. Or I can enable this Plus Eyedropper. Because currently the new selection is active, meaning that every time I click it recalculates which pixels will be selected and which ones will not. If I enable the plus eyedropper, I can keep adding pixels to my selection and thus increasing the area of selected pixels. So currently this is looking pretty well with a fuzziness of 48 and several cliques of my mouse on the heart. We don't see any selected pixels outside of the heart. There's a couple on the face of the model, which we can correct with the Quick Selection Tool. So for now I'm just going to click OK. And there we have our selection. So now I can zoom in on the face of the model once more. Take the Quick Selection Tool and just Alt click on the pixels that I want to deselect. So this is another way of using color as a method for selections. And I prefer this method over the magic one tool because it just feels a little more exact, like I have more control over what will be selected and what won't be.
17. 1.16-Focus Area Select: Focus area select allows us to select the pixels of an image that are in-focus and not select pixels that are out-of-focus. And for that example, I've opened 4.16 focus area. And we will find this function in the select menu at the top, and then selecting focus area. And Photoshop. Photoshop is going to do some calculations to see which areas of the image are in focus and which are not. And initially you might see this on a white preview, which is not what I want because I cannot see the image, the parts of the image of which are not selected. I don't have an opacity slider here, so I'm just going to choose something with partial transparency, which is the overlay here. So now on the image, I can determine which pixels I want to select and which I do not. So here we have this rose. And I'm just going to click and drag over this. And it's going to use the quick select function to increase the selection to also include this rose. And I can do the same here. And again, it's going to use the quickselect function to grow the selection to its bounds. And I can also select this by just clicking and dragging over it. And for removing from the selection, you simply hold the Alt key and drag over the areas you want to deselect. And it might have to do a little bit more than you would like. But this is how it works. Note that I do not use this function. I believe there are faster and more accurate ways of selecting. And my pictures tend to have a lot of depth in them. I showed them with a very low f-stop, so a larger aperture. So yeah, There's a very gradual difference between what is in-focus and what is not in focus in my images. And I, I just prefer other selection methods to get what I want. So I want to deselect this branch here at the top. So I'm just going to Alt drag over this and these. And that's the nice thing about this particular overlay, is that it allows us to instantly see what is selected and what is not. So from here, I can choose where to output this selection to a selection layer mask new layer, new layer with layer mask, new document or new document with layer mask. What I can also do is just from here, dive into select and mask. So if I click on Select and Mask, I end up in the select and mask workspace where I can use these tools on the left that we've looked at earlier, or the settings here on the right. To improve my selection. Let's just say I want to output these two new layer with a Layer Mask and then click on OK. And there we have it. So we have our isolated rose petals here.
18. 1.17-Select Sky: There are many possible situations where you want to quickly and accurately select the sky of an image to replace the sky, or to brighten it up or to darken it. There is actually a Sky Replacement function in Photoshop that we will be looking at in a different chapter. But there is a specific selection function, specifically for Skies, which we will be looking at in this image, 4.17, select sky. I couldn't use, for example, the Select Subject function or the Quick Selection tool to quickly select my subject. And then I can easily invert the selection by going into the Select menu and choosing inverse or pressing Shift Control I. But there's also a specific menu function for this, but in the select menu. And then choosing sky. And once we do that photoshop looks out what it thinks the sky is in this image and creates a better selection than I could've made by hand in the same amount of time. And looking at the details of this selection, like even the horizon here and these extruding pieces of hay from the hay bale are not selected. And this mountain hearing in the distance is obscured by some haze. But I could still actually select this or deselect this by Alt clicking on the horizon with my quick selection tool. So this function looks at what the sky in an image would be and creates a pretty accurate selection of it. And there have been situations where I've used this function to quickly select the sky. And in those situations, I have not been disappointed.
19. 1.18-Editing Selections: In this video, I'm going to show you how to use the Select menu to edit selections that we've already made. And there are many possible situations where that can be useful. And to demonstrate this, I've opened 4.18 editing selections. And I'm just going to zoom in on this rose petal here at the top. And I'm going to take the object selection tool and make sure the mode is set to rectangle. And I'm just going to click and drag a rectangle around this rose petal to create a selection. Now, let's say I want to remove this rose petal from the image. I just wanted to fill in with the background. For this, I could use content aware fill, which we will be looking at in a later chapter in detail. But to use this function, I can go into the Edit menu here at the top and choose Fill. And then when you end up in this dialogue, by default, Content Aware will be set for its contents. So I'm just going to click Okay. And it's going to fill with content aware. And I click the wrong button there. And I'm going to deselect. And you will see that you can still see the contour of this rose petal. And that's because the selection wasn't pixel perfect. And for Content-Aware Fill, you usually want the selection to be outside of the subject so that it removes the subject in its entirety and you don't end up with this bending around the subject that you're trying to remove. So what I'm gonna do is increase the size of this selection by using the Select menu. So I've gone back with control Z before I use the fill command. And now I am going to go into the select menu here at the top, and then I'm going to select Modify. Now you can create a border which will actually de-select the center of this selection and create a one pixel border around it which will be selected. I can make the selection more smooth, which is similar to the smooth command in the Select and Mask dialogue. I can expand the selection, I can contract it so making it bigger or smaller by a set pixel value or I can feather it and feathering it means that you just make it softer towards its edges. So in this case, I want to expand the selection by about three pixels. So I'm going to choose Expand. And I'm going to enter a value of three pixels. And you don't get a preview of this unfortunately, but I'm just going to click Okay for now. So now you see that my selection has grown by exactly three pixels, which I can also visualize by zooming in a little bit. And now if I use the fill command, and instead of going to Edit Fill, I'm just going to press Shift backspace for the same dialogue box. And I'm just going to leave it a Content-Aware and click. Okay. And now once I de-select, you will not see the contour of the rose petal because the selection was, I'm far enough outside of it that no pixels of the edges were selected. And in similar fashion, you can decrease the size of a selection. You can feather it if you choose. And you will find all of those functions in the Modify menu of the select menu here at the top. One other function of this I'm going to elucidate on right now. I'm just going to use the object selection tool to select part of this rose petal. The Select menu has a couple of other options that I want to expound upon a little bit. If I press grow, it's going to use a Quick Selection Tool like algorithm to grow the selection to the first edge of contrast that it encounters. So if I click grow, it's going to grow the selection to the edge of this particular rose petal. And if I use Control Z to go back one step, I can also use the command similar phi via the Select menu. And that's going to look at the entire image and self select pixels that look like the pixels that were already selected. And this is a very inaccurate process. It almost never gives me the results that are won't grow. I sometimes use, but similar is one that I've never really encountered a practical use for. So usually you use the Select menu to either get to one of these commands. Color, range, focus, area, subject, or sky, or use it to modify and expand or contract a range of selected pixels. But these ones further towards the bottom, the grow and similar are not ones you typically use if you want to wake, work quickly and accurately.
20. 1.19-Saving and Loading Selections: In this final lesson on selections, I'm going to show you how to save selections and load them within the same document or in different documents. And for that, I've opened 4.19 saving and loading selections and using the object selection tool set to rectangle mode in ads add to selection. I am just going to quickly select a few of these petals. And what you'll see once I drag a marquee around these two here, the area between them will also be partially selected. So I'm going to switch to subtract from selection at the top left. And I'm just going to drag a smaller marquee around this area to deselect where they meet. And then switch to add to selection again. And I'm just going to select a few more of these. And again, when you're dragging more keys, you can always use the space bar to move the mark key to a different location. So if you click and drag in the wrong initial position, you can always use the space bar to reposition your Marquee. Okay, so let's say I want to save this selection to use it later. For that, I can go up in the select menu and then go to the first one from the bottom, save selection. Here you can choose a document and I want to save the selection in the current document, but I can also choose a new document. I can choose a channel here and it's going to create a new channel, which I'll talk about more in a minute. And I can also name this selection, and I'm just going to call this collection. And it's going to put it in a new channel. And once I click, Okay, the selection is now saved. So I can de-select now using Control D. And I can always recall this selection in a couple of different ways. The first and most simple way would be going into the Select menu and then choosing Load Selection. Now, there's only one saved selection, so it's automatically set to this document and it's already set to the correct channel which I have just created. And it's going to create a new selection because I don't currently have a selection active. If I did, I could add to that current selection using this saved selection, I could subtract it or I could intersect it if I so chose. So I'm just going to click Okay, and it's going to reload the exact selection that I had before. So that's way number one, that's method 1 for reloading a selection. I'm just going to click press Control D for now to deselect. And now I am going to look at the Channels menu where you don't really have a lot of business being in, especially if you're a beginner working with Photoshop. But basically this gives us a collective channel for RGB, for red, green, and blue. And it also gives us the grayscale values for the red, green, and blue channels. So here we have all the information in the red channel, the green channel, and the blue channel. And the RGB is then a collective channel, combining those into actual color information. And here we have the selection channel which has been added by using the Save Selection command. Now, if you enable the visibility of this channel, it's going to distort the image. So it will display actually in the true colors, the objects that we selected, and in red what is not selected, similar to what Quick Mask Mode would do. So this is not something we want. The easiest way to reload. A selection from this channel's panel is holding Control on Windows and Command on the Mac. And then just clicking on the thumbnail of the channel. So if I click on this black and white rectangle here, it's going to re-select the channel. And that loads the selection as it was saved. And that actually works for layers as well, which I will demonstrate in another video. So by control clicking on a layer, you select all the active pixels within that layer, provided that it's not a background layer.
21. 2.0-Combining Images: Working with layer masks is another core aspect of working with Photoshop because they basically allow us to combine several images together into a single image in a non-destructive way, either based on selections which we looked at in the previous chapter or working with grayscale values, which I will demonstrate in this chapter. So this chapter is all about working with layer masks. And to get started with layer masks, we're going to need two images, at least two images in one Photoshop file. And there are several ways of doing this, a few of which I will demonstrate in this video. So I have Photoshop open here, and I want to combine the first two images of the exercise files of this chapter into one Photoshop file. Now what I can do is basically open both of them separately by going into the File menu. Choose Open, find the file in my folder structure. Here they are. So I can select both of these, and then I can click Open. And it will open both images in Photoshop, but it won't put them into a single document, it will open them separately. So let's say I want to add this image to this image or the other way around. Let's say I'm going to add this image to this image. So I'm just going to open the image here in Photoshop and I'm going to grab the move tool, and I'm just going to click and drag onto the other file, the tab that's open at the top. And then I'm going to hold down Shift as I'm still holding down the mouse button and then I'm gonna release. And that's going to place the other image as a separate layer in the dead center of the original, which is what the Shift key was for. So now I have both of them in one file. I'm going to undo that with Control Z. And I'm going to close the other image, and I'm going to show you another way of doing. Let's say I've opened this single file, then I can just go into Explorer or Finder on the Mac. And I can find my second image and I can just click and drag it into Photoshop. And again, holding down Shift, place it in the middle of this other image. Now, this is going to place it in a Free Transform. So you see these transformation points along the corners and the long edges. So this is something you have to confirm initially. So I'm just going to click this check mark here at the top that confirms the placement. And now I have two layers in this document. Now, please note that when you do it like this, when you use this method of combining images in Photoshop files, you place the second image as a Smart Object. And there's a whole chapter on smart objects later on in the course. But you should be aware of that it is a smart object. So you cannot use destructive tools such as the Spot Healing Brush or the clone stamp tool on this specific layer. Now, I'm going to show you my favorite way of placing several images into one Photoshop document. And to do that, I'm going to close out of this image by pressing Control W or Command W on the Mac. And I'm going to open Adobe Bridge, which I talked about for a bit in the second chapter of this course. So using Adobe Bridge, I can select both of these images in this directory, which I already opened before I started recording this video. And then I can go into the Tools menu here at the top. And there is a photoshop dropped down here. So I'm going to open Photoshop and then I'm going to choose load files into Photoshop layers, which is exactly what I want. And the number of images that you do this for doesn't matter. You can do this for 20 images at the same time. Even though depending on your system, it might take a while to open all of those into Photoshop layers. But I'm just going to select these two, click that option. And a few seconds later, both files will be opened in Photoshop. The background layer is not locked. It in fact, this document doesn't actually have a background layer. So I can just click and drag the order of the layers to adjust whichever one I want at the top. Because as you saw, it takes the file order of the folder that you opened and places the images in that order in the layers panel. So this, according to me, like that, my humble opinion, because there are always several ways of doing things in Photoshop concerning most of its functions. This is the most convenient way of putting several images into one document.
22. 2.1-Getting started with masks: Now that we have two images in one Photoshop file, we can start combining the two. But first, let's look at what these images actually are. The top layer 5.1 Introduction to masks. One is a photo of my friend Michael standing on the edge the roof of my apartment building. The second layer, which I can make visible by hiding the top layer by clicking the icon. Here is a photo of Michael's shoes here at the edge of the roof. Now, the way I wanted to combine these images is to make it seem like only Michael's shoes are at the edge. But his reflection in the puddle here is in fact showing. So basically I want to hide Michael in the end result at the top here. So I want to leave his reflection visible but hide Michael himself. Do that. We are going to basically make the top half of this image transparent. Now, we already looked at layer opacity, as stated in the previous video, where we can just change the opacity of the top layer to reveal the bottom layer. But that's not what I want. I want to localize this partial transparency. So I only want to make this top part of the image transparent. Now, we used to do that with the eraser tool. So here I have an eraser tool with a size property that I can change here at the top if I want. And with the eraser tool, you can just click and drag over a layer to erase that layer. But this is a destructive edit. So I am actually discarding the pixels that I'm dragging over and I cannot get those back unless I use Control Z. So if you've saved the image or if you want to undo part of the erasing that you've done, you are unable to do that. So to combine images in a non-destructive way, we are going to add a layer mask to this top layer. So I'm going to click on the top layer here to make sure it's selected. And you see it's selected by the gray highlight. And then I'm going to look at the bottom of the Layers panel to the third icon from the left, this little rectangle with a circular hole in it. That tells me like if I hover the mouse over it and add layer mask. So I'm going to click on that and you will see next to the image, thumbnail is now a mask thumbnail. So this indicates that the layer has a layer mask applied. And this mask is currently filled with white, indicating that the entire layer is currently visible. Now we can hide parts of an image by working with grayscale values within a layer mask. So if we want to hide something completely, we can just paint over those white areas of the layer mask with a black brush. And if we want to partially hide parts of an image, we can use a gray scale value between white and black to partially hide it, which I will show you in a later video. So I'm going to make sure the mask is highlighted because note that you can select either the layer itself or the layer mask by clicking on either of those. And I'm going to activate the brush tool. That's this regular paintbrush here in the Tools panel. You can also press the B key to activate the brush tool. Now, there are certain properties of brushes that we have to go over. There is a separate chapter on working with brushes, where I go into a bit more depth for these particular settings. But basically, there's three settings that you have to keep in mind when you're working with brushes. And that is the brush size, which is the size of your cursor. So the size of the brush you'll be painting with. There is the hardness, which I will give you a short demonstration of. And there's the brush opacity, which we will be looking at a couple of videos from now. So the brush settings can be found here at the top left where you see this brush indicator. Now, the size property is something you can change here as well as the hardness below it. And you can just enter a numerical value. You can drag this slider from right to left or left to right. Or you can actually put the cursor on the word size and click and drag to alter the size of the brush. But this is not the most convenient place to alter these properties because you don't get a preview of how big your brush actually is. So let's say I grab the default size, which is 30 pixels. So that should be. What your current size is, approximately 30 pixels. Then I have to move my mouse back to the image to see if it's actually big enough to paint out what I want to hide. So let me just increase the size here to 50. Well, that's still way too small. This is a 43 megapixel image, I believe. So. This is not the best way to change these properties. So I'm just going to click out of it. And I'm going to put my cursor on the image. And then I'm going to use the square bracket keys, which you will find right, of the P key on your keyboard, on most keyboards on accorded keyboard anyway. So with the left bracket key, I can decrease the brush size. And with the right bracket key, I can increase the brush size. And I'm going to set it to about 1000 pixels. And now I want to make sure that black is my foreground color. Now, the foreground color is displayed here at the bottom left of the toolbar. White is currently my foreground color, and I can switch that around by pressing this little elbow arrow. Or you can press the X key on your keyboard to switch out black and white. It will always be black and white when you first activate this, when a layer mask is selected because masks work based on grayscale values. So now I have a black brush of adequate size and I have the layer mask selected. And that means that I can now just click and drag over the image. And wherever I click and drag will be hidden in the composite image. So I can just paint down to Michael shoes. And there's my composite. And as you can see here in the layers panel, the top half of the image of the mask is now filled with black indicating that it is invisible. And the bottom half of the image of the layer mask is still in white, meaning that it is visible. Now, there's a few handy shortcuts that you can use when working with layer masks. I can use the X key to switch back to white as the foreground color. And then I can just paint back over the layer mask and bring Michael back. So this is completely non-destructive and I can change whatever is hidden or visible at anytime by just switching out the foreground color from black to white or from white to black. And just painting over the images, over the sections of the image that I want to hide or reveal. Now, let me give you a demonstration of brush hardness, which is a concept we will be using in several lessons in this chapter. We already opened the brush properties here at the top-left, and my hardness is currently set to 50 percent, 0%. So let me change that to 50 percent. Now, if I switch the foreground color back to black using the X key and then click on the image. You'll see that there is no longer such a strong gradient as we saw before. The brush has a lot less feathering and the shape of the brush is much more defined. So let me just change that back to 0. As a demonstration, it is now set to 0. And if I click now, you will see that only the very center of the brush position is transparent and there's a very heavy feather towards its edges. Now with 50, as we saw, we have a much more defined circle. And if I set it to a 100 percent, there is no feathering at all and you just cut a circular hole in the image. If you click on the layer mask with black, that is now what size you want to use is dependent on how well-defined the lines are that you want to paint out. Now, I have this angular roof here, which would be easiest to do with a harder brush. But if you want something to blend into the background more seamlessly, you will want to use a soft airbrush. Not usually 0%, more like something between 25 and 50, but it really depends on what you're trying to blend, which I will give you some examples of later. So let me just complete the composite. So I'm just going to set the brush size to approximately 50%. I wanna make sure black as my foreground color, my size is still set to about a 1000. So now I can just click and drag over the top part of the image to complete my composite. So the workflow is pretty much always put two or more layers into one document. Apply a layer mask to the topmost layer. Just paint with a black brush to hide what you want to hide from that layer. So what you're basically doing is cutting a hole in the top layer. So you can see the bottom layer through it.
23. 2.2-Masking with selections: In this lesson, we will be looking at creating layer masks based on selections, which is of course, something we've looked at extensively in the previous chapter 4. And we will be creating a composite it using two images. This image of a cooling tower, an abandoned cooling tower in Belgium where I went, wants to take some pictures and this image of a passing plane overhead. And we're going to make it seem like this plane is flying over the cooling tower. Now, you've probably seen a lot of images like that where a plane is exactly in the center of a lookup shot. And most of these are unfortunately faked. Like it's almost impossible to get the timing right, to get the position right. So sorry to ruin this for you, but almost all of those images are faked. There are some real ones out there, and they usually show there behind the scenes. If you look on Instagram, if you're on Instagram and you're into that sort of thing, you can usually tell when it's fake or not when it's too perfect. It's usually faked afterwards in Photoshop with either an entirely different plane or a plane that was moved to the exact right position. So what we will be doing is opening these images into one Photoshop file. And just as a revision, revision exercise, I'm going to show you two ways of doing that. So I'm going to select both of these images in bridge, both five-point two. And I'm going to go into the Tools menu, go to Photoshop and choose load files into Photoshop layers. And that's going to put the airplane here at the bottom, which is not what I want. So I can always click and drag to change the order. And I'm actually going to show you two more ways of doing this. So I'm just going to close out of this image for now using Control W. And I'm just going to open both files from Photoshop. So File Open. And I'm going to select both of these images. And I'm going to click on open. Now to get them both in the same document. I'm just going to grab the move tool, shortcut V. And I'm going to click and drag the airplane into the other file. And I'm going to release the mouse holding Shift to place it in the center. Now, I also have both of them in one file. And the third way of doing this is using the Creative Cloud library that you have access to through this course. So I'm just going to open my Libraries panel and just going to find the image of the airplane. And from the library. By the way, the library is organized into groups. So in group 5 layer masks, I can find the airplane image and just click and drag it into my Photoshop file. And then double-click to confirm. So that's something you can do using Creative Cloud Libraries. Now what I want to do is isolate this airplane from its background. And there are of course, several ways of doing this. The fastest way in the current edition of Photoshop is using select subject. So I'm just going to activate the quick selection tool, which will give me this button here at the top for Select Subject. If you don't want to switch tools, you can always go into the select menu at the top and then choose subject. Now, because this airplane layer is selected, it automatically finds the airplane as the subject. With this selection active, I can click on the Add Layer Mask button at the bottom of the Layers panel to just add the layer mask. And as you can see, the layer mask is in the exact shape of my selection. So you can first create a selection and then add a layer mask to basically cut out what you have selected, which is exactly what I wanted in this example. Now, there are a few minor mistakes that photoshop made here. Like the sky is still visible through parts of the wheel wells here. And what I can do to change that is just grab the brush tool and decrease its size dramatically. To make sure I can paint over these blue areas. Make sure black as my foreground color. And I can just paint over these areas to hide the blue. But this is something that isn't really necessary for this composite because I will be scaling down this airplane to such an extent that you will not be able to tell that there is still some blue in between the wheels. So let's forego making these final little corrections. You can if you want to, but you don't have to get the same end result as we're looking for. So I want to transform this layer. I want to make it smaller. So to get into a Free Transform, I can either go into the Edit menu here at the top and choose Free Transform. Or I can press Control T or Command T on the Mac. So that's usually what I do because I am shortcut maniac. So with this layer selected and without the menu open, I can press Control T to get into a free transform. Now, note that the free transform actually applies to free transform to the entire layer, not just the map, the masked area. You see this transform frame is a lot bigger than the airplane and it encompasses the entire original image and not just the mast area, which is something you should keep in mind when you're working with larger images out of which you want to cut a much smaller part. So now I can transform the layer. And I can either just click and drag one of the corners. Or I can do that using the Alt key on Windows or the Option key on Mac to transform the layer to its center. So as long as you're holding the Alt key, you will transform the airplane to its own center instead of to the opposing corner. Whatever corner you're dragging from. And I'm going to make it about, let's say 200 pixels wide. The size should be displayed next to your mouse cursor, by the way. And then I'm going to first release the mouse key and then the Alt key. And then I can just still drag this airplane around. Or I can nudge it around using the arrow keys on my keyboard and just put it where I want it. And then I still have to confirm the transformation by clicking this little check mark at the top, pressing the enter key, double-clicking or just switching to a different tool. So I'm just going to double-click on the airplane and there it is. I can still nudge it around provided that the move tool is active. So I can just use the arrow keys on my keyboard to make sure that it's actually centered on the chimney, on the smokestack or cooling tower. I'm not sure what the word is. So and now we've created a composite where an airplane is flying in the perfect center of a lookup shot, which is something you very often see on Instagram. And this is how those images are almost universally created.
24. 2.3-Brush Opacity: So far we've looked at the basics surrounding masking in Photoshop, combining two images into one document and working with brush size and brush hardness to combine two or more images together. There is another property concerning brushes that you should be familiar with if you're going to be combining images into one end result. And that is brush opacity, which we will be looking at in this lesson. And for that purpose, I am going to open the file five-point brush opacity one by just double-clicking it in Bridge. You can also obviously you go to File and open to open it from your File Explorer or Finder program. Now here I have a drone image that I shot of the island in the lake of bled, Slovenia. And what we are going to do is make this island float on the shell of a turtle. So for that purpose in the library, you will find the turtle image five-point brush opacity too, which is a PNG file indicating that the background is transparent. So I've already isolated the turtle out of its background. So I'm just going to click and drag this into my image from the library. You can also obviously do this from bridge or Explorer or Finder, as we've seen in previous videos. And dropping it in from the library puts it in free transform. So I'm just going to grab on to the edges and holding Alt, I'm going to increase its size from the middle. I'm also going to stand right outside the layer boundary and just click and drag to rotate it a bit. And as you can see, I can't really see where I want to position my turtle because the island is obstructed. Now, while you're in free transform, you can still change the layer opacity of the layer you're transforming. So we can see a bit more clearly what we want to do. So now I can see the island a bit better with an capacity of about 50 percent. So I can rotate it a bit more. Something like this. And I want like the neck to stick out of these trees at the front. Maybe increase the size a little bit, holding ALT. Okay? That looks about right. So I'm going to commit the transform by pressing the Enter key and then just increasing the opacity again to make the turtle visible again. Now what we want to do is basically cut an island sized hole in this giant turtle. And for that purpose we are going to hide the turtle. And we're going to click on the background layer to make that the active layer. And now what I want to do is create a selection of the island. And for that, again, we are going to use Select Subject. So I'm just going to go into the select menu at the top, making sure that the background layer is highlighted. And into the Select menu we are going to choose subject. And that creates a relatively accurate selection of the island depending on which version of Photoshop you're using. It didn't miss a few items though, the church spire and some of the orange rooftops on the island. So I'm just going to switch to the Quick Selection Tool, increase the brush size using the right bracket key. And I'm just going to click on these areas to add them to my selection. Okay? This looks about right for our purposes. So I am going to really visualize the turtle. Just make it visible again by clicking the eyeball. And I want you to think about what's going to happen when we add a layer mask at this point. Because as we've seen in the previous lesson, applying a layer mask leaves the selection and hides everything that is not selected. So in that case, we would actually get the reverse of what we want. So if I click Add Layer Mask now here at the bottom of the Layers panel, it's going to hide everything except the turtle where the island is sitting. So that's not what we want. It's also what we can see in the in the Mask thumbnail. By the way, everything is white except for everything that is not the island. So I'm going to, there's a few ways to fix this. Actually, one way of fixing it is just pressing Control or Command I on the Mac with the mask highlighted because this inverts the layer mask and turns everything white into black and black into white, giving us the desired end result. I'm just going to go Control Z back to this point before applying the layer mask is there's two other ways that you can fix this. So I can go into the Select menu and choose Inverse, and that inverts the selection before applying the layer mask. So now I've everything that is not the island is currently selected, giving me the desired result when I click on Apply Layer Mask. I did Control Z again and one more before inverting. So there's one handy little shortcut when applying layer masks. It's often the case that you want to apply a black layer mask instead of a white layer mask. And that is exactly what the Alt or Option key on the Mac does when you apply a layer mask. So with this selection that we started with initially and the turtle layer highlighted, I'm going to Alt, click on Apply Layer Mask, and that gives me the immediate desired result. So this requires the fewest amount of actions to get the mask that I would want. Now, I'm not quite happy with the position of the turtle. I would like to move it down a little bit more. And that presents a problem because I can grab the layer here. Once I start clicking and dragging, you will see that the mask also moves with it. So the cutouts changes basically. And I want the cutout to stay the same, but I just want to change the position of the turtle within the cutout, within the mask. Now, this is because the layer and the mask are currently linked, which is displayed by this little chain link icon between the layer and the mask thumbnail. Now if I release this by clicking the chain, clicking the link, then I can move the mask and the layer independently. So I can either click the mask and move that. Or I can click the layer and just move the layer. So now the mask stays in place and the layer is repositioned when I click and drag using the Move tool. So now it looks in about the right position. So now we finally get to talk about brush opacity. And to demonstrate that I'm going to highlight the actual layer mask and not the layer itself. And I'm going to grab my brush tool using the B key on my keyboard or just clicking it here in the toolbar, my brush size is currently set to one pixel, which is obviously a bit on the small side. So using the right bracket key, I'm going to increase its size. So using basically what we want to do is make it seem like parts of the turtle are submerged because currently it's just floating on the water. There's no shadow, There's no difference in transparency, and it doesn't really give a compelling result that way. So basically what I want to do is make the parts of the turtle that would be further underwater in this composite, a bit more transparent than the other parts to make it seem like there are some actual depth there. And for that purpose we're going to use brush opacity. Now, the brush opacity is displayed here at the top and it's currently set 100%, meaning you paint with a 100 percent white or a 100 percent black, depending on which is your foreground color. So now with a 100 percent white, nothing happens unless I paint over the island. So I'm going to put black as the foreground color. And as you can see, when I click and drag over the turtle, the entire turtle disappears. And this is also displayed in the layer mask by this big black spot here at the top. So that's not what I want. So what I'm going to show you is what happens when I lower the brush opacity, which you can also do in a few different ways. I can expand this slider and just click and drag this. I can enter a number manually. I can also just put my mouse on top of the word opacity and click and drag. But a very handy shortcut for brush opacity are the numerical keys on your keyboard. So if I press the five key, you will see that my opacity jumps to 50%. And if I press the three key, you'll see that it jumps to 30 percent. With the two key, it's 20 percent and that's about where I want to get started. So with my brush opacity set to 20, black as my foreground color. And then the layer mask here highlighted. I can just click and drag over the turtle. And it's going to incrementally increase, decrease the opacity of the turtle. So now everything is becoming a little bit transparent. So now what I'm gonna do is just click and drag over certain parts of the image again. And that's going to double up on that 20 percent. So 20 plus 20 equals 40% opacity in total. So that's going to increase the transparency of parts of the image that I go over once again. And that's what I'm gonna do for a like this shoulder part of the fin. And I'm just gonna do this a few times to really double up on the effect. And I'm going to make it seem like this part of the turtle is a bit deeper. And I'm just going to go over this edge. I'm going to take the head down a little bit. So I'm just clicking and dragging over parts of the image until I get the desired effect. And that is already looking a lot better. Now I can zoom in on the image a little bit using Alt scroll. And as you can see, the shadows of the trees aren't showing, showing through to the turtle like he can't see the turtle through the reflections. The trees which were also included in the selection. And to get around that, we are actually going to put white as the foreground color because this is currently filled with black in the mask, meaning the turtle is invisible there. So using a slightly smaller brush, white as my foreground color and an opacity of 20 percent. I'm just going to go over the reflections or the shadows of the trees. And that's going to allow me to paint through the shadows to the turtle, making the turtle partly visible, which increases the realism of our composite in most cases. So I'm just going to go over these shadows. And there we go. That is already a lot better. Now, normally, I would take a lot more time to refine this composite and really get the depth right. Add some shadow below the turtle and mix a few other additions here and there to really finish the image. But this video is about teaching you how to work with brush opacity. So with brush opacity, you can incrementally increase or decrease transparency by just painting over parts of the image that you want more or less transparent than everything else.
25. 2.4-Project Airplane: In this lesson, we will be looking at a practical application of layer masks. And we are going to take a photograph of my son and we are going to make him float in the air. If you look in the exercise files for this lesson, you will find two images, five-point for project Airplane 1.45, project airplane to now I'm going to load 5.4 project Airplane one into Photoshop first by just clicking and dragging it into the program and letting it go here on the splash screen. Now, for the next step, I am going to import the second image, which is in the same folder. And I'm just going to click and drag it into Photoshop and release it on top of the background layer. Now as we know, this puts it in a Free Transform. So I'm just going to confirm that free transform because I don't actually want to transform it. And now let's take a look at these two images in the top layer, project airplane to my son team OEM is laying on this piano stool and the bottom image is just the background. So without our model here, and what we're gonna do is basically paint out the stool to make it seem like T-Mobile is just flying in the air. So with this top layer selected, I'm going to click the Add Layer Mask button here at the bottom of the Layers panel, and that adds the layer mask. So now I can start painting with black over the areas that I want to make transparent. So I'm going to select the brush tool and I'm going to increase my brush size a bit. I'm going to make sure that black is my foreground color by pressing the X key. And I want my brush opacity at a 100 percent. So I'm just going to press 0 key in this case because the brush tool is active, 0 puts the opacity at a 100. And now I can just start painting over this foreground here. And that's just going to disappear. That's going to become hidden behind the black layer mask. And first I'm just going to do a rough outline of the floor here and I'm doing the entire floor because there is a difference in lighting on the floor between both images. And I want them to look consistent. I want the Florida look consistent as far as lighting is concerned. So I'm just painting out the entire ground here from the top layer, revealing the ground of the bottom layer. Now I'm going to want to increase the hardness of my brush a bit. And as we've seen, we can do that here at the top, at the brush settings here where the size is displayed. Or I can hold the Alt key, hold the right mouse button, and then I can move my mouse down to increase the brush hardness. And then I can just grab these more exact lines around our model here. And once you get closer to these edges, you're going to want to zoom in even more and scale down your brush even more. So you can do this in detail. And I'm not going to make this pixel perfect. Usually I spend quite a bit of time adjusting and readjusting my masks to make sure that it looks realistic. Even the slightest difference in lighting or color or blend of the background can ruin the illusion and make your composite look unconvincing. So I'm just painting along these edges. And we're gonna do that again over here. These edges are a bit too, too well-defined, so I'm going to come back to those. Again, decreasing my brush size using Alt and right mouse. And I'm just painting between his fingers. Because as you can see, there's inconsistent lighting. And that's not something that you can prevent in a case like this. Like we took these photos outside, outdoors in a parking garage. And for one shot, the sun was out. And for the other shot, the sun was hidden behind some clouds. So that gives you a difference in lighting no matter what you do. So I'm just going through all of these edges and note that if I go too far, like if I remove a bit too much of his jacket here, I can always switch to white as the foreground color and just paint it back in. Easy as that. Now, for this next part, I can zoom out a bit and increase the brush size again. And I'm just going to do my best here to paint all this out. And initially, I don't mind that I'm taking out a bit too much of his collar here because I can always switch to white and just paint it back. And I'm just varying my brush size as needed. And now I'm going to decrease my brush hardness as much as I can because this top part doesn't have to be as precise like the illusion is created by having him floats above the ground basically. And this background here, it doesn't look unconvincing that this is a bit different. So I noticed that I painted out a little too much of his shoes. So I'm just going to put white as the foreground color and just paint this back in his note that if I paint over to moan with black, he will disappear. So just be mindful of that when working with layer masks like this. So using black, I'm just going to take care of these final little edges. And here I'm going to grab a very soft brush. So I'm going to lower the hardness to 0%. And I'm just going to paint over the edges of it with a black brush to kind of put in a feather to make it seem like it's a bit uneven. And there we go. There is my son floating in the air. Now to make it look a bit more realistic, we can add a shadow to Cimon. So I'm just going to click the New Layer icon here at the top of the layer, at the bottom of the Layers panel. I'm going to name this shadow by double-clicking the current name. And I'm just going to drag this down under the, under the second layer. I'm gonna grab my brush tool. I'm going to go and hit the D key to set it to the default color. So black, in this case. I'm going to increase the size of my brush and decrease the hardness to 0. And I'm going to switch it to 40% opacity by pressing the F4 key. And now I'm just going to paint under T-Mobile here, like so. And now I can still change the opacity of the layer to make it a bit more transparent. So I'm going to set this to, let's say 60 percent, something like that. So this is with the shadow added, and this is without the shadow added. And the shadow makes it a bit more convincing. It's a tattoo big so I could grab the eraser tool and just paint over some of the edge here. Maybe make a small indent just to change its shape a little bit and make it conform a bit more to what my son actually is shaped like. So this is our final composite with Tim OEM floating in the air. These floating pictures are really easy to take. You just take two photos from a tripod, one without a model and one with the model on top of a stool or some other kind of object. And you just put them on top of each other. You add a layer mass to the top layer, and you just paint with black to remove what you want to be hidden.
26. 2.5-Project Dice: Now that we've looked at the essentials concerning layer masks and use them in a practical sense. With the airplane project, we are going to look at how to use several layers with several layer masks. And for that we need to have several images in one Photoshop document. And by far, the easiest way of achieving that is using Adobe Bridge, as I've demonstrated in the first video of this chapter. So I'm going to select these four images within the exercise files. All the 5.5 images, which isn't image of a friend of mine throwing a bunch of dice towards the camera, which are shot on a very wide angle lens. So I'm going to select these four images, and I'm going to go up into the Tools menu here in Adobe Bridge, go into Photoshop and then choose load files into Photoshop layers. And that's going to load all these files into Photoshop layers within a single document. These images are all the same size. There were all taken from the same position. And basically the purpose of taking the several images was that I could decide how many dice are actually in my final image. So here we have four images. And what I'm gonna do is work from the bottom up towards the top to decide which dice I actually want in the image. But for that, I'm going to move the top layer to the bottom because that is actually what I call a clean plate, which doesn't contain any of the dice at all. So I'm just going to drag this down to the bottom of the layer stack and I'm going to hide the three top layers. And I can do that in several ways. Like you can just click the eyes to hide the other layers. You can also click and drag across the eyes to hide them all. Or what you can do if you want visibility on a single layer and no other layers, you can also click on the I icon of that layer, and that's going to hide all the other layers. So here we have our clean plate and now for the second layer, project dice for, I'm going to make that visible and then decide which dice I actually want visible. Let's say I want this one right next to his hand. This one here at the front, and this one here in the middle visible. So what I'm gonna do is hide this layer behind a black layer mask. We've already seen that we can add a white layer mask by just clicking the Layer Mask icon at the bottom of the Layers panel, which adds a white layer mask. Now if I'm holding Alt or Option on the Mac and then click this icon I had. I add a black layer mask, hiding everything in the layer. And this is a lot easier because it's a lot more convenient to paint in what I want from the final image. Instead of painting out what I don't want, which is most of the image except for the dice. One problem though, is that now I can't see the dice because they are hidden behind a black mask. So I'm going to take a look at the properties panel, which should be in your current interface. If it's not, you can always go up into the Window menu at the top and then select Properties. Now with the mask selected, you get the mask properties here. And here I have a density slider. Now if I start lowering this to about 60 percent, you'll see that the image below the layer mask actually becomes partially visible again. You will also see it filled with a dark gray or 60 percent gray here in the Layers panel. And you can always undo that by just increasing the density to a 100 again. But now I can easily see where I want to paint with white to make those dice visible in the end result. So I'm going to grab my brush tool. I'm going to press 0 to make sure that the opacity is set to a 100 percent. I'm gonna make sure white is my foreground color and I'm going to decrease my brush size and increase the brush hardness a bit so that I can easily tackle these dice. And again, for this, I was using the shortcut, holding down the Alt key, holding down the right mouse button, and just moving the mouse left and right to increase or decrease size. And from the top and the bottom to increase or decrease the hardness of the brush. If you're working on a Mac, that would be the Control key and the left mouse button, if I'm not mistaken. So now I'm just going to paint over this dye here. And this one. And this one. And then I can just increase the mask density again to a 100. And there we have the end result. Now, I want to add some more dice, so I'm going to grab the next layer, project dice three, and I'm just going to make that visible. And let's say for this one, I want this dye, this dye visible in the end result. So I'm just going to hide the layer behind a black mass by Alt or Option, clicking the Layer Mask icon at the bottom of the Layers panel, and then set the density to about 60 percent so that I can actually see the dice. And to make things even easier, you can also hide the layer you did previously. So I'm just going to hide the second layer from the bottom so I can easily see which dice I actually want in my image. And then I'm just going to paint over this with white. And over this with white. Increase the mass density again. And there they are in my end result in if you still notice some missing edges or whatever, you can just still paint over it with white. Now that the dice are at least partially visible. Here is the image so far. So let's take a look at the final image, the top layer project dice 2. So I'm just gonna make that visible and I'm going to hide the other layers for a moment. No way. I'm going to leave those visible. And I'm going to hide this layer, bind the black layer mask Alt, clicking the Layer Mask icon, and decrease its density, and then hide the previous layer so I can see which dice I actually want. And let's say that I just want this one from this particular layer. So I'm just going to grab my brush tool, white as foreground opacity at a 100. And I'm just going to drag over this to make it visible. I'm going to increase the layer dense, the mass density again. And there I see I'm missing like a little corner from this dice die. So just paint over that with white, make these layers visible again. And here then is my end result. So I can Alt click on the icon of the bottom layer. This was my starting point and all clicking it again makes the other layers visible again. And this is then my final composite. And I create images like this all the time. Just to make it, we're just more dynamic and to decide for, to be able to decide for myself which objects I want in the final image and which I don't need.
27. 2.7-Essential Shortcuts: In this lesson, I want to highlight some of the more useful keyboard shortcuts when you're working with layer masks. And speaking of keyboard shortcuts, there is no keyboard shortcut by default for applying a layer mask with either black or white. And that's something that we can change ourselves. And that's exceedingly useful because layer masks are something that comes into play every time you open up Photoshop basically. So let's set up a couple sheet keyboard shortcuts for applying a black layer mask and a white layer mask. To do that, we are going to go into the Edit menu here at the top and then select Keyboard Shortcuts. The default keyboard shortcut for opening keyboard shortcut is Control Shift Alt K. So I'm just going to click here and then we have an overview of all the menu options we have at the top of the programs we have File, Edit, Image, layer, type, et cetera. And the Apply Layer Mask functions are in the Layers menu. So I'm just going to expand this menu option. And then I'm just going to scroll down and it's quite a ways down to the layer mass category. Now reveal all is applying a white layer mask. So I'm just going to click this and then assign a keyboard shortcut to it. And my keyboard shortcut is going to be Control Shift Alt M, as you see displayed on the screen right now. Now that keyboard shortcut is already assigned by default to changing the menu options. Now, that's something that I never really do because I don't need to change what menu items are available and in which order they are. I think the program is fine as it is in that aspect. So I'm just going to overwrite that standard keyboard shortcut with this one applying a white layer mask. So when I click Hide All that is for applying a black layer mask to hide the entire layer behind a black mask. So to assign a keyboard shortcut to that, I'm just going to press Control Shift Alt K. And that is already assigned to opening up the keyboard shortcuts for Photoshop. But I don't really need to be in that part of the program a lot. So and I do often need to apply a black layer mask. So I'm just going to overwrite that current keyboard shortcut with this one. So with these keyboard shortcuts entered, I'm just going to click Accept here and then click Okay. And then with this layer selected in the File five-point eight essential shortcuts, I can press Control Shift Alt M to apply a white layer mask. And I can undo that with Control Z, of course. And I can press Control Shift Alt K to apply a black layer mask, which is exceedingly useful when you're working with masks pretty often. And if you're working in Photoshop, you will be working with masks pretty often. So continuing on, some other useful keyboard shortcuts that are on by default is what we will be looking at next. And to demonstrate those, I'm just going to apply a layer mask, a white layer mask to this layer by pressing Control Shift Alt M, you can, of course, click the Layer Mask icon here at the bottom. I just want a white layer mask. And now I'm going to create a selection of my daughter here in this image. And to do that, I have the quick selection tool active, and I'm just going to click Select Subject here at the top to create an initial selection. Now, accuracy is not really important because this is just an example of some keyboard shortcuts pertaining to layer masks. So I'm just going to improve my selection a little bit by using a small brush and clicking on some of the other parts of the image. Now, let's say I want to hide my daughter from this image. I have the layer mask selected, and white is currently my foreground color, and black is my background color. So I want to fill this selection with black, for which I can use the keyboard shortcut Control Backspace or Command Backspace on the Mac. So using Control Backspace, you fill with the background color, which is currently set to black on my system. So I can Control Z to undo, and then I can press Control I to invert that layer mask. So I've turned the white within my selection into black so I can invert again to bring, to shop back here. So control, I inverts the layer mask. You can also fill with the foreground color if I just invert it again by pressing Alt Backspace. So Alt backspace fills with whatever is currently set to your foreground color Control Backspace fills with whatever is set to your background color and control I inverts the colors, meaning it hides whatever is selected. When there's a selection active. I'm just going to press Control D to de-select, which we've often used in this and the previous chapter. And I'm going to show you what happens when I press Control I with the entire layer mask selected. So with no active selection, I have the layer mask here highlighted and I'm just going to press Control I. And that's going to invert the layer mask as you can tell. The next thing I'm going to show you is how to copy layer masks from one layer to the other. And to do that, we are going to duplicate this current layer. So I'm just going to press Control J or Command J on the Mac to duplicate the layer. And I'm just going to hide the bottom layer for now because we don't need it at the moment. So what we're gonna do is recreate our previous selection. So I'm just going to click here at the top for Select Subject since my quick selection tool is still active. And that's gonna give me the same selection as before. And I'm just going to touch that up a bit. And I'm actually, I actually have to paint out a little bit here on the side. There we go. So let's say this is my selection. And I'm just going to fill the selection with black, which is currently my background color. So I'm just going to press Control 0. Actually. The first thing we're going to want to do is invert the selections. We can actually hide the background. So I'm going to go up into the Select menu and choose inverse. You can also press Control Shift I or Command Shift I on the Mac to invert the selection, to select everything but my daughter. And now we're going to fill this selection with black to hide the background. So I'm going to press Control Backspace, command backspace on the Mac. And that gives us my isolated daughter here. Now, if I re-enable visibility on the bottom layer, That's just going to restore the image. So now we have a full, the full image again. And let's say I want to copy this layer mask to this layer mask which is already applied to the layer below, I can just hold the Alt key or Option key on the Mac and click and drag the mask from one mask to the other. And once I release, you get this confirm dialog where you can specify whether you want to replace the layer mask or not. So I'm just going to click Yes. And now I've copied the layer mask from one layer to another. Now, a situation where this can be useful and I'm just going to press Control Z for now is when you're working with adjustment layers, which we will be looking at in a future chapter. So I'm just going to click here for the adjustments panel. If you don't have this in your interface, you can always go into the Window menu and then choose adjustments. And I am going to choose the hue saturation adjustment layer here, the first icon from the middle row. And let's say I want to completely desaturate my daughter. So remove all the color. I'm just going to click and drag the saturation slider all the way to the left. But that the saturates the entire image. But if I want to apply to only my daughter, I can just hold the Alt key here and click and drag the layer mask from the middle layer into the top layer, which is the adjustment layer. I can replace the layer mask and that applies the effect only to my daughter. So those are some handy shortcuts. Another couple I'm going to show you is you can temporarily disable the layer mask by holding the Shift key and clicking the thumbnail. So that disables the layer mask and shows you the layer with the layer mask. And what you can also do is Alt click on the layer mask, which gives you the mask in grayscale values. So now we see in white what is visible in the image and in black what is invisible. So this is another handy shortcut that you can use to more accurately paint out or in what you want in your end result.
28. 2.8-Clipping masks: Another way of affecting layer visibility is by working with clipping masks instead of with layer masks. And how clipping masks works, it works is basically you limit the visibility of one layer to the position and scale of another layer. So basically you're determining that one layer is only visible where the other layer is visible in the layer below it. And to demonstrate this, I've opened up exercise file 5.9, clipping masks. And what we're gonna do in this document is draw a circle using the ellipse tool here on the left in the toolbar. So there's this group of shape tools. It's, the default is the rectangle tool. If you hold the mouse down on this group, you can select the ellipse tool. And using the ellipse tool, I can just click and drag for an ellipse and then grab shift to constrain it to a circle. And using the space bar, I can still change the position of this circle. This is something we will be practicing in the chapter on shape layers. But for now I just want this circle. Currently, my settings have determined that this circle does not have a fill, so it doesn't have an actual color. So to change that, I'm going to look up here in the Options bar, and I'm just going to click the Fill Color and select one of my previous LEA used colors. The actual color doesn't matter because we're going to be using it as a clipping mask. So for clipping masks to work the mask, so the actual shape that you want the layer to be visible in needs to be below the image layer. So I'm just going to unlock the background layer by clicking the lock icon. And I'm just going to click and drag the ellipse down in the layer stack. It's still there, it's just hidden below this image layer. And now I want to create a clipping mask. So I want to limit the visibility of the top layer to wherever this bottom layer is positioned. We can do that in three ways. We can go up into the Layer menu and then choose Create clipping mask. We can use the shortcut key Alt Control G or Option Command G on the Mac. Or what I usually do is just go into the Layers panel, hold down the Alt or Option key. And you will see this like branching arrow downwards. And now if I click, I apply the layer as a clipping mask. And you will also see this downward arrow and the thumbnail scoots over to the right a little bit to indicate that it's a clipping masks. Mask, besides what you can see in the actual document, of course. Now a few interesting things about clipping masks is that the mask or the masking will move wherever I move this ellipse. So if I select the Ellipse and have the Move Tool active, I can just click and drag and move the circle around. And that's going to affect the visibility of the top layer. But I can also do is click on the top layer and move that. And that just moves where the image is visible or which parts of the image are actually visible. So this is an interesting application because you can use this for many different things. For example, you can put and the image inside of a text or a shape, or inside of another layer. So the only downside is that it applies to single layers only. So I can only clip this layer into this bottom layer and not other layers below it unless I put them in a layer group. And I'm going to show you that just for demonstration purposes. So I'm going to release the clipping mask by again, Alt clicking in between the layers. And I'm going to go back to my shape tool, grab the Ellipse, and I'm going to draw another ellipse. Right care at the bottom. It's a smaller one away. Actually, I want to click and drag and release it. So now I have two layers and I cannot clip this image to both of them currently. So when I Alt click between the layers, it just masks it to the newest layer, which is on top of the previous one. I can move this one up and then create a clipping mask by clicking between the layers. But then this smaller circle is not taken into account. Now what I can do is select both of these shape layers and put them in a layer group, which we looked at in a previous chapter. So with this layer selected, I'm just going to press Control G to put them in a group. And I'm just going to call this group circles. And now if I Alt click in between the layers, you will see that the effect is applied to both of these layers because they are in a group. And you can't clip to several layers at once, but you can clip to layer group as I've just shown you. So applying a clipping mask is as easy as Alt clicking in between the layers. And you can always release it again by Alt clicking in between those layers, again.
 Martijn Van Weeghel