Transcripts
1. Secret Swatch Intro to Color Creativity: It Hey, y'all, did you know
that swatching is not just for testing colors? It's one of my absolute
favorite ways to relax and practice creativity. I'll show you how
to take three or four watercolors and combine them into a cascade
of unexpected hues. Look, and here's the best part. At the end of the class,
you're gonna have a standalone piece of art that not only was fun to create, you've learned something, and it'll be gorgeous to display. So grab your brushes, and let's start practicing some color creativity together. I'm Jules. This
is my art bender, and I'll see you
inside my class.
2. Materials & Building Rectangles: Alright, let's get going,
and we're going to go over our materials
for this class. Very simple. We've got
some water, a rag. I've got my spray
bottle so that I can spray down my watercolors. I have four colors
of watercolors, so I'd encourage you
to choose four also. I have a yellow
ochre, a turquoise, green, blue, an opera
rose, and an indigo. And then I've got
some washi tape and a little clip because my pages kind of come
up in this book. Speaking of the book, I
have a sketchbook here, but feel free to use just a
standalone piece of paper. Make sure it's either
a watercolor piece of paper or mixed media. This is a 120 pound mixed media paper that
I'm going to use. So the paintbrushes, I'm going
to use flat number eight, but you're welcome
to use a Philbert. Filbert has this little
rounded flat edge to it. So let's get started. You don't have to
use the washi tape, but I certainly
like to because it helps keep the pages
underneath cleaner. And I love how an edge
looks like I did here, that edge is just beautiful. Put this washy tape down, just make sure you
smooth over it with your fingers and that
there's no air bubbles because that's the whole
purpose of it is to not allow the watercolor
to bleed past this line. So we need to make sure
it's really on the page. So the colors I've chosen I've chosen three that are kind of near each other on
the color wheel, which is like this
yellow, green, blue. They kind of go together on
one side of the color wheel. And then I chose a
color on the opposite, which is this Opera rose, which is one of my
favorite colors. It just looks good all the time. Let's go for this color first. Okay. And I'm just wetting
the paint just a little bit, getting more water on my brush. You can see the palette
through this pigment. I'm just going to
make a square in the upper left hand
corner and fill it in. That's a medium
amount of pigment. I can go back and get a
little bit more if I want to. I just pull from the
edge of the paint out. Alright, so this is where the
magic is about to happen, and I'm going to do this over
and over and over again. So put my brush in the water, swish it around, and I'm
gonna lift it back out. And I have a lot of
water on my brush, and there still is actually
pigment in this brush. Come over here and I'm
going to pull this edge. Pull this line with all this
water in it. That's that. I might massage the
middle just a little bit, I want to get that ombre
kind of look to it. And that's that. Okay, so now I'm going to rinse my brush. Well, most of the way,
because I really don't care if I still have pigment in here because I'm
going to use some of this color plus another
color for the next block. I'm going to use some
of this yellow ochre, and I'm gonna grab
just a little bit and pull it into this green. This is a new color.
Got a bit of it, and I'm going to come over
here and I'm going to make another square.
And I like this. I'm going to pull on
one side of my brush, and then when it
gets kind of sparse, I flip the brush, and I'm pulling pigment with
the other side of the brush. I'm going to pick up
some more over here and just kind of drop it in
so it's got more pigment. I can still see the
paper through it, and I've left the tiniest
little bit of line. If they touch, it's okay. That's where some of
the beauty comes in, but it doesn't have to touch. You'll see as we go along. Okay, so I've got this
color in my brush. I'm going to dip it in
the water, swish it, bring it up, and
now I'm going to pull this line with
that residual. Massage this middle
bit a little bit. Okay. I did touch in a couple of places,
but that's beautiful. I'm swish, dab on my towel, grab some more of this
what you call it? What is this yellow ochre
and put it into the green. Alright, and now I've
got a lighter shade. Slightly different. It just
changed the tiniest hue. I like this color a lot. Alright, I'm gonna dip it in
the water, bring it over. Oops, I did a little spot
there, but that's okay. Bring this down and let this massage in the
middle a little bit. Ritz. Now, more
yellow Tutu to do. I'm just upping volume of that yellow ochre in
comparison to that green. Okay, pulling a square. You see this does have
more yellow quality to it as compared to
all the other ones. Pick up some more
pigment. Dip my brush, bring it over, and
oh the rest of it. Massage the middle.
So this should be a pretty relaxing process as we go through.
Rinse my brush. Okay, dab it off. Get some
more yellow ochre. Here we go. About this color. Is that
lighter than that? We'll see. Okay, and this is an
interesting dilemma, so I can either make
one bink square here or I can divide
it up into two. Rinse a little, get
the water and pull it over. I touched that there. That'll be pretty. So,
the faster you work, you won't get that line
in the middle, right? I'm sure you're starting
to realize that as I am. Let's do more yellow. It's just barely any of that original green we
started up here with. Okay, dip M. Brush and
bring it over. Super Dupa. Let's keep going. How about just
solid yellow ochre. And I'm gonna bring this
block up just slightly, and I'm gonna try to even out
the spacing between them. Alright, so there's my
yellow ochre, pure. Okay, rinse my brush. Bring over the
liquid. Pull it over. Massage the middle.
Rinse my brush. Okay, so now I can start along one of these
other colors I've got. I'm going to continue with
this yellow and I'm going to put a little bit of
this indigo into it. Yeah, oh, boy, I got way too
much pigment on my brush, so I'm just gonna start
tapping it out on my palette until I can see the white of the
palette through the paint. I'm just going to pull
the littlest bit of indigo into this yellow ochre. Rinsed, spread. So I'm gonna get a
little bit of that. I think that's gonna
be interesting and bring it down into that. So now I've got three
colors together, and we'll see what happens. Isn't that pretty? So
that's a new color. This is where we're
learning. Damn dip, little swish and pull it out. Okay. And some more
of this yellow ochre. Got an even darker, richer color, pretty,
pretty shade. Like, if you're doing
trees and exploring, gosh, the human eye can recognize
so many shades of green. It's amazing. Rinsing my brush a little pulling the water over. So I love exploring greens
and oranges together. So pretty. Here. I'm getting some pulling, so I'm just going
to tilt my page. I'm doing it until the drips get over to the
edge right there. So now I'm gonna add just a
little more of this indigo. Oh, that's nice. Ritz my brush. Alright, one more color up here. Let's go all the way. That is a beautiful color. Ritz. Pull. The nicely
this is coming together, so now we can rock back towards
either Oh, you know what? I want to start mixing this
color with this color. Alright, y'all,
I'm gonna rock out a couple more columns
in this really quickly. I'm doing the same thing,
and I'm slowly gonna start adding some of that opera
pink down at the bottom, coming back up with
some more yellow ochre. I'm gonna finish this out and
to halfway the next column. Then in the next lesson, we're gonna start tying all this together and really
making this a piece that's gonna pop as a standalone piece of art.
See you in the next lesson.
3. Bringing it Together: Secrets Revealed: It So we're going to start going back
as this is drying, and I'm just going to kind
of play with these edges. I'm going to massage some water. And as I'm adding water, I'm kind of lifting a little
bit of that pigment off, but I don't care that I'm moving it from one
area to another, just kind of filling in, getting rid of the white on the page, kind of reactivating
some of this. See, I'm tapping
down on the page, and it's lifting up some of that heavy pigment
on the left side. Just kind of filled in all those little white
spots, so it's kind of cool. Alright? Message,
these a little bit. Now, these are going to
happen much more easily because they're closer
to activated than not. So I'm going to grab some
more of the yellow ochre and add it to the color
we just made. And as I do this, I'm going to take some of that residual color on
my brush and just bring it over and just keep filling in and moving it around. And that pigment's
gonna keep moving as I bring new colors over
to those squares because the paper's
wet because we reactivated the we
waited to do this instead of doing it
early on so that we would keep the integrity
of our rectangles. So now I'm just
swinging the colors back kind of on
the greenish scale to pick the colors back up from the left side that we just made. Now I'm just going to
go around and look and see where I just need
to drop some colors. I think everywhere
has got in between, except for this last line,
which is really wet. I'm going to come in
here and just put some shadow around suggesting that we've done the same thing. Smooth this out a little
bit, soften the edges. I also want to add
some more like just a brown or purply color, just a darker color to offset. Do you like getting the corners, 'cause it makes them look
like they're little boxes of color that are sitting
next to each other when you darken in between, and we're using all
the same colors, so it all actually
works together. I'm gonna rinse my brush
and soften some of this. Just dance my brush around these edges of each block,
kind of making it fun. And if I get a hard
edge, like, right here, I might get some water, I'm just gonna add it so
it'll smooth it out. Right here. Hard edge.
Smoothing it out. Nice. We're looking pretty good. I think I want to add
some more of this indigo, just kind of tinting
that side a little bit. Alright, we're
gonna let this dry and then we'll pull
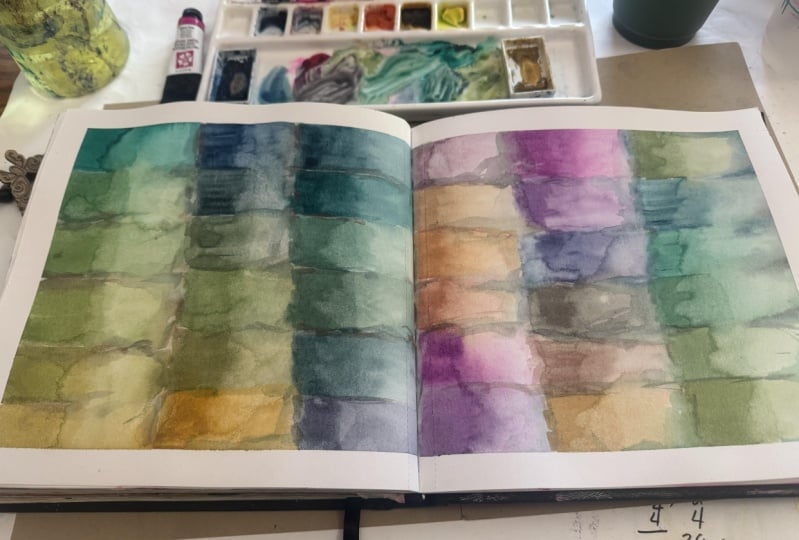
the washi tape. Alright, so this is dry. We are gonna take this off. This is the part that's so
satisfying in my opinion. Here's our beautiful
secret swatch spread. The secret is is that
you can do swatches, and it can be a beautiful
standalone piece of art, just like this other one
that I made. So satisfying. You can put these
up on your walls. You can discover new
color combinations. You can add gulves. You can add other design
elements, endless possibilities. I'm Jules and this
is my art bender. Thank you for joining
me. See you soon.
 Jules Art Bender, Artist and Art Educator