Transcripts
1. Introduction: Hello. I am Stephanie, Kill, gassed and have been a professional artist for the last decade. In today's video, I'm going to show you how to sculpt love vendor flowers. This is a really fun class. However, it requires some patients, so you have never sculpted before. Maybe don't stop with this class unless you love love vendor, and this is motivation enough to help you through the class. It's not difficult per se, but it requires a bit off externality and A said patients. If you have never worked with Paul Maclaine before, I would encourage you to check out my class politically Basics. First, this class specifically is going to show you how just called the HLA vendors from scratch. The project for this class is pretty straightforward. I'm just going to ask you to make your own love into flowers. You can play around with colors off course, and with the setting, you can put it on a scrapbook, all in the vases on something else or even France warm. It's into jewelry. This is completely up to you. But make 11 of flour and maybe share it with your classes. Well, I really love to see what students come up with. I really hope that you're going to enroll in this class, but most importantly, that you're going to enjoy it.
2. Materials: for this class, we are going to need Paula McLay sculpting tools. Small cutter I am using tiny camper crushers, a ceramic tile toe. Work on optionally small mosaic tiles to use to pre bake stainless steel wire cutting pliers. A pasta machine liquid polymer clay acrylic paints, brushes optionally a candle oven for pre baking.
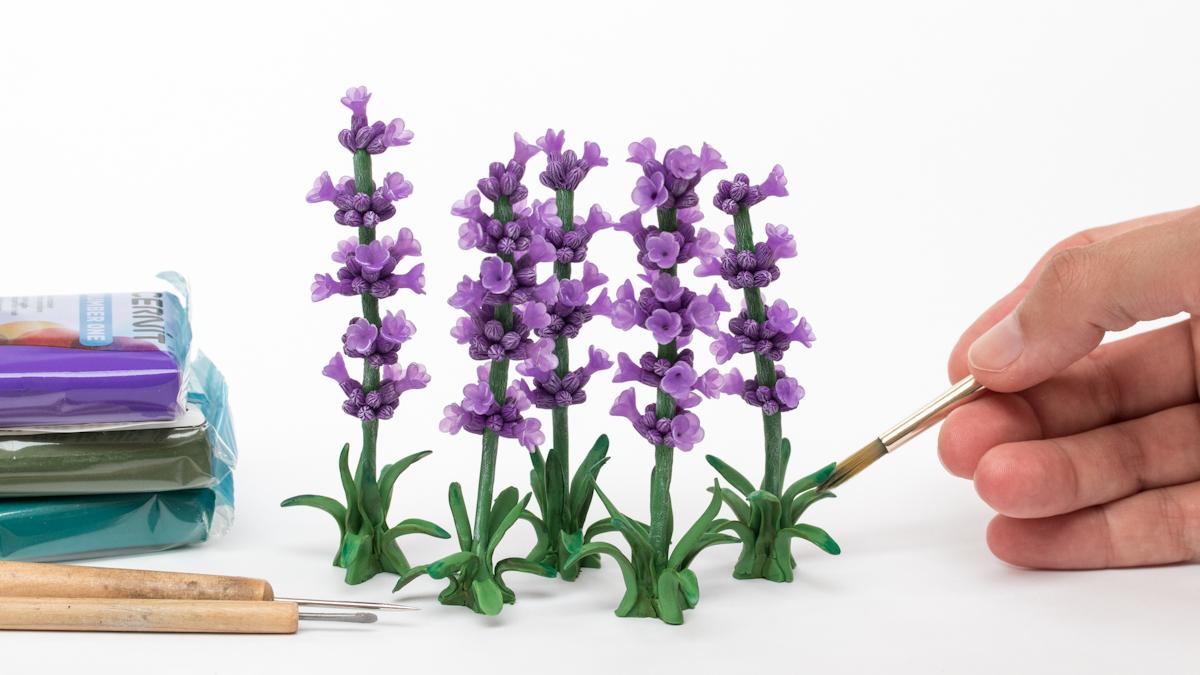
3. Making the Stems: we are starting to create the stems for that. We will cut pieces off stainless steel wire Jesus size of your liking for this class. I am going to make love ender flowers that are standing on their own, and I am cutting the stems at around 10 centimeters. That's two inches, but feel free to cut longer or shorter stems. E. Then drop each stem and two masking tape. This will help to undeclared later on. Paloma Clay doesn't stick well to metal, and masking tape is the trick to get it to stick more easily. - I always rub some clay onto the masking tape first, and then I Repola Maclay around it. Please note that I am using a pastor machine in order to get a thin sheet off clay on my makato past the machine that goes from 1 to 10 while 10 being the thinnest, I used the setting number six for the green mixture. I makes about seven parts off yellow and one part of blue. I often add a dash off okra off red mud, the green slightly if using a translucent clay like CERN it, that's all. If using and opaquely like female I also add the same amount of translucent so one part off the green mixture and one part off translucent clay. You might want to adjust the coloring. Do you like it? Twist and pinch the clay tightly to avoid any amable rollout. This them. She smoothed the clay down. Repeat until you have enough stems and said those stems assigned.
4. Sculpting the Flowers: Now let's do the love end of flowers. This is where you will need to be relaxed and patients first start. Roll out some translucent violet clay. I used the one from CERN. It's directly. It is called CERN. It's translucent violets online. Makato passed a machine. I roll the clay out on setting six. You then want to use a small round are T shaped cutter. Here I am using one off campers. Pediatric cultures. You could also use a straw are simply an Exacto knife. The Exacto knife is going to take off course a lot more time. Another option is to roll out a snake off clay and then cut even slices. Flatten each petal onto you tile, and then gently remove each with a blade for the flower. You will need a tool on which you are building it. I am using a metallic embossing tool For that. However, a toothache will do the job. The goal is to on a total off five petals around the tool. You also want the petals to overlap slightly. Theune. You want you twist the flower between your thumb and forefinger to form a flower I love under stem you will need between 15 and 25 flowers. Ah, yes, that is quite a lot. This is really the moment to get into the flow of sculpting and let your mind slip into a contemplative, even meditative mode. You might get really frustrated at first, but I'll promise it's gets easier with practice. I then put the flowers on small ceramic tiles and then I beg them with the stems in my candle off.
5. Adding Flowers: Now that you have the stems and the flowers, it is time to attach the wants to the others. We are going to use some liquid clay to brush on to list them, Then add some green colored clay of the same color than the stamps. Smooth the clay down with the tool or your finger. We are going to use some liquid clay to brush on. To list them, we will need a purple colored clay for the flower birds. You can buy purple clay already or mix it yourself using magenta, which is a pink and blue. If using a slight translucent clay like CERN it, you can use the colors as its, However, if using an opaque, clay like female at the translucence, clay to the mixture at the ratio from 1 to 1, so one part of translucent for one part off colored clay. To make the buds rollout, snake off purple colored clay, cut even slices, roll them into tiny balls and then make them a belong. You want the birds to be about the same thickness as you stem. Each bud is striped with the tool and then attached to the stem and grapes I also put each flower into a bud. For that, I dip the flower in some liquid clay and then push it into a purple ball, stripe the bud and finally added to a grape. - Yeah , when you are done with your first rape of flowers, it is time to add yet more green clay like before. First brush with some liquid clay and then on the green clay, smooth everything down with a tool or your finger. I liked you on some texture to the green, so I draw tiny lines to create a sort of fuzz. Each stem is going to have between four and seven grapes off buds and flowers, although you can go as Louis two or three. Each grape has between one and five flowers, though you can also add a lot more flowers. If you'd like on on it all, just be sure to make it a bit random, so it looks more natural. You might want to use reference pictures for the step just to get it right. Once you're stems are fully covered, bake
6. Creating the Leaves: I will be making love end of flowers that I will to stand on their own. If you want to make flowers to put in a vase, you don't need to do this first step and can go directly doing beliefs. Brush some liquid clay at the end of the stem on a bull off green clay and smooth it down towards the flowers. Places them and bull family onto a tile and smoothed down the clay onto the tile so it can stand on its own. Now roll out a sin sheet off green clay. Cut the leaves with an Exacto knife, contrary to the petals you want believes to be all slightly different. For more realism, flatten each onto your tile so the edges are as thin as possible. Remove each leaf delicately with a blade and then fold while drawing a line In Leafs center . You will add a total off eight leaves on each stem. Start with adding four leaves at regular intervals, make them face up towards the stem, then cut out triangles off clay and the feet of those four leaves the remaining fully use on the spikes. This time the leaves will face down. You might want to smooth out the cuts and leaves. Then you can bake. This is the final baking. If you're using female or CERN, it's bake for about 40 minutes at 130 degrees Celsius.
7. Finishing Touches: Now that you have sculpted flowers are done, it's time to add some realism threw paint. I will be using acrylic paint for the steps and various brands. Please always test your acrylic paints on polymer clay before. Since we are not using any primer, certain pigments can migrate into the clay. It should not be too much of an issue here, since you're using white and green on green, but it's always a good idea to test your material up front for the flowers. I simply amusing white acrylic paints. I am using the so called to dry brush technique to add a resemblance off fuzz. For that, simply dip your dry brush into some white acrylic paint and then brush it onto a towel. You want to remove most of the pain from your brush, then take your brush and go over the flowers, which will add a slight coat off Whites. Repeat this until all flowers and flower birds are covered in that white first. For leaves, I am using a mixture off kala green and okra, which I am mixing together. Depending on your green claim extra, you might want more or less Stahl oh or walker to the mixture. Dip your brush into the paint and then rush over the edges off each leaf. You simply want you at some interest and depth to the green clay. You might also want to add a walker or brown spots for more realism. - Let the paint dry and then varnish for protection.
8. Conclusion: Thank you so much for taking the time to watch and do this class. I would love to see what you came up with during this class. So please share your project with the class. It also helps students a lot. If you like to follow me on social media, you can find me pretty much everywhere and especially on Instagram under the Monica particular again. Thank you so much for taking the time to enroll in this class. And I really hope to see you in my next ones by
 Stephanie Kilgast, Contemporary artist.