Transcripts
1. Welcome!: Hello there and
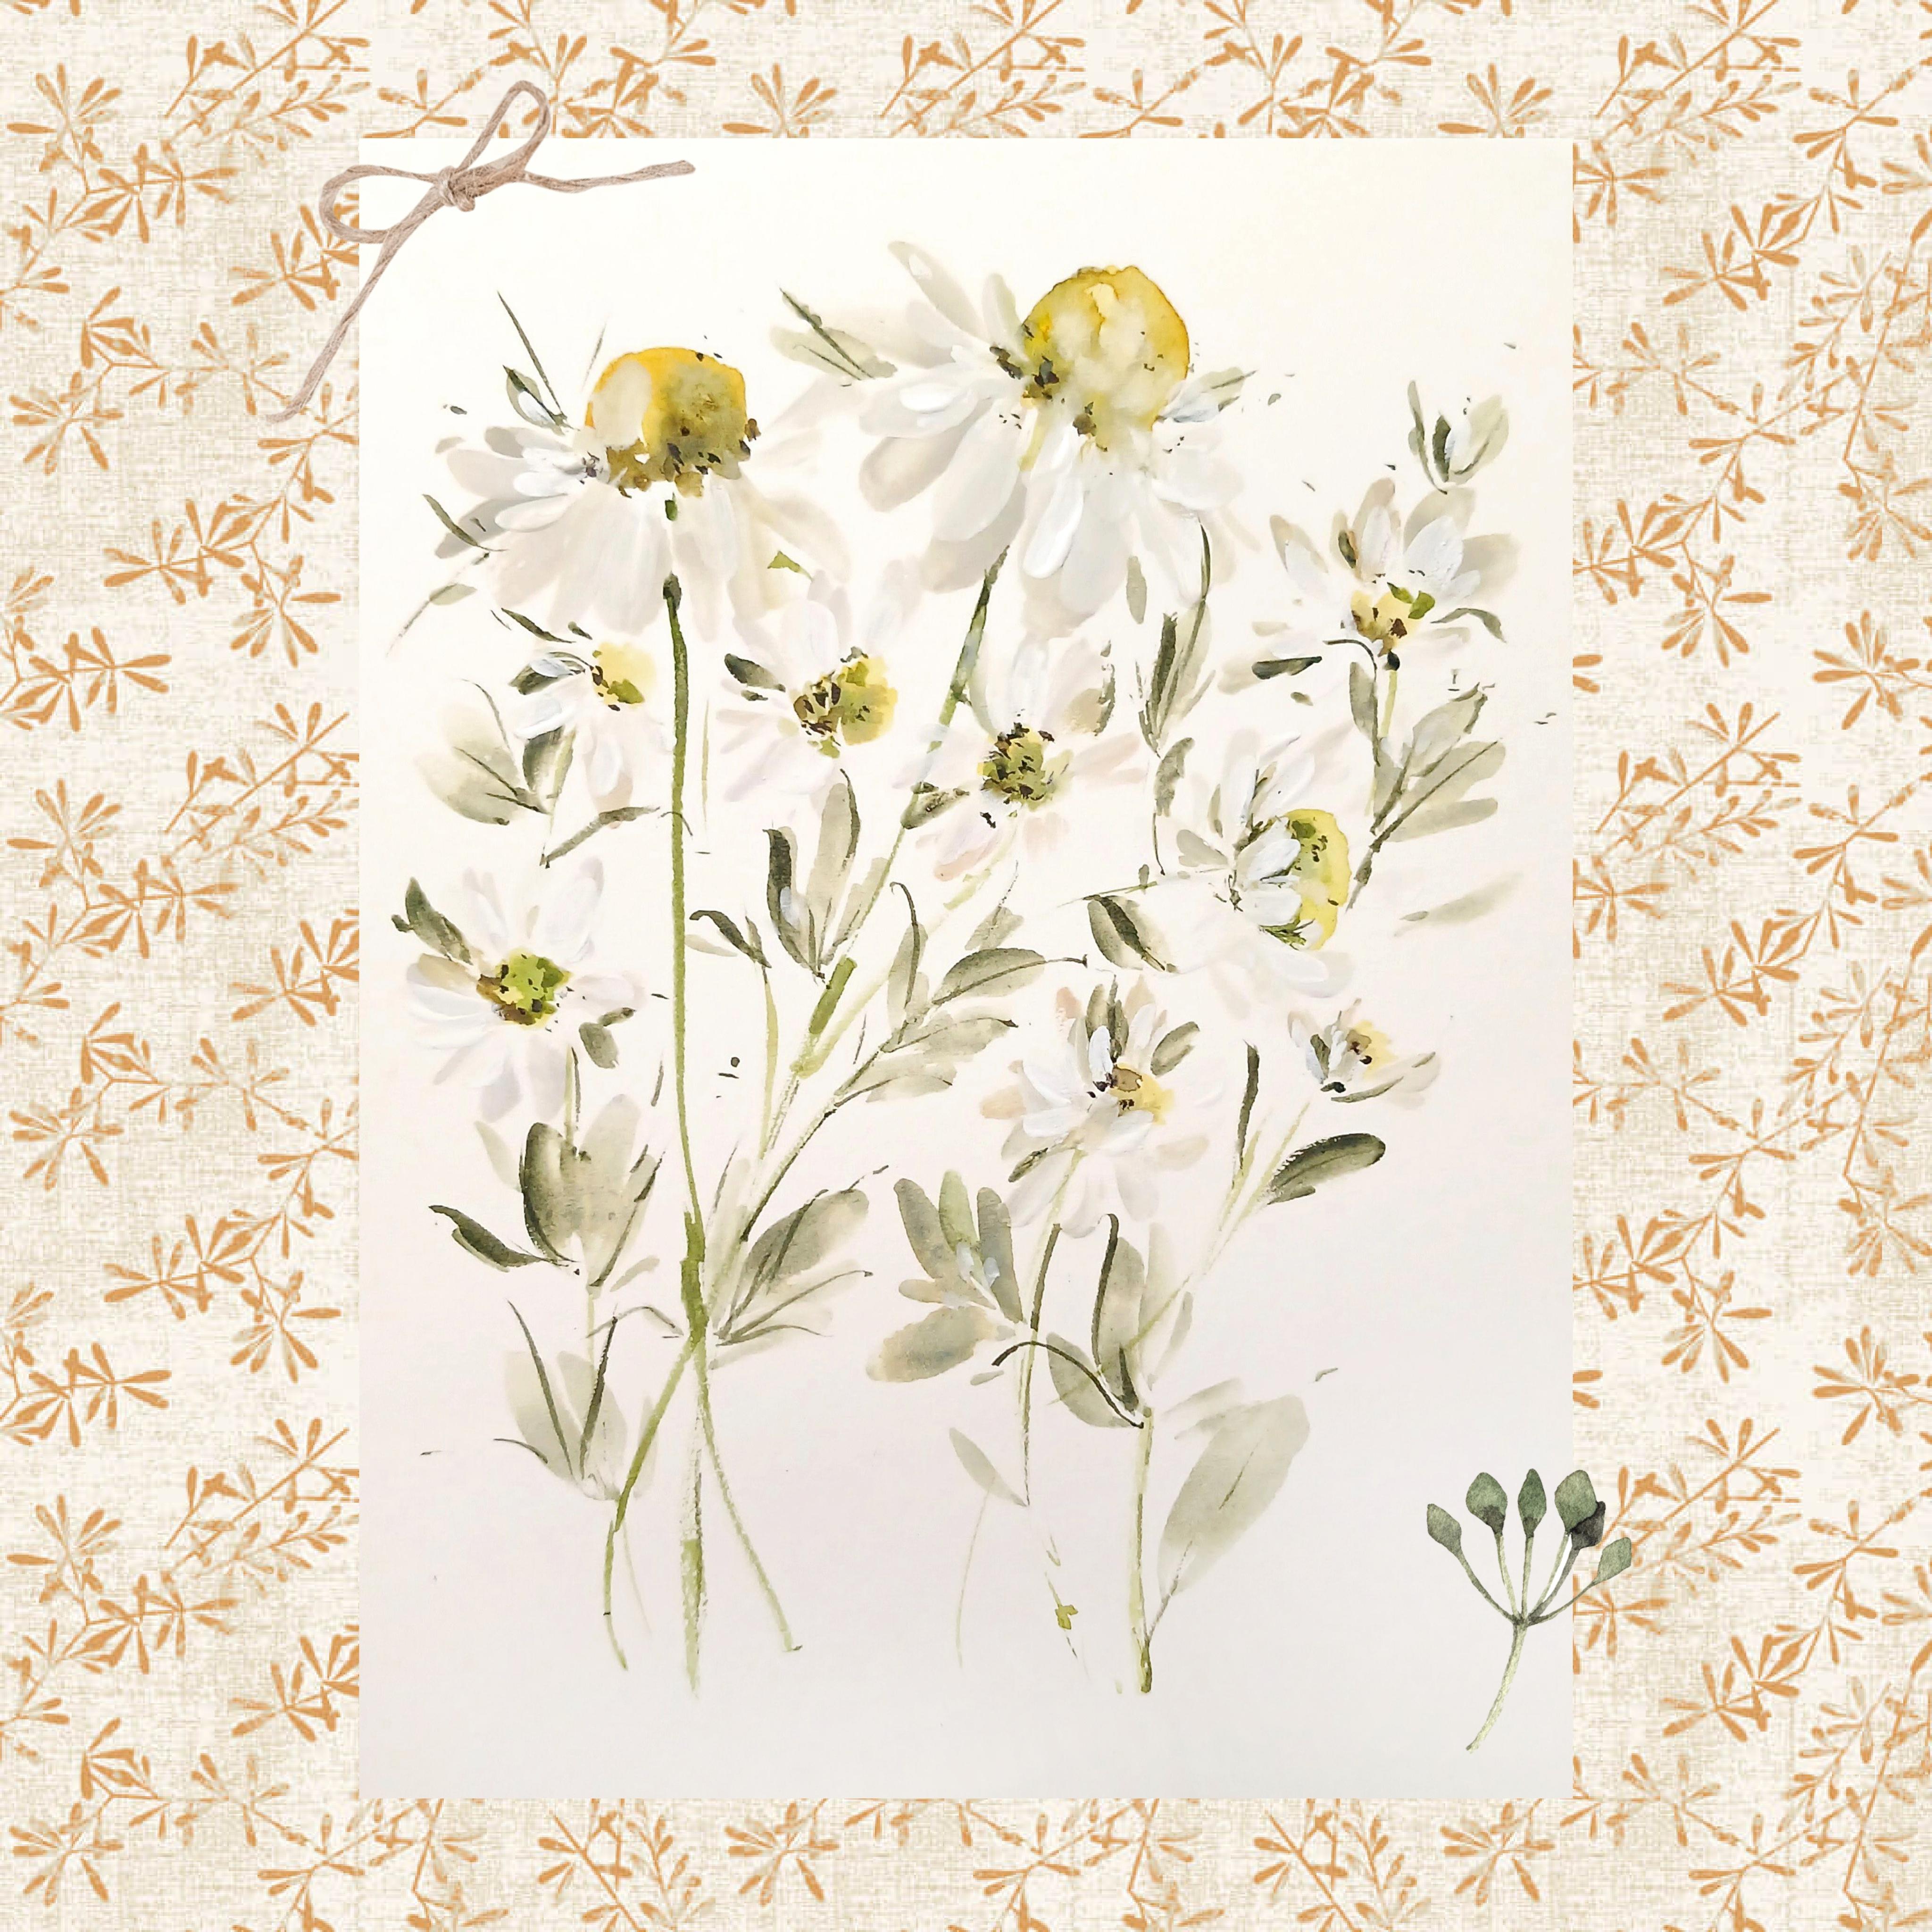
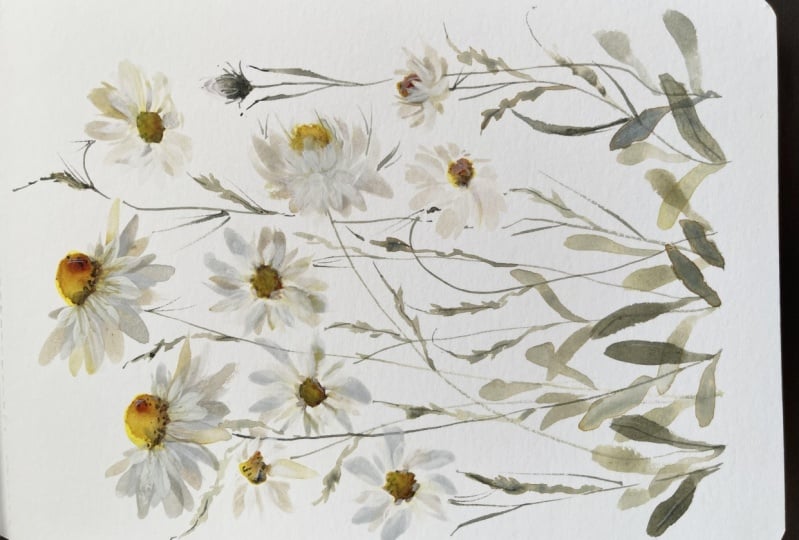
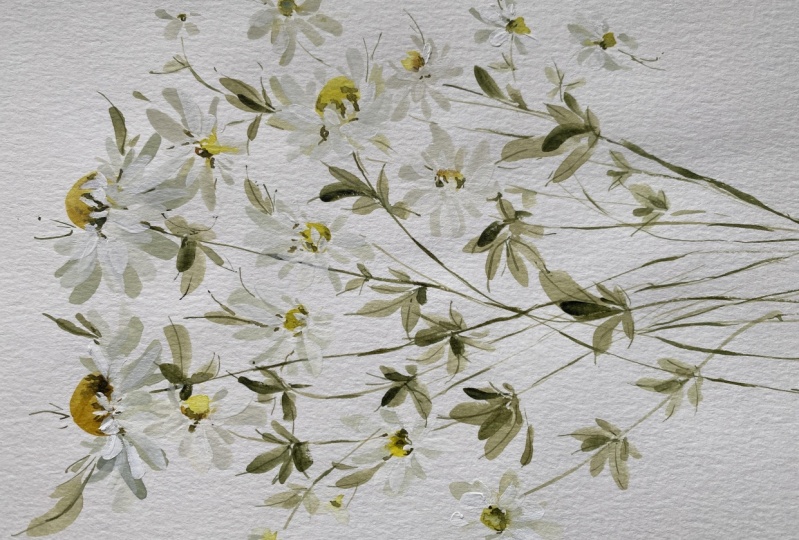
welcome to Dog Daisy. This is the fourth in a series of Scottish
wildflower classes. We'll be focusing on the
dog daisy or oxide daisy. And near where I live, these grow on the grassy
banks of the road into Edinburgh in large
Swedes, so pretty. I'm going to start proceedings by using all the
colors that we have in our palette to create beautiful flows and
blossoms of water. I'll take you through
quickly mixing a gray, and we'll be using this for shadow underneath
our daisy patterns. In this class, I want
to dispel the myth that developing your own style takes years. It doesn't have to. There is merit in both
exploring a smokers board of vertical techniques and
repetitive learning in one area. I hope with dog, as the
classes mentioned above, that you have a good
resource for developing your expressive water
coal skills with oodles of movement and
pretty finishing touches. We'll be using four different values
throughout this class. I'm just going to quickly
take you through that. We'll be practicing
various movements and learning to start the movement before the
brush hits the page. I'm also really keen
here for you to take on ownership
of the word artist. I think we often feel that
we have to wait for years until we can take on that
mantle of being an artist. But you are an artist now, as soon as you paint,
you are an artist. You're an artist Just looking at art and thinking about
what attracts you, what you would like to learn. And also just validates all
the efforts that towards this journey of becoming a
more confident water cost. We're going to have
three hero flowers and then some little
flowers around, creating lovely loose leaves. We can then add details too. As always, you can post your project in our project
and resources section. Let's move on with
the class now.
2. Palette & Play: I've got two pots of water just to keep
colors nice and clean. I'm not always
very good at that, but I've got one today
to splash water. Really good start. Let's just a little run through with
the colors that we have. It's a really lovely way of
introducing you to painting. I've our number two, Filbert, can use a
round brush as well. I don't feel that you have to get by in anything that I have. I am using the pure yellow. I'm just going to put a
little bit more in there. Quin gold, which
I just put here. Let's just have a play around with those
two colors together. We do want a little
bit of water in this because we want the paint to travel a little bit across
the dome of the da head. I've got this quin gold here, which is a lovely
luminous color. I really love it. That's our daisy head. Really? You can add water to
the other half of the dome. Let's just play around with that and they go really nicely. Nice bright daisy head. Then here we can add a little
bit of our brush powder. This is the moss green. And I just put it down here
the way we're using it today, if you have glorious pigment, is just to water it down a little bit because
we want it to travel. There are merits to using
it in its powder form, and I'll be showing more about that in future
classes. I'm sure. I'm just scooping
up some of that. Just dropping it in, and
just see how that moves. Isn't that gorgeous. What we're aiming for with the daisy head is we want
a little bit of movement. We want a little bit
of water in there. It's shiny, and there's still a little
pool of water up here. That's it. That's
our daisy head. That's one way to do it. Let's just show, you know, if you don't have the brush yellow in there
adding some water, then we have some other
green of your choice, watered it down a little bit. That has a gorgeous effect to I'm exaggerating these just so that you can
see the reaction. There might be a bit when we
actually do the daisy heads, there's lots of
different options. We could go in with yellow on one side and do the other
side with the quin Gold. Just have a play around with the com bees that
you like and you can also chuck in two or three different
colors into your head. It's nice to have a
little bit of variety. Then what we'll do with
our daisy heads is that a little bit more of
this brush or your undersea green to the
bottom of the head. We might wait a short while for most of the water
to disperse and dry, and then just drop in these
darker bits of the heads. And that's because when we draw the petals
into these areas, it will really set them off. We need that dark color
behind the white. They make absolutely gorgeous
paintings on their own. Gorgeous, Each one has a
little character of its own. If we move on to the petals now, I'm going to use the Dr.
Ph Martin's bleed proof, but like I said before, just use any white that have
white watercolor or gosh, What we're trying
to do here is get a few different whites and creams and almost like
a greeny gray as well. And that can just add shadow and playfulness and movement. We've got the white,
and I'm also going to put down the buff titanium. It's a nice base to
mix with other colors. It's also nice on its own. I want to mix a gray with you. Again, we have done this with the other daisy
class daisy days. But I just wanted
to run through it again because it's very quick. It gives you more subtle colors and they just look very
realistic and earthy. I think there's
some merit to that. I'm just showing you
this so you can fast forward if it's not something
you want to do right now. If you want to make
a quick gray course, you could just mix the
black and white together. Or a black and above
titanium together. Let's get a little
bit of that blue. This is I here,
French ultramarine. I'm not going to
do a lot of this, just want to quickly run through it a little bit of redline red. I've gone quite heavy
with the red there. This is all part of
the process really, because it depends what
gray you're looking for, this will actually
mix more of a brown. Because I can see there's a lot of red and
a lot of yellow. That's quite nice in itself. If you wanted a brown, you lean heavily on the red. Let's put in a little
bit more blue. The makeup of colors
changes as well. I know you all have numbers, but I've noticed a slight
difference in brand. You see adding that blue, this down on paper has
have made it more gray. Then the logic happens when
we add a white to that brings out all the colors
is like a bluey gray here. That forgot that I a lot. That absolutely you can miss around with the different
amounts of the three primaries. Of course, it depends on the
primary that you're using. You can get warm
and cooler grays just out of these
three primary colors. I'm now going to use this, I'm going to mix in a
little bit of white. This is where I like the fact that we end up with
something like this. I've left that here on
purpose, it really does. All the coils start
to mix together and you start to
relax a little bit. You get some beautiful tones
and shades out of that. I'm also just going to
mix some apple over here. This is the buff titanium. Take some of that
gray over here. You can see we've got
a war butchery gray here and we've got
a cool gray there. We could just dip in
and out of these. And the buff
titanium on its own, the white on its, Let's just get these on the
palette and have a look. First, we've got buff, titanium, creamy, creamy
color, gorgeous white. It's not going to
show up too much, I'm just going to put
it over this gray here. We've got that as well. That's a lovely
technique, by the way, is waiting for the darker
grays to settle and dry and then put your
white over the top. And that's what
we're going to be doing to create the nice shadow. Oh my gosh, you get that. Isn't that beautiful. That's about viscosity. The white I put down is thicker than the gray that I had mixed. Rather than rushing in
to this white here, it's actually just made these little bronchioles or trees and I both
that I really do.
3. Paint Values: I just want to
demonstrate value. We're going to be using four
different values of green. I'm going to start with our project with the very
watery green for our leaves. Let's just put that down. You can see that it's very pale. And it does gives us
a nice background to add our details. Let's call that 40% even. Maybe 30, 60 water and then
we're going to go a little thicker and we're going to
go 60% paint and 40 water. Well, I want to see green. It's beautiful,
isn't it? And let, migrate to go even thicker. Now, this one we're using 80% pigment and a
little bit of water. It's still moving quite well, but it's very, very pigmented. Then finally, we're going
to use it at a 9010. Now 90 is almost neat. The only reason why
we're adding water to this is because we're going to be using our line of brush. This is very neat, with enough water to
allow it to flow. If we go back to our line of brush just to demonstrate this, we want this to be
very thick because we're going to be adding
nice details to the leaves. But we also need it to move
because a line of brush, thirsty brush, it runs out of pigment and
water very quickly. Let's see if we've
got that right. Yeah, you can see it's moving. If it's too sticky, just add a tiny bit
of water to it. But we're just trying
was quite a blob there. Just trying to get
a little bit of movement with the brush
but it's very thick. Let's call that 90% 10% water. Now, I think we should do a
Scottish version of this. I know have their own way
of describing values. I think it would be fun to do a Scottish Fund if any
of you have suggestions. The only suggestion I have
so far is one's porridge, but that's not very
conducive to painted, but I'm determined to come up with my own little way
of describing this. But in the meantime, hopefully that clarifies the
different values that we're going
to be using today.
4. Daisy Heads & Petals Practise: Let's practice our
daisy heads now. I want to keep the color quite
light and also the leaves. When we practice those, because we're going to add details. I'm getting watery yellow here. Not too much water. I would say a 60, 40 mix on the left side, we've got more
pigment on that side, then we can get a little bit of that quin gold and bring that out to
finish the dough shape. If you wanted, you could
add a little bit of your watered down brush
if you don't have brush. We could also use
undersea green. If I just do a
little daisy here, then we can add some greens. That's yellow, quin, gold, and green, that's
the daisy head. And add a little bit
of a drop of water. Now you can choose
here whether you want to have the petals
merge with the head. In that case, we could drop some more water and
more pigment in. And then that follow through, it will merge in
with the petals. But I'm going for a drier
approach today with this. I just wanted to show you
how we're going to do that. We're going back into
gray that we mixed. I'm going to add a
bit of white to that. Now I want this fairly dark because I want some
shadowy leaves underneath. Now that needs some yellow because we're mixing the
three primaries there. Yeah, it's looking good
taking the excess off because I want to just go in
very gently with these. We're going to
practice movements. Go from left to right. And we're going to
do that movement where we start off
before we hit. Age can mix and match, can't me. We can have all sorts of
colors merging in with each other and upwards movement. And a right to left, left to right, upwards. You can see that we'll already have a bit of character
of their own. The trick here is not to do too many of the darker petals, because we're going to just put lighter ones
in between these. Now let's try a creamy mix of buff titanium and white. I'm going to go between
these and also the gray, and mix that in a little bit, just so that we've got various
different tones going on, tints, really because
we're adding white. And you can see we've got a cool gray there
in this gray blue. And we've got a warmer gray. And these warm and cool colors together look really lovely. And I really like the
way that this has just led a little
bit into that petal that's a little too watery
and I want to take off the excess of that and go in
just neat with this white. Also, have a look at what's
going on. I love this. So I'm not going to
paint over that, doing the right
to left movement. Then I'm just going
to start to build up between the petals here with this creamy titanium white. And then we're going to get
even more detail than just do little flicks of the edge of our brush to create these
tiny little petals. Wonder here. I just
want to continue to practice before you
hit the page movements. I want a darker color
here that will show up to mix some green. Okay, so it's like
a saw movement. I'll do it down here and I could show you the stems there. That's left or right. This is the one I
struggle with more. But actually usually like the brush strokes better
because I'm right handed, I find this more tricky
that those movements. Let's do a movement. Of course you've got the clock here you can do this is like a 01:00 02:00 With
that still going down, it feels like then we've
got upwards movement. Practicing these
is really useful, not just for this class, but in order to build on the skills that
you already have. You can also see
how we can start to build layers on these as well. We're just adding a
white gray there.
5. Leaves & Stems Practise: I'm going to use
our line of brush. Now I'm dipping this
into the green gold. You can always add a little
bit of brush to that, a little bit of dark green. Now you can approach
in two ways. We can do like a downward movement like this
and just follow through. You could do it with
your hand on the page, and then through like this, you could also do
it from the side, which I prefer because it reminds me of using a Pigma
micron pen or something. I like the brakes
in the stem and the roughness of it,
that's another way. And it's almost like
you're using the way, natural way that
your hand can move. You just choose which
feels right for you. I'm just going to
dry out some stems. Now that was that way. I'm going to do this
one more free hand, which is actually quite nice. Now a thing I like to do, it's a very tiny
little movement, but it's really useful. Add a dark line under your flower so
that it looks like there's a shadow
that's the stems. Then the way that we're going
to do the leaves is quite watered down because we're going to do some lovely
detailing afterwards. We need room for the details, which means that we're
going to go in with quite a w down under Sea Green. This is merging a little bit now with the green
gold. I don't mind. It's absolutely fine. A lot of you I know use under
Sea green. I love it too. I think it's a very
natural color. If you're wanting more zinc, I can't think of a word for it. Then you would add a little yellow or a little green gold and it will just lift
it a little bit, quite a flat color on the page. I do love it, but
that's what I feel. We're going to do some
really easy leaves. This is very much
like the petals. Let's just practice. What we're doing now is joining the petals up and we're
just doing other way round. I'm just adding a little
cluster of brush drunks, don't need to think
of the leaves. Then I'm going to get nita
paint on the edge of my brush. Or you could go back
to your liner brush. I'm just going to bring
down a little stem. Let me show you that
with the liner brush as doing a stem. Nice water Down under
Sea Green and here, flat of the brush here. Same movement as the petals, but we're just making
these smaller. I'm on the side
of the brush now. Very swift movements. Some like this
would be gorgeous, because it gives us lots of
scope for adding details. This is the movement
from right to left, it is that simple. That's it for the leaves. Really? We're going to do
details on this just now, so I'm just going to
let those dry and then we're going to come back
in and do some detail.
6. Finishing Touches Practise: Going back to our line of brush, this is a size zero. As I mentioned earlier, we're going to go
in quite thickly. Now with the paint. Mostly paint with a
little bit of water. The way to gauge that,
does it travel enough? Let's have a look.
It is traveling. If it's not traveling, then that's too much paint. If it's traveling too much and bleeding out a little bit,
there's too much water, then we want to
take the excess of, I'm going to pull that
through like this. I'm going to use it
like you would a pen. Just add some little details. Even just one line
like that is great. We can do the pulling
in and the going out. Same free movement
with your hand there. Just almost thinking
about it before you hit the page, starting
that movement. Less is more here. I won't be doing as many details
on the same leaf as this, but I just want to show you the different things
we can do there. I've got one line, I
could go in and do another little hint
of a line here, maybe another curvy line. This is the doodling bit
that I love so much. We can actually go up to the top here and then go out like this. Like a little thrill that
always looks lovely. Practice going out like
this or coming back into the stem and you can also elongate the leaves with a little flick
of your brush. I think that's gorgeous
Ops, got some white on it. I was dipping into
white and not noticing, you can see they just look like they're dancing now
and I really love that. Let's do one where we're
starting off with a little flick like that and then pulling
the line very lightly. If you push too hard, I'll just show you over here. You get a lovely leaf, but it may not be
what you want piece. If you have pushing too hard, it will come out like a
leaf, absolutely gorgeous. Though you might want to add a few of those in
between these leaves. What we're doing is
actually just using the tip very much like you
would a very fine liner pen. Watch out for drops
on your liner. You could actually just do some extra little leaves
like this if you wanted. So let's just carry on here. This is where you can
just relax and enjoy. I think the main thing here is not to push down too
hard on your brush. We're literally
just brush dancing, do extra little leaves
here and there. The way that I'm doing those is what we've done here,
let me assure you. Again a little bit and
again very quickly. Again, you can start to create movement in your brush if you start to move it as pulling that through, I love these little
dots at the top, you get the idea. You can obviously do your
version of this. I just wanted to show you
some different techniques that we could use in the
actual finished piece. Let me add some of little
details now where we're using. Green, I find it's a nice
way to balance a piece, for example, this is almost
neat, again, 80, 20. You can add some
little darker leaves. What I'm doing there and
I know that's showing up. I've done it very darkly
so you can see it. I'm putting the tip down and
then I'm moving sideways. You can use these little flicks at the top of your leaves, add them separately
on to the stem. If I was going this way and then we're
going like a curve, what you're doing there is
you're using brush shape to give you a leaf flat on tip, flare, tip reco, add details like this to
our daisy heads as well. We're taking water off and using this in a very controlled way. If it was too wet,
we wouldn't be able to do these little dots. The little dots. You
could also bring down to these little areas,
tiny little dots. And what it does
is it just links the base of the
head to the petals, just little clusters of dark. Or you could actually
paint it in if you wanted it like a few little lines. Less is more. Another nice thing here. I'm just taking the
paint off my brush, not too much water. And you can just soften the
edges of these and that's a really subtle but
very nice effect. See what I mean? Just helps the bleed into
the head a little bit fiddly but like it. Okay. Those are little details, we can do some of those nice little flicks that
we've done down here and bring those
into the flower as well. Just too much doesn't
need to be much, but all this movement just
really elevates painting. I feel we can draw this paint
out a little bit. Now what I'm doing
there is I'm wetting the petals a little bit because
actually this is tried. I just want that to bleed into the petals bit what
you're doing there, providing the undersea
green a way to move. Let's do it here. I
know it's hard to see. I'm just adding a little
bit of water to the petals. Just the top of the petals. Get in quick then with some water down undersea
green 20 pigment 80 water that provides that shadow. Just remember that it's an
option if you would like it. The last thing I want to do, let's just add some very neat
white to our little petals. That's our finishing
touch for the flowers. We've done a little shadowing
the suggestion of stamens. Let's get some white out, and I'm just going to use
it straight from the pot. If you're using
watercolor or glass, you can always put it
out on your palette. I want this on the flat side. I also want it on of the bush, in which of using both
of those then I want to just meld these petals to the flower head
a little bit more. Way we can do that is
by using this white. Don't worry if you're going over petals underneath,
it doesn't matter. I just want to add a
little movement to this head because
it feels very stiff and still The way we can do that is to go
over the head a little bit. I'm not fond of the shape of it. I just want to add a little bit of over there and we
can do the same here. I don't want to go over
that little yellow there, but you can see that I'm
really using it thickly so you can see the
brush marks almost. And we can do can little flicks at the
bottom of the petals. So this head is starting to
feel a little bit better now. I just want to bring up some
white into that a bit more. Let's not do too much. I'm very tempted to carry on sometimes beyond
what's needed, and let's move on to
our class now together.
7. Dog Daisy Class Project Part 1 : We're going to start by
replenishing our paints. I'm just putting down
some more yellow. This is pure yellow Schmika. We could also use a
handsome yellow or gamboge, putting a little bit
of buff titanium down. And CP, we've got our quin gold, which we're going to
mix with the yellow for the daisy heads and already laid down we've got our undersea green
and green gold. I'm just going to
take a little bit of that yellow mixture. I've started with maybe a 60, 60 pigment to water on the left, and then I've pulled it out a
little bit with some water. We want a little bit in
the daisy head too much, but enough for the brush
powder or darker green. Whatever you're using
is your color there to merge in and
travel a little bit. So we're starting here
again with our yellow. Then I'm mixing in
a little bit of the quin gold and a little bit of the brush of powder dropping in
just a little bit of water so that can travel. We're just dabbing
in a little bit of that to the bottom
of the heads there. This creates a nice shadow
where we pull the petals in. We'll move back to
our ph Martin's white and mix that with the
gray that we mixed earlier. So, and I'm also mixing in some of that white
mixture with undersea green. What we're doing is laying those shadowy petals
down first here, the full brush, a little bit
of white with that green, gold and undersea green mixture. Using our liner brush here, I'm just pulling out some stems. These don't have
to be perfect and actually really like it
when they are a little bit. Raf is a bit of dry brushing
and breaks in the stem. Think it all adds character. I'm going for a
third daisy here. Odd numbers are
always a good idea. We're going to do three
main daisies and then maybe bring in some smaller ones as support act as it were. I'm going back into that
gray white mixture. I want this want pets bring
in different directions. I want this to be a little bit more quite old
pigment brush there. This is almost the glash
style that we've used in other classes now that those darker gray petals
are dried and you may need to wait a little longer if you're using
cold press paper, we're just going in there and adding a slightly lighter color, smentingdarky, mid gray,
and then a light gray. And that just creates
the three D effect. I quite like that there. I'm just add some little petals overlapping that
daisy head there. Still a bit wet here.
So I'm just going to add in some highlights. I'm going to just add little daisies around these
three heroes of our page. But now the colors are
all mixing together, which I think is lovely. So we've got the yellow, and on my brush, we still Of the green white mixture. I'm just dropping in some of the brusco moss green and also some of that
green gold mixture. There's no prescriptive
way to paint. You paint with any colors
that you're drawn to. Really what we're doing
there is just using different values to create
a canna dome shape. Any yellow and any green or
green brown, I'm just petals. Now we're going to add those highlights and using
this quite neat now, back into the buff
titanium this time. And a little bit of the white, just off the screen
mare, Sorry about that. Using the side of
the filibit just to make some very
expression for marks, don't even think
of them as petals. We're just creating these lovely little swooshing brush marks around the heads, because daisies do grow
in all directions. If you look at the petals going over the stalk there, I think that looks lovely. What you'll find is because that green underneath
is still a little wet. It actually has this gorgeous
reaction because Dr. ph Martin's is similar
to white gash paint. If you use white gas paint
over a wet water color, it creates this lovely
chemistry I've always admired. I always loved that. We're just seeing that in a very
small way there. I might go on to do a
class about that because it's such a beautiful alchemy, a mixture of viscosity. Just moving around a little
bit of that brush screen, a little bit of undersea green. Just creating some
little shadows where the daisy head
and the petals meet. And I'm applying quite
thick paint there as well, so don't be afraid to go in with the gush and consistency
of water color there. Back to titanium. Little bit of undersea green, a little bit of
white and brush o just creates that nice
kind of gray look. I've said before, I was afraid of mixing grays for a long time. Could actually just some
of the paints that you have on the palette
with a bit of white and you'll have
either a gray or a brown. It's a very easy thing to do, so there isn't a one
particular recipe. So let's apply some of this. Dr. ph Martin's now bit
more thickly is quite neat, picking up some of that white, mixing it with buff titanium. So just get a little mixture
of whites and grays, mostly buff titanium there, we're going back into the white. And again, you can use white
glass or white water color. Doing these very
quick gestural petals that we practiced over, the gray or in between
the gray petals, wherever you fancy, really
then we're doing a sweep towards the head and you could also sweep away from the head. You see different brush strokes. I think the main advice here
is to trust your brush. And I know that
sounds a bit weird, but if you get to know a brush and you've done a little bit of a
practice run with it, you know what it's
going to do and you can almost relax the, that brush mark is
going to create itself. It is just about letting go a little bit
and trusting a brush. Now just mixing in, let's do a bit undersea green with white, which I feel is a
lovely, greeny gray. I often use it, I
think it's lovely. We're just putting in a few of those and this
creates some shadow. Okay, we're mixing
some of our CP, putting these tiny little dots, tiny little flourishes,
with our liner brush. I think it's always nice
to pick up the areas around where the head
meets the petals, but it's also nice just to put a few dots to suggest stamens. What's always effective with
this technique is that we're using quite a dark color
against quite a light color green and white there. And just placing some little
marks there in the center. We've got the CP, we've
got the green gold, undersea green and white
mixture there as well, a little variety of
different colors.
8. Dog Daisy Class Project Part 2: I'm going to pull
those stems down. Now remember, you don't have to pull all of those stems
to the bottom of that page. Sometimes I just suggest there's a stem there and then it doesn't actually go
all the way down, and that's because it can
get a little bit crowded. If we do that, I sometimes just join them
to one of the main stems, picking up the undersea green and just going to
place a bit more down. I really like at the moment, a down undersea green. The reason why I like this as we tried in our
practice run as well, it leaves room for
additional brush marks. I've watered down
undersea green there quite a lot and I'm just going to pull
through some leaves. Now what I like is to vary the value. You can see that the
first brush stroke that we made was quite watered down. Then I've got another
pool of undersea green, which has maybe a 60, 40 mix 60 pigment. We're just going to slowly
add some leaves again, try not to think
of them as leaves, but more like brush strokes. You can't get the is wrong, It's all about feel. So we're still dipping into our very watered down
under Sea Green, our mid mixture as well, where we can put in
some darker leaves. So I'm using the broad
side of the brush for those little gestures can just be dots or a tiny little
tip of my brush movement. I'm going to add
larger leaves here at the bottom just to
balance it out. Just adding some green here
between some of the petals. And what that does is just
give it some definition and just go round
and have a look where you would like
to make a few changes. Just even tiny little changes could make quite a difference. So back to our line
of brush, Excel. It's, and we're going to do our lovely details. This is our thick mixture
of undersea green. We're doing two things here, Those lovely details on
the leaves themselves, but also bringing out
the stems a little bit by just adding a line detail
on one side of the stem. Now you'll see here also
that what we can do is use it so that there's
quite a lot of movement. That's 80 28, pigment 21. We could also use
it almost neat, and I'll do that
in a little while. For now, I'm just adding these tiny details
to the leaves. The thing to remember here as we practiced is to start
the movement first. And now it sounds a bit strange, but I almost start
the movement and visualize the curve before
I actually hit the page. I think that really helps. I'm putting a little bit
of shadow there behind the stem and creating some details on the leaf
coming off that stem. You can see that I'm tooing and throwing quite a bit and
going to have to keep going back into that
mixture and making sure that my lineup brush
has enough water to glide across the page because a line brush runs out of
water so much more quickly. There you can see a little
bit of dry brushing. I also want to just darken
the top of the stem here. It just creates a bit of a
shadow under your flower, which all helps with
the overall effect. This is my favorite bit of this whole project because I love doodling and I love just, it's almost like the pen work. If you use a Pigma micron, it's very similar to
with the line brush. It gives you more options. With a pen, you can use it
head on or to the side, but with the line bush, we've got so many more options
in terms of brush stroke. And also how much paint, how much water you have brush. I'm doing my little
full stop sweep there. Let's do a few of
those. Quite like that. I sweep through really
quickly and just leave a dot. It's like an incomplete line. You can thicken your line
here and just put in some tiny leaves starting with a tip and then just allowing the liner
brush to flare out. You see here that we've
got a few darker leaves. I'm just going to
balance that out. We've got 123 like a triangle, doing another one there. We've got four spaces. Now I'm looking for somewhere
further up on the left. This keeps your piece a
tiny bit there as well. You can see now what
we're doing is building up different values
of green as well. We've got these
darker leaves just placed randomly
across the page here. If you imagine that
all the petals are pulled into one place, we have that little
vanishing place at the bottom of our flowers, adding some dots now
getting towards the end. But I just wanted to add
a few little details. I adore these tiny little dots and I use them a
lot in paintings. They make things so much
more character cool. And also just looks more
like there's movement in it, almost like tiny
specks of pollen. So I'm just looking at stems and I just want
to put a line here, just on one side of the stem. As I said earlier, it's a nice little finishing touch back to our 02 filbert. And I'm going to go in
with some neat white. So I'm just going
to make sure that my brush is not a
lot of water on it, it's just damp now and
I'm using this very neat. I'm just going to add these
tiny little highlights to our hardly anything at all, just little white highlights. It's particularly nice if you find a dark space like this, you can place the little white over your darker leaves there. It looks really effective
just highlighting these petals here that are
overlapping the daisy head. I really love those again, in a little detail
over a darker leaf, I'd like to do this
spot, a little, few dots white over the leaves, just like the petals may be falling or tiny
little white flowers. So have a look round now, see if everything is complete. Is there anything
you want to add now? You know? I'm happy with that, I'm really
happy with that.
9. Thank You!: I hope the takeaway from
this class is one of growing inconfidence in your expressive
water color skills. We've covered paint
values and mixing, layering, fluid
movement, and detail. I can't wait to see you again
in our next class together. If you want to
share your project on here, that will be wonderful. You can also share it over
on Instagram or Facebook. I am Holly Thomas, Design on both forums. And remember before I leave you, artist and you are awesome. I'll see you again
soon. Take care.
10. Bonus Lesson "Amelia" Loose florals: Right it.
 Holly Tomas Art, Watercolour | Gouache | Mixed Media