Transcripts
1. Introduction: [MUSIC] I love
discovering new elements that I can use in
my art practice. In today's class, I'm going to show you something new that
we're going to play with. I'm Denise Love and I'm an
artist and photographer. Today I'm going to
show you how I use a ruling pen in my art practice. The reason I love
the ruling pen is because it's very similar in the amount of ink
that it can hold to my Kakimori dip pen. I love this dip pen
so much and you see me use it a lot in a
lot of my classes. But the drawback for a lot of people for this dip
pen is the price. But I love it because it holds so much ink when you're drawing, you're not dipping
and drawing and dipping and drawing
as frequently. It's just become like
my favorite tool, but it's like 50
bucks and a lot of people are like, that ouch. [LAUGHTER] Then when I came
across the ruling pen, I was like, what a
nice alternative to my favorite dip pen, holds a lot of ink. I can adjust the
blades so that I can get different mark making sizes. I can use anything that I can
imagine just about for ink. I can use some acrylic paint. I can use some acrylic inks. I can use watercolor ink. I can use watercolor, anything that I can make the
right consistency can be a drawing ink for my ruling pen. It holds that ink pretty good. I can adjust the blades for how big a mark I want to make. This is super cool
and affordable [LAUGHTER] mark-making tool that I am going to love going forward because of
how versatile it is. The ruling pens, they
are a couple of dollars, they come in a set of three or four sometimes for maybe $10, you can see how much
more economically friendly they are
to your art budget. [LAUGHTER] In today's class, I'm going to show you
different projects just to get you used to
using the ruling pen and exploring the many uses and the different types of inks and paints that we might
consider using with it. I just want to dip your toes in and show you some
projects that you could try using this font
mark-making tool. I can't wait to show you
what I've got in store. Let's get started. [MUSIC]
2. Class Project: Your class project
is to come back and share some of the things that you created in class
today using your ruling pen, whether that be
some mark-making, some abstracts, some random writing that you could
use and collage. I want to see how it is that you've decided to
use your ruling pen and what you've made with it. Come back and share your
projects with us today. I can't wait to see
what you're doing. I'll see you in class.
3. Supplies: In this video, let's
take a look at the supplies that you might consider using
in class today. So I'm going to be
doing everything on my Canson watercolor
paper, just because I like these nice big pads for
experimenting and exploring on. So I'm going to be
using 140-pound cold press watercolor paper. Then you'll need a ruling pen. Ruling pens are super cool. These are devices
where you can put a little bit of ink in-between
the two blades here, and you can adjust how much ink is coming
out of that with this wheel that pulls these teeth farther
and tighter together. These are really cool. This
was a drafting tool early on and you would use it to do straight lines and some
stuff when you are drafting. So a lot of these come
in old drafting kits. I did drafting when I was
in college because I worked with blueprints and did
interior design stuff. I'm wide, but I never had to use a ruling
tool for drafting. But I love the ruling
pen for my art practice. These are pretty inexpensive. You can get a set of
three or four of these, usually for the $10 range. They come in different sizes. I'm using a medium-size
out of this set of three. I'm using the one in
the middle for class. Then I'd gotten a separate
one just to play with also. That's a little different. These come in all different
shapes and sizes. I've seen different heads
on some of the ruling pens. If you see some that are antique and have different
shapes or maybe they have a calligraphy title to them or something like that
just realize that these come in lots of shapes and sizes and you can have a lot of fun having multiple ones of these and experimenting
with them. The main reason I
wanted to do a class on the ruling pen is because
my very favorite dip pen, this Kakimori brass nib. I think this comes
in stainless steel also, holds a lot of ink. You dip it into the ink, it holds a lot of
ink and then you can mark make and draw
and it's one of the favorite little tools that I use in class since I got it. I like it because it holds
a lot of ink compared to a regular dip pen
that runs out of ink fairly quickly in
comparison to that. The drawback, a dip pen, you can get these
pretty inexpensively in a couple of dollar range, whereas this brass nib
is like $50 or $55. It's in that fifty-ish
dollar range. Which price is a lot out of
a lot of people's budgets. It took me a couple of
times thinking about it before I pulled the trigger
and bought that myself. But since I bought it, it is one of my favorite
tools to play in my art practice and so it
made it worth it to me. But I have a fantastic
alternative now and I'll be sure to mention this
every time I use that nib. These ruling pens, even though they're not
technically dip pens, they are fantastic for holding a lot of ink because
it holds more ink here in-between the two blades and for doing great
mark-making in drawing. As far as holding my gold mica ink, I'd say it holds just
as much ink and goes just as far as my favorite
nib that I like to use. These are definitely a
fantastic alternative to your regular dip pens. Even though it's not
technically a dip pen, you can use it like a dip pen. Just be careful when
you're using it, that you're not stabbing
it into stuff and damaging the tip of
your ruling pen. These are super cool. In class today, we're
going to do a couple of different projects
and you're welcome to experiment and
change out supplies. But what you need is
a dip pen or a set of ruling pen and a set
of ruling pens or set, you just need one really. So pick one and go for it. Then in class, we'll be
doing a couple of projects, just simple line drawing
abstracts just to see how do these work with
different materials. Here's with my gold ink
versus my acrylic ink versus some paint that I have mixed with airplane medium
to make into an ink. We have some options
here on what we can use as inks for our pen. In that, I'm using
some of my favorite Kuretake gold mica. I'm using acrylic inks. Those work fantastic. High flow paints
work really great. Fluid paints work good. Once you get into this
thickness of the fluid, and it's quite questionable
with the high-flow too, depending on what
you're doing and how tight you want that line, you're going to need to add
something to thin that down. If you add water to the paint, you're going to break down all the pigment in a way
that's not going to really be as good for the art-making as if you
used airbrush medium. This stuff is amazing. It's super liquidy, it looks like a little bit of a milky consistency
and it's really good for thinning the
paint down without breaking down the pigment. Really, the best way to see what that's doing is to try it. Mix some with water
and mix them with airbrush medium and then
you can see the difference. But it does retain the very rich consistency with the pigment with
the airbrush medium. If you want to use any
type of thicker paint, something thicker than an ink that's already made for, say, a dip pen, then you
can make an ink out of airbrush medium and I recommend that for
any of your paints. You can even make thicker paints into a nice ink with
airbrush medium. That's a fantastic tool to have. Then after we practice
with inks and different consistencies
and play, then I've made a few
little abstracts in class using the ruling pen. These were so much fun. I used it as writing underneath
before we got started. I used it as mark-making
and line-drawing on the top after we were finished and look how
terrific these are. I love this little trio that was created with our start
off of our ruling pens. See we can use the ruling pen under our art, over our art, and we can use it to create collage papers and
then we can tear those up and put
them into bits and pieces of things
that we're creating. Fantastic for those. I also created some little
abstracts with just showing lines and mark making with some dashes and
nice long lines, some dots just to show some of the differences that we
might get when we're creating just some pretty
little abstracts with some type of fluid product
like the fluid graphite, that's what I used
because I liked, It's a newer product for me
and I loved playing with it. You could also do
this with watercolor, which is probably what I
would have gone with had I not had this fluid graphite that I was so excited about. Then a lot of water, a little bit of paint, and then play with
that ruling pen with your marks, and your dots, and your lines, so super fun, really versatile
in the amount of things that I was using
the ruling pen for. I've got all these
fun projects that we're going to be
doing in class. So I want you to gather
for yourself a few of your favorite paints
for some abstracts, maybe some mark-making pieces that you really like to use in addition to your ruling pen and see what we
can create today. I'm just creating on some
plane watercolor paper and seeing what fun stuff
that I can come up with. The more that I create, I'm sure the more that I'm going to find to do with
the ruling pen, but I hope you loved
this very economical, super cool alternative for my dip pen that I love so much. I think you're going to
have a lot of fun creating art with this
particular products. I can't wait to see what
you're creating with it. So let's get started.
4. Using A Ruling Pen: Let's take a look
at the ruling pen and the different
options that we could consider using with this pen. The reason why I wanted to
show you the ruling pen is because I think
it's a nice option to the dip pens that I use. I got a regular dip pen
that's pretty inexpensive, and you dip that in ink and the ink runs
out fairly quickly. Then I have this
Kakimori dip pen nib, which is multi-sided, and
you dip it into your ink, and it lasts for a
long time because a lot more ink goes
up into your head. While this is not a dip pen, the regular dip pen, you can get them fairly cheap, a couple of dollars. My Kakimori dip pen is
about $50 for that nib, and I use it in a
lot of classes, but it's really very expensive. So unless you know that
you're going to love it, it's not something that a lot of people are going to invest in. I was thinking that
the ruling pen could be a nice option to play with. That's in-between like the
dip pen and the Kakimori pen. What this is, it's an old
drafting tool that people used to draft straight lines
when they drafted by hand. Which, you know,
funny story I have. I went to school
for interior design and we drafted blueprints and stuff by hand, it
was a long time ago. But I actually don't
remember any of my teachers ever introducing
us to a ruling pen, which now I'm really
excited by what it can do. But I don't think I would've
wanted to draft with these, I think I liked drafting
with a drafting pencil that I could just push more lead out instead of refill
the ink so maybe this is really even older than
my time of drafting. But it's a really cool tool, comes in many different sizes. I'm going to be using
the larger size, I think this is about a Size 4. But you can get
like a set of three or four of these for 10 bucks, so they're pretty cheap. What I like about them is
they hold quite a bit of ink and we can do straight lines
and we can do mark-making, and so in times when I'm liking
to do dots, for instance, with my Gold Mica Ink, I can do lots and lots of
dots with this ruling pen. I think it's a
nice happy medium. Basically the way it works
is you load this with ink. One gigantic difference
between these and the dip pens is you're not supposed to dip
these into the ink. But I do see people dip it. So you could try it. But it's not really actually made to be dipped into the ink. You got to be really careful
when you're dipping these or cleaning off these in water, not to slam the edge down
and damage the tips. The tips are important
with this pen. Basically what
we're going to do, the right way to do it is to load some ink into your pen, adjust the amount of
space that you have here coming on the tip by screwing or unscrewing the
dial on the side. Then you use these with
the open part facing up. You don't use it
with the screw part or the underside facing up. It's a very specific way. When the tips hit the paper, that you actually get
the ink to come out and that's with the
open sides facing up. If you were to do this
and push it to the side, all of a sudden there's no
ink here on the bottom. You have to keep it were both
tips are touching the paper and it has the sides going up so you have a continuous flow. Let's just take a look at
what I'm talking about. I'm going to open up my
gold ink and just show you. With this, you're not supposed to put ink in your
pen over your paper, because there's dips and you'll just ruin
whatever you're working on. Now I load the pen, and I'm going to
use the medium one, I think it's probably
like a Size 2, I'm going to have to look
up the sizes these came in. But basically you just fill it, come in from the side, and very gently rubbing that
brush against the edge, and you'll see ink up here in
the edge there of our pen, and then we can just
wipe the edges off. I like having a piece
of scrap paper handy so that I can test this and see. Paint facing up
and then I can see what line I'm going to get, and so now I can
adjust this tighter, if I'm thinking tighter line, I can adjust this wider, if I'm hoping for a bigger line. You see it's pretty cool that
we can adjust line sizes. Now bigger line uses
up our ink faster, so just keep that in mind. What you'll have to do
if your ink runs out, is come back over here, reload the tip with more ink and then you can
continue working. While it seems a little more
work than say our dip pens, it is super cool because now, looking here, I can
be in dot heaven. Because it's one of my favorite ways to
mark-make with the gold ink. So I feel like this
would go a whole lot further than my regular dip pen, which is going to run out
of ink fairly quickly because now I have way
more ink loaded into this tip than my regular
dip pen allowed me, and this is a super cheap
option for doing that. Now you can see if I moved
accidentally the tip, the bottom facing up
or the top facing up, I'm no longer getting any marks. That's because there's no ink actually touching the paper, and then as you come back, you'll have to restart
that ink a little bit, then we can mark-make until our little tip
runs out of ink. Then what I would recommend
you do is to definitely wash that tip in-between uses because you don't want
a whole bunch of ink or anything stuck on the tip. Now if I alternatively try
to use this as a dip pen, I could dip it, wipe off my edges, I do have some ink in there, I don't have nearly as much as if I loaded it with
that paintbrush. It does paint the top and
the bottom of my nib. If I try to wipe
that off right now, look at that, I wiped
the ink out of it. If we're using it as
a dip pen, maybe dip, wipe off the edges
and then go for it. But you just don't get as
much ink into your pen as you do by loading
it with a paintbrush. Even though this
is not a dip pen, you can dip it and it does work, and then just be careful to
go ahead and clean that out. I'm just swirling that in
a little bit of water, I've got some water right here. I'm just swirling that
in the top of the water and then wiping it off and
that does get it pretty clean. Even though it's not a dip pen, it can be dipped, just as a little side note. Because everywhere you look, you'll hear people say
this is not a dip pen, but look, it's still did it. if I go to the edge here, I might even can get
way more ink in there, wipe the edges off, and then come back
and start working it. See how much ink we
still have in there, so don't smear your hand
over what you already did, but definitely got
some options here, and I like this
because it's cheap and it will go a
long way for us.
5. Warmup Exercise: [MUSIC] Now that we know
how to use our ruling pen, what type of paint or ink
can we use in our pen? This is pretty cool. You can use a lot of different
things with your pen. I'm going to be using
in the future I'm sure, my gold ink that I love so much and
it's perfect for that. This is my Kuretake
gold mica ink and fantastic because we know I like mark-making with the gold. You can also use any other inks. If you've got some acrylic inks that would work really well. I've also got some
water color inks that I thought we could try. What is funny about these
is these are drafting inks. Also, they go in a
rapidograph pen. I did use those in college
so I actually have a rapidograph pen set and I might have some ink
hiding in that set, I don't know, but
another choice. You could also use paint. We should be able to use the high flow acrylic
paint just as it is. It's very high flow and
we should get plenty of movement in that paint for it to work in
the ruling pen, just as it is. I also have high
flow fluid acrylics. This is the high flow,
this is the fluid. I also have fluid acrylics and that comes in
lots of colors. What I do for the fluid acrylics and really any other paint beyond the really high flow ones is I add airbrush
medium to them. You might think, what is airbrush medium?
I have that open. This is a liquid that turns paints into air brush
paint basically. For an air brush paint, it needs to be super
fluid and that's what this medium
allows it to do. The difference from this to water is water as your
thinning out paint with water breaks down
the pigments and the airbrush medium does not
break down the pigments. It evenly spreads everything
around so it's still a nice rich color
without breaking down the pigments so there is a
difference between the two. If I'm using any of
my fluid acrylics and possibly even more
heavy body acrylics, I can use any colors
I've got just by making the right consistency
with my airbrush medium. That consistency is the
consistency of an ink or like a melted ice cream somewhere in that neighborhood. We can make up any
color that we can desire just having some
of this airbrush medium. If you don't want to buy a bunch of inks and you have
a bunch of paint, get one thing of this golden medium and
you'll be good to go. Let's just try some of these options out and
see the differences. I'm going to start with
the mica ink and I'm going to do it like a dip
pen for a moment because even though
it's not a dip pen, that we'll go ahead
and give me a test. When you're drawing with these, they're meant to be
drawn by pulling the pen but you'll notice I
actually went ahead and did down and back again. In the respect that we're
going to be using these, you can use these in
other directions, but they're mainly meant to be pulled like we're drafting. Since we're not drafting, we're going to be turning
this pen into what works for us and just test it out. There we go. That
is our gold ink. Look at how cool that is. If I had thought that
my line was too big, I could have tightened
down a little bit. Let's try the acrylic ink. Again, don't put the
ink on your paper. Don't feel your brush right
over your paper or your tip. Hoping that I can hold the
tip right over the ink, use the stopper to
drop some ink in. That's what I'm wanted it to do. Look, that worked fantastic. I can use my little test piece over here to get any drips. See that was a big drip. That ink is super fluid, so maybe I want to tighten
that down a little bit. Maybe I'll put a little
more ink in there now that I've got it
where I think I want it, and see if I've got
a drip coming out. I never want to start right
on my main piece of paper because of that big
drip that I just got but after I have it started, I've got it right
where I want it. I've got the ink facing up. I have the open facing up. Now I can draw and just see like what can I get with this, and how far does it go? Fun to test these out and see
what does this look like? Is this going to work for me? Is this the look I wanted? Then once you run
out of that ink, let's see what else we can try. The acrylic ink more
liquidy even than the mica. Very interesting, so I had to tighten that down
just a little bit. Let's try the
rapidograph ink here. Again because this has a tip. I'm just going to try
to push that link in there and see what
that does so set right in the middle
where I wanted it and then starts coming
out really nicely on my little sample
piece of paper here. Then I can see that this ink is actually more transparent. Very interesting there to
see that way liquidier than the other two
that I was just using but still works fine. Then when you run out of ink, you'll know and then just wipe
your pen off really good. Way more liquidity
than I would prefer. I think I touched it, not my favorite so we'll say no to those for this experiment. I got some watercolor ink, so let's go ahead and try that. Again, I'm just going to
try to dip this in with the dropper in my
ink head and see now this is why you
don't want to be working on your piece of art. Because look, what we just did. Now it was a big mess. Then we'll have to see, do I have the blades wide
enough for that to work? Okay. Actually that one
had dried paint in it. That was not liquidy stuff, that was real thick stuff. I just got that out of
there with my cloth. We want the liquidy stuff, not what was dried
up in that dauber. I'm filling these
with the curved part down because I feel like that's what's holding
my ink for me, rather than the straight side, that's my little well
there for the ink. Again, touch it down on
some other paper before your piece art because
you're going to have that great big drip. Then just test that out and
see what different marks, dots, lines, what
can we get here? Again, this one is a little more transparent than the
other inks I was using. A good option, maybe not my favorite for doing
different paints, but it is a good option. Now I'm going to try
[NOISE] yummy high flow. I like that it's got
a head here that I could maybe just
squeeze right in here. This is thicker. I may have to open
my little blades up. Then you just make sure both your blades are
touching that paper. Have a drip on the bottom
side that I saw forming. Then like that off, there we go. Now, so if you have a
big drip on the bottom, you don't want that dripping
off onto your paper. Just wipe that on the edge
of your bowl or whatever you've got that you're
doing ink with. This is a lot thicker paint. Even though it's high flow, it's not flowing quite the
same as our acrylic ink, so it is a little bit different. I can see that even though
on some of these I was going other directions
on this one, I really need to
go the direction that the ink is because it's not giving me a flow when
I go up the other way. Just think in like straight lines or dots
or whatever it is. If you're not getting it when
you go other directions, then turn your paper so that
you can always pull the pen. Sometimes it's working that way, sometimes it's not,
so very interesting. Another thing too is
the pen is mainly used to be straight up and down. Even though we can see that I'm slightly angled to pull it is meant to be as perpendicular
to the paper as possible. Keep that in mind also. You may try to with the thicker paint or
the high flow paint, hold that pen straighter but for dots, this high flow
stuff is fantastic. Look how much ink
I still have in there and how far
I've already drawn. You can see what
I'm saying here, this is going to last longer than some of the other options. If you're really having
trouble getting it started, then go ahead and open
the blades a little more. It could just be
thicker paint there. I can go ahead and clean
that out if I want. If it's too thick, just go
ahead and mix that paint with airplane medium and that'll thin it out and still give
you plenty of color. Then another option
that we have, or the high flow fluid paints. These will have to mix
with the airplane medium. [LAUGHTER] You don't need a lot, a tiny bit. Then with the airplane medium, it's real liquidy
milky looking stuff. I'm basically just going to take a paintbrush and mix that up till I get like a melted
ice cream consistency. I want it to be nice
and flowy like an ink. Then when I'm thinking, oh, that feels pretty
good, try it out. If you don't get the exact
consistent, let's see, right, you can try again and just take your brush, and very
gently swipe on the edge of our pen and load our pen, and then give
it a little test out. Maybe I've got these
blades too far apart. Here we go. A little
bit tight your blade, you'll be able to feel. I must have touched that again. Be real careful not to
swipe your hand back over these things until they're dry. I'm talking and moving
at the same time. I'm moving my hand over it but look at that. Now, that that could be my favorite thickness
of paint and we could even mix this with a
little bit of gesso in there and make that
matte instead of shiny. I could even, just giving you some
extra recipes here, take a little tiny
bit of clear gesso. That was not a little tiny bit [LAUGHTER] but I can take a little tiny bit
of this over here. I'm using it over here with the part that's mixed
with the airplane medium. Let's just see what we get. Tiny bit gesso, the color and the
airplane medium. Let's just see what we get. I'm just lightly swiping
the edge to fill the pen. Then we can test that out
over here on our paper. I may need to widen the blades
if I'm not getting a line. I actually have had a lot of
paint on the top of that. Let's go ahead and
swipe the top. There we go. Now
I'm getting a line. With little bit of
gesso mixed in, it'll be a matte
finish rather than a shiny finish because the
acrylic paints are very shiny. They're plastic. They're made of
plastic basically. I do like mixing gesso in
with my paint a lot of times just in mark-making and
different things that I paint because you get a
really pretty matte finish. I love that. Again, try your best when
you're writing and I have a hard time
doing this myself. Try to keep the pen as
upright as possible, that'll keep the
ink flowing down, it'll keep both of
the nib tips on the paper and your lines
will be more consistent and you can do plenty of yummy mark-making dots and lines with plenty of ink
still left in that pen. Look how far that will go. As a so you just wipe
that right out of there. Just wiped it nice and clean. As a dip pen alternative, the ruling pen is a really nice, inexpensive option for something that'll go a long way
in our abstract art. Now that we have tested all the different options
that we could give a try out, I say let's make a little
warm-up abstract project, like what we just did here, but maybe in a little
piece of paper on its own. Then we could also
paint a little abstract and just give it a test out with any type of drawing or painting
that we want to do. I'm just going to do
a couple of projects playing with the
ruling pen today. Let's get started. [MUSIC]
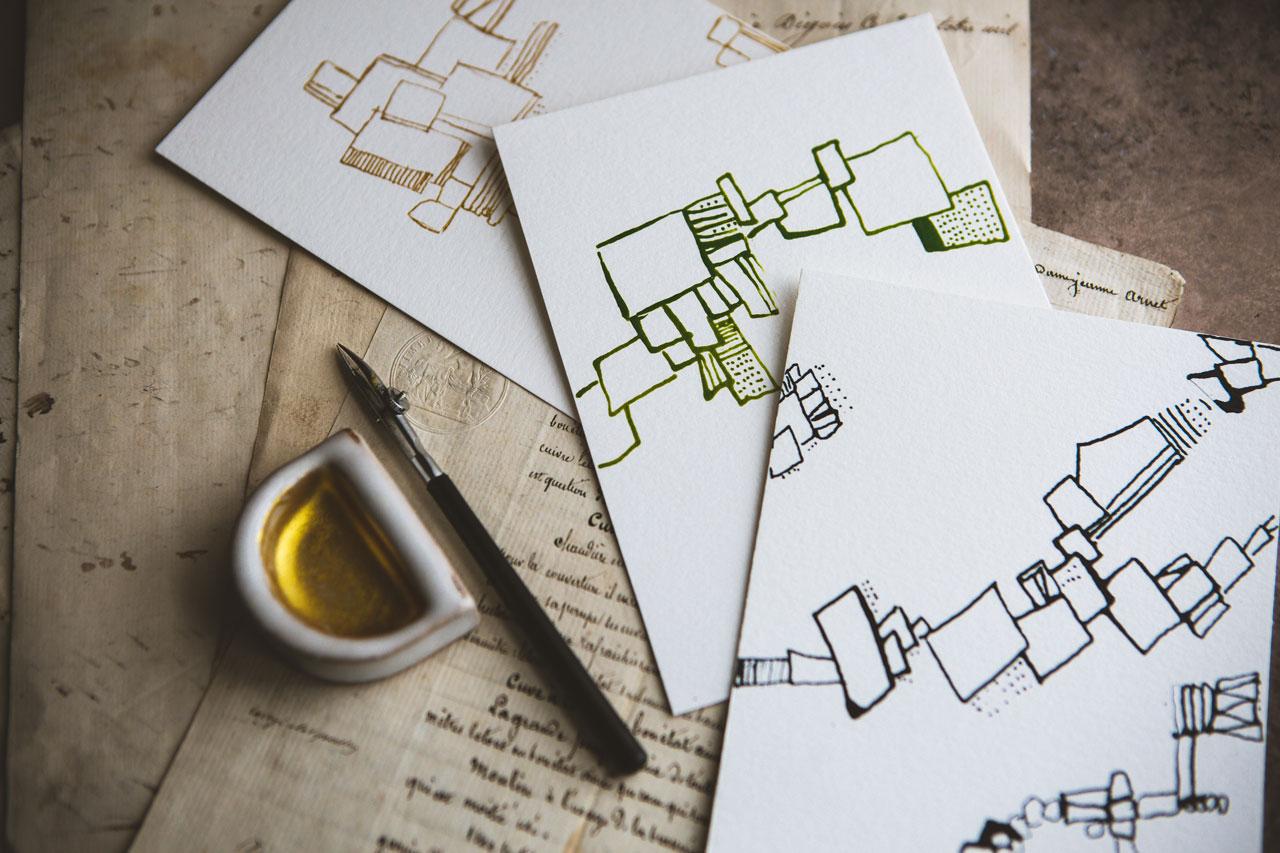
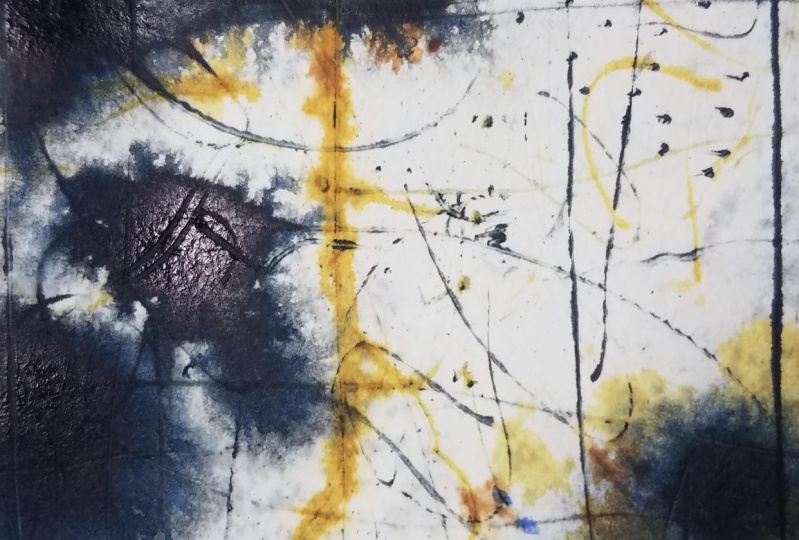
6. Small Pen & Ink Abstract: [MUSIC] For this first project, let's just do some warm ups. I am going to use the
pen exactly how they tell us not to and
use it as a dip pen. This is my indigo
Daler-Rowney acrylic ink and I'm just going to dip it in. I'm going to be real careful
about how far that I go. Wipe off the edges, if you have a bunch
of ink on the edges. Now see well, I didn't
get very much in there. That was very interesting. Then let's just see if I'm
even getting a good size line. This was a good indicator and let me just
wipe this tip off. It's a good idea to clean your
tip each time and I'm just using a microfiber cloth
because I like them. It's a really good idea
to test that out and even see how much ink you
can get in this nib. Then try to use the
stopper and see if you get a whole lot
more ink, which I did. [LAUGHTER] There we go. Very interesting,
[inaudible] test paper. Let's just go ahead and
do some random abstracts. Just draw shapes and get
a feel for our pins, and then we'll set this to
the side and let these dry. I recommend you do a bunch of these because
you'll get a real good feel. How to hold the pen, how much ink before
it starts to run out. Don't load your ink on
top of your piece of art. Now you can start mark-making. That was super thick. You can see how when
you set your pin down, it's going to create
a super thick spot. If it does, do you care? Does it look good? Did it ruin your piece? It's time to start evaluating
how this works for you. That could be an indicator
that maybe you need to tighten your
blades a tiny bit. The next time that you go
to set that on your paper, you don't get a big
blob like that. I'm drawing boxes because this pin really lends itself to straight lines
rather than circles. But you could experiment with round things and just see
did you get anything? I felt like I needed to
tighten that down again, but can we get a
circle out of this? Maybe. But when we were drawing, these are really meant
to go open side up, pulled in a straight line. They're not really
meant to be pushed, but they can be. Can you do a circle? Possibly. Just practice and
play with that and see, are you getting
shapes that you want? I really liked the dabber
because that allowed me to, if you get too much ink though, just like you saw, if you saw that, if you get too
much ink in there, it just blots out. It's only going to
hold so much before the weight of the
liquid plops out. You can't fill it
all the way up. It's just never going
to happen for you. But you can fill
it up pretty far, much further than a dip pen. We can do fun lines and shapes and mark making
with it [MUSIC]. The first project I want
you to do is an exercise in wine-making and just creating some fun little abstracts
here on your paper. This paper that I used is just the canon extra large
watercolor pad of paper, so I'm not using anything
special and I like using this paper because
it just holds the inkwell. It looks great. It's just
the regular watercolor paper that's not very expensive. I want you to try
just line-work, shape making, mark making. Do some lines, do some
shapes, do some dots, do some combining of
different shapes to come up with little
abstracts like these. It's going to get you
used to how much ink you can put in before you
get a very heavy splat. Because on some of these, like right here, right
here, and right here, even though I thought
a little bit more ink in the pen would work okay, soon as I put the pen
down on the paper, it was very heavy splat of ink and that could
add to your composition. It's not like it's a big deal, but it is a learning curve, and then you'd be able to go, oh, I see. I want you to practice just coming in from different
sides of the paper, bury up the size of your shapes, do some dots, do some lines, and practice with your pen and just creating quirky
little abstracts here. All right, I'll see you in
the next project. [MUSIC]
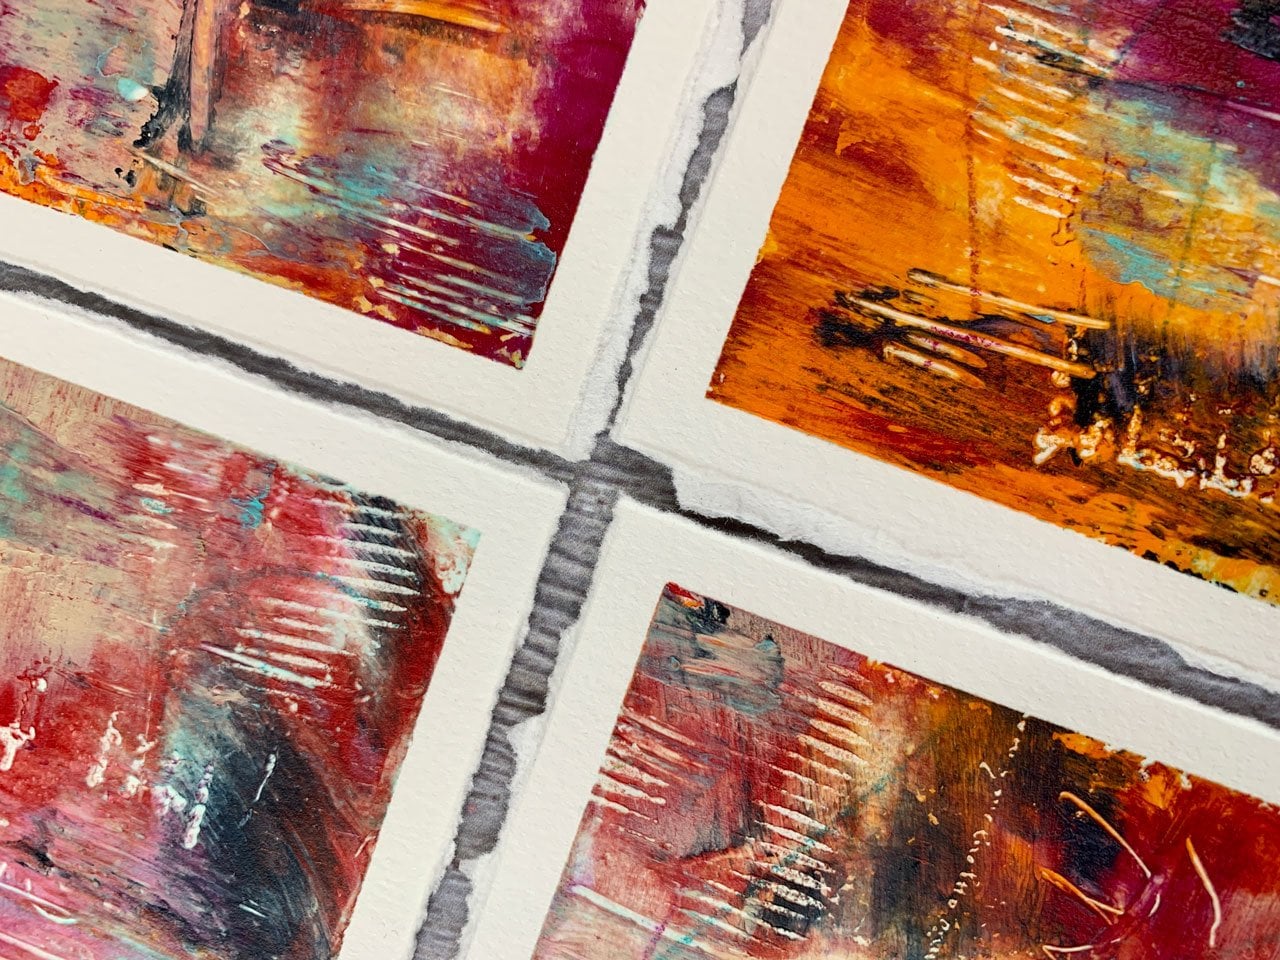
7. Small Painted Abstracts: [MUSIC] In this
video, let's make some little abstracts with our ruling pen as our start. I'm just using some of this Canson XL watercolor
cold press paper, 140 pound. This is a 9 by 12 pad, and I've just cut it in
half and cut it in half again to get four sheets of paper out of this bigger sheet just to play and experiment. I have taken my little sheets and taped off around the edges. I just want to start this
project out with some scribble. You can definitely
make these much larger if you want to, just thought it would
be fun to play. I'm going to use
some acrylic ink. This is the Payne's gray. I'm going to use
this like a dip pen, even though we know
it's not a dip pen. I could put the ink in the side, but I'm going to go ahead
and just dip it in. Because for this, I just want to do some scribble
or some writing, something messy where maybe
you can't really read it. Maybe I am writing out
a poem or a thought, or a wish or something that
means something to me. In the writing, I am positioning my pin with the open
part facing up. That's what's going
to allow both of the prongs to touch the paper, and me to write with the ink that's right in the
middle of our piece. That's really important because if you're trying to write with the little screw
head to the top now, you're not getting any
ink flow by doing that. I just want to fill the paper. I don't have to
fill a whole sheet, I could do it strategically. I could also use this to make lines and marks on my paper, and just continue to add things that I
feel inspired to add. Get creative with the way that you're writing and marking, and doing your dip pen on your piece of paper
to get you started. Then we'll want to let
this completely dry. Then we're ready to paint on top of it or use this
as collage paper. Lots of different things
that we could do with this. I do have a very thick
ink splotch on this. It's going to take longer to dry or I could just take a piece of a paper towel, and soak up some of that
ink if I wanted to, and that'll dry
hopefully faster. I have some of these I
have already done so that we can get right to painting. I'm going to set my
ruling pen to the side. You can see I've got
a couple of these, where I just scribbled on them and they've started to dry. They're already dry
and now we're ready to paint something fun on top. Generally, I do like
to go a little bit larger with my abstracts, but doing a little
pair here for this, I'm just playing
and experimenting. I'm going to put some acrylic paint colors
out here on my pad. This is olive green by Charvin. Green gold by Charvin is
the next color I've got. If you don't have one of
these paint lid openers, this is a life saver. Now all my lids that may
practically glue themselves down just open like
it's nothing now. [LAUGHTER] This is a new thing that I got recently
at the art store. I'm just like, "Where have
you been all my life?" Because you should
see me trying to open oil paints where the lids have basically glued themselves shut. I've gone to the
point that I have twisted so hard that I twisted my metal container in an unusual fashion and made
up ripped holes in it. This is the Charvin
Caribbean Pink. These are some of
my favorite colors. Lids I could never get
off before even with like a wrench [LAUGHTER], now it just magically
open very easy. If you've never seen a
little paint lid opener, Golden makes these and you
need one. They're amazing. [LAUGHTER] What a
burgundy. Let's see. Here we go, Alizarin crimson. I'm just playing with
a color palette that I've played with before
that I know that I love. You can play with
the color palette. This is Holbein Sepia. You can play with
whatever color palette you happen to be interested in. I'm just getting a range
of stuff that I like. Then I've also got
some liquid gesso, I love gesso, I use it as my white, I mix it in with other colors. I also have clear which I love to mix in
with my colors also, it makes the paint
more matte and gives me some other options. I'm going to paint a
couple of abstracts. I've got a little mark-making
tools, the clay tool. It's my favorite
thing [NOISE] to drive through the
paint and mark-make. I also like to drag
through the paint with a mechanical pencil
so you can see well used pencil light to
drive through the paint. I'm not going to drag through the paint
with my ruling pen, even though it is the
perfect tool for doing that, unless I have a ruling pen
specifically for dragging. I don't want to damage
the tip of my ruling pen. I want to still be able to use this for the purposes
it was meant for. These are pretty cheap.
If you have a bunch of them and some are
duplicates and you're like, "This is my mark-making ruling pen," while the paint is wet, then you can use it to
drive through wet paint. Otherwise, once these are painted on and
that paint is dry, we can mark on top of that
with more ruling pen and ink. Just some ideas for you. I'm just going to
mix some of these. I could use a paintbrush, but sometimes it's fun to
paint with your finger. [LAUGHTER] My goal
here on creating these is to not cover
all of my writing. If we're doing collage, my goal might be to cover the writing or collage
in some of that writing. I might have some
different ideas for how I can incorporate and
tear pieces of the paper, and use little pieces that
I'm gluing into stuff but for these, I'm going to hopefully not cover
all the writing. When we're all done, I will pull back the ruling pen and maybe extra mark-make
on top, we'll see. I'm just being
inspired spreading paint [LAUGHTER] using the gesso and the paint mixed a little bit and just see, what can we get? I get so excited to
come up here and work on some of these
projects because I'm like, "What can I create today?" It becomes a goal
and something fun, rather than a chore that I
have to get done that day. I don't know how you think
about your art practice. Sometimes filming,
workshops and stuff, it can be a lot of work and that could be
considered a chore, but I consider it like my motivation to get up
here and do something. Whereas being an artist that
works by myself at home, I might be more inclined to procrastinate and
watch Netflix all day. If I think about this as like, "What can I create today?" I come up here and
start making stuff, it's much more
motivating and fun. I'm just mixing a little
bit of gesso in with the paint colors
that I've picked as my color guide today. These are just colors
I've played with in the past that I
just really loved. No particular reason other than that, that
I've picked them. A lot of times I'll pick colors and stuff from
different sources, magazines and interiors, and I'll be inspired by things that I saw looking
in the magazines. Because I love
interiors and spaces and how we choose to decorate our spaces and the
things that we do. I get really inspired
by colors and objects, and the things that we
surround ourselves with. A lot of my color
palettes now come from beautiful coffee table
books that I'm just looking in and relaxing. Then I'm like,
"Whoa, look at this. Let's go try this out." Different fun tricks that
you can try for yourself. If you're thinking, how do I come up with a color palette? I love interiors. Some of my interior books
are my favorite sources. I'm just working
very intuitively. I'm not trying to create
something specific here. Maybe while the paint is wet, [NOISE] I'll come
through with one of my little drag tools and do
some little mark-making. [NOISE] I'm not trying to think, "Oh no, I don't
want to put a mark here, I might ruin it." I'm not trying to
think composition. I'm not trying to
think super hard about the whole process because I want some enjoyment in that process. I feel like when
you take stuff off, when you peel it off
and see what you got, the surprise is magical. I love that aspect of doing little abstracts
this way. [NOISE] We can come back
with different tools and I've got this
rubbery thing that is like a little spatula.
Look at that. It's actually for molding clay, but I like just walking around the art
store. Look at that. That just made me so
happy about this piece. This is just just so that
I'm dipping this in and I'm just doing some fun
mark-making across it here but yeah, I like to walk
the art store and thinking, what is this item and how can
I use it, and maybe I need it. That's how I came home with this
little tiny spatula. Super fun. These are
turning out super fun. Before we get too far, maybe I will do a little
more mark-making. This mark-making is just
dragging the paint around. I'm not trying to
do anything other than just create in the layers. Then what we might do, I really loving
what this is doing. Now what we could do is
take our ruling pen. We can let this
dry a little bit. We could take our ruling
pen and come back on the top of it with some
different mark-making things so in this aspect I'm going
to put in some ink and then, maybe we want to
mark-make with some dots or some lines or just something. That
was pretty right there. I liked the way that worked and we can determine
the size of the dot based on how far apart we have these little teeth wedged. So if I tighten
that a little bit, I should come back
with a smaller dot. Well, that was a whole thing. I just let all the ink out at once, so let's
just get ourselves maybe a little piece
of paper towel. Maybe I will work that into
my paint a little bit. I don't want that big
splotch there. There we go. Easy to fix so too much ink in here and it gets
too heavy so that's part of what that problem
is with the dipping. You don't know how
much ink you got versus is that about
to be too heavy. That's fun and then
I'm going back with the dark ink here
on this ruling pen, but we could have done gold. Gold is one of my
favorite and I'm just making some little
fun drag marks. Because gold is one of my very favorite
mark-making additions. Additions, totally
just drew that letter out didn't I [LAUGHTER]? Super fun there. Make sure you wipe
your ruling pen off every time you do something with it so that you don't have any ink dried and
caked on there. That one is super-duper fun. I might want to pair with
the dark and then maybe one with some gold so that I have a little pair
that I did on purpose. I'm just going to
dip a little in here and let's just see if I get a little
bit of a drag here. I'm actually thinking,
if I had white dots, a white ink would be
really nice right now. I actually do think I
have some white ink. This is opaque white ink for highlights and
corrections by Kuretake. It's another one that actually
did come in my art box, this is very thick, so I don't think that's going
to do what I want it to do today without shaking
it up really well. You may have to stir that. Let's see. I think
it's doing it though. Oh yeah, now I can
feel it moving. Let's try out. You can use acrylic white ink. I have an acrylic
FW de la Ronnie ink but the inks are
all in the closet. I just happened to
keep the Payne's gray and the indigo
on my table here but now that I've come up with this awesome selection of white, the awesome idea to use my ruling pen with
yummy white details. Now I'm thinking I need to
keep a white on the desk, but I can use this Kuretake ink and look how yummy and
fine these dots are, super pretty. I'm loving this. Here we go. I'm liking that. Then make sure you wipe
your ruling pen off. I just use that with a
cloth or a lint free towel. Well, let's check these out. These weren't meant to
be super-complicated. They're more of let's check
it out and see what we can do so let's start with
the two black ones. They're not 100 percent dry, but they're very
close so I'm going to try to be careful and not land them on
top of each other. But just a fun, easy. Let's make some pretty abstracts with our ruling
pens just to say, what can we do with this? That one I wasn't so
careful taking my tape off so be careful
pulling your tape. Pretty because when your
paints are not dry, the paper has an opportunity to tear so if you pull at
an angle when you're pulling your tape off very slowly and just pulling it away, you're less likely
to tear your paper but look how pretty that is. If you do that to a piece
that you really love, just cut in with a mat so that you've covered any
paper damage that you did. I get so excited and ahead of myself that I start
pulling tape too fast. If you'll just slow down a tad, pull it at an angle
away from your piece. You won't have that
issue and I know better. I get to talk in and I just get the willy nilly
pulling stuff off. Look at this one.
I'm telling you pulling the tape off
makes all the difference. Every single time. Look at those
[LAUGHTER] and I really love that I can see
the writing that we've strategically
left showing. Then the last one that
I did the white ink on and I do like
mostly dots and lines, but the little bit of dot
in this one is super fun. You can do that with
a Posca pen too but if you've got some white ink and a ruling pen, why not play? I pulled a little piece of
paper there, but that's okay. As long as I don't ruin
the piece of art itself, I can cover the paper
up. Look at that. Oh, look at this fun little
trio with the ruling pen. I hope you have fun with a
few ruling pen abstracts. I definitely want you to try a few little abstracts
with that pen. Do some writing underneath. Pick a few of your
favorite colors, just smoosh some color around. Maybe drag through the
color for some lines, come back on the top with
a few marks or dots. Just see what you get. They're super fun. I'll see you back
in class. [MUSIC]
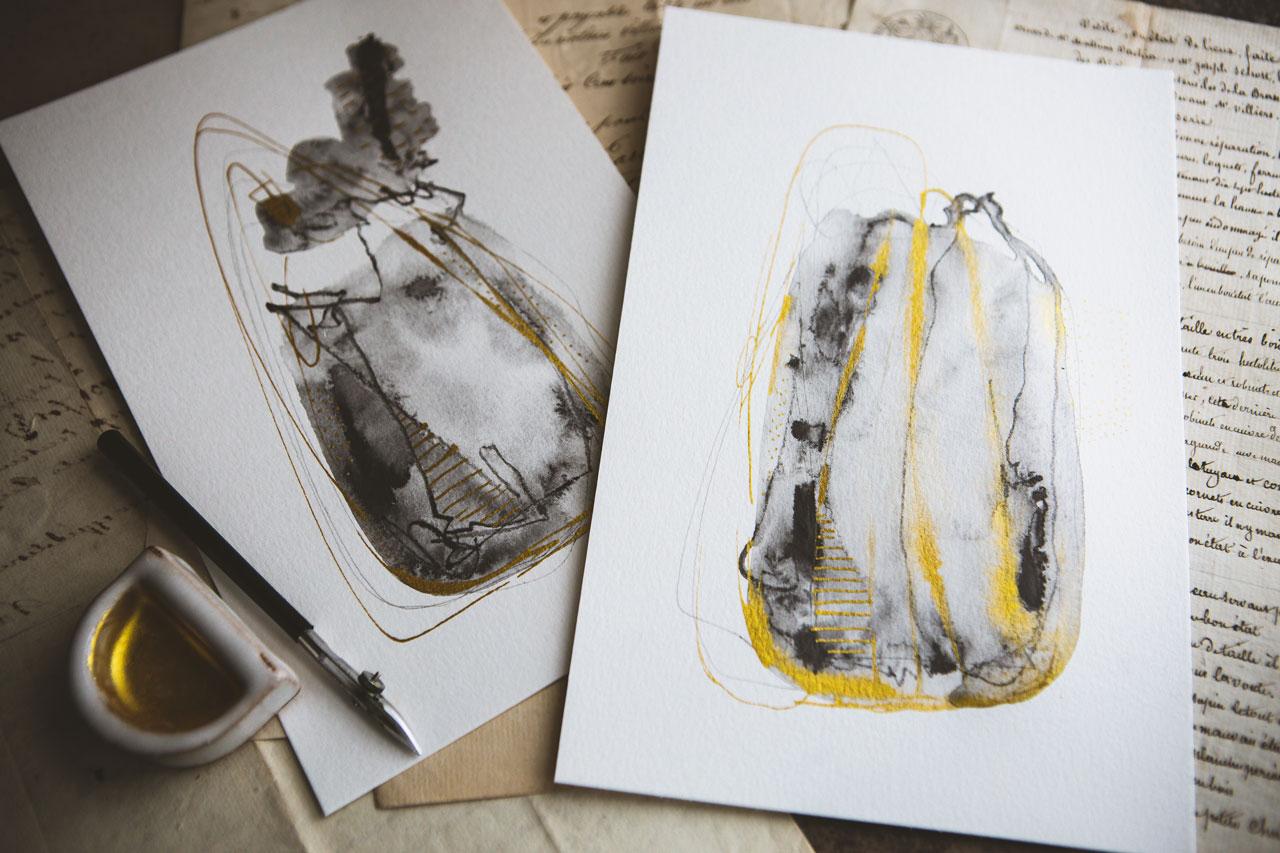
8. Graphite & Gold Abstracts: [MUSIC] I'm just playing here and I'm thinking in my mind, what if we create
a fun abstract, watery one, similar to, say, my watercolor abstracts
or my acrylic abstracts? But what if we create
with graphite and gold, which is a class that I really
particularly love because I like that gray and
gold combination. What if we just
spread some water, spread some graphite, do a few lines with some graphite, and then come back with
our ruling pen and do some fun gold mica
mark-making and stuff? Here we go with the larger one. This is my Raphael
SoftAqua number 0 brush, which is my favorite brush. I've got my Kuretake
fluid graphite, which is the coolest stuff. It's very thick,
liquidy graphite. I'm just thinking
if I just do, say, maybe some random shapes that we can create
something cool. That was a drip I
did not intend. I might see how I
can work that in. I'm going to go ahead and leave it rather than starting over. But I'm wanting the water to do some spreading
and some magic here. I want some dark and some light. I want the variations
in the dark. That's fun. Maybe I don't want that there. I want that to maybe be a mark. I might come back and pull
some of this in as a mark. There we go. Now what I could do, is add some more to that with my big graphite 6B stick that I love and just come in
here with some marks. In that case, I could come back now with some extra water. I'm just playing
and experimenting. I'm not trying to do anything
specific other than just see what could I create and if I do dip something
somewhere I didn't intend, what could I change that into? Then I might create two of
these while I'm creating, I like creating pairs. Make sure I got plenty of water. Come back in with some graphite. That's really fun. I love
that little line there. Let's leave that like it is. Maybe we'll come back
with my graphite stick. I like it because
it's water soluble. We're going to see some
dark and yumminess going on with the graphite
stick that we wouldn't normally just see with
like a regular pencil. I love that. I might come back in
with my regular pencil. This has got paint on it, but that's still
going to be okay and come back with some
really fine lines. Just to add into
our mark-making. See, one like this is going to be real pretty. Let's shake up our
bottle of ink here. Let's see what we can create. I'm going with my ruler and pen. I've got this little
set of three pens, but I've been using the medium
size in this set of three. I could switch it up and
go with a bigger one. But just to give you an idea, I'm using the bigger
one as a dip pen, which it's not a dip pen, but I'm using it
like it's a dip pen. We're just going for it. Simply because this is abstract, so I don't need it to be exact as if I'm writing some important
calligraphy or something, I got some options here. [MUSIC] You can see how
doing something like this, look how much ink I've
still got going in here to do dot-dot-dot thing, which is why I love this
because my other dip pen, my Kakimori dip pen, it holds a lot of ink, so it lets me do a lot
of writing and dots. While this little ruling
pen is a whole lot cheaper and lets
us go pretty far. That ink is still in there. No, I don't want to put my
hand down on the wet parts, which is exactly what I'm doing. Then in between, when you're thinking of reloading
or changing, just wipe your pen
off really good. Let's just move this
over for a moment. This is mostly dry. This was wet, so it was
combining in there. This one is mostly dry. Now I can come
through here and make some different marks
that aren't going to blend in quite like they
blended in on that one. You're going to do like
a little more solid, a little more defined. [MUSIC] I'm just putting a splash of
water down and then just letting it do its thing, and coming back after
it's dry and thinking, what kind of mark can I
put here, can I put there? How can I add some interest in the different areas that the water is doing
different things? That's what I am
looking at and for, nothing specific really. I just want to see, what can we create
if I did this? I'm not usually worried about if I'm going
to ruin a piece. But let's say that you've got
a piece that you're like, whoa, I love this so much. I think it needs something else, but I'm not sure what that is and I don't want to ruin it. What you could do is stop, make a color copy of
that piece of art, several color copies of it, and then work on the color copy until you're
like, this is amazing. Let's go with this. Then you can come back to your original piece of
art and say, I've got it. Otherwise, I'm not
telling you how many times I have personally ruined
a piece that I thought, and it wasn't ruined, it was just my own personal
opinion for what I wanted, but I thought, I totally ruined it and I
should have stopped. But if you take a picture
or make color copies of it, you've not really ever lost
that piece that you loved. It's just not in
the same format. I like these lines and
then lovely little dots. I love all the action going on with that
graphite already. I love it. Still wet right here. I'm trying not to
put my hand in that. Something in that's pretty cool. I'm actually pretty okay to let those finish drying
and call that good. But how cool is that to be
able to use the ruling pen for yummy marks and detail on top of a fun little
abstract piece like this? I love how you can see all the variations that I've
got there in that graphite, which you could also
do with a watercolor. I love the shininess
of that ink. I'm using the mica ink, but you can mix up your own little acrylic
inks that are metallic. You can use that. You could use any high flow or acrylic paint and mix that with the airplane medium
and make your own ink. You've got options here. But I do love it when
there is shiny and vibrant and exciting
as gold leaf. I think that's what attracts me to this mica paste the most. It is as vibrant and shiny
as if I did the gold, which is a whole lot harder, doing that gold, because you got to glue it and then stick the paper down and then rub the paper off and hope you got
it where you want it, whereas this stuff, I can go all over the
place and do whatever. The gold leaf is a whole lot
harder and this stuff is just as shiny and so
much easier in my mind. Anyway, super fun. I hope you enjoy making some random abstracts
like this and giving your ruling pen a
little test out for lines and marks and dots and just seeing
what you get. I'll see you back
in class. [MUSIC]
9. Final Thoughts: [MUSIC] What do you
think of the ruling pen? Is it not a really cool tool? While it is an old tool that
was created for draftsmen, I actually did drafting
in college because I have a degree in
Interior Design and we drafted blueprints
all through school on a drafting board
with a pen and a ruler. Yes, I'm that old. [LAUGHTER] I do not remember my teachers introducing
us to the ruling pen, but now that I've
used it for art, which is a tool that I'm
definitely loving for the art, I'm glad I never had to
use it for drafting. [LAUGHTER] I cannot wait to see what fun things you create, how much you love this tool. I loved it's really economical compared to my favorite dip pen, so while it's not
technically a dip pen, we will be using it very similarly and hold a ton of ink, and I love that about this cheap art tool that we're now going
to be playing with. I hope you love this
variation and different to my very extensive dip pen
tool that I love to use and talk about and that
this can now become a more economical piece to your art practice that I
know you're going to love. You'll see me pulling it out in classes going forward
as an alternative, if I'm pulling out the
dip pen, that's $50. [LAUGHTER] I hope you
love it. I can't wait to see what you're creating
in class today. Come back and share those with me and I'll see you
next time. [MUSIC]
 DENISE LOVE, Artist & Creative Educator