Transcripts
1. Intro: Hi, My name is feel I'm a freelance illustrator and today I'm gonna show you how to create this Stan in retro futuristic illustration using affinity designer I used to work in Adobe Illustrator and it'll be fighter shop. So I was combining the best from two worlds I was doing with Victor Shapes in a dorm, illustrating and then, in fact, a shop. I would it in high lives, even though the trust if it's But then I discovered the feeling to designer, which allows me to do everything in one application so I can draw shapes, plan something to tools, and then I can and some rested effects like immune, which works like drastic. But actually there Doctor and and I can come up with standing administration that looks like it's thruster, but it is 100% better. So that's why I like things to designer. And that's why I wanted to show you guys the possibilities of this problem because not so much people knows about this amazing software for joining this course. I guess you need to have some basic knowledge is off Adobe Illustrator or Father Shop, so you need to have some basic knowledge is coming. Pento works cause of vector graphics works. So I would say this course not for absolute beginners. But if you care some basic understanding off what is director and what is the Pento, then this is course for you. So welcome to my class. I hope you will enjoy it and let's start and create some illustration.
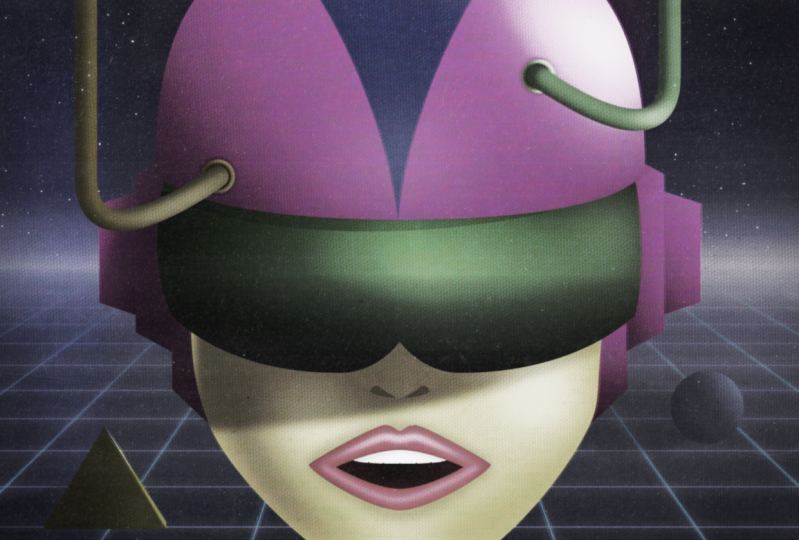
2. References and Sketching: So what? First I got the idea off droving some helmet, his wires, some woman facing helmet with wires. So this idea is not something you There is a lot off artists who explored this idea a lot, so I started to look at the references. Have be interested. There's a lot of illustrations with such idea, but I don't want to make the style of this illustration. I will come up with my my own vision of this idea. I just want to have some inspiration. Then I'm starting toe work on this kitsch on the first rough pencil sketch. After sketches down, I just put it into the scanner. Scan it. So here's our scanned skitch, and now we can move on the digital world.
3. Creating a Background: all right, here we are in. If you need to designer, let's start by creating a new document. Let's say it would be eight by eight inches and let's create an on board by the foot enough into designer. You don't have another board like you have in Adobe Illustrator. You need to create them. So let's hear this are go to and say in search our board. Now we get one. Let's based our sketch using place image to Here's our Skitch. It suggested that this all right, So, as you see, I it'll be changed. My sketch. I had it leaps on and I changes a little bit. The shape of the helmet. I'm not sure about this. Fears. Maybe I will not include them. So I do know we will see. Okay, and let's start with the background. Let's create our background. Let's choose a tango to Let's draw a tango like this. I get my swatches here so I already know the cars that will be using. So this tray is blue and let's make ingredient, Let's head and as a copy of his blue let's heat again is this circle to go ahead ends in we can change our second color as you see I'm using H is still slide this model by the photo guests. Ah, it's something like this. Not like this, but for me, it's not very comfortable. I refill it yourself sliders. It's smaller, easier, so we'll kill. It's just I was different color like this. Let's hear G. Now we can draw ingredient and let's make it like this from dark to light. Okay, let's hope it by dragging with holding out election or mug. Now we give, I will go rising horizon. Let's move. Maybe I was gauge to the top and said it to multiply. Yeah, all right, Yeah, Let's it another rectangle here and let's and some beach cower to it and let's remove the stroke with donated. Then let's go toe transparency, too. And as you see using this to, it's very easy to create transparency, radiant mask. So unless create a mask like this. All right, in this mode here, all right, this is our horizon that suggested little bit. Okay, what's next? And to be honest and I don't like this, multiply more. Let's just go to add this and let's walk it by going to their luck. What's next? Um, let's create our agreed okay to create greet, we need mental. Bendel works exactly like in illustrator on Father Shop. So let's create the first stroke. Let's it's some bright color, so we'll see it. It's a just the weave, all right to de select the stroke. I just hit escape. Just let the pento again Just hit the Beetle and let's draw I, uh, strokes to move them You just hold control. No comment on Mac and you can move the notes. I'm not sure is it to the right angle in terms off all the perspective fruits, I just draw it by I, Phil and do until it looks good. It's good. So let's draw another one like this and maybe another one. Okay, is the sea when I'm moving the notes, I snip in to the Yeah, my horizon line because I got this snapping don't own. And if he if he expanded and you see, I get most of the checkpoints is a checked check boxes. I'm sorry is checked, so I basically snap into to everything. Okay, so we'll just copy this left half and then flip it Ah, horizontally and copied to the right. But at first we need to adjust the with off our strokes. Let's go here and let's get pressure. And now you can play with this notes and just stroke. We've You can add another note. You see, there is a lot of who options here, so But we just need one. Yeah. No, let's not hear. And does you know what? This right? So because our stroke is in perspective, So the front part will be a little bit thicker then is the one from from from the horizon. So okay, like this. And then we can select our stroke hit control C or common. See? Select another one and heat control shrift. The common shift. Three. This means the based corporate appearance, as you see with style, is black to this new stroke. So let's repeat it with others under shift construction. Three. All right, so let's group. I was strokes by heaping hidden control G. And let's core Pete, My dragon was out. And let's sleep horizon. Uh, horizontal like this. Okay, now we get it. Now let's add some horizontal strokes. I'm not sure with this, we style I think we can play with it a little bit. For example, we can add with another note, gentle like this. Yeah, this would be interesting. Yeah, let's copy this new appearance toe all off the horizontal drugs by selecting it hidden controversy and country's shift. We we to planet to house the strokes like this. Let's make it a little bit thinner. Yeah, oops, This one a little bit thicker. You know, like this. It's a just this notes my holding suit. We can expand it through the all right I think we're done with Agreed. Lets us a group our horizontal strokes by selecting it and the kitten country G in his group. Everything Country G gain. Let's name It's great, All right, I think we down with a background. Ah, I think it's enough for our initial face because, waiter, when we were when we will build over our elements, we will proceed to the coalition face where we'll polish each element and shape Brian Different Maybe masks Grady INTs effects for now for the initial building face. I think we're down with background and we can move on to draw me in our head
4. Building Main Shapes: All right, let's great our head. Let's move. Always gets to the top and I think we can turn off the great for now. All right, so let's be for the mental. Mm. But maybe we can use our lips, too. If you heat em, you can circle between the rectangle on their lips and so around rectangle. So let's choose a ellipse. Still, let's example stated to some orange, it's journal the stroke. It's drawing oval face by hidden saved X. We can switch the cover from stroke to the field, the same as an illustrator. Let's just face Mm Okay, something like this. Then we can come heat control under to make our shape adjustable. Because until didn't if you don't do it, if you it will act like and just like a circle shape you cannot adjust the note to just the note you need to make it like free adjustable shape hitting control. Enter. And now you can see lived note and ingested bit. But this I think, Yeah, there's no face. This note is whatever. It will not see it. It will be hide hidden by the helmet. Okay. Mostly, it's group A background and look it. All right, let's create a helmet. Maybe we can once again use Ah, ellipse too. Uh, is this scene there is some guide showing up that cities chosen was it center? And I can draw the tango from story ellipse from here by holding control and shift. So really, this My real it's arrested. How a pressure. We don't need it. All right. And here, Elsa. Yes, It's just a bit when this Okay, something like this. It's also great adjustable, shaped by heating control. Enter. Let's move. It is not here because we'll have this shield glasses over top off it. And let's draw our glasses. We can start from from Xanterra, right? This for example, when this to create a straight line with a straight angle instead of just hidden note like you did in Illustrator In it. In. If Inter Centre need to hit without always or auction on Mark now we can draw a straight line. Okay, so we've got over lift part of the glasses. It sits shift Eakes. And now we can duplicated by keeping control J and then flip it horizontal like this. And then we select boss shapes and go to bed. This is like but finder in Illustrator, this is this. Ah, were similar, if you are similar. Was illustrator. This is exactly like Petfinder administrator. All right, You got Ella Shield. How was in glasses? Let's change the coward to To some blue. Maybe we can adjust it later. Here we can said to something like Maybe like this, we were just a little cowers in our coalition face. For now, we just need the rough shapes. Okay, this is over phrase kill. It's creating this years. Well, something for this desk we can use. Trump is or two. So it has Great drop is oId It's dated. All right, that's ingested. Maybe this we cannot say just this. Red notes By holding control, we just both at the same time. Okay? Yes, I think Centinela, this would work. I think we can just We're doing this right. Let's paint it with his, You know, the same color for now. Okay, I suggest the color bit. Now we can cope it by hitting control J and that it's unjust. The size bit like this. All right. And let's add another copy on this plate is wasted here from the ground and the same as an illustrator. We can send it back by hidden control shift and and left. Break. It's spring. Break it. Oh, just called in control. And he didn't live. Break it. The downgrade. I was shape underneath like this. All right, it's torn off the skitch. All right? Now we can select our year. Group it duplicate sleep, horizontal. And it's moved here. All right. And I suggest one note. So our left ear is a little bit bigger Bed. No one will notice it. So don't worry about this little, you know, things I even think is this little mistake. So how you would go it? They be ed a little bit off, you know, some some genius to his illustration. Because when everything not perfect, not digital perfect. It had some craft craftsmanship, you know, some I don't know. Some leave feeling to it. So let's leave it like this. Who is one year? A little bit bigger. All right. Okay. What's next? Next? We need to draw our leaps and knows. I think. Oh, yeah. Let's draw this line on the helmet. So is this season zealous shape its price. I'm random cower. And here is a corner toe you can else excessive by hidden see? And then you can select the corner and rounded else again, Sort of, you know, to And you know, we with the node. I think, Yeah, like this. Then once again, duplicated Floop. Select good when we get it. Yeah, like this. And now we need to mask this, you know, shape into with a helmet. I don't know if you know how the mask works in Illustrator. This was paying the real pain. You need to copy one instance on another. And this was very hard administrator. But what? I like an affinity designer. It's so easy. Look at this. He just select the shape you go to the wear spinal and your drug, this shape under knees, our helmet shape. And now it's in the mask. How easy was that? Look at this. This is so easy. It's OK. Let's apply the same cower. Maybe change it. Now let's draw lips, which was mental. I enjoyed, - so OK, let's, I don't know, banded with some red being created. Let's move it, make let's had a mask so our teeth would be inside off this month. Mouth good like this. All right, so this is our lips. Now let's draw knows. - Okay , Way down. Without knows. It's look funny now, but we will adjust it in our Polish in face. Believe me, go look different. So right, right. I think we are done with the main elements on, Well, differently. Fix our nose because now it looks very funny. But we'll fix it, believe me. So we'll get a well, our basic elements. Now we'll get background. We get helmet. Okay? Everything. I think the this wires, I will add them. Waiter at the position, face by the main composition. He's ready. So let's move on to them. Pollution face where I will Ed Grady INTs to our shapes. Ah, and transparency, moss and highlights and shadows and so on.
5. Adding Gradients: All right, let's start a Didn't some Grady INTs and publishing our basic shapes. Let's start with a helmet and let's try to make it look like it's chrome. Hold it to get some chrome ingredients. But I will show you how to make one from sketch. We go to the Grady End. Let's adjust our first color. So make it like this. It's a consideration somewhere. It unsaturated a pink purple are pretty something like this. Let's insert new color and let's see, Make it. I like dark one. Okay? And let's just our my sculler. Yeah, some orange, a little bit orange shade. Okay. And let's makes his great and radio. All right, all right. That's him, G. And it suggested like this. I am being You may be like something on this. Oops. So our hermit starting to, you know, looks acceptable. Yeah. All right. No, I would get our home ingredient. I think for now, let's just said the color to some. What? I like enough into designers. You can, you know, drugs a eyedropper and took the call from anywhere from even from two bars. But we'll took color from somewhere from other ingredient blight. it may be just a little bit change it. I don't know something like like this. It's also applies some transparency. But he didn't. Why Keyboard shortcut? I feel like this. I don't like the collar. No, I don't know what I'm doing. For now, let's live it like this. I'm not happy with it. But have a Jessica later and let's get some room to our years. Let's go to the ingredient and lets it our harangue radiant. For these for Rome, I think we wounded full collars. Let's just long did not that. Okay, so the first color, some grays, blue, the second color Well bay and some orange shade. Very, very white. Say the forints with some almost white. But with with a foreign. If you ask me why I choose these scours Exactly. I just took a lot off. I just watched a lot of examples off eighties chrome airbrush graphics, and I just took the coward from there. And now I already know how to build the typical eighties chrome Grady int. So I just know this covers from references. This will be a dark color. Let's dial it IHS! And the last one this is the highlight. All right, so I will Chrome. It's starting to appear. All right, Let's in just it a bit. Yeah. Oh, I could. Then we can hit control C and apply. Argh! Radiant hitting counter shift the And let's just change it little bit. So they were work not identical on this Disappointed here. All right. And let's also it some greedy INTs to our glasses and face way. Okay, Now, let's do something with our nose. Let's just paying to crew some me don't from all face. Let's just paid the opacity so we don't hear this upper side. Don't see. See this upper side of his nose. You know this. Let's also some of busy dear here on this, you hear? Just don't knows. That's maybe darken it a bit. All right,
6. Shadows and Highlights: Okay, Now he's Where's the real magic happens? I will show you how to head shadows and highlights to mimic this airbrush. Sell the three D. Look. Okay, let's start with the face. But first, we need to understand where our source light is. Let's say our source white will be here in right top going on. It means they're the shadows Will cost here, that old face on our nose a little bit and on dollar glasses. So let's George draw a shape of flour shadow. Let's became Pento. Okay, this Let's grab a color from our face some darker tone. Let's make it even more dark like this. All right. And now we're gonna add some blur to our shape. So here is the effect. Infinity designer. And here is gushing blue. Look at this. We turn on the gushing blue ingested and you see how cool is that? Now we can me make our hairbrush shade with this blower. I've seen somewhere. Mm. Like this. All right, Have a little bit. And let's move it underneath. How? Uh, glasses. Okay. We can else a just a paucity bid. All right. Let's also said some shadow underneath our glasses using the same technique. - Okay , I also edit some opacity mosque to eat. And let's disappoint some stroke, too. How? Glasses, I think. Yeah, I think. Here. All right. And using the same technique. Let's apply some shadows toe our glasses. - All right, let's polish our lips. So let's select our lips shape. And I think we need to make a little bit more red. Yes, I missed more eighties style lipstick color and to apply the shadows like we did with the face. In this case, we can make it with in the shadow effect. So let's hit in her shadow. Let's play with it and it's unjust. Radios the opacity. I think we can choose the dark car off our lips. Uh, change your radios. Yes. So know this. And they also we need the shadow Toby here around our inner shape. To do that, we select our inner shape. All right. And let's outer shadow here. Yeah, like this. All right. Our lips started to get that three d airbrush Luke hopes. Sorry. Okay, let's also ingredients to our teeth and maybe add a little shadow at the top of the teeth way. Okay. And now I'm gonna show you in as a secret technic how to add highlights. So we already added the shadows. And using a similar technique, we can add highlights. But instead of fusion shapes, we will use stroke and blew it. Look at this. So select the mental. Let's draw highlights, stroke Something like this. All right. It's a boy. Some with through it. Let's apply white power right now. Let's adjust the pressure. Okay, It's hopes. All right. And now guess what? Motion Blur. Look at this. This is this is pure magic. Yeah. Now we get that eighties. A brush highlight that's in just a perfect here. I think we can even I had some red shed door color. Yeah, and it repeats the process. Where is our bottom way? Okay, I think we're done with our main elements. And let's proceed to the last stage where we go ahead. More effects, more highlights and shadows and blowers and so on
7. Adding More Details: Okay, lets said more highlights and shadows toe all face. And then we will add some outer goes to our greed toward the horizon. So, uh, maybe here might And glasses. Okay, let's start way. Okay, by the way, we forget about our wires that comes from the helmet. Okay, let's that draw some for this time. I guess multiply will work. Okay, that's true of the wire. We can around it. This angle is making a stroke That's arrested. The pressure SSM right with color so we can see. All right. I think I missed. Now we can around it. All right, lead else and make this socket. Where are where our cord will plug into Get something about this? Yes. This is the base so far. Corn. That's some, you know, some gifts, some metallic parts that usually you can see on the wires. So great a rectangle and we can mosque it as we did drug in underneath. Uh, what's wrong? Oh, I'm sorry. Because this is ah, stroke. We need to convert it to shape. So let's go to where and expands. Joke. I already got my a short cut for this, so I hit control and this is now This is a shape, and now we can mosque our metallic parts of the wires. All right. Like this. Now it. Let's add some shadow toe a wire. As you remember, our life sources here. So this is where it comes from. And so we hear with. So we go to effects and in her shadow. Okay. And here's offset, and we will move. How? Angle? Where In our light source is right up angle. And now I was shadows Exactly what it should be. And it suggests that color. And I don't like this collar. Yeah, some washed out blue. We'll work congested color off our soak it. Maybe it's some transparency to our circuit to make it looks more interesting. It suggested cower off our metallic parts. And we can even add Trans Percy into them. This and in just a capacity. Okay, here's a wire. So next I will create other wires using the same technique. Okay, I build some wires here is there is nothing new. I make made them using the same technique as I showed you with this wire just with random colors. Now we're ready to move to our last face. Our illustration is almost ready. I want to do is add some final highlights and noon. So these robotic line off vision, of course it's must be. No, it must shining. It might be shining. It must cost some outline neon, maybe some me onto the helmet off course. There who's been there would be a neon around our greed and maybe horizon, and we will do it in the next lesson.
8. Adding Neon FX and Final Polishing: Okay, So are you ready for some noon? Other those? Because this is what we will do it. Now I show you how to apply this neon using gains eg ocean blue, um, on this rectangle and then I will proceed toe are the elements. So OK, basically, what we do is just making us an instance off our object hitting country, Jay. And then we apply lotion blur, and it's That's our neon. All right. What? You can make it more interesting by Brian Trans, Percy to some Mart, for example. Now it looks more interesting. And on top of that, we can add even more noon. Let's draw in the lips. So does choose a color. And let's head again. Zago! Schindler? Yeah, Now we're talking. This is neon. Yes. And we can also add some capacity to make it look more interesting. Yes, like this. So this is a basic technique just blurring the object. It incapacity masks. So I will apply this technique to the greed head to the horizon. And maybe I had some high white to the hermit, - so Ok, our registration is ready. Oh, I wanted to do is the last final Dutch I want to It some adjustment here is some adjustment . Wears a similar to father shop. And I will just add the levels adjustment wear. Let's play with sliders. Yeah, this is what I want. We can reduce the capacity of this effect because it's too much. Maybe something about 50 47 work. This is was out just with Okay, so I think we're down. So here is our retro futuristic illustration full off neon. And it's Obure One heard it 100% vector so he can, you know, recited whatever you want. So that's why I like this program so much. And I wanted to share with you guys off the techniques that I learned. And I hope you you learn something from it. And I hope you enjoyed this course And, uh so, yeah, thank you for joining in, and we shield black
9. Outro: Okay, now we're finished our restoration. I hope you guys like this course. Hope you learned something new because I shared with you all my secrets, especially the secret technique off using highlights and shadows with motion blurs. So I hope you like it for class project. I want to ask you guys, it's not necessary to draw such complex illustration like this across project. You can just draw one object like, for example. But he sleeps One object lips or whatever you come up with on a simple, radiant background. You must apply to this project, and you must acquire to this object Picnics. I showed you that highlights and shadows, you know, and maybe something noon on top of it. So, yeah, that would be awesome. Class project. So I'm looking forward to your works on. Don't be afraid to this question in the discussion board. Thanks for joining in. Bye. See you next time.
 Filipp Ryabchikov, Designer, Illustrator, Music Producer