Transcripts
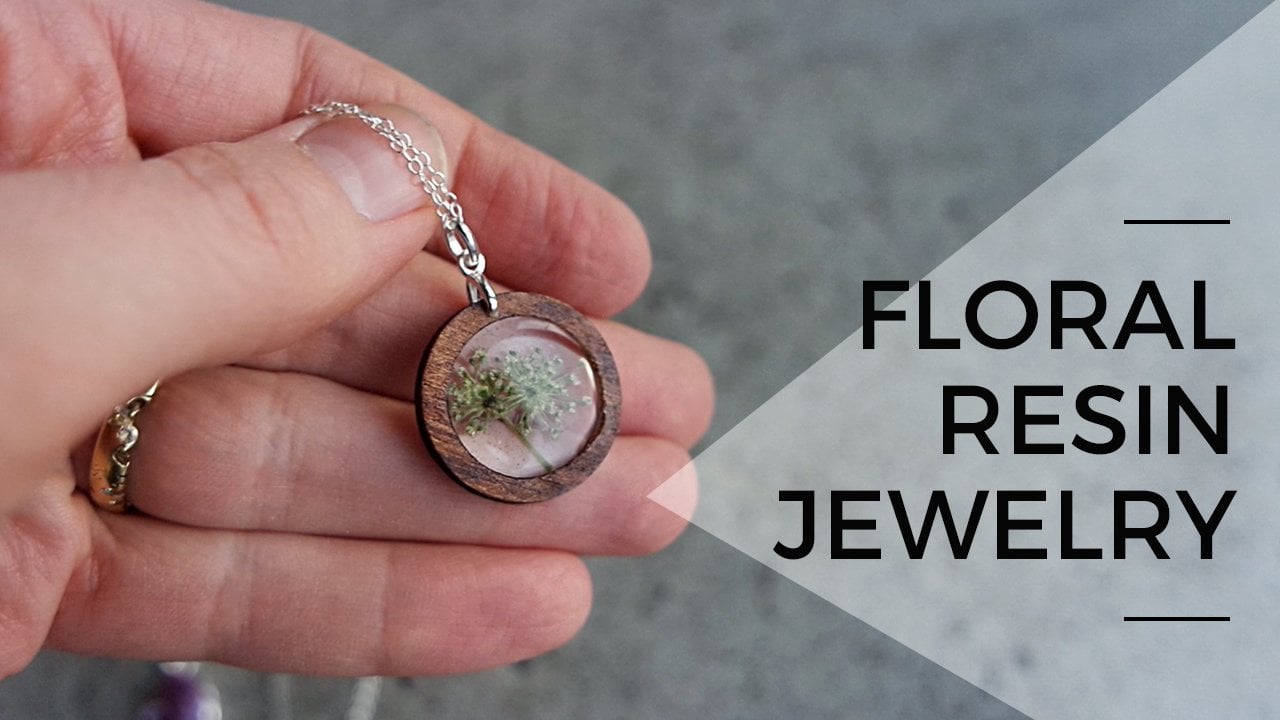
1. Resin Jewelry Introduction: Resin has become really popular these days and is trending everywhere, whether it's Home decor, furniture or Jewelry. Everyone who is looking for something unique turns their heads towards resin. And that's why you're here too. Isn't it? Hi, I'm Roshni and I'm a poet and small business owner from Chennai. I make Resin Jewelry part time and have partnered with Fashionous to bring to you this course. Fashionous is an online platform offering unique products and services related to fashion. So today I'm going to be teaching you how to create absolutely stunning jewelry out of resin. Now, resin is an element that is a chemical, and you need to know how to use it. So we're going to talk a little bit about using resin and making jewelry out of it. We'll also talk about the materials required and where to procure them from. There are various safety parameters to be considered too, and some tips to help you get that perfect form of art. This is going to be a complete guide, from preparing your resin to giving your jewelry a finished look. Let's begin.
2. Materials Required: So welcome to the first lesson, which is about the materials required for this. So when I began, it was around 2020. And out here in India, it is so hard to find the materials because in your local art stores, you're probably not going to find it. So we're going to talk about where you can find it and how to procure them and what are the things to use because there are so many things involved in here. And I will let you know a little bit about it. So these are our materials for making resin. So here we have our resin and our hardener. Usually resin comes in two portions, which is resin and hardener. And you'll have to read your instructions to know how much to use for your pour. So we learn a little bit more about that in the next lesson. But for now, I'm just letting you know because most resins, most brands will ask you to mix one is to one ratio. But here we have to do a one is to three ratio. Next, we have our cup and popsicle stick in which we'll be mixing the resin. Over here we have our mold and we have some bezels over here, which will be the basic structure of how you pour the resin in. Over here, you can see we have a weighing machine. This is because we have to weigh the amount of resin that we use because resin is a chemical component and you have to use it in the perfect composition that has been given. Next, we have our foils, our pigments and our glitters. These are basically used to customize your resin and make it to the color that you want it to be in. And then we have some tape over here which will be added to the back of your bezel. That is to make sure that because these bezels are basically just a frame and you can see that I can insert my hands through it, that's because there is no back side to it. So what we do is we add a tape at the back of it and use it. So that's why we need a tape. I'll explain that more in the next lesson. We have some flowers over here to add it to your resin, some foils, as I said, and that's about it. These are the materials that is required for you, and you can add and remove as you like. But the main materials that you would definitely need is your cup, your popsicle stick, your resin, your weighing machine, and your mold or your bezel. A few other things that you will require while making your resin jewelry is some jewelry findings to add on in the end to give your jewelry a finished look and probably to wear them as well. And another thing for you to know is that we have curated a resin kit for you, which you can find in the description link below.
3. Understanding Different Types of Resin: Before you begin doing resin on your own, I would suggest you try to do a little bit of research because there are various types of resin that you can use, such as epoxy, UV resin, and a lot of other resins. Epoxy is what I use in general and epoxy takes about 24 hours to cure. But when you use UV resin, UV resin takes only about five to ten minutes to cure. And what you use is a UV, such as your Nail Art UV. You can use that. You can buy it on Amazon I will Put some links in the description and you can use that.
4. Understanding What you want to make: So there are various types of things that you can make with resin, as I said in the beginning, such as wall decor, furniture, jewelry. Today what we're going to do is jewelry. And obviously, we all have a lot of ideas when we try to make something new. So it's best to make a mood board before you begin so that you know exactly what you have in the mind so you can buy the materials required for it. I'm going to show you how I use Pinterest to make my own mood boards, and we can go ahead after that.
5. Exploring Ideas: So in this lesson, we're going to learn and understand our jewelry goals, and we're going to figure out what we want to do so that we can invest in the right material. So I'm going to pull up Pinterest, which is great place to find out visual materials and get creative ideas. So what I usually do is I find out other creative artists, and I make sure that I'm getting their ideas and their outlooks to understand what the market is like. So what you could try to do is find out other resin jewelry for inspiration on Pinterest. And you can see a lot of ideas up here, some who've made their own bezels like this, which is very cool. And you can also try out some different ideas like this, where they've just prepoured the resin on top of this grass over here. If you can see there's no bezels, there's no mold, it's just Pre-poured. So various ideas out here you can try out. So now I'm going to show you my own moodboard and what I've added into it. So if you see over here, there are a bunch of pictures of starry night skies. And over here, you can see a color palette of pink and green florals over here, just a pink and gold, people, clothing, etc. So all of these are things that I'm inspired by. And what I do is I try to create things which are similar. So I love daisies, and this is a piece made by someone else where they use the Daisy in the bezels. And these are ideas that you can incorporate into your goals. I love some glitter as well, and I want to incorporate that into my design. So I've added a few glitters. I've added a few glitter images, and you can scroll down and try to check a few more other things. So how a moodboard helps is it gives you a good understanding and a vision of what you're trying to create. And you can add whatever you want. Go crazy with it. Add flowers, add glitters, and a color palette and design. I also had an ocean inspired one over here, as you can see, which I need to incorporate into my own. So have fun with your own ideas and explore and get a good understanding. And you can just do whatever you like.
6. Safety Measures: In this lesson, we're going to be talking about the safety measures of resin. Now, most resins are considered to be toxic and hazardous for your health, except for the epoxy resin, which is what I use. But since it's better to be safe than sorry, I take precautions anyways and suggest you do too. Resin is an after all chemical. To begin with, make sure to read the leaflet that comes with your resin. Each brand might have a different requirement. And if you're using a different type of resin that might have a different requirement to over here they've asked to wipe down the places, whereas it might've fallen with the paper towel. Now when you're working with resin, remember that it is in liquid form and it is bound to fall while using it. If it does fall, you can wipe it off with a paper towel. But something I would suggest rather than a paper towel is a wet wipe because the chemicals in the wet wipe work wonder when it comes to removing your resin from any surface and your hands as well. If it resin does fall on your hand at any part of your body, immediately wipe or wash it off. You can use soap or you could use a mixture of baking soda and vinegar. Now let's talk about the general safety measures when it comes to working with resin, a mask is extremely important. The reason I say that it's very important to wear the mask during using resin is because resin gives out dangerous fumes while we do use epoxy, which is an art resin that is said to not give fumes. I still think it's very important to wear them and protect your lungs because it hasn't can cause lung diseases. And also be in a well-ventilated room so that it can add out and the fumes are in, rotating around the same room. Another thing about YouTube, look forward to is making sure that we don't have any edibles around you under that or no pets or children around you because they tend to come and put their hands in or try to go close to it, which can be quite dangerous. So make sure to keep them away, at least in that period of time when you're using this. Always wear gloves while using resin. This is going to help you avoid making a mess. It's best to use nitrile gloves because they are known to be punctured as a stint in powdered gloves could end up ruining it as NPCs, don't use them. I'll catch you in the next lesson.
7. Mixing Resin: In this lesson, we're going to be talking about the most important aspect, which is mixing your resin. There is a ratio in which you have to mix your resin because resin comes in two components, resin and hardener. And this is the Epoke brand, which I have. So the measurement which is given is three is to one ratio. So you have to use three parts resin and one part of hardener. So we need to first measure because resin is more like a chemical reaction and much like we Bake, it's very important to have the perfect ratio. So I'm going to first switch on my weight and measure my cup, which is 3 grams. I'll tear it now because we don't want to measure the cups. So most people usually put their resin first. But I prefer to put my hardener because it gets easier to mix it. So I'm going to be putting about 15 grams of hardener. So now that we've got 15 grams of hardener, I'm going to pour about 45 grams of resin because we need to put it in the three to one ratio. So now, when it comes to mixing your resin, make sure to mix slowly, because if you mix too fast, you're going to cause too many bubbles to come and we don't want that. You're going to notice that in the beginning your resin is foggy, which is very natural. Just keep mixing for about three to five minutes and you'll notice that it starts clearing up and gives a honey sort of consistency, and that's why you want it. If you do notice some bubbles, don't worry. You can always take that out later. What I usually do is when I'm using my resin and when I put my resin, I try to remove them with the popsicle stick that we're using over here. Or you can also remove them when you're using it and putting it on the mold by putting a flame over it, such as lighter... Probably another minute of mixing. And I think we're done and that's about it. In the next lesson, I'm going to show you how to add add pigments and glitters into your resin. This is going to be the most fun part because you get to make your resin colorful and all of your pieces and customize it to the way you like it. So join me in the next lesson now.
8. Adding Extras: So in this lesson, we're going to be covering the most fun part about doing resin, which is customizing it to making it the way you want it to look. And you can do absolutely anything over here. But I'm going to show you some techniques mix today that I usually do when I'm doing Med edit. So this is where the mood board comes in handy, where you can pick your color palette and what you're looking at, your outcome. So today I'm going to be showing you with some glitters, some pigments and some stars over here and some foils. I've also got a few shells over here because I'm planning to do something that's ocean inspired. So first, just take a little bit of the resume of mix and pour it onto a different cup because you don't need too much for everything. So depending on what you're doing, you can take that amount of presents. So today I'm going to be doing a look that is like a midnight sky inspired look. I'm going to be adding a little bit of purple glitter and make sure not to add too much, because whenever you're mixing in resin, two less is always more. So along with that, I'm going to be adding some blue pigment. Now, I'm going to be taking a fresh popsicle stick, because if it goes inside the paint, it's going to make it hard, which we don't want. So again, less is more. Just put it in and mix it up slowly, because like I said in the previous lesson, mixing it fast will make it have too many bubbles in it, and we don't want that. So I usually use paint, which is normal acrylic spiritual paint. But you can buy normal pigments that has been sold mainly for resin. Or you can also use other powders, such as Mica powders or maybe even alcohol inks. Now how this helps is it gives you a greater color, a more opaque color. But I prefer using this because this gives you a 52 outcome as well. A thing to note is that the more pigment you use, the more darker the color becomes. And it's pretty much done. You can see there are a few bits over there, which happens sometimes it takes a little bit longer to mix. And so now into this, I'm going to be adding some of our little again, poor, just less, because the more you have, it can look too much and it won't come out well. You can see that it looks a little translucent because I haven't added too much pigment. Make sure to put your popsicle stick all the way through the side because you don't want me there isn't leftover over there, which isn't colored done. So this is one which I did with stars and some pigment. Now I'm going to show you with just flip again, put a little bit of resin only what you need. This one I'm going to take something that's a little more metallic pink. Along with this I'm going to be adding some holographic pink glitter, which is a little bigger to give it some depth again. Just mix it thoroughly and get it all in. Remember to mix slowly to make sure that there aren't too many air bubbles forming and that's it so in the next lesson, I'll be adding some foils as well as some flowers and showing you how to pour your resin into your mold and that's.
9. Pouring Resin into Molds & Bezels: In this lesson I'm going to teach you how to pour your resin into your molds and your bezels. So I have here some resin that I've mixed and added some color and stars and glitter. And this is a night sky inspired one if you had noticed from my moodboard. So I'm going to use this in this mold and what I'm going to do is because it's a thin mold, I'm going to very slowly pour it in to make sure that it doesn't come off. Notice that some bubbles have come through. That's completely alright, we can remove that. That was one Earring. I'm going to be pouring for the next Earring now. Notice that a few more stars got in this one. So I'm going to be putting it into the other one as well to make sure that there's equal number of stars. Make sure to fill up your Dome all the way to the top in such a way that it looks like it's going to overspill. It usually won't. Just make sure that it doesn't overspill. But do try to fill it up all the way till the end or else what happens is your resin is going to look like it's dipping and you don't want that look. Now what we're going to do about these bubbles over here is either you can give it a little tap when it's a big one and it'll blast. As you can see that this one didn't. So just put your popsicle stick in and try to pick it up and you can probably put it back into your cup. There are a few bubbles here as well. So I'll fish those out and I think we're done. What you can do about these baby bubbles is you can run a flame through it. I'm just going to let them arise to the top to make sure that they are on top and not in between the resin because then it will not blast. So this was the first earring and this is basically a night sky inspired one. So I'm going to do the next one which is a pink glittery fun one. I'm going to use this mold for that.. going to give it a little glitter on top because what happens when you use glitter is sometimes they end up going to the bottom and staying there. Now I'm going to be putting this in here. You have your first one ready. You can see that there are lot of bubbles here again. This is probably going to take a lot of time if you try to remove it. So the best thing to do is wait for it to rise and then after that, run a flame through it. So for the next one what I'm going to do is I'm going to use clear resin and then add in some of these flowers that are there over here. So these are really small flowers and they can look very pretty once you put them in the resin. What I suggest is either using a tweezer or a popsicle stick to put it into your resin. As the bubbles are extremely tiny, they're very hard to pick up, but take your time to do it and then push it all the way to the bottom because what happens sometimes is air bubbles start to form from underneath the flowers, so it helps to push it to the bottom. They do float because, well, these flowers are very light. These are press-dried flowers which you can buy outside and they come in various colors. They're very pretty to add into your resin and they're natural flowers as well. So into this, I'm going to give it a little glimmer and add some gold foil to it. In the end, it's up to you what details you want to add, but I really love working with flowers and gold foil. So this is what I'm using today and we're done with the molds. Next I'm going to be showing you how to use the bezels. As I said, there are bubbles that have reached the surface now so I'm just going to use a lighter to blast them. And what you do is you basically light it up and then just run it a little closely. Make sure to be careful with your hands. Resin is flammable so don't go too close. And we've lost all the bubbles now. So I will carefully keep this aside. Make sure to cover your resin because if dust particles fall, they will get trapped with the resin. Another thing to know is that different resin will take different amount of time to cure. This resin which I've used right now takes about 24 hours to cure. Some take just 6 hours while others take longer. So you can do it according to yours and make sure to read the instructions for that. So I've cleaned up my area now and I've got my bezel here. So this is basically an irregular shape and I have changed the shape a little bit. So what I'm going to be doing right now is using this tape to add at the bottom of this and give it a little base because you can see that this is a frame, just a metal frame and there is no back side. So if you put the resin, it's just going to go through. So what you do is you give it a little back which is done by this tape. So what I'm going to do now is adding this bezel on here carefully making sure that it's filling all the sides and then I'm going to cut it. So make sure to completely press it down on all the sides so that nothing is popping out. And make sure not to get any fingerprints on the center of your bezel where the tape is because then that will come onto your resin and you don't want that. So now I'm going to take a popsicle stick and slowly put on some clear resin onto my bezel. Make sure to wait until your resin thickens a little bit so probably once you mix it - about ten to 15 minutes should do. This would make it a little thicker. Resin has just 45 minutes of work time so once that 45 minutes is over it's going to be very hard for you to work with resin. So make sure not to wait too long as well. So I'm just going to add a first layer onto my bezel. I've cut my flower in half and I'm going to be adding it onto my bezel now. And if you'd like you can also add a few more flowers onto the sides. So I'm just going to cut some yellow flowers and put into it. The bezel is ready. Now make sure to carefully take this off and keep it aside and cover it.
10. How to do your Own Flowers: You can also use dried flowers. I'll show you a tip on how to dry your own flowers by yourself now. So an easy way to preserve your own flower is to take a book and add in a wax sheet in here or a baking sheet. You can take a flower, a fresh flower. This is a dried flower. But I'm just going to show you an example of an already dried flower. So you add in your flower in here and you close it and put a weight on it for about two weeks. And once the two weeks are over, you're going to be able to open and have beautiful dried flowers such as these. But you can always buy dried flowers outside. There are many materials you can get for resin jewelry outside. And I'll link that all in the description.
11. Demolding and Doming: In this lesson, I'm going to teach you how to demould resin pieces. So since resin takes about 24 hours to cure, I have already made a few pieces prior to this and brought it for you here today, which are these pieces you can see on the screen right now. So I'm going to carefully demold them and make sure not to damage the mold. So you can see here, there's this little dot over here, which is for instead of drilling and just making the hole, you can use molds like this, but this is something you need to be very careful about while demolding because they're easily torn as they're such a small part. So what you can do is just slowly, carefully push it from the bottom and you can pick it up. And just be careful when you're removing it from there. That's it. Demolding is a pretty easy and self-explanatory thing, but just going to showcase it to you anyways. So these are more smaller pieces over here and just be a little more careful with them. It can be a little tricky sometimes. You can see that some of my glitter sank to the bottom, which is why we always prefer to do it into the bottom rather than the top. Now you're going to notice in pieces like this that it sort of dips. And this is because you don't end up filling it all the way to the top, or sometimes it's just because the resin sort of shrinks once you put it on. So what we usually do is a process called Doming, which is putting a layer of resin over it. So since this is to have a 3D effect, I'm not going to dome it. I think it looks pretty cool. This is supposed to have like an ocean inspired look. So I'm going to do it on this one. So how we generally do this is we take the resin and use the popsicle stick and put a layer of resin over it to give it a clear coating and an even look. Now once you put a resin over it, just slowly push it onto the side, because if you're going to pour your resin, it's going to just fall over and you don't want that. Be careful when you're doing this to make sure that there's no spillage and it's all done. So a great doming alternative is standing. Now you might see a lot of resin artists out there doing sanding. So I'll explain a little bit about it, but I personally don't prefer sanding because sanding is quite a tedious and time consuming process. So sanding requires the materials such as sandpaper and obviously your resin. So what you do is you need a few grits of sandpaper from highest to lowest. You can check that out on the Internet, but I'll explain a basic thing about it. So you take your resin piece and you rub it on your sandpaper and this will give you a cleaner, smoother and straight finish. Now what you can do after that is add a little bit of Polish to make it look clear because sanding can sometimes make it look a little foggy and you're going to get a beautiful resin piece in a professional finish. Join me in the next lesson to finish our jewelry.
12. Finishing the Jewelry: Now that we've got our resin done, we are going to start adding in our jewelry findings and completing our jewelry. Here. I've got a two piece earring and I'm going to fix them them together first with a bunch of jump rings. So now to open your jump rings, you're usually going to find them closed when you buy them. So to open your jump rings, use pliers and open them like this. And then you can start adding in your pieces. Sometimes when your resin is thick, going to take a little bit of time to push it in there. So just wiggle it around until you've got your jump rings all the way inside. Then you can get them back into the shape that they were in. You can straighten this one a little bit so it's easier to put into this. That was much easier to put in. Going to do the same for the second piece. Now that these are done, I'm going to be adding these holders at the back as earrings. So I'm going to cut these in half because we don't need the earrings to be so big. And I'm going to stick these at the back like this. What I'm going to be using is a is a super glue. Be careful while handling these because they can stick your fingers together. Then put it on there. Probably hold it for a minute until it is fixed. Take another one now and stick it on there. You can see that this one turned out to be a little wonky. So I'm going to be a little careful while putting this one in and make sure to put it right down the center and just leave it on there for about five minutes. Make sure not to put the earring back or touch it until it's completely dry. Otherwise it could end up coming out. So next, this one is a very easy piece. All you really have to do is add a jump ring in there and then attach it. And then you can attach it onto a necklace. So for this one, I'm going to be adding it onto a pearl necklace to give it that ocean look. And I've got this one ready. Going to do the same with this bezel. Just going to add it onto this necklace over here. This jump ring, which I'm using right now, is quite a flimsy one. So I can really just move around with my hands. I wouldn't recommend using the flimsy jump rings because they do come out often. So this is the same thing. And over here, what I'm going to be doing right now is I'm going to be adding these rain drops over here, but you can see that there is no hole or anything over here. So what I'm going to be doing is I'm going to make a hole and I'll show you how you can do that as well. So you basically just take a pin and then you heat it up and you're going to use this pin to make a hole into this resin piece. So it's going to take a bit of time. Make sure to keep the pin in the blue portion of the flame because that's the hottest part and do be careful with your hands because the flame can be quite hot. Always make sure that your resin is completely hard and dry and you followed your instructions and cured it completely. Curing is the process in which resin becomes hard, so make sure that you have done that properly before you start this process or else you're just going to have your fingerprint marks all over your resin and you don't want that. So now I'm going to be taking this screw pin and I'm going to screw it on there. An alternative to doing this is using a drill bit I had a bad experience with the drill bit. One of the drills broke, so I stopped using them and this is an alternative that I use personally. I think it's much safer so you can use it accordingly. We are going to do the same to the other one and I'll skip showing you that and just do it straight away. Okay so now I've finished adding this as well onto the next piece. Now I'm going to be showing you how to add in hooks which is pretty much the same process really. Add in your hooks I mean add in your jump rings and then add in your hooks into that. Make sure you're adding it in according to how you want your earring to face. So I want mine to face this and so I am putting my hooks on in the same direction. Now I'm going to do the process with everything else and then I'll show you the finished products.
13. Conclusion: And that's it. We've reached the end. I hope you enjoyed this, and I'm sure this course has got you excited to try out resin with your own creative ideas. With all of the extras we spoke about earlier, you are a creator and a designer of your own stunning jewelry. Remember, there's a link in the description if you want your own designer kit for making resin jewelry. So this is the perfect choice if you want to start your own resin business or maybe pursue a new hobby or gift something beautiful to your loved ones. Feel free to ask us any queries. We're always here to help you. Good luck on your resin journey!
 Fashionous India