Transcripts
1. Introduction: Hey, everyone. I'm Chris, and I've been making
and producing my own art toys for
about five years, basically turning sketches
into tiny resin creatures. In this class, I'll
walk you through the entire process of making a resin art toy from
start to finish. We'll go from a simple sketch to sculpting with polymer clay, making a reusable silicone mold, and finally casting
the toy in resin. By the end of the
class, you'll have your very own resin art toy and the know how to make
more whenever you want. Whether you're brand
new to toy making or just want to see how
the whole process works, I've got you covered
step by step. So grab your materials and let's bring your first
resin toy to life.
2. Part 1 - Sketch your character: Time to bring our idea to life. Grab your pencil and paper. Let's sketch out our art toy. For this one, I'm going
for something simple, but still cute and
a little whimsical. I'm thinking of giving
it some kind of mask just to add
a bit of mystery. Giving your character
unusual looking eyes can really make them stand out. I'm going for a skull
vibe with the mask, so let's give him those
fun cartoony skull teeth. And there we have it,
a mask that's simple, cartoony, cute, and
totally iconic. What do you guys think? Alright, let's move
on to the body. I'm keeping it simple
with an oval shape to match that chibby look we've
got going on with the mask. If you're designing
a cute character, checking out kids
books and cartoons can give you tons of
great inspiration. Now we're moving on to the arms. Again, let's keep it simple. It'll save us a lot
of headaches during the sculpting and molding
process later. I get it. You probably want your first toy to be super detailed and fancy, but trust me, complicated shapes can lead to a lot of
frustration later on. So let's keep it simple for now. Simple is not a bad thing. In fact, simple is awesome. It lets you focus
on the fun parts without getting overwhelmed. I mentioned earlier that I
want my character to feel whimsical and what's more whimsical than a pair of
strange, crooked looking horns? Horns can be surprisingly effective on
whimsical characters. They instantly add a touch
of fantasy, mystery, or even a bit of playfulness, depending on how you shape them. I'm going for a furry
character this time, so, yep, we're adding
fur everywhere. I've made some twigs
here and there, and now our character
design is done. How about you?
How's yours going? For the next one, we
will start sculpting.
3. Part 2 - Sculpting: Blocking the main shapes: Hey, there. Welcome
back. Ready to start playing with some clay? Hold up. Before we
get to the clay, we need to block
out the main shape with some aluminum foil first. Right now, we're just
establishing the base shape. This helps us save clay and
keep things lightweight. Aluminum foil is easy to shape, and it also helps during
the baking process. That's why it's the
perfect material for building the base. Okay, looks like we've
got the size right. Since we're going to
wrap this with clay, make sure to leave
a bit of allowance. I use super sculpti firm
for all my sculptures. It's very beginner friendly, and you just bake it in
the oven to make it hard. I like to smooth the clay with
my fingers first and build it bit by bit rather than slapping on big
sheets right away. This helps make the
shape more solid and prevents air pockets
from forming inside. The goal for now is to add an initial layer of
clay over the base. Make sure to cover the
entire surface evenly. Let's check the size again.
Looks like we're on track. But we need to make
the head a bit bigger, so let's block in
with some more clay. O. All right, now it
looks just right. All right, time to blend
and smooth the clay. We want it to look
clean and solid. For that, we'll use
a wooden spatula or any tool with a
flat but soft edge. Simply run your spatula tool over the uneven surface
to smooth it out. Another effective smoothing
tool is a rod like this one. You can use a pen
or any round stick you can find in your kitchen. Simply press it
against the surface and roll it gently to
smooth things out. Give it a few good
rolls and you'll see the shape starts
looking super smooth. I'm going to bulk
up his tummy with some extra clay because I want
him to look super cuddly. Now that we have the
general shape of the body, let's move on and start
making his feet. And
4. Part 3 - Sculpting: Feet: Out characters feet
are very simple. We'll start by
rolling up some clay. Make sure the amount of clay you roll is enough
for both feet. We'll use our sketch as a
reference for the size. Once we have the right size, we'll cut it in half
to make both feet. Next, we'll make one
end slightly smaller. You can do this by
rolling the clay a bit more and pressing one
end slightly harder. I've trimmed it and cut the larger end at a
slight angle like this. That angled cut
will help us attach the legs more seamlessly to
the character's round body. Then, of course, I did the
same thing for the other leg. All right, time to attach
the feet to the body. Just press it onto
the bottom like so and make sure the legs
are nice and symmetrical. I'm using my spatula
tool to blend the feet into the
body, nice and smooth. To smooth out the surface, I'm using my rake tool. It really helps remove the
seam lines completely. So it all looks like
one clean solid piece. A rake tool is basically a looped guitar
string on a handle. It rakes the clay, which makes blending and
smoothing a lot easier. I decided to trim the feet a bit more to improve the
balance of the figure. In the next part, we'll
work on the arms. See you there. Two.
5. Part 4 - Sculpting: Arms: All right, this part's
going to be super quick. The arms are very simple. When it comes to symmetry, a good trick is to prep
enough clay for both sides, then just cut it in half. That way you know they'll
be the same size. For this part,
we're going to make two long teardrop shapes. Just roll each one out and press a little
harder on one end. That'll give you that
nice teardrop shape. All right. Now that
the shapes are done, just pop them onto
the body like so. Then blend the shoulder area where the arms meet the body. Let's talk about
patience for a second, because sculpting really
teaches you that. It's easy to get excited and want to rush
through the process, especially when you just want to see the final character already. But trust me, the magic
happens when you slow down. Take your time with each step, whether you're shaping, smoothing
or adding tiny details. Don't worry if it's
not perfect on the first try. That's
totally normal. You can always adjust, reshape, or start over if needed. What matters is enjoying the process and letting
yourself learn as you go. Some parts might
feel frustrating, especially when things
don't come out the way you imagine, but
that's all part of it. So breathe, take it
slow, and keep going. You've got this. Okay, I told you this part
would be quick. Next, we'll start
working on the mask.
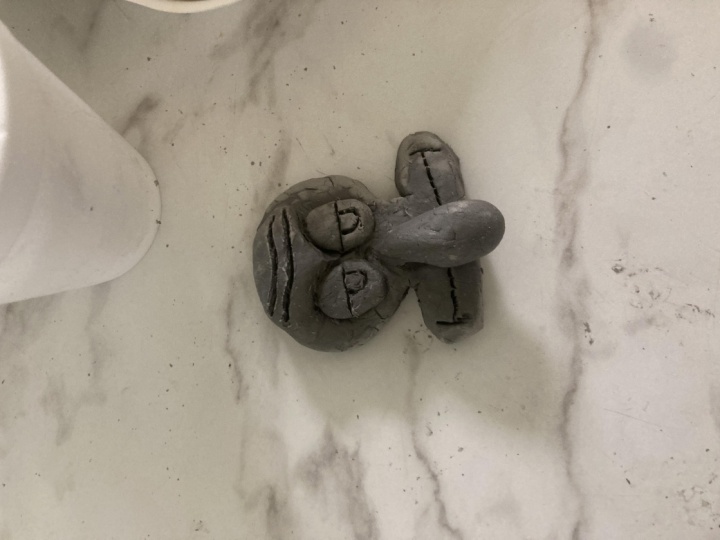
6. Part 5 - Sculpting: Mask, Horns, Fur, Finishes: Let's start with the mask. First, we'll need a flat
piece of clay to work with. Nothing fancy yet.
Just roll it out evenly so we have a
nice space to shape. Now, just place it right
where his face would be, making sure it sits
nicely in the center. Let's take one more
look at our design. You'll notice the mask has a line running through the center, so let's add that
detail as well. To do that, just place a strip of clay
right in the center, then blend and
flatten the sides. When blending, you only
need to focus on the sides. The goal is to make
the added piece and the main piece look like they
were always best friends, one single piece,
no awkward seems. The wooden spatula is perfect
for blending because it has just enough friction to gently pull and push
the clay along, kind of like it knows
exactly what to do. Oh. For the eyes, we're making our very own
punch tool, fancy name, but really it's just a
tiny shape we'll use to poke the clay to create
symmetrical eyes impression. Right here, I'm making
a cylinder shape because eyes are
generally round. Then I give one end
a distinct shape. This will be the tip we'll
use to push the clay with Now that our punch
tool is in shape, let's bake it and
lock this guy in. We'll bake it at
under 150 degrees Fahrenheit for about 3 minutes, enough to set it, not
cook it like a snack. After 3 minutes, we have
our punch tool baked, ready, and officially
promoted to tool status. I'll send it just a little
bit just to keep it nice and flat. No fancy shaping. We're just giving
it a quick tune up. Oh. Now we can finally give
our character his eyes. Simply press it gently depending on how deep
you want the eyes to be. No need to rush. We're not
trying to surprise him. Next up is his mouth. I'll simply cut a zigzag shape to give him those
skull style teeth, nice and jagged, just like this. I'll just refine it and
soften it a little bit. We don't want the
fangs to be too sharp. He's supposed to be a cute
little critter, after all. If you remember from our sketch, our character has
these whimsical horns, and that's what
we'll work on next. I'll roll out a piece
of clay that I've estimated will be
enough for two horns, then divide it in half. This way, we get equal
amounts of clay, which helps keep the horns
nice and symmetrical. I roll each piece
into a cone shape, then gently bend it into place. Slow and easy. No need
to wrestle the clay. And then we can simply attach them to our
character's head, just like this instant
personality upgrade. For his fingers, I'm
keeping it simple. Just add three tiny little
cone shapes on each arm. For the feet, I start with a sphere, cut it in half, and then trim just enough of
the tip for each foot. I used the tip of my
wooden spatula to add a little separation for his toes just enough to show
their cute little digits, not a single blob. Next, we are going to
add some fur on our guy. To do that, I'll
prepare a small pair of strip like this and
attach it like so. These should always
come in pairs with one strip slightly
smaller than the other. Blend the flat end into
the body like this. We'll add these at different
points on his body. No need to cover
the whole thing, just enough to suggest
he's a furry little guy. To This part gets a
little repetitive, so I'm just going to skip
ahead to the last piece. With the fur in place, it's
time for the cherry on top, a tiny adorable tail. And just like that,
our sculpture is done. Now it's
time to bake it. Pop it in the oven at 150
degrees Celsius for 5 minutes, just long enough for our little guy to get
cozy and firm up. After baking, I give it a little sanding to
smooth out the surface. I use a sponge sanding pad. It's perfect for following
the curves, corners, and edges, so everything
comes out nice and even. After sanding, I give it
a coat of gray primer. This helps create an
extra smooth surface. And there we go. I'm pretty
happy with how he turned out. Can't wait to see you in the
next part. More fun ahead.
7. Part 6 - Mold making: This part, we're going to make the rubber mold that we'll use to make copies
of our character. First, we need a platform. This will keep our sculpture secure while still letting
us move it around a bit. Perfect for getting
the best angle when we pour the silicone. Think of it as a little
stage for our star. Next, we need a container
to pour the silicone into. I use a thick, transparent
plastic cover. Using something clear lets
me see exactly where to pour and I can easily adjust
it to the perfect diameter. The silicone needs to be at
least 1 centimeter thick. So make sure the container is about 1 centimeter
away from the model. Once I've got the size, I secure the container with tape to prevent the
silicone from leaking. Now that our container
is prepared, let's set it aside
for the moment. This is the silicone mold. You'll have a part
A and a part B. We mix equal amounts to
start the chemical reaction, which will make it solidify. I usually apply a thin
layer of silicone on the model before pouring the main batch and submerging it. Let's start by mixing
a small batch. I grab a paint brush and give the model a
nice silicone coat. This little step makes sure
the silicone sneaks into all the tiny corners and
captures every adorable detail. No part of our sculpture
gets left behind. Three. I'll let it solidify for about an hour. The exact time depends
on the room temperature. Now it's time to submerge
the module in silicone. First, I secure the container
in place with hot glue. Be generous with
the glue and make sure there are no gaps
for the silicone to leak. I prepare a larger
batch in bigger cups. You don't need to pour the
entire amount at once. If the first batch isn't enough, you can repeat the process until the model is
fully submerged. Do not pour the silicone
directly onto the model. Instead, pour it at the bottom of the container
and let it rise up. This helps prevent air pockets. Make sure to pour at least 1
centimeter above the head. This thickness is
necessary to prevent the mold from wobbling
and deforming the cast. Let it cure overnight
to ensure it's fully set before removing
the container support. Now we'll cut from the bottom
in the zigzag pattern. The zigzag pattern helps
the mold snap back into shape rather than
sliding around and deforming. Start cutting far
from the model, the gradually work your
way closer to the surface. Once the space is wide enough, gently pull the model out. Now all that's left is our mold. As you can see, it snaps
back into shape perfectly. That's it for this part. I hope you're following
along just fine. I'll see you in
the next part. And
8. Part 7 - Casting: In this part, we'll cast
our first resin toy. First, let's prepare
our mold for casting. I apply a bit of baby
powder which helps the resin flow into
the small crevices and capture all the details. Then I secure the mold with a rubber band tight
enough to keep it closed, but not so tight that
it deforms the mold. I use a fast curing resin, just like the mold material, it requires equal
amounts of part A and part B to start the chemical
reaction and begin curing. Because this is a
fast curing resin, we need to work quickly. Mix the two parts for
about 15 seconds only. Pour the resin into 1 ft only. This allows the air to
escape from the other end, helping prevent air from getting trapped and causing
an incomplete cast. From time to time, I gently squeeze the mold to help
draw the resin inside. After about a minute, you'll notice the resin
starting to cure. Wait another 30 minutes
before demolding. After the weight, gently
crack it open and celebrate your resin
toy is officially born. Welcome to the
world, little guy. Obviously, we need to remove
the excess resin that built up under the feet and chip away any extra in the crevices. This can usually be done
easily with an acto knife. You can give it a quick sand
to make it extra perfect. Then just rinse and repeat
the process to cast more. Before you know it, you'll
have a whole resintoi army. In the next part,
we'll check out our final creation and do a little recap of
everything we've learned.
9. Part 8 - Finished Product: There we go. This is
the finished piece. In this build, you
learned how to create toy from clay to mold to resin. You now understand
the full process. You saw how to demold, clean up, and finish your cast, so it actually feels like a real finished product,
not just a prototype. Now that you know the workflow, you can create
anything you imagine. Imperfections included.
That's what makes it real. Thanks for sculpting with me, and I'll see you
in the next build.
 Cristopher Dino