Transcripts
1. Remove Blemishes Sensor Dust and more in Lightroom and ACR - Introduction: Hello, I'm Helen Bradley. Welcome to this Graphic Design for Lunch class, removing blemishes, sensor dust, and more in Adobe Lightroom and Adobe Camera Raw. In addition to teaching Illustrator and Photoshop, the Graphic Design for Lunch series of classes also includes some photo editing and photo management classes. These are taught for both Lightroom Classic and Adobe Camera Raw as both applications share the same base code. This means that within one class, you'll simply focus on whichever application you prefer to use. Today we're removing problems in photos, everything from zits to unwanted elements and we'll also look at the special case of removing sensor dust. Now, I'm going to do quick fixes on four separate images, each of which has a different problem and I'm going to use the exact same images in Lightroom and Adobe Camera Raw so choose the video that you need to watch depending on the application that you're using. In the class project area, you're going to see download links for the images that I've used so that you can download these and follow along and practice making these edits. As you're watching these videos, you will see a prompt which lets you recommend this class to others. Please, if you're enjoying the class, do two things for me. Firstly, give it a thumbs-up, and secondly, write just a few words about why you're enjoying the class. Recommendations like this help other students at Skillshare to say that this is a class that they too might like to take. If you'd like to leave a comment or a question for me, please do so. I read and respond to all of your comments and questions, and I look at and respond to all of your class projects. Now if you're ready, let's get started removing blemishes from images, first of all, in Lightroom. Secondly, in Adobe Camera Raw.
2. Pt 1a Lightroom skin blemish removal: This is the first of the four images we're going to look at, and in this case, skin blemishes are what we're looking at. I've clicked on the image to zoom it and now with the hand visible, I can just move it around to position the problem area where I can see it clearly. I'm going to the spot removal tool and I'm going to adjust the size of my brush so that's going to cover the problem areas. Now you can see that going backwards and forwards to the size slider is going to be a bit of a time consuming thing to do. So it's wise to learn the open and closed square bracket case, because that allows you to increase or decrease the brush size on the fly. Set your feather to somewhere around 30 to 40. We wanted to have a soft edge but not be too fluffy at the edges and the opacity at a 100 percent. For this we're using heal. We're going to say clone work in a minute, but for now heal. So what you're going to do is just click on the problem areas and Lightroom is going to find a fix. So this is the problem. This is the fix. The two circles will always be identical in size and they can be dragged around. So I can take the fixed closer to the problem area so that the skin tones are more likely to be similar. I can also resize this so I can make it larger or smaller. But the two will always be identical in size. If you ever need to get rid of one of these, you can just click on it so it's selected like this and just press Backspace and it will disappear. So let's just go around and quickly spot the worst of this girl's skin. I'm just keeping an eye on the area that Lightroom pixels are fixed and if I don't think it's particularly good, I can just move it into the position that I think it should be in. I'm just adjusting the size of my brush to match the problem areas as I go and just making sure that Lightroom doesn't select a problem area as a fix because that's just going to be duplicating the problem. So let's just quickly say what this is going to look like. When I'm finished doing my first pass at the skin, I'll just click "Done" and I'm going to zoom out. Then I can use the backslash case so we can see the before and after. So the Spot Removal tool is really good for skin blemishes like this.
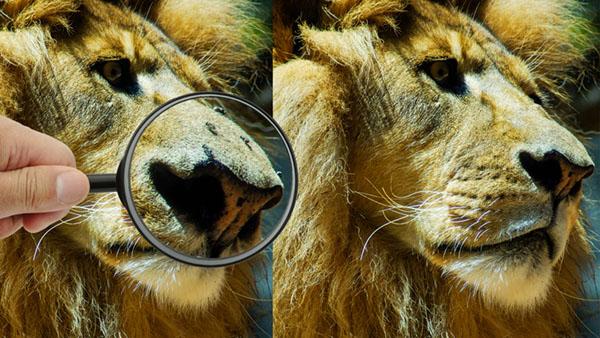
3. Pt 1b Lightroom Using Clone and Heal for object removal: This is the second image we're going to look at, and it's a lion shot at Taronga Park Zoo. I'm zooming in here and just moving the image into position, and I'm going to remove the flies from this lion's nose. So I'm going to the spot removal tool and I'm just going to start working on this area here. Now in addition to using the Spot Removal Brush as I circle, it's also possible to paint it on. So you may find that that's useful when you've got larger problem areas. Now everything's pretty good so far, but we're going to have problems here on this fly and this fly too. Because if I select this fly and try and do a match, the chances are I'm not going to get a nice edge that I need for the lion's nose. So I'm going to click Done and I'm going to go back to my Spot Removal Tool, and this time, I'm going to use clone. Because cloning rather than healing is more likely to allow me to keep the edge on this lion's nose. So I'm going to click here just to start the process, and you can see that Lightroom has picked this area here, and all I need to do is just to adjust its position slightly, taking into account where it's being applied here. Let's click Done. Now I'm seeing a little bit of harshness around the edge here. So I'm going to come in here and I'm going to increase the feathering a little bit, and I also might dial down the opacity just a little bit so that I don't see that edge, and let's click Done. That's looking a bit better. Let's try for this fly here. So I'm just going to paint over it and then look at the fix. Now the fix that Lightroom's found is not particularly good. It was a reasonable position on the lion's nose, but the fix wasn't moved in quite the right location to get this seamless transition. So I'm going to click done. Now if you hadn't known that there were flies on this lion's nose, I don't think that you would notice that they have been removed. Let's have a look at the backslash key, this is the before and this is the after. In this case, there was a very good argument for using clone instead of heal particularly on the lion's nose where we've got a hard edge that we want to maintain. The next image we're going to look at is one where we want to remove things just for aesthetic purposes. I'm concerned about these shadows in here. So I'm just going to position the arrow on the screen Spot Removal Tool. Just make sure it's a pretty good size and paint over this problem, and paint over this one here too. Just check to make sure that the problem is well gone away. Now down here, I also want to get rid of this. So again, back to the Spot Removal Tool, I'm just going to paint generously over this problem area here. Now there isn't much greenery around here in the visible area for Lightroom to use, so it's going to use some pretty funky stuff here. Well, I'm just going to take this with me and head out over here where I know that there is plenty of clean green area for the image to use. So I'm going to click done, but just head back here to make sure that Lightroom has applied the fix pretty well because sometimes it might need just a little bit of tweaking. Down here, there's another area I want to remove. So again, Spot Removal Brush and just paint over the problem. This time the solution is much closer. I'm going to zoom back out and let's have a look at the before with this shadowy bits and these pieces down here and after they've been seamlessly removed.
4. Pt 1c Lightroom Sensor Dust Removal: The last image that we're going to look at is plagued with sensor dust. Let's just zoom in here and have a look and say what sensor dust looks like. Typically, sensor dust is little dark splotches in areas of the image that should be even in color. This is probably sensor dust here as well and there's a bit over here. It occurs when you've got a dirty sensor in your camera and either you need to clean it yourself or you send it away to be cleaned. Now, sensor dust can also be little hair, so you might see it as hairs. Your camera will probably have some feature that allows you to look for sensor dust and identify if you've got it. Lightroom luckily has the tools for getting rid of it if you don't catch it and it stuck inside your photos. Sensor dust removal is basically the spot removal tool but there's an extra tool in Lightroom that helps you get rid of sensor dust and it's down here and it's called visualized spots. What you're going to do is turn this on and when you turn on visualized spots and adjust this slider here, you can see the spots in the image and you're looking for spots in areas of light or even color. There's a sensor dust spot. Here's another one, and here's this one here. We can now see them more clearly than we could perhaps on the original color image because Lightroom has this special tool that helps us identify where sensor dust might be. I've got my spot removal tool selected, it has to be for you to be able to visualize these spots. My brushes not nearly big enough so I'm going to size it up with the square bracket K. I'm going to click here on this dust problem and then I'm going to find perhaps a slightly better solution for it. Let's go for this one and let's have a look at this one. Now, if we think that we've cleaned up the sensor dust, we can click Done and that will take us back to the original color image and we can zoom in and just see if we can see where we made that fix and I can't see the fix at all. Let's zoom out and now let's see the before and after. This is the before, there's a dust spot there and there and one over here and after then the sensor dust has been removed. The spot removal tool does a really good job on these problems. Skin blemishes like we saw in this young girl's face. It also did a good job of removing the flies from the lion's nose. We used it to clean up problems around the edges of this image and it was also handy for removing sensor dust from the sky in this image. These small jobs are really the ideal jobs for the spot removal tool. If you need to get rid of a light poles or light wires or anything that is significantly large, then this tool really isn't designed to do it and you're much better off taking the image into Photoshop and doing the job there with the more sophisticated tools that Photoshop has for fixing large areas that are problems in an image.
5. Pt 2a ACR Using Clone and Heal for blemish and debris removal: This is the blemish image that we looked at in lightroom and now we're going to look at it in Adobe Camera Raw. The blemish removal tool is up here. It's called a spot removal and you're going to click on it so that you can make adjustments to the image now. The image is way too small here. I'm going to take it up to about 100 percent so I can see the problem here as more clearly. I'm going to hold the space bar so I can see the hand and move the image into position. Now, the spot removal tool has some options and we're going to use the heal option. It's one of the two options. We'll use clone in the next image, but heal's going to work here. For size, you can adjust the size using this slide. But really, if you're going to be going and adjusting the size of this brush all the time, it's much easier to learn the keyboard shortcuts for the square bracket keys. The open square bracket key makes the brush smaller, the close square bracket key makes it bigger. You want a feather of somewhere between 30 and 40. It's quite a good setting here, and you want your capacity at 100 percent. With this brush, you're just going to click it once. That's going to make a circular fix over the circular blemish. This is the blemish and this is the area Adobe Camera Raw has chosen to fix it. If you don't like the fix, you can move it around. You can also move the blemish around and you can resize it. The two circles are always going to be the exact same size. The problem in the fix are always the same size. Now, you can just go through without finishing up with this tool and just click on the problems that you're seeing in the image. You just want to keep an eye on where Adobe Camera Raw has chosen the fix, because sometimes it will get it wrong and actually use another piece of blemished skin as the fix and you don't want that to be the case. When you need to move hold the space bar, that gives you the hand, you can just move the image around. That's not a very good fix, and that's pretty bad as well. Typically, what I will do is fix things that won't be still there next week, but leaving in things like freckles and moles because they are a permanent part of a person's skin. When you're done, you can just click away and select a different tool. The next problem we're going to look at in Adobe Camera Raw is this one, where we have a line that has a number of flies on his nose. We're just going to zoom in here so we can see them clearly. Now, the spot removal tool use the way we used it before. Just clicking on this is not going to deal with this fly. We're going to paint on it this time. We're actually going to use it like a paintbrush to cover up the problem area, and then when I let go the left mouse button, Adobe Camera Raw is going to make a pretty pathetic job of finding a solution for this problem area. Well, all we need to do is to just go and put it in the right place, a place that is giving us a better result. Now I'm going to do this fly the same way. Adobe Camera Raw has done a better job this time. Let's look at this one here. That's pretty good too. I'm going to click away from that too so we settle those fixes and look at these two flies here. With these two flies, we've got the harder edge of the lion's nose to deal with. For this, we would do better if we switch from heal to clone. I'm going to leave the other settings at this stage the same, and I'm just going to brush over this fly here. I'm going to look at the fix here. The line of the lion's nose is slightly out. I'm just going to move this fix around to see if I can position it just a little bit more evenly across the lion's nose. Now, if you don't pick clone before you get started with this brush, don't worry because you can easily change it to heal. So you can use heal or clone by just selecting this. Then let's have a look at this one here. I'm just going to draw around it and again, just double-check to make sure that Adobe Camera Raw has picked a good spot. It's not a really good fix. I'm just going to move this a little bit further into the lion's nose to try and keep this line here working a little bit better. Then I'll just click away from the tool. I'm going to zoom back out and then let's have a look at the before and after here. I have the Camera Raw defaults for this image, and that is the lion prior adjustment and with the flies on its nose and here is the finished result. The image itself is adjusted and the flies are removed. Now let's look at this image here, because in this case, all we want to do is get rid of some of the things that we don't like in this image. I'm just going to zoom into this area here on the side of the image. Again, I'm going to the spot removal brush, this time probably heal, and again, I'm just going to paint over this area, and paint over this one too. Going to hold the space bar down and go down to this problem area here. I'm going to paint all in to the very bottom of the image to get rid of these little branches here. Now, the sky would not be an ideal fix for that area, so let's just take that with us as we head over here to find a much better fix for that area. We come back here. You'll say that the fix is much better. Let's just finish off with these little bits here. Again, that's a pretty good fix. Clicking away, let's go back to the full size image and let's have a look at the image as it came into Adobe Camera Raw with these blemishes here, down here and across here. Then the custom settings that we've applied to the image.
6. Pt 2b ACR Find and Remove Sensor Dust: Now, the final image we're going to look at is one that has a sensor dust issue. So up here in the image, let's just zoom in here, up here is sensor dust. So this is dirt inside the camera. It needs to be specially cleaned. Either you can clean it yourself if you have the skills or generally people will send it away to be cleaned. The problem is that I didn't pick it up soon enough and it's really spoiled this image. So let's go to the spot removal tool and we're going to look at the special tool that is available in Adobe Camera Raw and in Lightroom for visualizing and getting rid of these very things, this sensor dust. So I'm going to click to turn on visualized spots. I'm just going to increase this slider so that I can see the spots really clearly. This is a sensor dust spot. This is one here and this is one here too. Now, you can only see this when you've got this spot removal tool selected. So I'm just going to have a go at fixing these. I'm not sure 100 percent what's happening there, actually just moving that fixed it up pretty well. So when you're done with this tool, you can just click away from it. Let's have a look at the before and after on this image. This is the camera raw defaults. The images came into Adobe Camera Raw, problem here, problem here, problem here. This is the fix, using the special visualize option for the spot removal tool that makes it much easier for you to really see whether you've got sensor dust issues in your image and obviously to fix them as well.
7. Project and Wrapup: Your project for this class is to take an image that has problems in it and to fix those blemishes using the Spot Removal tool. Now you might have images with sensor dust, you might have problem blemishes that you want to get rid of, or just things that you don't like in your image. Post a image of your completed edit in the class project area. As you're watching these videos, you will have seen a prompt which lets you recommend this class to others. Please, if you're enjoying the class, do two things for me. Firstly, give it a thumbs up, and secondly, write just a few words about why you're enjoying the class. These recommendations help other students at Skillshare to say that this is a class that they too might enjoy. If you'd like to leave a comment or a question for me, please do so. I read and respond to all of your comments and questions, and I look at and respond to all of your class projects. My name's Helen Bradley. Thank you so much for joining me for this episode of Graphic Design for Lunch, and I look forward to seeing you in an upcoming episode soon.
 Helen Bradley, Graphic Design for Lunch™