Transcripts
1. Welcome to Class! What Will You Learn? Who is this Course For?: Welcome to the real estate
photography course. I'm going to teach you
a simple approach to taking amazing real
estate photos. So first off, what is
this class all about? In this class, I'm going
to teach you the gear. You need to take great photos, how to use that gear, what settings to use
for real estate photos. You're going to
learn how to compose your photos for any
room that you go into. You're going to learn several
different lighting styles, whether you want to
use lights or not, I'll teach you how to
take great photos. So we're going to cover using flashes, using natural light. Then also what's called
the flamboyant technique, which is a popular approach to taking photos for real estate. I'm going to show you how
to edit those photos. So sometimes it's just making a great single
photo look amazing. Other times it's a
bit more advanced and combining several
photos into one. And then lastly, you're
going to learn how to start a real estate
photo business. So from finding
your first clients and building out
your portfolios to more advanced things on how to sustain yourself as a
real estate photographer. Who is this course for? Primarily this course is aimed at photographers who know how to take photos and want to make money with
their photography. Real estate photography
is a great skill to have, even if it's not your passion. But you can make money from it. And then you can go off and do the fun photography
that you love, street photography,
landscape photography, portraits or whatever. But real estate photography
is a great one. You can fall back on to
actually make a living from. This course is also for real
estate agents, landlords, anyone that has a
short-term rental who wants to take great photos, because great photos,
cell properties, you can make a lot more
money whether you're selling a home or you're just
trying to rent it out. If your photos look amazing, What's the basic goal with
real estate photography? The goal is to show
the general details, space, and layout of a room. It is not to create a
dramatic, stylized photo. So you're not going to
get too creative with the way you edit
your photos, really. We just want to show the space, but we want it to look amazing. We want the lighting
to look good. We want details to pop. We want the exterior to be
highlighted if necessary. Those are all things
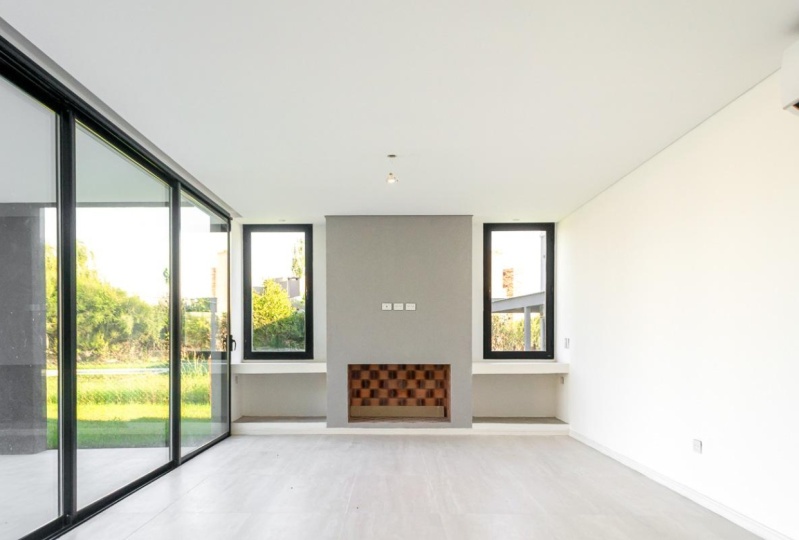
that we're going to cover how to do in this class. Here's a few examples of
the style of photography. We're going for. Wide shots showing the
space, bathrooms, kitchens, every space I'm going to
talk about in this class, I'm going to have real
demonstrations of the rooms. So I'm not just going
to talk about it. I'm going to show
you what to do. And lastly, why do great
real estate photos matter? They matter because
better photos sell more. You can sell a house for more. You can get more rentals. You can charge higher for your rentals if
you have great photos. This has been proven
time and time again by people who host short, short term rentals or by
people who sell properties. You probably know
this yourself too. If you go on Zillow
to look for houses, if you go on Airbnb
to look for a rental, you are drawn to the one
with the better photos, they get the first clicks, and they also sell
at a higher price. So it's a very valuable skill, whether you're doing
it for yourself or you can use it for someone
who needs your services. So that's what we're going to
be covering in this class. If you have any questions,
feel free to ask. I'm always open to suggestions for ways to improve our classes, and I just hope you
enjoy the experience. Alright, let's move on.
2. What Gear Do You Need as a Real Estate Photographer?: What gear do you need to be
a real estate photographer? There are three main things. A camera with a
lens and a tripod. For cameras, you can use
DSLR or mirrorless cameras. Either is perfectly fine. The debate over
which one is better. It could go on for years. Most brands are moving
towards mirrorless cameras. The setups are a
little bit lighter, but in terms of price, things are about comparable now. But if you're getting into this and you're looking
to buy a new camera, I would move towards
a mirrorless camera because that's where
companies are going. The more important question is crop sensor versus full frame. Because we are wanting
wide shots of most rooms. Having a full frame camera
allows us to more easily get those wide shots
with more lenses. With a crop sensor camera, you will need a wider lens to be able to get
those wider shots. And I'm gonna go over
those lens options in just a second. Crop sensor cameras
are generally cheaper than full-frame cameras. So that's the issue. If you're starting out, if you
have a crop sensor camera, don't worry, you can use that. You do not need a
full-frame camera. But if you are starting and
you are looking to buy one, I would err on the side of full-frame if you
have the budget. Now, I do want to
cover smartphones. If you're a professional
photographer looking to make money with this, I would not use a smartphone. It doesn't look professional
and it doesn't give you the capabilities
that you have with a DSLR or mirrorless camera. However, if you're an agent, if you're a landlord or a host, you can get away
with a smartphone. You have to make sure you're paying more attention to things like composition then things
like lighting and editing. Although smartphone
cameras have come a long way and I'll talk about
that more in the future. In terms of lenses for
a full-frame camera, you'll want something
between like 16 the 35 mm. If you're using crop sensor, you'll want something
like a ten to 18. So depending on the
camera and the lens, a ten millimeter on a
crop sensor will be more similar to a 16 millimeter
on a full frame. And I can tell you
that for most spaces, especially tight spaces
like a bathroom, you might need to
be somewhere on a crop sensor like 12 mm. Whereas on a full frame, you'll be somewhere like
between 16 and maybe like 24 or so. It really depends on the space, but I would say that anything tighter than 18
millimeter or even as 16 millimeter on a crop sensor can feel
tight in certain spaces. So you will need one of
those ultra wide zooms. And this is why
I'm talking about with a full frame camera, you have more options. A 16 to 35 is more of
like a standard range. You could get standard
lenses at that size. Whereas on a crop sensor camera, those are more of
those ultra wide zooms that are a little bit
more specialized, not that you can't get those. It's just, there are going
to be fewer options for you. Now, another thing to
consider is a prime for Zoom. Remember, a zoom lens has
multiple focal lengths. You can zoom 10-18, for example, or 16% 35, whereas a prime
is just at 12 mm, at 16 mm primes are
generally cheaper and they also have a wider open
aperture generally. So you can open up
and allow more light. That being said,
with the settings we're using for
real estate photo, we're usually using
something like an F 8.0 to get more in focus. So having that
wide-open aperture doesn't necessarily help us out. So that's one reason to get a prime for
real estate photo. The other thing is if
you are in a tight space or if you're in a room
where there's furniture, being able to zoom in or out helps with
your compositions. You can always crop in,
crop out a little bit, but it's a little
bit different than being able to quickly zoom in or zoom out
with a prime lens, you're going to have to be
moving your tripod a bit more. That being said in this class, I'm going to be using both zooms and primes to show
you the difference. And you'll see me
walking through the process depending on
what room I'm in, I'm in. Here you can see examples of bathrooms where these
are super tight spaces. But with a ultra wide lens, you're still able
to see the space, see the different aspects of it, even if from a corner
or from a doorway, another tool you'll
need as a tripod. A tripod is necessary in a lot of cases because
in indoor spaces, you will need to be locked down if you have a
longer shutter speed, which we might be using, we'll talk more
about settings in a minute in a future lesson. But you're going
to want a low ISO. You're going to
want to lock down your aperture and not
open up all the way. And so that leaves
our shutter speed to potentially be a
bit longer than normal And hand-holding your
camera might not be the best-case scenario for
getting a sharp image. So having a tripods grade. The other reason is
when we're doing more advanced photography
such as flamboyant, where we're combining images with ambient light
with natural light, with our Flash, maybe pulling a photo where we're
exposing to the exterior, then those photos need to be locked down on a
tripod so you're not getting any camera
shake between photos. Fluid head versus geared
had fluid heads are great because it's just easier to
pan and tilt up and down. It's more when you're doing
video that that's important. However, I like a
fluid head tripod. I just find that I can lock down that specific
composition more easily. They are more expensive, but I would I'd go
for fluid head. And if you ever do get into video production
and real estate, video is a thing you
might as well have a fluid head tripod as well. Some other tools that you
might want to consider adding to your toolkit or a
remote shutter trigger. Again, when we're
taking multiple photos. Bracketing is one style of photography where we
are taking photos at different exposures
and combining them so that we have a great
general exposed photo. You want that photo to be
locked down on a tripod, not touching it even with
your finger because you might accidentally
wiggle it a little bit. And so having an, a remote shutter trigger
where you plug into your camera and
you can just press it and not move the
camera is great. Most modern cameras also
come with an app where you can sync up with
the mobile app on your phone and you can use that, which is great, but I find
those a little bit wonky. If I can use that term, they don't always connect. They get disconnected. It's just more time-consuming
to use those kinds of apps, but you can use those. Alright, now let's talk
about the biggie lighting. There's lots of different
lights out there. There's flashes, also
known as strobes. Those are like the typical flash that you put on top of a camera. And in real estate photography, what we're going to be doing
is not just on the camera, but off the camera, to the side of the camera. We're going to be walking around with our flash,
taking flash photos. And so you'll need a
flash that also has the trigger that
connects to your camera. So there's lots of
different options. We'll talk about
brands in a minute, but flashes are what
I would recommend. You can also use
continuous lights. Right now I'm using a
light to light this video. They are great for video. It's great because
you can see what the room looks like with the
light compared to a flashy. You can't really
tell until you look at the photo what the result is. But with a continuous
light source, you can set it up, you
can move it around, you can see, okay,
this looks good. I need to point it
this way or that way. But they're heavier. They often have to
be plugged into the wall unless you have a
big battery pack on them. And so I would suggest getting flash or strobes
which are lighter, more affordable, more
easy to move around, and they don't have
to be plugged in. You'll need with that light
stands to hold up your flash. Unless you're gonna be like
holding it up yourself. But I suggest just
using a flash stand or a light stand and then also
an umbrella and or lightbox, something that's white
or silver that's going to spread out that light. The key is that a
larger light source equals softer, less
harsh shadows. So generally what
we're going to be doing when we're lighting
up a whole room is flashing into an
umbrella or through diffusion so that the
light is not hard, not creating harsh shadows. Sometimes we can use the
ceiling and just bounce that flash off a ceiling or a wall to get that same effect. But you'll want to add this
to your kit eventually. Here are some photo
examples you can see, especially for
interiors like this. You're not going to
get this lighting when without a flash, there's no window,
there's no natural light. You're going to
need some kind of flash that's adding
late to the scene. Even for this one where
there's a big window, I can tell and you'll eventually be able to tell that this photo was shot not just with the
exterior light coming in, not just with the ambient lights on the ceiling and
the lamp there, but also with a flash
to give it more light. Alright, so that's about
the gear you need. Again, we're going to talk
about settings and setting up this gear and a lot more depth coming up in the
next few lessons.
3. Camera Settings & Modes to Use for Real Estate Photography: In this lesson,
you're going to learn the basic settings I recommend for real
estate photography, everything is a starting point. Depending on your situation, you might need to
adjust a little bit. But here are the basic
rules of thumb that I would follow for your camera
if you want to set it up to aperture priority mode, just a quick refresher if you
don't know what that means. It's an semi-automatic
mode where you are telling your camera
that you're going to lock down your aperture. Remember the aperture
is the opening of your lens that
lets them light. We're going to lock
it down to F eight. That gives us enough
depth of field, which we want in real estate photography to have most of your
scene in focus, especially with
wide-angle lenses, you'll generally get a lot in focus compared to a
more telephoto lens. But with a wide
angle lens at F8, most likely the whole room will be in-focus, which is good. What that means is
your camera is then going to use the
shutter speed and ISO and automatically
adjust those to set exposure and get a
generally exposed photo. We also want to lock down our ISO depending on the camera, it might change how you do this when you're on aperture
priority mode. Sometimes within the settings
you can tell your camera, I only want to go up to ISO, whatever you want, 200, 400, 800 during any automatic mode. And other cameras, you can
manually set both settings, so an aperture and
then manually set your ISO to the lowest setting, which I would recommend. So ISO 100, if you
can, some cameras, the lowest is one-sixth
times it's 200, whatever the lowest ISO
is for you set that. And then it leaves the shutter
speed to move around from one-sixtieth of a second to one-two thousandth
of a second to half a second to be able to
expose your photo properly. Your exposure compensation is
another important setting. So this is a setting if you haven't
played around with this, It's really key to use for
real estate photography. Because what you're basically
telling your camera, if you use that, normally it's set to
zero and your cameras just going to get a
general exposure. But if you bump that exposure compensation
up to plus one, for example, it's forcing
your camera to say that you want your
photo to be brighter. And generally we want bright, open airy photos with our
real estate photography. So I'll use that exposure
compensation dial to force the camera to expose a
brighter image that I like. Or if you're doing
bracketing manually, you can adjust your exposure
compensation up and down so that it will automatically expose like minus one
exposure compensation, zero exposure compensation, or plus one exposure
compensation. That being said, there's most cameras have an
automatic bracketing mode, which will do this
automatically. I know this is a lie if
you're new to photography, but FAA aperture ISO 100, and then let your
shutter speed go up and down to expose properly. In terms of shooting
raw vs JPEG, I always use raw. I think you get more
room for editing. Sometimes you don't
even need to do bracketing when
you're shooting raw because you have so
much information there that you can
bring up the shadows, you can bring down
the highlights a bit. And so you don't need to worry about combining multiple images. But the file sizes are large. And if you're
taking thousands of photos a week doing your job, then it can get quite daunting
to be able to organize, manage all of those files. And to be honest with
real estate photography, you could get away with jpegs. Jpegs for most new cameras
are super high-quality. You can still edit them. But I always err on the side of caution and I
like shooting raw. But if you are using JPEG, make sure it's on
the extra fine. The largest file
size, resolution, quality mode that your camera offers in terms of drive mode, drive motors, that setting
where you're choosing things like setting
a self timer, you're doing burst mode, those kinds of things. Either you're just shooting a single photo or you're
using bracketing mode. As I mentioned, bracketing
mode generally is a setting where the camera will
automatically take three photos. One exposure, stop
apart, one lower, one, perfect exposure,
and then one above. And again, the reason to do that is in different situations, parts of an image, parts
of the room might be in more shadow or
might be brighter. And just taking one
photo won't be able to get that dynamic range, that range of exposures, right? And so you can take
different exposures to be able to expose
to the shadows, to expose to the brighter
parts of a room. And then you can combine
all of those photos and post-production
and it creates a nice, evenly lit photo for Focus mode. Set it to a wide mode. You can usually change the mode to be like
a specific point, like a focus point, like it'll be a little box that sometimes you
can even move around with the joystick or the touchscreen on the
back of your camera. And just having it in the center wide generally
is the best option. If you have it as a too small of a focus area and you're accidentally in the bottom left of the corner of the frame. It might focus on like a
couch or something that's in the foreground of
the frame rather than what's in the middle, which is generally better. So wide focus mode
for white balance. I find that most cameras
are great nowadays, I would just do auto unless
you start to have issues, especially in rooms where
you have really warm light from some ambient lights
from the room like lamps. And then you also have exterior
natural light coming in. That's really bright. Daylight temperature,
different light temperatures. If that's being
an issue for you, you might want to set your
white balance manually, but I find that auto
white balance is great. If you're shooting in raw mode, you have so much room to be
able to adjust the colors and match different frames because you can run into issues
when you are doing. What I'll again referred
to and continuously remind you is the ambient
method of taking photos. It's a combination of
flash and ambient photos. Combining those color
temperatures from the flash, from the ambient light can be a little bit
problematic in situations. If you're using auto mode, but I'll just start
on auto mode and adjust accordingly
within your camera, there's often a setting to
set a level and a grid. Often it's like a thirds
grid that will have two lines vertically,
two lines horizontally. And this is very
important because we want Level straight
photos and you can use that grid to
be able to line up things in your image
like a door frame, like a fireplace wall, like a window frame, to be able to get those
lines straight up and down, which is so key to real
estate photography. Sometimes this can be
a little bit hard, especially if we're using
a super wide angle lens, you get a little bit of
warping on the edges of frame, but you can often fix that
in post to some extent. So don't worry about
that too much. But try to get the best straight photo
in camera as possible. And using the thirds grid and the camera level is
super key to doing that. Alright, thank you so much
for watching this lesson. And the next one we'll
talk a little bit briefly about using a smartphone
4. Can You Use a Smartphone for Real Estate Photography? Pros & Cons: In this lesson, I want to talk
about using a smart phone and go a little bit deeper for those interested in using one, you might want to
skip this if you're not using a smartphone. This is really for those
real estate agents taking this class, landlords, short-term rental host,
who don't want to invest in a lot of equipment. I'll talk about the benefits and drawbacks of using a smartphone. So first off, benefits, the quality is getting better on smartphones and
certain smartphones, the quality of an image
kind of matches what a basic DSLR mirrorless
professional camera I can do. It's more affordable because you probably have a
smartphone in your pocket. It's easy to think, oh, I'm just going to whip this
out and take great photos. And sometimes you can, it's simple to use. There's no complicated settings are things that
you'll need to know. It's basically just being
able to set up in an area, compose it the right
way, and take the photo. Just click the button
to take the photo. The problem is that most
smartphones don't capture RAW photos as good as basic
DSLR or mirrorless cameras. So what this means is
that you don't have a lot of room editing and you don't necessarily need to edit all your photos too
much to look good. But in terms of things
like combining images and things like that
and the photos will just look better
if you edit them. And not having nice
high-quality photos from a smartphone limits your ability to edit
them the right way. The other issue is when we're getting a little bit
more professional, using just flash alone. Sinking up a flash to a
smartphone is very difficult. There's not really great
tools to do that right now. So you can just use
the Flash that's on your smartphone to
get enough lighting. Potentially, you could use continuous video lights to
light a scene LIDAR room, and use a smartphone
to make it look good. But when we're talking about more advanced techniques using a flash or a strobe where we're bouncing
it off the ceiling. We're maybe taking
multiple images where we're bouncing it off
different parts of the room, that flamboyant style,
then it's going to be practically impossible
with a smartphone. Also just like setting up on
a tripod, not impossible, but more difficult using
a trigger, self timer, bracketing all of these
things are going to be more difficult with a smartphone. That being said,
you can certainly take great photos
with a smartphone. But as a professional
photographer, you'll want professional gear. Truly, even though you as a photographer might
be able to take a great photo with a smartphone. You don't want to show up to a professional photo
shoot at a house, taking photos with a smartphone. Nothing against smartphone,
smartphone photographers, It's just not going
to look good, even if you promise, I'm going to take photos just
as good with this camera. You'll want to actually
have professional gear. As a professional. In this class, I
will do some tests to show you the smartphone versus the professional camera and how they ended up looking. But I just wanted to share these thoughts before
we move forward.
5. How to Compose Real Estate Photos - The Basics: In this lesson, you'll
learn the basic process to taking great real estate
photos. So let's get into it. The first thing is
generally you shoot from the corner of the room. This is where you're
going to stand and get the best view of the entire
room as much as possible. Things to look out for
are that lens distortion. So on the edges of
a wide angle lens, sometimes things start
to bend a little bit. So if you have things
like photo frames, TVs, doorways, window
frames, just pay attention. If it looks super weird, you might need to adjust while you're there
taking the photos. Because while some of this can be fixed in post production, sometimes it doesn't, It's
a bit hard to do well. And so readjusting your frame, panning to the left or right or choosing a
different corner of the room is maybe the best idea. You want to start with the
camera at waist height. I find that this is a great
level for a lot of rooms, like your living
space, bedrooms. The time you might want to raise the height of your camera is when you're in places like the kitchen bathrooms where
you have countertops, you don't want the frame to be like right here at
countertop level, you want to see
those countertops. You want to potentially see over those countertops
to be able to see things like the oven range or the bathroom sink or the
toilet or whatever it is. And so lifting up the
height of the camera, there is probably a good idea, but still probably
about chest level depending on how tall you are. But maybe you're on that four to five foot mark is pretty good. You generally don't want
to be like shooting down or shooting up at a room. If you are in a big great room, similar to what I'm
shooting in today. You might want to
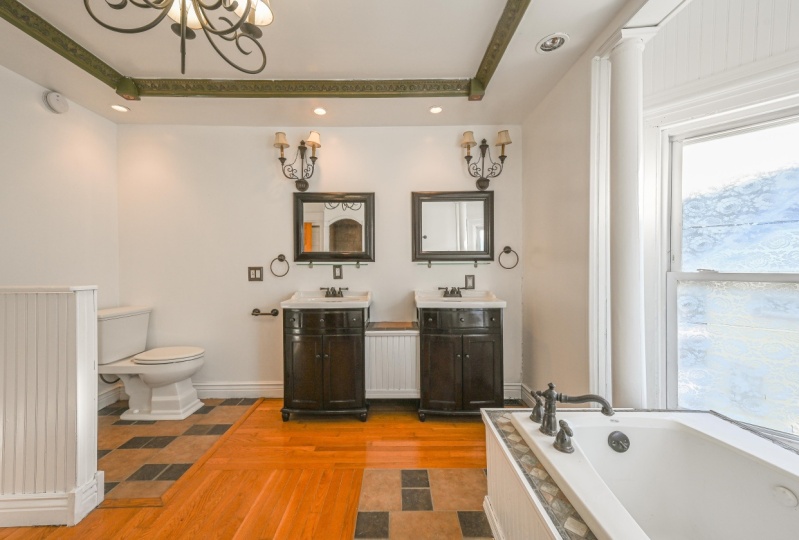
raise it as well if you have super high ceilings. Here's a couple of
examples of that. So here in this room, you're probably a little bit
higher than waist level. To see over the bathtub. The photographers is
probably standing in the bathtub for this example. To be able to see
the countertop, to see those sinks and not
be eye level with them. Here's another example
where we're a bit higher in this
photo to be able to see those countertops and to see what's beyond
those countertops. I mentioned this before, but you want to make sure
your camera is level. Look for straight lines
vertically and horizontally, but more importantly vertically, you want lines of door frames, window frames, picture
frames to be vertical. Choose one of the most
important lines in your frame to be your guide post and make sure that that one is
locked down vertical. If other ones fall slightly, not vertical, that's okay. We're going to
again show how you fix some of these things
in post-production. Here we have a bedroom
where that window frame, the corner of the room is often a good thing to use
as a straight line. But even the corner
on the right, the corner in the
background in the middle, and then on the left we have
it looks like a doorway, maybe on the very far left, that might be like an
arm moire or something. All of those vertical lines
are perfectly up and down. And then you might
not be a designer, but I find that as a real
estate photographer, It's your job to make the room
look as good as possible. So clean up things,
make it simple. That's probably the
best rule is if there's too much
clutter, just remove it. You can take it
out for the photo, put it back, clean stuff up, things like pillows that
are on couches, bed, make sure those are fluffed, looking good as much as possible and you're going
to get better at this. And sometimes you might be
taking photos of empty spaces, so you might not run
into this issue. But if you are photographing spaces that already
have furniture, this is super important. And then also look
for reflections in windows and glass
picture frames. If you're in that reflection. Again, it's possible to remove some of this stuff
in post-production, but it's going to be so much
easier if you could take a photo without
those reflections, you the photographer, and
then also when you're shooting with a flash,
if you have stands, if you have a flash
off the camera, pay attention to that, showing up in a
reflection as well. Here's a couple of
examples of rooms that just look nice, clean. Those books look perfectly
positioned on that shelf. You can tell this was sort
of a tough room to shoot in because you're crammed in this corner with the
crib and the dresser, but still you get the general
sense of the whole room. Here's an example
of a bathroom using that tile as the line, the vertical lines
to keep straight. But you might want to
just remove things if there's clutter on the sink, if there's toilet paper, if there's trash
cans in the room, maybe just remove that stuff while you're taking the photo. So those are the basics. In the next lesson, we'll
talk more about lighting
6. Lighting Basics for Real Estate Photography: Let's talk about lighting. In future lessons, you're
going to see all of this in demonstration mode, me in the rooms doing this. But first, let's
learn the basics. There are three basic
types of light to understand you have
your natural light. This is the sunlight coming
in through windows and doors. You have your house lights, also known as the
ambient lights. These are the ceiling
lights can lights, fans, lamps in the background
can do whatever is in your room from
the house itself. Those are your ambient lights
and then artificial lights. These are your
flashes, your strobes, your video lights that you're using in terms of taking photos, there's a few options. So first you can do just a
natural lights off approach. This is just light coming
in from the outside. You can see that light, bright enough, clouds went by. And this video
itself is getting a little bit brighter
as I record this. So that's just using
the natural light. You can also have the lights on. So of course you're
going to be getting the natural light
from the window, but I'm going to call this
the ambient light shot. This is where you turn on the ceiling lights or
any lights in the room, and then you have the
combination of that. So taking that step further, lights on in the room and
then you're adding flash. And this is called flamboyant. What's the comparison between lights on or off with it off? You're going to get that
much more natural style. It's going to be the color
temperature of natural light. You're not dealing
with a combination of different color temperatures, which can be nice. And this is more of
a designer look, think of like a
Pottery Barn catalog. Go to their website
and look at photos. You'll see that this
is a very nice style. However, this is not possible. And a lot of homes, because most homes don't
have big bright, airy windows that let in enough light to get
that sort of style. Here's an example of that. These big windows taken at the right time of day where you, all you need is
that natural light to make this room look amazing. And that goes to
say that sometimes you're locked down at a
particular time of day. I wish that you could pick the time of day the shoe
and you should try to, and you might need
to go to a location, go to a house at
different times of day depending on if it's
a north facing, south facing, west, east, depending on what
rooms are facing, which direction at
that time of day, you'll need to pay
attention to it. You don't want harsh
shadows in your shots. One of the reasons I'm shooting this video in this
room right now is because while I do have north-facing windows
here in California, meaning I'm not
going to have a ton of direct sunlight
into this room. I do get direct sunlight
in the morning, and I don't want those harsh
shadows for this video shot. Similarly, I would take these real estate photos
at this time as well. Let's talk about lights on. This is a common approach. This is the style that you'll see for most real
estate photographers, and this is what
we're going to be covering in this class. You turn on the ambient lights if they add something
to the room. Sometimes this means leaving the can lights on
the ceiling off, just turning on lamps and
life that actually look good. Generally though we're going
to be turning on everything unless it's something that
detracts from the room. So if it's like a weird
off-putting light, too harsh to too warm, you might not want it. But generally, we're going to be turning on most of the lights. Here's an example of that, where the photographer
is shooting with the ambient lamps
in the background, as well as the natural light. And it looks like some
flash potentially as well. Here's a shot where ceiling
light, lamps are on, even though they probably
don't add a ton of light, it creates this overall
style to the photo. Here we have all the lights on. We've got the pendant
lights on over-the-counter. Ireland, we've got the
lights by the oven. We've got the lights in the
background and the ceiling. Even in the bottom right, you can see on that
countertop you have some lights underneath
the upper cabinets, which just adds a little
pop to this photo. This one, you can see
really the contrast between the exterior natural
bluish daylight versus the warmer
interior lights. There's ways we're going to be able to fix this and post that. We don't have this weird color
casts that are competing. We're going to want it
to look a little bit more natural and cohesive. But this example shows
the combination. Here. Even in this photo,
the light is on. You can't even see it except in the reflection of the mirror, but you have that
one can light on. And it just adds a little bit of light even though
the photographer is definitely using your flash as well to light up
this interior space. So right now I want to show
you an example of one space. Then I'm going to
photograph later in this course with the lights on, lights off so you can
see the difference. So here it is with
the lights off, supernatural nice-looking
photo in here it is with the lights on,
ambient lights overhead. And here's a
side-by-side comparison. Totally different style. I think that lights
add a lot to this. And you'll see a
lot more of this in the live demonstrations in
the future of this class. Now let's put it all together
into the flamboyant shot. So what does this actually mean? I know I've already said that. It's a photo where you're
shooting with your flash. You're also shooting with
the ambient lights on. But in terms of technically how what photos do
we need to take? You have to take one photo
with just ambient lights, no flash, so just the
ambient lights on. Also, of course you're getting natural light from the
window size shot one. You're then turning
on your flash and taking a photo
with the flash. Sometimes this is
multiple photos depending on how
big the room is. Then oftentimes you're shooting what's called a window pole. And this is a photo exposed
to the exterior window. You can see behind me that the window is quite overexposed. If I exposed to that window, everything inside this
room would be too dark to expose and you
don't want to do that. You want to generally exposed to the
interior of the room. But what's called the
window pole is where you're exposing to
what's outside. And you'll see this
code through Zillow. Go look on Airbnb, look at other real
estate photographers. This is a very popular style. Here you can see some examples
of this where this is not a naturally occurring
photo with one frame. The photographer is exposing to the interior and then taking a separate photo exposed
to the exterior. Or doing some heavy
editing of a raw photo, depending on the situation, but oftentimes it's a separate photo
that's later combined. Now you only want to do this if it adds something
to the photo. If it's cells that room more. If you are taking
something and there's like a trash truck or just
like a weird building outside. You probably want to
overexpose that photo. You don't want to
show what's outside. Here's an example of where
this is an exterior patio, but this is likely a
combination of two photos. If not, it might just be a raw photo or a
bracketed photo. But an example of where
we are exposing to the interior lights on
using a flash as well. And then we're also
getting a shot exposed to the exterior because it adds so much what's outside
that balcony. There is a technical approach to how we actually shoot
these to be able to combine it later on in post that's coming up
in the next lesson.
7. The Window Pull: How to Make the Exteriors Pop: Let's talk more about
the window pole. So a reminder, this
is exposing to the exterior of a window door, anything where you
can see the outside. It's not overexposing,
blowing it out. That's a term that I'll
use to mean overexposing. You wanna do this if it adds
to the story of your photo. Here's an example
of a photo where the photographer did
not do a window pole. There probably wasn't
much outside to look at. And so she just decided
to totally overexposed, which is a great call. Here's an example where of
course you want to show what's outside of that window,
this beautiful skyline. You don't want to overexpose it. You want to be able to see it. It totally cells this room. So how do you capture
these photos? Either one, you just simply
take a separate photo that's exposed to the outside. So you adjust your
exposure compensation or manually adjust your settings so that what's outside exposed, this is a little bit
harder to combine. Then the other option
is you set the flash directly at a photo and you'll see me do this in
the demonstration. You exposed to the outside, the flash overexpose
is the frame of a window and it's
actually much easier to combine some quick tips photoshop to do that
after the fact. So a reminder, the
flamboyant style we're going to be
covering for a lot of our rooms are an ambient photo exposed
to the interior, a flash plus ambient light
exposed to the interior. Sometimes this could
be multiple photos if it's a big room
and you need to balance the flash off
multiple areas of the room. You're going to do a window
pole exposed to the exterior. And then something
I didn't mention before is some repair shots. This can be if you are
in the reflection of a mirror or of glass anywhere
in the frame of your photo. So that is the window poll
8. RAW vs. JPEG Photos - Which Should You Shoot?: Is one photo enough? This is a very common question that I get about real
estate photography, so I wanted to cover it again. Here is one photo enough
compared to bracketing? One photo is great
because it's simpler. You don't need to worry about
combining files later on. And if you're going for
a natural looking photo, just using natural light, if you're not going
to be editing and doing the flamboyant style or
a bunch of post-production, then you might as
well get away with just shooting one raw photo. That's much easier, but
bracketing is great if it is difficult to get an even
exposure of an entire room. We've talked about
this before and also when flamboyant style
is not possible. So if you don't have a flash, if the room just doesn't lend
itself to using a flash, if it's not going to add a bunch to that photo and
make it look better. Sometimes just doing
bracketing is good enough
9. Key Lesson: What Photos Do You Need to Capture?: What photos do you need to capture for a real estate
photography shoot? You are taking the viewer
through a tour of the house, make those connections
with your photography. This is probably one of the most important things to
take away from this lesson. Beyond just, you need to take XYZ number of photos per room. Remember, you're taking
viewers through a tour. Without video. Have you have video?
That's great. But if you're not doing video, then it's important for
viewers to be able to sense, okay, I can go from
this room to room. This is how the kitchen
connects with the living space. This is how the primary bedroom
connects to the bathroom. All of those kinds of things that are helpful as a viewer. So that's one of
the first things when you walk into a space, makes sure that if
there's open hallways, if there's open rooms and walls that connect the
kitchen to the living space, you want to make
sure you show those. But in terms of the
basic for each room, I recommend at least
one wide shot. Obviously this is the basics. You just need, at
least one wide shot. You generally want to
show two angles per room. So this is oftentimes
from opposite corners. So you can see the entire room. If you go from one corner to the opposite corner,
get a wide shot. You've got that
whole room covered. Sometimes you might want
to go for what's called a one-point or flat perspective. If there is a wall or something in the room that caters to this. Some examples of this are this great sink and the mirrors. It looks great having
this one flat perspective where you're shooting
perpendicular to a wall. Here's another example
of where you're not shooting from the
corner of a space. But this is taken from
a flat perspective. Here's another one. It's a definitely a
little bit more of a designer look where
there's art on the wall, although you can see
the reflection of this photographer's
camera in that painting. So you want to be
careful of that. It's harder to do that. Get rid of reflections or
not be in a reflection if you are shooting in
flat perspective. Now let's go room
by room and talk about how many photos
you need for each room. This is just a general
rule of thumb. You might take 510
photos per room, but in terms of delivery or if you are selling space yourself, this is generally what
real estate agents want. So you'll want fork
photos of a kitchen. The kitchen sells the
house a lot of times, especially if it's
a nice kitchen, of course, you'll want
for photos of that. And this isn't just going to be just wide-angle
photos from corners. Potentially, you're going to
have more detail shots of certain appliances
that are Silva space. Again, for bathrooms, you'll want to photos of each bathroom. For bedrooms, one is
generally enough, but take them from opposite
corners if you can. Two of the primary bedroom. So this is the main biggest
bedroom of the house. You want to have two of those. You want to have
your laundry room. You want to have I would say more than one photo for
the big living spaces. This is another selling
point of a lot of houses. So having multiple photos of that and then one
of any other rooms. So if there's offices,
dance basements, that kind of thing,
even a garage, you'll want to have at
least one photo of that. Here's an example of two different photos
of the same space. The one on the left is
great because you can see what's outside that window. And that's probably the
selling photo of this room. But the one on the right
shows that connection between the kitchen
and the dining space, which you don't see in
that photo on the left. Here's a great photo
showing the connection of the dining space to the
living space, to the kitchen. The open concept, very American thing that is very popular now, I'm not sure if it's as
popular around the world. Let me know if it's a thing yet. But this photo is great for showing that
connection of the room, but it's not a great photo of each individual room itself. You'd want to have specific
photo of the kitchen, of the living space, of
the dining area as well. Here's another one that
shows that connection of the living space to what's beyond the dining
room and the kitchen. So that's what
these examples are. Just examples of showing
those connections of the room and then beyond
those wider connection shots, which might be in addition
to the photos of each room, then you might be getting photos of specific details of a room. So for this example, it looks like there's an
office setup in a bedroom. That's kinda cool to show. This would be more, I don't know if for
selling the house, but more for a short-term rental that you might want to show. Here's a photo of the pantry. Here's a photo of a bathroom. From this perspective,
you don't see the tub. So you'd want to make
sure you flop over and get the photo of the
tub itself as well. But this perspective, you see that there is a tub
there which is great. And then you also see the
main visual details of a bathroom which are
generally the sinks, the shower as well. Here's a more flat one-point
perspective of a kitchen, showing the general
space of the kitchen You're not getting a great
shot of the oven here. I would also probably try
to widen out or backup if possible in this
photo so that you can see more of that
space on the right. You don't see what this
room is connected to. This is actually an
example of a photo. I'm not a huge fan of because while you're seeing the
space of the kitchen, sometimes when you
get a little too close to the countertops, it just looks they
take up too much space in the photo, which
is unnecessary. I probably would have if
I just wanted the photo of the kitchen gone
back to the right a bit and just angled it
a little bit more from more of the corner to see
that oven range to see. And you would still
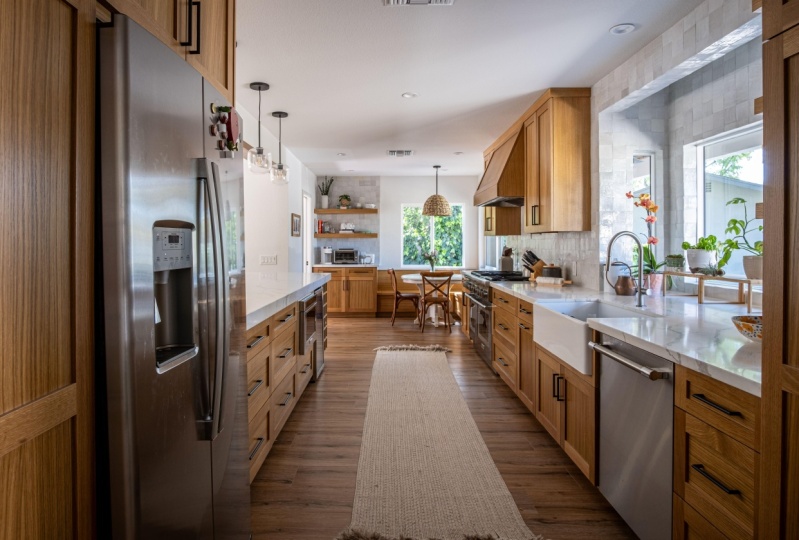
see the cabinets, the fridge, the sink as well. Sometimes it's better
though to take a photo from that perspective instead
of the corner of a room. And this is an example
of that where it's nice to be able to see straight
down this galley kitchen. You still see the details, the left and the right. But you're centered on what the highlight of
this photo is and that is that window and the little breakfast dining that's in front of the window. Here's a photo that
I'm not a huge fan of. I'm showing you the
pros cons what I like, what I don't like
about certain photos. I like that you
can see the range. It's highlighting,
the oven range and then also the backsplash. But it's kinda like
wanting to do too much. They're trying to show also on the left it looks
like an island, but and then the sink is sort of squished over to the
left side of the frame. I would have rather just
backed up and gotten the whole photo with the
island with oven range, with the sink and the
window that's on the left. Because right now
this photo is seems like it's just trying
to highlight the oven, the range, and the backsplash. But if you're gonna do that,
just just flatten out and take that photo rather
than try to do everything. We talked about the
interior of the house. Let's talk about the
exterior of the house. Generally, you're
going to be shooting at eye level outside, not at waste because the
space is just bigger. You're taking photos of
the house, it's bigger. So you're gonna be
shooting at eye level. You're going to capture
with three wide photos. One from the left,
one from the right, and then one centered
on the house itself. And these are going
to be wider photos of the entire house. Then you're going to pop in
and go a little bit closer to the entrance of the
house and get that door. And if it's connected to a porch or a patio
that's on the front. You wanna do that and
then back up even further and get sort of a
property line photo where you can see a little
bit of the edge of the property and maybe
even the buildings are houses on the side depending on what the
neighborhood looks like. Of course, just to give it more context of what's
that space look like. So here's some examples of that from the left,
right center. These are a bit far back
on that left and right. I might have gone in
a little bit closer. That one on the right is nice, but see how that
one on the right, you're the photographer
is closer to the curb and you really see just the walkway
up to the house, the one on the left. You're seeing mostly the street. You don't really
need to see that. And I would have tilted up a little bit on those two shots, the left and the right,
because the top of the house is being a
little bit cut off. But a good example of getting that left,
center and right shot. Here's an example of that
left front shot as well. These houses are
really close together. One of the things that
I'll talk about is trying to show the depth of the house, if you can, from
those angled shots. That's why we get
those angled shots, as well as the Center on shot to be able to see
that depth as well. Here you can see a little
bit better of the depth of the house on that left
side of the frame. Here is back at this
photo or this house. This is a good example of
the whole house photo. And then also that popping
in close to the entryway, I might have even gone a
little bit closer to highlight that porch or taken
a separate photo of that porch as well. Here's a great photo showing
the depth of a house. And this one probably just makes this highlights the house
better than just straight on. Of course, you want to take
both of those photos as well. Here's a straight on
photo just to show you the difference of what a
straight on photo looks like, here is one that's a little bit closer up as well,
showing that entryway. Here's one of the
entryway itself. Another thing to consider
when you're taking exterior photos is the lighting. So you don't have as much
control of the lighting in some sense because you're
dependent on the sun, if and the weather. How the weather is that day will determine
what your photo looks like. That being said, you can
try to take your photos at different times of the day
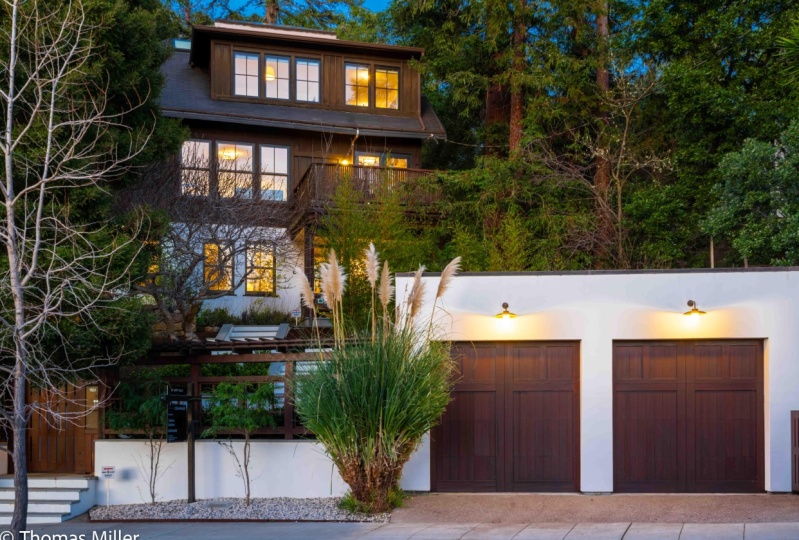
to highlight your house. So here is a great
shot of this house, which at night with
all the lights, with these big great Windows. It really is a selling
point for this house. This might not work
for a lot of houses. They might not have
the big windows that show the interior
of the space. At dusk during this
light blue hour, which is the time
right after sunset, and also the cloudy sky
looks a little ominous. So if I were taking
this photo and you had the option to take it again a different day
when it wasn't cloudy, but this nighttime
sky is pretty cool. So then we've got our
exterior different shots, but we need the
backyard shots as well. If there is a backyard,
so same thing. Left, right, center
from eye line, you want to get
that of the house. So the left, right, and center, but then you want to backup, go to the corners
of the property. If there is a nice
backyard space and get that whole backyard connected to the house from those corner. This is gonna be different
on any, every home. I'm talking about like a typical American suburb
where it's just like a box. But of course this is
going to look different if you're somewhere
else in the world. If you're taking photos
of an apartment building, if you're taking a photo of
a big farmland rural area, but generally just photos that show the backyard
space plus the house. If they have that space, then one photo for each
feature of the backyard. So if there's a pool, a deck, patio, garage, etc. Taking photos of those individually and highlighting
those is important. Here is an example of the
same house that we've seen, the front from the
one on the left. This is a photo from the
back corner of the property. And then the one on the right, this is from more
close to the house, but it shows the backyard space connected to the garage
which we haven't seen or that garage granny flat ADU kinda thing
you see in the back. That's a nice
perspective as well. So if there is a feature in the backyard that you
want to highlight, make sure you're
highlighting that here. They even took a
photo from across the alley as well to show
that entrance to the garage, which is kinda neat to have. Here is a great patio. These are just photos of
features you want to showcase. The pool and the pool is
connection to the house. Here's another photo taken later in the day where the lighting within the house really highlights the house. But of course, this is a house
again, big open windows, lots of light from the
interior that really highlights that house not going to work for a
lot of properties. This is a great little
selling point to an Airbnb short-term rental, or even to selling a house. But this great little
patio gazebo type thing, very good to highlight if you
are shooting with a drone. I want to cover this
really quickly. So aerial drone photos, I'll use that term
interchangeably. Ariel is really just any
photo taken from the sky. Drone is with a drone. You generally want to have one photo of the
front of the house, one of the backyard, and then also a neighborhood
location shots. So this might be one that's zoomed out quite a
bit where it sort of pinpoints where the property is in the context of
the neighborhood. Especially if it's
close to any sort of cool feature like nature. If it's close to the mountains, if it's close to the downtown
area of a certain town, being able to connect the dots. Here's the location to
that cool feature of the town with a photo is
you're very, very cool. Alright, with all
that being said, I think it's time to get started with some photo demonstration. So in the next lessons, I'm going to be taking photos of the interior space of my
house that I live in. I'm very lucky enough
to have a house that I think is
worthwhile photographing. And it'll be a good example of a common approach of taking photos with
furniture in them, already stylized, got photos on the wall,
things like that. So there might be things
where you might not run into with the
photos on the wall. You generally don't want to have family photos in your
real estate photos. But in the future lessons, I'm also going to
be taking photos of another space without
any furniture, which will be completely
different in terms of the approach of taking the
photos, much more simple. And also for editing the photos a little
bit easier as well. So looking forward to that, and we'll see you
in those lessons.
10. Basic Room Photo Demonstration with Flambient Technique, Natural, and Flash: Welcome to this lesson, which is going to
be a perfect one to refer back to
because I'm basically going over the entire
standard process that I recommend for
real estate photography. And this is for an office, but this could be a bedroom, this could be a kitchen, this could be a
bathroom, really, any type of room. The same elements that I'll
walk through will apply. And also in this lesson, I'm going to be
comparing and showing the differences in the different lighting
styles in more depth, including a ambient plus
flash, flash ambient. And then also using
the flash with a filter to get more
of a natural look. If you want to go
for that sort of natural style lighting
without a room, with a lot of natural
light being led in. Right now you can see from this view of my camera
that I'm in a corner. I'm at my standard
sort of waist height, a little bit higher for me, I'm back in as almost
as far as I could and I've leveled everything and I'm just trying to get
this side of the room. You can see that I have a window open and I have this curve in here that I could close down. I think it depends
on what the room is. If you have a room
where, you know, you're going to
do a window pole, then you might not want
the curtain to be closed. And so for this room, I like what's
outside the window, it's a lot of green. And so we're going to be
doing a window, Paul. But if you have something
outside the window where you don't really like it
and there's curtains, maybe close those
creditors down if they're sort of sheer
curtains like this. So I think that
looks pretty good. I'm just looking at
the composition. We're seeing pretty
much everything. There's a reflection in
this poster over here. Let me see if there's
anything I can do. Sometimes just like tilting
up or down will help. Then also, since that
didn't seem to be helping, let's just turn off
this light and see if it's really adding
much to the room. I think for this case, for our ambient shot, we'll keep that off. So let's go through
the basic process of the typical photo
that I would recommend, which is the flamboyant style. The first photo we're
going to be taking is with the natural light
coming in from the window, as well as the ambient lights. Now there's one light
I didn't turn on, which is a total game changer. And that's this one here. Because that totally changes the vibe of the room with
that little light there. And so having that on is
gonna be really nice. So from over here I'm
just double-checking, making sure everything
looks good. Now this is my office, so there's some things
that might look a little bit better if I
take down like this little light right here. It's kind of ugly. So
I'm actually going to, it's going to take 2
s to take this off. So that looks better. This plant is a little awkwardly coming into the
frame. I like the plant. Oh, yeah. That's way better, at least in my opinion. So I'm gonna take one
photo right here. Let's make sure our
focus is pretty good. Okay, so our focus is good. We are at F8, as always, ISO one-sixth, and then our shutter
speed is what is determining our exposure. So we're at 1.5 of a second
right here on the app. It just shows it as two,
but there's one-half. So we're going to stay
right about there. Like one-half is pretty good. So let's take this picture. So this is our first
photo, the first layer. Now let's turn on our flash. Then we're going to
do a window poll. But first I just want to look at that photo with the
flash and compare it. Yeah, that's pretty
good. I might take another one higher power. I was at one eighth power. And this is really
just highlighting, adding a little bit of contrast
to all of our furniture. That's going to look
really good, especially for the shelf over here. Now let's drop our exposure so we're increasing our shutter, leaving all of our other
settings the same. Got some nice greenery
out that window. And we're just going
to point our flash right at that window. And we're going to
take this photo. And that was a little bright. Let's drop that power
just a little bit. There we go. Let's try one more.
I think I might've got a little
reflection in there. That was worse. So
let's go over here. Cool. That looks good. Okay, so that is
our basic setup. We've got our room with
the ambient lights on. We have the flash bounced off the ceiling and
then we have our window poll. What if we want a
different style? Let's go ahead and try
to get a more naturally Just natural lights style. I'm gonna put my flash down. I don't need that for anything. Now, if we were gonna do that, we would turn off our overheads. I'm not 100%, wow, look at that white
balance on that shot. I'm not 100% sure about the
ambient light right there. It's so nice to have
that little bit of ambiance in there for this room. But I think for this style, the all-natural light,
Let's turn it off. That's just giving more
of that natural look. We're gonna be completely
over exposing the outside and all take one with it
exposed to show you what it looks like in
post combining it. But this is probably that natural style you
might want to go for. So I'm going to take this shot. Now that's a two-second shutter. That's why you need
to try hip-hop. And let's do one where
we are exposing to the outside right here. This time I'm not using a flash, so we'll be able to
combine those images, but it'll just be a little
bit of a different process. So that's our natural shot. Now if you want a
little bit more of a naturally lit scene and
you want to use a flash, I would recommend using an umbrella or some
sort of diffusion. So here I have my umbrella, which has the filter
on the front. Within it. There's a silver background
of the umbrella. So all the light from
this flash is going to bounce and then be diffused
through the white. If I didn't want it to be
diffused or spread out so much, I could take off this filter
and that might look okay. But I'm just trying to get
it as natural as possible. So natural light is
generally spread out. And so I'm going to just
do it something like this. Now you watching this,
you're in this frame, but I'm just gonna
do a test shot just to see what
this looks like. I'm going to underexpose
just a hint because I know I have my flash and turn
this up to full power. Let's take this shot. And because our
shutter is so slow, that might not work well. So what I'm going to do is
actually for this case, I'm going to boost my ISO just a little bit to 1.5 of a second. And I boosted my ISO to 800, which should be fine
for this camera. You have to know
your camera and know how much noise you're getting
with an increased ISO. But so that the camera
shutter syncs with the flash, you might need a faster shutter. So let's just take a test shot. And that's pretty bright. Okay, So actually I'm
going to decrease that. We don't need it that high. We still want that
half shutter though. Something like That's
looking pretty good. So here we are. I'm gonna move you now. So you're like right in
front of that flash, but you're out of the way. So let's take this shot. I'm going to raise up the flash. Let's do that one more time. Alright, so now if we look
at these photos and I see a little weird shadow
coming from the door frame. So what I might do
is try one where the flash is coming from
right behind the camera. If possible. We don't have a lot
of room in here. Now I'm just holding it
up so there's gonna be light coming from
behind the camera. And that's pretty good. We're
getting a lot more light. This room was a little
bit too dark to have a totally naturally lit shot because then everything
is getting overexposed. So adding some light
with this flash, reflected and filtered looks
pretty natural actually. So you can see the difference that I'll put up on the screen. So that's that photo and that's the process that I would do
for pretty much any photo. Next, I'm going to pick a different corner and
take another photo. Typically I would like to
go to the opposite corner so that we can see what's
on this side of the room. So I would probably pick that corner unless I want
to go for that corner if my camera is wide enough to be able to see
what's behind me, which is a closet,
which is nice to see. But I want to see the opposite
side of the room with the door opening to the hallway. Again, visualizing,
giving a map of the environment as we take our photos and as
someone's looking through them. So now I'm in the
opposite corner of the room and I think it's
the best because I can see the entrance to the hallway as well as this
other closet door, which is a nice
highlight for the room. I have my ambient lights on. I'm gonna go ahead and turn on those hallway lights as well. So now we got a lot of light coming in and you can
see that my camera, I actually push it
behind this chair. I kinda cheated that chair
up a little bit closer. So first, I'm going to
take my just ambient shot. I think it's a
little bit bright. Let's drop down to
one-third of a second, and we'll take this shot. Then we'll take one
with our flash. Cool, Nice. That's a pretty basic shot. It's not like the money
shot of this room, but it's one that
gives more context. All right, I hope this helps and we'll see you
in the next video.
11. Introduction to this Demo: Hey there. Welcome to the live
demonstrations of this course. So I thought it'd be fun to
just break up the monotony of the lectures behind
the slideshow with some actual
in-house demonstrations. So whenever you see me wearing my hat, That's what it means. I'm going to be doing
a live demo walking you through the entire process. So the first thing I
thought would be good is to go over the kit that I'm using just
as an example of what you might consider getting. And then I'm going to do a
walk through of the house as if I was walking in for the very first time to talking
about what I'm seeing, what I'm planning to photograph, how I'm planning to photograph. And then later throughout the course you're going
to see me actually going room by room
doing demonstrations. Alright, so let's go
and look at my kit.
12. What Equipment is in my Real Estate Photography Kit?: In this demo, I want to
show you the kit I'm using for real estate
photography today. And I'll just talk about
the equipment I'm using and briefly why I brought
it with me today. So the first thing is
the camera comes down to the most important thing
that you need is a camera. I'm going to be photographing
on a Fujifilm X t4. This is a crop sensor camera. And because of
that, I've brought to lens options both primes. I do have a zoom lens, but I think I'm
going to get away with these two lenses today. And this includes the
Fujifilm 16 millimeter 1.4. Remember that we talked
about the one-point for aperture not really being a benefit for real estate photography because
we're going to be photographing at an eight. And then I also have the
Sami Yang, 12 millimeter. And I wanted to test out
this lens as an option for an affordable prime lens that has a super
wide focal length. This is a manual focus lens, making it a little
bit more affordable. But because it has
such a wide field of view and we're going to be
photographing in F eight. We shouldn't have a problem
getting sharp focus. Now on top of this camera
you see this thing. This is the flash trigger which combines with
this one right here. This is the newer end W5 70. This is a kit that's a super affordable that you could find on Amazon or a lot of
photography websites. And the reason that I have the trigger that's connected
to the cameras so that I can have this off
camera and it will trigger the flash for
me. I brought my tripod. This is the Manfrotto
be free tripod. It's carbon-fiber, super,
super lightweight. So this will be super
easy to move around. It's not a fluid head tripod, so not gonna be using it for
video but for photography. It's great. Next to that you
have a light stand. This is just a typical Stan. All of them are pretty good. This is for the flash. If I'm going to be using
that and speaking up flash, I also have the
light stand holder, which is this goat ox holder. So it's just the goat ox
flash, external flash holder. So the flash pops
and right here, you can clamp it down. Then we have an umbrella and some diffusion that
goes in front of it. And I'm not going
to put it on yet because I may or
may not be using the umbrella with the diffusion for all my shots,
it's going to depend. Sometimes I might just be bouncing off the ceiling
because I'm in a house which is my house that has a lot of white ceilings, are
all white ceilings. I might get away with just bouncing this off the ceilings. But if I want a different look, just more of a natural look, I might pop on the umbrella and just brighten up the
entire area with that. So that's the kit and we'll
see you in the next lesson.
13. Walkthrough of the House - Let's See What We're Working With: Alright, so what I'm going to do is just an actual walk through. I thought this would
be interesting for you to see from my point of view, perspective what I'm thinking
when I walk into a house. So let's just get at it. If I was entering this
house for the first time, I obviously know
this. It's my house. So I have a plan, an action plan already. But what I'm looking
out for are, what are the rooms? What are the connections
between the rooms? How is the light right now? So I'm just going to talk through what I'm
seeing initially. So right off the bat, I see these great
white big windows. I see this big,
great living space. Looks amazing, but the
light is falling a little bit harshly with
the shadows over there. So I'm going to see if
there's another room to start out with likely than
just painting around, I'm just seeing what
the rooms I see some cats have to get
out of the photos. We got a little TV
space right here. This might be a good
one to start with, although it might be
better just to wait for this entire open living space because we can do
it all in one, go. Panning around. So we see some connections. These are things
to keep in mind. So we have a connection
to what's the kitchen, or we have the entry way which also has a
connection to the kitchen. So when we're photographing, I'm just kind of
walking through things that I'm thinking I'll be doing. I'll be taking some photos
from this angle to show this entire space with that
connection to the kitchen, to maybe even
something from around this way with that
connection to the entryway. So the viewer as they go
through these photos, knows where they're at. Let's just take a
look at the kitchen. So I I will admit that this is not how clean my house
always is with three toddlers. This is nothing near
how close it is. So I spent a lot of time last night and this
morning cleaning up. But there are going to
be things that I noticed like here we have a
sticker chart for our children and that's
going to have to get removed because that just pops and is too much
color right there. Now if there were
any dirty dishes, I might try to clean
some of this stuff up here like the soap dispensers. It looks it's not
necessarily dirty, but it's just a little
bit too much clutter. The plants are fine. I might move around those
plants just a little bit. Here are some money shots that
we're going to be getting with the oven range, a little coffee bar over
there and this table. But even like little things
like this napkin holder, the salt and pepper shaker, not necessary to move, but might just clean it
up just a little bit. And I'm already starting
to think of, okay, we want our money shot
of the entire kitchen, but we're going to want
them money shot of just this breakfast as well. Something to think
about as well. If you're doing photos for a short-term rental and
not just for selling a property is you might need
more photos of the features. A photo just
something like this, but a little bit wider of the range isn't going to
necessarily sell a house. I might do something a
little bit wider like this, showing the full kitchen, and I'll do that as well,
but for short-term rental, showing the range, showing that we have a mini
fridge and a wine rack, a microwave, a dishwasher. These are things you
want to show case in a short-term rental shoot. So think about those things. So turning around, we see this other connection
to the living space. So we'll definitely want some wide spot now I'm
kinda backed into a corner. I'll just show you really
quickly right here. But I'm probably going
to end up standing, maybe right around where
these flowers are, or even back further. So I can get that full
shot of from this side, the kitchen opening up
to that living space. Here we have the
laundry room laundry going to have to move that shoes preferably clean up just a little bit down there. We got a powder room
and I'm noticing okay. So we've got this
bathroom right here. The lighting is not terrible. It's a little bit bright. We have this light
shining down there, so I'll probably wait
to photograph this. Always going to
close toilet seats, maybe even move some of
that soap and stuff. That little basket
just for the shoot. But looking good, we got a
little play area over here. This is something that for
perhaps like an Airbnb rental, this is something to photograph. But for selling a property, really, this should probably
be cleaned up more. And that's just gonna be a little bit of a
background shot. Now here's another
money shot from the corner of the
property or corner of the house where we're seeing the connection
between the kitchen, What's the dining area and then the other living
area with the TV. So we'll be taking one
photo from here, again, waiting for the sun to move. And this is the
importance of scouting a location ahead of
time, or at least, at the very least,
knowing where the sun is and the direction
of the home. If you are south-facing, north-facing, depending
on where you live. And knowing if there's
going to be Windows, you've got to pay
attention to that. So here's another bathroom and because we're on the
other side of the house, this might be a good
bathroom to photograph right now where we're just
getting ambient light. Hello, watching
for those mirrors. Got some toys down there. That's all stuff we're
going to clean up, but this is a good room
that we might start with. There's a couple of
bedrooms I skipped for now. But here's the primary
sweet and here is another room that might be a good one to start out with. It's a little bit bright
coming through that window. But I think by the time we photograph the primary bathroom, which is in here, which does not have a lot of natural light. The lighting will look good
in the rest of the house. So here's the primary bathroom. It's sort of a square
and I'm going to turn on the lights so you can
see what's going on. So the lighting looks pretty ugly right now what I'm going to do is take these towels out, take out the shampoo
in the shower, the soap, all of that. Clean it up quite a bit. We've got a bowl a bowl
water for the cats and dogs. So things like that. I'm just going to clean up. But anyways, I hope that you enjoyed
this sort of walk through. I'll probably start with this bathroom when
we get to the demos. And then depending
on the lighting, I'll be moving on to
the rest of the rooms. But I hope you enjoyed this little lock
there and it gives you some ideas for what
to look for when you are starting out at a house. Cheers
14. The Kitchen - Part 1: Welcome to our first
live demonstration. And for this live demo, I wanted to take
photos of the kitchen, which is generally one of
the most important rooms, likely the most important room for any type of house,
real estate photography. So I wanted to talk about the entire process
from beginning to end. I'm going to be taking a
lot of different angles, probably more than necessary, but I just want to show you all the different
possibilities. Now this room has a
ton of natural light. So this is a room that
might lend itself to being a great photo with
that natural light style. So we're going to do that. We're going to show
you the difference between taking bracketed photos. We're going to do the
ambient style and then the flash flamboyant style we're
going to do at all here. The first thing I
wanted to know, I want you to note is
the settings I'm using. So I have my camera
set on a manual mode, but you would likely be on an aperture priority mode where you are locking down your
aperture which were at an F8. I have my lens manually
adjusted so that it's about, we're a little past
seven or 8 ft or so, and then it goes all
the way to infinity. So everything is
pretty much in focus. My ISO is the lowest
this camera goes, which is ISO 160. And then my shutter is
just bouncing around depending on if I want it
to be brighter or darker. So right now I'm going to set it to auto just to show
you what's happening. And let me actually just
take a video of this so you can kinda see on my camera, I also have my level set up. So here's my level. You
can see that green line, which means it's level. And then I also have this grid. You can kinda see the
grid lines up and down, which are going to help me
line up lines in my frame. Now with my shutter speed
set to automatically, I can bump up my
exposure compensation and you can see that I
have a specific dial here. A lot of cameras,
it's just going to be in the menu itself. But as I increase that, I can make it brighter. So this is perfect because it's automatically adjusting
my shutter speed. Now I might not necessarily
want to keep it on auto if I am doing my
combination of shots, my manual shots, I flash shots, my ambient shots, my
natural light shots, because I want them
perhaps locked down my shutter speed and
locked down my exposure. But for just getting
a naturally lit shot, something like this
looks pretty good. I don't mind the
overexposed background, so I'm just taking that shot
just so you can kinda see. And that's a one-point
three-second shutter. Really long to get
all of that light in. Because I'm shooting in RAW, I'm going to be able to bring
up those shadows a bit, bring back the highlights a bit. Although I don't
even necessarily want the highlights
to be brought down. I liked that overblown. Look for this natural shot. Now I want to go
through and just take one bracketed shot as well. And in my settings, it does have an option
for changing the settings to expose your brackets
one-stop over, one at zero and One-Stop under. And so when I hit this button, it's going to take three shots. Now let me record that
because it's pretty cool. You can actually see
what's happening. Let's record. It took three shots, which was pretty neat. And you'll all be in the
settings section of this class. I'll be going through
these photos, looking at the
different combinations. What's better bracketed versus not for most of the
rest of the shoe. I'm not going to be bracketing. I find that it's just a little bit too much work for myself. If you're just shooting in JPEG, I highly recommend bracketing. But if you're shooting in RAW, I would say one is enough, especially when you're combining the single photo with the
ambient lights and the flash, just shooting single
photos and Ra is perfect. I'm going to turn that back
off to single shot as well. I didn't really talk
about this angle, so this angle I chose first because we're seeing
the entire kitchen. We're not getting a super
highlights shot of some of the main features like
the oven or the range. But it's an important shot to show the layout of
the entire kitchen. You do see the fridge, you see the the dishwasher, you see in the distance there's a coffee bar and a
little breakfast nook. You see the range in the back. So this is an important angle. So now that we have
that natural shot. And what I wanna do too is I'm just going to
take a photo with my iPhone and we will
compare the difference. I'm basically getting
the same angle. Now with this iPhone, I do have the option for with two lenses for the one times
and then the 0.5 angle, which is a wider angle. So I'm trying to
perfectly match this up. Okay, So let's take
that one photo. I think my lens was a little bit wider so I can see
the cabinets on the left and right
in the other angle with my 12 mm Sam Yang, Here's the wide view which is honestly a
little bit too wide. I feel like I don't get to see the background gets
pushed farther. You can kinda see that when
I'm zoomed in quite a bit, even though I can, I can
still see the left and right Side which I want versus this, I'm kinda pushed even further
and we can compare and contrast those photos in
the post section as well. I'm going to be going through the raw photos from my camera versus the raw
photos from my phone, talking about the different
capabilities of editing. So if you're interested in
shooting with a smartphone, definitely check
out that lesson. Now let's get back to taking
photos with this camera. So what I'm going to do is I'm going to turn on my remote, which allows me to
trigger my camera, which is good because
I don't want it to be touching trigger when I'm taking the photo
even touching this, I can tell it shakes the
tripod a little bit. And even though we can line
that up later in post, I just want to make
it easy, simple. I'm going to take photos by pressing a button on my phone. And this will allow us to take the shots for our ambient shot with the ambient lights on
and then also with our flash. Alright, so now we can see
on my screen that we have a shutter speed of
one half second, which is that's how
it's represented here. We have the f-stop. It doesn't show
it's an FAA and it doesn't show because
this is a manual lens. It's a Sam Yang lens, which doesn't provide that
information to my camera, but it has a dial on
the front that I can see an F8 and then
my ISO one-sixth. So what I'm going
to do is now turn on our lights in here. And just little
things like notice how there's little rug. I'm not sure if you'd see
kinda pops up right there. I'm just going to pull
it up just a little bit. So that's not pulling up. I want to make sure
it's kinda like centered in this walkway. I'm going to turn on all
the ambient lights in here. We got a bunch. These lights over here are
a bit much so I'm going to, let's see if I bring
down my shutter speed. That's looking pretty good. We have one more light. As the garbage disposal. There we go. That's looking pretty good. This is a much different photo than the one we saw before, which was of the natural light. But it's going to
work out pretty good. So we're adding
one-fifth shutter speed. I'm just going to tap the
button and take one photo. Cool. The other thing too
with the lights on, the exposure to the outside
is a little bit better. It's not perfect,
but it's better. Now I'm going to
take my flash shot, not moving my camera. I already have my trigger on, which is good because I'm not going to even
touch the camera here. I'm just turning on my flash. Now with the flash, I'm going
to have to take a couple of test shots to see
what power I want it. But right now I'm just going to aim it just up at the ceiling, about like two or 3 ft
away from the ceiling. I'm going to go at full power so we can see the difference. I'm not really
worried about what it looks like on the ceiling. I'm worried about what
it looks like when it casts light onto
what's in our scene. The appliances,
the countertops to highlight those make those a
little bit more contrasty. So here we go. Take this one photo. Cool. I'm gonna do it from this other angle because
I noticed that there was quite a bit of a reflection
on the refrigerator. So I'm thinking if I shoot from this side and I
can go over here, I just don't need
to be in the frame. It's going to look better. That looks pretty good. So now what I'm
going to do is I'm going to continue to
move down this line. Now, I'm going to hop up on
this countertop, hide myself. Another reason, this
remote trigger is great. I can see when I'm on
the camera or not. And shoot from over here with the flash that
is, I'm about here. Don't wanna be in the frame. 123. Pretty good. So you can see that it's totally
blowing out the ceiling. I might have been a little
bit too close to the ceiling, so let's do that one again. But it's highlighting
the countertops. It's highlighting the appliances and everything over here. So I'm gonna do,
this is a long room, so I'm going to do
one from way over here and you see me in this one. So of course I can cut
myself out of this as well in post so I can mask
myself out if I want. So I'm just gonna do that one. So this one, I'm just going to stand here
because I want to highlight that oven
range really well. Cool. And let's just take one
more from over here, way in the corner. Cool. So that looks pretty good. Now what I'm going to do
is since I'm over here, I'm going to get
these window pulls. So I am going to actually be decreasing the
shutter or increasing the shutter speed
rather so that we are exposing for the outside. And that's good. You don't need to do the flash, but with the Flash does
it's going to help a lot when we are editing
these photos. Later on and masking
around things. The window frame and these
window frames are kinda clean, white light color, which is going to be super-helpful if
there's curtains and things, It's a little bit harder
but it will still work. But let me just show you. So I'll take, just for
the sake of Education, I'll take one photo over here. Just like this, where we're
exposing to the exterior. Now the flash was on but
it is pointing this way, so it's not going to
affect that photo. Now. I don't even like
what's happening in the photo in the window that's on the right
side of the frame, but I do like the green in the background and I'm
just going to stand over here and point my
flash right at the window. I'm going to be cut out of this part of the photo anyways. That was probably a bit bright, so I'm going to decrease my
brightness back up just a little bit. There we go. Make sure I'm not in
that reflection as well. And that's looking pretty
good for this angle. So what I'm going to do is I'm going to move the
cameras around to a different angle and walk through that
different angle as well.
15. The Kitchen - Part 2: Alright, so here's
the second photo that I'm going to
get for the kitchen. And you can notice
behind me that I have my tripod setup on the
countertop itself. And that's one of
the great things about this little Manfrotto. Be free tripod, you are
free to move it around. It's super lightweight
and let me just take a shot really quickly so you can kinda see what
I'm working with. Again, if we want
that natural look, my overexposed
just a little bit. I don't want my flash on. Now I'm going to take a photo
so you can see those grid, that grid line It's
really nice to see in this photo and the grid lines
don't show up on the app. So you can't really see that. This is another hero
shot where I think it's a great shot to highlight one of the features
of the kitchen, which is r to the features
which is this range, and then also the breakfast
and coffee bar area. So three features, all-in-one. This kitchen is a big kitchen, so it's nice to break it up into different areas for our photos. And I really like the
look of this one. I use the grid to really try to make
those lines straight. We've got the tile, we have the window, we have the doorway, these cupboards over here, all things that we can use
to straighten out our photo. So let me connect to my camera so you can see what
I'm working with. Alright, so now first
I'm going to retake this photo with just
a supernatural look. You also noticed that I am
shooting up higher because I want to see the
countertop as well. So let's just make it
a little bit brighter. Bright and airy look something like that. Looks pretty good. I'm going to take this photo. Then you can see that the process is pretty
simple once you start to get a groove of things. So I'm going to turn
on these lights now. So those are all the
lights in that room. And there are some
overhead lights right above the camera. I'm going to turn
on just because that's going to add a little bit of light to the the oven range. You can see that with
them on versus off on. I think it gives a better
presence to all of that light. So let's take this photo. We're at a shutter speed of, I don't want to be too bright, so shutter speed of
one-fifth of a second. I am noticing some reflection
on the countertop. Is that this light over
here that I just turned on? Oh, no, that's probably
that's these ones. So we're just going to
have to deal with that. We might have to we might
want to remove that in post, or it's okay to live with
some little reflections. It is natural after all. So now I'm gonna
get my flash shot. So it is again, holding my flash up right
here at the ceiling. We are at half power. That's pretty good. Let's
do one at full power just to have, alright. And then we'll take one
from over here as well. Really highlighting
this back area. And now we're going to
get our window pulls. So we're going to increase
our shutter speed. We are getting this
weird reflection coming in from that window, which is just like the
other window reflecting it. So let's see what happens
when we do our window pole. This is a nice window to get as a window pole because it's
nice and green out there. Not bad. I'm going to go from this angle. Hey, decrease our power
just a little bit. It's a little bright. Cool. I'll be able to work with that. Alright, so that's it for this second angle
of the kitchen. I'm probably gonna get one more looking this way at the kitchen. So turn everything
around. Coming up next
16. The Kitchen - Part 3: Alright, so now I have this angle setup because I
wanted to really highlight this side of the kitchen and I wanted to see also the
space and how it works out. So in this shot, we
can see everything. We can see the range
from this side. We can also see the sink
which we saw before. We can see the entryway, which is important to
be able to show people where they are in the
map of the house. And then we also see
the countertop over here with a hint of
open nis over there. Now I could kinda go a little bit more like
this, but not really. I don't want to necessarily
highlight the open kitchen, open area in this shot. I'm going to come
around to this side shooting that way afterwards. But right now, this is still
a kitchen highlight shot. So just making sure our
lines are pretty straight. We are getting a little bit
of warping on the edges. Like having these lights
here on the right-hand side. Alright, cool. That's,
that's pretty dang good. So we're gonna take this shot. We have all of our ambient
lights on still for this shot. So let's just go ahead
and take that shot. Now let's take our flash shots. Then I'll take one from
down here with the flash. And they'll even take one from way over here in the entrance. Or if I get hot
myself right here almost. Might have
been too bright. This light over here I'm
noticing is kinda nice in here. So I'll take one with that on
and maybe we'll combine it. Cool. Now with this photo, I'm not sure if I'm going
to want that window poll. I can't even see what's
in that window right now. So what I'm going to do is
just literally crank up my f, my shutter speed
just a little bit. And there's really not anything
I need from that window. So we don't need to do that. But what I do want to
get is one more shot, just with natural light. I do think for our house, for these open rooms, the natural look actually
works really well. So we'll see, and
then the day which ones I actually prefer. I'm going to increase the exposure by decreasing the shutter speed
just a little bit. And we'll take that shot. Nice, cool. Alright, so that's this angle. And then I think the
last one I want, which we haven't really
gotten a good shot of, is the countertop, the fridge. And then also from
this angle here, looking into the open area of the living room
and dining area
17. The Kitchen - Part 4: So here I am at this other angle where you can really see
this side of the kitchen, the dining area into
the living room. Now, my settings right now, I'm just going to take a shot. I'm at one-fifth of a shutter speed and the
kitchen is a little dark. So I'm just going to
boost that and see what happens with the photo. If I expose really to the
kitchen itself one half. Actually, that's a two-second
shot and not One-half. One-half. Yeah, that's right. Alright. My lines are a
little bit straight, so let's straighten out
those lines, just slow it. There are a lot of lines
to pay attention to. Now, overexposing those windows right now is not a bad idea
because from this angle, There's a construction
project going. This is my house is I'm working on a
tree house back there. And so overexposing is
probably better than let me just show you what would
happen if I did a window pole. Eventually, we'll
have a nice sort of backyard area out
there for photos. But for today, we're
going to overexposed from this angle into the
background backyard. So I think this
looks pretty good, but I do want to get
the ambient lights on. So that's including ambient
lights for the kitchen, but also in the living space. And now I can decrease my
shutter speed a little bit. So the exposure of that room and this room is quite different. And so shooting in RAW for
this photo is important. I'm going to put on the
ambient lights in the hallway to now that was a
very little thing, but down this
hallway to the left, you'll be able to
see a little bit more with those
ambient lights on. Okay, so let's take this shot. Now let's take our flash shot. And really with this
one, I am trying to add a little bit of exposure
to the kitchen. And I'm going to look at
that photo right here. Boost that power. And
just a little bit. There we go. That's
a pretty good flash that will combine really well. Now I'm going to
take one that's just a little bit underexposed for some of this area
in the living space. And I'll see if I
want to combine those photos because it's kinda hard to see this
great chandelier. We have the fireplace as well. So I'm just going to take
this photo with no flash. Alright? I think that's
it for this angle.
18. The Kitchen - Part 5: I'm adding one more shot
of just the brac business. We had that shot from
before where we had the range plus the
breakfast, Nick. But I really wanted
to just highlight this breakfast neck itself. So let's take one
with just natural, naturally lit,
something like this. Now let's take one for if we want to go with
the ambient route, our ambient lights on. Still getting used
to, which is here. Now let's take one
with our flash. And our window pulls. Tripod moved a little bit. So I'm going to go
through those again. I think my legs
were my tripod legs were a little bit too far apart. So let's go through
that sequence again of the ambient lights at least. Alright, so let's take one, just know there
are flashes lung. So let's take the
flash one first. Then one with flash off. Now a window poll. Those wooden poles were a little bit dark, those first ones. So I think I'm going to really like that
shot while I'm here. I'm actually just going to turn around and I'm gonna do one of those flat profile shots
of our oven range, which is such a highlight, trying to get centered with that as much as possible.
There we go. I think this one is
just gonna be better with all natural light. That's gonna be a really
nice photo to have. Even just get a
little bit closer. Still want to be up a little
bit so I can see the oven. But I also like seeing
that that hood above it. Now I'm trying to make
these lines as perfect as possible in frame. But I'll show you a quick
trick in Lightroom to quickly make some of these lines straight in the
post-production section
19. The Primary Bathroom: Here I am in the
primary bathroom, and bathrooms are
always pretty hard. You'll hear a little bit
of extra echo as well. So I hope that
doesn't bother you, but you can see me in
the reflection that mine photography camera
is way in the corner. And one of the benefits
of the flip out screen from the z4 is that I
can actually set it up, flip the camera around, and actually see exactly
what is on the frame. I'm also using the app, which is going to allow me to
remote trigger the camera. So looking at this setup, I got it as wide as possible. This is what the 12 millimeter. And this is a situation
where even having a wider lens might
be even better. But I think we're gonna
get away with it here. Now my goal with
this photo is to show really what this
entire space is. We've got the toilet, we've got the bathtub, we've got the double vanity, and then of course we
have the shower as well. Something that I'm going
to look at to see is, do I want this close? It's kinda cool to see
that closed as well, that that's a mirror, maybe halfway so that
you can kinda see that It's a toilet as well, maybe something like that, giving that sense of okay, what is this space? We've got the toilet room, but we've also got this
cool, cool mirror. I might just do two
different ones. There is some nice natural
light coming in from that room and that's some of the only
natural light we are getting. So remember, we're
shooting at f eight, we are shooting at ISO 160, which is the lowest
for this camera. And then we're just
using our shutter speed to basically expose properly. We're going to take first
are shot with the lights on. We do have all the lights on, not a room that lends itself
to an all-natural photo. So we're gonna do that. Then we're going to
take our flash shots. And I might do one where
I'm pointing it up just at the ceiling and then maybe
one in this room as well. And see what that looks like. If I'm going to use all
of those and combine it, and then that's going
to be pretty much it. Then we're going
to swap angles and see if we want to get
a different angle. So here we are with like a one-fourth second
shutter speed. So obviously having it on a tripod is important right now. So let's go ahead and
take this one shot. So from here I can just press this button
to take the shot. Makes sure I'm not
in the mirror. That's pretty good. I'm gonna go in here and
just do one with this door open all the way so that
you can see the toilets. So people know that there
is a toilet in there. Then one with it shut. Ouch. Careful. I actually really like that. That's pretty cool. I think that's a cooler shot. Now, looking at this, I might
tilt down a little bit. I don't necessarily need
to see the ceiling, the very top of the ceiling. And I want to see
more of this tub. I don't want to get rid of
that shower head though. But seeing that tab
is pretty cool. Not sure if this ladder
adds much or detracts. I'm just gonna put like that. It kinda adds a nice tone. I think that's about as good as we're going to get
from this angle. I wanted to make sure we
saw the vanity lights. We're seeing the double sinks, we see the shower heads, we see the bathtub with spout. And I think this is pretty much as good as
we're going to get. So I'm going to
retake this photo again just like this
with the lights on. Now let me open that door. Turn on that light as well. Actually, that's kinda nice. Brightens up that area as well. Cool. So that's looking
good. Now let's take one with our flash. With the flash, It's
always a little bit of trial and error to see
how powerful you want. Different flashes
work different ways. This one, you can set it to full speed and then you
can go down by increments. So if I want it
to be half speed, I can go down and just go down until It's not as powerful. So what I'm gonna do is
just from, from over here, I'm just going to shoot it at the ceiling and see
what this looks like. The cool thing about using
the remote is I can just switch to viewing my
photos right from here. You can kind of see
the before and after. It adds a little bit,
although we have my reflection in the glass. So we're gonna do that again. Let me go over
here on this side. So if you see me, I'm gonna be standing in this corner and
while we're at it, I'm just going to take
one from inside here Now I'm going to take one just, just so we can see which one works best from over
here in the corner. Kinda, really close
to the camera itself. Might be too, too close. So let me switch. Here we go. Cool. So we're going to
have to combine a couple of those because we are getting the reflection
in the glass itself. But I think that's pretty good. Now I do want to
take one more with that door close just
so we have that. The second shot with the flash, with that door closed. Alright, so that's
looking pretty good. We're going to flop angles
and get a different shot. Alright, so you can
probably see me in this shot somewhat. So what I'm gonna do
is take the camera and I know we talked about
doing opposite corners, but I'm going to go to this
corner here where we can see the tub and
the shower itself, which I think is a good
view to be able to see. So let's go ahead and we definitely see
us in this reflection. So we're going to open
this door for this one and turn on the light. Here. We're getting some
really funky angles of those doors, the door frame. So I'm going to try to
get that plant in there. So I'm just trying to
set up this angle. It's pretty difficult to see
what I'm doing over here. So what I'm trying to
do is try to make sure these lines aren't
totally out of whack. So I want to highlight the
bathtub, the shower itself. I think something like
this works pretty good. You kinda wanna get a little
bit of the ceiling as well, but we're also highlighting
this big wall of tile. So that's pretty cool. Alright, so let's go ahead
and because I'm filming, I have my flash on. I'm just going to turn my
flash off actually right here. Just turn this off and then take this photo
here with the lights on. I'm going to make sure our
shampoo can't be seen. That's pretty good. And then I'll take one
with the flash on. Cool. Not sure if the flash
adds much to that photo. Let's change it up
again and we're gonna take it from
the opposite corner, probably where the shower is, so that we can show
the connection between these vanities and then the
primary bedroom as well. Alright, so now
we're getting the, so you can kinda see, I'm trying to make
these lines vertical, but we're still able
to see the vanity, the double van de,
but now we can also see out into
the other room. So we're going to have to
clean up that really quickly. We are getting a lot
of those cool light from the daylight
coming in from there. That's the problem
with mixing tones. What we're going
to do is turn on those ceiling lights over there. I'm going to grab my flash, turn this off, get
our first shot. Let me see him
crouched down under here. You don't see me. Take one shot. And then we're gonna do
one with the flash on. And I'm going to stand over
here as much as possible. I'm going to have to
move this camera. That's good. Then I'm gonna go ahead and
do a flash shot for out here. So I'm just going to stand on this side of the door frame
and point up at the ceiling. I was a little bit hot, so let's do that again. You see me in the reflection, how we're going to balance
that against the wall behind me. All right. So that's it for the
primary bathroom. And I'm going to move
on to the bedroom itself where I think the
lighting has improved
20. The Primary Bedroom: Here I am in the
bedroom and I have one shot all already
pretty much set up. It's from this
corner of the room, which I think is the best one, where you can see the nice
window and sliding door. So I'm just gonna go over
here and kind of clean up these curtains a little bit. This is definitely a spot where seeing the
outside is nice. So we are going to be doing our window poll for this shot. Alright, so we're all cleaned
up now to take our shots, you'll notice that
I am at pretty much right at waist level, a tiny bit higher, so we can see a little bit from above the bed. Not sure if I like
this blanket here. Just add that, right? Yeah. I think that's cleaner.
Alright, so ready to take this shot first with
the ambient lights on? Let's turn on these. Even though we don't see them, it's going to add a
little bit to the shot, especially when we
change directions. And let's take one shot. Our flash was on. Let me take that one more
time without the flash. Now let's take it
with our flash. Sworn. Check that out really quick. This is the before. We're getting a little bit of a nice highlight on
that furniture itself. Let me boost the power
just a little bit. Alright, so let's add
this more powerful flash. Remember, we're not
really worried about what the ceiling looks
like for these shots. Were more carrying
what it does to the furniture and the interior of the rooms. Let's do one more. That looks pretty good
now I'm just gonna go over here and
take one just to have and I am going
to be in the shot, but we're gonna be
able to mask me out. Then same over here. It is a bit of a actually
let me try one right here. I like how that looked for
these photos over here. Alright, I might have
been a little bit bright. Alright, so now we're
gonna do our window pulls. So what this means is we're
going to drop our exposure and we are going to
expose to the exterior. And then we're also
going to flash directly at our exterior
around the window frame. So here we have this view. It's still a little bit
overexposed on that right side. So we're gonna do
this separately. One for the Laughter window, one for the right window. Boost at full power. There we go. We might actually,
let's adjust our focus. Just trying to get that
reflection is not so harsh. There we go, That's not bad. Now let's do one for the
sliding window on the right. You'll also notice in
the mirror that we'd get that reflection as well. So we'll see if we use that
reflection in the mirror. Let's, There we go. Something like
that's pretty good. Alright, so that's
enough for this angle. We're going to rotate and flip from the opposite corner so we can see coming this way
with the bathroom as well. So we, again get a sense of
where we are in the room. So we're going to
move over here. So we're going all the
way in this corner. And on this side we're
seeing that bathroom. We're seeing the closet, which is going to
be nice to show. You've got the bed and we
also have those lamps. Now you'll notice I'm
looking at my phone because when I'm connected to my app, which I want to do so you
can see what I'm seeing. I can't use my viewfinder or the LCD screen on
the back of my camera. It's pretty good. We're getting a little
bit of a funky line. I want to make sure
those door frames are as level as possible
with this lens, I am getting quite a bit
of work around the edges. Some of that I'm
going to be able to fix it in post for sure though. I'm wondering if I
want to come out in front of that dresser. I kinda didn't like how that
dresser was like poking into the bottom left of the
frame as you see here. But I do like that plant. I might just come something
like I get both lights. We're just get one I
think I got one light with that plant in
the background. I think that looks better. These are just the
things that you got to think about and
do kinda want to see that light at the top of
the frame, the fan anyways. So that's looking pretty good. Okay, so let's take
this shot ambient. And then also with our flash on through one flash over here. I'm just going to take
one from over here. Actually from in here. Alright, so we have
our flash shot, we have our ambient
shot this side, we didn't need any window poles. And so I think we're
good with this angle. Now I just want to see one
thing really quick to see if an angle from this
side is necessary. It's not necessary, but I
think I will take this one as well just so we can see the door and I will
open up that doorway, hallway door into the hall. And we have this nice
window over there. We can see the
whole bed and that, we can see the whole bed
and that corner as well. Alright, so this
is a pretty good full shot two of the bed. That's nice. I'm
going to open up this door so we can
see into the hallway. And I'm going to
turn on those lights as well in the hallway. Alright, so let's
take our first shot, which is just our natural
light with our ambient lights, with our flash off. We're going to take
one with our flash. Going to come over here
and do another flash. Alright, now let's
do our window pool. So I'm going to drop my exposure by increasing my shutter speed. So it has a nice exterior. And we have, That's pretty good. So let's just take one
without the flash. Now, one with flash
around our window. That's pretty good. Cool. So I think that's it for this room and we'll
keep moving on.
21. The Laundry Room: Alright, so moving on
to the laundry room. This is another
kind of basic room. But for me it's pretty simple. I'm going to take
one from this angle, from this corner of
the room that you see in your frame and
one sort of opposite. And there's a couple of things I'm trying to
highlight in this photo. I'm trying to highlight the
bench, which is awesome. The door to the exterior, the continuation of this
room to the powder room, which you can tell
from that wallpaper. So anyone looking
through these photos would see that this
connects to that bathroom. And then of course, the
washer and dryer and any sort of cupboards and stores
that we have in this room. So I think this angle
is pretty good. We have these cool
hooks on the wall. I'm going to move this
backpack to this one. It was kinda taking up
a lot of visual way on the right side of the frame. Yeah, I think that
looks pretty cool. Shoes are not perfect, but kinda normal to have them a little bit
string like that. This is a photo where I do not want to see what's outside. It's the driveway to the garage. There's a lot of
stuff out there. And so what I'm going to do is completely overexposed
that I'm not going to be doing any sort of window
pulls for this photo. So right now if we want
a naturally lit shot, what I would do is decrease
our shutter speed. Now we are getting some
interesting reflections going up on the
wall to the left. It looks like coming from
the window behind me. I'm just going to have
to live with that. Maybe there's things I can do in post to blend that together. But that's okay. It's not a make or break shot
or aspect to the shot here, looking pretty good
for a natural shot, but I'm just going
to go ahead and shoot this with our
flamboyant style. So we are turning
on the lights in the laundry room as well
as in the bathroom behind. We're a little bit
bright right now, so this looks pretty good. Just want to make sure we
are as level as possible. Using this cupboard on the left as our guide post for
what we want up and down. That looks pretty dang good. So we're going to go
ahead and take the shot. Nice. Now let's do
one with our flash. Full power, just
from behind camera, a bit pointed up at the ceiling. And that looks pretty good. I might take one from
over here as well. Now with this one I'm
going to do actually setup my flash point into the ceiling and then
get out of frame. You might be able to see my cat in the brain, but that's okay. Cool. I was a little bit too much getting on the wall over there. So that flashes just sitting
in a cupboard up there, which now you can see open. We'll see if that does anything. Not bad, be able to use some of that for
one of our photos. So that's from this angle, I'm going to swap sides
and we're going to move this camera to the other
side for the opposite angle. For this shot, I'm actually
literally going to be opening this door and sticking one leg of this tripod out the frame to get as close
to this wall as possible. Now we do have some dirty
laundry in this washer, so I might take that
out real quick. So those are the things
you might have to do as a photographer and that's
totally fine for the shot. Of course, you want
to ask the homework. If it's okay for you to do that. This shot is looking
pretty good. I don't like how this
backpack is in the frame, like how it was. I'm going to take that down and that's looking pretty good. So I'm going to take
this shot like so. We're gonna do our flash shot. Nice, that looks pretty good. I also think that this laundry room lends
itself to a flat shot. This way, kinda looking at our our laundry machine and
then also the cupboards. So let's see what
that will look like. So we do have the
cat and the shot. We've got this
toilet in the shot. Which isn't a bad thing because it gives us more
context to where we are as I like to do is
move you out of the frame. And that's looking pretty good. I mean, typically
I would probably move the cat out of
the shot for sure, but this is looking pretty good. The washers don't seem to be the driver does seem
to be perfectly level. Something like that
looks pretty good. It might be a little bright. There we go. Something like That's
looking better. Albeit a strain this
out more in post. We had our flash gun. So let's turn that off. Let's turn our flesh
on. A little hot. And then again, nice,
That looks good. So that's pretty much it
for the laundry room. Now with every room
you're not going to be able to get every
single corner, every single inch, unless you take just saw too many photos, but you don't want to
take too many photos. You want to solid ones
per typical room. And then for the kitchen, primary bedroom living spaces, you might need some
additional ones. But I think that pretty
much covered it. Well for the laundry room
22. The Living Room: Now we get to work with a super small space
in this bathroom. It's actually not the smallest
bathroom in the house, but bathrooms are tough. So you can see in the frame that I initially put the
camera right outside the room were on
my 12 millimeter giving me the widest
option possible. And it's just tough, but I think we can
work with this, the tile and here is super fun. There is this curtain here that you'll see here on
the frame that I've opened up because I
want to see the tile of the bathroom and the shower itself and
adds a little bit. There is another light in
here I'm going to turn on, but there's a fan on there, so you might hear some
of that fan noise. I'm going to move
these paper towels. She's going to get rid
of this soap right now. Overall, this is actually
looking pretty good. It's almost like, it's
like the best you can do with such a tight space. I'm like literally getting
right up next to the door. We see that door frame there, which isn't
necessarily a problem, wondering if I should be
up a little bit higher. Just for the bathroom shots. Clicking down at the
countertop, the tub. Ideally, I'm not
showing the door frame. I want to give the
illusion that there's more space in here
than there really is. Getting inside that door
frame helps with that. So this is actually
honestly pretty good. So let's go ahead and I'm going to open this up
just a little bit. So people know that that
is a bathtub in there. If they look closely,
it's pretty good. Alright, so for this photo, we are going to take it
with the ambient lights on. And let's go ahead and
take this shot right here. We're still on a timer from
previously, so that's okay. Now I'm going to take
one with our flash on. That was so bright. Okay, so let's decrease
that shutter quite a bit, or increase the shutter
to decrease the exposure. Or we could have. And now I'm seeing
paper towel and corner. So let's actually
turn off our flash. Let's start from scratch. Looks pretty good. Kinda want to highlight those tiles just a
little bit more. So I'm going to tilt down. So we see more of the tiles. Yeah, that's better. Okay,
so let's take this shot. We're starting from scratch. Okay, now let's
turn our flash on. It's way too bright, so
we're just going to decrease our flash power.
That's pretty good. That's going to brighten
it up quite a bit. So that actually looks
pretty good in here. Let's see if there's
another angle I can get showing the bathtub. I might be literally putting my camera up here on the
counter, but let's see, sometimes it's easy
just to pop off the ER best to just
pop off the camera, move it around and see
what we're working with. That it'd be nice to get
a shot of that bath tub. So this is kinda like
the opposite angle. So I think we're
going to try to go something around here. It's just trying to figure
out how we're going to get that tripod. You can probably see
me in here actually, and I am crouching underneath. That's not bad. So literally, you
might be able to see my camera in the
corner or a there, it's like literally
against the toilet, against the wall,
crouched in there. The other thing that
I want to do though, is get a shot of the vanity. So here I'm going to
take a photo from probably within the
bathtub itself. It kinda like this shot right here where you see the vanity, see a bit of the tile. It's kinda nice to see those. It's kinda like the choice. Do I want the tile
or the lights? Maybe a tiny bit of both. That's not bad, except you
are in the way now my friend. So let's do this. One. Can take it from over here. Then I'll come inside
for the flash. Nice. So that's how you
can take a photo of a tight bathroom
and I'll be doing another one as well.
But I hope you enjoyed
23. A Small Space Bathroom: Alright, so now we are
photographing the open area which the fireplace kinda connects
nicely to the entryway. So that's why I have this photo framed up like this where we see the fireplace along with
the entrance as well. So here we're going
to take this shot. It also shows where
the kitchens at, which is nice, again,
showing those connections. So let's take this
shot right here. We've got the ambient lights on. And let's get our flash on. And now let's do
our window pole. This is definitely
gonna be a photo where we want that window pole. Exterior shot right
there, both sides. Out the front door and then also that window
in the background. So let's go first,
the front door. Nice. Now this one, I
see my reflection. Cool. That works. While I'm at it over here, I'm gonna do a couple
more flash shots, but we got to boost
our exposure. So now this is going to be another photo where doing
just a naturally lit photo, it would look nice, too. Cool. Alright, so let's go
ahead and turn off all the ambient room lights. For a natural shot, exposure is pretty good. Maybe increase it
just a little bit. Let's take that shot. Then let's do a window poll. I think mostly of that
front window, the door. Nice, Cool. So that's a great
shot of this area. So next we're going
to just move on and see what other angles
we need of this space. Alright, so I know I'm a
little bit dark in this shot, but what I'm going to
do now is just get this great room shot showing
the windows in the back, the sliders, and just
how big this room is, that's the goal of this shot. I want to show the
height of the ceiling. I want to show the
height of the fireplace. And then just again, showing the rest of that room that we haven't seen before. So looking at my shot now, I'm going to take a
photo for you to see. I'm not recording on my phone. Now, I've composed this image. A couple reasons why I wanted to make it a kind
of extremely wide. I kinda like the lines coming up the left side and then
also the right side. You see a little bit
of little lines from the beam on the ceiling
and the kitchen. And I really like the fireplace
being on that third line. So beyond that, right third, we've got the window's
kinda going in the background on
that left-hand side, we also see the beam at
the top of the ceiling, which is super cool. I might come down on my
tripod a little bit, I'm a little bit high. Now let me take this
photo one more time. This is just with natural light. I don't like how this basket is. So much in the frame. A little bit less as fine. That's pretty good. So let's take this photo. I've just been kind of
composing this photo. So let's just take
this photo for reals with just the natural lights. Let's do one with natural light. And at the same time, I'm
just gonna do it sort of like a naturally lit photo
with a window poll. So I'm just, these
windows are too big for me to do a window
pole with the slider. So I'm just going to
expose to the exterior. We'll see how we
can mask that out. I'm going to get this
window pull this way. Should help. Let's do one more, a
little bit closer. We are at full power, but there's so much
light coming in. It's hard to compete
with that light. Cool. And while we're at it, let's turn on our ambient lights so we have that shot as well. Alright, So I went a little
bit out of order on that one, but this is our last shot to combine for our flabby and shot. I've turned on all my
light house lights and let's get this one. Here we go. There we go. Nice. That'll combine
two really nice photo. So I'm going to move over
to the opposite side of the room and get another
shot of this great room. And probably from this
corner over here. Alright, so I moved over to this corner of the great
room, we'll call it. I've composed this
shot so that we can still see the great fireplace. We can see the
entrance to the house, but we can also see a couple
of other areas that we will highlight and other photos which include the dining space, the little little kids area. You see a hint of the
connection to the kitchen. Then you also see
that this is another Sitting area over here. So let's go ahead and take
this shot just like so. Then I will take a flash shot. Let's take one from over here. Trying to really highlight this city area right here
in front of the fireplace. That's nice. And then we're going to get
our our, our window poll. Let's increase our
shutter speed. For that exterior front door. It's looking pretty good. Maybe a little bit hot. There we go. Cool. So that's another great
shot for this area. I'm going to continue to move to the dining area to highlight that spot which
we haven't done so yet, you can probably see
in my shaky camera what this looks like now, this is gonna be
another great shot to really help showcase the, the map of the room
where we can now see where that sitting area is with the TV in relation to the dining area and
the kitchen itself. So I kinda wanna get
one shot where we're seeing a hint of
the sliding doors. Although I don't
think my lens is wide enough for
that necessarily. That's a pretty
cool shot though. I'll get one that's more highlighting the
dining space there. You can really see my tree house project in the background. Do plan on taking
this photo again at a future date when we
get a new dining table, which will fill the space
a little bit better. So here let's take
this shot right here. We've got our ambient lights on. Let's do our flash shots. So here you see me in the camera looking at this photo. I think it's going to be
another great one for just sort of a natural look. So let's turn off the lights and see
what that looks like. I like it. I like it. It's pretty nice. Let's make it a
little bit brighter. Let's take that photo. Then. I'm also noticing we
have a window Pole perhaps in the kitchen windows. Let's go ahead and see what that looks like. That
might look good. So let's go ahead and
take that window poll. So I think that's it
for this wide angle. Now I'm going to push
in just a little bit. You can probably follow
me on this camera. I get a little bit closer
to the dining space, which is going to
highlight the dining space a little bit more. And while still highlighting the kitchen and this great room, it's just not going to be
as extreme of a wide yeah, something like that's nice. It's still see that beam on top. Still see our
table, the kitchen. This is really starting
to highlight the table. Alright, so I've lowered my
camera a little bit because I kinda wanted to tilt up so
we can see this chandelier, we see the fireplace, we see this great room right
here, the dining space. So this is really for
highlighting that dining space. Trying to get those
lines straight in camera using my level. Let's close as possible. It's only take one
photo like this so you can see what we're working with. That's pretty good. We're a little bit hot, but for a natural lit photo, that's probably pretty good. Now let's turn on our ambient
lights so it can get. So let's take this one shot. We're going to add a quick little flabby and
shot from this angle. Just a little bit of
subtle highlighting of that fireplace,
which is nice. Now let's get our window poll. It's pretty nice for this photo. Let's try it from here. We're going to have to turn on. Let's do a 10-second timer and see what are two-second
timer and see what I can do. If you don't have a
trigger and if you're too lazy to set up your remote
trigger, you can do this. One way to do it. Let's see. But that is a lot
of trial and error, but that actually will
look pretty good. So that's the dining room, dining area spot,
which is great. You also see the bar with
the counter over there, which we didn't really
highlight before. So next I'm going to move to a couple of the other bathrooms, which are going to be simple
and see how we can get those
24. Introduction to Demo 2: Welcome to this series of videos that you'll see
throughout the course. This is a real-world
demonstration of a shoot that I'm doing
in my own house, which we have cleaned out. And this is a house that
we're getting ready. It could be for sale or to rent, and we have not staged
it or anything. So you probably hear a bit of echo because there's literally nothing in this house except for the walls, the hard floors. We do have the
appliances which will be good to show in
some of these photos. With this series of lessons where we go through each
of the bedrooms and the rooms and talk
about how I would go about photographing
and entire home for a real estate listing with this series
of videos in this house, in particular, it's going to be a very basic setup without talking about staging
or anything like that, because we just
don't have anything. And this might be the
case where you show up for a listing and they
don't have anything. We'll talk about editing
photos and adding 3D realistic photos
in the future, both manually in
Photoshop yourself, but also using different tools
and businesses out there, websites that do
this professionally. So for taking photos though, it's still going to be the basic premise of we're gonna get multiple
shots per room. We're going to do a
flamboyant settings. So that means we're going
to be capturing photos with the artificial
lights on in the house. We're going to be
getting a flash photo. We're also going to be
doing any window pulls to expose for the outside, ultimately to combine them. Now of course, as I've
mentioned before, this is totally a
preferential thing. If you have a client that likes just naturally lit photos, we might not even
have to take photos with a flash or do
that whole setup. It's a good idea to talk to
your clients ahead of time, to ask them what types of
photos they would prefer. And also depending on
what's outside the window and what's going on and what
the style of the home is. You might just want to go for a naturally lit setup in terms of equipment
that I'm using, I have my Fujifilm X t4, which is a crop sensor camera. This is going to come into play when we're choosing lenses. The lens that I have
right on right now is a 16 millimeter prime lens. And the reason I have this on is because I like
how sharp it is. The 16 millimeter is
a little bit tight in terms of angle of view. But for most of our wide
photos, it looks pretty good. Now I do have a ten to 24
zoom lens which will come in handy when we are in tight spaces and we need
to get that whole room. What I don't like
about this lens and whether you're on
full-frame or crop center, if you're at that
super wide 1012 or 14 mm on a full frame camera, depending on the lens, you
might get a lot of distortion. It's going to depend on how
close you are to things. But I was doing some
test shots here and when I'm really close to this
refrigerator over here, it starts to get warped. And so I'm going to prefer and try to stick on
the 16 millimeter. But It's really up to you and you'll see the difference
when I pop on the ten to 24. Now on my left side,
I have a flash. This is the most basic
flash setup you could get. I think it's one of the cheapest options that
has good reviews on Amazon. And I wanted to get it
just to show you what you can do with a basic flash. This is the newer end W5 70. It does have a remote sink, so I have this on my camera which allows me to place this in different areas and not have it tied directly to my camera, which is going to
help when we're doing those flash ambient shots and also window poles
where we're going to be shooting this
directly at a window. It's on just a
basic light stand, but it does, I did buy
this goat ox head, which is great for me to be able to quickly just
tilt it up and down, spin it around, get it
any direction you want. Now there's a lot
you can go into with flash settings
and things like that. But I'm just going to set
it on mid-range power, see how we go, and then just change it and then
adjust from there. So I think it's time to
get going with some rooms. In this room. What I'm noticing,
I was going to photograph this room first, but behind me, you might be able to see some light
splotches coming in. And that's because
the time of day, the sun is shining through
a window in a way that I don't like these
really bright patches. So I'm going to wait
until later on to see if those patches are gone
once the sun moves. So we're going to move
to some other bedrooms, living space, the bathrooms, and get started there.
So let's get going.
25. The Living Room: Alright, so here we are in the living spaces is the
living room, family room. It's the entryway as
well in this house. And right now it's
just a big open room. And I've already
actually swapped to the ten to 24 for this shot because I wasn't able to get the entire room with
just that 16 millimeter. So you can see here,
I'm not going to, for every lesson, show you
what's going on in the camera. But I wanted to talk about
the basic settings that I have going on right
now to get us started. And then it's going to
basically stay the same except for our shutter
speed is going to adjust. We're on to F and
F a aperture to get a fairly deep
depth of field. Our ISO on this camera, the lowest it goes is 160. So we set those, we
lock those down. You could either use aperture
priority mode on my camera. I'm on a hybrid manual mode. It's the aperture. It's basically like
aperture priority. The aperture is
locked to F eight, the ISO is locked to 160, and then it adjusts
the shutter speed based on where my
exposure compensation is. So the exposure compensation
has a dial right here, but I'm using the
remote triggers so that I'm not touching the camera at all so
that I can set it here. So you can see that
on mine I have the exposure compensation
setup pretty high. If it was just exposing to the exterior which
it goes there, then it would be at zero, but I have it up at plus
two stops of light. Right now. I'm going to
do it all the way up to two and two-thirds so that we can expose to the
interior of the room. I'm going to shoot this
room a couple of ways. I want to show you what
it would look like to do a session without the flash and then also with the ambient flamboyant style. So the first one I'm going to take is this one right here. So I'm just going
to snap this photo. I am shooting in RAW. I'm just going to
take another one just for kicks and giggles. I really actually don't
want to adjust the focus. So I tapped on the screen
to adjust the focus there. And when I do select a
different part of the image, it does adjust the exposure. That's how my aperture priority and using the device to touch on somewhere in the photo
works for this image. So I'm going to basically start from scratch because
I don't know if the focus has changed all so I'm going to take a photo there. Now without adjusting the focus, I'm just going to go to
the exposure compensation, take it down until we are
exposed to the exterior. Now the exterior of the living
room here is rather nice. It's there's some trees. You see the neighbour's
lawn and yard, which is actually a
fairly nice looking lawn. It would totally
depend on what this looks like if I want to take this photo or not
with the exterior. Also notice I do have
the curtains drawn. They're not looking
at 100% great. So I'm going to actually go
ahead and change those up. So these are things, you know, when you're getting started, if you're rushing around, you might not think about, but you've got to pay attention
to these kinds of things. You'll probably see
on the screen moving. So I'm going to have them out. I do want as much natural
light coming in as possible, but maybe closing them like that looks a
little bit better. Now you might not
have curtains in your room, so that's okay. So let's go ahead
and we are going to expose the ground again and then use my
exposure compensation. Looks pretty good. So I'm going to take
this photo months. Now. I am going to adjust my
exposure compensation down so that I'm exposing
to the exterior. And that's pretty good. Now, I am going to do one
where I adjust the focus to the exterior to take that
one just as well to have. Now what I'm going to do is I am going to turn on
the overhead lights on to take one just
ambient light shot. So we're going to take
this one as well. You can see that's a
two second shutter. So it's quite long, so I don't want to be
touching the tripod at all. And before I looked
at set this up, suddenly I didn't
talk about is tucked into the corner pretty
much as much as possible. I am showing this little
table here to give a little bit of a sense of what the boundaries of the room are. I do not see the wall
that would be on the left side of
the photo frame. I am getting a little bit
of warping that we'll be able to be fixed
in Lightroom. But you can see there is a little bit of
bend in this photo. Alright, so now let's carefully
to turn on our flash. I'm going to see
what it looks like. I'm just going to
take a test shot with these settings now
this is in the frame, so I can't have that. I can review my photos
on my phone as well. So we're getting a little
bit of a difference. Now basically what I'm doing, if you could see is that i'm, I raise this up just a bit and I tilted it
a little bit more. I'm just bouncing
it off the ceiling. The ceilings are white, so that is perfectly
good for our photo. Let's take one more. Alright, looking good. And now we're going to do a
window poll where we point directly at the window and
expose for the window. With this flash shining
directly on that window, that we're going to turn our
exposure compensation down. Now I know this is taking quite a bit of time to go through
all these things, but that is what it takes to make sure
we get a good shot. Now if I wasn't recording, it might be a little bit easier. This is taking some
time, but that's okay. I'm pointing the flash
directly at the window. See what this looks like. It's tilted a little bit down. There we go. Alright, so that's gonna give
us a good photo to be able to expose to the outside. Now, the exposure on these
could be a little bit off, but I am doing a raw photo, so we'll be able to use that to bring up
or down exposure. Let's do one more at this
one without the lights. There we go. Alright, so that is this first
setup here in this corner. I'm going to go around and take the same photo from the
other corners of the wall. And then I'm going to
move to another room
26. The Kitchen: Alright, so here we are
in bathroom number one, which is a very,
very tight space. I am definitely sticking
to the ten to 24 lens. I'm on 10 mm right now. And I still have the
F eight, ISO 160. So in this room, we have a couple of little
items that I've placed to just have a little
bit of color contexts, which is nice because this
will actually come out as like a real looking
good bathroom photo. Compare it to an empty
bedroom which will have to add some furniture
later if necessary. I have hanging plant
up here which you get a little bit corner
of this frame, which is impressive to see
that this lens right here, it's so wide that you see that. Now it wouldn't make sense
to shoot this way where you have a better view
of this bathroom vanity. Although I might do
that just to have more of a detail shot of
the bathroom itself. I have a shower
curtain, colors match. It's just little things
like this thing. I'm not sure if I want
to leave that or not. I can kinda see what my
photo looks like using this, which is kinda cool. I do. I want these closed. A little dark. I think seeing the bath
tub itself is nice. Toilet seat down. We have the ambient
lights on in this shot. I might attempt to do
a naturally lit shot, but it's so dark in here, we only have one
little window up there that that's gonna
be very difficult. I have angled it to try to
get some of these lines. You can see the lines. Let's see where are some
lines in this frame? Right here, vertical, vertical, as much as possible. Knowing that I can make some
minor tweaks in Photoshop, but not a ton. So I'm going to stick
with this angle here. Snap a couple of shots. So let's go ahead and do one. Let's do a natural shot
for this bathroom as well. So we're going to
attempt to do one now. We don't have a window
that we're going to need. A window pull from. Let's see. Oh, yeah, I'm using
my remote so I can't use the exposure
compensation here, so I can get a decent
we expose shot. Now, I might just take this
a little bit to the right. I need if I do this, maybe I'll put these over on this side so they're closer to the camera and
look a little bit nicer. But I do not want them to work. So trying to get
some balance there. I think I liked
it the other way. Just playing around. You're here with me for
the full experience. Now, I'm not an
interior designer, and that would be one
thing to get someone to actually come design
your space for you. But it's not bad. I just don't really
like how I see this handle over on
the right-hand side. I have If you've probably
noticed for this shot, I have raised my camera
up a little bit. It was similar
over there because the entry table was sort of in the way and I
wanted to get above that. Might be as good as it gets. Trying to even that
out just a little bit. It's also going to let a little bit more light in like that. So let's turn off our
lights and go for that. My flashes dawn in
the other room, so when off but I don't think
it affected this photo. I'm gonna do one a
little bit darker. Let's see. There's nothing, there's
really nothing outside that I wouldn't really want to pull in. So this one is going to be, let's just take one a
little bit brighter even. Alright, I realized that
camera was really dark. So apologize for that, but now I have turned
on the lights in here. I've adjusted the
exposure compensation just a little bit. So let's try this. All right, and then I'm
going to bring the flashing. I to be careful not
to touch the tripod. And I am going to try to balance this off the
ceiling inside there. So let's see what
this looks like. Wow, that's pretty bright. So I'm going to drop the exposure compensation
just a little bit, but it looked nice. So let's do one more
little bit bright. I can tell that those and those countertops
might get overblown. I can also decrease the
power of my flash here. But either way, it
looks pretty good. Let me do that just for one, just to see that
was at full power. I'm about half power now. And let's take one more. And that might be a
little bit better. Alright, so I am going
to flip around trying to get a detail shot of
the vanity itself. You'll probably see that
photo later in post, and then we'll move
on to a bedroom
27. The Primary Bedroom: Okay, so here we are
in the main bedroom. It's the largest bedroom and we have some
space to work with, and we also have a
big sliding door and another window and
a couple of windows on the opposite side of the wall to provide a lot of natural light. So again, in this setup, I'm going to do one
naturally lit shot, and then we'll do an ambient shot and then a
flash ambient shot. I'm not really going
to do any window polls because these windows
are frosted over. And so there's not really
anything to see from outside. Now, I guess I have a question. To leave the doors open to the bathroom or to
the closet or both? Looks like I think it looks a lot cleaner
with it actually closed. Let's see this one. I think
leaving this one opened makes sense because it
gives a little bit of context to where we
are in the room, in the house when people
are going through the listings online and
they're looking at the photo, trying to sort of see
where they're at. It will be good to be
able to see that that is the bathroom off of
the main bedroom. Let's go ahead and I'm at
an F8 as always, ISO 160. I'm back on the ten to 24. We are focused to the basically the wall
in the background. I have tried to vertically align as many walls as possible, but you will see that
this line right here, this wall is a little
bit not perfect, but on the other side, these doors are pretty good. This wall might on
the right side of my actually just get
cut out or cropped out. Once we do some straightening
and post anyways, I could bring it maybe
I'll bring it back. Let me actually back
up just a little bit. So we have more room. We can always crop in. The resolution of these
photos is pretty high. And exposure wise, it
looks pretty good. So we're going to
take this photo. Let's take one more. So
let's snapped this photo. Now let's turn on
our ambient lights. Okay, so let's snap this photo. Then. Lastly, we're
gonna do our flesh, so I'm just turning on our sink. This we're going to we've got a big room point at
the ceiling. It on. We're still at medium power, so we're going to
see what this looks like and then adjust. It's pretty good. Let's go
full power. Pretty good. Alright, so those are
these photos on this side. I am going to take a photo
from one of the other corners, so we have it and then move
into the other bathroom, which is going to
be a little bit tricky because that room is not really designed
for great photos. Alright, so I have moved to this other corner and I did
want to film it because I think this is a great example
of another window pull and something that I'm
going to show you in editing how to remove objects. So all of the Internet modem and router is plugged
in to that wall. And it would be
easy to unplug it. But I want to show you
how easy it will be to remove that in Photoshop. So it'll be a good
example for that. For this photo, what
I'm going to do is I'm going to
test something out. So I have been using my remote, which is nice because then
you can see what I'm doing. But what I'm gonna
do is just turn on a two-second shutter
or two second timer. And I'm just going to press my camera to see
what it looks like. So here I'm just going to do a completely naturally lit shot. I am blowing out the
outside windows. We also have some sort
of dots in the ground, which is where the bed was, imprints in the carpet. And that'll be
another thing we can quickly fix in post-production. So I'm going to take this
photo barely touching it. Now I'm gonna do one where it
is exposed to the outside. Now we're going to turn
on the ambient lights. So I'm at and F A16, the ISO, about a one-fifteenth,
one tenth, one eighth shutter speed. Now I'm gonna do my flash
against the ceiling. Let's see what this looks like. But the shutter speed
a little bit faster, one-twenty-fifth of a second. That looks pretty good. And now I'm gonna
do one window poll. So I'm going to expose
to the window outside. It's not the best looking outside now that I'm
looking at it again, it is the deck out there. But it's it's hard to appreciate what it looks like
from this angle. So let's try this. Review it and make sure
that flashes surrounding the entire window.
That's pretty good. And I'm gonna do
one for this flash or this window
over here as well. I did get the
reflection in that one. So what I'm gonna do is I'm
going to move this flash, angle it from over here, hopefully not getting that
reflection in that window. When it flashes something
you have to be aware of. Yeah, much better. Alright, so same
setup as always, we got the natural light. We got exposed to the exterior. We got the ambient light. We've got the flash
to the ceiling, and then we've got
the window polls. I'm taking all these photos because I don't know right now exactly which photos
I'm going to like which ones I'm going
to use are combined. Maybe at the end of
the day, the client, which in this case is us as the people who are getting
this house ready to show. Maybe we want it
all naturally lit. Maybe what's naturally lit
will look better with the, the furniture that we're
adding in editing. So it's good to
have the options. Alright, I'm gonna move on
to the bathroom over here.
28. Bathroom 1: So here we are in the bathroom and it's a super
awkward bathroom. And the reason is because
it's not like wide open. There's this wall here
which I wish was not here because if
this was not here, I'd be able to see a
bathtub behind here, as well as the toilet, as well as the shower, as well as the two sinks by
putting myself in the corner. But because I can't, while we're stuck with having to choose what we want to show, I think this is the best
that we're going to get. And the reason is because I want to show that
there's double sinks. I want to show that
there's a shower. I also want to show that there's a toilet
in the bathroom. I'm also going into your
shots showing the bathtub and maybe the shower
from a different angle. But for sort of, I guess our hero bathroom shot, this is going to be it. Now. I'm just going to
walk you around and show you what the
alternative was. I've thought about doing
something like this too, which is not bad because it's a little
bit more straight lines. I'm definitely going
to have some warping. I'm definitely
going to have to do some editing in Lightroom
to straighten out lines to reduce the warping because we are getting
that in the shot. So this one's not
terrible because you can see it's straighter. That you can see the shower, you can see the sinks. You just can't see over there and see how big the
bathroom actually is. But this one is not a bad one. Now let me walk you this way. So here you can kinda
see what the setup is. But that's like a
super boring photo. Here's the toilet which you
don't really need to show. Now if I set up
anywhere over here, we're seeing ourselves
in the mirror, which is something you could
potentially try to fix. In Photoshop. It wouldn't be impossible, but not something
I want to do. Now. I couldn't get in the bathtub and try to do
something like this. But it doesn't really
show our double sinks. For our main shot. I'm going to go around here and try to get as much of
the bathroom as possible. That's why it's good to
have these little flip out screens if you're not using a remote is you can actually see what
you're working with. Now also notice that I've raised the camera above the sinks quite a bit so that I
can see them clearly. I wanted to get some of
those lights up there. There are a lot
of lines that are kinda tilted but
looking pretty good. So let's actually do
our ambient light. The window is also a
frosted behind me. I thought about doing
one with it open, but the view out there
is not really great. So we're just gonna do
full natural right now. Lock that down and take this
photo a little brighter. It's not terrible,
but there's also not a lot of light coming
from the right side of the frame over here because there's no windows,
so it's a little dark. So I think the ambient or a flamboyant combo is going
to work good for this photo. Let's take this one
though. Now with lights. Okay. Now we're going to bring in
our flash that's on already. Do not want to touch my camera. This time we might
combine a couple of different photos with the flash, because one I'm going to flash in this area and then what I might take it to the other area and turn it on.
Let's take this one. This needs to be on,
probably going to have to decrease or increase the shutter speed or
decrease the size. Let's decrease the shutter
speed just a little bit. Meaning make it faster. A little bit bright still
it's taped down the power. Alright, that's not bad. Now let me take this
into the other side. Okay. I'm standing here.
You could probably see me in the reflection. So the cool thing about the remote shutter is I
could stand over there and actually just adjust all
my settings but make sure I'm not in the reflection. You see it? See how that was, right? It was too bright on the ceiling and I'm
going to turn this around again to break. I'm going to just
make an adjustment but actually holding it up, you can't see me but I'm
holding it up with my hand. That's not bad. I know you didn't
see me in there, but I was basically just
holding this up myself, positioning it,
rotating it until that flash wasn't as
awkwardly bright in one spot. So I think that's it
for now for that shot, I am going to take a couple
of other photos that you'll see as alternative angles. But really with the
bathroom is just working with tight spaces, trying to show the features
which for me in this is the double sinks,
the standalone shower. Also, this means I'm just
going to use separate photos to get the other features
like the bathtub itself. Alright, hopefully
you're enjoying these photos and these
series of videos, and I will see you
in another one.
29. Bathroom 2: Alright, so I'm in
the kitchen now and the lighting is
a little bit better, but there are still a
couple of areas that are problematic just for creating a nice shot that doesn't have, as you can see here at this
super bright spots of light. So the first thing in the kitchen then I'm
going to do though, is raised my camera up. I've been shooting a lot of the bedrooms and stuff
at that waist height. But for the kitchen, I
really do want it to be a little bit higher so that we can get over-the-counter tops. Now the tripod I'm using
is nice because it does have a little bubble level
here that I can look. It is a video tripod, so it doesn't have
a tilt ball head, which is really nice
for making those fine tune quick
adjustments for leveling. But I can do adjustments
with each leg to get it leveled and it makes sure our lines are a little
bit straighter. Now looking at this photo, Let's see, There's a couple
of ways to approach this. And I think I'm gonna
do it in multiple ways, but one is just the
straight on shot of the kitchen right here where we have all of the elements
of the kitchen. We've got the fridge,
the stove, the sink. I'm actually going
to switch over to the 16 millimeter
lens for this shot. I know I liked that lens. I know I have enough room in this space for the
600s and I can backup just like the sharpness and not so much
warping of this image. Let me see what this looks like. Alright, so I see that I still have the
splotches of light on the floor which I might be
able to get away with cropping out or pushing my
camera in, tilting up. But I also have it on
the sink over there. So this handy-dandy umbrella, which is actually
for my camera flash, I'm gonna see if I can put it up and block that light
coming in from outside. I'm not sure if this
is doing anything yet, but I'm running it
there. I might work. Oh, we are almost there. There's just a
little bit. I see. So let's see In that
could get fixed in post, but let's see if we
can fix it right now. Alright, I think that's as good as we're going to get now. We are also having some
clouds coming that also decreases the amount of natural light in this kitchen. So if you're going for a photo that's completely
natural light, I'm not sure if that
was the best move, but let's try to take this
photo with the natural light. We're going to bump up. Exposure compensation
still looks nice. We've got a lot of light
coming in from all sides. So let's try this. Alex, Nice. Now we're gonna do one with the
ambient lights on. And then one with a flash. Put this flash on this side, see what that looks like. Alex, really nice. Then I'm just going to do
one more over on this side. Cool. Alright, so now
I'm just going to quickly go around the room. I'm going to move the camera. Alright, so now I've moved into the corner and I'm going
to try to get a shot where we're seeing that open
area over in the side. And I know you don't see
this yet on the camera, but because the kitchen
opens into the living space, I want to show that
connection in a photo. So something like this. I'm going to take just
natural right now. And I actually really liked the natural look
of these photos. I'm going to shoot it
with the ambient lights on and also with the
flamboyant Leighton. And this is one where I
will do a window, Paul. Oh shoot, I kick that leg. We're all we're going to hope
that Photoshop fixes that. Now, I think I should retake
this one at least with the ambient lights on
without the flash. Then went to flash. And then one with
exposed to the exterior. One with the window poll with this pointed directly
at that window. I'm going to take one
with the flash lighting up this room. This is potentially one
of our other hero images. And so I want to make
sure I have the option to combine that part of the room. Overexpose just a little bit. Now looks pretty
good. Like I said, this is sort of a hero
shot where we're seeing the kitchen, the living space. This is also the
dining space as well. I'm going to continue
taking a couple of shots of the kitchen from
a couple of angles. And then also one of
the dining space, which is one where we
will definitely need to add a table or something and post
if we want to show it as a dining space itself. But hopefully seeing how I
shot this kitchen helps you. I'm just going to change
the angle so I get a shot more of just the stove, just the sync from that corner, maybe leaving out
the fridge and maybe one of just the stove
and the fridge, really highlighting
the pantry as well. So getting those four shots
of the kitchen is key
30. Front Exterior: Alright, so I'm walking
up to the space for the first time to take photos. And it's actually
a different day. I'm wearing something different. And the reason is because in the other videos I was
being I was filming it and taking the photos earlier in the day and the
backyard was just super bright and sunny with a lot of shadows
that didn't look good. And so I decided
I wanted to wait until later in the day
to get these shots of the backyard where
everything was in the shadows. So one of the features
of the backyard, which I'm just going
to do the features first and then I'll move on to a big backyard shot is
this deck right here. So I'm actually going to move around the furniture
just a little bit to make it look nice. But really I just want to
capture this whole area. Maybe even have this tree and
the plants in it as well. Alright, so I'm just
going to take a couple of shots from different angles. Still on the F8, I saw 160 and now
I'm just backing up just a little
bit to get some of the planter in the foreground. Now this shot here
looks pretty good with the tree in the foreground. We also have the
decoration on the wall. And you really get a
sense of where you are with the backdoor, the sliding door of
the master as well. Nice. Alright. So with that shot, I'm just getting a raw shot. I'm not doing any sort of crazy lighting flash or anything. I'll do all my editing in post. So there's another
feature over here. The sun is going
down a little bit. So it might end up looking like some nice golden hour sort of backlit setup. Let's
go over there. When I took this shot
yesterday to test it out, I actually didn't even think
about shooting it from this angle because the
lighting was just atrocious. But having the shadows
of the tree on the house itself creates
a more dynamic image. And so I'm gonna
get this shot from both this side looking this way, then also looking
the opposite way. So I'm trying to capture
all the features, the garden boxes, the table over there, the little parabola
with the grapevine. And I think that came
out pretty good. You also noticed
that was probably shooting up above compared to down at regular
height or down lower. Just made this look
a little bit nicer. Now this angle over here is really nice with the lighting. I don't want to get any
lens flares or anything artistic like that while I'm shooting these kind of
real estate photos. So I am trying to
get in the shadow of the tree that's
blocking the sun. But from this angle
looks really nice. So let's go here. I noticed that my
shutter speed is one-sixth, tenth of a second, so I'm going to open
up to an F 6.4, just so I'm not getting
any shake in my shutter. Right here. I'm getting a little lens flare, so I'm just going
to have to cut that out trying to straighten
out my lines. And while shooting. I might just do on
a little bit closer more of the back patio itself with the back area patio. This photo is nice
because it shows the extension of the backyard, which we don't see in
any of the other photos. So it's nice to
have that as well. I'll take one kinda like
that from over here. I don't think that one's
going to work that well. But I think out of all of these, I liked the first one
from that corner. And then maybe the close-up
of the parabola itself. Now I'm going to backup
and get a shot of the entire space as
well as the garage. So now you have a sense of what the entire
backyard looks like. I'm going to shoot
from over here, try to get as much
of it as possible. Again, trying to sort of set
the scene for the customer, potential customer, and give them a sense of
what the space is like. So if I stand here, we get part of the deck as
well as the garage back there, which is nice to see. I'm actually going to even
turn a little bit more. I'm going to have to move the camera because I want to see these trees over here on
the left side of frame. So that's a little bit almost the view that you're
going to see. I'm on a little bit
of a wider lens. I am on the 16. Now the sun is proving to be a little
bit difficult right now. So I'm crouching down just so that I'm not getting
any lens flare. I might take this in just a couple of minutes
when the sun goes down even more so I can stand
up and get a better shot. I'm going to try one
shot from over here. And that's the shot
that shows the garage, as well as that
back patio space, which will give a sense of
how the space is connect. Potentially put that
idea of what someone could do with that space, the garage being in another option for an
entertaining space. So I think overall
I got the features. I would probably take just a
photo of the garage itself, but that's pretty
self-explanatory just from one angle,
the whole garage. I have a another shot
that I'll try to pop up here that I took the
graduates Well done. My office was set up with
entertainment space, which will really sell
the garage rather than an empty space as it
is now that I'll show you. Other than that, hopefully these backyard shots
look good to you. And I'll be showing you how to edit them later
on in the course. But for now, Have a good day and we'll see
you in another lesson.
31. Back Yard & Exteriors: Alright, so now I'm gonna
get the front exterior shot. So one straight on,
one from either side. So three shots basically, one backed up across
the street and then there's no really features
that I want to show here. But if you had a nice front
porch or something like that, I would probably get a
separate shot of just that. I will get one shot of just
the entrance itself as well. With the sun going down. The lighting is
looking pretty good. I'm going to start with
that front shot right here. Just straight on. Looks nice. With every passing moment
as the sun goes down, the lighting actually looks
better and better and better. So I'm just going to back
up and get the entrance, the whole entrance like
this square root off. Alright. I'm gonna start on the left and I'm just getting the house. I don't really care
about the driveway and the trash cans over on the left. And so I'm just getting to the right with a bit
of the front yard. Now this shot in the center, there's this lemon
tree right there. So that's how it's
not even going to be really worthwhile. In this one, the trees are
kind of in the way as well. You can probably barely see me, but it actually provides good cover for my
camera over there. Something like that might
work. I'm going to backup. Now this one. There is some trash piled up on the left. So in an ideal situation, all that trash to my
left will be moved, but it's not too bad. Now let's get one
from farther away. A little bit of the parkway
is a tree in the foreground. That's nice. This one's a little
artistic backup. Get one from across the street. Now that one across the
street didn't look that good, you get the telephone wires
and if I backup more, you see that telephone pole, which you see in this shot, which really doesn't sell. Well, I'm gonna get a
little bit closer up to the house because those
ones a little bit further away weren't
as nice. I think. Seeing that tree over on
the right side looks nice. This one isn't bad, but you
can see the camera in it. So I definitely take that
out in post. Move it. And I do see myself in the
reflection just a little bit, so probably move
just a little bit. It's pretty good. So that's
pretty much it for exteriors. And hopefully this helps. And we'll see you
in another video. Bye
32. Introduction & Basic Editing Process for Real Estate Photography: Welcome to this
section on editing and post-processing your photos. We're going to make your
photos look amazing. In this lesson, I just
wanted to talk about the applications and
the basic process that I do for editing. And then we're going to
dive into the applications, actually doing it
in the next ones. So the apps that I recommend
are Lightroom and Photoshop, both made by Adobe. Adobe products. They work really well together. I'm just used to them, but they do cost money. They have a monthly or
an annual subscription, which is not always fun. But if you're a professional, you're going to make
your money back. Well, by using these products, Affinity Photo is an
alternative if you want a onetime purchase product, so it's not a subscription,
which is nice. Then there are free
alternatives like the photos app that comes with a Mac or
comes with Windows computer. Those are great
for basic editing, but you're not going to be
able to do a lot of the things we do in this class
like combining photos, doing that flamboyant style of photography that is a
little bit more advanced. So you can get away with some basic editing using
any sort of free app. But I would highly recommend checking out Lightroom
and Photoshop. That's what I'll be
using in this class. Really the question is, when it comes to
editing and how to edit photos is what's the
style you're going for? I think for a lot of
real estate photography, you're just going for that
bright area and clean look. And if you're going for a
different style than that's up to you to kinda come
up with how you edit it. But I would stay away from being too stylized with your
real estate photos. Remember at the very beginning of the course I talked about our main purpose is
to show the space, to show the details
of the space, how it's laid out, what's included in a space. Don't go any further than that. You're not trying to create
art with your photos. You're trying to ultimately
at the end of the day sell a product so that product
has to be seen easily. And so that bright, airy, clean look is what we're going
to be doing in this class. My basic editing
process is as follows. Start with cropping
and rotating, which helps recompose the image. If there's something that
I want to crop out of, it, helps straighten out
those horizontal lines, those vertical lines as much as possible with a simple rotation, then you straighten your lines. So using the transform
tool in light room, I'll go over this
or any other tool. There's ways to actually
tell the program, I want this line
to be up and down. And this one too, and it
will make sure it happens. You'll wanna do your white
balance and color adjustments. So this is just
making sure that, Oh my gosh, my cat wants
to be in this class. We're just going to let u be
in this class for a second. For white balance and
color adjustments. This is just making sure
the colors don't look off. Whites are true white. It's not looking green or
pink or orange in your photo. You want to do your
adjustment to your exposure, your shadows or highlights. So this is probably oftentimes bringing up the exposure
of your shadows, maybe bringing down the
highlights a little bit. So you have a much
more even look, not super contrasty, not super dark or
anything like that. And then another
thing I'll add is a little bit of
clarity or detail, which in Lightroom it's
simply the Clarity slider. There's also a texture slider, but also looking at things
like the Detail panel, which is the sharpness. And if you have any
noise in your photos, which happens with darker rooms
with longer exposures and also with higher ISOs which you're probably
not shooting with. So just paying attention
to those things. And then beyond
those basic edits, we move towards our
advanced settings, which is when we're blending
together images will then be masking out windows or masking
windows into your photo. Potentially even virtually
staging our photos. This is something we
haven't talked about. Adding furniture to a room. This takes a lot of work
and effort if you're doing it manually using Photoshop. There's services out
there that do this and online apps that
can help you do this, which I would highly
recommend checking out. This is definitely going to be that premium cost to your
real estate photography. If you are providing
it as a Service, then you can do things
like sky or grass replacements for it,
your exterior photos. So that's the basic
editing process. Those are the tools I recommend. Now let's dive into
actually editing and we're going to start with
some brief overview of how to use Lightroom
33. Adobe Lightroom Introduction for Real Estate Photographers: Welcome to this section of the real estate
photography course, all about editing our photos. In this section,
we're going to cover the basics of editing
in Lightroom. If you already know
how to use Lightroom, the first couple of
lessons might be a little bit repetitive. You might want to skip them. If you are brand
new to Lightroom, I hope that this helps you out. I'll walk through
importing, organizing, and all of the basic
tools that you'll need to know to start editing
your photos in Lightroom. This is not an in-depth a to Z beginner to advanced
course on Lightroom. We have another class on Lightroom if you're
interested that I recommend you take
if you want to dive deeper and some of the things, while I'll try to go over each step as clearly
as possible. You might benefit
from a little bit of background knowing how
to edit in Lightroom. But if you're coming from
another editing app, this should be
super-helpful to I am using Lightroom Classic. Lightroom Classic is different than the Lightroom CC version, which is their
Cloud-based editor, which is an amazing program. But I like using Lightroom
Classic when I'm editing a lot of photos at one time. And it also works really well going between Photoshop
and Lightroom Classic. I'm using the 12.3 release, which has a lot
of the latest new AI based tools like masking. Some of that will be using, but you can use pretty
much any version of Lightroom Classic to do a
lot of what we're doing. In this lesson, I just
want to import our photos. The photos that I've given
you as practice photos are in a zip file in one
of the previous lessons. And when you open it up, you should see all
of these files. These are DNG files which are full resolution raw files that have all the
information of that photo. So you'll be able to edit
them just like IN for you. I've rename them to
keep them organized. Bedroom 1234. So that's four pictures
of one bedroom. And you'll see me combining these images in future lessons. I will be jumping over
to the original photos. Sometimes when I want to
show you some edits that are not in these set of photos. So I haven't given you every single photo that I've given. I've given you sort
of a select few. I didn't want to overwhelm you. Unzip that file. Then here in Lightroom, let me just give
you a quick tour. So at the top, you have
these tabs that basically take you to different rooms
for different purposes. We're going to be staying in the library and developed tool. Developed tool is where
you actually edit your photos library is
where you organize them. On the left side of
the library you have your organization navigator and down at the bottom you
have an Import button. You might see this toolbar
down here as well. This is our little
photo tray where photos will pop up
once we import them. To import photos, There's a
lot of ways to do it just like every tool you can
use keyboard shortcuts. But there's a simple
Import button here in the bottom left. From there we're going to find the folder that you
want to import. You can do that
through the Navigator or you can actually simply go to your finder and you can click
and select all your photos. Or if you're on a
PC, you can use the documents and drag
them into Lightroom. Or what I would've
done has gone into this external hard drive under this folder where I have
them stored on my computer. I want you to import
all of these photos. But if you were taking photos yourself and you took
a bunch of photos on a bunch of different shoots. You might want to adjust,
import certain photos. And from there, when
you open up a folder, you would just click on or off the photos that
you want to import. There's also a handy uncheck and check All button
down at the bottom. Over on the right-hand side, there are some things
that you might want to do that are pretty
cool for organization. And one is add to a collection. And so I'm going to do that. You can do this
later, but I think it's beneficial to do now. So add to the
collection is checked, then I'm going to
click the plus button. And this is where you
can create a collection or sort of like a folder
for these photos. I'm going to just call
this real estate photos. If you're doing a bunch
of real estate jobs, you might want to name it as a specific job and
then click Create. Now I'm going to click Import. I'm not gonna do anything else over here and just click Import. Now they will be
imported into Lightroom. You'll see them up here in
the main window and then also in the little photo
tray down at the bottom, which is nice if you
are viewing them one at a time with
this button here, you can just go through and click on the
photos down below. All of these windows can also be moved around to give
you more space. And I'm zoomed in on my screen so it's easier for
you to see in the playback. But if you're using a
full resolution screen, you'll have a lot more space, real estate on your screen. You can always get back to
these photos by going to the collections and
clicking that folder. You can also go to catalog to see all the
photos that you've created imported into
Lightroom rather. And I started a new
catalog for this course, which you can do by going
up to File New Catalog. But typically, most people
will just use one catalog and import all of their
photos into Lightroom and organize them
within collections, which is nice to do. Or you can find it under
folders by going to, this is sort of like a
view of your documents. You have your
external hard drives and places that you've
previously imported from. But I think it's easiest just
to organize by collections. And within here you can
also create a collection. If you need to,
move them around, create a new folder,
separate them. Sometimes I have folders for all the photos and then I have another folder for
these selects. I'm going to talk more about organization in the
next lesson coming up. I've already organized
these photos. These are the selects that I wanted to give you
to practice with. But I'll talk through
my process of organization if you were
starting from scratch. Alright, see you in
the next lesson.
34. Organizing Photos for Efficient Editing in Lightroom: Alright, so now you should
be in Lightroom and you should have all of
your photos imported. The next step is to
organize them so that if you walk
away and come back, it's just easy to find the right photos that
you should edit. As I mentioned, I've already
organized these photos, so these are fairly organized. But if you had imported
all of your photos, you would need to be able to quickly find the ones
that are your selects, the ones that you want
to work with and not. Lightroom has several
ways to organize photos. One is in the library, in the folders, which
we've talked about. The other is by giving
your photos a rating, which you can see
here, the star rating underneath the big window. You also have a flag which
can be turned on or off, which is flagging or unflagging. Then there's these color
labels that we can give them. My process is typically
I go through my photos and I'll just go one at a
time using my keyboard, right and left buttons. And the photos that I like, I'll give a rating for. And I can do that with
a keyboard shortcut. Number four on your keyboard. 12345 gives you the
different ratings. The ones I'm maybe iffy about, I'll put three and the ones that I know for sure
I'm not going to use, I'll put as one or just
leave without a rating. These are all my select, so these would actually
all be fours or fives. Fives are the ones
that I know for sure, for sure I'm going to work with. You can use the star
ratings however you want. I would just go through here. Go 5555. This one maybe is a four, this one's a 3333444. And maybe it's I know that this photo itself is
a really great photo. And that's going to be for sure one of the ones that I
send the client back, but this one maybe not. So that's a three, for example. And I'm just doing this randomly because I want to show you now, we can use these filters
up here in this tray to filter only my five-star photos. Anything with a
four-star or above, three stars or above, or you can click this
little button to be equal to three stars. So here's my three-star photos, here's my four-star photos. So this helps us to
quickly filter our photos. And the ones that we like. The next thing I
would do is I'm going to turn this off because I
want to show all these photos, is give it a color label. And this just helps us visually see which photos should
be grouped together, especially for real estate
photography where we're doing multiple photos were redoing the ambient method or just any bracketing option
where we're combining photos. So see how we have these
four photos of this bedroom. Those all go together, right? So I'm going to select
all four of these by clicking one and then shift
clicking the next one, right-clicking and
giving it a color label. So I'm going to just set red. It doesn't matter really to
me what color I'm using. I'm just trying to
visually organize these. So when I look at
the photo tray, I know they go together. So for example, I would set this next set of
three to yellow. This next shot of the
kitchen set to green. Now you can see how easy it is to see which
photos go together. The last way to rate a photo basically is to
turn the flag on or off. I reserve this for later on and I'll show you
that in just a second. But some people use
this just to show the photos that they
like, don't like. So basically select
or non-selective. And similarly, you can
filter by flagged down here. I'm going to open up my
catalog that has all of the original files and edit to show you what
that looks like. So I'm going to go up
to File Open Recent. And my last catalog that I used is the one that
contains all of those original files and a bunch of other projects and
photos that I've worked on. So you'll see how I organize
their ingest as Eigen. Alright, so this has opened
up and on the left-hand side, I can scroll down and you
can see all my collections. And I've actually created
sub-collections or subfolders for some
of these folders. And to do that, you
would first create a collection set which is sort
of like the master folder, the higher-up folder, and then your subfolders
would be collections. And so I have a video
school folder for all of my work related to video school. And then I have this real
estate photography folder. This is where I put
all of the photos from these two shoots,
which you can see. If I go through and
just click through, you can see all the
photos from the class. And then you'll see
that some of them have five-star rating down below, some don't have a rating
somehow, one-star. You'll see some that have
a color label as well. Now, if I just
went through and I clicked the five-star filter, it pops up all of the photos
that have five-star filter. These are all the
ones that I know I want to work with and edit with. And I've added all of those five-star photos to a separate folder called
real estate photography top, which makes it super quick to get to those top photos now. So here they are in this folder. Now let me turn off
that five-star rating. Not that it really matters. But here you'll also see for this shoot of my current house how I've given a color label, too many of these photos
that go together. So for example, this photo here, these all go together. These yellow ones,
these all go together. You'll also notice perhaps
that I have a flag. And the reason I use
the flag is when I create a new photo
using Photoshop, which is a step you'll see
in this in this class. What happens is I'm combining multiple photos and
then it creates a new version of that photo and re-import it into Lightroom. And that becomes
this combo photo. And I set that as
a flag, a flag it. So I know that this is the
column combined photo. I know that's
getting a little bit advanced and so you'll see that process later in the course and it'll
make a lot more sense. But really what I want you
to just know is that you have the four methods
of organization. You have your folders over on the left-hand side
and your collections. You have the star ratings, you have your color labels, and then you have your flags. So now you know a
little bit more about organizing
photos in Lightroom. We're going to continue in the
next lesson to developing, and I'll show you the basics of editing photos in Lightroom. See you there.
35. Basic Editing Process in Lightroom for Real Estate Photographers: Welcome to this lesson. In this one, we're
going to go over the basic Develop tab features, how to use these sliders and specifically more for
real estate photography, which tools I will be using. You can see that I
cleaned up the view, I close down some of these tabs, the toolbar down below. Also one thing is
under View, loop info. You can turn on or off info
with the command I on a Mac, Control I on a PC. And you can see the
photo that I'm shooting, I'm editing right now, which is the nursery one. This is a good photo to play
around with because it's a naturally lit
photo, ambient light. But I am not going to end up
doing any sort of combining flamboyant style with
this photo just because I liked the natural
aesthetic of this photo. Alright, so let's get over
to the right-hand side. You'll see that there's a lot of dropdown panels or Windows and you could drop down
each one to see which one, which what it does. The basic sliders are
a lot of what you're going to be playing around
with in light room. Each slider you can click and drag to the left
and right to adjust, you can double-click to reset it back to the original setting. If you make a bunch of changes, you can reset all
of your edits with this reset button on
the bottom right, and that reads sets
pretty much everything. You can also hover over the slider and press
the up key or down key on your keyboard to make individual adjustments are little incremental
adjustments. And you could also click in
this number area and actually type in a number if you have a specific one that
you want to edit. You can see up at the top, the first thing we have
in the basic slider is or panel is some color
adjustments profile, which is the basic
color of your photo. If I click this down, I have camera matching profiles because I shot this
with a Fujifilm camera. It has the Fujifilm
color presets built in. And when you shoot
with a raw photo, you actually have to apply
them here in light room. So I typically add it or shoot real estate photos
with the Pro via look. And you can see if
I hover over this, it changes the colors
just ever so slightly. You don't need to do that. I feel like the colors of the Adobe Standard Adobe
color are pretty good. You could always make your
adjustments for other color. Editing down below
with other sliders. Below this, we have
our white balance. This is a super
important setting for real estate photography
is to get your white, right? So generally, most
cameras shoot pretty well and it's going to automatically use
your camera settings, but you can adjust these here. You can choose the
auto and this is going to try to automatically, within Lightroom, adjust
the white balance. You can use these
sliders to make it warmer or cooler and then change the tint to make
it more green or magenta to see what you like. Or you can use the Eyedropper, click here and then find
something that's supposed to be pure white or pure
gray in your photo, like this little crib here. And it's going to adjust all
of the colors accordingly. Down below we have our exposure
sliders or tone sliders. You have your overall exposure. You have your
contrast which makes your darks darker and
your brights brighter, or the opposite makes
it more of a flat look. And then you have your
individual sliders for just the different
portions of your image. So if you just want to adjust the highlights or the shadows, or just the whites which are the even brighter parts of
your image than highlights, or the blacks which
are just the darker. You can adjust those sliders. This is generally what I like to do with
real estate photos. I bring up my shadows to make it a little
brighter and area. I might even bring
up my highlights depending on if I'm
showing what's in the outside of the window are
not same with the whites, as long as we're not
overexposing anything that's we want to
see in the image. And then I LL crush the blacks, meaning I'll drag the blacks down just to bring back some of that contrast that we lost when we brought up
the shadow slider. With all of these panels, you can turn on or off the, the settings just to
preview what it looked like with this I button, you just click it and hold it. So here's the before and after Kinda like the warmth
that we had before with the camera's white balance. So I'm going to change
the white balance to add shot actually. Then we have underneath, we have our presence. These are tools
that add sharpness, add detail, and also your color settings, vibrance
and saturation. I typically stay away
from texture and D Hayes here in this panel, those are more for
landscape photos, close-ups, that kind of thing. But I might bump up the
clarity just a little bit. Just clarity adds a little
bit of Christmas to crispness to the edges and the details of
things in our photo. Sometimes I like to just go extreme with them to see
what they look like. And then dial it back. Some people actually
like softening images just a little bit
for real estate as well. So going down with the
clarity can be cool too, but that's more of a
preferential style. Then with vibrance
and saturation, saturation will bring up the color saturation for all
the colors in the image. Vibrance does it in a
more intelligent way. As you slide up the vibrance, it will bring up the
saturation of colors that aren't as
saturated already. Like in this image, it might bring up
more of the blues and greens compared to
the warm yellows, reds and oranges
versus the saturation, which just brings everything up. So you can see if I crank the
saturation all the way up, look how crazy the
reds and yellows are versus my vibrance. When I do it, It's
still too much if I drag it all
the way up to 100, but it's not terrible. But I never would just
drag that up all the way. But for real estate photography, it really depends on what
style you're going for. Some people like that. D saturated. Not moody look but clean look. But in a room like
this with the nursery, some nice photos on the wall
and nice colors on the wall. I might just boost the
saturation just a little bit. So that's the basic panel on. And that is a couple of things that I might do for
this particular photo. I'm not going to go over every single panel because some of these do similar things. I might go through specific
ones later on when I'm talking about a specific
demonstration of a photo. But if you're
interested in what all of these panels do in-depth, I definitely encourage you to check out my full
Lightroom course, like the tone curve for example. This is just another way
to adjust the exposure. You have this curve that
goes from shadows on the bottom left to
highlights on the top right. And then you could set
points in the middle to increase or
decrease the exposure. So say I want to bring
up my highlights. I can do this by clicking
up at the top and dragging the top of the
slider up or the curve up. And then I could say, I want my shadows to be
a little bit darker, so I'm going to bring
those back down. And that's a typical what
you'll hear in photography. S curve, which is, it kinda looks like an S, which adds contrast
to our image. Maybe you don't like
contrast and we want to go something like this. Nice, bright and airy look,
which is pretty cool. Now I can turn on and off this panel by clicking
this eyeball. Or I can press the
backslash key on my keyboard to see all
of my edits removed. So just clicking
off this eyeball just removes this
panel's adjustments. And that's cool to see
what each one does. But just to see the before, after you can press
the backslash key. You can also see that
down below by clicking this before and after,
it looks like a y, y, you can click
through this to see the different views of the
before and after look. The other main panels that I want to show you are
the Detail panel. This is sharpening. So with raw images, lightroom will generally
add sharpening already. Without any sharpening, raw images just appear
a little bit soft. But you can increase the
amount of sharpening by dragging up and
down this slider here. You can zoom in to your
image with the Z key on your keyboard or with this
little exclamation point. And that might help
you see a little bit more of what you're doing. Although with real
estate photography, when we aren't really bumping up our ISO on our camera a lot. Generally, that's
not a good idea. You'd rather be on a tripod, slow down your shutter speed. And the risk of getting
a lot of noise in your image is rather low when
you're using that method. With that low ISO. There's also a new
de-noise feature. So this is an update with one of the latest releases
of Lightroom that automatically reduces any noise which whether you increase sharpening or just with the photo itself
with a higher ISO, it will have noise. If you are shooting raw and
you have the raw image, not the DNG that I sent you. You can use that feature
or you can manually reduce noise by dropping down the
manual noise reduction And then increasing
the luminance, which is a lot of noise, you might get the color noise. Both of these are
different types of noise. Luminance is sort
of black and white, desaturated speckles you'll get color noise is exactly that. It's like red, green, blue dots that you
see in your image. But again, this is most
likely if you're shooting dark situations at night
or just with a higher ISO. But this isn't important
panel to check out. Just making sure that
you do have some sharpening if you are shooting
raw lens corrections, this is another
really important one. So when we're shooting with
why super wide lenses, sometimes you get some
warping around the edges. If your camera is one that has a profile that's
already in Lightroom, you can go to profile, click Enable Profile
Corrections. And it might already
appear on here. But my Fujifilm camera lens
does not have a preset, so I have to do it manually. But if you had, for example, the canon 16 millimeter, then or 14, 35 or any
of these other lenses, it might already be on here. So check that out
because you can see that when I turn
this on and off, it does a little bit of
removing vent vignetting and removing the warping
around the edge. If it doesn't have your cost, your lens profile
automatically in here. You can do it manually
by going up here to manual and you can
adjust the distortion. So for example, if your image is super wide and
bending around the edges, you might want to
go a little bit negative to bring the
center of the image in. And that warp removes
around the edges. I generally don't worry
too much about this. Sometimes the
vignetting can be bad if you are not
using a good lens. And this is where I would
remove the vignetting. So you take this vignetting
slider and I drag up that even with this lens actually I can tell there's
a little bit of vignetting, so I'm gonna go plus 25 there. You do not want to do that with the effects down here where there's a post
crop vignetting. And what this does is it adds a white vignette or it
as a black vignette. For real estate photography, you really want to
stay from vignetting. But if you want to
remove a vignette, that would be under manual
vignetting or it might automatically do it with
your specific lens profile. Speaking of Lens Corrections, another really important
tool is the transform panel. This is one where I spend
outside of the basic panel. This is probably the second
most important panel in light room for real
estate photography. This is where we can
straighten outlines. So in this image we have several lines and
one that's a little bit off-kilter is this bookshelf on the left and then this
dresser on the right. There are options to
try to automatically make lines vertical or does
it looks at the photos, tries to pick the
most important lines and it will automatically
straighten out. So let me click through some
of these to show you Otto. It's probably looking at
this line right here, these lines in the middle. It's okay. Let's turn that off. Vertical. Does a decent job
making the bookshelf, this dresser, these
lines vertical. So those are ones
I might try to do. But another way to do
it is the manual way, which is by clicking this
little button right here. Your mouse turns into a
little highlight box. And the goal, the processes to set two points that
should be vertical. So I can go to this dresser here and I can go and
you can see how it's zoomed in on exact
point to give you a little better chance of getting this
perfectly straight. So I'm going to set it
right here in this corner. And then drag and then go down
to this point right here. And nothing's going
to happen until I sat a different, a second point. So I'm going to
set another point. So we're gonna go here
in the corner wall. Now it knows that
those two points should be vertical, right? So it's adjusted the image and it has made those
lines vertical, right? So let's go to a different
image and I'll show you a different use of this. Let's see this one. Okay, so I'm gonna
go to this one. This is dining to. An important thing
is if you're doing a flamboyant editing process, I would combine
your images before using the transform tool because It's harder for
Lightroom to get to use this transform tool
even if you copy and paste it from one
photo to the next. To get it perfectly
for these three or these four photos
that we're going to combine in Photoshop. The way it bends and warps, It's going to be difficult
to match perfectly. So I would do this after I do
all my flamboyant editing. You'll learn that in the
future section on that. But just as an example, you can see that because
of the warp of the lens, the angle, these cupboards
are not perfectly straight. This door frame on the left is not perfectly straight as well. Let's just see if auto fixes it. Auto does a really good job. So sometimes Otto is
all you need to do. Vertical does a very
similar job to. But if you wanted to
go the manual route, I can click on this point. Let's go to the top
of this cupboard. Drag down again, see doing
one line doesn't do anything. So I'm gonna go to this one. That does a pretty good job. This line on the wall of these tiles is another good
one that we want up and down. And sometimes the more you add
and you can only add up to for the third and fourth one might not make an adjustment. Let's see this door frame. So adding to this door
frame didn't do anything. So you really have
to pick and choose. I would say prioritize the first two lines as the ones you definitely
want to be straight. So here's the original. Now instead, let's make
this door frame straight. So now I've picked those
two on the outer edges. And because those outer edges sort of straighten out the
other lines in the middle of the image like these tiles now are already pretty
straight, right? You can do manual adjustments. There are these
transform sliders for tilting, rotating, warping. But generally I stick
away from that. Now, if you did it
and there's still some lines on the left or right that aren't exactly up or down or you just
want to get rid of them. One thing that we didn't
look at is cropping, which is another very
important thing that I, we'll often do at the
beginning of an edit, except when I'm
combining photos. In the ambient method, I'll do cropping at the end. But cropping is this
tool right here. Here you can click crop. You can choose
your aspect ratio. So I'm on my original
aspect ratio and it's locked to that. But I can choose
a different one. I can choose a one-by-one
if I want a square crop. But generally the
standard two-by-three, which is my original
aspect ratio, is perfect for real
estate photography. To crop. You just take in a corner
or the top and drag in to basically zoom
in or crop into photo. So I might say, Let's get rid of that
very far left edge. We don't need to see that. I want to see more of these knives on the
right-hand side though. And there you go. You could also rotate by
hovering over the corner and dragging to the left
or right to rotate. You can also adjust that with
this slider here or reset. So that's a great tool
to be aware of as well. Again though this wood and then you just press
Return to save that. But again, you would do this
after combining photos. So for this photo, I would probably remove all these adjustments until I do all my edits in Photoshop, which we'll see in the future. But for our photo like this, where I'm just
editing one photo, I might go in here. And because I can't really
see that bookshelf, I might just crop it out. So it's not like this
weird line on the left. Maybe I don't want
to see as much of this dresser right here, and that looks pretty good. I do not like how this
photo is sort of crooked. So maybe I would go
in here to transform. Turn this off, and then
choose this photo. Let's remove this dresser. And let's make this photo the line that I
want to be radical. Now it looks pretty good. And then the dressers
still pretty good. It's not so bad. Alright, so those are the basic editing develop tools that I will be using
for a lot of my edits. There are other things
healing, cloning, these specific gradient
mask tools that I'll be showing you in the future of this class
in specific cases. But for now, just
play around with it, get used to adjusting things, making changes with the sliders. And then we'll see you in the
next lesson as we talk more about specific cases for
real estate photography. See you there.
36. Combining Bracketed Photos in Lightroom + a Comparison of RAW vs Bracketed Photo: In this lesson, I'm
going to show you how to work with bracketed photos, how to combine them
in light room. So this is an example of
that, the kitchen 12.3. And what's cool is
with the info on, you can see the settings
that my camera chose to shoot this bracketed
photo at or photos. So this was the settings. For some reason. It says 1.0. I think that's because I was on my manual lens which didn't
connect to my camera, so I had my F8 manually. But it does record
the shutter speed, which is the longest, was one-third of a second. The shortest rather was
one-third of the second, then 0.6 s, and then
1.2 s was the longest. And so you can see that
in this long shutter, the shadows are a lot brighter. And that's great
because we can see the details of the cupboard
on the right and left. It gets blown out or
overexposed in the background. But we have in this photo, these details
versus in this one. This photo is a little
bit dark in the shadows, but the background is
exposed really well. So to combine these, we
can select these three. You could select
however many you have. And then right-click and then Photo Merge and you're
going to choose HDR. Hdr is another name
for bracketing photos. Hdr, high dynamic range. Here it automatically will adjust and blend the
photos together. There are things that
you can adjust if you want it to manually
adjust the settings. You definitely want it to auto
align in case the things, the photos are just
a little bit off. You generally shouldn't
have any ghosting. What this is is
if you are taking a photo where
there's like people moving in it and they move from one area to the next
area of the frame, then this would get rid of
that ghosting in your image. But because we're
doing still-life, there shouldn't be
anything moving. Then all we have to
do is click Merge. And what's going to happen is a new photo is going
to appear here. It's loading up in the top
left you can see the progress. And here is the merged photo. This is one where I would
click that flag button here. Or if I was in my library, I would flag it here. Now I can see that
this is the one that is the one to add
it versus thinking, Oh well, as this
one or this one, I easily can see this
is the merged photo. You can see that it's a great combination
of, of the exposures. Now, is this necessarily better than just going into this photo and adjusting the slider is like we can bring
up the shadows. We can bring down
the highlights. I'm going to bring up the
overall exposure quite a bit. Bring down my whites. You can get in here. And with some of the more
advanced masking tools, we could probably get it
to look pretty close to what the other bracket
photo looks like. But without doing any
other adjustments other than just the tone. We can compare these two photos with this comparison view. So this, we saw that before and after this one that
looks like RA. This is where we can
compare two photos. You want to drag and
drop a photo from your film strip to compare
as your reference. So I'm going to
drag the HDR photo. And then now we can see on
the right-hand side are my adjustments of the raw photo. And this gets pretty dang far. I would say that in this case, it might not be necessary. And if you are shooting in RAW, you might not need to do
bracketing unless it's a crazy dark and bright
contrasty situation. If you're shooting in JPEG, I would definitely
recommend bracketing. But after seeing this example, it's clear that a raw
photo can be edited pretty well and might not
need bracketing. But if you are bracketing, this is the process. It's pretty simple
and you can tell that it does a pretty
dang, good job. And you would do this
before you go in and start doing any of your other
color sharpening, cropping, and all of those other adjustments
that come next. Thanks so much for watching and we'll see you in
the next lesson.
37. Natural Light Kitchen Edit: So this is my bracketed photo
and I just want to show you the rest of the edits I would make to
this particular photo. You can see that adjustments
have already been made. These are the ones that were
made when bracketing and you had those auto
adjustments selected. So it looks pretty dang good. A couple of things I would
do is I would go into my transform tool and
I often do this first. This left side is just a
little bit not vertical, so I'm going to select
this part of the cupboard. And then over on the
right-hand side, this part of the cupboard too, you just get that sort of
bending from this lens. And now that
straightens things out. I'll then go into my crop tool and just copying a little bit to the left or from the left
to get rid of that handle. And on the right
looks pretty good. I wanted this to be
like a balanced image with the center. Really, actually, I might go
in just a little bit more. I'm trying to decide if I want to get rid
of those handles. Maybe I do just to have
a more balanced photo with this runner in the
middle of the frame, in the middle of the kitchen. And that looks a lot better. Now our fridge does come out. It's a little bit tilted, but that's just because the fridge stands
a little bit back. That's totally fine. I would probably go in
here to the tone curve or the basic sliders and drop my highlights and
whites even more. This is where I would
probably go in and use my masking tool and I'll show
you that just in a second. But my detail looks pretty good. Sharpening looks pretty good. Maybe I'd go back to basic and add a little bit of clarity. Sometimes texture looks
good when you're taking photos of things like
cabinet or wood textures. And then lastly, the background
is a little bit bright. So I might go in here
with this mask tool. You're going to see me
using this in a lot of different ways in
the demos coming up. But basically the way
this works is you select a mask and there's masks
for all different things. For us, we're not
going to be choosing subjects because that will
select people in your image. Sometimes we will be looking at the sky for exterior photos. Generally we will
be using objects brush or one of these
linear or radial gradients. The radial gradient, gradient, if I click that and then I just click and drag in my frame, you can see that it's a circular
mask that feathers out. And you can adjust all of these settings here with the
feathering and everything. You can also turn on
or off the overlay, which is that pink overlay
to see what we're selecting. And we now have this masks
window that pops up up here. Again, this gets so advanced
and you can check out my full Lightroom course if you want to dive
deep into this, I just want to show
you the basic process for real estate photos. Because now what
we're doing is we're going to make adjustments to whatever is in this
pink selected mask. And so on the right-hand side, we have all of our
adjustments that we can make to what's in here. So we have our
exposure so I can take down my highlights
just a little bit. You can take down my
whites just a little bit. I could even go down into my, it has a curve option
and I can just ever so slightly bring down my
highlights and then maybe bring down my darks
just a little bit too, just so that we don't
lose that contrast. Maybe we want to bring up
the saturation back there, but that might not necessarily be a good idea because it's going to bring up the
saturation of the cabinets, which I don't want to do because then it won't
match the color of the cabinets in
the foreground. But with this mask on or off, which we can now go up to the mass panel and
turn on or off. We can see that it just blends out that exposure
just a little bit
38. Exporting Photos from Lightroom: There's lots more to
learn about editing, but I want to show you how to
export a photo to save it. For our sharing. You need to have your photo tray film strip down here open and select the photo or
photos you want to export. You can click on it, you
can Shift-click a series, or you can command or control on a PC, select specific photos. I'm going to take this photo
that we played around with and the keyboard
shortcut for it, for it is Command
Shift E on a Mac, control Shift E on a PC, or going up to the File
menu and going to export. Here we have this box which can look a
little bit daunting, but just take it
one step at a time. The first panel is
the export location. Here you basically just
under folder, click, Choose and find or
create the folder on your documents that you
want to save it to. Next, you have your naming. So this is, you can get super creative
with it if you want. Starting at the top
of the drop-down, you have your custom name. So this is if you
want to just give this photo a specific name. So maybe kitchen. More realistically
though, you would want to choose custom name, original file number, or
custom name sequence. So for example, I might call this California House or
what give this a name. And then all the photos
that I export would be in sequence then so
California's House, one, then two, then three, etc. Or another one that I often use is the original file number. Since this is a DNG with
a custom file name, it doesn't include it. But this is often nice because it includes that file number. So if you ever have to go back
and reference that photo, re-edit it, or we're working with a real estate
agent or whoever whomever. And they say, Oh,
can you re-edit that photo of the kitchen? You can quickly find it. You can give it all kinds of custom numbers, names as well. For example, if you want to just rename it to the file
name with a sequence. So the existing
file name that you, that's already on here. And then in this sequence, you can do that as well, or completely custom, but I
generally choose custom name, original file number, or
custom name sequence. Next, we can skip video. We're not doing
video file settings. This is important. So jpeg is typically
what you'll want to export out as 100. Quality, not limiting
the file size unless for some reason, you're working on a
platform where you can only upload files that
are 1,000 kb or one, which is the same as 1 mb
or two, or whatever it is. But generally you
don't want to limit it so that it can be the full
resolution, full quality. So that's the quality. Next is the size. Generally, I also don't
want to adjust the size. But if for some reason on our website or whatever
platform you're posting to, it's optimized to be specific to a certain aspect ratio
or aspects size, then you might want to
change these settings. So generally I leave
it as the long edge, and then I put that pixel size, so 1,000 pixels, 2000
pixels, et cetera. And I leave it to the long edge so that if it's a
vertical photo, which is generally not going to happen with real estate photos. Then it would set that as
2000 pixels and then adjust the shorter aspects
side to whatever is necessary based off of your aspect ratio that
you've chosen in your crop. Generally that so if I
just set the long edge to 2000 pixels and
it was this photo, the bottom and top
would be 2000 pixels, and then the sides would be whatever pixel aspect ratio
of two-by-three resolution. Also, this doesn't have to be a specific number if you
don't have the re-size. But 150 is pretty high-quality
for online viewing, so I would just
leave it at 01:50. Output Sharpening. This is something you
can play around with. If you choose to turn it on, you can choose screen
and then standard. The other options
are for printing. And this can look
a little bit good, but I like to do
my sharpening in the Detail panel while
editing the photos. So I generally turn
that off metadata. So this is if you
have want to remove your personal or location
info on the photo itself. So or you can include it. So you can include
your copyright info. You can include all the
metadata that's with the photo, which is like the
camera settings used. If your camera does
connect to locations, it would include that. It's up to you if you want
to include that or not. I generally just keep it on
there just so that I have that info on that photo file. Watermarking also
generally don't do that for real estate photos, but if you want to
add a watermark, you can turn that
on and then click this drop-down and
click Edit Watermark. And here's where you can
create your watermark, your name, you can
choose the positioning. You can upload a file if you have a logo or
anything like that here. Turn that off, and
then post-processing. All say Show in Finder so
I can see where it is. And I'm just going
to click Export. You'll see the export
bar in the top left, and then it will open the file. So now I have this
photo saved is 2000 pixels by 13033, 1333. And we can see that this is a nice high-quality
export of this at it. So that's how you
export in light room. I'll see you in another lesson, continuing with
our photo editing. Cheers
39. Copy and Paste Settings from One Photo to Another in Lightroom: An important skill to know how to do is
to copy and paste, edit to another photo, especially for real
estate photography, whether it's the same room
or even a different room, generally you want your photos from one house to look similar. So for example, if
I was just doing natural edits and I wanted to copy the settings that I
changed for this photo. All the edits I did, which we made a bunch
of them earlier on. I would press the Command C on a Mac or Control Z on a PC. And it brings up the
Copy Settings window. Here you can choose which
ones you want to have on. Generally you want
to have all of them on except for the transform and crop and also the healing. So you don't want
your masking either. And as long as you
use the same lens, you would include your
lens corrections. You don't want to do
these other ones like the transform because
that's the one where we're straightening out
lines and a different photo, a different room is
going to look different. So you want to do that manually, same with the cropping,
healing, etc. So all I would do
now is press Copy. Then I would go
to my next photo. So here is a similar photo, similar vibe, ambient lights on, but natural light photo. This one I would, I am
going to actually use the flamboyant process in the future with
these other photos. But just for example, I can now paste it command V, and it pastes all those
settings onto this photo. And if we look at both of these together and let me do the
reference photo again. So let's reference
the other one. You can see now the
colors are very similar, Similar vibe with just
the overall look. Sometimes the only
thing you have to do is adjust the overall exposure, individual exposure
just a little bit, just in case certain parts of this photo are a
little bit bright. I might just, if I was really
trying to match this photo, increase the highlights
and whites so that that window is sort of blown out similar to this other photo. And that looks pretty dang good. You can also, once you copied, you can right-click and
choose Develop Settings and then paste or here
you can get to your copies settings as well. And the other thing you can
do here is you can select multiple photos and
paste settings. So right-click develop and Paste Settings and it will paste
from what you've copied. There's also this
paste from previous. So if you didn't go through
and copy the settings, but you were just
going one at a time. If you go to the
next photo and then choose to paste from previous, it will paste what you previously did in
that previous photo. Alright, hopefully that makes
sense, that tongue twister. And we will see you
in another lesson.
40. Create & Use Presets in Lightroom: In this lesson,
I'm going to show you how to create a preset. So here's this photo that
we edited previously. If we open up this
panel on the left, this is where you
find your presets. I have a bunch of presets
that I've created and downloaded or purchase
from other people. This is where you import those. So if you ever buy a preset
online or download them, you can click the
Plus button, import, and then you find that preset
file on your computer. You can also create a preset here by clicking
the plus button. Click Create. From here you can choose
the settings that you've edited to
include in this preset. So similar to how
we learn how to copy and paste settings
before this is helpful if you want to
just quickly be able to edit your photos based off of a style that you've created. So I would select all of these maybe not Lens Corrections. All of these seem pretty good. Or maybe you just want to do a basic exposure adjustments. So maybe this is like
you call this real estate exposure bump or
whatever you wanna call it. And you would just select
the specific ones. Click Create. And now under user, we have this exposure bump. So I can go to my next photo. Let's go to this one right here. And now if I click
that, it edits it. Let me undo that just
so you can see that if I hover over these, you can see the
different options. But if I click it, now, as easy as a click, we made all those
changes to this photo, which is pretty dang cool. Then if you ever need to
share this with someone else, you can right-click
it, Show in Finder, and it will open up
the actual preset file that you can then share with other people
you could share to another computer or whatever. So that's how to use presets. The other thing to know about
too is this amount slider. So this is a new,
relatively new update. Say you like a preset but it's just a little
bit too strong. You can back it down. Or if it's not strong enough, you can actually increase
all the settings that you're adding by
increasing this amount. And you can see it
actually adjusting these sliders on
the right as well. Pretty cool, huh? Alright, so that's presets. And we'll see you
in another lesson.
41. Sky Replacements in Photoshop: On the sky is
completely over blown, overexposed because I was
exposing to the house. I could have
bracketed this photo and done one exposed to the sky. But even with this photo, if I dropped down the exposure, you get a little bit of
information in the sky. I'm just doing this just to
show us what's in the sky. But it's not that
dynamic of a sky. This is on the edge of
what you believe is morally right in terms of
how you create photos. And it might depend on
your real estate agent. And maybe on a job, the agent will tell you, can you replace that sky,
make it look better? This is a common practice, so it's up to you to decide
if you want to do this, but let me show you the process. Right-click your photo and choose edit in Photoshop because this is currently done in Photoshop perhaps
in the future, you'll be able to do this
in Lightroom as well. Once it opens up in Photoshop, go to Edit Sky Replacement. Here. It's going to open this window. And if you have the
preview button checked on, you can see what's
actually happening. At the top you have
options for skies and Photoshop comes with a
bunch of different options. You can also import
photos of Skies, which I think makes most sense. If you're in a location, skies look different,
clouds look different. So you might, as a real
estate photographer, wanna go out there
and try to capture beautiful skies
in your location. See how this photo, it's not exactly perfect. The warmth of the sunset. You want to make sure you try to match it as much as possible. So you can go through
here that one doesn't look realistic and there's gonna be
settings that we can use to adjust this, this one. Not that great. This one might work, but the color isn't great. So if you find a
photo that you like, then we can go in and play
around with the Smiths. There's different
things you can do to adjust the edge, fade the edge, so it does a pretty
good job asking you out the edges Photoshop
super powerful now, but you could
adjust the edge and the fade to fix that up. So we want to definitely
brighten this up quite a bit. So it looks like it
matches the exposure of this photo will
probably make it. You're going to make
it a little bit more blue unless you wanna go warm. But I think blue is
going to look good. Something like that
looks pretty good. You can scale it up. See how if I do that, the clouds move closer, scale it down if you want. Okay. This is going to depend
on the photo you upload. You can flip it, you can then make foreground
adjustments. So this applies to the
edge where this photo is being overlaid onto your photo. So here we can adjust it, kinda blends it in. So see, it's really
hard for you to see, but with the
foreground lighting, you turn that down or up, you can see that it kinda
adjust the fade into the trees. All these things are
meant to just fine tune the edge and you can
play around with them. Color adjustment, add
some of the color of the photo to your
foreground, to this. This doesn't look too bad. The only thing I don't like
about this photo is that in the original photo we have
this sunset right here. So I might choose a different
one for this photo, but once you're happy
with your adjustments, you can choose to output it to a new layer or
a duplicate layer. I'll just choose new
layer and click Okay, and now we have this new sky replacement
group that includes the photo and all the
adjustments that we made to make this look better. The only thing I don't like
about this photo is how the sun in the original photo is actually shining
through the tree here. But with the sky replacement, there's no sun there. So there's different
things I could do to remove that son. But I would do that before with something like the Healing
Brush Tool or the clone tool. And I'll show you
that right now, but now you know how to
use the sky replacement. So that's pretty much
it for Sky replacement. But if I want to remove that, an easy way to do it is with
the Spot Healing Brush Tool. So take that tool, adjust the size of
your brush up here. You can also press the
Control option that would be the Command Alt on a PC and drag it left or right to make
it bigger or smaller. Then I'm just going to
paste paint over that. And it looks like
it was choosing some leaves from over here. So I'm just going to do
this a couple of times. You could also get a little
bit more specific with the clone stamp tool. It works similarly, but now I can actually select a part of the image that I want to copy
and paste to the new spot. So option to make a
selection and then I go to the new part and select
or click to paint it on. Basically, since this is a tree, it works pretty, pretty
dang good is pretty easy. It's hard to tell. If you just look at this
photo, looks perfect. Then I would go to
Edit Sky Replacement, going to add the preview on. And it chooses the
same photo as before. So we're just going
to have to increase the brightness like
we did before. Make it a little bit blue, a couple of little adjustments. And that looks a lot
better, even brighter. Alright, so now we have this new sky replacement
group turn on or off, and that looks
much more natural. Now one thing I didn't
mention though, is that I would edit
this photo in Lightroom, that original photo
to get it straight, get the line straight, the crop, right, the
colors and everything. I would get that done first and light room with
the original photo before bringing it into
Photoshop to add a new sky. Because now I could go back to Lightroom and edit
this and it will be fine, but I like doing that
original editing first. When you're done with all this, you click Save Command
S or Control S on a PC. And if I go back to Lightroom, it'll pop up as a new photo, similar as we've seen before. Whenever you save a new
photo from Photoshop, it adds a new version
in Lightroom. I can flag that as the
one that I want to continue working with from here. Alright, thanks so
much for watching and we'll see you in another lesson.
42. Step-by-Step Flambient Editing Process: Welcome to this section
on flamboyant editing. So this is a very
specific process for how to edit real estate photos. And as we've learned, you need a few things. First, you need photos with
the ambient lights on. You need photos
with the flash on highlighting different
parts of the room. Sometimes this is one photo, sometimes this is multiple. And then you'll need a
window pole if there is something in outside the
window that you want to see. So I'm going to
show you how to do this with the office photo. I've also included
a document with step-by-step instructions for the flamboyant editing process. I've broken it down
to every single step. Sometimes in some situations
you won't do all of these. But I'll include this in the
previous lessons resources. So you have it. I think for the first time
going through this though, it'll make more sense if
you watch the video and you want to look at the
instructions at the same time, it'll be hard just to
follow these instructions. So watch the tutorial and use these, maybe
print them out. Helpful. So the first thing we're
going to do is in Lightroom, apply basic color and
exposure adjustments. And specifically
for window pulls, you want to make
those adjustments thinking about what's
outside of the window. So in Lightroom,
what we're going to do is do our basic adjustments. I'm just going to do
this really quickly. But you would go through and do all of your adjustments to your photos for
color and exposure. Not thinking about transforming
or cropping or anything. Just for color and exposure. Maybe bring up my saturation
just a little bit. And I'm going to
copy this, copy. Remember Check None,
and then just choose Basic and go over to this
photo and do the same. Looks pretty good. We don't want to
make these photos to dramatically different
because we're blending them. And then go to the next one. I'm going to paste the same. But really what
we're worried about is what's outside the window. And so what's
outside the window, we might actually bring up our vibrance or
saturation even more. Maybe make it a little
bit more green. I don't know. Depends
on what you want warm. I'm just looking at what's
outside the window. Maybe the original is fine. You can make all
your adjustments. If it's a big window with a better view than
it might change. Now, the next step is send
photos to Photoshop as layers. So to do this, I'm going to
select these three photos. Right-click, edit in and
open as layers in Photoshop. This is going to
open up Photoshop. And it's going to open up these photos in
your layers panel. I'm going to change my layout so it's this it should
be the same as yours. I'm using Photoshop tool any 23, But go up to Window,
Workspace Essentials. And this is what it should
look like if it doesn't go to arrange or workspace rather
and Reset Essentials, I'm going to open up my Layers
panel and make it bigger, as big as possible. Alright, so now
what I need to do is reorder layers in
Photoshop from top to bottom. So the top is going
to be a repair photo. So this is if you have
any reflections issues with reflections, which I don't have
in this photo, then we're going to
have our window poll. I should make this optional. So now we have our window poll. So let's put our window
pole at the very top. And I'm going to rename it
by clicking into the Title, Double-clicking, I'm going
to call this window pull. You don't need to do this, but I think for this following along,
it'll make it easier. Then we have our ambient shot. So this is the one
without the flash, so that's this one right here. Off is one. Then the last one at the bottom is our flash shot. And you can turn
these on or off to view them with these
little eyeballs. On the left of the name. There's so much in Photoshop, we're not going to cover it all. Again, I have a Photoshop
course similar to the Lightroom that covers everything you
need to know about Photoshop. I'm just showing you this
process for flam me editing. So hopefully you
can follow along and get comfortable
with this process. The next step is to
align the photos. So even if you're on a tripod, I think it's important to align the photos to make
sure that they match. These ones. Turning them on or off, they look pretty darn similar. But if they don't, go up to select all three of them or all
of your photos and go to Edit Auto align
images. Choose Otto and just click okay. And if it did anything, it would make minor adjustments
to move them around, rotate so that they are aligned. And you'll notice
this if you were photographing something
like in hand-held, for example, you will see them
move around and get fixed. The next step, this is optional, and I'll cover this
in a demo later on. If you have multiple
flash photos, then you'll need to blend
those photos together. We'll cover that in
a future lesson. We're going to skip that and
we're going to go to set ambient photo loop to
Luminosity mode at 50 per cent. So I'm going to turn off the visibility of
our window poll, select our ambient later layer, and then change to
luminosity blend mode, which is this dropdown at
the top of the layer panel. Luminosity is at the bottom. So what this does is
it brings in some of the colors and the lighting
of your ambient photo, but it blends it together
with our flash photo. If we drop our opacity to 50, this is a good starting point. And I can turn this on or off. You can see that it fixes
some of the flash areas with this option can see
there's some harsh light on some of these objects
on the bookshelf. And adding back some of that ambient lighting
helps quite a bit. And then from here
you can adjust the opacity up or down to get more or less of that ambient
photo back in there. So for example, for this photo, I think like boosting up to 75 actually looks pretty good. So subtle adjustment,
we're just sort of blending the ambient photo
with that flash photo. So this is looking
pretty good so far. The next step is to
mask our window pole. So the first thing is to switch the layer
to darkened mode. This technically doesn't
have to be first, but I like to do this. And what this does is it
removes the overexposure. So if I select the
window pole layer, and again on our drop-down of blending modes
switch to darken. You'll see that it
automatically actually removes the bright
parts of the image. And we can see the darker parts, which is what's in this window. But you can still see me holding this flash on the
right-hand side is weird. Flash bubble around my window. So what we need to do
is remove everything outside of what's in the window. So to do that, what we're going to do is first we can create
a layer mask. So to do this, the first
thing I'm going to do is option click and drag this down to this layer mask button, that's this button down
here that looks like the rectangle with
the.in the middle. And by holding the
Option or Alt, if you're on a PC, it
removes that image. And you can see that with
this black box here, layer masks are ways to
paint in and out a photo. Let me just show you something
if I undid that and I just drag this down
into the layer mask, it would be in white and we see this photo is still undo that. Drag it again, option drag. So it's a negative layer
mask and it removes it. And then from here, what you typically do with editing layer masks
is take your brush, which is B on your keyboard. You can make all the
adjustments to the size of the brush up
here, the hardness, the edge or control option, and drag left or right on your keyboard to make
it bigger or smaller, up or down to make it
harder or less hard. That would be Command
Alt, I believe on a PC. And then here we can paint in, and here's where we
choose our colors. We have black or you click this and you select
a different color. But for Layer Mask, we're just painting
in black or white. Since it's all black, we need to paint in white. So we can switch this by
clicking this button here, this little arrow which selects the first color or
the secondary color. Or you can press X on your
keyboard to switch those. So I have white now. And if I start
painting this end, you can see that it starts painting in areas of this photo. And then here in the
layer mass in the panel, you see that that
black starts to turn white where
I've painted in. If I painted too much, press X to switch
to the black brush. I can paint out remove
that I'm adding. I'm removing from our layer
mask that we created, right? So you could manually do this
and paint in the window. But there's an easier
way to do this. I'm just going to delete
that layer mask by selecting it and pressing the backspace
button on my keyboard. I'm going to start over. So I'm going to option, drag it into the
Layer Mask button. So that was just a
little bit of a detour of layer mask just to
teach you how to do that. Then the next thing
I need to do is with the polygonal lasso tool
mask around the window. So back here, here is your
polygonal lasso tool. This tool you just click, click Click and it sets
boundary points. And you want to do this
around your window. Now with the layer mask selected so you don't want
to have the photo collected, you want to click or select if you want to have
the layer mask selected. You also want to have
your color set to black. So if this is not set to black, you want to press the X
key to make it black. Or click in here and make
sure it's set to black. We've already selected our
layer mask, clicking here. Then we press Delete
on the Delete key. And what happens is we're
actually deleting the black. What's inside this mask. Now I can take my rectangular
marquee tool and just click anywhere to get
out of that selection. It was still had that little
marquee around our window. And from here we can go in. We could take our brush tool, press B on the keyboard
and make it smaller. We can brush in the
edges, are the edges, depending on if we
want to fix things, make it a little bit cleaner. But that does a really quick job at making this window poll. Add to this photo. And with the darkened mode, if it wasn't in darkened mode, the edge of this photo
or this window frame, see how over-exposed it is. It looks funky. Even get this top right corner
and let me zoom in so you can see it
just doesn't look good. But with it being in dark mode, it removes all of the
bright parts of the image, which is why we use the flash to overexpose the edge
of this window frame. And really the benefit of
doing it this way with the Polygonal Lasso tool to make that selection of the mask
is say you had a window or a door with five or six windows
in it with little edges. You wouldn't want to
do that with a brush. It would take too long to
create those individual masks. And by using the
darken blend mode with this polygon or lasso tool. It does it all within a
couple of quick steps. So this is looking pretty good. We can turn this on or
off and you can see what happens with that window pole. The next thing you
would do is if you do have any reflections
in your window, you would repair that. We'll see that in a future demo. But with this photo, we're just going to skip that because we don't
need to do that. Next in Photoshop,
we're going to flatten and merge this photo. So what we're going
to do if we're happy with how it looks, is select all three, Shift-click to select
from bottom to top. Then we're going to right-click
and choose Merge Layers. And the reason we
wanna do this is because there's some
stuff that we're going to do in Photoshop
to fix the ceiling. That has to be done with that. With this being one layer. Now it saves it as window poll. We could rename this
to merge or whatever. If we save this at this point, let me just save it. It's going to save
a version of it back in Lightroom that
we could check out. So now here in Lightroom we
have this photo up here. I'm going to flag it so we know that this is the one
we're working with, which is the combination
of these three photos. Let me go back and
Photoshop because this photo that's
in Lightroom is still connected to this file that we're working
with in Photoshop. So the next step of my flam me editing process is
to fix the ceiling. Sometimes with the flash
and the ambient lighting, you get some funky
looking ceilings with different color casts. And so generally we
want to desaturate the ceiling so that the
ceilings are pure white, which is unless your ceiling
is a different color, It's really what most
ceilings look like. There's a couple of
ways to do this. One is we can duplicate
the layer and make edits to that layer just
for parts of the ceiling. Or we can do a specific
adjustment layer for saturation. And I'm going to show
you that method, which I think is the
typical method I use. In Photoshop. You click this little
button right here, which is our different
adjustment layers. And I'm going to
choose Hue Saturation. Right now. It's making adjustments
to the whole image. And the properties of
this effect are up here. So up here in the
properties panel, if I take the saturation down, see how it adjusts the whole saturation
of the whole photo. So now we just need to
select our ceiling. To do that. It's similar. We're going to use the Polygonal Lasso Tool. We're going to take that tool. We're going to click around
the edge of the ceiling. You can go outside of the canvas here and
that doesn't matter. And then you just have to finish that connection so that
we're making this selection Now an important thing that
we're gonna do here is modify it to have
a little bit of a feathering to this selection
so that the adjustment we're making isn't so sharp from saturated too desaturated. So we're going to go to Select, Modify, Feather in here. I think that ten pixels is fine. And we're also going to apply effects at the Canvas bounds. So we're going to click Okay. So now there's a little
bit of feathering. You can't even see it. But what's going to happen with our adjustments
going to do that? Alright, so then the
next thing is to delete our selection
from the layer mask. So back in here we have
our selection with are here now we're
actually going to change our color to
white and then delete. What we have now is actually the opposite of what we need. We need our layer mask to include our ceiling
and not the room. So let's go back.
We're going to take our marquee tool,
just click out. And now what we can do is with
this layer mask selected, we can press Command
I to invert it. So this is a little
bit different than before with the
window poll where I option click this
and add a layer mask. Because it was a, an adjustment layer already
that has a layer mask, we had to invert it. So now if we make an
adjustment to our, our hue and saturation by clicking on the hue
saturation effect, bringing up our properties. We can drop our saturation
and you can see we can make our ceiling perfectly
white or gray. We might even bring up the
lightness just a little bit. But what I don't
like is that we lose a little bit of that
color from our light, which is natural to have some of that warmth
from the light. Maybe push this a
little bit too far. Something like this
might be good. But what we can do is
erase a little bit of this mask with a brush to
get some of that color back. So we paint back anything with, with our brush so we can
press B on our keyboard. Now what I like to do is drop our opacity to
something like 25%. And what will happen
now is if we have our eraser or really
not an eraser, but our black brush, we can paint over this light
and it does it in layers rather than in one
full blast pressure. And we can kinda
get the amount that we want in a little
more subtle way. So now if I turn this on or off, you can see that it's just
applying to our light. The ten pixels on this
photo might have been a little bit much for the
feathering of this mask. I feel like it drops
a little bit below the edge of this line
on the ceilings. So I might actually go
in here and erase it just a little bit
more with this brush. Just a subtle fade, which makes it look
a little bit better. And then once we're done with
all of these adjustments, we're going to save it again, take it back into light room. Those save, those changes will apply here to this
photo as well. And then we'll continue
to make all of our final adjustments here with our straightening of lines using the upright tool
cropping and things like that. Any last adjustments in
the rest of this class, I'm going to show you a
bunch of demonstrations for all of these other photos
that you have here, walking through the process. Because with each
of these examples, there's some differentiations
and how I would edit them or different
things that I would do. For example, in this photo, there's going to be multiple window pulls that will
need to work with. We'll also need to remove
some items in this photo. In other ones, I'll show you a different process for editing our ceilings in light room rather than using the method
taught in this lesson. In Photoshop,
there's going to be examples here where
I'm standing in the frame and we're doing
multiple flash photos. And we need to blend
these together before we do some of
the different steps. So continue watching
the different demos to learn some more advanced ways
to do flamboyant editing. Thank you so much
for watching and we'll see you in
another tutorial.
43. Editing the Kitchen Dining Nook: Welcome to this next
section of the course. In this one, I'm
going to go through full demonstrations of editing. Several photos. Editing is where photos, real estate photography
really pops. Of course, you have to get
great photos in the beginning. But to take your
photos from okay, to amazing, It's in
the editing room. So I'm going to walk through my entire process for
each of these photos. And you'll see the name of
the photo in the lectures. So jump around to
the ones you want. You can follow along
with the photos that you have access to from
the downloads. So in this one, I'm
going to start with the dining Nuuk photo. So the first step is I have my four photos for this setup. I'm gonna do my basic edits and walk through
this entire process. So I'm going to go ahead and
increase my shadows a bit. White balance is
pretty good right now. I might make a final
adjustment later on. I'm going to bring my blacks
down just a little bit, bring back some of that
contrast. Clarity. I'm going to boost just a
little bit as well as texture just to get the textures
of the wood paneling, the tiles as well. Saturation, vibrance,
I'm also going to boost just a tiny bit for
saturation, vibrance. Maybe a little bit
for saturation. That's looking pretty good.
Details looking pretty good. I'm just going to
boost this up just a little bit for sharpening. Set up to like 75 or
so Lens Corrections. I'm going to leave
as is for now, transform, I'm going to
leave as is for now. And that's pretty much all of the basic edits that I
want to do for this photo. I'm going to copy and paste these settings so that I do my basic, Also, my detail. Git. I'm going to copy
this and I'm going to go to my next photo, paste it. So this is the photo with the flash pointed
at the ceiling. You can see there and pay attention to
where the stove is. You can see that it just highlights that
stove quite a bit. Here. I am shining the flash
and it's highlighting the background or the coffee
bar, the dining notes. So that looks pretty good. I'm going to just paste
those settings as well. Looks pretty good. It's a little bit bright, so I might bring my
highlights just a little bit down for this one are my
main, my whites down. Then lastly, this is our
edit for our window poll. So we do get, I'm going to
paste those settings which copies the clarity
and stuff that helps. We do get some reflection in here That's just
because of the windows that are to the left
of frame which you can't really get
rid of right here. Maybe you'd want to Photoshop
all of this out so it's a clean IV looking background, but I'm okay with it being a
little bit more realistic. For this one, I might play
around with the dehaze. Dehaze can help get rid of
some reflections and bring out the details of
skies and things. But in particularly through
windows, it can help. I'm going to boost the
exposure just a little bit. Maybe for this one I am
going to play around with the tint and the
white balance just so that the leaves
out there look nice and warm, beautiful. That's looking pretty
good. So the rest of this photo looks
like junk, right. But for what's outside of the window, it
looks pretty good. All right, so our
next step is to take these four
photos, select them, shift clicking all of
them right-clicking, and choosing to open as
layers in Photoshop. Alright, so now we're
in Photoshop and the first step is just to
order our layers properly. So our window pulls
going to be at the top. And for this one
I'm going to rename this one last time just so you can follow along a
little bit more easily. But in the future, I'm
not going to be renaming these are ambient photo
is going to be next. And then our flash photos
are at the bottom. So I'm going to just
call this ambient. And then flash one
and flash two. So the first step, if we have multiple
flash photos, is to blend these together. So what I need to
do is probably take the one where I'm standing in the frame and I'm going
to erase that part of the image so that it blends
with now what's behind it. So to do that we can
use a layer mask. So I'm going to take flash to drag it into our layer mask. You're gonna get super
familiar with layer masks. Now, this is not a hide all layer mask where
it turns black. If I hold the Option key down
and would have done that I'm going to take my brush
B on the keyboard shortcut. You got to learn those keyboard
shortcuts Control Option, click up or left or right
to increase the size. And I'm also going to
take my opacity up. Now, really the area of
this photo that I want to keep is the breakfast nook and the coffee bar on the left. So I'm just going to paint
over me standing right there. And that looks
pretty good. And I'm also just going to paint over that giant flash in the ceiling. So now if I turn this on or off, you can see what's happening. I'm also going to actually I got it paint over on the
right-hand side too, because I want to
make sure that we are seeing the stove oven area, that the secondary flash
photo is really highlighting. So that's pretty
good. So now we have these two photos that are
going to be combined, and I'm going to
select both of them, right-click and
just merge layers. Now we have our three
standard layers. The next step is to
take our ambient photo, change the luminosity to 50%
and then adjust from there. This is looking pretty good. Again, what this does is
it kind of gets rid of those weird color casts that we see with the flash photography, the sort of blue light. It brings back some of that ambient lighting to
blend it in together. So something around 67 looks
pretty good for this photo. Next, we're going to
fix our window poll. So I'm going to turn
on my window poll. I'm going to turn
the mode to darken. So you can see if I
highlight that quickly. Now we can see the
window coming through. But we see so much else in this photo that we
want to get rid of. So remember how we remove this. We have to create a
mask around our window. I use the Polygonal Lasso Tool. There's all kinds of tools, but this is the benefit of
the polygon lasso tool, tool. And using this method is I
can go around these windows, even just getting all of them with one go,
something like this. Like so. So now we have all
those windows selected. The next thing I
need to do is create a layer mask by option
clicking this and these order, the order of operations
can be somewhat changed, but I'm going to
option select this and create a layer mask. And that has removed everything that's a
hide all layer mask. It removes everything.
Everything is black. But now, as long as this is black here in our
color selector, if I press Delete
on the keyboard, it deletes the
selection that I have with this mask out
of the Layer Mask. Now if I take my Marquee tool and just click anywhere
to get rid of that. Now we have this nicely
blended photo window, Paul. There are some weird
shadows going on. So what I could do
is zoom in here. That's what the Z
keyboard shortcut and then holding option to
zoom in if you're on the negative key
or the zoom out. Or going up here to the
positive plus to zoom in. And I'm going to take my brush. So now I have a brush
and it's really big. So B on the keyboard. And what I'm going
to do is I'm just going to paint out this
little line right here. And just pressing the
space on my keyboard to get my hand tool
allows me to move around. And let's looks pretty good. There's a little bit on
this lamp right here. Just a little bit. Press X on my keyboard to
get back my white brush in, X to go to black, to brush out. And this looks pretty good. Now, a quick thing
you could do to fix this reflection is something
with the clone stamp tool. Where is my clone
stamp tool right here. So here's the clone stamp tool. The way this works as we
might've seen before, is I need to select
part of the image that I'm basically going to
copy to another area. So I have my brush set, press the Option or
Alt key on your own if you're on a PC, click here. And now actually I gotta
be on the photo itself, not on the layer mask. So now I'm going to paint in. And you'll put, if you
play around with this, you'll see that
look how close I am to the edge of the left
side of the window frame. If I click and drag and paint, it's actually painting that left side of the window frame. So you got to make a selection
and only paint so far As where the leaves
are basically, you'll get the hang of this. And because this is
sort of a background, I think it's going
to look pretty good. I could do the same over here. A little bit harder
because they don't have as many leaves here to
sort of blend together. So I'm just Option
clicking around, sort of blending it in. Now let's zoom out. You always want to zoom out to
see how it looks. Now the right side
of this window looks a little bit funky. Let me undo some of those. Something like that looks
better or maybe we just leave that reflection
on the right side. But the one on the
left actually looks pretty good,
especially zoomed out. You're not really
going to notice that too much on the left. That reflection was a
little bit jarring. Cool. So now we have our photo. We have some weird color casts
going on in the ceiling. I want to see which yeah, there's some weird stuff
going on in the ceiling. There's some blue light, the warmth of the
lights up here. So we are going to
fix this ceiling now. So remember how we do that. We have to flatten these layers
by selecting all of them, merging layers or flatten image, either one will work and all
of this becomes one image. Next I'm going to
take my polygon, a lasso tool. Again. I'm going to select
around our ceiling. This time. I can actually just
add feathering here. So I can just feather here. This is a cool option
that Photoshop now has. And what I'm actually
going to do is create a layer mask or a layer
adjustment for hue saturation. And it automatically applies that selection to
this layer mask. And I'm going to drop
my saturation all the way around like negative 75. I still like having
a hint of color. And then remember what we did. We took our brush, we drop the opacity and we just brushed out X on my
keyboard to get my black. And I just brushed out
a little bit around our lights to make sure
that we're not losing that, making it a little
bit unnatural. Going to do a little
bit around this vent to just because it has a little
bit of a different color. And that's looking pretty good. We can turn this on and off and you can see
that it helps get rid of that blue light up
here in the top right. And also it's, it looks like
it's a different exposure. But because we move everything
to a desaturated look, it fixes that already. Cool. So now I'm going to
save this and it's going to send it back into light room. So now we have this
image in Lightroom. So I'm going to flag it
to know that this is the one that I'm
working with here. I'm going to make my
final adjustments starting with my transform. I like to do
transform before crop because sometimes this changes, the crop automatically
fixes what I would do. I'm going to take this
right side of this cabinet. And then also, let's see, always trying to figure out what the most important lines are. I'm going to take
this one first to see this edge of the wall. That does a pretty good job. Oops, let's get rid of that. Let's just take
this one as well. It's looking pretty
good. All right, so that's looking pretty good. So now what I'm going to do is crop in just
ever so slightly. So I'm going to take my crop
tool and just crop into the left just a
little bit because that edge wasn't so nice. I like seeing the full oven
range as much as possible, so that's pretty good. Press Return on my keyboard
to get out of crop. Now I'm noticing this little coffee stain or
something on here. So I'm gonna take my
Healing Brush tool and just paint over this. And it does a pretty good
job blending that together. Okay, maybe even get
rid of this reflection of the light band. Alright, so that's
looking pretty good. Let's see just our
overall white balance. Let's go back to our basic. I'm going to take my
colored eye dropper. I'm going to pick the white on the wall over here where
it was a little bit warmer because of these lights shining on the ceiling
and maybe from exterior, that looks pretty good. I might So close. Yeah, I think just dropping
the temperature and tint just a tiny bit helps. Another thing that I like
doing with cabinets like this, you don't wanna go too far, but with the HSL panel, I can take my color picker for saturation and pick
this specific color and make them pop
just a little bit. You don't wanna go too much because one that
could just look bad. And sometimes it's
just bringing up the orange just a little bit. But just making it pop
just a little bit. Maybe even the
luminance might help. Nice, Cool. So this is looking really good. I think that's pretty much it. Sometimes I like to go into my tone curve and
just see about adding just a little bit
more contrast at the very end to
the overall image, really make it pop. And I can see the
before and after over these final edits here
with the backslash key. Or I can see like
the first photo. And then this edited
can bind photo here. You can really see
the differences. Nice. Last thing I'll show you is sometimes I like
to brighten up my ceilings. So I'm gonna take my mask tool. I'm going to use a
linear gradient. This is one where you select
one side of the frame. So I'm going to just
click and drag. And you can see that now
I'm picking the top. I'm not just picking
the ceiling though, so I'm going to go
rotate it along this edge of the ceiling. Then you can click
this little middle box and move it around. And then let's expand this box. And what I'm
actually going to do is subtract some of this from the top of the vent
hood and the cabinets. I can click, subtract. I could do a brush and
just brush it out. Or I could subtract another linear gradient and
kinda create one like this. You can really get in
there and fine tune it if you're just trying to make a
selection of the ceiling. But for this one I'm just
going to do this and then just boost the exposure
just a little bit. See how that just brightens up the whole room
just a little bit. And we can turn that on
or off with this mass. So off, on, off on. That nice, maybe even just
bring up the shadows a bit. Nice. Really makes this
photo pop Cool. So this is my
breakfast nook photo. I hope you enjoyed watching my full process and we'll
see you in another lesson. If you've edited these photos yourself, I would
love to see them, post them to the class
and in the discussion. And I would love
to check it out. Thank you so much
for watching and we'll see you in another lesson.
44. Editing the Primary Bedroom 1: Welcome to this next demo. In this one, I'm
going to be editing the bedroom photo here
that you have access to. So similar to the kitchen
one it or the dining nuke, it has four photos, but I think it'll
be beneficial to see this process one more time. I might go a little
bit faster since you already are starting
to know things. The first thing is first
is to do my basic edits. Mostly just exposure, not with
white balance necessarily, except for our window poll. Here. I'm just going to
bring up my shadows. I'm going to bring
down my blacks, bring up my whites
just a little bit. Clarity boost just a tiny bit. Saturation. I'm not going
to touch saturation. It's, it's pretty warm already. Account are bringing out
the blues of this blanket. I can try to do that
with my vibrance, but I might actually
go down into HSL, take my color picker
for saturation, and go into this blue. Do that. And sometimes I see you click and drag up to
increase the saturation. I see that as bringing
up blues and purples. So here I might just go in and bringing those
two colors up, sort of eyeball it. How I like it. I know I said I'm not going
to play with white balanced, but I'm just going
to bring the yellows down here just a little bit. It was just a little
bit too warm and my opinion detail
looks pretty good. I'm just going to increase
just a little bit. There's not a lot of noise, but I'm just going to reduce
a little bit of noise. Balance that up to 20 or
so. Looking pretty good. Okay, So this is a good starting
point and you'll really see how this photo
transforms because it's, it, it honestly doesn't
look amazing right now. So I'm going to copy and
paste these settings. Copy detail. I'm also going to take
the HSL, and that's it. And then I'm gonna go
to the next photos, paste these settings,
paste these settings, and paste these settings. And then for this one, just pay attention to the what's outside of the
window a little bit more. Make it a little bit
more green, warm. It's hard to not
pay attention to what's happening outside
of the window frame. But remember this
is just for what's being seen in the window frame. Cool. Okay, so that
looks pretty good. I might even just
do a little dehaze. Clarity, just a little bit vibrance and it's
looking a little bit funky. Green. Me boost that tint
just a little bit. Cool, So that's
looking pretty good. Next step is to select all four. Right-click Edit in open
as layers in Photoshop. Okay, so now they're in Photoshop and we're just
going to reorder these. So our window poll
goes up at the top. Are flash photos are at the bottom and we have to
blend these two together. So this top one, it's highlighting this front
side of the bed quite a bit. This back one, it's sort of like the backside of the bed
and the room over here. What I'm going to
do is I'm going to put this one in the bottom. I think overall this one looks
a little bit more natural. So the one where I'm
flashing over here, I'm going to create
a layer mask. And with my brush
at opacity 100, I'm going to just
brush all this ceiling out and then brush this left
side of the image out too. Because really what
I'm getting is this bottom right corner of
the image from this photo. If you see, if I turn this on, an object can kinda
see what that's doing. And there's quick ways to create automations or shortcuts to
do a lot of these things. And these steps that
I'm going to show you. And I'll cover that in a advanced Photoshop
section coming up. But right now I'm
just doing every step manually one at a time. So now I'm going to
combine these two photos, right-click both of them,
merge those layers. Now with the bedroom, I'm going to change this to
Luminosity and 50 per cent. And you can see that that gets rid of those cool
flash color casts, but blends it in a way
that is pretty nice. This one I might do
like a lower opacity, kinda like the way that
the flash photos look. Then I'm going to
take my window poll. So remember there's
different steps. But basically what we need to do is we need to make a selection around this window like this. And I'm going on the
inside of the curtains, so just the window itself. I'm going to option, drag this into my layer mask. Then I'm going to delete on my keyboard as long as
this is set to black. And that will basically
add back this selection Now I'm going to
get out of that. And that looks pretty good. I might go in here
with my brush. Just brushed the edges a little bit and
sometimes just taking the opacity down just
a little bit helps. And that was a
little bit too much. Nice. Alright, so that's
looking pretty good. Cool. So overall the photos looking
pretty good in this one, I'm going to take
this photo back into light room so I
can save this now, I don't necessarily have
to merge the layers. It will save what you're seeing here as a photo in Lightroom. The merging of layers is
important if you want to go ahead and edit the ceiling. But since we're going to
do that in Lightroom, we can go back to
Lightroom and now we have this combined photo here. I'm going to flag
it so I know this is the one that
we're working with. Cool. So the first
thing I wanna do is brighten up the ceiling
and D saturate it. To do this, we're going to
create a mask for the ceiling. There's different ways to do this in the Mask Tools option. The two that I would recommend
are the linear gradient. Clicking this, you
can see if I now go into my image and
click up or down, I can basically select just
one part of the image. So I can go in here, try to get this at the
right angle of the ceiling. The more I bring out these
bars on the top and bottom, It's sort of feathers it out. I can go into this middle
one and line it up with the ceiling as
much as possible. And then to, because this is selecting the
whole top corner, I would take this
mask and actually subtract another linear
gradient, like so. But lining it up, It's really hard to get
those edges perfect. And if you see now if I take
my saturation or I push up my exposure and I'm
just gonna do it extreme so you can
see what's happening. Those lines aren't perfect. So a better option
is the object. I found this to be
pretty good for ceilings with the object tool, what I can now do is just draw on I'm clicking and
drawing onto the ceiling. And Lightroom is going to see the edges of where
the ceiling and the wall meets and do its best at
just selecting the ceilings. So I'm gonna do that. I don't want to go over
the edge. Now I'm done. I let go and it did
a pretty good job. So only thing I don't
like is over here. If I go over here, it selected part of the wall, which is actually
a different color. So what I'm going to
do is take my mask, subtract, and I'm
going to use a brush. I'm going to turn my flow
and density all the way up. That's kinda like the opacity. Then I'm also going to
leave auto mask on, which helps with like
selecting the edge of things. If you're brushing
too close to an edge, it will protect you. And just there we go, Something like that
should work better. I might need to fix
that up afterwards, but let's get out of my brush. Press Z on the
keyboard to zoom out. Now let's do our adjustments. So first I'm going to desaturate a little bit and
then I'm going to increase the exposure
just a little bit. That's looking pretty good. Now if I want to
desaturate even more, then what I can do is I can
similar to as in Photoshop, I can go in here and
subtract using a brush at a lower density without Auto
Mask on and a lower flow. I can brush out some
of this selection over the lights to get a little bit of that
warmth back in here. If I turn on my overlay, you can kinda see
as as I brush on, it's doing it in layers. If I bring up the
density quite a bit, you can see it start
to come off faster. I'm going to undo
that because I want the density pretty low, so it's kinda like just blending
in as much as possible. Cool. That's a pretty quick edit. I would probably fine
tune this a little bit more and take some time to
make those edges perfect. I'm going to just bring up the
shadows just a little bit. There's like a funky line going on over on the
right-hand side, which I don't really like, but that's pretty good. Now what I'm going to do
is just do my final edits kinda like I did for
the kitchen photo with the tone curve, I'm just going to add a
little bit of contrast. And then one of the
most important ones which I almost forgot about is the
Transform. Transform. I'm going to take my lines, got to make sure
that this line for sure this is a big
prominent one is straight. Probably this line here
in the back of the room. This line of the window. Yeah, that's all
looking pretty good. Then I'm going to
come into my crop. I like seeing the hallway, but I don't need to
see that door open. And that was my bad. I actually left some blankets
on the floor Over there. Something like that centers
the bed, feels really nice. So again, we can compare this. Let's do the reference to our first photo, left and right. It's looking pretty good. I might even boost the contrast just a little bit and make it a little
bit brighter. Maybe even just the
overall saturation just a little bit
and make things pop. That's looking pretty dang good. So this is the bedroom at it. I hope you enjoyed this lesson and we will see you
in another one. You don't want to miss
them because you might learn something new in each one. See you there?
45. Editing the Primary Bedroom 2 + Removing Objects in a Photo: In this lesson,
I'm going to edit this empty bedroom photo. This one's a little
bit different because we have to Window poles. So that's the main difference. So I'm going to do
my basic edits. This is a different house, so I might just copy
and paste the edits from a previous photo if I
had already edited them. But since this is
a different house, I'm just going to do
a quick little edit, boost the shadows,
bring down the blacks. Highlights, leave
basically the same. A little bit of clarity. Vibrance pop just a little bit. And that's pretty much it. I mean, it doesn't
look great right now, but we'll make some changes
to the final photo. Copy those detail HSL, I don't need that. And I'm just going to a quick
tip is I can select all three of these develop
and Paste Settings. And it's going to paste those adjustments to
all of these photos. Now the big thing is this
one is a little bit bright, so I'm going to actually take the overall exposure
down just a little bit. This one, the outside
looks pretty good. This one, maybe a little bit of D Hayes and bring
up that exposure. Maybe for this one
I might D Hayes as well and bring
up the exposure. Cool. So now I'm going to
take all four of these right-click and edit in open as layers in Photoshop. In this photo, we're going to learn a couple of
cool things like removing this little WiFi
setup in the background, removing the spots on the
floor from the carpet. We got some weird fan shadows going on with those flash
photos that shouldn't be there. Now what we're going to
do is we're going to put both window pulls at the top. We're going to edit
those separately. We've got our ambient photo next and then our flash
photo at the bottom. First, I actually have to
align these in this setup. I wasn't using my
remote trigger. So I think that these might
not be perfectly aligned. So I'm going to go
to Edit align Otto. I can see here on the
canvas from the edges. After they aligned, I can see the transparency grid behind it, so it definitely did
move them around. So you don't want to
skip that step if especially if you're not
using a remote trigger. Alright, so the first step is for our ambient shot,
what we're going to do, we're going to change the
blend mode to Luminosity, set the opacity to 50%. Now let's work with
our window poles. So starting with
this one, which is, let me make sure this is the window Paul for
the right side. I probably could have
used this one for both, but I'll just show you
how to do this for both. If you have two, I'm
going to take this, set my lasso tool around
my image or my window. I'm going to option drag
it into the layer mask. This is got black on
it, which is good. Press Delete on my keyboard. Looking pretty good. I might go in here and do
a little bit of brushing. So B on the keyboard, make sure I have the white now, or actually I still black. And I'm just going to
brush out a little bit. The edge, which seems like it's my opacity is down at 54%. Alright, so now what
we're going to do, I'm going to move over to
this side of the picture, turn on our other
bedroom window, poll, take my lasso tool. Just go around our window. So same thing. Option, drag it into
the layer mask. Delete on my keyboard, get out of that mask and
this one looks pretty good. Take my brush, maybe brush out just a little bit
of this curtain. And let's zoom out. And that's looking
pretty dang, good. So in this photo
I am going to do a little bit more
work in Photoshop. So I'm going to just blend
these now, are merged them. So select all layers. Merge layers or flattened image basically does the
same thing for us. For the ceiling. Let's go ahead and
do the ceiling. This is a funky ceiling and this one is probably
a bit easier to do in Photoshop rather than light room with the
Polygonal Lasso Tool. I'm just going to take
this all the way around. Like so. Close it off. Now we have that selected. So now what I'm going
to do is I'm going to select and create a hue
saturation adjustment. I'm going to decrease the
saturation quite a bit. Then I'm going to take
my B were rushed tool Pasty at 50% is good
and I'm just going to erase around my light and also around these fan
blades because these are Brown fan blades and
it doesn't make sense. If half of them, half of a blade is gray. It looks pretty good. I can press X on the
keyboard, touch it up. So now I'm kinda erasing
around the ceiling where I brought back a
little bit too much color. Alright. Let's look
in pretty good. Okay, so just with that
adjustment, it helps a lot. I might just brighten it
up just a little bit. Good. Does lightness slider? It's not as fine tuned as the Exposure Slider is you
have and in light room, I could do a separate
adjustment layer and use a different tool
like the levels or curves to more fine
tune the ceiling. Honestly, it's pretty dang good. Next, I want to get rid of these little marks
on the carpet, which is where the bed was and this is something
you might run into. So what I'm going to do, I'm going to use the, let's just use the
Healing Brush Tool for this one spot healing brush. So it looks like a band-aid
and I'm just going to make it a little bit smaller. There's different modes and
you could test them out. But I just like
leaving it on content aware and seeing
what it does first. It does a pretty good job for this proximity match
also might work for this one because it's taking from something from the
proximity of this photo. And since it's all
that carpet texture, it does a pretty
good job as well. So now the floor
looks pretty good. But there's one
glaring issue and that's all this junk
over here in the corner. There's different ways to get
rid of things in Photoshop. And as the AI tools
get better and better, being able to remove or replace content in a photo
is getting easier. Let me show you a few ways of removing objects in Photoshop. The first thing
I'm going to do is duplicate this layer by
just dragging it into the plus new layer
button so that I have a layer that I'm working on that if I don't like
what I'm doing, I can always delete it
and start from scratch. The tools that you can use. Our There's many. There's a few here under the
spot healing brush tool. The first one I would try
is just the Remove tool. So selecting that I can now make the size of my brush
bigger or smaller up here. Or as always, control option on a Mac to drag left
or right too big, make bigger or smaller. Then I just literally
can draw over this. This is a pretty complicated one because it has the wires. The background is
not too complicated, so it might work. Once I have it all highlighted, I'm going to let go and
it's going to process it. And that did a pretty
dang, good job. The base boards a little
bit funky from afar, you can't really tell. So we might want to
change things up, but I'm just going
to call this the Remove tool so we can
see the differences. Next up, let's create
another layer. I'm going to call this
the spot healing brush. Here with this layer, Let's zoom in here again. And now we're going to take
our spot healing brush. So this one, it kinda
does a similar thing, but it's more of a
healing tool where it takes sort of what's around it and it
tries to replace it. This is more for
like, I don't know, for Photoshop retouching like removing pimples and
things like this. And it works pretty good for
this area next to the wall. But as I get closer
to the base board, it starts to be a
little bit funky. And I've found that if I
just do it all at one time, it won't do as good of a job. So see, if I do that,
it just doesn't do it. So I'm just gonna
do one at a time. Yeah, I see the white of the little router right there
is really messing it up. So I can keep
painting over this, but this is a tool you can use in conjunction with the
other ones potentially. So that's spot healing brush. I like the removed tool better. Let me show you another one. So this is, I'm going to call
this Content Aware Fill. This is a really cool one that sometimes
works really well. This one we literally just
make a selection and it's best to get it around the
object as much as possible. So I'm just going to go
around with the polygon or lasso tool like so. You could also use,
let me just show you. So that's that selection You could also make a selection with the objects selection, I'm just going to
draw a box over this whole setup here and it's
pretty much all selected. And then from here
I'm going to go to edit content aware fill. So let me zoom out here. So now what we need to do is
tell Photoshop which part of this image do we want to use to fill in this area that
we have selected? And we do that because we
have by using our brush, which is the plus. And we could paint on, and we can say, Okay, we want this wall we want
if I brush over here, we want the floor
the floor board. We want you to use all of this information to
make that adjustment. And on the right-hand
side, it's okay. But obviously not, not good. You could change the color
adaptation and things like the rotation adaptation
and that might help. But it's clearly not
doing an amazing job. I just wanted to show
you this tool though, because sometimes it
does a pretty good job. So now we have that and
it's not, not perfect. So there's one more
tool that I want to show you and that's the sort
of the manual way to do it. And that is, let's get
rid of this selection. Let's zoom in here. We're going to use the
old Clone Stamp tool. So here we can choose
our clone stamp. And similar to how we've
used the clone stamp before, we make a selection by
pressing the Option on a Mac key and then making that
selection or Alt on a PC. And then we can kinda go
over and blend it in. So let me make this a little
bit smaller actually. So Option, click Option, this wall paint option, the wall paint in
option the wall. And sometimes you might need to use a couple of these in tandem. And maybe for this image, it's more the wires on the ground that I'm
worried about and I don't care so much about
the modem sitting there. Then if some internet
sleuths sees this photo, they're going to say that's
the Photoshop because there's some wires that are
appearing on a Nowhere. Maybe we do just get
rid of this as well. But this one's definitely a little bit more time-intensive. But with this tool, we can get a
straighter baseboard. So I could keep going, but you can see that this
one is getting pretty good. So the colors are
a little bit off. So not bad. So that one compared
to the removed tool, the baseboard is cleaner. So maybe what I would do first
is do the Remove tool and then do a clone stamp tool
to fix the base boards. So here if I take
the clone stamp, especially where the baseboard
is a little bit wonky, like up and down. We can fix that. And that's pretty dang good. One that I would
also check out is which works similarly is
the Healing Brush tool, not the spot healing brush
which automatically does it, but the healing brush, which works similar to
the clone stamp tool, where you make a selection
with the Alt key. And then you go to where
you want it to blend in. And it does so in a
more intelligent way. So I can take this, move
it over here, blended in. So let me actually just go two. Last one, I promise, to this new layer. And I can take this selection right here
and then go over here. And it does a pretty
quick job at fixing that. That might be the
winner actually. So that is the Spot
Healing Brush Tool or that's just the
Healing Brush tool, not the spot healing. So you can kinda see
the differences. I would say the Healing Brush, the clone stamp work pretty good and then the Remove tool. But of course it's going to change depending
on your situation. So now that we've
done all of that, I'm going to use
the healing brush. I think that actually
looks the best. And then I'm going
to actually just right-click and
choose flatten image, and it disregards
the hidden layers. I'm going to save this and
bring it in to Light room. So now we have this image
in Lightroom, flag it. Now one problem is
the edges are a little off from the alignment. So the first thing I'm
going to do is go down to the transform tools and
straighten things out, strain this line is
a good one to use. Then maybe the door frame. And that does a
pretty good job at straightening
everything else out. And I'm pretty happy with that. I might just boost the
contrast just a little bit. Brian things up, make it
pop just a little bit more. And with that little bit
of pop and contrast, I think it looks
pretty dang, good. Awesome. Well, this has been a long one, but I hope that you
learned through this process how to remove
objects in your photos, which is definitely
something you'll need to do in your real
estate photography. Thank you so much
for watching and we'll see you in another lesson.
46. Editing an Exterior Photo with Sky Replacement: In this lesson,
I'm going to edit this front exterior photo. I already did another
lesson replacing the sky, but I want to show you this
from scratch what I would do. So first things first, with my basic tools, this is one where I'm not combining layers or
anything in Photoshop. It's just editing
this specific photo. What I'm going to do is I'm
going to boost the shadows, but I don't want to
lose my contrast. So I'm going to bring
back down those blacks. The, right now I'm editing
for the house itself, which is very, very cool. It's a little bit too
cool from the shade. So I'm going to warm it
up just a little bit. But I also want to
really make things pop. So I'm going to bring
that vibrance back up. That really helps quite a bit. I could go down
to the HSL panel, which I might do and bring up the saturation of
just the house. Maybe some of these other
colors like the red. I don't want to bring too
much of the yellow up, although that looks pretty good. Playing around with HSL is
really fun for exteriors. Now, I might want to do a specific edit of just
the house in a second. But right now, I'm gonna go
down to the transform tool and see about making
these lines vertical. They're pretty close.
And that's pretty good. This is also one where
I might just use the auto or the vertical. Now actually I like the, the one that I did with this, but I do have to crop in. I don't like that gate
on the left-hand side, so I'm going to
crop in like this. Now it looks pretty good. So you see the whole front yard or most of the front yard and the entryway might just rotate
just a little bit though, Brown, something like that. Cool. This is a case where
I might crop burst and then redo these because one of those lines
was I actually cropped out. So I don't really care
about that anymore. So I'm going to redo
it with this line. It's pretty good. All right. That's
looking pretty good. Okay. So the front of the
house is a little bit dark. So I'm going to take my
mass selection tool, and this time I'm going to take my object and just see
what happens if I paint in this front of the house and see if it does a
decent job selecting it. Nice, not bad. I'm gonna go in here
and I'm going to add another object and I'm going to paint this side of the house. That did not do what
I wanted it to. I'm going to add
Let's remove that. Let's try again. I'm just going to take
my box marquee tool and select this. There. That worked pretty good. Alright, so now what I'm
going to do is just boost the contrast and the exposure just a little bit
brighten it up. So it doesn't look so
much in the shadows. And I think adding a change in the sky for this
photo will really help. So this is looking pretty good. I think I'm gonna go ahead
and take this into Photoshop now to replace the sky. And this time I'll pick a photo that's a little bit different, that I think matches
the sun's setting vibe of this situation
a bit better. So here in Photoshop, I'm going to go up to
Edit Sky Replacement. This time I'm going to
use a different style. Let's find one that is a sunset, one that looks more natural. Now, I know the skies
from this locations, so I think this one
looks more natural. That looks kinda like the
clouds that we get here. That looks pretty good. I might brighten it up
just a little bit. Maybe make it a
little bit cooler. I don't wanna go overboard. There is some spillage
over on the edge. So let's just increase the
fate of the edge maybe or decrease the shift or shift the edge up
just a little bit. I think that helps. Cool. So that's looking pretty good. So turn this on and off. You can see this actually
looks pretty dang, good. Nice. I like it, so I'm
going to save it. I'm gonna go back
into light room. And then here in light room, What's cool is I can actually do a sky selection if I want to make further
changes to the sky. So those guy, you could do
some of this in Photoshop, but I find it easier
in light room. So now I have this
guy selected and from here I can boost the contrast. Now this is sort of like
an edit on top of an edit. So you've got to be a little
bit careful about this. But I kinda wanted to just make that sky pop
just a little bit. Sometimes even
bringing up the Dehaze for sky can really make it pop. Nice. So that's
looking pretty good. Then I might go down to our
tone curve for one final just brightening and
adding of contrast. Yeah, that's looking
pretty dang, good. Cool. So we can see those
final edits that I've done. And then what I can do as well. Let's do a comparison
before and after. This one actually
already has edits to it. So let's reset this photo. And here we see the before and the after on the
right-hand side. That's pretty cool, huh? Alright, thank you so much
for watching this lesson. If you have any questions
about this, let me know. Otherwise, we'll see
you in another one.
47. Editing a Kitchen Photo with a Natural Designer Style Look: Welcome to this tutorial. This is just a natural edit
of this shot right here. I thought that this could be a great sort of just stylistic, fashion designers style at it. So I liked the straight
flat profile of this photo, but the foreground
is pretty dark. So what I'm going to do is just boost these
shadows quite a bit. So we can really see these cabinets that are the
highlight of this photo. I boosted that all
the way up to 100. I'm actually going
to go even more further with the
overall exposure, but then tone that down the
highlights and the whites. I am going to completely
overexposed the window, but I'll do that with
a mask later on. Bring back down
the blacks just to bring that contrast back. Texture. I'm going to boost a
lot because I really like the texture of this tile and the cabinets as well. Clarity do that as well. Vibrance. I'll bring up just a little bit. White balance is pretty spot on. I can go in here
and see if I use the eyedropper to pick
this front of the sink, which should be white. But when I do that, it starts
to look a little too cool, but I can always turn that back. So I can just start there and then move back with
my temperature slider, which can help quite a bit. That looks pretty dang good. Next, what I'm going to do
is let's go into detail. Let's make sure our sharpening
up That's looks good. Might do a tiny bit
of noise reduction. Looking good. That's looking good. I might go in here now and I'm going to overexpose this window. So to do this, Let's try the object tool, and I'm going to take my marquee selection tool
and just drag it over. Our window. Does a pretty good
job at doing that. And then I might add with
a brush in Auto Mask on the rest of this window that didn't get selected.
That looks pretty good. Then I'm just going to
bring my exposure up. Now. I don't like how it's getting those plants
in the foreground, but we will fix that
in just a second. So I don't mind having
a little bit of detail. I don't want it to be white.
That just looks weird. But I'm going to
bring that exposure. I'm going to also scroll down
and decrease the sharpness. Actually, no, I take that back. I'm going to leave it like so. But I am going to
go up to our masks, subtract with a brush and subtract on our plants because
I want to see our plants. You see our overlay. Let's take our density up
quite a bit and flow up. And using the objects Select
might be good for this to just subtract object Mask. Alright, so let's
turn off overlay so we can see what
we're working with. Now, if this looks good, I can always take my
preset mask amount and I can increase or decrease
which basically duplicate, duplicates what I've
done or tones it back. I'm just going to boost
that up just a little bit. So if I had made a
bunch of changes here, then that's what would change. Okay, that's looking
pretty good. Alright, so now let's go back. Let's go back to
our basic settings. It's looking pretty dang good. Let's just use our
transform tool to make sure everything's vertical
and horizontal. That flattens it out just a bit. Let's just do Otto see, that's pretty dang good. I can go in here to my crop tool and if
I start to rotate, I can see exactly
where my lines are and they are spot on vertical. The sink is centered,
looking pretty good. Yeah, it's like pretty fail. You did a good job taking
this photo majors. It's squished into the left. That is looking
pretty dang good. So let's see the
before and after, before, after, before, after. Boom, that's looking great. My friends looking
really, really good. Let's go into our
lens correction. And what I might do is just a little vignetting
fix just to make those edges a little
bit brighter. And then also bring that
midpoint in just a little bit. More like a little
stylistic thing, but I kinda like how that looks. Nice. Pretty dang, good. So that is a nice natural
light edit of this photo. I hope this gives you some ideas for what you can do for
this type of photo. And we'll see you
in another one. Cheers.
48. Quick Bathroom Edit: In this tutorial, I'm going
to edit this bathroom photo. It's a pretty basic one
is just two photos. There's no window pulls. The first thing
I'm going to do is any basic exposure adjustments. So for this photo, I'm going to just bring
up my shadows a bit. I'm also going to
bring up the overall exposure just a little bit. Bathroom, I want to make
nice bright white clean. That's basically
what I'm going for. The white balance
I'm okay with right now because I'm going to blend
it with this flash shot. I'm honestly not really going to do anything
else right now. I'm just going to select
these two right-click Edit in open as layers in Photoshop. You'll want to watch the advanced lesson on using actions to speed
up your workflow. Because I have great actions that I've set up to
auto align layers with F5 instead of selecting
them and going up to Edit Auto align layers. And I also have one for changing my ambient layer to
Luminosity Mode opacity 50%. So check that lesson out. I don't want to walk
through it in this lesson, but now we have this photo that looks
pretty nice and clean. So let me turn off
this ambient layer so you kinda what's going on? I like it on except the ceiling. I don't like that glare
from the outside. So let me actually
just let's see. So that's coming from this one. So I'm going to add
this to a layer mask. Take my brush tool, turn it to black with
X on my keyboard. And that looks pretty good. Alright, so now I'm
going to save it. This is going to send
it back to Lightroom. I've already edited this photo, you can see here, but I want to show you this from scratch. So it's added this new version. And really what I'm
going to do it just go down to the transform tool. Take my upright tool and I'm
going to take this line of the mirror looking for what's prominent line and then this
one of the door right here, it's kinda this one's
going to be hard. I'm not sure if this is
going to work or not. Am I have to just crop it out? That works pretty good. Pretty good. I'm
getting a little bit of blur from the edge of our lens and it's
pretty distorted. So I was using that, I believe it was a
super wide lens. So let me just try to bend it just a little
bit to fix it. That's pretty good. Helps just a tiny bit. And I probably should
have done that before I use the upright tool. But now I'm just
going to crop in from the left just a little bit. Kinda wanna get rid
of this handle. Let me see if I can do that
with the Healing Brush tool. My selection, move it up and
that's pretty dang, good. That does a really good job. That distraction is not there. There's still little bit there. See, I don't know if it
almost didn't get that bit, so let me decrease
the feathering. Yeah, that looks good,
that looks good. Cool. So that is looking
pretty dang good. Maybe just boost the contrast just a little bit,
a little S curve. You know me, I like
to do my S curves. Maybe is it too bright friends? What do you think might be hard for you to see
on that screen? You're watching this on me, bring my whites down
just a little bit. Make sure my white
balance is on point. I'm going to select
the wall which should be a pure white. It makes it feel a
little green to me. So I'm going to
remove that tint. You just cool it down
just a little bit. Or what I like to do
instead is just go in, go to the HSL panel
and bring down my yellows and orange
just a little bit. Alright, so that is
this bathroom edit. And I would definitely
keep these things in mind and removing some
of the yellow from a bathroom that you want
to be pure white clean. Another thing I
might do is just add a quick little linear gradient. Exposure bump to the ceiling. Something like that
might be good. And then I'm going
to actually subtract a bit from the wall. So there we go. You can see what I'm doing. I don't wanna go
to that extreme, but I think that just makes it pop just
a little bit more. So that's a quick
little bathroom edit. I hope you enjoyed this lesson and we'll see you
in another one.
49. Darken TVs in Lightroom: In this lesson, I'm
going to show you how to darken a TV really,
really quickly. Sometimes you just
want it to be darker. You don't want the
reflection here. You can see my
shadow, me in there. So what I'm going to do
is create a new mask. So if you're starting from
scratch without any masks, you click the Mask button. I would just do
object for this one. And I'm going to use the marquee box tool
and drag around our TV. And it does a pretty good
job selecting the TV. If it doesn't do a perfect job, you can erase things with a subtract brush or subtract linear gradient
or subtract object. But really with this selected, I'm just going to
drop my opacity or my exposure down
opacity, That's crazy. Me, my shadow, even
just a little bit. If it's like pure black, it looks a little awkward, but bada bing, bada, boom. Just like that. Turn it on or off. Much better, right? So that's just a little tip for editing
your real estate photos. See you in another one.
50. Speed Up Your Flambient Workflow with Photoshop Actions: In this lesson, I'm going
to show you how to be a super powerful, efficient
Photoshop editor. What if I told you
that with the click of a button or a keyboard shortcut, I can do things like change my ambience layer automatically to Luminosity mode
with opacity 50%. Or I could take my window poll, I can quickly set it my boundary around
my window poll with any sort of masking tool. And then I could, using two keyboard shortcuts, darken it and turn it into a inverse layer mask and
press the Delete key. So if three presses of a button, no mouse clicks, I have my
window poll ready to go. That's all done with
Photoshop actions. So let me undo all of this. So to set these up, you'll need to set up your project with
everything ready to go, as if you were about to do
the action yourself manually. Then you wanna go up
to Window and actions. And here you can see a
bunch of default actions that come pre-installed
with Photoshop. You'll also see some
that I've created like my ambient layer, edit, my darkened window,
window pull inverse, those are the ones
I just showed you. Aligning layers. So I can select all of
these and press F5. And there are keyboard
shortcuts that you can use or change for any option. But actions are
better to use when you have multi-step
things that you're doing like changing
the blend mode and the opacity or even beyond. So let me show you how
to do it, for example, with the luminosity
mode ambient layer. So I'm going to set
this back to reset it to create a new action. Click the Plus button here, I'm going to call
this ambient layer. We can set a function key right now to be the
keyboard shortcuts. I'm just going to set
it to F6 for now. And then you want to record. Here, I'm going to record, so I'm going to
select this layer, then change it just as I would to Luminosity
mode and change my opacity to 50% and then press the Stop button
in this action panel. So it's recorded
each step so you can see that it's
selected the layer, set the current layer to
the illuminate nasty mode, and then also set
the layer opacity. I don't actually want it
to select this layer, have this Select
Layer step in there. So I'm going to delete that
because what I want it to do is just do it to whatever the current layer
is that I have selected. So if I run this for
this bottom layer, for example, I just
press F6 on my keyboard. It changed the luminosity, blend mode to the luminosity and opacity. I'm going to undo that. Pretty cool, huh? So you could do this
however much you want. So for example, if I
did it for this layer, you're not going to be able
to automate the selection of a mask or creating your mask. But once this is set, if you want to create
it for the window poll, Let's create a window pole. One. What are our steps
for window pole? Remember, we're recording,
set the blend mode to darken. We're going to option drag
this into our layer mask. And then we're going to press the Delete key on my keyboard. Now let's pause that. So now we have this whole window pull
action for this layer. So let's go ahead and go
into another project. This window, Paul, is a
little bit difficult. You don't have these photos,
but I just want to show you. So if I already
have this selected, and then I go to my actions
and I run my window poll, which I didn't set a keyboard
shortcut for this time. I'm just going to
press the play button. Boom, just like that,
with one-click, it created the window
poll for this photo. Now, this photo I had to
do a little bit of editing because the exposure and
everything was a bit off. But in terms of that
whole window pull action, it did it with one action, with one click of a button. Pretty cool, right? So what I would do
if you're really serious about editing Photoshop, editing real estate photos
and flamboyant photos. Photos specifically is setup
actions for aligning liters, for adjusting the ambient layer, for doing the window poll, and then even for
sealing adjustments. So once you make your selection, do an action for dropping
the saturation or even feathering the ceiling
edge or whatever it is that you want to
include in the action. Pretty cool stuff. Thank you so much
for watching if you need help with actions. There's lots of great tutorials
on YouTube. Dive deeper. But of course I'm here to help
too if you have questions. So thank you so much for watching and we'll see
you in another video.
51. Clean Up Smudges on Stainless Steel Appliances in Lightroom: Here's a quick way to
clean up smudges and things from stainless steel, fingerprints, that kinda thing. So here we have this oven that has this actually has a
couple of things in it. So this isn't exactly
what you would use it, but I'll show you
how well it works. So I'm going to
use a mask and I'm going to use the
object select with, Let's go ahead and
use the marquee tool. I'm just going to hover
over all of this. And it does a pretty
good job selecting that just the silver part and
selects the black in-between, but that's totally fine. And really what I would
do is scroll down and do a decrease in clarity and
a decrease in sharpness. And it kinda just blurt it out. You can also go up and
decrease the contrast. And then you can go up to the amount slider and
just kinda bump it up. And if that's too much, I might decrease the
sharpness adjustment. But let me show you
that on, off, on, off. Pretty crazy right? Now again, this
is something that you might not want to do if you're selling the
house with an oven. But say it was like
this right here. It's pretty similar. This just has some
smudges the dishwasher, so I'm going to select that. And let's go ahead and
decrease the clarity. Sharpness just a little bit. And bump up, bumped
down the contrast, and then bump up
the overall amount. Pretty good, right? Turn these on, off, on, off. That is how to quickly get
rid of a bunch of smudges. On stainless steel. Of course, you could
use the Healing Brush or the clone stamp tool as well, but you gotta do that
like one at a time. And I find that just this
little quick trick helps a lot
52. Replacing Photos, Wall Art, and TV Images in Photoshop: In this lesson,
I'll show you how to replace photographs or our work with stock photos that are other photos that
you might find online. For example, this is a
photo of me and my family, but if I was selling this house, I wouldn't want us to be
in this photo up here. I found this photo right here. This is just a random
landscape photography photo. I use unsplash.com for a
lot of stock photography. It's free to use. It's good to give credit to
our photographers out there. So shout out to Cal visuals
who took this photo? Big Sur. So the first thing to
do is get your photo or your image as close as possible
to what you're replacing. So I'm going to zoom in
here over to this part of the fireplace and drop the opacity of the photo
on top quite a bit. And then I'm going to
just kinda move this down until it covers
the whole image. Then I want to fix the angle. To do that, you can
hold the Command key on a Mac Control on a PC and then take any of the
edges or corners. And it basically warps
the photos so you can manipulate it so it looks
like it's tilted back. Pull one side forward, angle it so that it
matches the frame here. I'm going to do this and
then I'm going to make the whole thing a
little bit smaller. You can even just take each
corner and pin it there. This is not a square
photo though, so I don't want it
to get too squished. So something like this might
look good then to bring back my opacity that
makes sure it looks fine. So that's the first step. But then what I'm going to
do is I need to cut out part of this image because
obviously we have these frames in front of
it and this other stuff. So to do that, I need to make a selection. Let me see what
happens if I take my quick selection tool and
I paint over this image. I could do it this way. Although that's not perfect and the edges don't
look that clean. Although let's see
if I just yeah, Now I'm gonna do it manually. Sometimes that might work. I'm going to take my
Polygonal Lasso Tool and just get in here
and follow the edge. Because the edge of this image, it actually has some
chromatic aberration going on with that purple line. But because it's a
little blurred out, we're going to get a little
bit of forgiveness for not getting these
lines exactly perfect. So I'm just going
to go around here, go around this little
rock thing that's sitting here up and around this. And then close off.
Like that's fine. Then I'm going to zoom out. And for my go back to my
polygonal lasso tool, I think my feathering, I'm
just gonna put out one pixel. Then what I'm going
to do is I'm going to select the stock
photo, turn it on. There's different
ways you can do this, but one of the most
forgiving ways is to actually use a layer mask. So I'm going to create a
layer mask with this photo. And now what I'm going to do if this is set to white
and I press Delete, it, deletes the inside
of this selection. So we need to inverse
our selection, which you can do by going up to Select Inverse or Shift Command I on Mac and then
press the Delete key. Now I'm going to get
out of that mask and you can see that it did a pretty good job at
blending in there. Now, I need to add a
little bit of a blur here that's going to
match the blur that I have with the other photos. I'm going to take a blur, gaussian blur, and
let's just do something that's going to match like 1.3. It's pretty good. And maybe even add a little
bit of a drop shadow, select that layer,
Double-click it. Super small drop shadow. So it kinda blends into
the frame a bit more. Something like that. Two good. Remember we're zoomed in on
here and the full quality, if we zoom out, hey, that's pretty dang good. So those are the
steps to doing that. This is a pretty
complicated photo. Sometimes you can get
away with no blur. You can get away with not
having to mask it out. But I wanted to show you
this whole process so that you know the steps in case you do need to
do those things. Alright, thank you so much for watching and we'll see
you in another lesson.
53. Editing iPhone photos vs. Professional Camera Photos: In this tutorial, I want to show you the difference
between editing a raw photo from a professional camera
and an iPhone photos. So you don't have
these two photos, but these are the ones I
took during that lesson, earlier in the class. And you can already see that
the quality is not as good. There's a lot of
noise in this image, especially if I zoom in, you can probably see some of
that digital looking grain. And to be honest, if this is zoomed
out and it's on a small screen,
It's not terrible. We can still do a lot of the
techniques that will improve this photo like going to the Transform tool
legacy of vertical. Well, not really fix
that automatically auto. Nope, but we can go to our upright tool and
we should be able to make these lines of these cabinets a
little bit straighter. So that's like the biggest
issue with that wide lens. And I was shooting
this on an iPhone 13. So the quality of cameras are
getting better and better. And even with the new Pro
iPhone and other smartphones, you get raw capabilities. But that doesn't mean that
it's comparable yet to a DSLR or mirrorless camera whose sensor is
much, much bigger. So if you ever use
the transform tool and you get these white borders, just click the constraint crop and that will
automatically crop it in. So this is automatically
better in terms of the edit. The biggest difference
when it comes to edit, the difference in editing
is with exposure. And so if I come in here and
I try to boost my shadows, you're gonna get
a lot more grain. You just don't have a
lot of information. It does produce a more balanced
photo from the get-go. If we compare it to
Let's look at this was sort of like the
mid-range where I was trying to expose
to the cabinets and the foreground and
the background gets a little over exposed. But we have so much
more information in the shadows and the highlights that we can use in this photo. So even if I bring down my whites and I
bring up my shadows, we're not getting
a lot of noise in the areas of the shadows because the raw capture just contains so much
more information. Here, especially this is
a nicely bright room, but if this was in
a dark bathroom or a room with no windows, are few windows and not
a lot of natural light, this photo would look
kind of like trash. It just would not look good
when it's on a full screen. So that's the
biggest difference. As I mentioned. Of course, with newer
phones, newer sensors, it's going to get better
if you have a camera that has the Roth photo option, you definitely want to
use the raw photos, which will have
more information. Using the different
lenses is great. You now have a
wide-angle lens and a more telephoto or standard
lens is this one right here. And it's not terrible. And it might not even look
that bad on your screen. But you just don't have
those capabilities. Adding clarity, even
just a little bit starts to make it look a
little crunchy and weird. Adding saturation. We want to be very careful. I would say that
the advice is just be super subtle with your edits, you're already getting a
somewhat processed image from most phones in terms of
exposure, colors, contrast. So really all you
want to do is play with cropping and
then the upright, straight tool in the
transform panel. So hopefully this helps you out. If you have questions
about this, let me know. Otherwise, if you are serious about real
estate photography, makes sure you're investing in a DSLR or mirrorless camera. There's great deals for
used cameras out there. Even the entry-level DSLR is from companies
like Canon or Nikon. You can probably get one for a few hundred dollars used
from sites like k.com, KE h.com or BH photo video.com, or your local camera store, or check out your local
Facebook marketplace, Craigslist, that
kind of place too. Thanks so much for watching and we'll see you in
another tutorial.
54. What is Virtual Staging? What Tools Should I Use?: In this lesson, I'm going to
talk about virtual staging, which is making an
empty room looked like a home by adding furniture. You've probably
seen this before. Perusing through
Zillow listings, Something's feels a little
bit off and you realize, oh wait, that
furniture isn't real, that picture on the
wall isn't real. That TV screen, it
has the same show exactly on every channel at
the same moment in every room is helped sell a home because
it shows people what it could possibly look
like and it makes it more of a home than
just an empty house. The tools aren't perfect though, and I'm going to talk
about a couple options for you to use online. But there's actually been a
super exciting development while I was recording this
class with Adobe Photoshop, where you can actually
use generative AI to have within Photoshop, create artwork for
the wall furniture right within the app, and it's included
with Photoshop. I'll be covering how to do
that in the next lesson. There are tools like
home-style are.com, which is an online app where you can actually
upload your photos, include they have a bunch
of furniture and stuff. This is probably the
simplest method. It does cost money
to use these tools, but the results are okay
and it's easy to use. Then there are the W14 you
options like Box brownie.com. There's other services
out there too, but you're going to be
paying anywhere between 1030, $50, her photo. And unless that's something
your agents paying for, then that's likely not something you're going to do yourself. There's even more
complicated software like Autodesk 3ds Max, which is DIY. It's a completely
separate application. If you're interested in, you can check that out, but I don't teach that myself. I am going to teach
you how to do this in Photoshop using the new
generative AI method. And you get pretty close
to the results you'll find in home-style
are and box brownie. It takes a little bit
of time and practice, but let's head over to
Photoshop and see how to do it.
55. Virtual Staging in Photoshop with Generative AI Features: Hey friends, Photoshop
has changed dramatically since I even started
making this course. And with the new AI
art generation tools that are out there, photoshop has added
this option for generating images
within photoshop. Currently I am using the
Beta version of Photoshop, which if you go to create a Creative Cloud app and
you click on beta apps, you can download this At the
time you're watching this. This might be a
feature that's already exists in the normal
Photoshop version. But all of this furniture
was created with this tool, which basically allows me with a text-based prompt
to be able to create an add different types of furniture like this or wall
art, right within Photoshop. I don't have to find PNG images are
purchased stock images. It can be done right within Photoshop,
which is pretty cool. Now of course some of this
stuff doesn't look amazing. It kinda looks like the
fake stock image that you find in a lot of
real estate photography. But for a quick sort of a job, it does the trick and it's only going to get better
and better and better. So let me show you the process for how to do this in Photoshop. I'm going to use
the living room. One photo, which is a somewhat edited
version of this photo. And what you wanna do is
open it up in Photoshop. If this is only available
in the Beta version, obviously you need
to open it up in the Beta version
and makes sure that the contextual tab bar
is open on your screen. What you need to do then is
create a mask or a marquee around the area you
want to generate art. So for example, if I was doing
it over on this wall here, I might just add a
little box like this. Then the task bar pops up. Here. You can click Generate, Fill, and then you describe
what you want to see. A round mirror and
you click Generate. It might take a minute. It's using the Adobe
Firefly AI system to create this artwork or
whatever images that it's going to create
based off of its stock portfolio and
everything like that. So now we see that it popped up with an
option which is pretty cool and it gives
you three options you can click through. If you're not happy with
any of these options, you can click Generate again. If you are happy, then you just see that it
opens up here as a new layer. You can also give feedback by giving a thumbs
up or a thumbs down. Now, one thing that
you'll notice though, is if I try to move this around and I'm going to move
this taskbar down low. It's created, it's sort of generated that
whole mask, right? So that whole mark key that
I created, it's generating. So we can't just simply
move this around. What we can do though, is we can add or
subtract from this. So if I select the
layer mask here, I can click Subtract. And if I turn off
the bottom layer, you can kinda see what I'm subtracting and you might
be able to fine tune it. Sometimes it also
generates parts of the image that you
might not want, or you could even add from here. So that doesn't look too bad. Let me try one more
option for art. So I'm going to turn that off. And let's start again. This time I'm just going to use the Rectangular Marquee Tool. Let's actually leave
that on there and let's do something right here. Abstract piece of wall art. You'll need to play
around with the prompt, the texts that you're giving it. Because it does it always return exactly what you want and you can be as
specific as you want. So here we have this. That's kinda cool. This is, I think this is better. This is my favorite one. So that looks pretty good. So I'm going to
leave that on there. But maybe I do want
to move it around. So then you can use your standard Photoshop
skills to edit this. And what I mean by that is I can take my objects selection tool. I can hover over to this. Let me click a marquee around this art and it's
making that selection. Now I can go back to
the image part itself. And copy it and paste it. So now we just have, I'm turning off
that bottom layer. Now we just have the artwork without the bottom
or the background. So I can move this up and position it up a
little bit higher. For example, we can quickly
add a shadow to this by double-clicking it and
opening up drop shadow. And let's just reset
to default and then play around with this. I think the shadow should go
on the bottom right side, something like that
looks pretty good. Trying to make it just look
a little bit more natural. Something like that
works pretty good. You can move item or
items around that way. Now let me show you how
I quickly did the couch. So I took my Marquee
Tool and I just made a big rectangle here, a small blue couch. And you can see for this one, it didn't really work. The couch is the
wrong direction. This one's better,
but it's just like not really a good catch that
fits this room as small. Let's say mid-century. Stylish blue couch. Real estate photography. Sometimes giving keywords
or key phrases like that will improve what it, what it results in. You can also notice that
in the background and change the table back here. And that just looks funky. So these ones look okay, but still not great. So let's start from scratch. And I just am showing you this
process because I want to show you what actually happens. It's not just like
a one-click wonder. I'm going to create
a marquee tool, but I'm not going to
touch the edge this time. Let's try it right here. A modern, blue
mid-century couch. Stylish, simple real
estate photography. Alright, so here we have
a few more options. This one looks pretty good, but it made some weird design
choices in the background. So here's where I would go in, subtract from the mask. Maybe even take my,
let's see where am I, my Quick Selection Tool. And select everything
above the couch. Select and Mask. Then delete it from above
the couch like that. Let's subtract a little
bit from over here. I don't know why it did. That. It adds a shadow which is cool, makes it look like it's
fitting in the room. You would find tune it. So I wanted to switch
over to this photo because I wanted to just
show you that this one, this couch I got, the prop was simple, it was a blue couch. I just kept generating new versions of it until
I found the right one. But what I did was I
changed the color slightly. So I did an object select, and I just selected the couch itself and
made a new layer. And then I added a hue saturation adjustment
layer that you see here. And then if you add these
adjustment layers and you click this button right here is the box with the
arrow pointing down. It applies it just to
the layer beneath. So here you can see if I want change the that was
for the coffee table, but for the couch, if I want to change it
to a different shade. Here, I can do that. Although it looks
like I didn't get the bottom of that couch side, I have to fix that selection. Later on. I also added a bit of a blur. So with the layer
itself selected, I went to Filter
Blur, Gaussian Blur, and I added one to two pixel blur just to soften it up so it
looked like more of a photo rather than like this crystal clear image
that's generated with AI. And I find that helps
blend it together. Kinda thing the shadow, the saturation, the contrast. You have to play with all
of these things to try to match what your
photo looks like. But I just wanted to show you this generative AI
feature in Photoshop because it's a really cool tool that you can add
to your arsenal. It's actually the quality if you play around with it
is just as comparable as a lot of these expensive
services or purchasing stock, our stock photography that
you can add to your images. And it's something that you
can upsell to your clients. In terms of adding virtual
staging into a package. Play around with it. It's only gonna get better with time. So learn it, learn the tool, and definitely use it to your advantage in terms
of your photography. Thank you so much
for watching and we'll see you in another lesson.
56. How to Deliver Photo Files to Clients: Welcome to this new
section of the core is all about the business of
real estate photography. In this lesson, I'll
cover how to deliver photos to clients whomever
you're working with. They're going to want to
get the final file somehow. You could just e-mail them. But I suggest using a
Cloud storage service for this simple tools like
Google Drive Dropbox. They fit the bill,
they do what you need. You can create folders organized and I find it very
helpful to have all of the photos online in the cloud so that you
can access them on the go when you're out there on a phone or while you're
traveling or wherever, you don't want to be stuck traveling out of the house
and have a client really need access to your photos and you not be able to
deliver them to them. So I think this is the best way you get
free storage to start, and it's very
affordable if you do start to use up a lot of space. If you're looking for
a website that's a little bit more
professional where clients can actually look
through a set of photos. Maybe you have them
pick, selects. Before you do full edits. You have fold deliverability
where they can download and there's no weird
sharing links or anything. There are a few more advanced
options like pixie set, Zen, folio, smug mug
and Squarespace. And with all of these tools, you can also build
a portfolio or a full website on top of this, these are tools that have the
website aspect as well as the file photo delivery
management system on top of them. All of these platforms like
Zen folio that you see here, they're going to have
gallery templates that make it super easy to create a professional
looking website. They'll also have
secure sharing. So if you go under
Feature checkout, the share options in here you can see what it might
look like when you're sharing a gallery with clients where they can download
high-resolution, medium, low resolution, you
can give them those options. They can comment on photos, say like you're
working with a client. They say, Oh, I like
this, but can you change this furniture out? Can you fix this? There's a weird shadow here
or whatever they can comment. You can also, let's go back
under their photo proofing. Were they save their
favorites and you know, it can even connect
with light room where they'll pick their
favorites, ends and folio. And then it will automatically save those as favorites
in Lightroom, which is pretty advanced. So that's n folio. Here's pixie set,
very, very similar. It's all, all pretty
much the same. It's just going to be a different price point for
all of these platforms. But these are the highest
rated ones that I have students around the world using to grow their
photography businesses. Squarespace is another option. They have add-ons
for things like photo delivery,
templates and stuff. If you're just looking for a simple way to build a website, squarespace is the way to go. I prefer WordPress websites where I get a little
bit more customization, but Squarespace is easy. I'm also going to show
you Adobe portfolio, which is included with your
Creative Cloud account, which is a great free, meaning you have access to it
way to create a portfolio. So I'll cover that
in a future lesson. But hopefully this
lesson helps give you some ideas for how to deliver
your photos to clients. If you have follow-up
questions, let me know. Otherwise, it's pretty simple. You just got to figure
out what method you want to use porcelain
personally, I use Google Drive
for all of this. It's simple. People know how to use Google. Thanks so much for watching and see you in the next lesson.
57. Tips for Creating a Real Estate Photography Portfolio: In this lesson, we'll cover
building an online portfolio, some tips for choosing the right photos as well as
platforms that I recommend. I already mentioned a
few platform options. The other one I wanted to
include in this list is Wix. Wix.com is super
easy drag-and-drop, and it's free to get started. You can't get your own
domain name URL for free. And there will be small
Wix ads on your website. But it's a great way to just start building out a website. And if you want to eventually pay for the upgrade
to remove those ads, get your own URL, you can do that, and so
it's free to get started. Squarespace is also simple to use drag-and-drop templates, but it does cost more than these other
options I've found. And then WordPress, wordpress
is for more advanced users. I have a full WordPress course. There's lots of tutorials out
there online on WordPress. But it does take a little
bit of tech knowledge to figure out how to
get up and running. I want to talk about
Adobe portfolio because it's a freeway
to get started. And I'm going to do a quick
demo of how it works. But before I do that, I just want to talk briefly about how to build
out a portfolio. And in general, my
philosophy is less is more. You don't need to show every
single photo that you've taken of a house on
your main portfolio. Think about what is a client coming to your portfolio to see, they're seeing, can you
take beautiful photos? Can you take a variety
of beautiful photos? And then they want
to contact you. So that's pretty
much all you want to have on a website or portfolio. If you are really serious
about real estate photography, you don't want to mix this up with other styles
of photography. If you do wedding photography,
wildlife photography, don't mix and match
those photos with your real estate photography
in your portfolio. There are times where having a website with dedicated spaces for each type of professional
work you do can work. But if you're really trying to launch a real estate
photography business, make your website
dedicated to that. Then the next question
you might have for me is what about
using something like Instagram or another
social media platform to put out your photos and
to create your portfolio. Instagram is a great
place to put out photos, but as we've seen over
the past ten plus years, the priority of it as a photo sharing
platform and a space for photographers has decreased. And while you can use
it to find clients, I understand that
people are still on Instagram and all the other
social media platforms. I don t think it's
the best place to build out your portfolio. You just don't have
control over it. And there's so much limitation
in the sizing of images, the visibility of images. And even like adding
links and information, it's just less you can
do on your own website. So I highly recommend having a website separate than
your social media accounts. Do both, but focus and
prioritize on building out your own website burst because if you want
to get clients, yeah, you can send
people or show people your Instagram account. Maybe people will find you through someone referring
you and sharing your page. But at the end of the day, having a website with a clean portfolio that's
not competing with the thousands of other things the algorithm is trying
to press out to people. It's going to work a lot better. So let's jump into
Adobe portfolio and I'll show you how
easy it is to use
58. Creating a Quick Portfolio Website with Adobe Portfolio: Let's jump into Adobe portfolio and I'll show you how
easy it is to use. As I mentioned, it's free with
a Creative Cloud account. You'll want to sign
into adobe.com and go to portfolio.adobe.com. Then go and click
Continue as your name. Once you're logged
in. Here, you can see all the different templates
that you can start using. Really, it's up to you to
find one that you like. But again, my
philosophy is simple, is better for real
estate photography. I also like a light
white background. It just kinda goes
with the vibe of what most real estate
agents and people selling houses or
Airbnb are going for. But of course, if you like
that more stylistic black, dark background, you
can do that too. So I'm just going to go ahead
and click this under AS1. Once this is open, you can see more info about
what this looks like. You can see what it looks
like on the tablet or phone. All of these templates are going to re-size
for each device. And the way that most
of these portfolios work is that they have the hero image here
that you can click into and then you can
see the full gallery, which is pretty cool. I'm going to click
Use this theme. And then it's truly
drag and drop. It automatically
puts in my name. I could change my to my
purse, my business name. I can just change it
to a call to action. So California real
estate photography, whatever you wanna call it. Then down below we can
click Create, add a page, and then we can add
a custom sub page, which is the one we saw
where we'll add the photos. You can even import
a Lightroom album. Now this is Lightroom from Lightroom Cloud, not
Lightroom Classic. But if you have edited your photos and
classic exported them, you can actually upload
them or just add them to the Lightroom app on your computer and then sync it up here, which
is pretty cool. Or we can just go to page
I'll call this Claremont. Maybe you have one
for each address or you have these destinations, which is part of the navigation, the menu of the website. You can create a new one or you can make this your homepage. Maybe we just want this to be the homepage gatt
be a gallery itself. So let's open that
and now let's go and open up a photo grid. And then we can
upload our files. Uploading a handful of
photo files randomly. It would be better
to go through them ahead of time and pick and
choose the ones that you want. But you could also do this
and then you can kinda see how they look
on the website. Once they're uploaded,
you can click this photo grid button
to manage the images. And here you can
create a custom order. You can just simply
drag and drop the photos so that they're
in the order that you like. You can add captions. Back here on the main page. If I click this again, we can edit the grid style. Maybe we want a few
more images per line. Can make the width of this portfolio a
little bit smaller. You can see you can customize it pretty much however you want. To add a new section. You can just go and hover over at the bottom or above
and click the plus sign. And so maybe you have
your full gallery below, but you want to add
like a hero image. Maybe you do video,
anything like that. You can do that. You can also add a contact
form at the bottom. That might be a good idea to have at the bottom
of your homepage. So for example, if I was
actually building out this site, I would put in an assortment
of my best photos from my real estate
photography on the homepage. You can customize
everything from the logo. You can add a logo
onto your website. You could turn on
or off navigation. Maybe you just want it to be this clean page with just
the page header or you can even delete this or customize it just with photo, some
simple information. And then the contact button at the bottom to turn
off our footer, make it super clean. You can edit the
background colors, the fonts, everything over
here in these settings. Another cool thing
is we can switch to a different theme by
clicking the theme button. And let's just switch
over to, let's go Hagen. And it will update
the site for us. So with one click of a button, we can see what it looks like. You can click the Preview button to really see what it looks like on any device. And this is good because
we can see on this view, maybe there's too
many photos here. Maybe you want to have one per row or just on the homepage, we just want like one image, then go to the galleries. So once you're ready to publish, you can click the Publish
button and then you'll get a website link to this portfolio
and you're good to go. You could actually
purchase a domain name using like godaddy.com or name cheap.com for forward that
URL to this portfolio, which would be a super
affordable way to create a photography portfolio
without having to pay for the platform like Zen
folio, SmugMug, pixies, etc. So hopefully this little
tutorial helps you out if you're using Adobe portfolio or if you're using
another platform, hopefully you got some
advice for how to build out a good-looking portfolio. I'll see you in another lesson. Bye
59. How to Find Your First Clients: Welcome to this lesson on
finding your first clients. There's two steps
to finding clients. Step one is to set yourself up for success by building
out your portfolio. To do this, if you don't
have a job lined up, you might need to
photograph your own home, clean up your rooms as much as possible and make it look as nice as you can and
practice taking photos. Then offer this service
to friends and family, even if they're not
selling their homes. Taking photos will give you practice and it will help
you build out a portfolio. When someone's coming
to your website, they'll want to see
a variety of shots. If it's just one
location, one shoe, they might be unlikely
to hire you compared to seeing that you've done
a lot of this before. It's a fake it till you make
it type of thing where you want to have a big portfolio
as much as possible. So reach out to friends,
family members, anyone that you know who keeps their house
clean that might look nice and ask if you could take photos
of their house. And of course, if someone
is actually moving, offer your services for free, I don't mind doing a
little bit of work for free in the beginning to
build out your portfolio. And then the second step is literally just putting
yourself out there. Local cold e-mail, cold
call, real estate agents, agent groups in your area and
send them your portfolio, send them your name,
contact information, let them know that you are a new photographer in the area. You're looking to add
clients for work. These real estate
agents are always looking for people to have on their roll-call in case someone that they're working
with isn't doing a good job. They're on vacation, they're
blowing up and they need more people to be able to reach out to and take
photos for them. And building these relationships is really how you're going to have long-term success
with this game. Similarly, message,
local landlords or real estate agents do a
little bit of sleuth work. Go on Craigslist, go on Airbnb, gone any apartment website, try to find the contact
information for the owners or the
hose on Airbnb, you can literally just message
to the host and let them know that you're a real
estate photographer. This is actually a great way
to build out your portfolio. You could do this and
offer it for free, although I would probably
try to charge for it. You can message hosts that
have listings that don't look so great compared
to the other ones and offer to take
better photos for them. This is very similar to
starting any kind of business. Start local, reach out to
people. Cold, call them. Let people know in your
circle that you're doing this so that if
they have contacts, if someone to some of their friends is moving or maybe they there Small Landlord, they'll be able to refer you. Another thing you
can do is look at local social media groups face, there's often a neighborhood Facebook
group for every city or every neighborhood or
platforms like nextdoor.com. I often find people
posting about housing, posting about wanting
photographers. And so you've got to
pay attention there. A lot of these groups often will allow people in the area to post or promote
their own businesses on a certain day of
the week or something. It depends on the group. Pay attention to the rules, but you can promote
yourself there There's also landlord and realtor, real estate agent
groups out there. There's websites like bigger pockets.com out there where
you can create a profile. There's forums,
there's people always ask them for services like this. You can put yourself
out there and connect with the agents there. Again, that's where
you're going to find the long-term work is
working with agents. I promise you, if you're
doing all of these things, if you're reaching out to
people, cold emailing them. If you're finding new people
through social media groups, you will find work. It just takes a little bit
of time and effort upfront
60. How Much to Charge for Real Estate Photography Services: The last question
you might have right now is what about pricing? How much do you charge
for your services? This is going to be a huge range depending
on your experience, where you live,
what the market is like here in Los Angeles. It's super competitive because houses are super expensive. But there's also a
lot of photographers. So you have to balance that. Or maybe you live in
an area where there's not as many photographers
and you can charge more. Or maybe you live
in an area where there's not a lot of turnover. And so these jobs are
going to be fewer, fewer and far between. So you do have to charge more. It really is going to depend on your location and making
this a full-time job, again, is going to depend if there's enough
work out there. My advice is always to go
back to your hourly rate. So figure out what
your hourly rate is, your ideal hourly rate is, and calculate how much time are you going to
spend taking photos? How much time are you going
to spend editing photos? How much time are you going
to spend emailing and working with that client,
delivering those photos? Total, all of that up. And that's going to
be a package price. In the beginning, you
might not know what this is and it might take a few times to figure out what
this truly is going to be. But I don't like the idea of giving clients and hourly rate. I want to give a package rate, so I want it to be clean
and say for one home, you're going to get
50 photos back. You're going to get
exterior photos, interior photos, aerial photos. And it will be X price, $1,000, $200, whatever it is. If you can grow and start
to get consistent work, add in the cost of the
equipment that you have to buy or if you
have to rent equipment. The education that you have. All of that comes into play with running a
business for yourself. And you can't just
pay yourself for the one-hour that your
location taking photos, that would not be
worth your time. So this is going
to take some time. But if you have
follow-up questions about rates or if
you have an idea, please let me know
in the class or join the photography
and friends group and community where there's other photographers
going through the same process with you. And we'll be able to more help you more with your
specific situation. Thank you so much for watching this lesson and I
hope it gives you some great advice for starting your business and
finding your first clients.
 Phil Ebiner, Video | Photo | Design