Transcripts
1. Introduction: We all know that feeling
when you're staring at a blank page and you don't
know where to start. So let's not do that. I'm Nick. I'm an artist
and illustrator. I draw all sorts of things which I sell on all sorts of products. And one of the things I'm best known for is drawing animals. So we're going to do
that in this class. This is a fun class designed
to help you look at things around you differently and
fine tune your imagination. We'll start by getting
outside and taking photos of all sorts of
random things to work with. Then we'll look closely at
our photographs and we'll see what creatures are lurking
in unexpected places, hidden in plain
sight and waiting for us to find and
bring to life. Doing this will sharpen
your observation skills and help you see the inspiration is all around us all the time. Although the classes
based on animals, you can use the same
techniques for any subject. Fun fact, this has
a name paradolia, the ability to see shapes and
images in a random surface. It's a simple seeing
shapes in clouds, which I'm sure we've all done. I'll be demonstrating this class using Procreate on the iPad, but you can use
any Apple program or just a pen and
paper if you prefer. So, come on. Let's get started.
2. Finding Chaos: We're going to find
order in chaos, so of course, we need to
find the chaos first. Grab your camera phone, get outdoors if you can, and let's look for things
to turn into animals. Cloud shapes are a
great place to start. So if the weather's
being helpful, keep looking up and
seeing if you can find potential subjects to photograph in the ever changing skies. Any random weathered
surface is good, whether it's wooden planks, worn paint, or lichen
and moss on rocks. This is an old terracotta pot with an interesting surface. Logs, branches, and tree bark
are good places to look. Trees and bushes often have outlines which can
suggest animals. I'm sure I can see a dodo
here and a very obvious dog. Look at the negative
space around objects, too, like the sky
through branches. Don't forget to look at
patterns made by shadows. Road surfaces have
loads of potential, whether it's utility
covers making faces, patches of contrasting
damp and dry concrete, and even litter or trash. Tea leaves at the
bottom of your cup, the froth on top of your coffee, any other random
things that you come across are all worth
a quick photo. The more you look,
the more you'll find. Let's get back to the studio and turn some of these
into creatures.
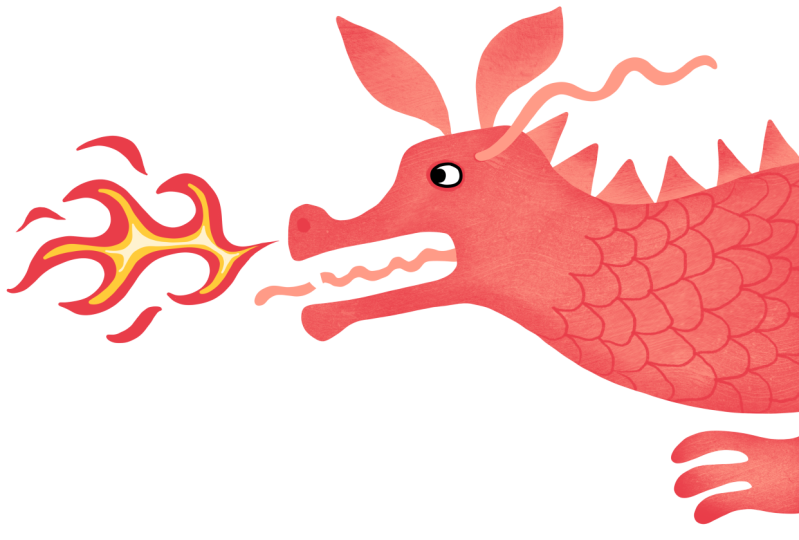
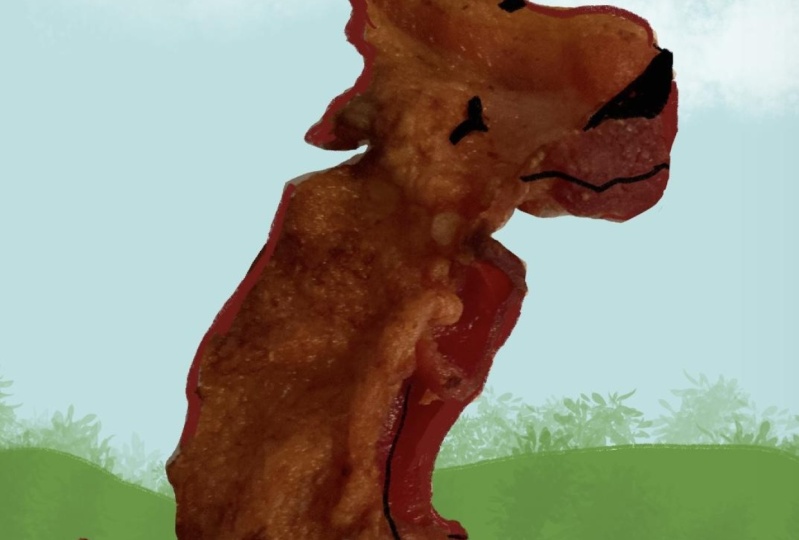
3. Dragon on a Road Surface: My starting point for this was
a dry patch on a wet road. Can you see the
dragon lurking there? I took a photo and I've opened
a new canvas in Procreate. It doesn't matter what size. I'm using the screen
size for this demo. But obviously, if you want
to make finished artwork, you might want to
make it nice and big. Tap the wrench for the
actions menu and choose, add and insert a photo. A two finger pinch to zoom out, and then I'm going to move my photo into the best position. I want to leave some room on the left for some fiery flames. I'll tap the arrow at the
top left to deselect. In the layers palette, I'll add a new
layer to sketch on. I'm going to use a
midtone color to sketch, so this peachy pink
will do nicely. I'm using the six B pencil in the sketching section
of the brush library, but obviously just use whatever brushes and
colors you like. I'm going to zoom in and I'm going to sketch
out my dragon. You can choose which bits to
include and which to leave out and how closely you
follow your original photo. The main idea is
to get inspired, so it can be very loosely
based on the photo. And of course, you don't
have to trace over it. If you're using a
sketchbook and pens, you can just use
your original photo as something to get started. You might want to include your original photo texture or you can just use
it for the sketch, which is what I'm doing here. I'll give him a pointed
crest on his back and some pointed teeth and a tongue. Let's put an eye to
bring him to life. And to add some perky ears and a dragonish
streamer thing, too. I'm not quite sure
what they have a name. I'm going to add a foot, and it's too far down, so I'm going to use the S
shaped selection tool at the top left and free
hand setting to lasso it, and then tap the arrow on
the top left and move it up. Tap the arrow again to
deselect. That's better. So here's the original
and here's the sketch, a short nosed road dragon. He needs some flames, too. I'm just going to make him a bit chubbier and move those
flames a little too. This is the good thing
about working digitally. I want a really smooth brush for the outline and to get rid
of all the little wobbles. In the calligraphy section
of the brush library, I'm going to make a copy
of the monoline brush by sliding it to the left
and tapping duplicate. Tap the copy to go into
the brush settings, and in the
stabilization section, I'm increasing the
amount of streamline. You can test it here
and play around with the settings until your
brush feels right. I'm adding a little
stabilization too. And then tap done in the top right to save and
exit back to the canvas. Time to add a new layer and I'm going to lock the
sketch layer for now, so I can't accidentally
draw on it by sliding the layer to
the left and tapping lock. You can see the little padlock
showing on the layer now. I'll do the same with
the photo layer, too. Okay, I'm going to start
with his eye because I like to work my layers from front to back most of the time. You could give your creatures
closed eyes if you prefer. It's up to you. Sometimes
makes things easier. Sometimes I put the pupils
on a separate layer, but I'm just keeping
this one fairly simple. I'm adding some white
to the eyes, too, a new layer for the body, and I'm dragging that
beneath the eye layer. This brush is so lovely
and smooth to use. I'll drag the color
chip at the top right down to fill
the body with color, having made sure there aren't any gaps in my drawing first. Now another layer below that. Top tip, Procreate always makes a new layer above the
currently selected one. So if you prefer, you can tap on the layer below where
you want the new one. I actually really like the
peach for his ears and crest. In order to fill an area,
it has to be closed. Otherwise, you just
fill the entire layer, and you can see this by
turning off the other layers. Time for the crest, and again, I need to make a closed
shape to fill with color. Having the dragon the same color as the sketch is confusing, so I'm going to change
the sketch color. I need to unlock it by sliding to the left
and choosing unlock. Then I'll tap on the layer
and choose Alpha lock, which means that
nothing can be added to that layer except where
there already are pixels. Now I'll pick a
contrasting color, tap on the layer and
choose fill layer. Okay, back to the peachy
color and the ears layer, and I'll draw in the tongue. And then a new layer
for the flames. And again, for the
streamer thing. I'm going to turn off
the background in the layers palette to be
able to see the teeth. Or if you prefer,
you could change the background color to
gray for the same effect. I'll add a teeth layer below the body but above the tongue. And again, these need
to be closed shapes, and this is quicker than
doing them one by one. And now the claws. I'm going to add
some texture now, so I need a new layer
above the main body. I'm going to tap on this layer
and choose clipping mask. And you can see this is on by the little arrow
by the thumbnail. Now anything I draw on
this layer will only show whether there's
something on the layer below, which is clipped to. I'm going to use the
peach again for texture, and in the industrial
brush section, I'm using the concrete block. There are loads of fun texts to choose from, so have a play. I'm lightly adding the
texture to the body, and then I'll change
back to the red to go back around the edges
for a slight three D look. I'm adding in a circle
around the eyes using the six B pencil and a nostril. Now I'm adding another
clipping mask layer above the texture one and
using the six B pencil. And top tip, your most
recently used brushes are in the recent section of the brush library
for speedy access. I'm adding some
roughly drawn scales. I'm adding the concrete texture to this foot in the
same way as before. I'll do the same again on
a new clipping layer above the ears and crest and this time using the
red for the texture. Lastly, I'll add a new layer
above the flame and use the orange and yellow and the monoline brush for
the fiery details. I'll tap and hold the eraser
to use the same brush to clean up the edges,
and we're done. Here's the inspiration photo. Here's the sketch, and
the finished dragon.
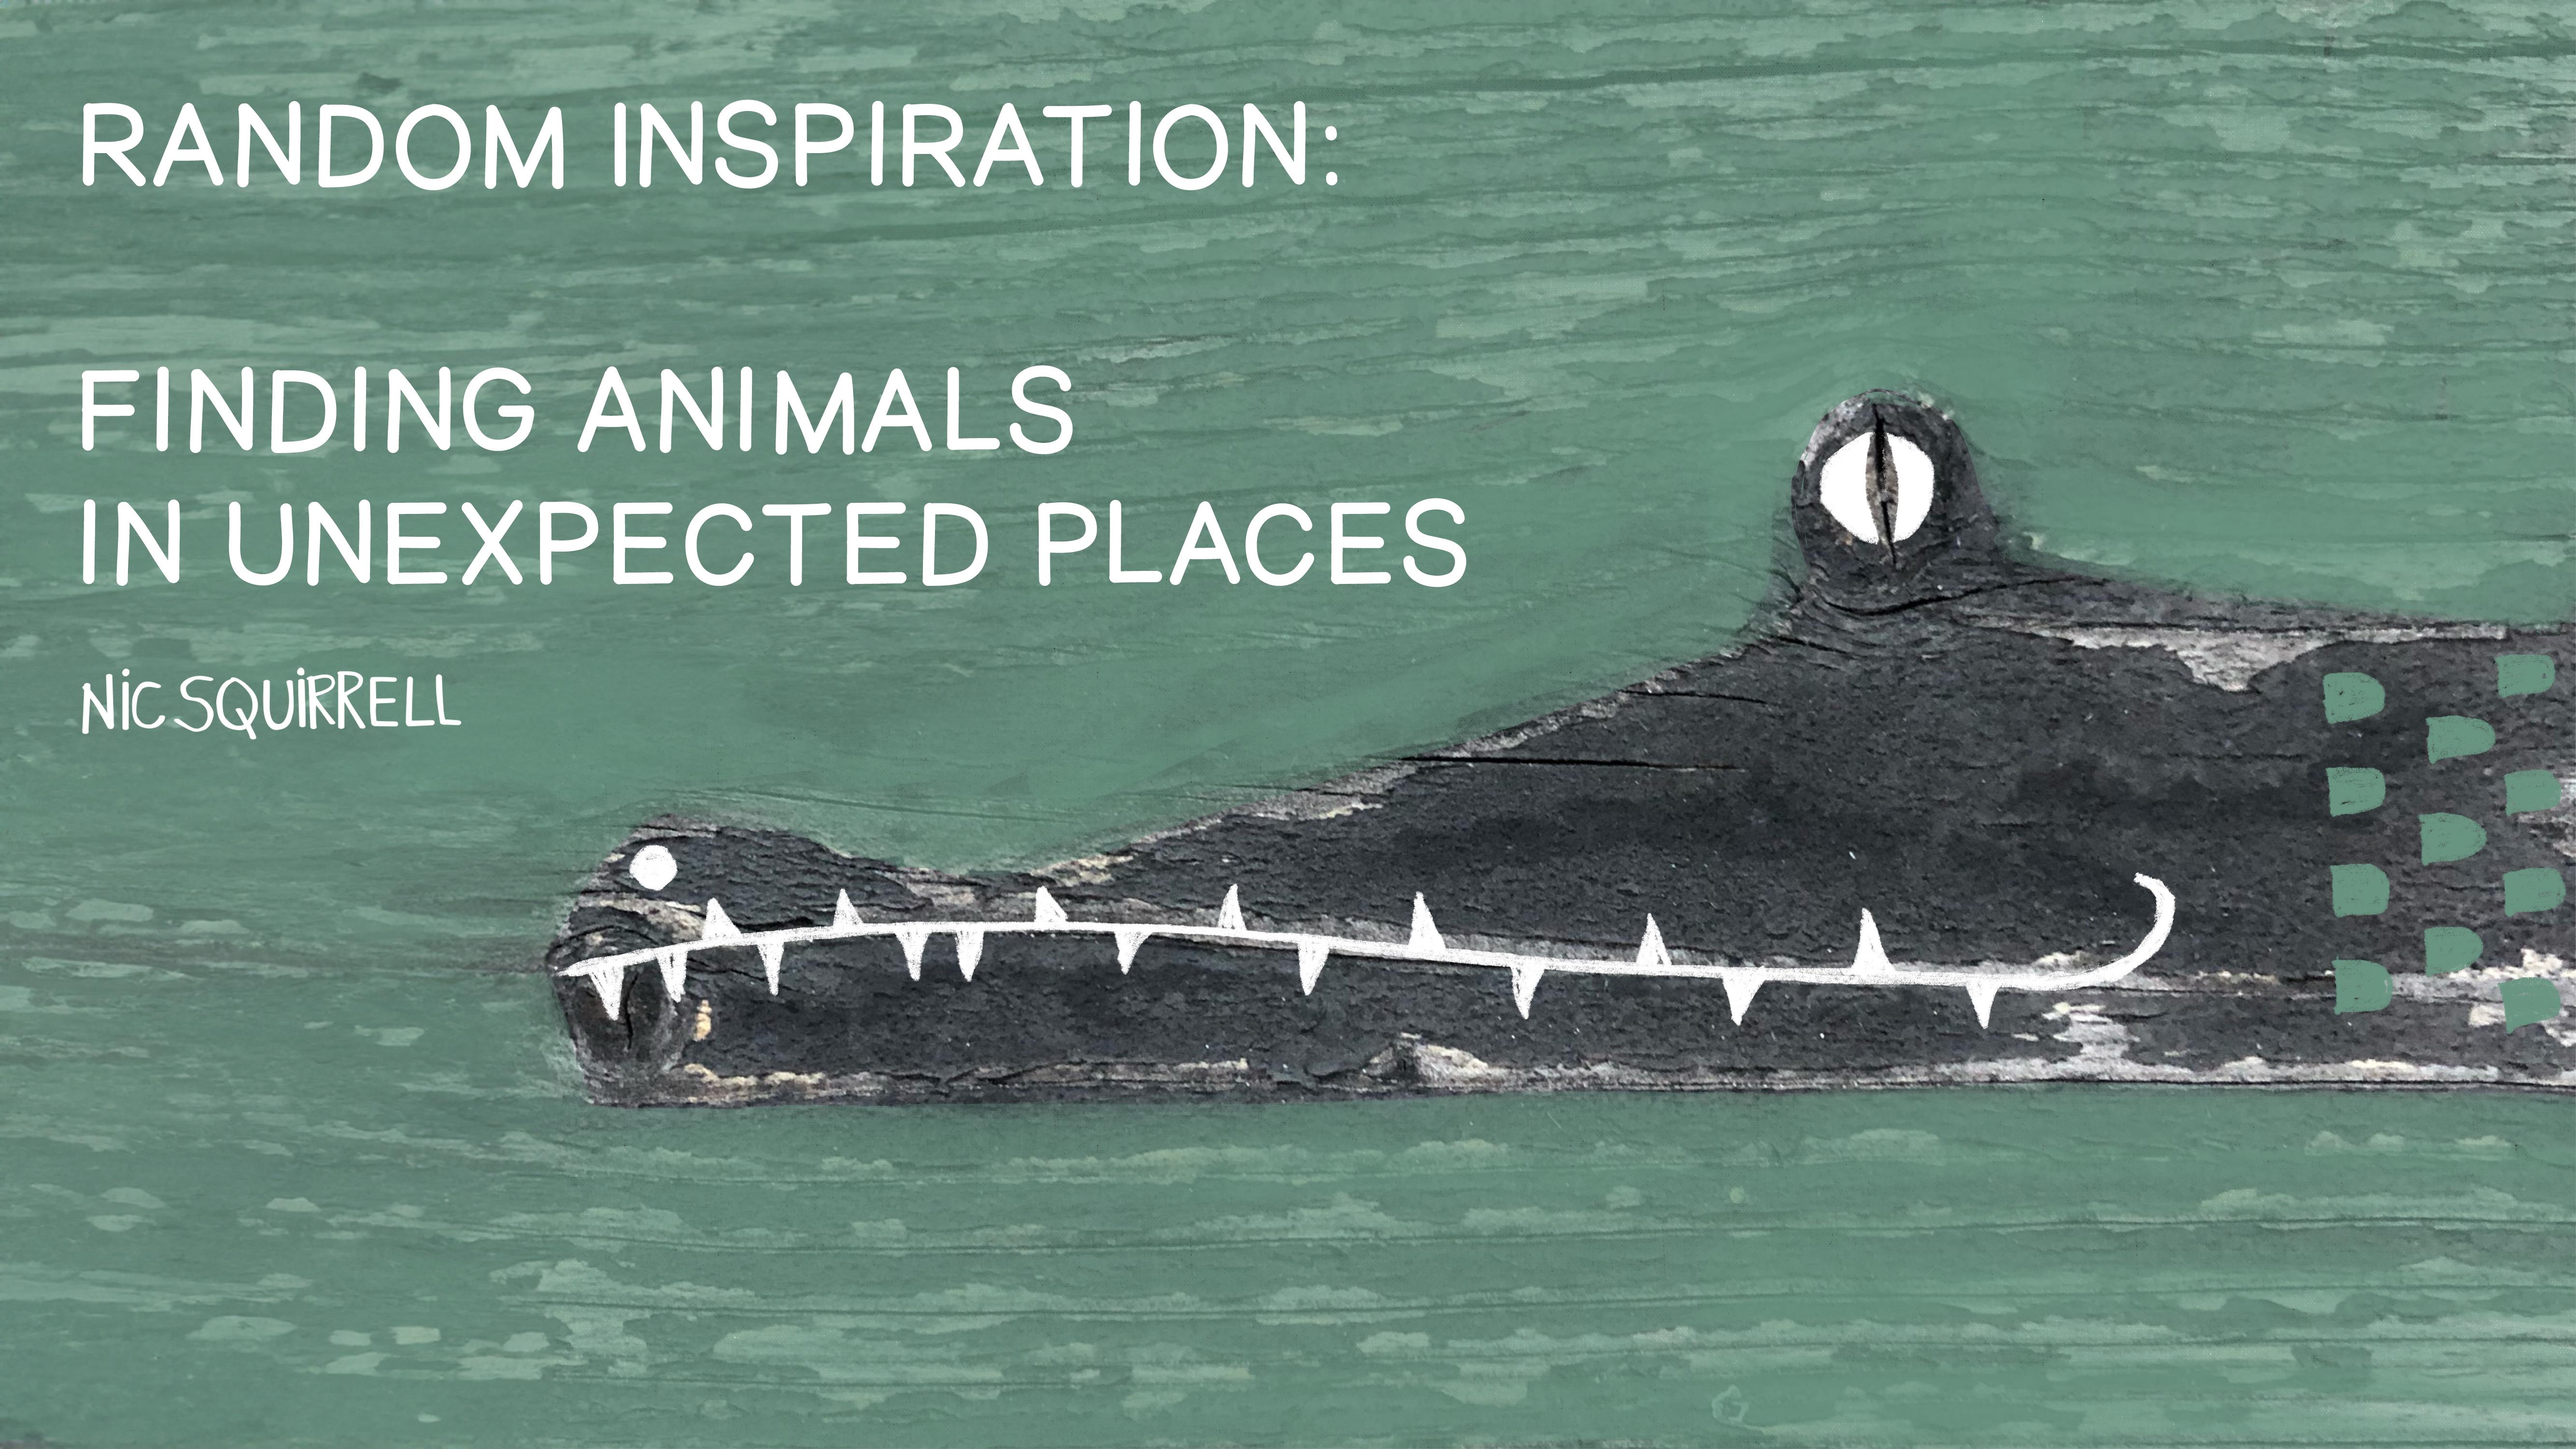
4. Crocodile on Wood: With this one, I'm starting with a piece of weathered wood, which was actually
on a balcony in France near Montblanc,
not that that's relevant. He definitely looks
like a crocodile to me. Can you see him? I'm going to keep
this one quite loose, and I'm going to use
the wood as texture. I brought in my photo as before, and I'm working on a
new layer above it. I'm locking the
photo layer to stop myself drawing on it by mistake. And in the painting section
of the brush library, I'm using Salamanca, and, of course, you can use
any brushes you like. I'm going to carve
out my crocodile or alligator using the
negative space around him. This is very translucent brush, so I'm going to layer
it up a little bit, but I'm going to leave plenty of the wood texture peeping
through to keep it looking kind of like a swamp that an alligator or
crocodile would lurk in. I'm adding a new layer
for the details. I'm using the white
and the six B pencil, which is in the
sketching brush section. Starting with his eye, I'll draw the outline and
drop in the color. And then I'll tap and hold on the eraser to erase with
the same six B pencil. And I'm erasing
where his pupil is. I'm going to make it vertical to give him that crocodilian look. Now for his mouth, and this is what really stood out and
made him look like a crock. So I'm going to follow that line that's already in the wood. Adding a nostril. And of course, he needs some pointy teeth. Okay, I think I'll add a
few scales to finish off, and I'm keeping this loose. I'll add a new layer
and tap and hold on the color chip to go back to the previous color,
which was the green. Maybe you can tell that I wasn't a kid who colored
inside the lines. Maybe in these days of AI, we'll come to appreciate all the irregularities of
human hand drawn art more. Okay, he's done.
Here's the original, and here's how he turned out.
5. Cat on the Sidewalk: Here's a patch of pavement or sidewalk with a couple
of water meter covers, which looks to me like
the face of a cat. We kind of preprogrammed
spot faces. So anything like this with two roundish blobs
reminds us of eyes. I've left some space around my photo to leave
room for his ears. Let's lock the photo layer
and add a new one to work on. Starting with this
creamy color to draw his outline using the same
super smooth monoline brush. I'll drop in the
color to fill him in. And now I can't see
his face anymore, so I'll tap on a little
N on his layer and I'll slide the opacity down so that I can see
what's underneath. He needs a nose, so I'm
going to add another layer, and I'll tap on a new layer and tap clipping mask so that it'll only show where I draw over the pixels
in the cat layer. Because the opacity is
lowered on the cat layer, it's also lowered
on the nose layer, but I can see well
enough to draw. So I'll release the clipping
mask in the same way, and you can see that even
though it's a bit messy, I've closed off that
shape at the top, which means I can fill in the shape without filling
the whole canvas. I'll turn the clipping
mask back on, and if I take the
opacity back up, you can see how that works. Take the opacity down again to do the eyes on a new layer. And then I'll do the
pupils on another layer. I'll put the opacity
back to Max, and now we can see
that the white of his eyes doesn't really
show up against that cream. So I'm going to add another
layer just below the eyes. And I'm going to
use the nose color, and I'm choosing a soft brush
like this soft airbrush. I need to take the size up, so I'm going to make it about
the same size as his eyes. And then I'll just tap
gently in the middle of the eye to get this
kind of halo effect. Going back to the nose layer, I'm going to tap the
layer and choose Alpha lock so that I can't draw anywhere where there
isn't already paint. I'm still using
the soft airbrush, and I'm just going to add
a black tip to his nose. On the background layer
and I'll choose a color, and then I'll switch
off the photo layer. Okay, a few details now
and I'm going to add another layer in between the cream cat layer and
the clip nose layer. And because it's sandwiched in between a layer
and a clip layer, it will also be
automatically clipped. And you can see that from a little arrow on the layer icon and also because there's a tick beside the words clipping
mask in this menu. I'm using the ink bleed pen, and I'm going to give
him some stripes. I want to make sure that I close the shape before
dropping in the color, and you can see that if
I unclip this layer. If you get this
outline effect when you're color dropping,
you can just undo that. Drop in the color
again and this time, leave your pen on the
screen and slide it towards the right until the
little lines disappear. This happens more
with certain brushes, so just adjust that threshold as needed, and that's
looking better. I'm going to repeat that on the other side and put some in at the
top of his head too. Let's clip that layer again and we'll have to clip the
nose layer again too. Clipping masks are
a bit strange, but they're so very useful,
I do use them all the time. Mish off his ears and one last layer for his
whiskers and a little smile. Here's what we started with
and here's how he ended up.
6. Bear in the Clouds: Pretty sure you can see a
bear here in these clouds. As he's white, maybe, he's going to be a polar bear. I'm going to use the cloud
as the bear texture. I'll start by locking the photo layer by
swiping towards the left and tapping o and then adding
a new layer to draw on. I'm going to use a sky blue for the background and the same super smooth mon
line brush as before. Now he looks like a seal, so let's give him some ears. Then I'm dropping the
blue into the background, and he needs to be lighter. So I'm unlocking the photo layer exactly the same way
as I locked it before. I'll tap on the adjustments
one tool on the top left, and I'll choose hue
saturation brightness, and then I'll slide
up the brightness to make him look less
of a mucky old bear. I'm just going to lock
that layer again. Back on the sky layer, I'm using the same brush as an eraser to take the
outline off of his ears. It's probably not the
best brush to erase with, actually, because of
the smoothing settings. I need to add a new layer underneath the sky layer
but above the photo. The sky layer is kind
of acting like a mask. I'll give him a black nose. And then changing to
the ink bled pen, which is in the inking
section for his eyes. And closed eyes are
simple but so effective. Now for the insides of his ears. And the only thing I
need to do now is to get rid of that little
leafy bit on his neck. I'm going to unlock
the photo layer. And then slide it left
again and duplicate it. This is because I'm
going to alter it more, and I always like to keep
the original as it is. With the copy photo
layer selected, I'll tap on the adjustments
wand and choose clone. Circles appeared, and
I can move this to the place I want to use
to cover up the leaves. And you can use any
brush you like for this, and you can see that the
brush icon at the top has a little sparkle on it to show that you're now using
it as a clone brush. I'm going to use
the soft airbrush to keep it looking cloudy. Now as I draw, the
circle moves and it covers up the leaves with
whatever's under that circle. Tap again on the
adjustments one to exit clone mode, and he's done. Here's the original and
here is the finished bear.
7. Bird in the Leaves: I'm starting with
these tropical leaves, and I'm looking also at the negative space
between the leaves. I can see a bird there who might have a rather
fabulous tail. I'll add a new layer to draw on, and I'll use the super
smooth monoline brush, which I think I'm
now obsessed with. So this is roughly the
shape that I want, and I'm just going to
refine that a little bit. There aren't any gaps
in that outline, so I'll drop in the color. He's not quite right,
so using the eraser, I'm going to remove a bit of the orange to make
him a better shape. Okay, let's sort that tail out. I'm going to use the shape of the leaves for his
very fancy tail. I'll drop in the color. I don't want the
background to be orange, so I'm going to tap and
hold on the sky color, tap on the color chip, and in the classic color picker, I'm going to pull
the color circle towards the left
to lighten it up. Let's see how that looks. Okay, now I'm adding a
new layer in between the photo and the main color
layer for some details. But actually, there's a
strange bit of flour here, which I don't like, so
let's just fix that first. I'm going to duplicate
the photo layer, and working on the new version, I'll tap the adjustments
wand and choose clone. I'm using the soft airbrush
to just get rid of the flour. I'm not being too fussy about this because
it's just for fun. I'll tap on the wand again
to exit the clone mode. On a new layer, and with the mon line pen and
the orange color, I'm going to draw in his beak, and I'm going to add some orange tips to his
tail feathers. Some of these bits are off
the edge of the photo. So let's cover those up.
Time to add his eye. And last of all his
legs on a new layer. So here's how he started, and here's how he ended up.
8. Rabbit on the Road: Here's a very unpromising
soggy bit of concrete, but there's definitely
a rabbit there. I'm locking the
photo layer and I'm adding a new layer on top
to draw out the rabbit. I'm using the same super
smooth one line pen as before, and I'll fill him with color. On a new layer, I'm
drawing in his front leg, and I'm closing the shape
so I can drop in the color. He's quite a solid
kind of rabbit. I think maybe he's had
too many easter eggs. So I'm going to take a little
bit off the pink layer. Now I'm going to move the leg, so I'll select the leg layer, tap on the S shaped selection
tool on the top left, and choose free hand, and then draw around
the leg and then tap on transform arrow at the
top and move that leg back. Tap the arrow again to deselect. I'll add another layer
for his puffy tail. Let's turn off the photo now. I'm going to move him down the page by selecting
all three layers. To do this, select the
first one and then slide the others towards the right until
they all turn blue. Tap the transformer arrow
and drag him into position. I'm going to make
him a little bigger, too, by dragging the
corner, no doubt. I don't normally make things bigger because they
can lose definition, but they won't matter
here for this demo. I'll add a layer above the body, and I'm going to make
that a clipping mask. I'm giving him a pink
nose and using 60 pencil, adding an eye and
some ear details. Just refining the face shape
a little with the eraser. Now for a bit of texture, I'm going to alpha lock
all the main layers. Whether you use Alpha
lock or clipping mask, kind of depends on how many
layers you've got to play with and how much you think you'll want to
change things later. Alpha lock is really simple
and it uses less layers, but you are modifying
the original layer. Clipping mask are layer heavy, but they're non
destructive so that the original layer that they're clipped to
remains intact. They are a bit more
fiddly to work with, but they also give
you more options. For the texture,
I'm going to use the coal brush from
the artistic section. I want to use the same pink as the body to texture the legs. It's got a nice, subtle
kind of watercolor texture. I'm going to add
some more layers to blend it into the body. I'll do the same for the tail. Then I'm going to do the
reverse for his body, so I'll tap and
hold the color chip to go back to the
darker pinky red. And because I'm not
completely sure about adding the
texture to the body, I'll do this on a clipping mask. When you add a new layer in between eclipsed layer
and the layer underneath, then this new layer will automatically be a
clipping layer too. On a new layer, I'm adding some whiskers. I'm going to add a
colored background, and now he just
needs some flowers. Here's the wet concrete he came from and here's the
finished rabbit.
9. Final Thoughts: Here are just a few more
very quick examples for you just to give
you some more ideas. I hope you've had
fun with this class and that it's helped
you to look a little closer at everything around you and things you might not
have noticed before. Inspirations everywhere, often in the most
unlikeliest of places, and now you've primed
your brain to spot it. Your camera role
will soon be filling up with pictures of
flaky paint surfaces, wet roads, bits of soggy old cardboard and
cloudy skies like mine is. Your project for
this class is to post one or more of
your found animals. Or if you found something
else, post that. It'd be great to post before
and after pictures as well, if you like, so that we can see where your
inspiration came from. I do look at every
class project, and I really love to see them. If you enjoyed this class, please do take a moment
to leave a review. It really does help me, and it will help others to
find my classes, too. If you want to be kept up
to date with my classes, please make sure to
follow me here on Skill Share and do feel free to post in social media using the hashtag Nick
Squirrel Skill Share. I might just feature you in
my Scram stories if you do. Thanks again and bye for now.
 Nic Squirrell, Artist and illustrator