Transcripts
1. Introduction: Welcome students to know
accounting QuickBooks. This is QuickBooks
for the rest of us. Do you want to use one of the most powerful business
software programs available? Quickbooks is often associated with an accounting software. Though accountings
do use QuickBooks. Non accountants can also take advantage of this
powerful software. There's available at
a reasonable price, so don't miss out. There are many tools, features, and functions that a business
owner or manager can use without the need
to learn accounting. This course will teach
you to do some of the basic transactions
in QuickBooks, such as recognizing revenue, setting of a purchaser, paying expenses and more. These activities
can be input into the system by you without learning any
accounting that will allow you to have more
accurate profit reports, manager receivables, pay bills, and track your mileage. Because it's done as you go. You don't need to wait
for an accountant to do this on a monthly basis. You will also be introduced
to the QuickBooks mobile app. You will get to see
how you can make sales and input receipts as you go along rather than collecting a shoebox
full of receipts, that builds up becoming
an overwhelming task. It will get to practice
in QuickBooks. Even if you do not have a
subscription to the software, you will practice using the QuickBooks sample company that is available to the public. Then allows you
to actually test, drive the product and
see if you like it. You get comfortable with the
product before paying $0.01. Yes, that's right. You will get to practice each skill you
learn in this course. It's not just about watching
but doing american. I'd have a doctorate
in business and I'm also a CPA with
real-world experience. I want to welcome
you to this course. I'm excited to be
able to help you obtain the knowledge to use QuickBooks online because it's such a useful and
powerful business tool. I want you to feel at
ease knowing that you can use many of the functions
while being an accountant. It doesn't take a
lot time or money to get the training you
need QuickBooks online, just the desired alarm. Welcome to know
accounting QuickBooks.
2. Overview: Hello, QuickBooks students. And this lecture,
what we're gonna do is looked at QuickBooks and get a feel for the different levels of
resources they have to offer, will go to their website
and give it a quick review. To start with regard to go
to the Intuit.com website. So the company into
it makes QuickBooks. They are the owners of the software for
QuickBooks and they own other things to other resources at
businesspeople use TurboTax, which is the tax software
that into it provides, which is also very
compatible with QuickBooks. Then of course, QuickBooks, which we're going to
be looking at, ment, which is a Personal Finance
website and resource. And then credit farmer which
provides credit reports. And finally, Mailchimp. Mailchimp offers a
businessperson or an individual who wants to
maintain mailing lists, some resources to do that. So these are all
the things into it offers we're gonna be
focused on QuickBooks, so you can just click on the QuickBooks
linked to go there. All right, so this is
the QuickBooks website. So QuickBooks Online is
a cloud-based service that offers the cookbook
products through their website. And this is nice for
a couple of reasons. First of all, you can access
it from any web device. They have a very good
phone app that offers some potential benefits there and you don't have to
backup your data files. That's another good thing. One problem that you
might run into though, is if you have
multiple companies, you will need a license for each of the companies
for QuickBooks. Now you can have them all
under the same account. So you can have John Doe business one business
to business three, but each of those business 123
will have its own license, so you have to pay a
monthly subscription fee for each of these businesses. Now if you go down to the plans, you can see that they start with a simple start essential
plus and advanced. However, there's
actually another level, this a little bit cheaper. Go ahead and click on
Plans and Pricing. Now, if we scroll down, you'll see there's
actually a level called freelancer and it's
the least expensive. Now please note that this is how the pricing is set
up as of this video. And this is how the
website Intuit and QuickBooks looks as of the
filming of this video. However, making
change it at anytime. But they should have
they should have similar information up and similar products that
they're selling. They may change the price. You never know. Right now the self-employed
freelancer version is basically $15 a month. However, the first three months
they give you a discount. What this is is for people
who have a small business and the business is what they
call a sole proprietorship. Which sole
proprietorship means is that the business
and the person or the same thing and the
business is gonna be reported on the
person's tax return. They call that a Schedule C. Now, freelancer
gets some of the, some of the more powerful
options that QuickBooks offers. First of all, you can track
your income and expenses. You can use your
phone app to snap receipts and have those put
directly into QuickBooks. You can use it for
estimating quarterly taxes. You can track miles if you have a business
vehicle or you make calls to clients and you
want to use your vehicle. This could be very helpful for the tax return time and you can run some of
the basic reports. So if that's all you need, then the freelancer version
would be right for you. Each version gets the same thing but they added
different functions. So simple star as the version that QuickBooks I think kind of pushes everybody
to start with. You get the same thing,
contract invoices. You can track your miles. You can do the same thing
you could do in freelancer. However, a couple of the more important things you can do. First of all, if you
have contractors, meaning you hire
people to help you, but not employees, you hire people as
independent contractors. You can send them 1099. You can also send estimates. And I think that's pretty
important for a lot of people to be able to send their
clients estimates. You can manage your cash flow, which means that you can
make sure you don't run out of money to make
an important payments, like for your payroll or
to pay your suppliers. The essentials package is basically $50 a month after
the first three months. They do the same
thing with a central, except that you can
now have three users. And so when your businesses really starting
to take traction, you may have multiple
people that you need to use QuickBooks because you
don't want to do everything. And so that's where
I think there are real differences between
essentials and simple star. You can also manage
and pay bills. You can manage your expenses
in the previous version, but now you can actually use it to directly pay the bills. You can also track time with
the essentials version. That makes sense
since you probably have employees at this point. When we get to the next version, we call that plus with plus. I'm going to do the same things, but you can have more users. Now you can track inventory. This is an important aspect for businesses that
sell products. If you have a company that
sells some kind of product, you're gonna really need
to track inventory, especially as you
grow your business. Maybe at first you don't
have much inventory. But as you really start to
keep more and more inventory, that can be become a real, a key to your success. You can also attract projects. So you might say, for example, you have different
clients and you want each client
to be a project. Take a contractor
who built homes. He or she might want to
have each home that they're building or developing
become it their own project, and track the profitability
of each of those projects. You can imagine how you
could do this for a lot of, for a lot of different reasons,
for different clients. Maybe you have a landscape
business and you want to track the profitability for each of those clients
that you have. Now we're getting into
the plus addition. It is an $8 cost at this point, with the first three
months being half off. Then we get to the final must be most robust level and
that's called advanced. And it's going to cost
you a $180 a month after the 50% off in
the first three months, you can do everything
the other one could do except now you can
have five users, but allows you to do a lot of what they call
business analytics, meaning you can run a lot
of these complex reports. You can also manage
employee expenses. So now they're looking
at a business that has a lot of employees. You can batch your
invoices and expenses. You can customize
access by role. So what does that mean? Well, it means you have one employee that
you want to get into QuickBooks and work on invoices, and then you have one employee
you want to get it and you want to work on the payroll, but you don't want them
to be able to get into the areas that they
don't need to get into. So you can get each of
these employees their own role to get what they can access while
they're in QuickBooks. You can have some specialized
app integrations, the app that you're using
for your mobile device. And then here's something
that I think is really important to a lot
of managers and owners. And that is you have a
dedicated account team. So if an issue, sir, come up, you have that dedicated team to help you and that can make
you feel more secure. They often use some
special training and you can automate some
processes and tasks. So that would be something you could set up to eight so you don't have to do
the work directly. So just because you
selected one of the plants and you found the one that you think works
right for you. You're not finished yet. You have to decide
now whether or not you're going to add payroll. Notice it says it's
optional because you can do the payroll
yourself and then you can input all
the transactions and to QuickBooks
if you want to. However, if you
would rather have QuickBooks become
your payroll service, they'll do that for you. And what that means
is that they're going to take over the
payroll responsibility. If you do it yourself, that means you're going to
have to do the calculations. You're going have to
withhold the money, you're going to have
to remit the payments for the federal withholdings and for any withholdings for, for example, insurance or for state or local taxes
that you withhold. All of those things. Payroll taxes have to be
withheld and done by you. And you have to make sure you don't miss anything
because if you miss any payroll deadlines for remitting their withholdings
to the federal, state, or local entities, then you get pretty hefty
fines and penalties. Quickbooks will do that for you. That way it kind of
takes away the stress is also if you have if
you want to do payroll, you're going to have
to have training. Are you going to have to
hire someone that's trained, that has already has
training and payroll. And that can be a
little bit more costly. So this could work for you. It really just depends on you. If you already
have an accountant that those hands
and our payroll, then you may not need this. That's why it's optional. And you can still use QuickBooks without having to pay roll, but you're just going
to be responsible for doing the payroll yourself. So that's why they
offer payroll, but it's not
required and it will add some additional costs to
what you're already paying. That's a quick overview of QuickBooks and the different product levels that they have. Hope that gives you a feel for what level you think
might work for you.
3. Sample Company: Hello, QuickBooks users. This lesson we're going to
start out by looking at the sample company
that we're going to use to learn QuickBooks with. The website that you're
going to need to go to is right here for you. If you select that website, you may have to go through
a verification process. Then what comes up is the Craig's Design and
landscaping service. This is a sample
company that QuickBooks provides for anyone
and everyone to use. We can use this as
a way to practice QuickBooks while
you're going ahead to learn how to use it yourself
with your own company. You can think of as a
testing environment for you to go ahead
and learn how to use QuickBooks without having
to go through and by the QuickBooks
product and then make mistakes using your own company. Instead, you can use this
environment to practice. And then when it's
time for you to apply this to your own company, you should do a lot better. This is Craig's Design
landscaping services, say, and there's already a
bunch of information and data input into this company. And it's the same for everybody. So any student that
ever goes in here, it's going to get
the same information as anyone else who would go
into it at the same time. The information is always
going to look the same. So for example,
if I go to Sales, you can see some sales that were already put in by QuickBooks. These would look the same
no matter who opened it. You can still add your
own sales if you want to. But as soon as you leave, it reverts back to this. So let's just in a
sale just for fun. We'll add a new sale, will add an invoice. I'm just gonna pick
the first customer that comes on the list. Then I'm going to pick the
first product that comes on. Unless you can see a lot of
things already populated. We'll just leave them
the way they are. And then we'll put
the amount in there, we're gonna make it $1000. Then you can see that with taxi comes to 1080,
we'll save that. Then we'll close it. Then. Now when we look at our sales, you'll see that the
first sale was $362.70. Now it's the one hundred, ten hundred eighty dollars
that we just put in. However, we're the only
ones that can see that. Let's go ahead and leave
this and then come back in. So I closed the browser and then I open it back up and
I went to the same website. And now I'm going to
go to sales again. Now you go back to sales
and you see that the $1080 sale that we
had just put in, it's gone because we left
and we came back in. Always revert to the same. That way we can practice doing the different
things and QuickBooks. And then when we come
back, we'll have a clean slate to
start with again. Whenever it's time for
you to watch our review, anything that I do in a lesson. Remember we're always
going to start out from a clean slate. And then whenever it's
time for you to practice, to do any of the
practice assignments. So make sure that you close
the browser and go back in because each lesson is going
to start from a clean slate. So that's gonna be the
sample company that we're going to use for, for each of our assignments
and to walk through the different resources that are available in QuickBooks online. We're going to use Craig's landscaping business
and large sample.
4. Navigating QuickBooks Online: Hello cookbook users and
welcome to this lesson where we're going to get an
overview of QuickBooks. Now remember, we're using
the sample company. So make sure you go to the link that is provided to take you straight to the
sample company, Craig's Design and
landscaping service. Remember each time you go in
into that sample company, you're going to
have a clean slate. So all the data's going to
revert back to the way it was set up originally
by QuickBooks. So every time you
go into a lesson, make sure you close
the browser and then reopen within the
sample company. Revert it back the way it was. Also the same thing
for if you do any of your assignments
for each assignment and make sure before you
start that assignment, you close the browser
and then go back in so that everything's
reset to the same amounts. That being said,
you start out here, we have Craig's Design
and landscaping service. You can kinda see the
way things move in any of these that have a triangle
with an exclamation point, that just means that you
don't have access to it. Books offers businesses
different levels of resources that they can use. Some you may want,
somebody may not want. With the business overview, they give you some
just standard reports and measures that can really just kinda helped
me give you an overview of your business at
this point in time, gives you your profit
and loss expenses, bank account balances,
invoices, how your sales Look. This is all based on the
information was already preloaded into Craig's Design
and landscaping service. I can see how this can
be really useful for any small business owner
that just wants to open this up every day or on a regular basis and
just get a overview. And most of these
you can drill down to get to more detail
for each of these. What what created this
$3,906 in income? You can select that. It'll take into more detail one useful areas on
the left sidebar. And so we're right now
in the dashboard area. But you see that each of
these areas as can take you directly to one of
the areas of operations. Banking is your
bank accounts and the transactions that are
in those bank accounts. Then you have your sales to your customers,
cashflow information. Then you have expenses when you have to
pay those vendors. If your company has projects, this is where you would
go to it directly. For employees and contractors. This is the area
that takes you to those resources
that you might use. Here are your reports, for example, profit reports, receivable reports, any kind of report that you would want
to run in QuickBooks. You can select this on the sidebar and
would take you there. Taxes has tax information. So sales tax obviously 109 nines are what you
provide to your contractors. So if you hire a contractor
instead of employee, this would bring
you to that area. Mileage is for
your driving miles that you can use as a deduction. This is information that more accounting
personnel would use. This will take you directly to an accountant that you
might have set up. And then these are apps that are available that you can connect with QuickBooks to
automate some of the activities and set
up automatic downloads. I would suggest you
go in there and see some of these you might
already be using. For example, PayPal is one of the apps that you can
connect with QuickBooks. Then you have the new button. So this is whenever you
have something new, you have new customer, you have a new estimate, you have a new sale
to a customer, you have a new
vendor or you have a new expense to that vendor. You have a new employee or
timesheet for that employee. You have a new bank account or you want to make
a new transfer, you can get you can get to these areas by going
through the sidebar too. This is just another way
to quickly access one of those business operations
that you normally do over here on this gear. When you select the gear, this takes you to the, a lot of the settings that you have. These would be lists over here. You might have a
list of inventory. You have different
tools for importing data, exporting data, budgeting. Here's your profile, but then let's spend the most
time in your company. So let's go to our account
and settings area. We're gonna cover this in more
detail in the next lesson.
5. Settings: Hello, QuickBooks users. Now in this lesson what we're gonna
do is go ahead and go to the company settings so you
can get a feel for where you can make a lot of
customizations. So make sure you go to
the sample company. And again, always make
sure that you close the sample company
from previous work you did in it and
then open it up. So we're using the same numbers. What we're gonna do
is click on the gear. As we talked about before, this shows us a lot of the
areas where we have settings. So what we're gonna do is I'm going to go to the account
and settings area. This first page has a lot of information for
your basic company, how it's presented,
and how it looks. For example, if you wanted
to add a company logo, you would be able to do that
by just selecting this area. They don't have one setup
for Craig's Design and landscaping service that
would depend upon you because this could be
useful because it will then be carried forward into your invoices and easily
incorporate it into the different forms that
you use so that you can really make this
make this your own. The company type as far as the tax form that
you're going to set up, if you don't know,
don't worry about it, just leave it as whatever
it's defaulted with. If at some point
you need to hire an accountant for a tax reason or for
something like that, they're gonna be able to help
you with that information. This course is more
to go ahead and do the day-to-day transactions that the business person can
do on his or her own. We have the contact information, the address, these
are things you would definitely be able
to put it in there. Then communication
with Intuit if you want to share information with them for
marketing purposes. For usage, this is how
many users you have setup for the pins on
what you're paying for. And then you go into your sales. Now, you can really customize your invoices so
that the customers, it gets something that this very noticeable as your company. You can go in and you can
add different fields. You can just make determinations on how you're gonna
deal with shipping. How are you going to
deal with discounts? If you're a company that has
tips or gratuities that can be applied to the invoice
really depends on each company. You know that your
company is different than products and services. Late fees, progress invoicing. So if you're going to invoice a customer for a job as you
hit different milestones. Craig's landscaping might have a job that lasts for three
months and maybe they're going to invoice them after they get to different
levels of the job. You can set up messages
that are customized and very personal
for your clients. Maybe you have your own
slogan that you use, or maybe you have
something you want to put there for the holidays. You can set reminders,
delivery options. There's so much you can
customize and it would be done here when you
get to expenses. Same thing for your bills. How you going to
approach your bills, how you're going to approach
the purchase orders that are that you're going to
use with your vendors. Those are things that can be customized and setup
with settings, times, so timing and
scheduling for your employees. What is the first day of
your week? Is it Monday? Is it Sunday? How do you want to how
do you want to do that? What about time sheets? What kind of fields do you
want to show on those? Then in the advanced area, is your first day of the
year gonna be January or do you use a
year, fiscal year? I know that seems weird, but some companies begin their fiscal year and a
different month of January. This is where you
could set it up accrual basis or you could set up as cash-basis,
company type categories, any kind of automations
for pre filling out forms, applying credit,
projects, currency, the number formatting the
date formatting this area, this account and
settings area is very useful for business owners to really get the business to look the way they
wanted to look. In other words, instead
of having to change things up so that your business
fits within QuickBooks, it's much better to change
QuickBooks up so that it works within the way you like to operate
your own business.
6. QuickBooks Mobile App Intro: Hey, QuickBooks users. Today's lesson, what
we're going to do is look at the QuickBooks app. Now we're just gonna
do an introduction to the app and we'll look at doing some of the transactions
using the app later on, like making a sale, are snapping a receipt or something like that,
will do that later on. Right now, I just
wanted to give you a quick overview of the app. And I think the QuickBooks
app on your mobile devices, one of the more
beneficial resources that QuickBooks offers you. The way you can get
the app is to go to either the iTunes Apple Store
or you can go like for me, I use an Android, so I went to Google Play. You can see the QuickBooks
that make sure you get the one that's into it as
the WHO makes it. When the app is loaded, you have to go through
a loading process. You have to log in,
you'll see your company. And I don't really
have any transactions on this particular
company as it's used to. As an example company. However, you can kind of get an overview of what
it looks like. You see the quick
actions near the top. Or you can do you
can go quickly into some areas like you wouldn't do an invoice or snap a receipt. And those scroll to the right. So if we kinda scroll
to the right and look, you'll see it in the
customer comes up, take pay bill expenses. Those are just a quick
actions that are available around the
page when it comes up. Now when you click on the menu
area in the bottom right, you'll see that it shows you shortcuts to some of the things that you
might want to do. For example, transactions, some checking invoices,
customers estimates. These are just shortcuts for
things that you do quickly. We're not going to
look at those today. What we're gonna do now is just kind of
giving you an overview. However, we'll look at some
of these as we go along. If you click on the
All tab on the top, you see it goes into more
detail and it covers some of the activities that you do less regularly than
with the shortcuts. Go into the QuickBooks website, you see they have an app's page. And it kind of shows you that QuickBooks is
very interested in integrating their product with mobile devices and also integrating it with
other companies, other businesses,
other resources. Let's look at the first
one is the first page. And then as we scroll to the
right, you see that, hey, the QuickBooks app also
connects with guideline. I don't use that. You might Mailchimp,
which is a resource that helps a business maintain
their mailing list. Square, which is used by
many small businesses, and then Amazon business. So these are some of
the ones they feature. But if you scroll down,
you see all kinds of apps that are either done by into it, the QuickBooks company or indirectly other companies
where QuickBooks will also have a connection
with them so that you can utilize their resource
through QuickBooks. You can see that
there's many of them. There's no way we can
go through all of them. There's so many of them,
but you might find this depending on what type
of business you're in. You might find that some of
the adopts you're already using and they are very helpful for you in
your current business. And it's nice to know
that they can be integrated into
QuickBooks for you.
7. Setting Up Products and Services: Hello and welcome back to
QuickBooks, rapid training. In this video, what
we're going to do is we're going to look at sales. And so one of the
things we have to look at before we do
the actual sale to customers is to see how we would add
products and services. And customers. We'll look at adding those to our information and
then we'll look at a sale in a future video. We do this by first
selecting the gear and then we'll select
products and services. What we'll do is we'll add
a product and a service. This is accompany, That's
the sample company and so it's a landscape,
it's service. And so they offer both service
and they offer products. So you can see
they've already got some services and products
already provided. And let's go ahead and first, let's add a service. So we'll click on the new icon. And we're going
to add a service. Let's say we were
gonna do consulting. For yards. You can add additional
information depending on your business, you can put the SKU, you could add additional
category if you need that. You can add additional
description. We want to make
sure we put the I sell this product
to my customers. This taxable. Lot
of times services aren't taxable for
sales tax reasons. So we'll we'll put non-taxable, but it really depends
on your situation. Do you purchase this
from a vendor? We don't. So that's all we're gonna do. We're gonna save and close. And it's as easy as that. Let's go ahead and
add a product. So again, click New. Now our products, our inventory. We have two options. Inventory items that we sell to customers and we
want to keep track of. And then non inventory items. They give you an example, nuts and bolts that we
might use an installation. What we're gonna do is
do an inventory item. Our inventory item is going
to be landscape timbers. The landscape
timbers are used for borders and other
features in a yard. We don't have a skew or SKU. You do, you could add that there and we don't need a category. Now, the initial
quantity on hand, so this is a new item for us. We're going to say the
initially had to 0 and we're going to
buy them later on. We're going to purchase
them at some later date, but we're just setting
up the product. Now if you're bringing in
a company that's already been in operations
and you're going to set them up for QuickBooks. This is where you would
add your initial quantity on hand that you already have. And then you would
set the date up. As of the date that
you're starting to use. Quickbooks will just
use the current date. Reorder point is a useful
option because it allows you to get sent a reminder if your inventory drops
below a certain level. Will keep inventory asset
account to be inventory asset, the description that
would be up to you, the sales price, so
well, we'll say $10. And sales of product income
is a good income account. You could change that
if you wanted to. This is a taxable item. We're talking about sales tax. Then when we go to purchase the cost of this inventory item, we pay $4 for you
can set that up. We'll see how to do it. At the time of the purchase. The expense account
for purchasing inventory items should
be cost of goods sold. So that's correct. We don't have a
preferred vendor. You can set that up to. There's a lot of options
that you have here. And then we just
click, Save and Close. Perfectly normally wanted
to add a customer. We would do that by going
into the customer tab. This would be the
area that we would normally add new customers. It shows a list of customers
they already have. Here you can add a new
customer with a green button. Call it customer Z. You can put their
name, their address. You can do not's
tax information. The only thing we're gonna
do is we're going to go into payment and billing and
we're going to put terms, let's say net 30, meaning that if we
sell to customers Z, we're going to
invoice to customers, eat and they're going to need
to pay us within 30 days. Then we don't have
any opening balance, and so we'll save it
and go from there. We've set up a customer, we set up a product, and
we set up a service. Now we're ready to make sales.
8. Sales Receipt: Welcome back to the
QuickBooks course. We're in an exciting point in this course because we're
now at the point where we're gonna look at sales
and what could be really more exciting than
sales in a business. First sale we're going to
look at is where a customer gets the product or service immediately and pays
for it immediately. So first of all, let's start by going
to the new icon. Then under customer, we're
going to enter sales receipt. Work to sales receipt. And what we wanna do is
first put the customer in. If you have a new
cluster where you can conveniently added here, we'll just click
the first customer that's already in the system,
Amy's Bird Sanctuary. Because this customer
has already been set up. We can see that there's an email and a billing
address already set up. Be careful with the sales
receipt date that you use, the date that you want to use that can really mess you up. If you use the wrong date. We'll let it go to the
default date and use that. There's an opportunity to
use what they call tags. And tags are like categories, but they are a
little less formal. You can put tags into your
sales receipts to help you further categorize
your customers and the type of
sales that you make. Next, we're going to look
at the payment method. How did the company, the customer, Amy's
Bird Sanctuary pay us? We're gonna put that. They paid us with a check. They could do a cash check. Our charge. We're gonna do a check. You can include a reference
number if you needed to, for example, the check number. Then we have the deposit and where we're
going to put this, what account when we go
and put this in our books, we're going to put this what
they call an deposit funds. Even though we're
going to eventually move this into the
checking account, at this point, it
hasn't been deposited. So on deposited funds
or funds that we we've gotten our
office basically that we need to
bring to the bank. Then we go down to the
products and services that we're selling to the customer. Let's say the customers
ordered some sprinklers. So we're going to do products. And we'll go down
to sprinkler heads. And we'll put the quantity, let's say four, and
we have the rate. So then we're gonna charge $8. Is that a taxable item since it's a product
that usually is. Then we're gonna put
sprinkler pipes, will do two of those. And again, the rate is $44 each. This is a taxable
item That's good enough to see how this works. Then you get to
select the sales tax. Is it a California
tax or we also have a Tucson tax will keep
it at California. If there's any kind of discount that we're offering the client, perhaps for being in the military or something
of that nature, then that's where the discount percentage
would be involved. The ability to add
additional messaging. This was set up when we
looked at the settings to automatically populate
this message. But we could change it on
the fly if we wanted to. Maybe we know the person, the manager at Amy's,
a bird sanctuary. And we wanted to personalize
the message a little bit. But now I go down here and
we'll do Save and Close. Now let's go see the
results of our receipt of the sale will go to sales and then we'll
go down to customers. And we see Amy's Bird Sanctuary. There's a lot of actions
you can take immediately. You can receive
payment notice that that company has a
balanced open with us. There's other things too. We consider misstatement
an invoice, do an estimate all directly
from the customer area. Let's look at the specific
details of the customer. First of all, you can see the sales receipt
that we just did. Then you can see
other an activity that his customers had with us. And you can go into the
action button on the right, and you could do
different things for these previous sales, whether or not there's open invoices or payments
that have been made. But we came here
mainly to see that you can track down the sales
receipt that you just put in.
9. Sales Invoice: Welcome back. In this lesson, we're going
to look at invoicing. For example, a client comes to us, they
need some work done. We do the work. And instead the client
pain I was on the spot. Let's say we're going to
send that client invoice in. That client's going to pay us within the terms
of the invoice. First of all, go to New and we're going to
select under customers, we're gonna select
the invoice button. Now notice that we got
a quick book offer, but we're going to go ahead
and back out of that. First, we're going to
look at the customer. So we're not going to
add a new customer, we're just going to select a
customer to send an invoice, will go with the next one on the list bills, wind, surf shop. So again, this customer
will set up previously. So we have the e-mail
and the billing address. Notice we have terms in here
because it's an invoice. When bills, wind, surf
shop gets this invoice, they'll know that they need
to pay it within 30 days. You can change those on
the fly if you want it to. These were set up in
the settings area. Again, be careful
with the dates. Again, we adopt in your use tags which we discussed earlier. We're not gonna do that. And then we're gonna
induce some services for Bill will do a design service, and then we'll do some
gardening services. And we've already setup the
quantity and rate for design. Landscaping is the type of service that's
different for each client, will set up a rate of $150. And we have the ability to
change it was taxable or not. A lot of times services
aren't taxable. As for sales taxes
are concerned. Depends on your situation. But in this case we
don't have that, so we'll keep it as it is. We'll keep the message the same. And we'll go ahead and
we'll save this and close. When we look under bills, when surf shop and
the customers, we can see all the different
items that we have opened for Bill
already as a customer. And you can go ahead
and receive payment whenever whenever the manager send you the payment for
this particular job. So if they were to
send you a payment for invoice 139,
which we just did, then you could just use the
receive payment button to designate that amount as payment for that
specific invoice. So that's the overview of
how to do the invoicing.
10. Receive Payment: Welcome back to QuickBooks. We have another exciting
lesson in this, because this is a lesson
on receiving payment, receiving payment
for invoice that we must might have
set up in the past. What we'll do is we'll
go to New and then we'll select received payment because we're receiving
payment on an invoice. Then we'll select
bills, wind surf shop. Then we'll show
the payment date. And we can see that that particular customer
has several invoices setup. What we'll do is
we'll pretend that we received payment
on invoice 127. Now you can receive the entire amount or if they only send you
a partial payment, then you can change that to whatever amount
they send you. Then we need to look
at how they paid us. Did they pay us with cash check? They charge it, will
do another check. Again, you can include the reference number from
the check if you want. And we're going to use on
deposit funds Again, why? Because we've received the check but we haven't deposited
into bank yet. So we could put it
as the checking or savings account if we took the check directly to
the bank, but we're not. So we're going to keep it under deposit funds until
we're able to do that. Now that we've got
everything set up, we make any change to the
memo or whatever we want. And then we'll go down and
select, Save and Close. We can review the impact to our customer by going
into the customer's area. We want to see the impact
of receiving that payment. So we'll click on
bills when surf shop, we can see that the previous invoice that was open for $85 has been closed.
11. Bank Deposit: Welcome back to QuickBooks, and in this lesson, we're going to look at how we're going to go about depositing the checks and cash that we've been receiving from
customers into the bank. So right now we've
got it in our office, maybe in a safe, and we
want to take that money, take those checks and
bring them to the bank. Do you go to New and you
go to the bank deposit. We're going to deposit this
into the checking account. So we don't want to change that, although you could change
this to the savings. For example, if you,
if you wanted to, make sure your data is
correct, That's important. You're again allowed to
categorize this with tags, for example, make this easy to search in the future
if you wanted to. We're going to deposit
everything we have. So we can just click this. But if you only want to deposit
some of these receipts, you could do that too, if you needed to do that. And then you can actually
add our received funds. For example, if you wanted
to add additional cash from a tax refund
or if you wanted to take some other texture them
money back as cash from some of these sales from
the bank so that you can have money to give change. You could do that.
Explain the memo. We're just going to be used for you have additional
memo opportunities here for your
convenience and to help you understand the situation. If you wanted to remind yourself what was going on
in that particular deposit.
12. Sales Using App: Welcome back QuickBooks users. In this lesson we're
going to focus on using the mobile app, the app that you
could access through almost any smart phone to do some of the same
transactions we just looked at, whether it'd be
adding a customer, an invoice or taking payment. You can do this
right from your app. And so that allows you as a non accountant, as
a business owner, to keep up with the
transactions and have some real-time
information for yourself. The first thing we looked at before was adding a customer. You could do that by selecting the customer button there
on that front page. Or you can go down to the menu. You can select the menu. You can select that
customer button there. Either way, it
really is up to you. Once you do that, you'll
see a list of customers that are already
already there for you. If you wanted to add a customer, you can hit that plus
button at the bottom. When you do that, it asks you if it can access your contacts. That could be very helpful
if you have most of your business contexts already
on your mobile device. However, I'm gonna hit deny. From here, you could
set your customer up just like we did
using your laptop. We're not gonna go through
and set up another customer. I just wanted to
show you that you could That's all you have to do in order to access the area
on your mobile device. Now, what if you want
to add an invoice? You could do that right there in the field when it occurs. Just go to that
front page and hit the invoice button or go
to shortcuts and invoices. And then you can go
ahead and you can add that invoice right there. The customer invoice
number, the dates, all of those things can be added right there
from your phone at the time of the sale when you're interacting
with the customer. Now when it's time
to collect payment, it asks you one of two things. First of all, do you want to go ahead and set
up payments with QuickBooks if you
don't have a way to collect from the
customer right now, I like using credit cards. You can actually do that
through QuickBooks. So you would just select George payment and then it would take you to a screen
where you could set it up. And I'm just going to
be a fee for that. But but QuickBooks offers that service for you if you
don't want to do that fine. And we'll go back and record
the payment manually. Even though we're not back at
the office, we can do this, ask the client pays us we
can put the invoice payment here and the amount and we can apply it
to the right account. The last thing we're
gonna look at is one of the other things we did
using QuickBooks online, where we took a sales
receipt and we can do that on our computer when
we get back to the office. Or we can select sales receipt
right here from our phone. And we can say, all right, we're going to
select the sales receipt. We can select the
customer that the sale is to select a date. We can select the method. So if I select method
and asked me they pay in cash checking card,
very convenient. You were able to
keep our books up. We don't have a backlog of work that we need to do when we
get back to the office, we can do it from
a mobile device. This last screen,
what I'm showing you is instead of hitting shortcuts, you select all, you can see how it kind of breaks down all those different
transactions. And it makes it easy for the non accountant to follow along with what
needs to be done. So if you get a little bit
confused about what's going on and you have a customer
that's making a payment, then you can go to
the All section and, you know, it's money coming in. So they make it
very clear for you. They put the different types of tools that you would
need for money coming in. So that narrows down the choices that you have and makes it less confusing for some people. Later on, we'll
look at money going out when we want
to make a payment, will see those are grouped
together in another area. So just wanted to show you another part of
QuickBooks mobile app. Instead of selecting the
shortcuts, you selected all, and it gives you categories of the different types
of activities that you would see in a
normal day-to-day business.
13. Add Vendor: Welcome back to the
course on QuickBooks. And this lesson which is going to focus on
adding a vendor. Vendors would be
companies, businesses, people that provide
you with products like inventory or services
are supplies. So when you're when you're going out to get things
for your business, you get them from the vendors. So these are entities that
we're going to be paying. First, we'll go ahead
and set up a vendor, will see where the
vendor list is also. Go to expenses. And then vendors. We already have a list of interstate were setup
in the sample company. However, we're going
to add a new one, so we're a landscaping business. The sample company
is set up that way. What we're gonna
do is we're going to set up a vendor for
buying our gravel. We have a new vendor
that provides gravel for landscaping jobs. Gary's gravel. Let's go ahead and add that. So what we'll do is
we'll click new vendor. And this is not a person, this is a business. So we'll put Gary's gravel and you can provide a
display name if needed. It defaults to the same name as you put in for the company, we can add an address, put 1221, and we'll
add an e-mail address. We can also add a phone
number and billing rates. They're going to bill us. We're going to put the
terms in that we need to pay Gary's gravel and they
give us terms net 30, meaning we have 30 days to pay. We don't have any
opening balance. This is a new account with Gary. And so we'll keep that at 0 and we'll let the
default date stick. If you have an account number
or business if you have their business ID or social security number
like their tax ID number, that could be very helpful
for tax purposes if you wanted to track them
for 1099 reasons, then this button here is
your step for doing that. You can set a default
expense account, for example, of this
was for insurance. You can have an insurance
expense account. This is probably going to mostly be purchases associated
with inventory. But what we'll do is
we'll leave that blank. That way we won't go into
do the payment transaction. We have the ability to adjusted as needed and
used to account that. It's going to work for
that specific time. We'll save it. Here you go. We have Gary's gravel
and it's all set up. We can create a bill, an expense for that, write a check to that company, create a purchase
order or make it inactive just from
the Action button.
14. Purchase Orders: Welcome back to our course
on QuickBooks online. In this lesson, we're going
to look at purchase orders. So if we need to purchase
more supplies or inventory, we can use a purchase or to send it to our vendors to tell the vendors to go ahead and send us more of the
resources that we need. So we'll go to New and then
we'll use the purchase order. And then we're going to use a vendor that we already
have in the system. So we're going to
use Tanya's nursery. It already populates
her information. If we wanted to ship
this to our location, it's already set up to do that. However, what if
we had a project and we wanted to
send the supplies, the inventory, straight
to the customer. We could easily do that
with the ship to box, would just select the customer
from the drop-down box. Be careful with the date. Always check to make
sure that it's correct. It can really mess up your
reports if you don't, then how do we want to ship it? Ups or federal express,
something like that. You can use tags to help
organize your jobs. You can use tags to help
make things easier to find. Let's go ahead and look at the items that we're
going to order. And what we'll do
is we're going to order a new inventory items, something we haven't
ordered before. Select inventory. What we're gonna do is we're
going to order daisies. We do not have a SKU number for the daisies and we're not
gonna put them in a category. The current initial
inventory on hand is 0, and we'll use the current date. Make sure that you're
careful with the dates. As usual. We don't need a reorder point for
this inventory item. Inventory asset account will
remain at inventory asset. And then for the
description for sales form, we'll leave that blank for now. The sales price will be $10. The income account should stay at sales of product income. For sales tax this as a taxable at the standard
rate category. And then for the
purchasing information, for a description on
the purchase forums. We already know what the daisies are so we don't need to add any further details
for the purchase form. Then on the cost. Let's say we're gonna get them from Tanya's nursery at $6. And you want the
expense accounts to remain at cost of goods sold. The preferred vendor will put Tanya and we'll save and close. Now we have a new
inventory asset. We're going to
order from her 100. We can put a customer. This is for the customer, Jeff's July copies
is our customer. Now this lets us know this connects this order of
daisies for gesture lobbies. Again, if we wanted
to have it shipped straight to the customer, we could put it in
the ship to area, but we want it to come to
us first so we can make sure it gets sent to the customer at the time that we wanted to
be shipped to them. Well, at another product, The Rock fountain, and we
just need one rack fountain. And then so now we've
got a purchase order for Tanya's nurseries for two
items we can save and send. This will send it to the vendor. Let's create another
purchase order. Will go to New and then
purchase order will select a current
vendor Hicks hardware. The reason I wanted to look at this as because they already have a lot of stuffs filled out. And the reason it's filled
out is this is what they used the last time they
did a purchase order. So it kind of helps you out by putting in the same information. However, we're
going to need to go in and change some of this. Notice how when you
hover over the quantity, it tells you how much you
already have on hand. In this case, we're going
to add a different amount. You can change these. Then you can put
a customer here. So we'll put the
customer as pies cakes. Again, what that does
is it allows you to connect the customer the
purchase order So we know why we're wide the
purchase order was made. We can use this when we're
going to invoice the customer. Then we'll just go ahead and
save and close this time. That's how we setup and use the purchase order
system to maintain the inventory and
supplies that we need to on our business.
15. Bills: Hello and welcome
to another lesson for QuickBooks Online. This lesson we're
gonna talk about, uh, not so exciting topic
and that is paying bills will start out by looking at paying bills that
weren't a purchase order. Meaning we at 1 ordered some products or
supplies from a vendor. And then we were sent the
products or supplies and now we need to pay the bill for
those products or supplies. Only once we pay the bill will the inventory be adjusted to show that we
have that product? For example, if we're buying
additional inventory, it won't show that we got the inventory till we
have the bill setup. If we just do a purchase order, it doesn't impact the inventory because ordering something
does not mean you have it. But when you get the bill, that's when it shows you habit. We're going to set up the bill. We're not going to
pay the bill yet. We'll see that in a second. So let's look at how we would pay built off of
a purchase order, will go to New. And then we'll select
bill for the vendor. I'm going to select
Tim Phillip masonry. And on the right it shows you the current purchase order that's open purchase
order of 1002. Now, if you had another bill from Tim Phillip masonry and you wanted to pay that without
impacting the purchase order, you would not add it. But if you wanted to go ahead
and add this to the bill, in other words, you
set up a symptom, a purchase order, you
receive the rock Fountain. So let's go ahead and
add that to the bill. Now. You can see it's down here. So the category, this would
be for something like expenses advertising or if you've got a service from
Tim Phillip masonry. But we did, we got a product. So we're gonna close
the category of detail to minimize it. And we're going to look
at the item that we have, which is the rock fountain. And then we can
make adjustments. If this if this went to
goes to the customer, we can put that which customer this rock fountain goes to here. However, what we're gonna do is we're going to go ahead
and just save it. Now if you save and
schedule the payment, that means that
you've set you'll set your account up with an
outside bank or credit card. We don't have that because
this is a testing environment. So we're just going
to save and close. Let's say we want to order something and we don't
have a purchase order. In order. In other words,
we're going to just order something from
another vendor. This time we'll use Tanya's
nursery, Italians Nursery. We're going to order some
solid and some equipment to use for a job for the category, we were going to
get some equipment, so we're gonna rent
sod equipment. Then the amount
that we're paying Tanya's for that let's say $100. Is this tied to a customer? You can include
that information. And if it's tied to a customer, is it is it taxable? We're not going to worry
with that at this point. It's just available for you. If that's the case, then for the product, we're going to order some soil, will order 30 bags. And again, if it's a customer into his
billable and taxable, That's where you
indicate that you can either schedule the
payment or not. And since this is a
testing environment, we can't skip the payment, but that's something
that you could set up to where to attach to a bank account or
credit card account so you can schedule
the payment for later. We'll go ahead and
save and close. So we have several
bills and some bills. They were already
input into the system. What happens when it comes
time to pay those bills? So we'll hit the New
button and then pay bills. Here's all the bills that we have in the system
that are there, including the one for Tim's masonry and Tanya's
nursery that we just put in. Notice we have a red arrow for the ones that are past due. You can change the
way that the bills are displayed in
alphabetical order by pay, by just clicking it. Or maybe it's more
convenient to put due date. And so this will put the
stuff that's due first, first, and then how
are you going to pay you going to use MasterCard? Are you going to use
savings account, checking account or visa, and then the payment date
in which it was made. So you're going to pay these bills and then now you're putting that the fact that you paid the bills into the
system if you paid them yesterday and you
wouldn't want to change that date to yesterday's date, then you just click the
bills that you paid. And so we went ahead and paid all the bills that
were that were due. And then you can against
get into the payment, but we're going to
just save and close. So what we just did
was tell QuickBooks, our accounting system,
that we pay those bills. You would pay those bills. You'd go back in and then you would tell the
QuickBooks that you paid them unless you had connection between
QuickBooks and an account. Just now by just saving, we didn't actually pay them. We were just telling
QuickBooks that we paid them.
16. Expenses: Welcome to another lesson
on QuickBooks online. In this lesson,
we're going to look at when we have to
pay for an expense, but we didn't get a bill. For example, let's
say we went to get gas for our company vehicle and we paid for the
gas and we wanted to tell our accounting system
that we have that expense. How would we go
about doing that? They never sent us a bill. We just paid them on the spot. So go to New and we
have a new expense. We didn't get a bill, we're
just getting an expense. We purchased gas. So there's a place where we regularly purchase
gas for business. And so we select that. We make sure that it's correct
when we purchased the gas. Now we have two accounts of payment account and
a payment method. Don't get these confused. The payment account
which has default to MasterCard is the account that's for accounting as
the accounting account. When we look at these, we see the different accounting
accounts that we could choose from and you can
see where they would show up on our balance sheet. The payment method is what you handed them at the gas station. Did you hand them an
American Express card? Did you hand them cash? Did you'd hand them a check? And so in this
case it's gonna be MasterCard and go into the
payment account MasterCard. But it could be different. It could be where you
handed them cash, but where did the
cash come from? That it comes from
checking or savings. Are you paid them with a check, but you use to check from
your MasterCard accounts, sometimes they send you checks associated with
your credit cards, right? That wasn't the case. We handed them the MasterCard, so we'll use that and we
have a reference number. If there was a transaction on that a number on that account, make sure the payment
date is correct. Not day you're putting
it into system, but the day in which
this occurred, you can apply tags as we've
talked about in the past. Then they'd defaulted
disinformation based on the last time we went
to the gas station, will put in eighty-five dollars because it was
different this time. And we'll put a little
description here, gas and let us say
a quarter of oil. Was this associated
with a customer, you would put that
information there. We weren't. So we'll go ahead and save
and we'll do another one. Now, as we saw a minute ago, when we use the payment method, we could've indicated
that we paid by check. However, there might be a little more direct way
of going about that. Instead of using expense method, we'll do an expense but telling QuickBooks
directly that it was a check will go to New
and then we'll do check. It's not really that much
different from an expense. It's just more aligned
with what you would need for to tell the system for
using your checking account. So let's say we got
our healthcare premium built for a company and we're
going to send them a check. The check, their bank account could be a check from
the checking are the savings typically
you're going to use the checking account and
then it has a check number. And this is why it's
probably a little bit better because there's signs as a check number
that we can use. Quickbooks doesn't
allow you to print checks if you opt
into that service. Otherwise, if you have your own separate checking
account with separate checks, you would have to have the
check number correspond to the check number here
and you can set that up. We're going to pay
for health insurance. So under category
will find that. And then we'll put the amount. So let's say $1400 is not
associated with the customer. And so we've already said
everything we need to. You can add a memo for
the check if you want to. Let's say monthly premium
and we're ready to go. We can save and close. So what that's done is it's
input into the system. Letting QuickBooks
know that we wrote a check for our
health insurance. If you wanted to
print the checkout, if you have that setup
with your company, you can you can do that.
17. Expenses Using App: Welcome back QuickBooks users. Now, we have a really
interesting lesson to talk about today, and that is, we're gonna
be using the mobile app. We're not learning
to do anything new. For example, we're
not we've already learned how to do the
expenses and the bills and the vendors we're doing is
using the app to do that. And so that allows you to
do is being the owner, the manager of the business. You can update you the
information as it occurs. And that's gonna be
pretty powerful to keep your information
up-to-date at all times. So first of all, let's
say, for example, we wanted to put a bill
in as it occurred. You could just select
the quick action bill. Here we have the bill details. Again, we're not going to actually go ahead
and put the bill. And this is the same
thing we did earlier using the QuickBooks Online. However, this just shows
you that you can put that same information
here using the app. If you wanted to go ahead
and do the expense, just like we did earlier, you select the
expense, quick action. And it takes you to a screen where you can input the expense, just like we were doing using the QuickBooks Online
from our desktop. If we wanted to add a vendor, we would select the
vendor quick action, just like we were doing
vendors on our computer, we could add them directly
from our mobile app. Again, just showing you
that all the things we just did using the QuickBooks Online, we can access through our
mobile app just as easily. And at the time that this
situation is occurring, something that's really cool is that you can snap your receipt. So you just select
the snap receipt from the quick actions. Then say you went
for business launch. You could snap that receipt
right then in there. And then it adds the
receipt for you to review the receipt
we just put in using our phone and now shows that receipt is in the system. However, it is not completed. As for review, if
you select that, it says, well, we're missing
the payment account. That's what's required. All we have to do is add
the payment account and then we would be able
to select that a save. And it would be in
the system for us, it would already be
done and we would have some real-time expense
information and we wouldn't have to worry
about putting a bunch of receipts in at the
end of the week, the month, the end of the year, even we would have the
information in the system already up-to-date and have more current information
about our profit loss and the type of
activities that are going on in our organization.
18. Tracking Mileage: Welcome back to our
QuickBooks course. In this lesson, we're
going to look at mileage, which is something that a lot of business owners have to track and that can be a real ordeal
to keep track of the Miles. First of all, it represents a potential expense that you
can use for tax reasons. And also you need to be able to substantiate
those mileage. Let's go ahead and look at what QuickBooks offers to
help us now if we were in the QuickBooks
Online menu and we go down to mileage, we select that. First of all, you can do it automatically by using
the QuickBooks app, which we're going to actually
look at in a few minutes. And if you want to get that app, they provide you
with a handy QR code to take you directly there. However, if you wanted
to do it manually, in other words, you
wanted to go into QuickBooks online
and input the trip. You could do that by just
selecting Add trip manually. So it lists out all the
trips that you have and there's no trips listed
here at this point. But if you added a trip, you would put in the
date the trip occurred, you would put the distance, the starting and ending point, and the business purpose. So this allows you to just
put the trip and manually. A much easier situation
is to use the app. The app gives us a great
opportunity to track them out as they occur in and to have very precise
information. One way you can do it
is to just go ahead on the Quick Actions and
select track trip. And when you do that, it starts
tracking your drip edge. You just click the start button. It starts tracking the trip. And then we're finished. You click the Stop button and then you put the
details of the trip. And after that, you would put
the details, for example, what was the business purpose and any other types of information you
wanted to add to that? Now, when you go to the myelin
area under the shortcuts, so you would go down to Menu and then you would
select mileage. This allows you to
either track a trip. So if we select the
track a trip arrow, it would take us back to the same thing where
I started tracking the trip just like we
saw from the quick menu. You can also turn
on auto tracking. Now order trackings pretty cool because once you
start auto tracking, then anytime you go
on any kind of trip, it's going to sense
that you are on a trip and it's going
to put that trip into the list of trips that
you didn't have to go back to later because there'll be all the and reviewed trips and you'll have to go
back in later and say, okay, this trip was
for business purposes, this trip was for personal. And what you did for
the business once this this allows you to automate the the tracking and the miles to where you don't forget to start
tracking a truck. This can be very helpful for people who
make a lot of trips. They have a lot of
different clients down the road all the time. Or perhaps they're the
kind of person that forgets to start
tracking the trip. And then they get sidetrack
and they forget to go back later on in and put
the trip and manually, however, the downside,
it's a little intrusive. You might not want to have
all your trips tract. You can also add
a trip manually, just like you did with the QuickBooks Online
using the computer, you would select the
plus at the bottom. And then that takes
you to a screen where you would put the trip and
manual, you'd put the date. You would put the starting
point, the ending point, the distance that you went, whether it was a
business or personal, that down on the
business purpose. So when you go ahead and
put the starting point, you can either add the address manually or you can use
a current location. And that's a little
bit better than using the QuickBooks Online
from your computer because your phone will know your current location and make that a little bit
easier for you. However, you can put
the address and two, and you do the same
thing for the ending. And then for your
business purpose, they have some
already set up for you meeting with
client, for example. And you can add different
purposes so that let's say you have some business purposes
that you use all the time. And you want just to put those in for our frequent purpose. And that makes it a little
easier for you there to. What we've seen is that
QuickBooks allows you to really take control
of your mileage.
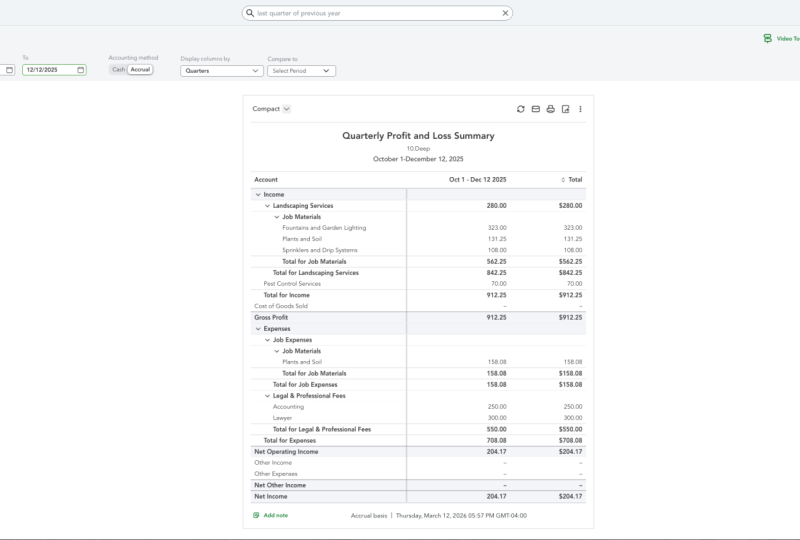
19. Reports: Hello QuickBooks users. In this lesson, what we want to look at is the different ways to get information from
QuickBooks so that you know, as a manager, as
a business owner, what's going on
with your company? And like we've been saying that, that there's some great tools. The QuickBooks app, for example, can help you stay on
top of your expenses, recognize revenue as it occurs, and that allows you to get really good information
as it occurs. However, how do you go about
getting that information? So that's what we're going
to look at in this lesson. So first of all, if you go to the dashboard and then just select
business overview, this is a great, great
starting point. Already. What it does is just gives
you the profit and loss, which is a lot of
business owners want to know and keep track of. And you can see it in
different time periods. Last 30 days this
month, last quarter. You can keep track
of your expenses, you can keep track
of your sales. You can see how they're
going, obviously, not too good for this
particular sample business. You can keep track of
the end voices that you have that had
been paid and unpaid. So this is just a
quick place to look. You can see your
checking account and other accounts that you have the balances that you have them. The cool thing is
that you can actually make changes and you can
actually drill down. So if you select on any of these areas for income expenses, it it drills down
into more detail. That's great, Just as it is. Now, if you go to
the reports area, you're going to find even
more options for you. And now there's a lot of reports
available in QuickBooks. This there already
for you and then you can create any
report you want. You can set them up
yourself as custom reports. We're just going to look at
the ones that are available because you may never need
a customized reports. A lot of these reports
are available for different reasons
that you might not find that you need on your own, such as there's reports that accountants
user that bankers use that you might not be interested in running as
part of your operations. So let's look at some
of the ones that are more for the operations
of the business. Now see these little
starred favorites. These would be what? Whatever the manager
wants to show up on time at first and to add
one or take one away, you just go down
here and you just click the star to get rid of it or click the store to add it. Let's start out with
this business snapshot. I think that's
really cool. Report. Looking at this snapshot, you see that breaks
down into income and expenses and then there's
more that you can get to. Down below, we'll look
at those in a second. But you can see the income and different time periods
this year today, last month, last quarter. They expensive. Same thing. For example, this year date, maybe beginning of the year
or something like that. So you want to look at last
month and then you can see it automatically just
update it right then and there for you in a little pie chart that's set up for you. And any of these areas
you can drill down. So you can say, well, what
does this thing right here? And you can drill
down to it and see what led to that number. Same thing for any of these
profit and loss this year. Let's look at last
month's so that we have a comparison
between this last month. Again, you can make all kinds
of changes on the fly here. So this is pretty neat. Here we have the previous year
income comparison. That's very useful for
a lot of managers. They can see how they're
doing as compared to their historical activity. And then this is really great. Who owes me and who do I owe? These are receivables
and a lot of times small business owners find that they have a lot of receivables. So you own a business,
you can go out, you serve as clients, you sell them products and
they're gonna pay you later. Well, if that gets out of hand, you can find yourself
doing very well on sales, but being cash poor. So this is really
helpful and you can, again see how they kind of lights up and
you can drill down to see the details
of John melting. And what makes up that
$450 is at one sale, Is it a bunch of things? And then who do I owe
so that you don't get behind on your payments. Going back to reports, there's some other
reports that we can look at some more detail on
the profit and loss. Now we just looked at several profit and loss opportunities with QuickBooks. But these are, these are reports that are also
available to you. These are in different
types of details. So profit loss as
a percentage of total income as a comparison for different periods in more
detail versus summary data. And so when you click on, for example, let's
do one of these. You'll see that it gave me a certain time frame that
might not work for me. So if you scroll up, you can make all these changes and you can change
this entire report. So instead of a
percentage comparison, you can look at
the previous year. You can change the timeframe. Let's look at some
other reports. Scrolling down to who owes you. You see accounts
receivable, age detail. So these are sales
you made that you haven't collected cash from. But when you select
these, you can, it can help you manage
those so you don't get behind and collecting them. So if this doesn't work for you, scroll back higher
and you can make changes to the timeframe
that you want. And you can see the
people that owe you 130 days, 31 to 60. I'm not too bad. But then you can see
somebody has ODU for overthrew almost three
months, right? Iraq diner. So this can help you focus on maybe going out and
talking to them to make that collection so that you don't run into a
cash flow problem. Even if you have good sales, he's need to keep
that cash coming in. There's additional reports. What do I what do you owe? We have the bill payment list. We have a list of unpaid bills. These are great options for you as a manager
depending on what you want. These prebuilt reports are just great for you to get
started with and use. And then you can
make customizations. As you go along. We have expense
information, sales taxes. If you have employees
and you want to have an employee list, there's stuff that's specific
for the accountants. If you have an accountant
to help you with certain tax filings or certain
other types of filings. That's the reports area. And the main thing to remember
is that each of these, as you go into them, not only are they a great report which you can also drill down. So if you see automobile
expense, What's that? You can drill down and you can see what makes
that expense for you. And you can change all of these by scrolling to the
top and changing the dates and time periods in customizing it in various ways. As you can see, reports are very useful for business
owners, business managers. They can really
give you a lot of insight information and the
stuff that's available to you straight from QuickBooks can be very helpful without you having to learn how to build any kind of special
customized reports.
20. Conclusion: Thank you for joining
me in this course. We have covered so much ground. You now have the knowledge to begin using QuickBooks Online for your business needs as a
manager or business owner. I hope you have enjoyed
it as much as I have. Please help me by
providing feedback if I can ever be of service to
you, please let me know. You can now say I
can use QuickBooks.
 Eric Knight, DBA, CPA, CGMA