Transcripts
1. Class Introduction: [No Speech]
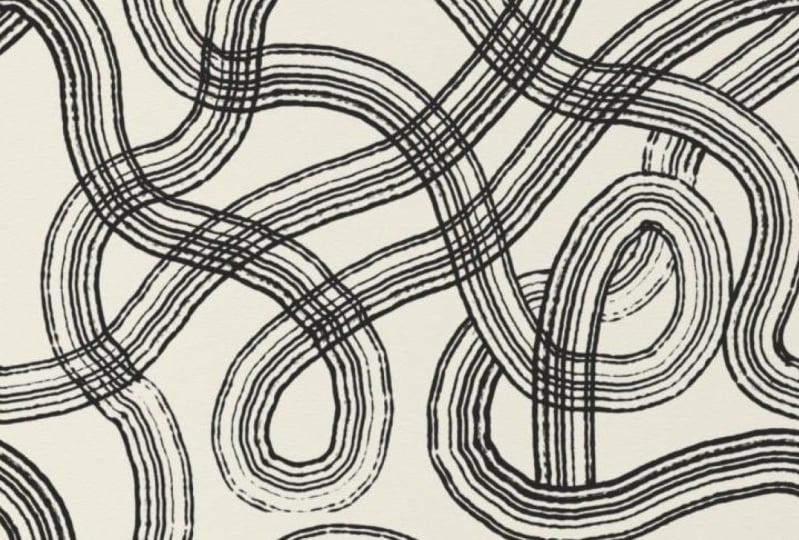
2. How to Make Interconnected Looping Repeat Pattern: Let's get started by
creating a new Canvas. Tap on plus, and
then new Canvas. Like always, I will do 4,000
by 3,000 and it create. For this pattern, I will
turn on the drawing guide, and you can add it the opacity,
density, thickness, size. I'm going to do something
like that, and then hit done. In terms of brush, I like
to pick something that is relatively solid for
this particular pattern. For this particular pattern, it's helpful for
us to understand what is the mechanics
of a repeating tile. Basically, when we look
at a repeating tile, the left edge has to match
perfectly with the right and the bottom have to match
perfectly with the top. So with that in mind, we're going to do some marking
before we start drawing. I am going to mark
roughly over here. That is going to be the entry point of a
particular squiggly line. I know that if it enters
or exit from the left, it has to match with the right, and I'm going to do a
similar marking right here. And then you can mark as
many dots as you want. The point is that it has
to match the top one. If you have one at the top, you have to have a bottom
one on the same line. I'm going to stick with this. This will just serve
as a visual guidance. I'm going to turn the
opacity down to maybe 50%, so you can see it
on screen as well. Then we can start drawing. Let's create a new layer, and then move this
new layer under our reference layer so that the reference layer
is always visible. If you want, you can also change the blend mode so that
you can always see it, even if the color
is very similar. I have mine set as
multiply at the moment. And from here, I am going
to draw my squiggly. Now we're ready to draw. You can make it
squiggle as much as you want, something like that. Then. Now we have our rough sketch. I'm going to make sure the left edge perfectly meet with the right,
not just roughly. I'm going to create
a new duplicate and to shift our pattern to the a bit and shift the other one to the right
until the edges snap. You know that we have
worked on roughly have our lines exiting or entering at the
same entry point, but it's not perfect. We're going to make sure the transition
goes well in this step. Merge it down and
then you can use the eraser tool to erase as much as you need to
connect these two lines. Then the other one seems to
be working a lot better. I only need to erase part of it. We're going to do the same
for the top and the bottom. Create a duplicate and then move it down and move
the other one up. It's crucial that we have the snapping
turned down so that our movements are perfectly
constrained to one axis. Then we can merge
these two layers down. We actually can delete
our reference layer. We don't need to remember
the entry points anymore. This seems to be working well. Okay. By moving them left
and right and top and down, we also have exposed some
opportunities of gaps. I'm just going to draw a line across so that we don't
have this awkward space. Perfect. Now we know that our left perfectly meet with our right and top perfectly
meet with the bottom. If you want to be fancy, you can turn on the alphck, which is using two
fingers to swipe right. This will lock the
transparent pixels. If you were to use a darker
color to draw some shadows, let's go with something
super grainy, like that, if you were to
draw some shadows, you will not draw
outside of the edge. This will create some
level of dimension between these lines
that makes it more like almost more three D. Notice that we have some
step born edge sticking out. Let me just smooth it back in. Much better. Then you can go into the motif to add
some more shadows. And I'm going to continue to
use the same method to move my shape around without losing
the perfect matchiness. The point is to expose
the transition connection points so that I can
work on the shadows. Seems like we're good for now, and there's one missing here. So I would need to create
a duplicate to move it to the left and to move it to
the right until it snaps. Then I can merge my layers down. When you move things around, you might see new gaps
that needs to be filled. At that point, you can just use your double finger to unlock the alpha lock to
draw on a new layer. In this case, I've used a new color and you
can totally do that by adding more accent into the canvas. Just
make it more fun. It's entirely up to you. Just remember, if anything
touches the left, you have to use the
same method to make sure the right matches as well. Now we have a wavely
squiggly pattern.
3. How to Test Your Patterns: In this video, I want to
show you how to quickly test your pattern tiles and save the preview
right on your iPad. First, you want to take
a screenshot of this, and then go to your photos app, either Lum press the URL
or Lum press this QR code, which will take you to
the default browser. If you have the P created open, you want to put it right
next to your browser. I have all my motifs
compressed into one layer, and I'm just going to
drag and drop here, right on the browser, and you
can adjust the scale here. If you like what you're seeing, you can also download your
preview right on your iPad. Just tap on this button, and you should be able
to either download or print by hitting
this share button. Don't forget to
bookmark this page, so you can come back to it whenever you're ready
to test a new pattern.
 Esther Nariyoshi, Teaching Illustrator based in the US