Quick and Easy Watercolour! Painting Point Prim | Rebecca Humphreys | Skillshare

Playback Speed


1.0x


  • 0.5x
  • 0.75x
  • 1x (Normal)
  • 1.25x
  • 1.5x
  • 1.75x
  • 2x

Quick and Easy Watercolour! Painting Point Prim

teacher avatar Rebecca Humphreys, Handmade Watercolour Maker

Watch this class and thousands more

Get unlimited access to every class
Taught by industry leaders & working professionals
Topics include illustration, design, photography, and more

Watch this class and thousands more

Get unlimited access to every class
Taught by industry leaders & working professionals
Topics include illustration, design, photography, and more

Lessons in This Class

    • 1.

      Point Prim intro

      1:08

    • 2.

      Materials

      1:05

    • 3.

      Painting Point Prim

      5:20

    • 4.

      Adding Some Texture

      1:12

    • 5.

      Optional Ink Highlights

      2:31

    • 6.

      Outro Point Prim

      0:35

  • --
  • Beginner level
  • Intermediate level
  • Advanced level
  • All levels

Community Generated

The level is determined by a majority opinion of students who have reviewed this class. The teacher's recommendation is shown until at least 5 student responses are collected.

38

Students

7

Projects

About This Class

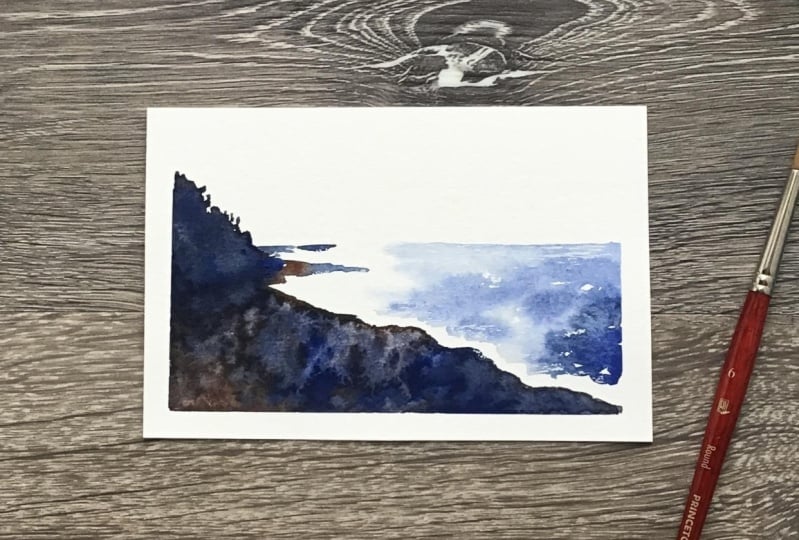
Using only two colours, come along for this fast and fun watercolour class! With no predrawing and no layering, this one is speedy, but all filmed in real time and easy to follow along with. We will visit a section of the Nova Scotia shoreline and paint a sweet impression of the waves crashing on the rocky, tree-lined beach.

in this class you will learn about:

  • mixing right on your paper,
  • an easy way to add texture to your painting,
  • and how to get some lovely sparkle on those waves! 

Ready? Let’s go! 

Meet Your Teacher

Teacher Profile Image

Rebecca Humphreys

Handmade Watercolour Maker

Teacher

I'm so excited to finally be able to give you the teaching experience that I've always wanted to share. My handmade watercolour making journey has definitely been an adventure- one that could have used an experience guide along those particular jungle paths! The 1-on-1 coaching sessions available here are now making this possible- from my home, straight to yours.

I have 3 types of coaching sessions available. The Backstage Pass is a deep dive, taking your hand right from the beginning and setting you confidently on your personal paint-making path. You can start it at any stage- trust me, I know you'll have questions! I'll be with you for SIX months (you will have four 60-minute coaching calls within that time), so I'll get you through the bumpiest part of the road and help you m... See full profile
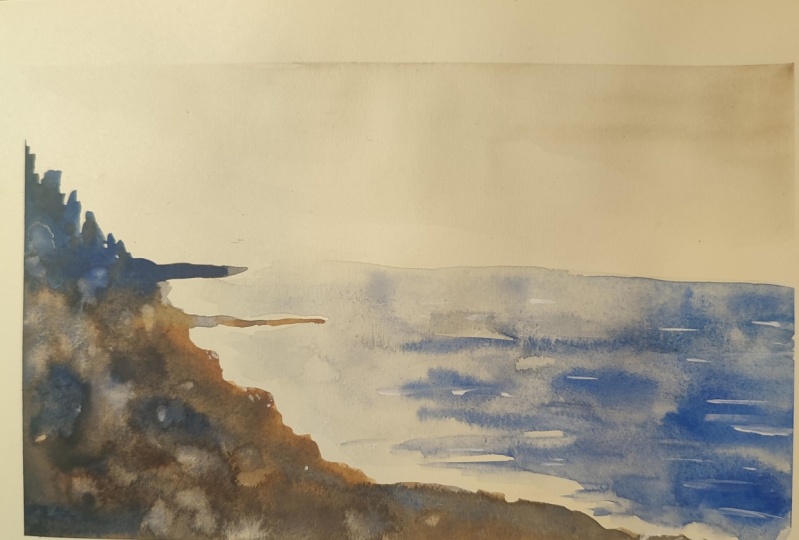
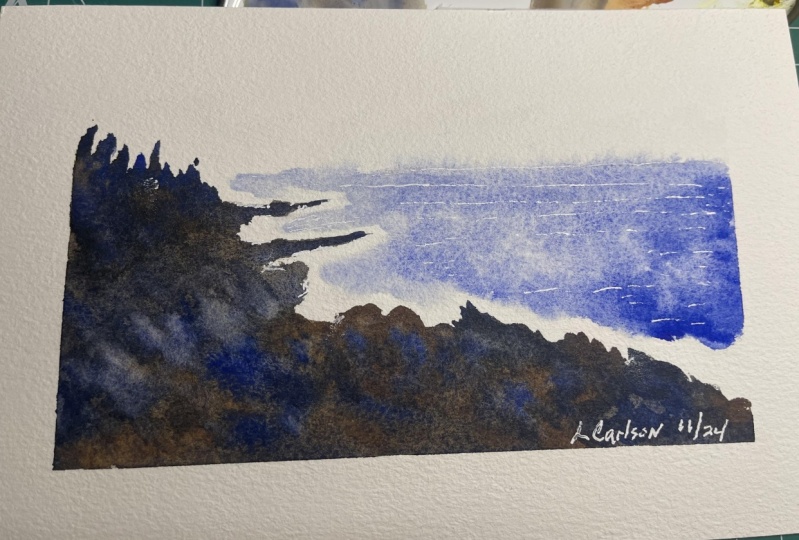
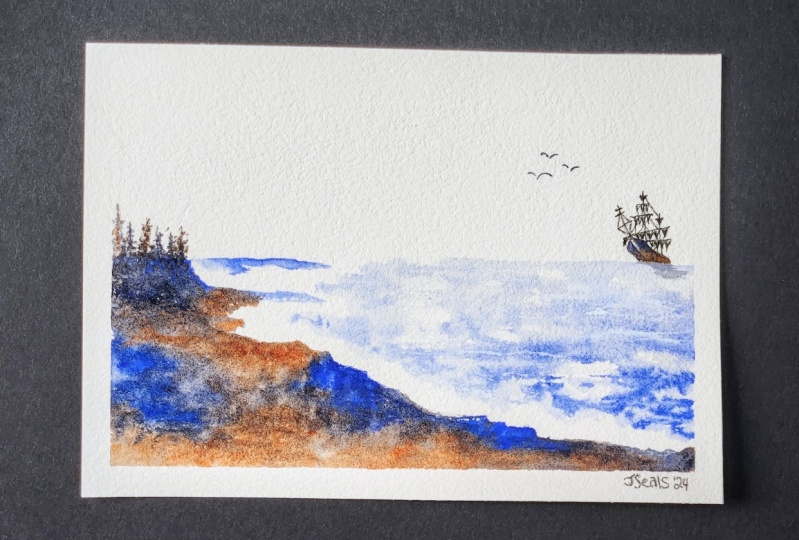
Level: Intermediate

Class Ratings

Expectations Met?
    Exceeded!
  • 0%
  • Yes
  • 0%
  • Somewhat
  • 0%
  • Not really
  • 0%

Why Join Skillshare?

Take award-winning Skillshare Original Classes

Each class has short lessons, hands-on projects

Your membership supports Skillshare teachers

Learn From Anywhere

Take classes on the go with the Skillshare app. Stream or download to watch on the plane, the subway, or wherever you learn best.

Transcripts

1. Point Prim intro : Hello, and welcome to this class. I'm so glad that you decided to join me. It's going to be lots of fun. My name is Becky. And my husband and I live near the water, and we live near the woods. And so both of those things tend to feature frequently in my art. And with all the water that we're around, I've noticed an alarming number of lighthouses that tend to appear in my art. But I do love painting water scenes. And while the scene that we're painting today is from an area that has a lighthouse, we're not actually going to paint the lighthouse. Maybe we'll do that another time. But this area is called Point Prim, and this is the lighthouse from that area. It's in Nova Scotia. But I'd like to paint this scene with you instead. So let's go grab our art supplies. We'll talk about those in the next lesson and get started. 2. Materials : What will you need for materials? Well, it's a watercolor class. You'll need your watercolors, some water, a piece of watercolor paper. I'm using 140 pound cold press. You'll need a watercolor brush. I'm using a round that comes to a good point. You can use a palette, if you want for some mixing and wash tape to tape down the edges of your paper and a white pen or some other way to add some white highlights if you want to. Now, today we're only using two colors, ultramarine and Burnt Sienna. I'll be using my own handmade watercolors, but you can use whichever ultramarine and Burnt Sienna that you have access to. We can get lots of hues just from those two colors and I really hope that you join me. It's going to be lots of fun. Let's go grab your stuff and we'll get started painting in the next lesson. 3. Painting Point Prim: The first thing you're going to do is grab that washi tape and tape down your piece of paper onto your surface to give you a nice white edge when we're finished. We're also going to make up two really nice juicy puddles, one of ultramarine, and one of Burnt Sienna. We're going to just dip into those and do some mixing, but just those two puddles and make them nice and pigmented. Now, you can tape your paper down to pretty much any surface. You can use your desk or palette. I'm just using a piece of cardboard. That I made waterproof by covering it with a few layers of packing tape. It makes for a very light drawing board, basically. With a mix of a little bit of burnt sienna into your lt Marine, we're going to paint a little bit along this rocky shore. We're just going to leave the trees from the top for now. But going back and forth between very pigmented ultramarine, very pigmented, burnt sienna, we're going to put in this shore line. Now, I could be using a bigger brush here, but I wanted a smaller brush for those two little points of land that come out and disappear into the shimmer of the water. It's important to make those come out as thin as possible because of the distance that they are away from us, that piece of land looks very, very thin due to perspective. And don't be afraid to go back and forth, let your colors mix on your paper. You will end up with a much more vibrant and lively painting than if you do your mixing on your palette for this piece. There are times when you need to mix on your palette, but today's painting is not one of them. Just have fun going back and forth between your alta Marine and dibrzi, and don't feel the need to wash your brush in between, it really won't matter, dive right in. So once you get that rocky shore, you'll notice how I've made it not even not talking about the trees right now, but just the shore line. Try not to make that like a straight line. Here in Nova Scotia, this is a boulder strewn rocky area. Make it lumpy and bumpy and try not to make it like a child's cloud that goes equal distant bump bump bump. It will look a lot more natural if you're able to make it more random. When you're doing your trees, try not to overwork the area. I got a little carried away here because I made the tops of the trees to similar. If you make things look too much the same like the bump bump bump. It will also look a little odd. Once you get those trees in, walk away from them. Now you're going to have some clean water here, really clean water. You need this to be super duper clean and just wet along the edge of that without actually touching where you've painted. You're going to leave a good buffer there. This is to paint into and to have your color soften away into nothing once you get to that water. Now, I'm trying to use the belly of the brush here a little bit to leave some white highlights in the sea But you'll notice that I'm not painting from right to left and leaving the brush landing in that wet and wet area. If you do that, you'll end up with the brush releasing a blob of color there and you really want your paint to be the driest at that point. You want your color drop to be on the right side where I've just put in darker colors. You start your brushing on the left brush to the right, and when you pick up your brush, it won't release a surprise on you. And then I'm not taping off the horizon, do your best to make this a straight line. Now, if you do want to put some tape in there, you can. But this is meant to be fun and quick. So you can draw a straight line. Now, along the edge, we're leaving this white because there is so much foam and froth that comes as the waves crash against the shore. We're going to lighten the edge of that paint that we put down in a couple of places, soften that edge a little bit to make it look like some foam is coming up. Now we're going to add some water in for some texture. 4. Adding Some Texture: Now, this step is completely optional. You could just stop here and it would be fine. But while your rocky shore on the left side of your picture is wet. If you want to add some texture, this is when we do it, when it's still wet. We're just going to drop in some drops of clean water, and you'll notice it has a similar effect to salt. You can actually see it blooming and pushing the pigments away like right in front of our eyes. Now, this works at this point because the paint is not a big puddle, it's damp. We're actually working wet into damp. And I actually enjoy the effects of this better than salt, but either one works pretty well. But in this case, water works really well because we've used such heavy amounts of pigment. The water will come in and push it away, and you'll end up with some pretty cool paint textures. Now we're going to just walk away from it, just walk away, let it dry. 5. Optional Ink Highlights: Now, once your painting is dry, and I really do mean dry, we're going to add some of this spray and foam and this liveliness that happens around the edge of the water. But we're not going to do very much of it. We're just going to do an impression of it, which is what this whole painting is, an impression of the shore. With your white gel pen or with a very small brush and some white watercolor like doctor PH Martin's. You can add some very thin horizontal lines in our water here, that will add a little bit of sparkle. If you were able to add more or leave more white highlights by using some dry brush, that section really isn't necessary, but I had a little too much flat area there, so I needed a little bit of lines. Again, this is all optional. Now, along the shore, if you do this little dotting method, it really doesn't require very much, and yet it looks like a splash, the water's coming alive right there. You can also even do a few little dots and things on the shore. You don't have to just stick with doing it on the water section. Because trust me, if you're standing there, you're getting wet. That spray travels a long distance. But literally that's it. You don't want to overdo it with this white ink. It's more to add just a little bit of foam, just a little bit of liveliness. Then once you're done, put down your pen. It's so easy to overdo it at that point. When it comes to taking your tape off, always, pull slowly and pull away on an angle from your painting. That way, if your paper starts to tear, it will not tear into your painting, it will tear out of your painting, so it's actually far less noticeable. That my friends is it. You've finished your painting. That's how easy this is. I really love this little project. It's super fast, and you can do this with lots of different scenes. Make an impression of it, what you see. 6. Outro Point Prim: So that's it. It's all done. Pretty easy, right? That's the kind of painting I really love to do. Quick, easy, mix right on the paper. Don't get all bogged down in the details. Now, if you really like this and you want to see more classes like this, I would really love to do that with you. So please leave a review and let me know that you'd like to see more classes like this. I'd love to have you along for the journey. Let's do more quick and easy watercolor. Thanks. Bye.