Transcripts
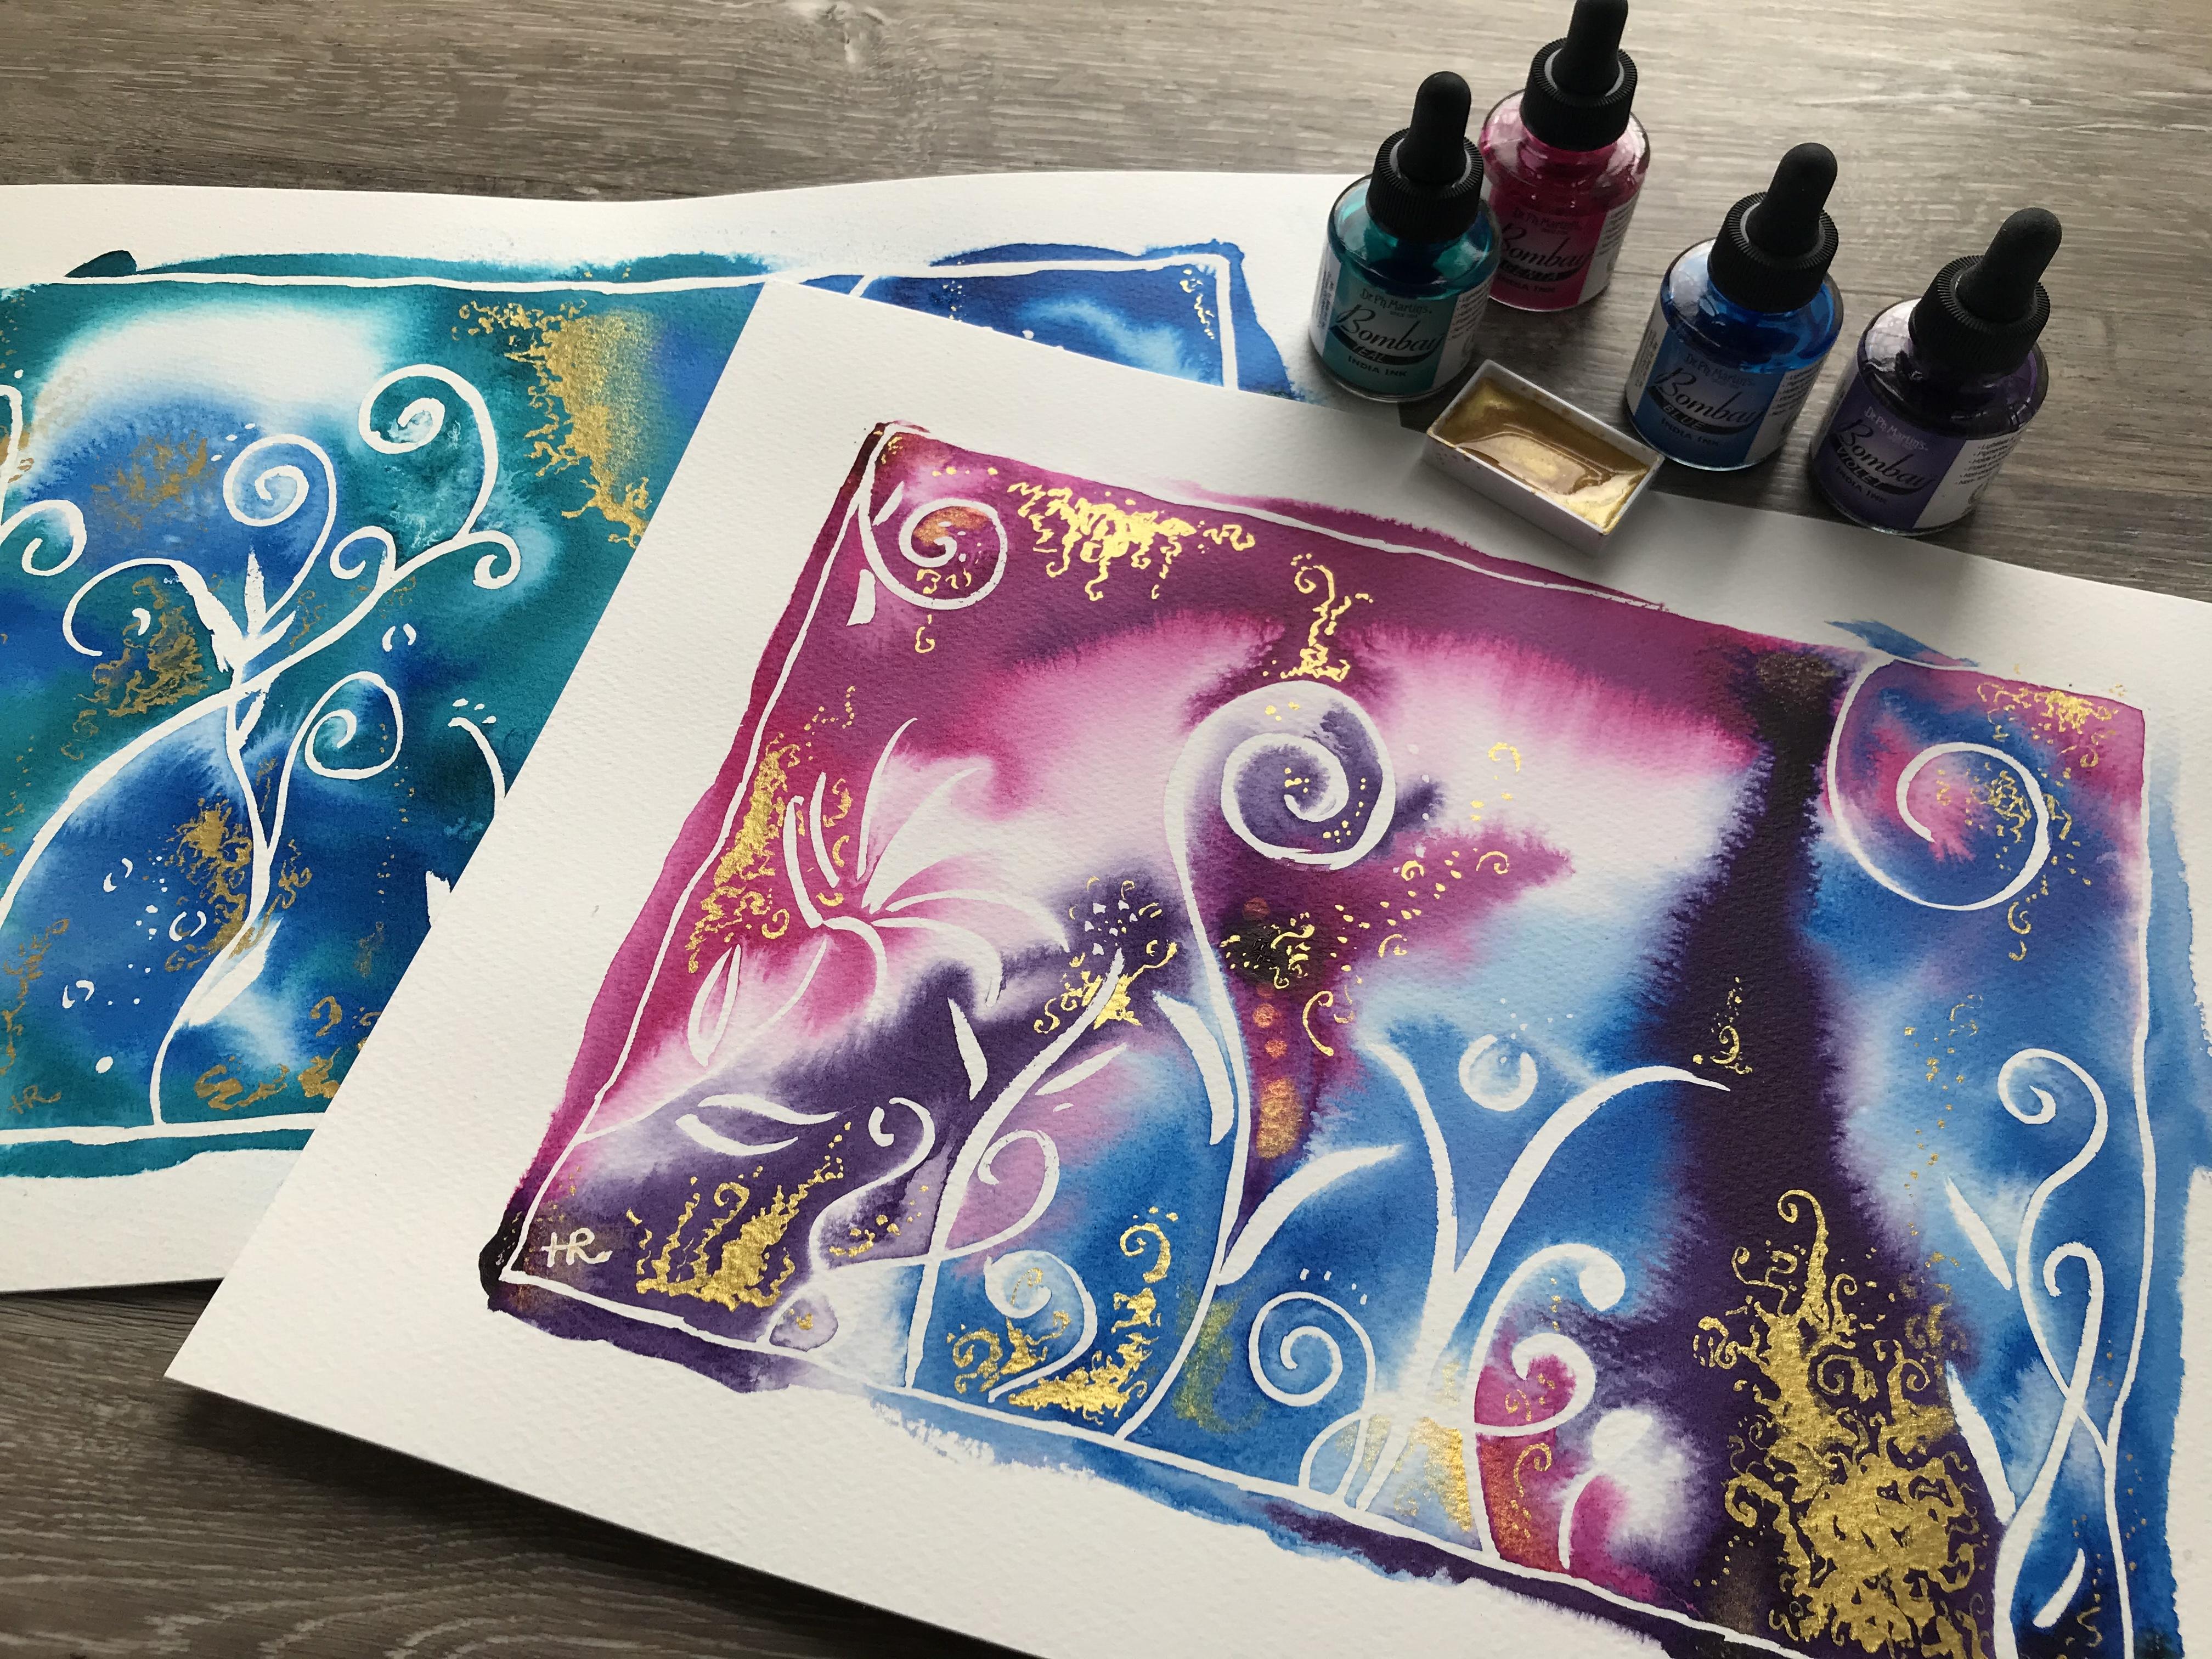
1. Supplies: Hi. Everyone today will be showing you how to paint with India ink and make some fabulous abstract art. Okay, so today we're going to make something like this. Actually, this is what we're going to make. I'm just gonna turn it a little bit so that you can see the gold shimmer. Um, so what will we need to make this today? While first of all, we will, of course, need some watercolor paper. I'm going to be using a sheet of quarter imperial paper. You can use whatever size you want. This is not a size dependent project you can make. This is big or a small, as you would like to quarter. Imperial is 11 inches by 15 inches. So I'm working pretty big today, but, um, you can work this larger, small as you like. Eso. The main thing that we're gonna be using today is ink. And, um, I have the number one set of Dr Ph Martin's, um, India ink. Um, you can use any type of waterproof ink that you would like to. The reason I'm using this India ink is because I love what colors it comes in, and it's waterproof. So I can put other things on over top of it. And so to use the ink, I have these two little glass serving dishes and I use them as a palate because the ink can't stain them. If I washed them off right away. They're very, very shallow. But I don't put very much think in them. I mean, you don't need very much ink is very strong, so they work fine for what I want. I do have a little plastic pallet as well. And, um, that works just fine, too. I just I don't like the fact that it's quite light, so I don't want to, like, tip it over. In addition to the ink, you will also need ah, variety of brushes. Um, so I have a big brush. I would prefer to have even a bigger one than this, but this brush is too wet your paper so you can use ah, good brush for your large one. It's it's okay, cause you're not going to get ink on this Just water. So if you have a nice brush, that's really big, go ahead and use that, um, otherwise you're gonna want some brushes that you don't mind using with ink. Now. I wash my brushes, um, with shampoo afterwards. So mine are not ink stained, but still, um, to be on the safe side. I prefer to use a brush that I'm well is. Okay, it gets wrecked. So the way that I wash my brushes with is put a little bit of shampoo and just smoosh it all around in the sink. Thought here. And you'll notice that even though you think that you've gotten it out, the soap said's in your hand will be, you know, definitely colored. So do that and then rinse and keep doing it and rinse until it's completely, completely clear on dumb. The use a good shampoo. Don't use one that some like a two in one or something like that. That's gonna put conditioner on your brushes. Just ah, basic really good shampoo. Eso I have a larger one. Ah, and I also have a smaller one. Now this smaller brush I'm going to be using not for ink, although it could be used for that. But I'm gonna be using that for a smaller brush for some gold watercolor at the end. So that's one reason that I really like using a waterproof ink like Bombay India ink because it's not going to move when I go on, put watercolor over on top of it. The other thing is you can also put, um, other layers of, um Inc over it again. Um, so you can have, um, one side done and let that bleed haute. And then once it's all dry, do the other side. And then that way you don't have, um, colors mixing that possibly may come together and be gross. You can actually look them over layer and be kind of cool. So another thing that is not a necessity, but it will take your project to just think to have some designs in it is some masking food . Now, I prefer to use this drawing them. Um, the reason that I like this one is because it doesn't stink. No, I'm very sensitive to sticky things. I really don't like stinky things. Who does? That's a stinky thing. I love it. Uh, whatever. Maybe if you're a skunk, I guess, um, but this one's a really good one, and it's also like, um, I don't know how to describe it, but it isn't a gum. So when you go, you'll see when I go to pull it off. Sometimes you can just it just kind of like due to do it just peels right off. It doesn't take a lot of effort to get this off. Um, however, to get it started, I actually like to have one of these little guys. You can use a regular erase or whatever, but I like these little erasers on the end of these big pencils. Um, I do have other pencils with erasers and other erasers, but there's something about this'll Italy Racer that works really well with getting this stuff off. If you put this on too thick, it will take a good long time to dry. If you put it on to thin, it won't cover at that well, and it also won't come off as easy. I do have one other tip for you about a mask include, and drawing dumb things like that. Um, a lot of people like to put the masking fluid down paint and then hair dry hair dryer or heat tool. Um, if you do that to masking fluid, sometimes it will, uh, at here rate into the paper, and it will become very difficult to get it off. So I highly recommend not doing that. Something else that you might find useful is just a little Mr for your paper, You know, that kind of thing. But, um, usually I made my paper so wet with the paintbrush that Mr is not necessary. But you might want that, Um, other than that, I think we are good to go. So let's get our tape and tape down our paper and let's get started.
2. Masking: Alright, So I've just got my paper tape down and I'm going to start using this drawing gum. And before you use this, it's very important that you soap your brush first. Um and also preferably that you don't use, um, an expensive brush. Don't use your favorite. So to soap it, just wet it and rub it on a bar of soap or squirt some liquid hand soap into your palm and make sure coating the bristles well And don't rinse it just as a reminder. Even though you probably heard that 1000 times already. Eso I'm just using this masking fluid to make a sort of wobbly outline. Ah, wonky little box to mark my edges and this isn't necessary, But I like the way that it turns out. So I like to do this. My brush is quite small, doesn't hold a lot. So I dip it fairly often. But I actually prefer using a smaller one like this because that way I don't get like big globs of masking fluid as often. And it's just I have a little bit more control over where he put the masking fluid. Um, so what can you put in your box, your your abstract mast off section. Uhm, I'm going to be filling this particular piece with just some silly doodles and squiggles. Um, but you can fill it with whatever you want. I don't, um, start a with, like, a pencil outline of what I want to do. But you certainly could do that. Um, I like to just sort of play and see what happens, which could be a mistake, but that's what I like to do. Uh, the other thing that you can do instead of squiggles and doodles and silly things is you could mask off your family name. Um, the date that you moved into your home, Um, the names of your Children and your your family tree sort of and have, like, a nice keepsake that you can hang in your entry way of your home. Or you can, um, have it to commemorate moving into a new apartment or into a new house. And it makes a really nice host warming gift as well. If you ever want to make something for someone, um, and weren't sure what to make, um this is this is cool. And the neat thing is, is that you can color coordinate it too. Whatever. Whatever you want. Um, it's it's fairly open. Whatever you decide that you would like to mask off here. Ah, the choices air fairly. Ah, limitless. So I'm talking about these particular doodles now. Um, like I said, these are not planned. So you've probably caught under that, um, but one of the things that I have found that it is important to do at least composition wise for myself. Um, try not to let the doodle or squiggles or whatever. Um b two, equally distant from each other. Um, wherever you're making them, um, they don't have to start at the bottom either. I also like to have some coming in from the sides and from the top, but try not to let their stems or what not be too even, Um, even though that is what my brain keeps trying to do, I keep fighting it, Um because it will. It will look better as a composition in the end if it's more random. Even though we as humans are not very good at creating actual random like you can see, these are all very, uh, even so for um the other thing I find is very helpful is if you can cross some stems now. Like I said, you don't have to do flower doodles. Whatever you choose to do. Um, I did one that was made to look more like, uh, forest, and it had, like, grasses and things all coming up and waving. Um, you can make it look like, um, like a kelp forest with all that help weaving in and up. I found those ones actually work better if you turn your paper in portrait mode. But that does not lend itself well to a skill share class video. So Ah, we decided to do a garden. Do Tole think today I'm so eloquent. Garden due to leave thing? Um, yes. So make whatever doodles appealed to you or mask off your name with folk calligraphy or what date you moved into your house. Whatever you decide that you want to do, you could also do some sort of, um, geometric shapes, um, like, almost like a Zen dangled type of thing. But one thing I will ah suggest is don't cover all of the areas equally with your masking. Um, try to leave Ah, some white space to balance off the busy nous of your doodles because you're also gonna have a busy nus from your ink bleeding and all that as well. And you want to have a balance if you can, um, in some larger white space areas versus the mask off, Um, the word of my pattern, that type of thing. It has a nicer appeal as a composition. I like to do a lot of these kind of swirly Tanguy things. Um, I also once we get into some of the, um, finishing touches at the end with some gold, you'll see that I like to try to repeat those things. So try to do some doodles with your masking fluid that you may want to repeat with your gold later.
3. Ready, Set, ..: Theo. All right, that's awesome. So while our masking fluid is drawing, let's get our ink painting supplies ready. So I'm gonna be using these three colors from Doctor Ph Martin's Bombay India ink set. And these pallets, as I already showed you before. So the colors I'm using again are magenta blue and violet from set one. And they come with a little eye dropper and the size that I got. And you really don't need very much ink. That was just too little squirts. Um, so I'm going to get all three of my inks put aside. Once I have those ready, it is time to wet the paper. Now, um, I try not to dip my brush in up past the feral if you notice the way I did my brush into the water, Um, if you go past the metal Ferrol on the brush up to the wood part the handle of your brush um, what can happen is you can cause the glue that holds your handle on to start to dissolve. Um, this is a big problem. And why some people have brushes with handle is kind of wobbly. Um, so I like to have a large water jar. But I also like to maintained by brushes, So this is a way that I find a solution. I just push the brush up against the side of the water jar instead of the bottom. But that's enough about the water jar. Um, so use a big brush to do this and wet your paper as evenly as possible. Um, don't don't leave puddles in areas now. The reason I'm saying this is because, ah, the masking fluid. Each line of the masking fluid can form a little ridge, and these ridges act like small retaining walls. Which is interesting makes for very interesting things once you get your ink happening. But it can pose a problem when you're trying to what your paper evenly, because you can end up with puddles where it's sort of, um, enclosed or dry spots. So you notice I'm going over this of quite a number of times because I want to make sure that all of the paper is wet evenly. In order to check, you may need to look from another angle, get down a little bit or a look from the side, and you can see where it's wet and where it might be pulling a little bit, and you can fix that up. Now you'll notice. From this view, it's a little bit easier to see that I've taken my water past the edge of my border, and that's important for what I'm going to do with the ink, because otherwise it will not show up.
4. Ink It Up!: - Okay , so your paper is evenly wet. So now you're gonna wait your paint, brush your ink safe paintbrush, and you're gonna grab some ink from your pal. It's on your brush and do a swipe across your wet paper. Isn't that cool? That's called a bleed. When it goes all over the place like that, you can rinse your brush off, grab a different color and do another big swipe. Um, your options here pretty much endless. You can do swirls and swipes and whatever you want to do. But this is very important when you're putting down your colors, your ink, um leave yourself a lot more white space than you think that you are going to want. Because trust me, my friend, that ink is going to travel a lot further than you think it will. And, um, it can You can travel really far. You take a look at where that, um, bottom right Purple triangle Swipe is now I'm gonna add in some more purple violet. Uh, I guess it is to their and I'm also gonna add in more magenta to the top big arc. And that's safe to do because your paper is still very wet. I made a little splotch there by accident, but it's a wonky border for just such emergencies. So you can add in more wet ink to a wet ink blob, because your paper is still very wet. If your paper starts to dry oat, do not try this. You'll regret it. Trust me. Um, that's another reason why I choose to use 100% cotton watercolor paper for this project because it gives you a lot more time, um, to get your ink on and it just behaves a lot better. You see how far that purple is already traveling? It's going to go a lot farther than that. So, um, the reason that you want to give yourself a lot of white space is because if you don't leave yourself enough white space, you lose all of the liveliness of the ink bleeds. And that's the point, really, of doing this project with ink and not with water colors is because you get all those fantastic bleeds happening, and if you fill in the area with color, it looks it looks and pretty, but it doesn't have the same liveliness. In the same appeal that those ink bleeds do, Um I've done so many of these, but you really You really do have to give yourself lots of space. Right now. I'm just soaking up a little bit where I had some puddles because I This paper is so, so wet. It's curving a little bit, so I'm just soaking up a few of the little puddles now.
5. Gold Rush the First : people. It's time to break out the sparkly stuff. The Goldwater color that I'm going to be using is one from curry Taki story colors. Um, it is number 903 right there. It's Ah, there. Yellow gold. I like to take the pan. Uh, right out. And just use that. It's just for our simpler. Um, Okay, So once again, I have to activate my Goldwater color because it's dried. Yes, because that's what I end up doing because it's dried. Um, So once again, once you get it all activated, Um, the first thing I'm going to show you is a little trick that you can do. You can add Goldwater color to the little puddles that you might have left of some wet ink . Now it doesn't create as obvious, um, or as eye catching and effect is what I'll show you next. But it it has its own neat fun effect, and I kind of like to have a few different things to play with. So it's safe to remove the masking fluid once your ink is completely dry. Um, just before we even remove them asking fluid, check out some of these bleeds that we get from ink ink has such unique qualities. I really love working with it. Um, it often makes me laugh because they don't know what it's gonna do next. So here's how I use the little eraser on the end of my big pencil to get that masking fluid going, and it's pretty easy to remove after that. So here it is, all removed, and now it's ready for us to add our, you know, Cool Inc effects, too. So, um, I have ah dedicated water jar for my gold. Uh, watercolor. Let's get Keep Curling Gold Inc. That's not right, and I've been using the same little jar for ages. And so that way I'm able to kind of re use some of that gold watercolor. But I try to keep his much of the gold in the pan, as I possibly can. So keep an eye on the bottom right corner of my pan and notice how once the gold starts to coat my paintbrush. I don't want to just swish that all off in my, um, water. So I wipe it off first on that corner, and I find that way I don't lose as much of my my paint. And it's, uh I hate to waste that pretty gold step, so, you know, that's just a little trick for you. Um, So I'm going to zoom in here so that you can sort of see a little bit better when I'm doing . Um, this angle is not the greatest for you to see what I'm doing. My hand will be in the way somewhat, but rest assured, I will show you from another angle a little bit later. But what I want you to see here is the way that I'm basically just playing. I'm interacting with the way the ink has bled as well as my mast off doodles. And I'm just tempered. I'm just seeing what I want to do next, and I'm doing it. Um, the other thing that I'd like you to notice is the way I hold the paintbrush almost completely vertically at times. And that helps me to get some of those really delicate little 10 droll looking doodles with the gold. Um, because I'm the papers is like, barely touching the paper. Um, in fact, a lot of times it does not completely Dutch. The paper and I have breaks in what I'm doing. But that's OK, cause it it still works like it adds to the I don't know the look, Whatever it is I'm trying to say, I think you understand.
6. Gold Rush the Second: So if you're wondering, where do you put these gold? Doodily bits? Um, I have found that they the contrast looks best. So if you can put the gold where your water color were water where your ink is the darkest your gold will show up more. Um, you can also use it to show up areas where, um, you have what's called a lost line in what you've masked off. Maybe the ink didn't go all the way to the edge of the masking. Um, and you you perhaps want that part to show up so you can use the ink, the ink, my goodness, you can use the watercolor, um, to show off where that separation where that mast off area should be. Now you might want to put the gold where you have the white mast off parts, and you can, um, I like to put it in areas like this where there's white from the white of the paper, but not necessarily where I have it masked off, I found It's not as appealing to me visually when I do it that way. But this is it's an abstract rights. So if that's what you want to do You want to try it? By all means, you know, it would. It's gonna look interesting matter what you do. So here's ah, uh example of what I was saying, how you can use it to show up a line that's been lost. So I have a couple of suggestions cause I've done so many of these that I found a few things that work in a few things that don't work. Um, try to have some variety in what you lay down. Um, try not to have them all look exactly the same. Try to have some that are, um, small and delicate little tenderly looking doodles and try to have some that lay down. Um, a lot more gold coverage. Um, it'll add to Thea the variety that you're seeing, and it keeps the I busy looking at some of these different things. Um, because this is watercolor. You can add water to it, and you can smooth out some of those edges or you can make them disappear altogether off into the oblivion. Um, you can also one of the things I like to do, which, um, not doing right here, but you'll see me a few examples of it later. I like to have some of the edges sort of bleed off into nothing. It's it's a need effect, especially with gold. Um, I do try to keep my edges as varied and odd and bumpy and squiggly as possible. I like to not be able to tell where the brush was going. What? How it was moving anything like that. Um and I it's It's fun. I like to to To play basically, just play. Um, make sure you you ah, have the freedom to take some of your gold rate outside the border. Um, you'll notice how that works now with the border showing up because you've taken the ink past the border. So after this, after I've taken the tape off here in the next lesson, I'll show you from a different angle and, ah, a couple of examples that I think that you look
7. Gilded: now from the side. Um, so I'm gonna show you more. Close up the molten metal effect that you're trying to achieve that you want when you use metallic watercolor. So this piece is a different one that I have done. Uh, I did this one with, um, blue and green and teal inks. Um, but it was useful for me to give you a demonstration from the side. This piece is all in recorded in real time. That way you can see exactly how long it takes me to do some of these silly little doodles . But you can also see the speed and kind of scum ble motion properly that I do, um, a little bit easier from the side and in real time and my hands not in the way as much. Yeah. Now your doodles and squiggles and gold touches are probably going to look different from mine. And that's great. Make it your own. Um, dots are fun to add into, and once again, like I said before, um, if you have a shape that you can repeat, go ahead and repeat it. So in this piece, I had a more dots that I did with the masking fluid. So I wanted to put in more dots with my gold touches as well, because it would and be repeating that pattern. Um, so a piece of advice that I can give you, um, from learning the hard way and and doing strange ones that I really didn't like. Um, try to keep your shapes your gold, um, touches. Trying to keep those as organic and uneven as possible If you make a bunch of tendrils hanging down and they're all the same length, Um, such as what I'm gonna show you here. It's not very interesting. Um, it doesn't have as much appeal. Eso try to keep them as unique and different and wonky and and silly and playful as you possibly can. Um, I do want you to notice the sort of stumbling emotion that I do in lots of different places . Um, it's ah, it's It's the effect that I like the most. Um, when I'm finished, it gives me the most delicate little tendrils. Um, the strangest, squiggly lines, because I'm not completely in control of where my brushes going or what it's going to be doing, And so it helps that organic look, um, so much more. And ah, you may need to add some more water to your watercolor pan to keep the paint thin enough to flow off of your brush, especially if you're doing thin little ones like this. You'll want your watercolor to be just a little bit thinner, but thick enough so that it lays down almost like gold foil, right, like it covers really well. But as you're working, your paint will begin to dry it, so you may need to add in a little bit more water. But have fun play, do silly scum ble things and just see where it ends up.
8. Other Examples: Okay, I've got one more demo to show you before we look at a few examples that you can try, Um, this particular doodle, um this is what my brain views as a castle. Sort of doodle. Um, it it ends up being sort of triangular, um, with lots of crazy, interesting things happening all over it. Um, ridiculous. Bumpy edges and a lot of swirly do believe it's, um I often put these Cassilly ones, um, against some deep blue Like this, Um, mostly because I'm using, um, yellow gold. And so the yellow gold with the blue ink to me, that's just like, Oh, so anyway, I really like that contrast. Um, this particular doodle tasseled doodle. Um, this one doesn't have as many points or turrets or whatever. It's not a castle, so I don't know what you want to call it, but to me, that's sort of what they end up looking like, Um, this one doesn't have as many of those points as usual because it's a little bit of a taller triangle. Um, so there's no rules, right with these, um, I just try to react with what the paint has done and go from there. Andi, if you try to fit, you know your doodle in with what you want to do instead of what's actually on the paper. You're not gonna enjoy it as much. So just try to see what's there and intuitively, um, play and see what you want to put with what you've ended up with. Um, Lee, they're really important. Take away here. Um, that I want you to really grab ahold of is this is fun play, um, create, Even if no one else sees this, um, which I really hope other people seeing these because that I think there are a lot of fun. They're really cool. I love looking at them. Um, the eyes so busy looking at all these things all over them, they're They're really interesting, very lively. And and And as I said, there are a lot of fun. They're really fun to make, and they're really fun to look at. So play and have fun and just enjoy the process. Um, get lost in in the silliness of the doodles. Um, try to keep your edges as non uniform as possible, and do try to keep your hand out of your wet paint. Um, yeah, but that's that's just one more example that I wanted to show you. After this, I have some pictures of some finished gold doodles to maybe help you get some ideas as to some things that you might like to try. So here's the one that I just did all finished and some more squiggly doodily bits. And I hope that gives you some inspiration. Some things that you might like to try. Um, notice Here is the one with the softened off edges. I really like this one. It's a fun corner. One that I use a lot. This one. It kind of gives almost like an aerial photograph. Look, so that's pretty easy to do. You just you do a gold outline sort of around the edges of a bleed and soften off the inside edges with water. It gives it cool. Look, you can also do this one like a little peep coming through. Well, wonderful people. That's it. Thank you so much for joining me on this inky doodly journey. I really hope you decided to try this in it. I I promise you this is a lot of fun. Take care, guys. I'll see you next time
 Rebecca Humphreys, Handmade Watercolour Maker