Transcripts
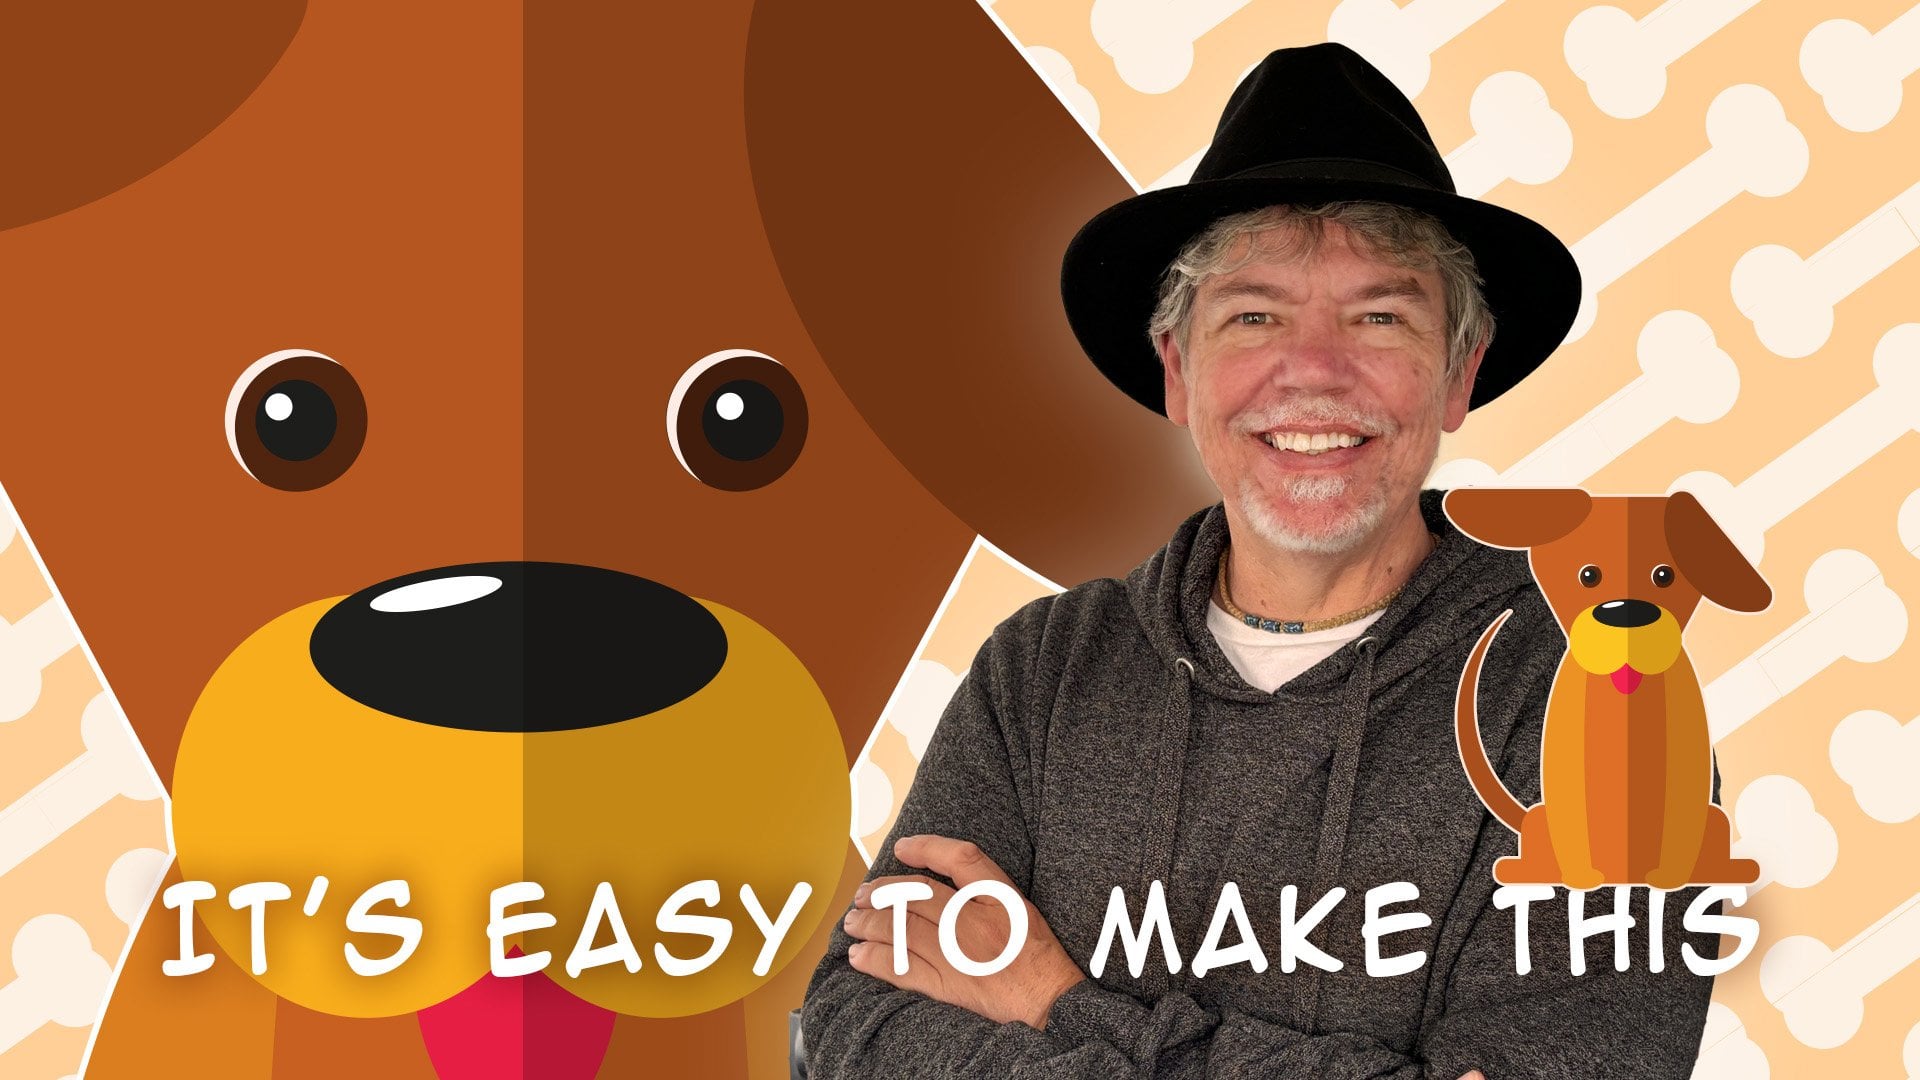
1. Intro to this Quick & Easy Vector Logos Course: Do you ever get asked to create logos by friends or
family or a business? Maybe you need to create
a logo for yourself. Hi. My name's Tim Wilson, and I want to show
you how easy it is to create amazing looking logos, very, very simply in
Illustrator on the iPad. Now, we're going to be
using basic shapes. The monkey, for example, is
just a whole lot of circles. And we're going to be doing
some interesting text, and we're going to be sampling
colors from photographs, as well. Let's get going.
2. Make a New Document and Create the Monkey Hair with 3 Circles: Let's start off creating
a new document. And with this document, I'm going to make it portrait mode. So I'm going to start off
with my screen option. I'm going to go into my
1920 by 1080 pixels, but I'm going to then
go across here and just flick over to
portrait orientation. So it's 1080 wide by 1920 high. Now, these sort of
things are ideal for anything like Pinterest, where you've got that long
thin look that you're after. I'm going to click
on Create File after checking that I'm in RGB mode over there because I'm doing something
for screen this time. So I'm going to draw
two little animals. I'm going to do a monkey and a giraffe and then have
some text on there. The text is going
to say the fun shop or the fun experience, whatever you want
to put in yours. But I'm going to start off
by doing the monkey shape, and I'm using mostly squares
and circles for this. Certainly with the monkey,
it'll be mostly circles. Let's start off with an ellipse, and I'm going to draw in my
elliptical shape over there. I'm holding down once
again the center option. In there. And I can always draw these bigger and
then scale them down. It's not a problem. And what I'd like to do
is just have a bit of color in here so I can see
what it is that I'm doing. We can change those colors later if you don't like
what you see there. So I've got this shape here, and that's going to
be the monkey's head. Now, I also then want to kind of cut out where the face will be. I'm going to have two
versions of this. I'm going to make
a copy of this. Let's try that again
with the correct tool, make a duplicate copy, and duplicate that
again over there. So what I'm looking at here
is Gs to be able to use these two shapes to cut out
from that shape in there. Now, I'd better have a
fourth shape as well, because I'll need another
one for the background. But I'm going to select
those three items. And then what I'm going
to do is to go along here to the usual space, and I'm going to use the
cutting out the front. So minus the front object, and convert to path. And that's going to kind
of be the monkey's fur. So I've got this over here, that'll be the monkey face,
and that'll be the fur. And I'm doing the fur in blue. So let's just move that across. Now, it's in the wrong place. So if I click on this
little icon here, this allows me to just move
it above the other shape. Let's take that shape, drop it down onto there. You see they will snap into the right position very quickly. So have a bit of a go, get
the face and the fur done, and then we'll come in,
we'll put in some ears.
3. Create the Ears, Eyes & Mouth with Circles: Let's do the ears.
They're really easy. I'm going to take the
elliptical shape, draw one ear, once again, holding down the center to get a
perfect circle in there. And I'm going to give
it some color as well. So let's just pick up the
same blue that I had. And I'm going to
make a copy of that, and the copy I'm
going to scale down. So once again holding
down a little button, and I will then use the same color that I had
there orange for the moment. We'll sort out all
our colors later on. So let me pop that in the right position.
There's my first ear. I'm going to group it and
then duplicate the group. I've got a second ear there, my first one will
go on that side and the second one,
which I'm going to flip. Let's go across here to the align options
and flip it around. It's going to go on the
other side in there. Once again, we're
not worrying too much about being that
accurate in here. I'm going to take
these two shapes, which I will group together. And I'm going to go up
to my layers panel, and I'm going to drag that group above the other two groups, so the head coming
is in the front. We can select all of those
and get rid of the stroke. So we're just left with
the monkey itself. Now, we need some eyes
in there as well, and that's going to
be really simple because that's just
going to be circles. So a little circle over
there. I'll make mine. Well, I'll use black, I think, duplicate that, and then take the duplicate
and pop it in there. Let's have another
duplicate in there. We need some sort of nose area here and then a mouth
and a little nose. So I'm going to do something similar to what
we've done before. Take the same shape, maybe darken down the
color a little bit, and I'm going to draw in an
ellipse to go in that area. That will go in there, but I do want a little
mouth at the bottom. I think what I'll do
for the mouth is I'll actually use the shape
to make the mouth. I'm going to just
copy that shape. Let's just put the original back where it's going to
go somewhere down there. And you see it's not quite
in the right position, needs a bit of lining up, but we're going for a
more free hand look. Let's take this,
make a copy of that, pull the copy up
just a little bit, and I can select them
both and then go across to my combined
shapes option, and I will then
minus the front from the back and convert
to path down there. There's the mouth.
Let's make that red. So it's obvious what we've got. Now, of course, with this, I could just scale it
down a little bit, so we just have a
little slither, and let's take that and then move it into the right position. And finally, we just need
a little circular nose. So that's just going to
be a little nose so. I'll make that a dark
brown or black as well. Let's go with black for that. As I said, we'll change all
of these colors later on. Now, the top of the
head looks a bit bare, so I want to have
two tufts of hair. But before I get to that, if you'd like to do some ears and eyes and nose and mouth, and then we'll do a bit of
tuft for the top of the head.
4. Create the Hair by Subtracting One Circle from the Other: The top of the head or the tuft of the
head will be really straightforward because I just need a few shapes,
a few circles. Honestly, I'm going
to take one of these circles over here. It's grouped at the moment. But if I just ungroup
it temporarily, so I'll just ungroup that, I can then take
this little shape. Let's make a copy of that
first, make a copy of it, and take the copy over there, select both of those,
and regroup them again. So this will be for
my tuft of hair. Let's make it a bit bigger. I think so we'll have a
slightly bigger tuft. I'm going to copy it there. I will change the color of the copy so that you can
see what I'm going for. So over here, what I'd like to do is to have some
sort of little tuft, little round bit like that. I don't want to
look too horn like. You might have to experiment with the size and
say, well, actually, if we go with something
maybe a little bit smaller, and then maybe this could
be a little bit smaller, as well, and then I can
move that one up but there, just experiment and
see what you get. I'm going to select
those two and cut the front from the back. So the usual going over here
to the right hand side, and we're going to minus the front object,
and convert to path. I want a second one of those, so I'll make a copy of
that. Pull that down. And this is going to be the
tuft of hair over here. We'll select both of those
together. Same again. We're going to now
make these into one, so combine all and divide, sorry, combine all and
then convert to path. And I do want to get rid
of this bottom section. Fastest way to do
that would be to take another shape and just put that other shape
on top of this one. So it doesn't have to be exact. We're just getting
rid of that shape in there in case it
overlaps onto his eyes. And then same again, we'll go in and we'll
cut one from the other. So we'll just say, minus the
front shape from the back, convert to path,
and this can then go on the top of his head
as a little tuft of hair. If you wish, you can then still select that one and this one, although don't forget you've grouped it with the
other shape as well. You might have to ungroup
it and you could then make that into one
shape if you want it.
5. Make the Giraffe's Head: I'm going to take the monkey and just scale it right down. So once again onto
my center touch and scale it down and just move it out of the
way for a bit. But I'm also going
to go to my layers, and in the layers, I'm going to lock that layer down
so I can't touch it. I'm going to make a
new layer over here. So this is my monkey layer. And if you wish, you can just double click and give it a name. Likewise, with the new layer, this is going to be my giraffe. So I'll just call
that ja for speed. And I'm going to go
onto my giraffe layer. Now I've locked that
layer, so I can't put the wrong things onto
that layer by mistake. The giraffe, once again, very, very simple shapes. I'm going to start
off with an ellipse, and let's just start with
a very vivid yellow. For now, actually, let's go with a slightly
darker yellow. You won't be able
to see it properly. And click and drag, get a perfect circle
up over there. So I'm going to do
two of these circles, so one over there,
and one over here. And then I want to join
those two circles up with a line or a
little rectangle. Now, we could do this by going up to the rectangle,
making a rectangle, then trying to angle it around correctly to get into
the same direction. Sometimes, though, it's just easier to work at
a different plane. For example, here, if
this was down here where it was lined up
perfectly on there, that way, when I drew in
my rectangular shape, I can just put the
rectangle shape in alike. So I know it's perfectly
lined up with those, and I'm going to
select those and then make them into one
shape. One more thing. Before I do that, I want
another copy of this shape, so let's have another copy. We'll just leave
that over there. We're going to make
the mouth with that. But I'll select those, go once again up to my
combined shaped options, and I'm going to combine
all of those into one shape and convert to path. So now I can just angle it
around for the giraffe's head. This is going to be the
mouth. So what I want to do here is to make another copy of that. So I've
got two of them. I'll just change the
color of the front one. You don't have to,
but I just want you to do it so you can
see where I'm going. And I just want to create
this little crescent shape. We'll select both of those,
and I'm going to copy sorry, I'm going to crop
one from the other. So as always, up to
combined shapes, and we'll just say minus
front, convert to path. Just move that into the right
position, angle it around, and there's the simple
little graphical mouth shape in there. I'm going
to select them both. You see, I'm not
going for accuracy by any stretch of
the imagination. I think we'll just
go back in here and combine them all
into one shape like so. So there's our basic
giraffe shape, and the next stage
will put in some horns and some ears and some eyes
and nose, whatever you want. But for now, if
you'd like to get to that stage and then come back and we'll
do the other details.
6. Use Simple Shapes to Make the Ears & Horns: So back onto this, we'll
zoom in a bit to that. And I think I'd like to
actually angle it around a little bit more,
something like so. So some horns out here
and then some ears. The ears will do pretty much the same way
that we did those, but keeping them even more
simple, so just some circles. So let's do that very quickly. So we'll have an ear over here. And we'll make a copy
of that one another ear on that side. And then the horns, we'll
get them coming up. So once again, let's
go in here and just do a horn shape so that'll be
a little elliptical shape, like so, and a line
down from that. I did say this stuff was going to be really simple, this one. Select both of those, and I can either group them together or I'm going to go in and unite them together
into one shape, so combine all convert to path. I want two of those there, so we're going to
have one there, and we're going to have
another one which will angle around. Over there. Right. It's looking more
like an alien, actually. But, hey, when we've
got the neck in, it'll look like a giraffe. So same as always go in here and just combine the whole
lot of them. Combine all. Convert to path. The eyes and nose really
simple once again. But do have a bit
of a go with those. Then we'll come back, do
the eyes nose and the neck.
7. Use the Pen & Pencil to Make the Neck: Let's make some eyes and noses. So I'm simply going to use spheres over to the sphere,
and we have a little I. Over here, I'm going to
just fill the eye with black and we can get rid of the stroke from that as well if
we don't need it. We need two of them, obviously, so I'm going to make
a duplicate copy, let's zoom in and put those in the right
position over there. Now, while we've zoomed
in, like this, sorry, I've made that one a little
bit too big for some reason, I'm going to have to
make a copy again, so we'll duplicate that
one and move the duplicate over and we can angle them
around as well if we need. While we've zoomed right in, you can see we've got
some corners over here. If you wish, what you can do is you can select
those corners using that direct selection
tool and just grab the little circle and pull it out to round them off a bit. Same over here, I can
just select these, grab that, and just round
that off if you need. I'll do this one just a
little bit. Over there. It depends on your design
and how you want to work. So I've got some really
wacky looking eyes here. I think I might need
to rotate that one a little bit around
a bit better. And then in here, I
want the nostrils, and I'm going to do
the same thing again. But this time, I'm just
going to have a stroke, no fill, and I'll make the
stroke a little bit thicker. And let's just scale that down, get into the right size. So we'll have one
that's going to go. Now, this is where
you can get into trouble if you're trying to select something by
dragging it by the line. So I like to deselect it and then click and drag
it straight away. So there's the first nostril. Make a copy of
that, deselect it, grab it, and move the copy. Into the right
position over there. If you need to arrange
them a little bit better, just move them around to how
you feel they should be. No, right or wrong
here. These are just animal symbols that
we're creating. Now, when it comes to the neck, the neck is going to
go down over here. You could do it
with a rectangle, but it's going to be so much simpler if I just
use the pen tool. So I'm going to go and
get the pen tool over here and really
quickly just go click, click, click and click. Like so. Fill that with a
color. So let's change that to yellow fill, and I'm going to then get
rid of the stroke as well. So over to the stroke and
choose none for my stroke. Of course, we can
then still select those two shapes once you've
got into the right position, of course, and go into your combined shape options and just unite them
together as one shape. So I'll just say combine
all and convert to path. Now, of course, it's gone
in front of the eyes, so we can click on
this little icon here and just move it back
behind the eyes as well. Now, of course, this is a girafe so we need some spots on
the giraffe, as well. And I'm going to do
that using the pencil. So with the pencil tool, I will just draw
in a little shape, like so, and let's have
another one over here. Oh, that's a really weird shape. Let's do one bit
smoother. Like that. Maybe another shape
that kind of comes in there so that you can see
what I'm actually drawing, I will change the color of
those to something different. Make sure I'm clicking
on the right one. Let's have a look at
what's going on here because this is something
that can happen sometimes. You can see I've
actually gone into the group with those shapes
and group them together. Without realizing it, I've been known to
hit the group option. So I'll just ungroup them
all, and then once again, I can then click on
those shapes and just adjust the color to
something different. Now, these shapes
need to be straight, well, lined up with the neck. So I'm going to
select those shapes. And I've made sure, by the way, that I haven't
selected the eyes and the nose or the nostrils. And I'm going to go in over here to the our usual option,
the combined shapes. I'm going to say divide all and then I'm going to ungroup. And what this will have
done is it will have cut those out so I can then
delete these bits, which are the extras over
there really quickly. Like so. Right, so we've got two animals. We need to sort out some
color soon as well. This is obviously a children's graphic that we're creating, but we still need a decent
color scheme for that.
8. Sample Colors from a Photograph: Now, you might think
you've got the wrong video here because all of a sudden
we've jumped into the web. So I've gone to a
website called Unsplash. This is royalty free Images, and I've done a search
for toys because I want to use colors
from the toys. And down here, I've
just scrolled down until I found something that
I like the color scheme of, and they've got some
really nice colors in this particular image. You can pick any image
you like for the colors. But I'm going to download that. So let's go choose
this over here, and it asks me if I've got an
account, no, I don't have. So let's just try that again
with a click on the picture. There we go, you don't
have to have an account, and in here, I'll just
choose to download it. Now, I honestly only need
the very small file size. So I'll go with medium
in here because all I'm going to do is
use those colors and sample those colors. Let's download that, and you can see it sort of says
give thanks to that person. So I'm saying thank you to Max. And then I can go back to Illustrator and I'm going
to bring in those colors. So I'm going to go to my place. I'm going to go and find that
file in there, I've placed, which should actually appear in my Downloads folder there. And in here, I've got that picture somewhere.
There it is. And that brings it in.
It's pretty large, but I can just scale it down because all I'm interested in is sampling these
colors in here. So find yourself an
interesting picture, and then we'll
sample some colors. Now that I've got
my picture here, I could go along over to my panel and use the
ittle sample tool, and I can move that across and sample the exact
colors that I want. You can see, especially
as it's so small, I'm having difficulty picking up the right color that I'd like. So another way that we
can actually do this is to actually vectorize
the picture first. So on the photograph, let's just get rid
of that color panel. If you have a look at the
bottom, with a photograph, you've got this
little icon here, which is a vectorizing icon. And when you click on that, what it will do is
it will convert those pixels into vectors. Now, this is a great
way of tracing, if you like, it could
be called a trace item. And you can see now it's got some options in my
properties panel here. So I could go into
these options, and I can change the number of colors in that vector shape. Now, I'm going to take
down the number of colors. I just wanted to look at
about 20 of those colors. I don't want to be too limited, but 20 will give
me a nice option. And if I zoom in, you'll see how it's all flat vector
colors. In there. If you don't like the colors, just increase the numbers in there until you find
the ones that you want. So it's just great we're
very quickly getting flat color from an
image. There we go. I think I like those
colors in there, and now my life will be so
much easier if I go and sample those colors because I could
just move it onto there and that's a flat color
that I'm sampling from, I can then save that color. Once again, I'm going
to do the same thing, and I'll just work
my way through all of these colors in here, sampling the different
colors that I like. I want to get a few
colors going in here. Now, remember, I locked down the monkey because it was
in a different layer, so I might have to just
unlock the monkey, and then I can go and sample
or change my colors in here. So when it comes to
the color scheme, I'm going to be probably using similar blues and
pinks in there. Don't forget with these things, very often you'll find you'll have grouped items together. You might need to either
double click them or go into the group over here where you can select pieces individually. So I'm just going to do
a few of these in here, so I'm going to
go with that sort of greeny color for the monkey. And once again, I will go
through the ears in there, just selecting the areas
that I want to do. And we'll make it
that color there. Same with the top
and then finally into the face, as well, the face is going to be I'll do it as a pinky color in there. Anyway, I'll finish
up those colors. I won't get you to watch
the whole process. And then once again, the
same thing on your giraffe. Find a color for the giraffe, and I've decided to use the sort of orange
color that I've got there and then some
different colors for the spots on the giraffe. That way, we'll have
used the colors from that interesting
looking photograph. Try it out, get your
colors going there.
9. Create Outlined Text & Edit the Shape: I've created three little
bits of text over here, the fun and Shop. They're all just
standalone bits of type. And I found a very
bold typeface that I like to use for that because this is
obviously all about fun. What I'm going to do is
just put these together. I think I'm going to
have the fun fits really nicely just on top
of the word shop in there, and then I can take there,
which is not very important. I'm going to rotate it around. I'm holding my finger
on the touch control so it rotates in 45 degree
emblem increments. I'm just going to pop
that. I think over there, maybe we can make this just a
little bit bigger. As well. Maybe that a bit smaller. You can try this out on your own ones and
see what you can do. So I think I'm happy with
that just about there. Just get this word fun, sort it out a bit, maybe a
fraction bigger than that. So that's going to be my text. Let's select all of those, and I'm going to scale it up
to go to the edge in there. Now, the next thing that
I'd like to do is I'd like to change some of the type
in here because this P, I'd like the P to
be a lot longer because I'm going to have the
giraffe coming out the top. I want to balance that
with a longer P in here, once again, adding to the fun. I'm going to go and find
my crate outlines option. Now you can see at
the moment it's come up and it doesn't show any crate outline or
crate options in there. But it's because I'm in the wrong area and I need
to do it in the type. You probably knew that already. I'll go to outline
text in there. It's now outlined, and I can then use this little tool here, the direct selection tool
to select those two points, and I can move them
down, like so. Once again, I'll just hold my shift key so I can move them absolutely straight
down. I do apologize. Sometimes I call that the shift
key because it works like the shift key in
Illustrator on the desktop. Right, so have a bit of a go, get some text in there. And while you do that, I'm going to color up my
text into different shapes. If you have a cost done
as I've done with the P, outlined it or create outlines, you can still go in and you can just double click and
select the letters individually and then color
them up as you need, as well. As you can see,
I've got a bit of fun going on in my colors here, and I'm just going
to take these two, and I'm going to
move them around. You can see they are
grouped together. So the giraffe needs
to be flipped around. The monkey probably needs
to be done, as well. So let's select them both. We'll go over here to the
alignment tool and flip them, and then I can move them
into the right position. Try that again and we'll
move just the monkey by itself and the giraffe as well, and I'll just
increase the size of the giraffe a little
bit in there. We'll move the monkey out and maybe scale that down
just a little bit, and of course, it needs to go on top of the giraffe as well. I'm going to have to go to
my layers and then just move the entire monkey layer up above the giraffe
layer in there. I think that's pretty much done. You can just keep fiddling
with this as much as you like. Try color variations as
well while you're doing it. But we'll stop right over there.
10. Well Done - and Project Info: Congratulations. You've reached
the end of this course. I'm sure your logo
is looking amazing. For the project, what I'd
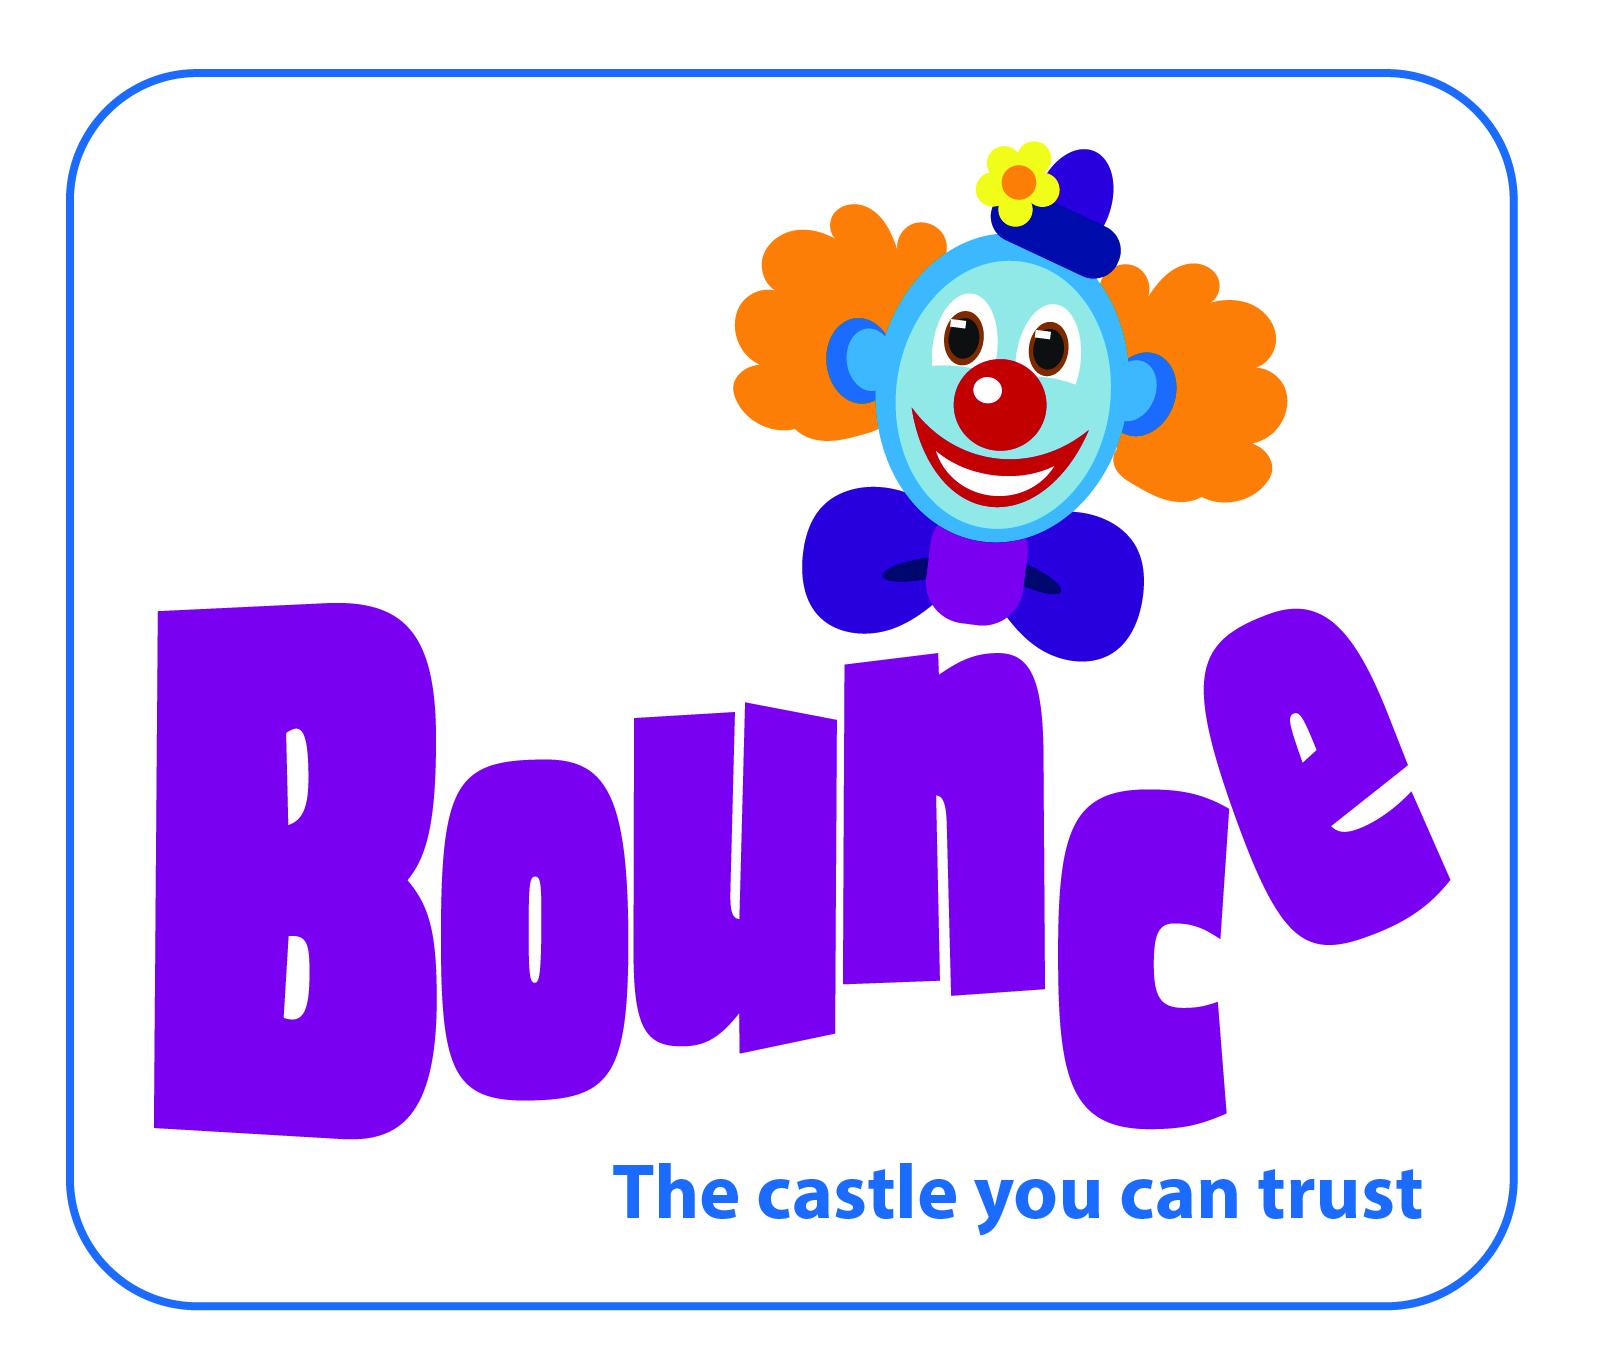
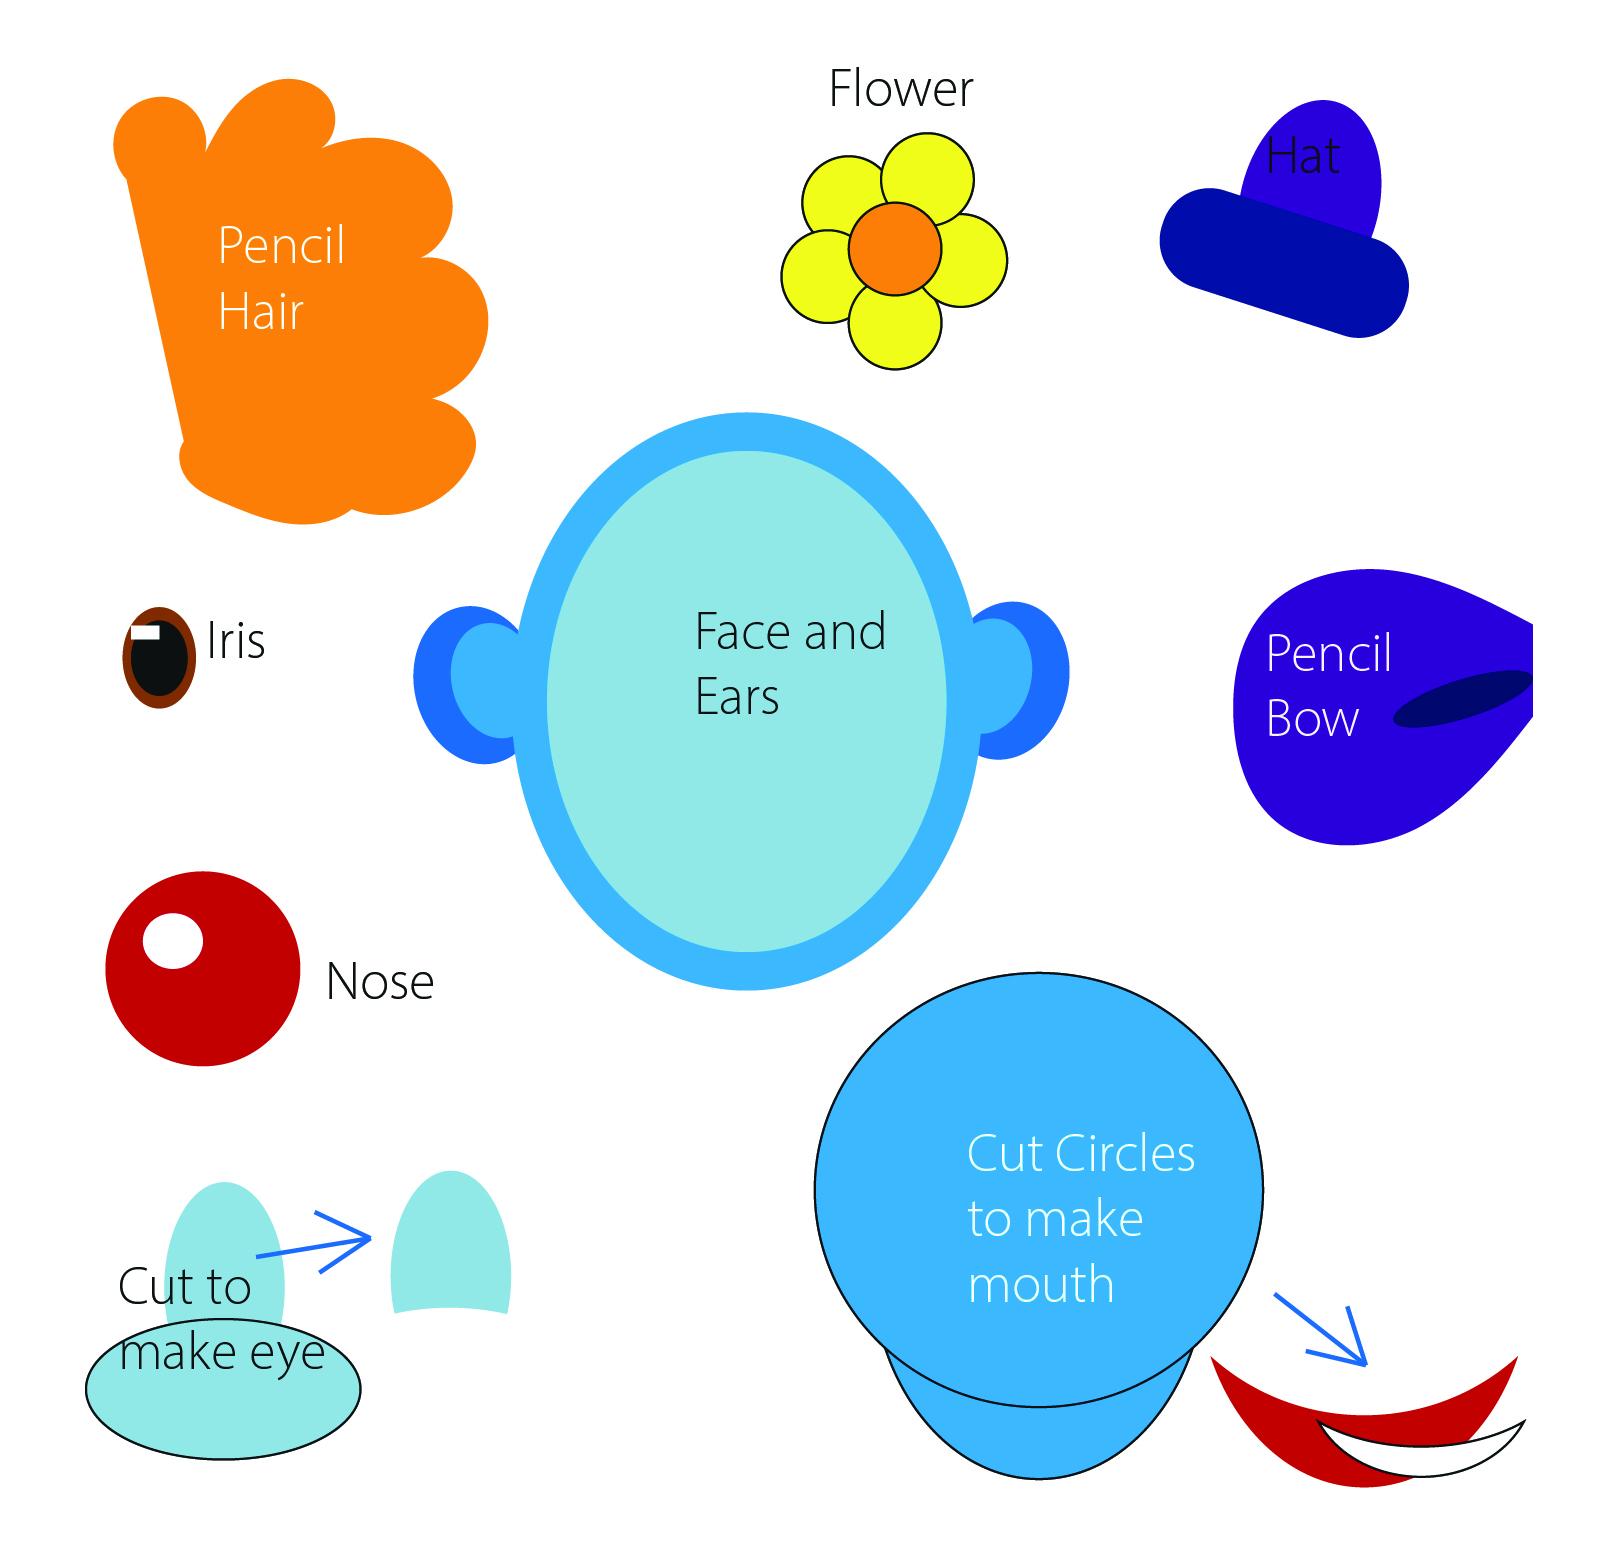
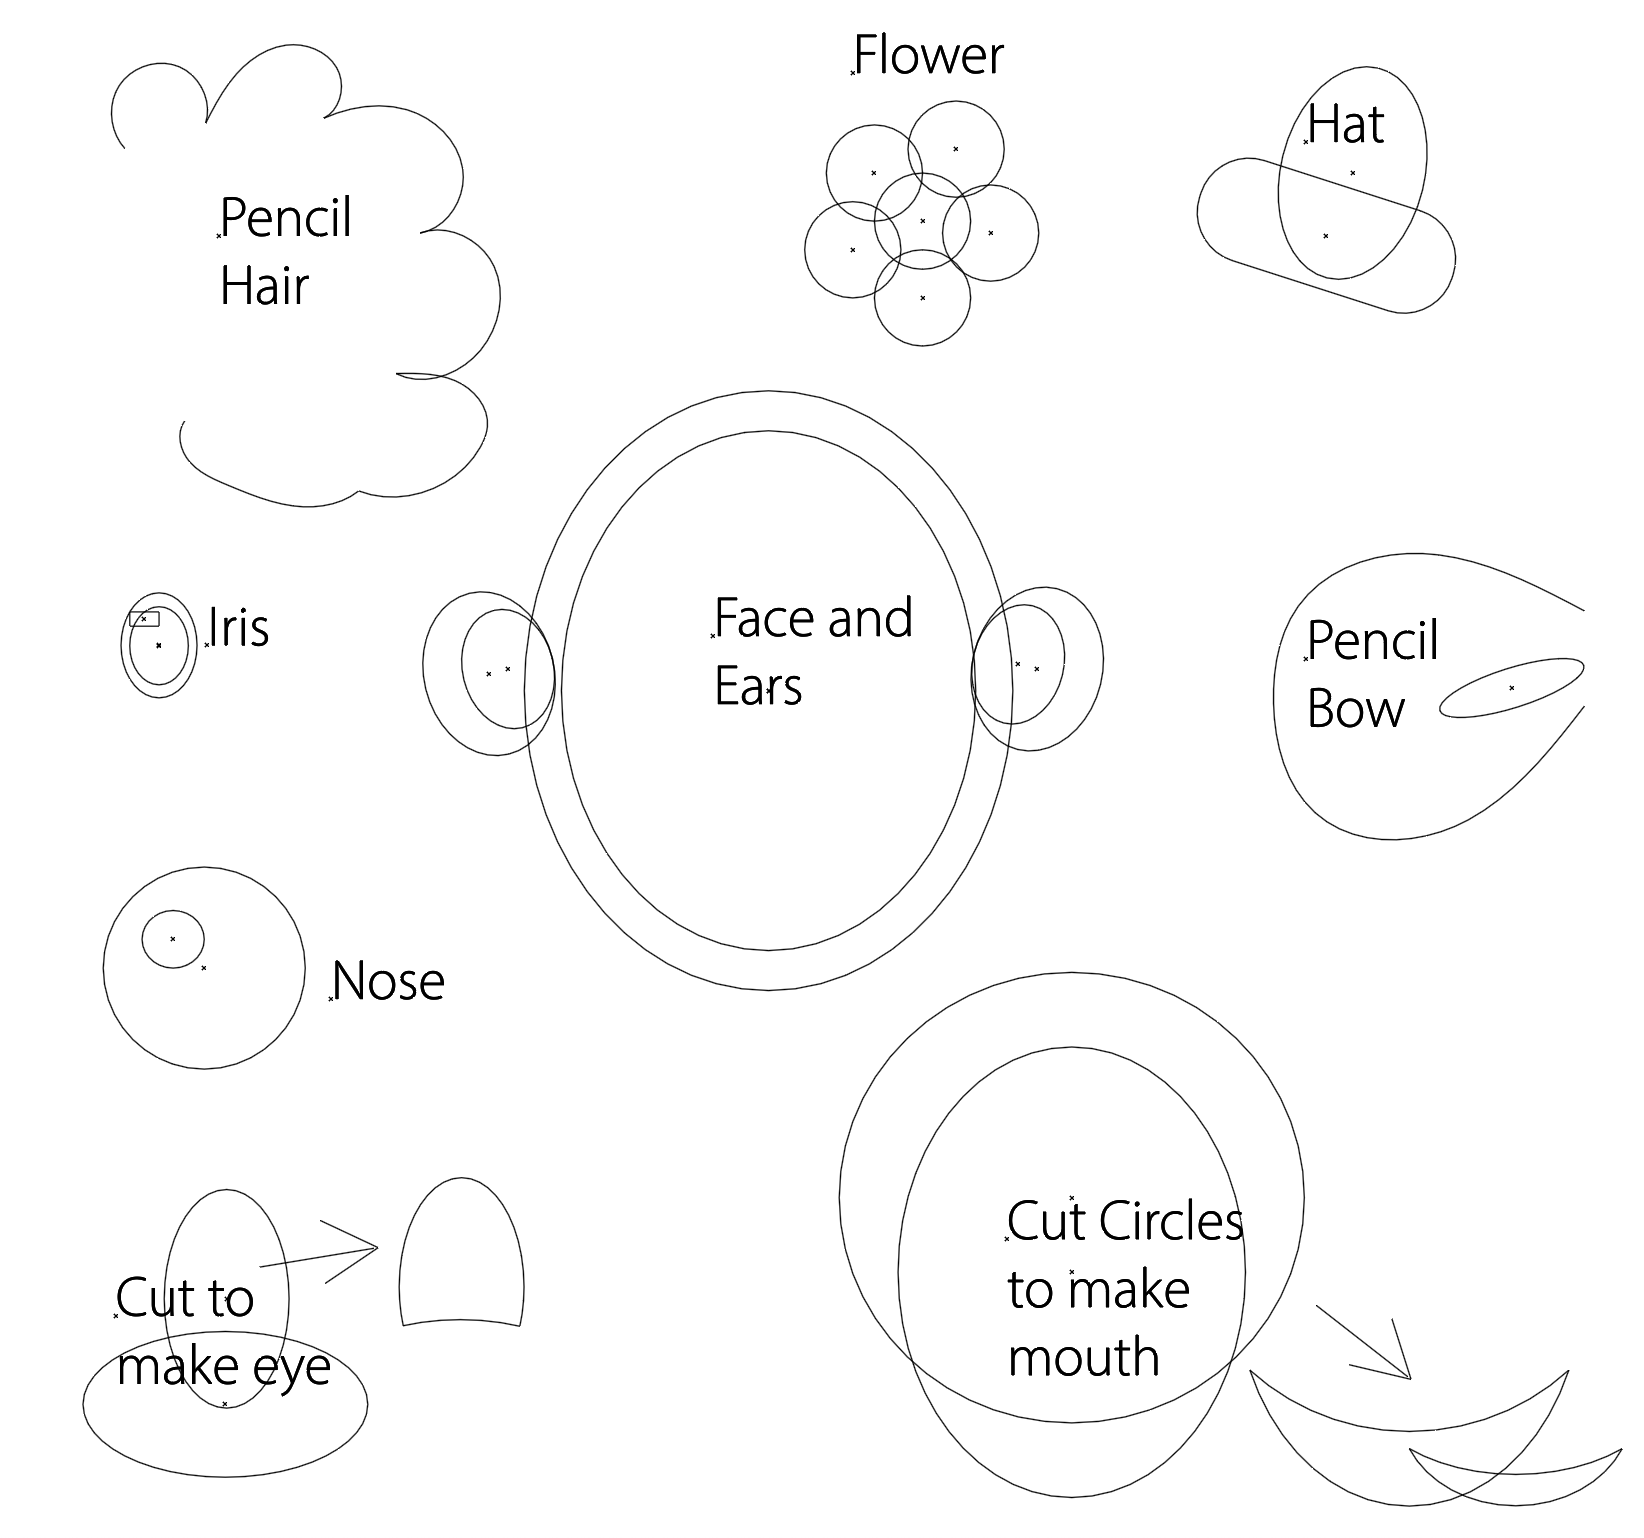
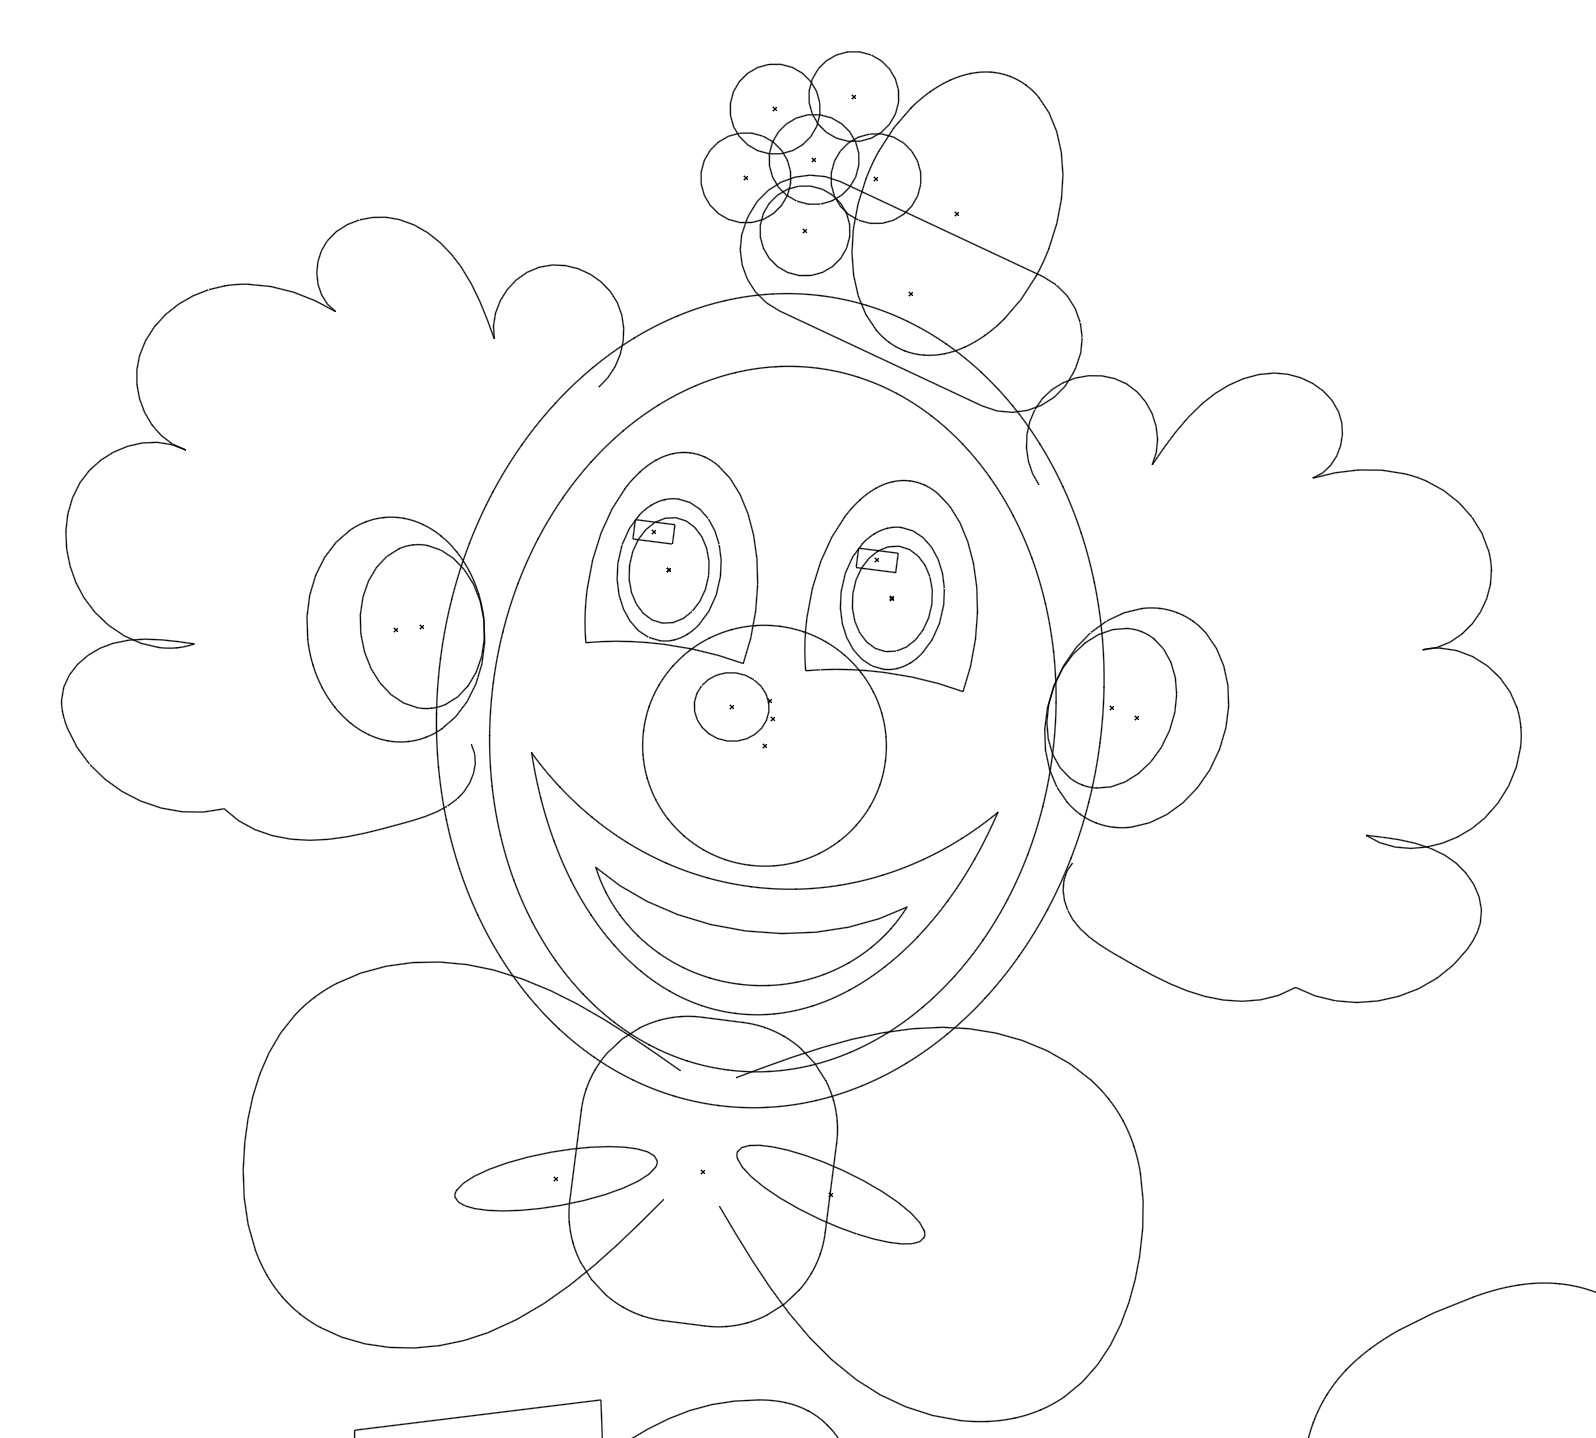
like you to do is I'd like you to create a logo
for a bouncy castle, and I've provided the
files that I've done. You can do something
very similar. Now, as you can see, we've got the various
parts of the clown, and I've actually done a little screenshot to show
you how I've created it. Some of them are just circles. Some of them I've used a pencil, and I've also used a lot of just cutting one
shape from another, for example, the eyes. Once you've done that, have
a bit of a go with the text. And for the text, take
your standard text, outline it, and
then you can start to move the individual
letters around. And don't forget to post it. I love seeing what you've done, so share it with me. Please don't forget
to leave us a review. It really helps us to create
more content for you. Remember to have a look
at our other courses. If you go down to the
bottom, you'll see my name. It's Tim Wilson,
and you can go to my profile and see all
the courses listed there. Or you can just search for
Tim Wilson in the search bar. You'll find we do all sorts of Adobe and affinity courses, as well as a Canva course. There's beginner,
intermediate and advanced Illustrator
on the iPad. I've also got SAM
for the desktop. And finally, don't
forget to follow us. That way, you'll be
the first to hear about the new courses
that we create. I'll see you in the next one.
 Tim Wilson, Adobe Certified Instructor and Expert