Transcripts
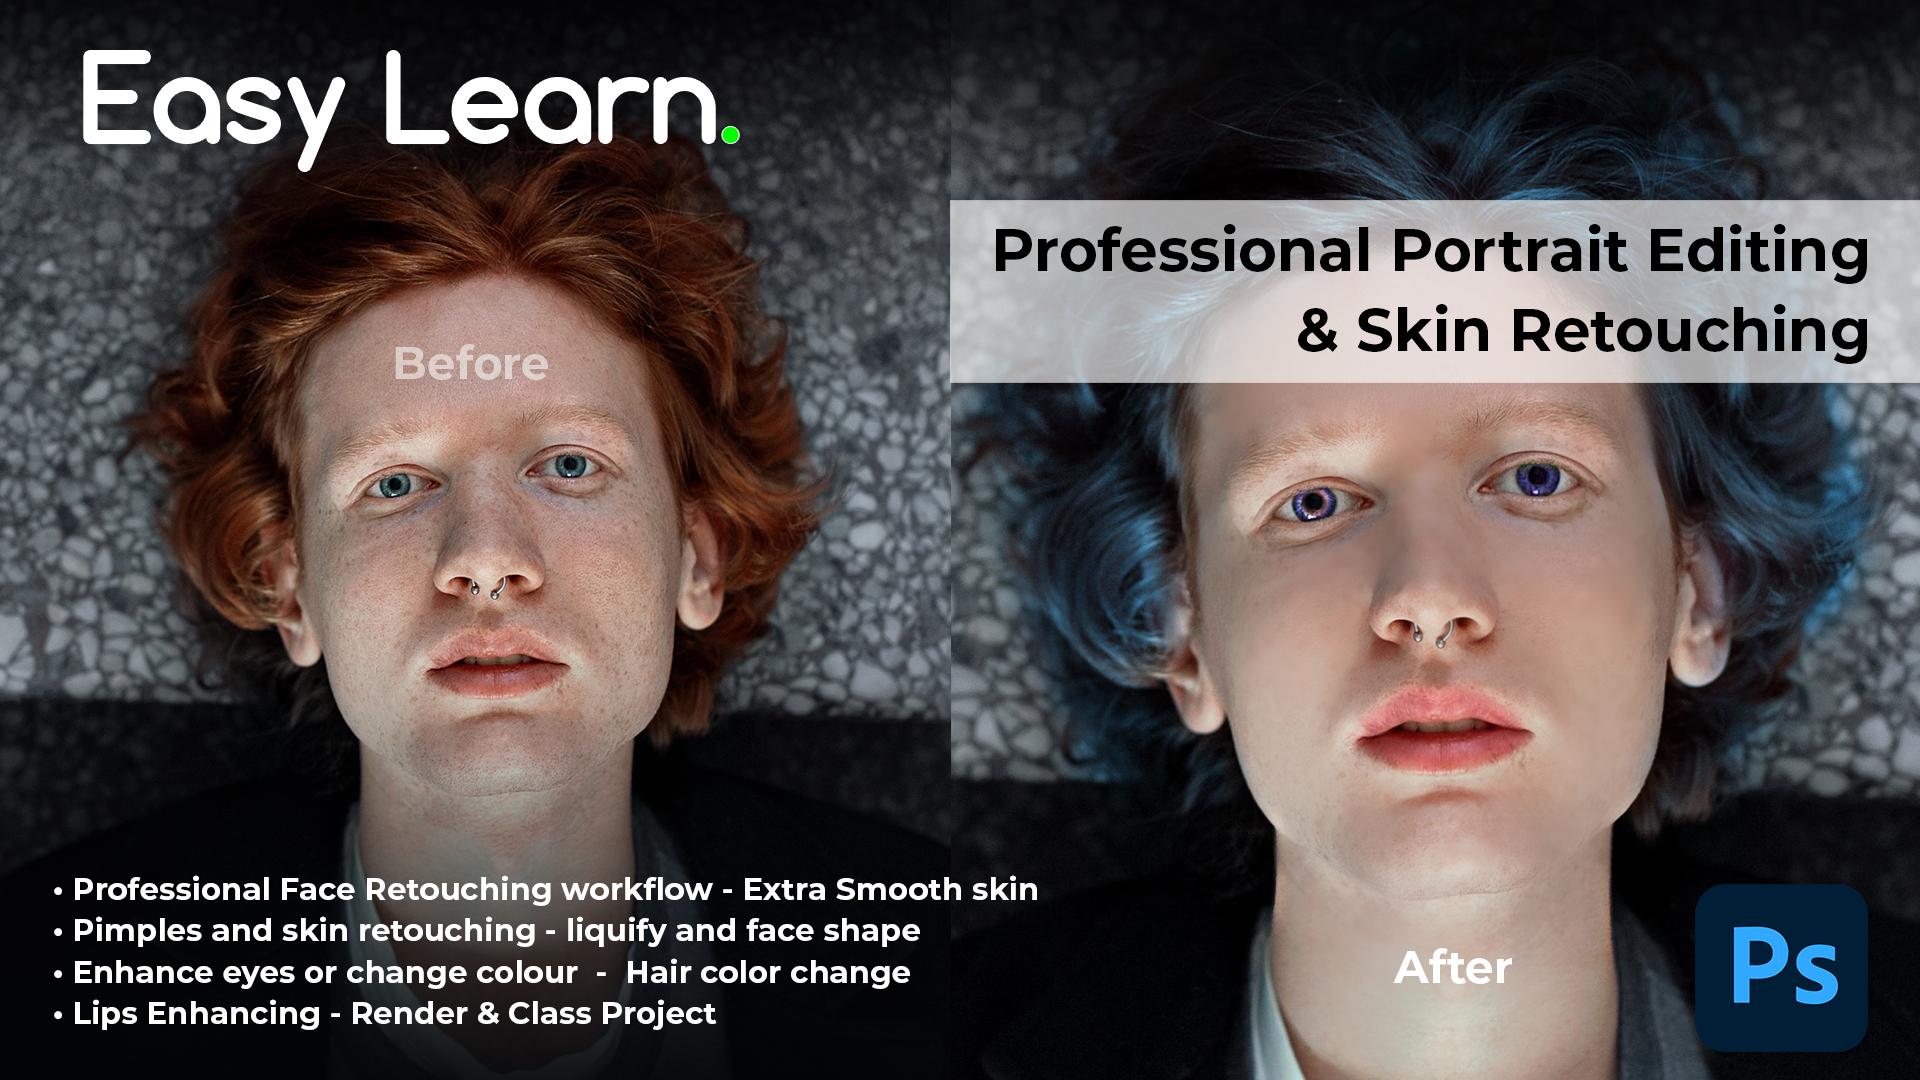
1. Intro retouching 1: Hello everyone. My
name is I'm a I'm a digital artist and director working from
past seven years. I've been very
lucky to work with major brands including
United Nations. They are not dedicated me, Pepsi got rid of Canada
algorithm itself. This class I will teach
you basic techniques and processes for
professional fees, retouching and portrait editing. The class is divided
in full force. And in this class you will teach some basic techniques and procedural
professional fees that you're touching and
portrait editing. It's used in different projects
and streamline workflow of editing quarters for fashion granted and
commercial use. You're going to
learn fear through teaching advanced
imaging techniques, advanced section to speed up your workflow faith
through teaching. Professional workflow,
extra smooth skin retouching of being
present, skin liquefying, changing the phase shift and, and things are already
changing the color of eyes, enhancing the lips scholar. In the end, we will go through the rendering and class
projects solar start the class.
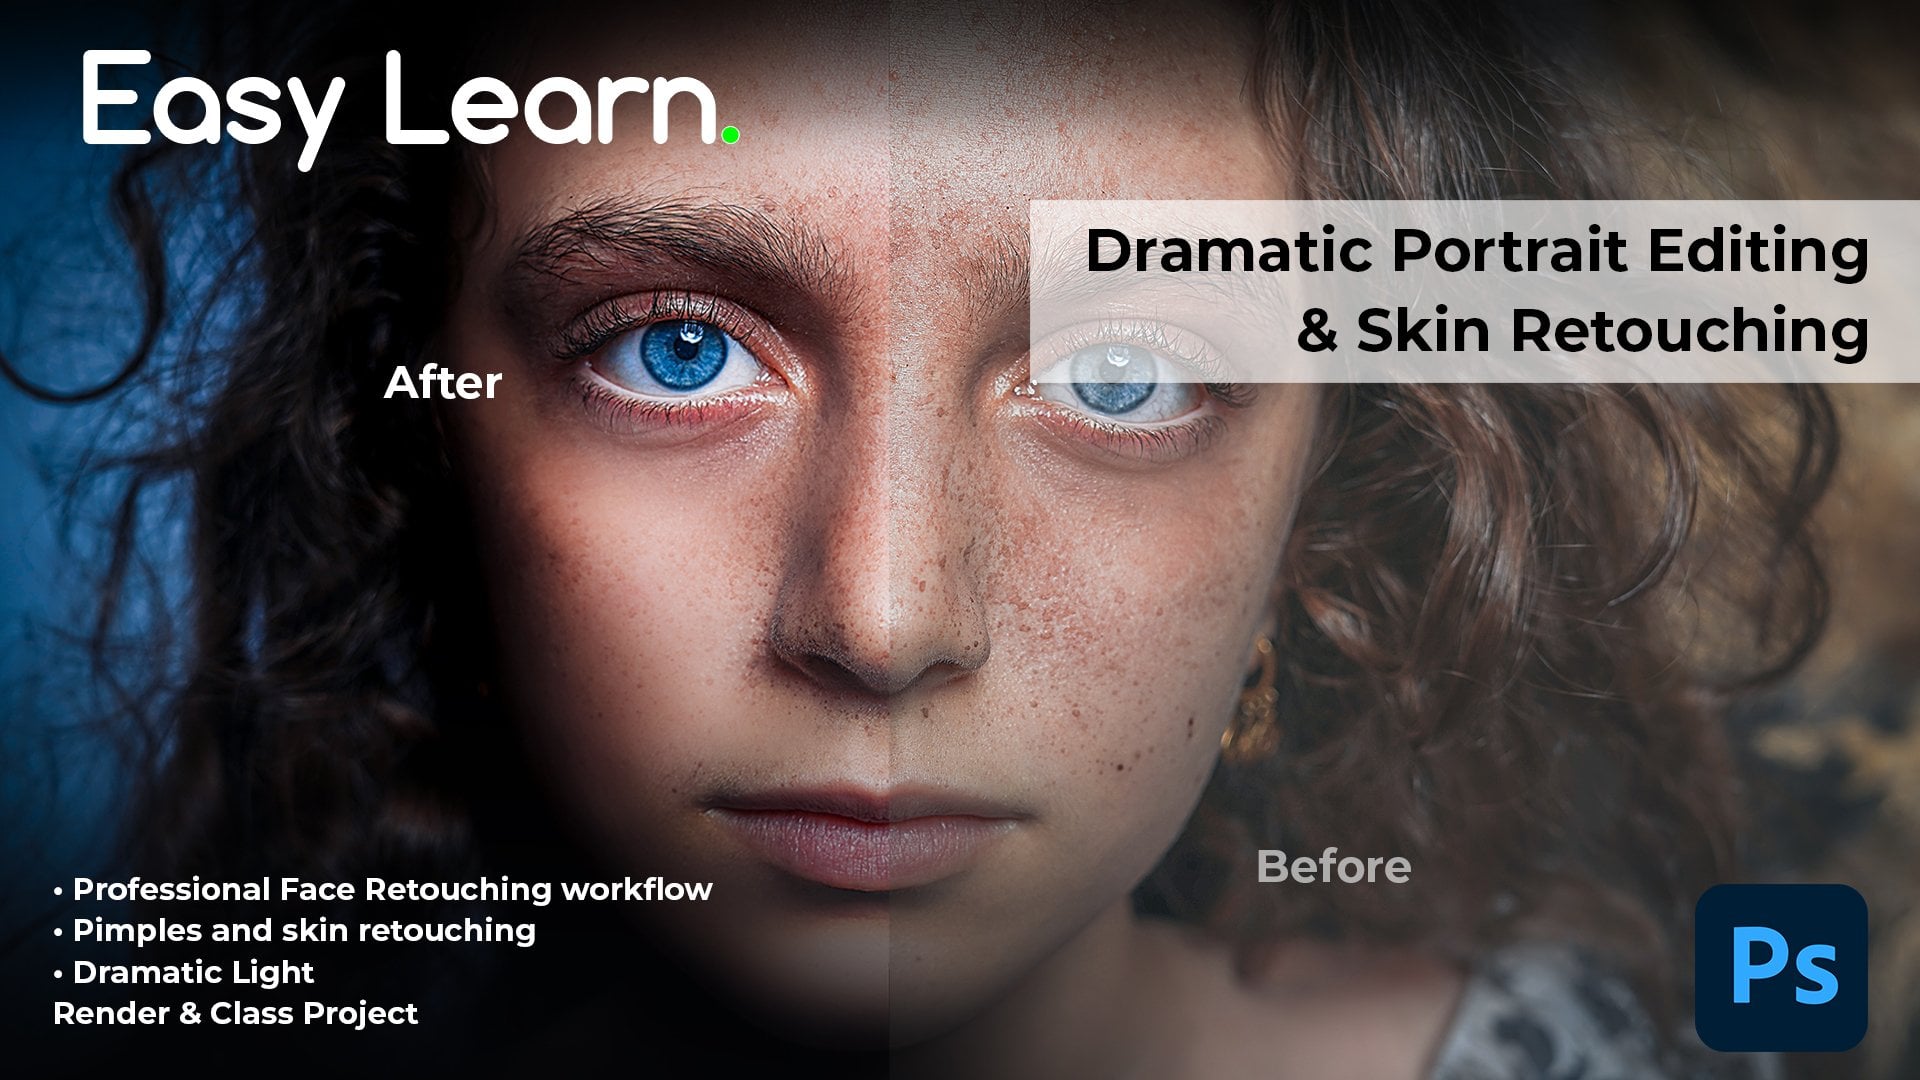
2. Detail Mainting Retouching technique: So here I have opened our example picture
of a quarter of a boy and we will try to retouch it your skin very
professional way. And we will follow the workflow. First of all, we need
to duplicate the layer. It will select the layer
and we will duplicate it. After that, we will go to the
Filter and go to the blur, and we will select Surface Blur. Then we will select the radius according to our,
our requirements. We can select it around 16 and we can select the
threshold around 30. So it will, it will not too
much detail of the picture. And after that we
will select, Okay, and then we will duplicate
the layer diagram earlier. We will duplicate
the layer we treated with the surface blur filter. Rule. Duplicate it and then
we will go to the Filter again and we will
select the other, and we will select the
boss, the high-pass, we will select the
shadow radius according to our requirement, 10%. So we will be Peeps
the detailing save. Ten is perfect. We
can change the radius off offset according to how much detail we
want in our picture. I think Jen is perfect, so we'll select the ten
and then we will change the layer opacity from
normal to linear light. Then we will select it 70%. And then we will
select both layers. We will group it and we
will select the Layer, Layer Mask and hide it all. Here. It created our group
part of the face retouching. And then we will
select the brush tool and select the soft round brush. And we will start selecting
the area we want to detach. Just zooming the
fixture and slightly start retouching the
area we want to return. To smooth it. We can change the opacity
and we can change the flow of our brush. So it can control, it can, it will give you the
control of brush tool. If your face into teaching
very professional, like mostly keep my
floor to the 60. Give me a decent look and feel. We will select it and we will start tracing out our details. This is a very
professional way to keep our feces retouched and keep the details of
the pictures alive. Stick your climb. It will take little time
and start focusing on the areas that you
want to detach and then keep the
opacity around 73%. It can give you a
realistic field. This is the first
part where we teach our portrait in a decent,
professional way. The details of the picture, the beauty of the
face is the same, but enhance your beauty. This is the before
and this is after. So we almost retouched a
decent amount of picture.
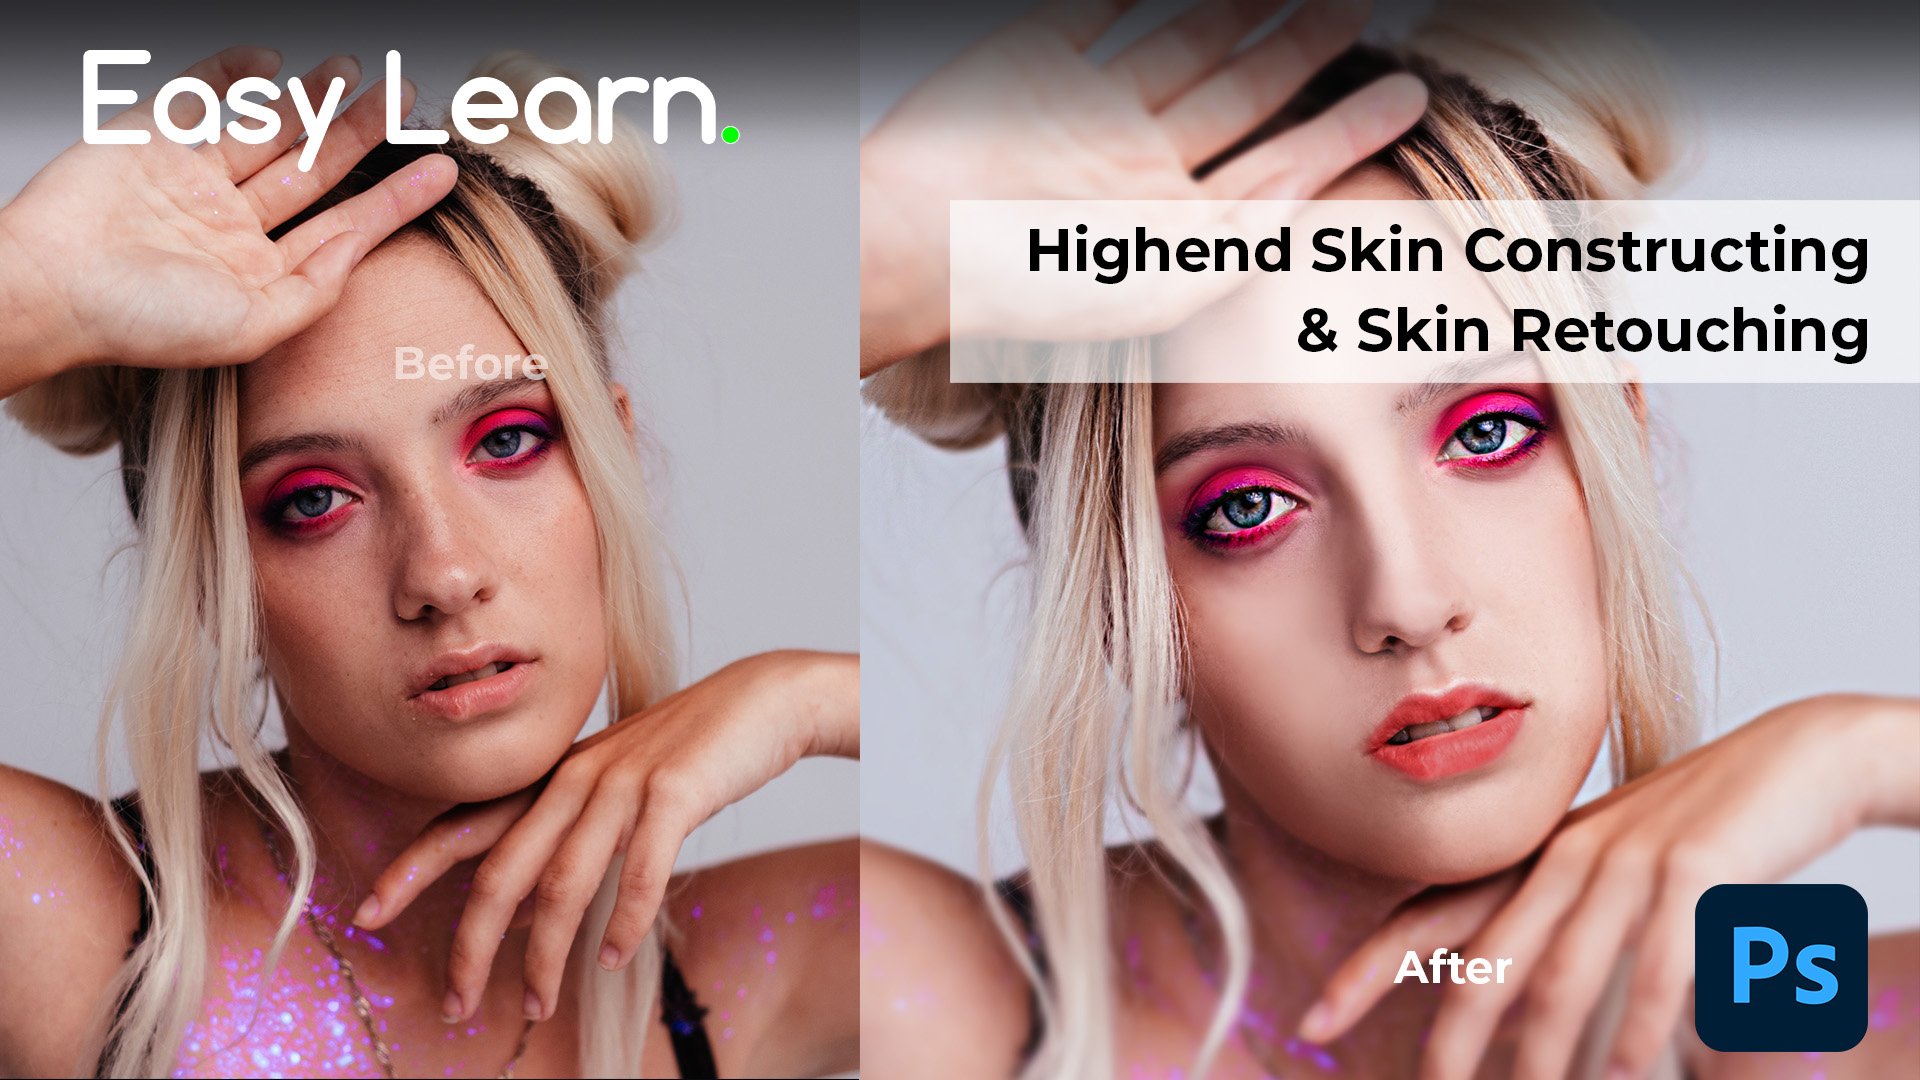
3. Extra smooth retouch: After that, we will
just merge it, merged both layers
and keep it one. Now if we require to add more detail than we want
all the phase smooth, we can duplicate this layer and we will go to
the Filter again. And we will select
the stylize distort. It will go to the noise and
selected dust and scratches. And we will change the radius according to our requirements
together will be the face features are hiding and the scars and the pupil
marks are hiding. Then we will select OK. And
after that we will go to the blur filter and then
Surface Blur again. And we will select it
according to our requirements. Keep the details of
the picture are live. Then we will select
Okay and go to the Layer Mask again
and Pi D doll. And the use of brush tool with the lower floor around 2037
or maybe 45 is perfect. We will start revealing
our layer mask. So it will start
hiding the mask. I think 16 workflow is perfect. It's giving a very
smooth effect. We can repeat where we
want more smoothing. It will take a little
time to smooth it down all the parts
of it, of the face. It will give a very realistic and very
plastic field effect. Usually it's a quick way
to reattach the skin. That's how we can give our face-to-face teaching
very smooth effect. And we can hide more marks
and more scarred and Morpheus details and p bit more makeup like
fill in our portraits. And then we will dump. So here is before and here he
is after all for our scene.
4. Pimples and scars removeing: Here I opened another picture for the workflow of how we
can remove the impulse. We will simply select
the spot healing tool. And we will increase the size
of sport healing tool and market around where we
want our impulses removed. There is another way
we will just select the patch tool and select the area of the pimple
we wanted to remove. And we will select
the skin nearby and it will compute
it immovable pimple. We have to select
the skin area nearby so to keep the distance, it will keep the color, tone, and color theme,
same of the picture. A little time taken process, but the practice, you
can keep it perfect. Just select the area I don't
pin falls and just keep your batch of a little bit so it can highlight the other parts of phase and merge it over. Just a little time taking, but it's a very professional way to remove the pimples
and to give your, your portrait photogenic
and realistic look. And there is a shortcut as
well to remove the pimples, you can use it just to select the color of the dead area and
select the brush tool. Keep the brush size a large, and keep the workflow, the flow of brush around
50 and just mark slightly. And it will give a
little makeup look. I don't want to your PC and hide your all the field
for them give you a very, very small standard, very skin. Professional makeup, the skin. But you have to keep the
floor for your filter. 47 or 50. And you have to keep
it very little. This is how we can remove from the portrait and p
bar very professional, very smooth skin without going through the
face, rotating.
5. Face modification: Now we will explore how we
can change the phase shift. We can change the lips and eyes shape with the use of
LIGO of liquefied tool, we will go to the filter and
we will select the Liquify. Liquify tool will open. And then we will select
the fear severely confine, and it will select the faces. Then we have options
of eyes I highlight, I can change it accordingly. And it will increase
the size or five. You can increase the height of five degrees vertical
files accordingly. You can change the direction
of also directional. If I use in order goods twice, then you can change the options. You can change the
height of nodes, you can change the
width of nodes around your all your requirements or face shape changes can be
filled through this filter. You can change the
forehead just because you have to experiment with
it and you can change it. You can smooth out
your jaw line. You can increase or decrease
your your jaw line. You then change
the face of yours. Who mirrored that changing
to keep it more heart look. And then after that
we will select, Okay. This is before and
this is after. The change of jaw line.
6. Lips color: And now we will explore
how we can change the lips scholar and
he ends the ellipse. We will go to the Brush tool. We will select the
smooth brush again. Then we will select
the color tone from the swatches we weren't. I will select the light
pinkish tone and then we will go to the layer. Then we will select the
layer mode as color. And then we will start coloring. It. Will give your portrait lips ready. Enhanced, very beautiful look. You can play with the law, but you have to play with the best year as well to keep
the things that realistic. I will breath around 4623. So it will keep realistic
and then you can smooth out the corners
with the eraser tool. It will start giving more realistic approach to
the lips of our portrait.
7. Change eye color: Now we will explore how
we can change the color. For the eye color. We have to select the
Quick Selection tool and zoom in and select
the area after debt. Duplicate that area
Layer via Copy, and we have our eyes separate. After that, we will select
Hue and Saturation, and then we will give
it a clipping mask. So the hue and
saturation change will only effective on
the IEEE selection. And then we will increase a little saturation to
increase the eye color. And we can change the
brightness and contrast. So if i, and then
using a few section, we can change the
color of the eye. This is a very quick way to
change the color of eyes. But we have also other
way where we can use it already
professionally highlighted. This is how we can
change the eye color. But the other way to change
the eye color is just select that dodge tool and it will highlight and start
highlighting the retina bar. Select the mid tone and start highlighting your 13
up part of your eyes. And it will start
highlighting the Eichler. That third method to use is to enhance the eye
color is using the brush tool and I brush, I have different brushes
available in my gallery. I will share the eyebrows
with you as well so you can use it to change the colors. Just select, go to the gallery. It will take a little time
to find us the eye filter, and here it is. We have different brushes. I always slept 652 wire brush. And just create a new layer and select the
color you want to. I selected the red. Just brush it and keep it over your eye and
zoom in a little bit. Degree their size,
much you want. Then you can duplicate
it for the more loop. Then you can select the overlay. It gets all depending
on the experiment. You can keep doing
experiment with it and see the formula. You can use two different
brushes as well. Part of that, I offer that, just select the
smooth tool again to smooth out the
corners of your eyes. Then you can use the
other brush as well. For the I, which is three, it will give more realistic
effect to your eye. Just keep the brush
size according to the size of I market. And then it is the outer corners of the eye. So it will look. This is how we can use it to
different brushes to change the eye color and give it
to another realistic login. It's a very beautiful technique to enhance their portraits. And after the debt, we just merge it
down with your main.
8. Hair color: So now in this part of
class we will explore how we can change the hair
color of our model for it, we will select new layer and we will select
the required color. We want to change
from the swatches. I'm selecting the cyan color and then I will select
the brush tool, keep your brush flow down 49 and select the area you
want to change. Then go to the layer opacity and select the
option into color. And then keep Lord the flow of your brush
around 14 or 20. And selecting the
hair colored area. Do it very slowly because
it's a time taking process. I'm doing it in a speedy manner to give our class to the point
and very direct and short. Because here we
are to understand the technique and understanding the procedure of
how things work. After selecting the area. Just like the eraser. And keep your opacity
around 17 years perfect. And then zoom in and start
refining the details. More time you will spend on it. The more details get refined. Do it slowly. It will take time. And then you can
change its opacity to around 74 to give it more
realistic effect on them, you can define it, find your highlights
accordingly. It's a time taking process. In short, it will take time to keep things ready, perfect. You can change your
float around 17. Keep it in realistic field. And then you can predefine the face area with
small size of eraser. Also, we have options where you can change the style in
the field of parallel. You can change it
into the multiple. It will give us other fields. You can change it into the
lightened, into the overlay. It will give you another field, but the perfect feel is keep the Layer
Style in two colors. It will give you
the perfect feeling of how we can change the
color of for our model and give you very close to the reality effect without even doing any
makeups or anything, then we will merge our project. Same thing we can do if we
want to change the skin tone, we will just select
the brush and select the skin tone we wanted. We can select the reddish, we can split the brown
from the swatches. We will just select the color, layer style to the color and
start painting our skin. Start brushing over our skin
and it will start giving your skin remodels
skin required field. We can keep it little brown. We can do it later, reddish, do it a little bright. It's totally on our
personal choices. Who can change it anytime. And it will give you more
control over the editing. Both your portrait, you can lower the opacity for
the controls were just, it's just another way to keep the colors of your skin
according to your requirement.
9. Retouching action: Now we will explore how we
can speed up our workflow, PSU touching it by using
their chance for the action. We have to do it one
time and after that, we can use debt speedup workflow
to create it one time we have to just select a new
action by clicking on it, change the action
name to retouching. Then start recording the action. Now our action is
starting recording. And then we will
duplicate the layer. Then we will go to the filter, we will go to the blur, and we'll select
the surface blur. We'll select our radius to 60, a threshold to 34,
universal use. Then we will duplicate our layer again and we will
go to the filter. We will go to the other
and select the offset. And then we will select the
radius around ten or 10.5. Then we will select
OK. We will change high-pass layer style
into a linear light. Then we will select
itself St around 70. Then we will group
these two layers. We will select our layer, layer mask and hide it all. And by the use of brush, we will start doing
the retouching. And till this, our
action is recorded, we will go to our action. We will pause it. And our
action is recorded and all set. Now, just delete it and you can just select your
action and play it. And it's already all done. Just choose a brush tool
and start retouching. This is a very
sweet of workflow. You can use to retouching portraits
in just a five-minute, in a very professional way.
10. Final result, Advice & class project: So here is the final
result of our class. If you have any questions
regarding the class, you can ask it in the
discussion section of the class for the class
project followed by procedure of face retouching and
retouch a picture and show me before and after of
your face rotating. You can use different
pictures or picture from the project resources
or from your own gallantry. Use my technique to
reattach the picture. First of all, clean the
pimples and then start retouching the picture and then play with the phase shift, then enhance the eye
color and hair color. And then after retouching submitted In class
project section, I can give you feedback and
critiques and get a chance to win Amazon gift card,
Instagram Photoshop preset. Thank you.
 M Amir Naseem, Graphic Designer / Creative Director