Transcripts
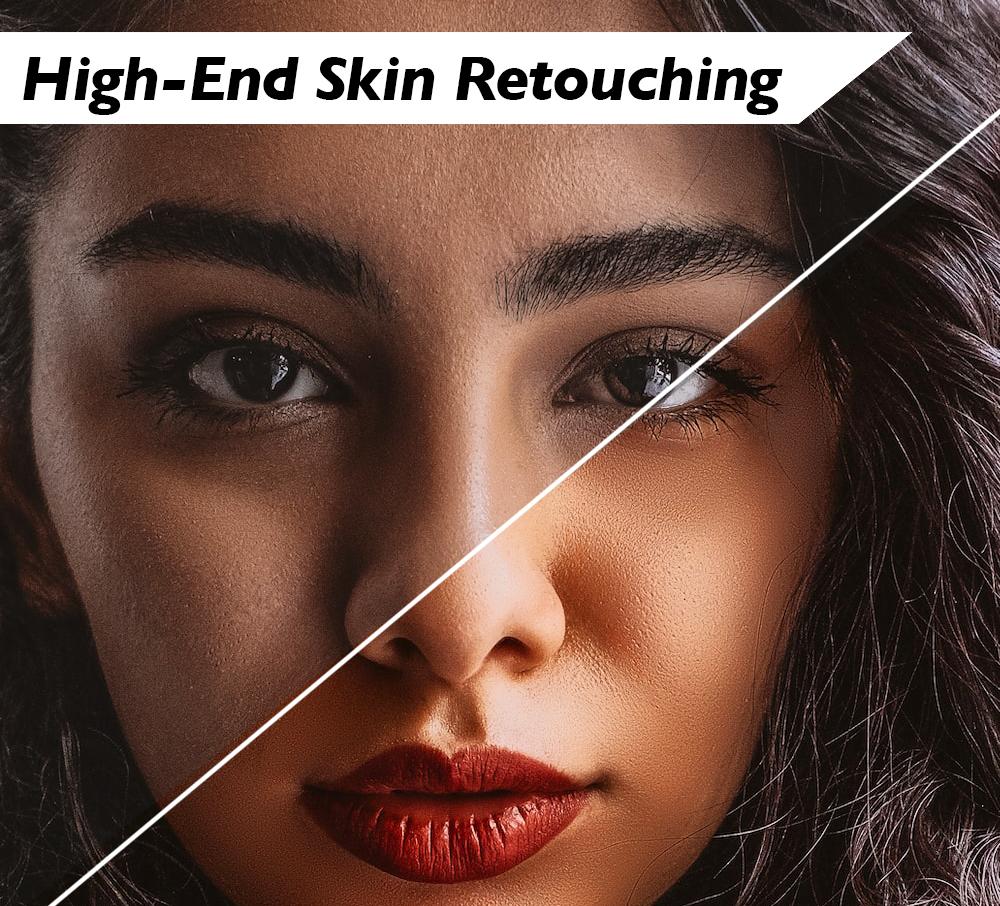
1. Introduction to Portrait Editing: Hi, I'm John gain, photographer, the
aquifer and error. And if you're
watching this course, that means you want to create
the perfect portrait color. If you want to take your
rock freshly shot image and transform it into a Vogue
magazine where the photo, this is the right class for you. In this course, you will
learn how to be moved imperfections like pimples,
wrinkles or moles. How do we move? I bags? How to brighten it white and D. How would you smooth
the skin and create the perfect creamy texture
at any photographer dreams? And finally, how to add shine
and glamour to your photo. This course is short, quick, and to the point, we're not going to get into
complicated technical terms. But feel free to re-watch any parts in pause
whenever you need. Alternatively, I am
here for you and I'm always happy to answer
any of your questions. For the class project, you will take your
own portrait photo or ones that I will
upload for you and edit them using the
method you learned in post them to see a
before and after. So let's get to work
and let's create some brilliant photos
worthy of a magazine cover.
2. Remove Imperfections | Simple Retouching : The first lesson in this course is how do we move imperfections? Getting rid of temples
spike in wrinkles. It's super simple and it's the first thing you should do when modifying the portrait. Before tackling texture modifications
and texture improvement, you should get rid
of imperfections. This is done super easily. You go to the left side
of the toolbar and you select the spot
healing brush. As you can see,
Photoshop shows here tutorial and you
can see that this is exactly what we want. Select the brush size. You have to have an
appropriately sized brush just as big as the spot, but it has to include the redness and
inflammation area as well. So now let's click on the spot. And he has, you can see
it's magically gone. You can repeat the process
for every single spot. Photoshop will do a great job. Do not rush this. Do not try to select
the whole area because then Photoshop is not going to do
the best job it can. So like every spot manually, it's super quick, super simple. Just a few clicks, just a few seconds. As you can see, we're done. The face looks perfect and
it took us only two minutes. Now let's move on to
a different picture. As you can see, the spots here are already masked with makeup. So select an appropriately
sized brush. Click on the spots in there magically gone
just as before. But the reason why I chose this is not because
of the spots, but because of
this masking tape. A lot of photographers
and models use masking tape to
stretch the skin. And we want to get rid of that tape in
post-production. Tip. Do not use the spot
healing brush. You can is going
to be super easy. But it might not do a good job. As you can see, this
doesn't look natural. So Control or Command Z. And now we're going
to select this area, use the Polygonal Lasso
tool because this is a square or
rectangular object. This is super-quick,
super-simple. And now right-click. And we have two options
that are closely related. We can click, Fill, Select Content Aware, and click. Okay. This did a very good job, but it's still not perfect and we do not have room
for adjustment. So again, control or command, if you're on a Mac to go back. And now we're going to
click Content Aware, Fill. Content Aware Fill
does a much better job and you have control over
which areas are selected. So Photoshop is going to
sample from the green areas. We do not want Photoshop
to sample from the eyes. So we de-select the eyes. As you can see, this is going
to adjust in real time. This is perfect. Now we click, Okay. And Photoshop has added
that to our photo. So look at that. Now you know how to remove in perfectionist and how to remove a bigger objects like
that sticky tape that we had on the forehead
of this beautiful model. So let's get to the next step.
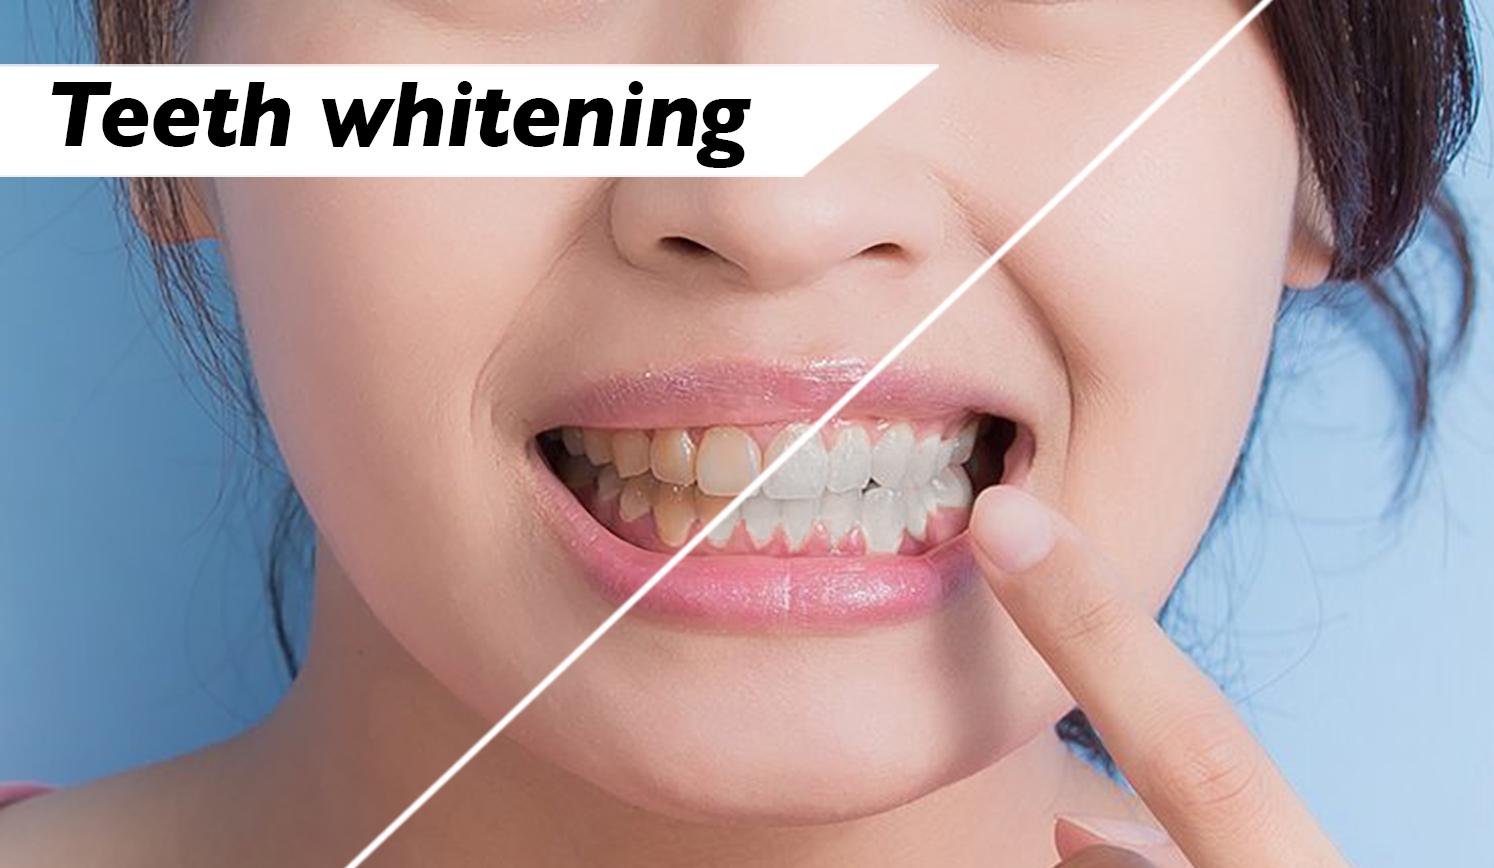
3. Whiten and Brighten Teeth: So you want to know how to whiten n brighten the
teeth of your model. This is super easy as well. We go to this button over here, the adjustment layer button, click on hue and saturation. And as you can see and
as the name suggest, This modifies the hue. It modifies the saturation and the brightness of the photo. We want to apply that
only to our teeth, not to our model. So the thing you're going to
do is click here on yellows. And it's selected a
part of the image, but we didn't know what part. So in order to have
a better view, we're going to move this
right over here and increase the saturation
to the maximum possible. As you can see now, Photoshop is modifying the orange parts. What do we have to do is
minimize this area over here. Now, move it so
that only our teeth are going to be
selected, not our guns. So the gums and the
lips are not selected. The face is selected, but that is not an issue. We can fix that
very, very easily. What we tried to do is have the keys selected
and not the guns, which is exactly
what's happening here. We can move that around a bit just so we can make it perfect. Just like that, I will say
that is very, very good. Now we have to reset the values that you
have just modified. And now we can go ahead and
decrease the saturation. Increase the brightness.
As you can see, the teeth look perfect. However, it modified
the face as well, and we do not want that doing. So what do we have
to do is go to this mask that is
automatically created. Click Invert. Now nothing is modified. Click on B for brush or
access to brush menu right over here and create an
appropriately sized brush. This, by chance is
the perfect size. We select the white
color over here. And now we can paint on our model with the mask
that we have created. So we're just going to paint on the teeth area just like that. And as you can see, they're
white, they're bright. They're exactly as
we want them to be. If this is too much, you can always decrease the
opacity of that a mask. And you can bring them to a more yellow, more natural color. But this is how to whiten in
Brighton your model's teeth. Super simple, right?
4. Remove Eye Bags: So let's remove the eye
bags from the photo. Previously, we used the
Spot Healing Brush. But if we use it again, photoshop does a good job. But this has spots, blocks and it doesn't look good and it doesn't look
natural, certainly. So we can right-click on the Spot Healing Brush
and click the patch tool. The Patch Tool is more manual
version of the same tool, but keep in mind, a manual offers
you more control, which is exactly what
a photo editor wants. So select the iMacs,
just like so. All the way up in here. You can simply click and drag. Just like so. Control or Command
D to de-select. You can see evolution didn't
much, much better job. If you think that Photoshop
missed some spots, you can go ahead and
select them again. In modify the diffusion. The diffusion is how soft the edges of this
modification are going to be. If we click a diffusion of one, the edges are going to
be super, super rough. If we click the maximum, the diffusion is
going to be much, much softer and it's
exactly what we want. So now we drag down. And as you can see,
the edges are super soft and it's much
better than before. So now we've removed the eye
bags from the model's face. Let's try a different
example because I'm going to try and show
you something different. This model has very pronounced
and accentuated ibex. We could remove them all, but then that would
not be natural. It wouldn't be the
same person anymore. Tip. Keep in mind that Photoshop is a very powerful tool where
you can modify anything. Moderation is key. Keeping a portrait natural, keeping the face of your
model realistic is key. So let's try and do that. We have to duplicate this image either by right-clicking
on the image and clicking Duplicate or clicking Control or Command if
you're on a Mac J. Now we duplicated the layer. We use the exact same
process of selecting the area and then dragging it down exactly
like we did previously. Do not go to foreign to
the bottom of the photo. Just like that. Photoshop did an amazing job, probably even better
than the first time. We have to select this area again because it's a bit rough. In my opinion. We increase the diffusion to the
maximum which is seven. And then we try
and fix that area. And now it looks perfect. But again, this is not the same model anymore
because we did heavy, heavy modification on the marr. Let's try and fix this
wrinkly area as well. Then I'm going to show you
what I was talking about. We drag it down just as before. And even though this
doesn't look perfect, it doesn't have to. Because right now we're
going to click on Opacity and decrease
the opacity. Now, if you click
the opacity of 0, this is just the photo
from the beginning. If you click the
opacity at a 100, this is just a modified photo. We have to find the sweet spot, a good in-between that shows some wrinkles in some high bags and keeps the portrait natural, keeps the model's
face realistic, just as it is in real life. This is great. Now you know how to
completely remove iMacs, just like we did in here. And how to make
them a bit softer, but still keep the
realism of your model. Let's go to the next part.
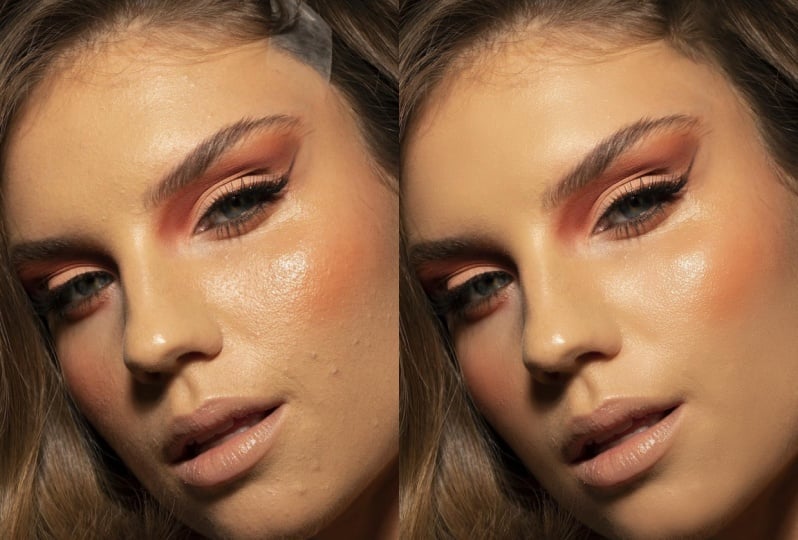
5. Professional Skin Softening: So now let's get to the most important
part of this course, how to smooth the
skin and make it creamy and worthy of
a magazine cover. This is by far one of the
hardest parts of this course. You should pay
attention and we're going to move a bit slower. The first thing we need to
do is duplicate this layer. You can either do that by
right-clicking and clicking on Duplicate or control or command. If you're on a Mac J, first step is done. Then Control or Command
I to inverse the photo. Then click on blend modes and go to vivid light
right over here. This doesn't look good
yet, but just wait. Then we go to Filter up top. And we'll do other
and high-pass. Now the level of high-pass you choose depends on the photo. This is just done by training. You have to do it by trial and error depending
on the lighting, depending on the skin tone, depending on the
hardness of the face, so on and so forth. For this particular photo, I would say somewhere around
17 to 30 would work great. We just need to have
smooth texture of the skin without too
many of those artifacts. I think it's 17, maybe a 20 is the perfect level
for this particular photo, you should start with
20 and then increase or decrease depending on how smooth the skin
you want to have. Then you click, Okay, this is for now. Now we have just
a few more steps. So hang on. We go to Filter blur
and Gaussian blur. Now, D higher we have the value, then the photo is unchanged. And it's exactly the photo
that we had when we started. The lower we go with the value. Then we have just a
high-pass filter. And this is not good either. So now we just increase
this until the face has an appropriate smoothness while still keeping the
texture of the skin. This just depends on personal preference and how much you want to edit the photo. I think a one or
maybe a bit higher, or 1.3 is perfect
for this photo. Let's go bid down
a one-point two. This is perfect. It's smooth, but still keeps
the texture of the skin. But as you can see,
everything is smooth, including the hair,
the eyes, the lips. This is not what we want. Of course. Then we want to create a mask. If we create a mask right now, then by using a brush
and the black color, we can remove the smoothness, but this is counter productive. So what do we have
to do is click Alt or Option if
you're on a Mac, and then click the Mask option. Now the mask is negative,
It's a negative mask. So now with the brush
tool and with white, this time, we can paint
on the model's face. This is much better, right? So let's increase
the size a bit. And let's start painting
on the model's face. As you can see, the skin is getting
smooth and beautiful. And it's exactly what
we want it to happen. You can hit those
particular areas. We could modify here as well. So now you just paint until
the model has the perfect, perfect texture
that you wish for. Let's decrease the
brush size a bit. Let's paint here around
the chin as well. Don't get too close to the lips. If you get too close to the
labs for other objects, then you get this
artifact over here. And this is not good. Control or Command Z to undo. And now continue painting. So we can paint but
keeps some texture, keep some areas natural. For example, here
around the nose, we're not going to modify anything because
that's a tricky spot. And this spot that the
human eye would recognize, it has been modified
to keep that in mind. We can go around the board
of the face as well. Decrease the brush size a bit. Let's go around
the nose as well. Just like that. This is perfect. This is beautiful. And now the model's face
is super smooth, is much better than before. And now, if we think this
is too much, for example, we can go over your
opacity and just decrease the opacity a bit to o
level we feel is natural. As you can see, the model's
face still has texture, but now it is
smoother than before. It's not a fake filter like you see on Instagram
or Snapchat. This is done manually
with a lot of control. If we select this layer, you can see the before
and after is massive. Now let's try a different photo. We can switch to this
panel over here. And as you can see,
we returned to the photo that we
modify it earlier. Let's try and do
the same thing for this model, just for practice. Follow me closely so you
can learn the steps. The first thing
that we wanted to do is duplicate the layer. Again, right-click and click Duplicate or Command
or Control J. Good. Control or Command I to inverse. Go to Blend Modes
and hit vivid Light. Go to Filter. Other high-pass. Hit the level that you want. Click on level that you want. For this photo, I think
maybe a 17 is perfect. We click Okay. Then again to Filter
Blur, Gaussian Blur. And now we blurred as, as much as we want
in order to have a smooth texture for
this particular image, I would think we have to increase it a bit
more because we still don't have texture
around the forehead. 1.5 is perfect. Let's do the mask now. Do you remember how we do it? We click Alt or Option on a Mac and click
the Mask button. This is a negative mask. Now we select a brush. We increase the size of bed. Now we start painting
on the model's face, just like we did previously. Again, the model's face is
starting to be smoother. So the better. We can decrease the size a bit and go round
the chain as well. Just like that. This is beautiful. But keep in mind that before you start
smoothening the skin, you have to remove
the imperfections. If you do not remove
the imperfections, you are going to smooth
and demo as well. And your photo is going
to look artificial. This is not what we want
to do with our photo. Now, minimize the brush a bit and go around
the nose as well. Just like Daddy cheek. This is great. Just touch a better
around the nose. Do I would suggest not to go into the **** because
it's a difficult area. It's a tricky area. Just a bit around
the eyes as well. We can zoom out a bit so
we can see the results. And as you can see,
the face is much, much move into before. We can decrease the
opacity a bit comedian 90% just so we can have
it a bit smoother. When we hide the mask, you can see that we have
made the skin smooth. We have made it perfect. This is how we make that creamy, creamy texture of the face that's worthy of
any magazine cover.
6. Add Shine, Highlights and Glamour : Now, the final step of this course is how
to add brightness, glamour in shine
to your portrait, and complete this process
with the cherry on top. This is going to look great. Let's see how it's done. This is super-quick. Super great. Go to Curves. Take the middle of this
curve and drag it up. Drag it up just until the
screws looks like that, and try not to make it
sharp, just like it is now. Make it curvy in great, Just like I said, it's
tangent at this point. This is right. Now after we do that, we double-click on this layer. And now we have the Layer
Style menu popping up. We're going to work with
the underlying layer. This is our focus point. We drag this point
a bit to the right. Like that. We drag this
point to the left. Now we click Alt or Option on a Mac to split
those two in half. You might not see a
difference, but just trust me, now we can split them up and
move them independently. And as you can see, the
edges are going to be way, way smoother, which is exactly
what we're trying to do. Let's try and do that for
the right tab as well. Drag it a bit to the right, drag it a bit to left, and it's very smooth. Just as you can see. Now, we are done. We click, Okay. We click this mask
option right over here, and we click Invert, just like we did in some
previous processes as well. We take the brush
tool with white. We make it a bit bigger
and a soft as possible. Now we start painting
on the model. We tried to paint only on the face and not on
the hair because that's not why
we're trying to do we're trying to paint
only on the face. Just like that. That is great. Just like that. Now, we go ahead and
decrease the opacity. This is beautiful. Now, if we turn it off, you can see there is a
world of difference. Just like in real life when
you see models applying makeup and applying
highlights and shadows. This is exactly what
we did in Photoshop. We apply highlights
to the model's face. And this adds depth, complexity, shine and glamour. Look at that. Let's show
a before and after. This is truly incredible. With this, we completed our course and now you know how to brighten
and whiten teeth. How to smooth in phase, how do we move
imperfections and I bags? And finally, how to
add shine through your photo in order to make it look like a million dollars. I hope this was helpful. And if you want to learn more, check out my
description and check out my other courses that are key in there bound
to help you learn Photoshop to a next level. Hope to see you soon. Take care and happy
Photoshopping.
 John Game, Photographer, Editor, Designer