Transcripts
1. Introduction: Hi guys, My name is Alice. I'm an artist and this class
is all about how to take beautiful product photography at home for your
hand-made business. I've been a professional artist
for over ten years and I decided to completely rebrand my business at the end of 2021. I create fun, bold, quirky art and products
with a sprinkle of sass. I've had to learn
everything myself. If you are also a
small business owner, you can probably relate to that. One of the most valuable
skills I've learnt whilst building my business is
product photography. When you're selling online, amazing photographs are
essential because they are often the only connection
that potential buyers have to what you're
offering. In this class I'll be going through
everything, the whole process, the equipment you need, things I think that are
really important to consider before even picking
up your camera. Editing tips, lighting tips, examples of really cool
backgrounds and textures. And I'll also be
sharing my top tips for awesome product and
lifestyle photography. Any questions please ask.
2. Why Good Product Photography Is So Important: If you sell art and
products online, either through your own website, etsy or another platform. Having amazing photographs of
your products is essential. Photos are the main
connection that someone has to what
you're offering. Buying art, creative products, and gifts is both an emotional
and logical decision. I like to present
my products and art in a way that clearly shows what I'm offering and
also appeals to emotion. I'll go a bit more into how I do this later on in this class. If you value your art and your
products, others will too. If you take the time to make your products and art
look beautiful online, this increases their value
to potential customers. Even if you have
amazing products that look absolutely
stunning in the flesh, if your photos are bad quality and make your product
look terrible, this will put buyers off, how you present your products
really means everything. You can apply this to
in-person selling as well. So if you imagine going
to a market and walking past a stunning market table, there's different
levels on the table. Everything is
presented beautifully. Some items are elevated to
make them look more expensive. There's beautiful attention to detail all across the table. There's maybe some flowers and little bowl of sweets or something at the
end of the table. You think the products
are more valuable. The person values their
products and it draws you in a little bit more compared to if you walk past the market. So whatever things just
chucked on the table, there's no thought about it. There's dirt all over the table and little
marks on things. And it's just presented
in a way that makes the products not look very expensive or valuable and the person doesn't seem to care about what they're selling. It really makes a
massive difference.
3. Recommended Equipment: If you're just starting out, you can just use your phone as most phones nowadays
have decent cameras. I just use my iPhone to
take all my photos for quite awhile and I'm even filming this video
using my iPhone, which is why I can't show you
a phone on the table here. You can still take
beautiful photos that stand out just
using your phone. And in this class, I'll
be taking you through some tips on how to create
awesome photographs. As it's not just about
the camera that you use. You can have the most
expensive camera. But if your
composition, lighting, and editing is awful, it's not going to help
your product stand out. If you do have the budget or highly recommend investing in a DSLR camera if you don't
have one already, I won't lie. This has been a game
changer for my business. The quality of the
images is so much higher compared to the photos I can
take with my iPhone eight, there is a learning curve. Obviously with DSLR cameras on the settings will
probably be different for you than they are for me. It took a lot of trial
and error to find the right settings for my
camera to take these photos. So you'll need to have a
play and see what works for your space lighting and
your specific camera. You might be able to tell that this particular video
is a little bit shaky because I've been
using my tripod to actually film most of the
videos during this class. But obviously, I want
to show you my tripod. So if you have
super steady hands, unlike me, you might
not need one of these, but I do recommend getting a
tripod as it makes things, make things a lot easier and you can pick one up fairly cheap, Although bit of a warning, you get what you pay for. This one cost me 15 to £20. It lasted me less than a year. And as you can
see, the tops come up compared to this one
which is a lot steady. I don't see it breaking anytime soon and it did cost
me quite a bit more. So it's up to you whether you want to invest in it or not. This was absolutely, absolutely fine if you're
just starting out. But yeah, try and invest in
a better one if you can. Sometimes when you buy
cheap, you buy twice. This tripod is a
standard camera tripod. And then I also bought a
separate tripod attachment. I can attach my phone to film
and take photos as well. Onto a software editing
helps enhance your photos. I think you should create
photos for the edit as a badly taken photos with
no regard to lighting or composition can't
be sued with editing. I personally use Lightroom
to edit my photos. There's so many
other options out there, including free ones. I'll go a bit more into
editing later in the class.
4. Important Things to Consider Before Taking Your Photos: I think there's a few
things to consider before even picking up your
camera to take photos. The first thing I feel is so important to get really clear First is your target audience. If you know who your
target audience is, your photos will
be more unique and personalized and
effective because you will attract who you
actually want and who you think is going to buy,
what you're offering. Here are some examples
of questions that can help you establish
your target audience. How old are they? What are their
interests, lifestyle, motivators and values? What is their personal style? Do they like bright and
bold colors or pastel, muted shades and patterns, for example? Try to get your target audience as clear as possible as you
can in your mind, as this will be the foundation
of great product photos, knowing your target
audience better and applying what you
know they like to your photographs will help your target audience
connect more with what you're
offering and help you stand out in a crowded market. Another really
important thing to consider is branding. Branding isn't just
colors and a logo. It's how you make people feel. So before you take each photo, consider how you want the person to feel when they
look at the photo. What emotions do
you want to evoke? What mood or vibe you
want for your photos? Think about your target
audience and how you want them to feel
about your brand. And finally, you want
to aim for consistency so people can instantly
recognize your products. Once you have your branding and your target
audience established, it will be a lot easier to
create consistent photos. Obviously, it doesn't mean that every single photo
has to be the same. I recommend trying to
create the same mood, editing the photos
in a similar way, using similar
colors or textures, or even creating
consistent composition.
5. Lighting Tips: My number one top tip for amazing product
photography is lighting. You've got to get
the lighting right. Daylight is free. I personally think
that daylight is the best lighting for
product photography. The main issue with this is
obviously you need to take your photos at the
right time of day. So for me, this is
between 11 AM and 3PM, and you also have
to have a room, preferably with
some big windows. You can obviously
take photos outside, but this is obviously
very weather dependent, especially if you
live in the UK, you kinda know what
that's going to be like. Things might blow away. You might get a little
bits coming into the shot. It might start
raining or something. It's not ideal, can be done
if that's your only option. But obviously, you are
restricted a little bit by the weather if you want to
take your photos outside, or that might be
your only option. I highly recommend taking
your photos on a cloudy day. So direct sunlight
doesn't make for the best photos that unless
it's a stylistic choice, a cloudy day is best. And obviously on a day
that's not too windy, so things aren't
blowing away and you're not like constantly
fighting with the wind. You can't obviously
by daylight lamps, if you don't have a room to take photos in using
natural lighting, daylight lamps are an
extra investment and they can be quite pricey and
bulky as well, some of them. So if you don't have
a lot of space or big budget, it's not ideal. I just highly recommend using
daylight is the easiest, it's free and it gives the
best results in my opinion, but I'm just putting
this option. And for those of you who definitely can't get
natural lighting. Here's an example
of a similar photo being taken in good
and bad lighting. Can you notice the difference? The one on the left is taken in really poor lighting
with the flash on. I don't recommend using a flash to take your
product photos. Also don't rely on editing to try and get your photos perfect. You should aim to take
great clear photos in good lighting and
editing should be used to just enhance them. Another plus of using natural lighting is taking
advantage of shadows. I've seen some amazing lifestyle photos for
the products have these beautiful shadows over them and it creates this moody, atmospheric feel that really gives me a connection
to the photo. This might work really well
with your target audience and the mood and emotions you want to evoke through
your photographs. Get creative and see
if you can create some cool shadows in your photos without taking the focus away from your
product or your art.
6. Backgrounds and Textures: Playing about with
the background and textures in your
photos can really help you attract
your ideal audience and also help your
products to stand out. You can get really creative with this and it doesn't
have to be expensive. You can use things just
lying around your house. My brand is quirky, a bold and colorful, and my art includes vivid blocks of color. So color paper works really
well for my product photos. I got these large sheets of colored paper quite cheaply
at my local art store. But if you can't get
access to these, you can also lay lots of A4 sheets of colored
paper onto a table. You can use random things that you have around your house, like satin material, a soft dressing gown. This is actually a dressing
gown or even a fluffy rug. So these two things
are actually coats. This is a fake fur coat and that's another coat that I have. I've used both of these to
take photos in the past, wrapping paper or
patterned tablecloth that can make a
great background for flatly photography
obviously makes sure that the tablecloth and wrapping
paper is not copyrighted. So a wrapping paper like
this, It's really simple. It should be absolutely fine. If you want to create
rustic natural vibes, you can include wood
textures as well. Think about what colors, textures, and patterns
suit your brand. Always ask yourself, does this reflect the product
and help it stand out? Does this suit my target
audience and what they like? Feel free to get really
creative with your background, but always keep the
focus on the product. Your background should
elevate the product, not distract attention
away from it.
7. Product Photography Tips: As I mentioned earlier in
this class, buying art, creative products,
and gifts is both an emotional and a
logical decision. In order to satisfy the logical decision-making
part of the mind, It's really important
that the buyer knows and understands exactly
what they're buying. Leave the buyer with
no doubt whatsoever in their mind about what you're offering and what they will get. You can do this by
taking a range of photos from different
angles and perspectives. It take a photo straight on, then from the side,
then from the corner, if it has gone as
zoom into the product so the details are super clear. Also take photos that clearly show the texture of the product. Doesn't have a glossy
surface or a matte surface, reflective surface
with some products. And if it's relevant, I like to place the
product next to something to show the size. For example, with my stickers
for one of the photos, I'll place a ruler next to the stickers so the buyer knows exactly how big the stickers and can actually visualize
how big it is.
8. Lifestyle Photography Tips: So as well as appealing to the logical decision-making
part of the brain, you also want to appeal to the emotional decision-making
part of the brain. And this can be done through
lifestyle photography. Lifestyle photography is where you can get a little
bit more creative. You can infuse more
personality into your photos and also create more connection with your target audience. I'd like to create a fun, bold and colorful
environment for my products to be
in, for my photos. I consider what my
target audience likes and what their style is, and include objects
that reflect my brand, their style, and the
five I want to create. My target audience happens
to be people like me. I often ask myself
what I like for me. I love to include plants, flowers, crystals, and
affirmation cards. All of these suit my
brand and my style. Your objects will be different according to your brand
and target audience. Your product should
always be the focus. So try to make sure that
the surrounding objects enhance the product and
aren't a distraction. One tip that works really
well for me is when I've set up my lifestyle photo and I have all my surrounding
objects setup, take one object away. Often, this can make
a big difference. As I know for me, I always tend to put a
little bit too much in the shot onto the
rule of thirds. You may have already
heard about this in photography or art. You don't need to do
this with every photo, but it's just a really good tip. Try to avoid placing
your product directly in the
middle of the frame. Instead, imagine splitting or frame into three
equal columns and three rows and place
the product on the intersections of the
horizontal and vertical lines. You can use the
composition of your photos to draw the viewer's
attention to your product and help it stand out in
other ways to consider your use of negative space to bring attention
back to your product. And you can also use lines
to guide the viewers focus and also to point
directly at your product. So I'm using this plant here to literally directly
point to my bookmarks and these crystals
here and just gently guiding the eye
background, the bookmarks. I'm going to apply the rule of thirds for this
particular product photo. I'm going to leave a bit
of negative space here. Everything I've set up
here is to try and keep the focus and the intention
on the bookmarks. Another quick tip before I
show you the finished photo is trying not to have anything coming off one of the corners. So whenever you're
taking a photo, pay attention to the corners to make sure nothing
is coming off directly off one of the corners because you might
find that actually pointing away from your photo. And especially if you're
on a platform like Etsy, where you're actually
competing for attention, you might actually be
pointing to another listing. And subconsciously somebody
will click on the listing that their eyes are drawn
to rather than yours. So just be a little bit wary of having anything
in the corners of your shot kinda pointing
away from your photo. Here is the finished
product photo. I'm really trying to keep
the focus on the bookmarks. I've used the rule of thirds. I've used a bit of
negative space, and obviously the flowers are pointing directly
at the bookmarks. And here is an example of a photo that I
definitely wouldn't use. As you can see, the plant
is going directly off the corner of the photo and
pointing away from the photo. You can use a bit of
your intuition with this tip and you don't
need to apply every time. But if you're struggling
with your composition, this tip might help. For some reason, odd
numbers are more visually appealing
than even numbers. So when you're creating
your composition, think about including
an odd number of objects along
with your product. So for some reason here, Three Crystals just
looks a little bit more satisfying than four. And also the total number of things that the
viewer can see is five. So if for some reason
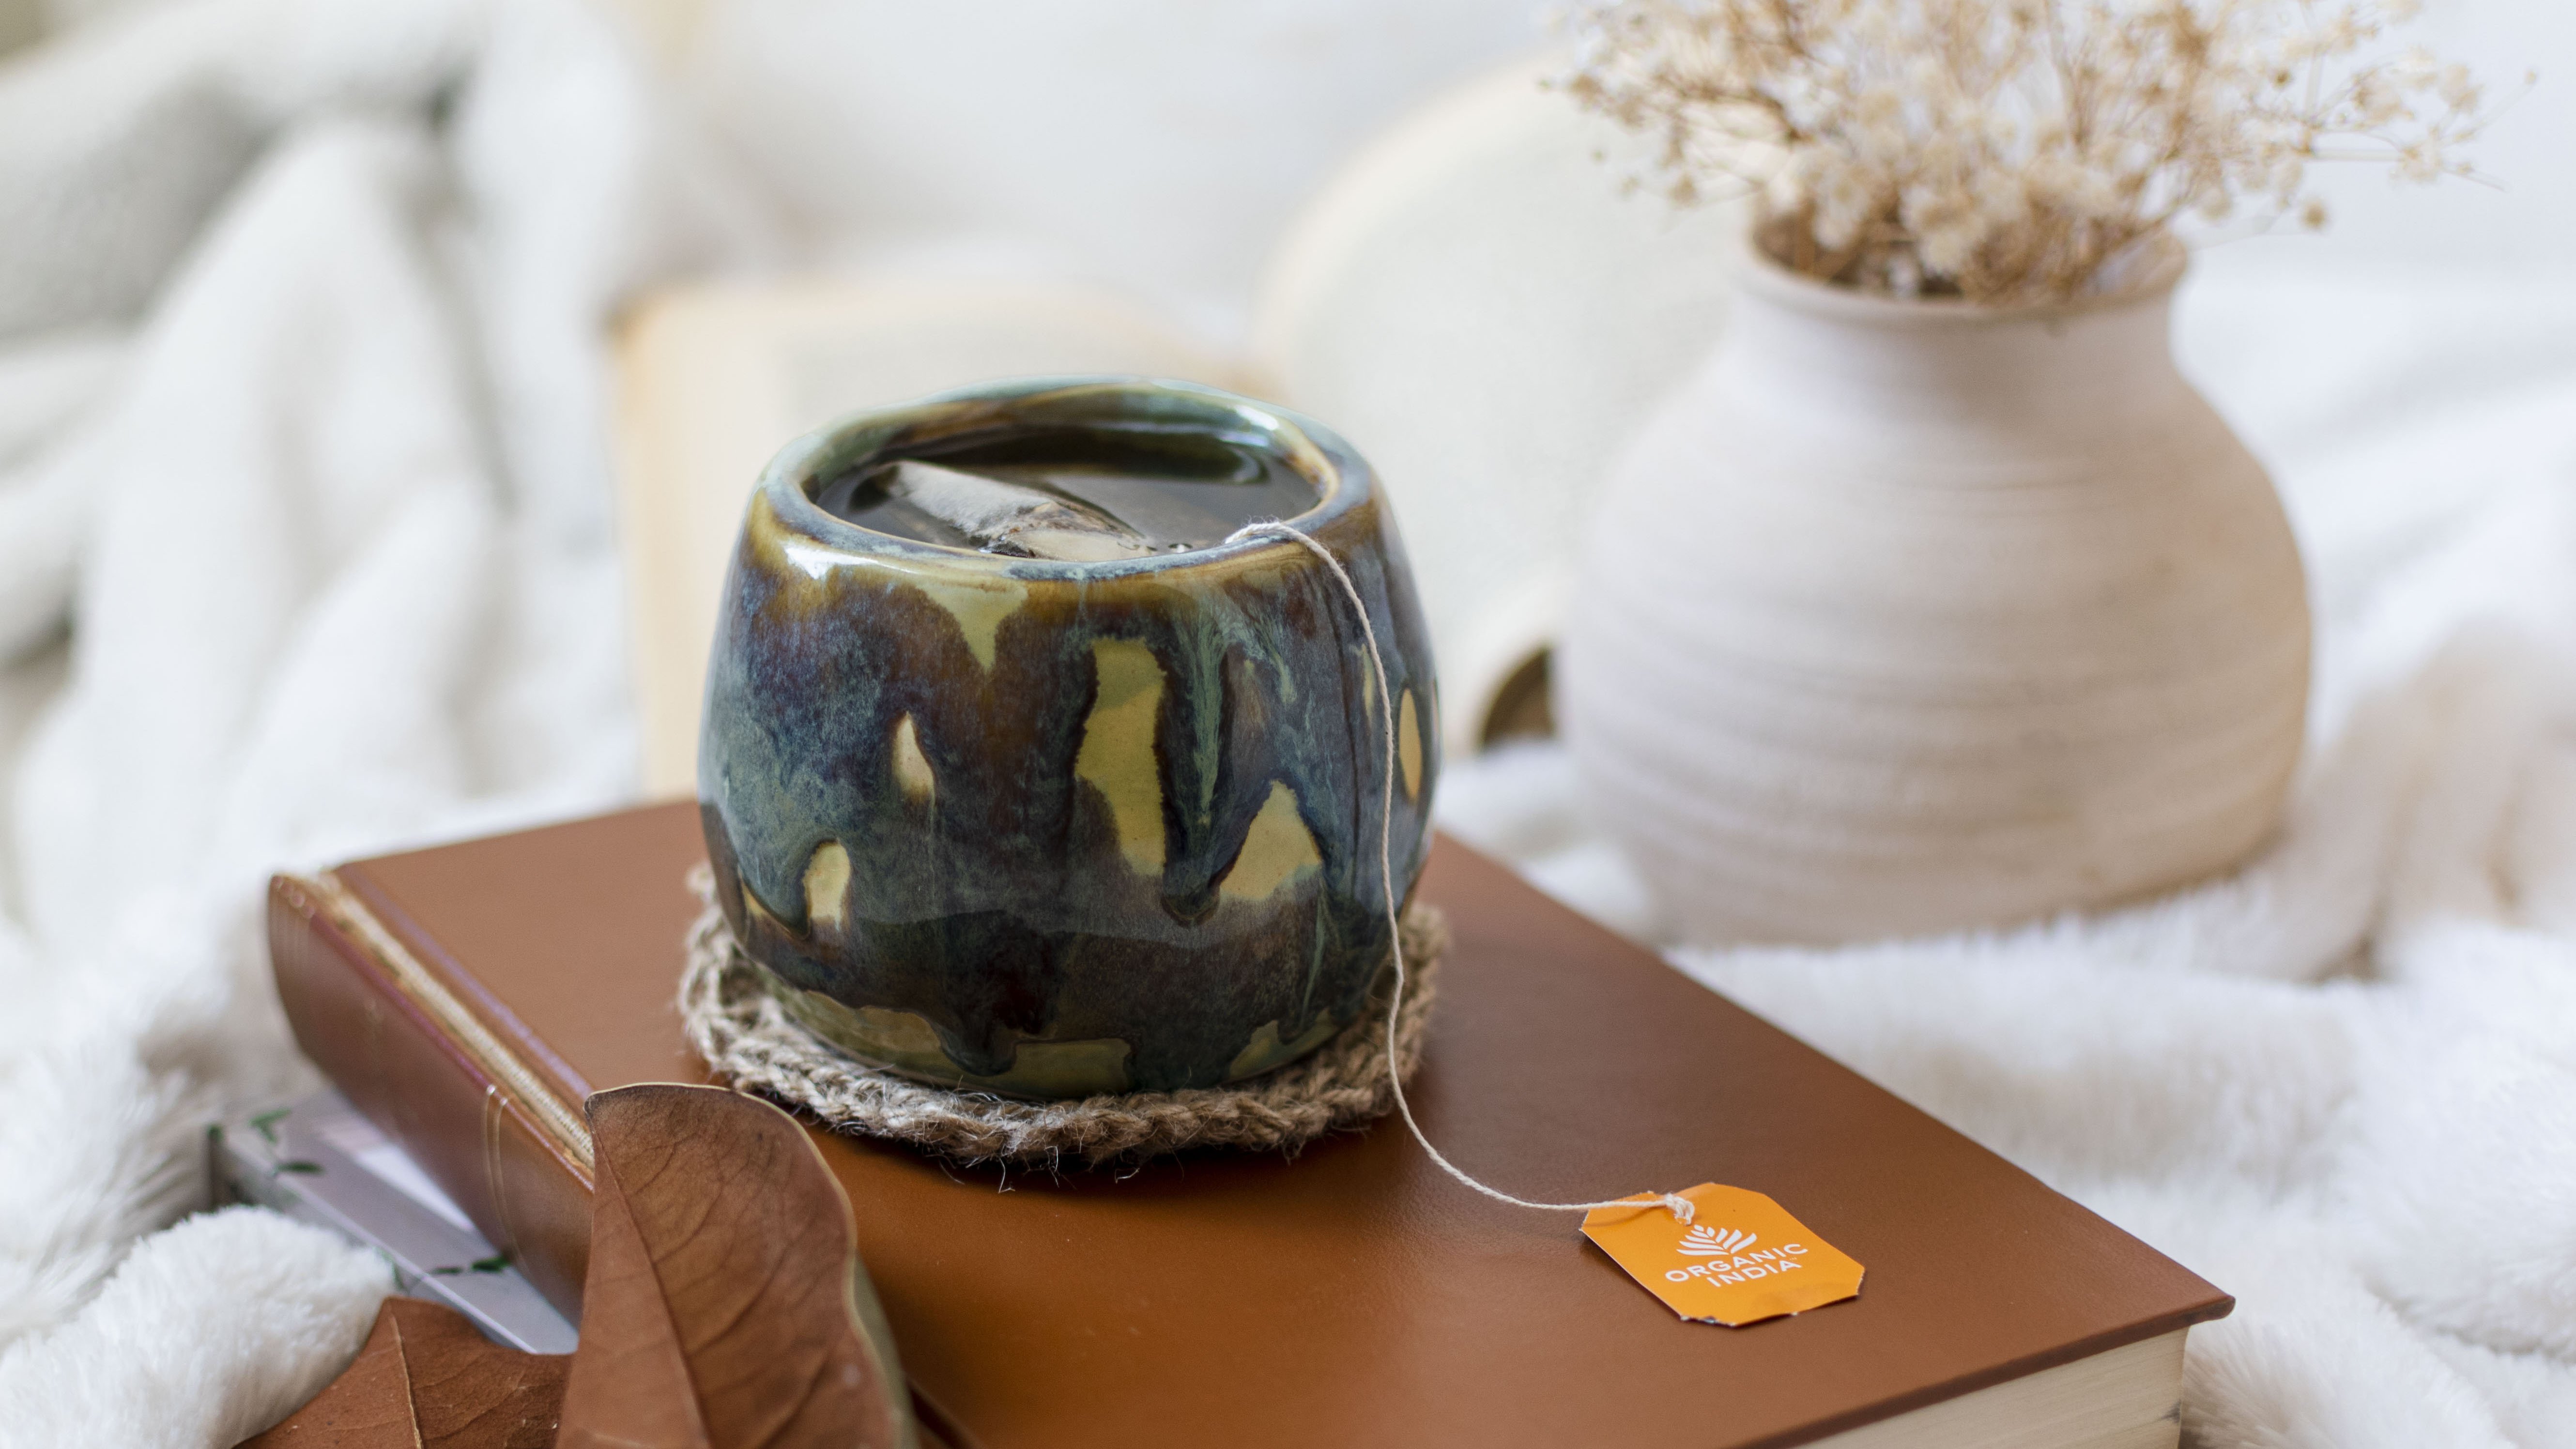
that's just a bit more visually appealing, again, you don't need to use this every single photo that you take, user intuition a little bit, but if you're struggling, this tip can really help. My favorite lifestyle photo tip is to bring life
into your photos. This could mean including
a plant or flowers in the photos and
animal, some nature, or even yourself or your
hand holding the product, or someone wearing the bracelet you're selling, for example. Symmetry. The brain loves a
little bit of symmetry and it makes for a really visually appealing and satisfying photo. Like with all of these tips, you don't need to do this
with every single photo, but this can be quite fun and you can get really
creative with this. Try to incorporate
some symmetry and powder lines into your photos. And the final tip I have for awesome lifestyle photography is it gives your products
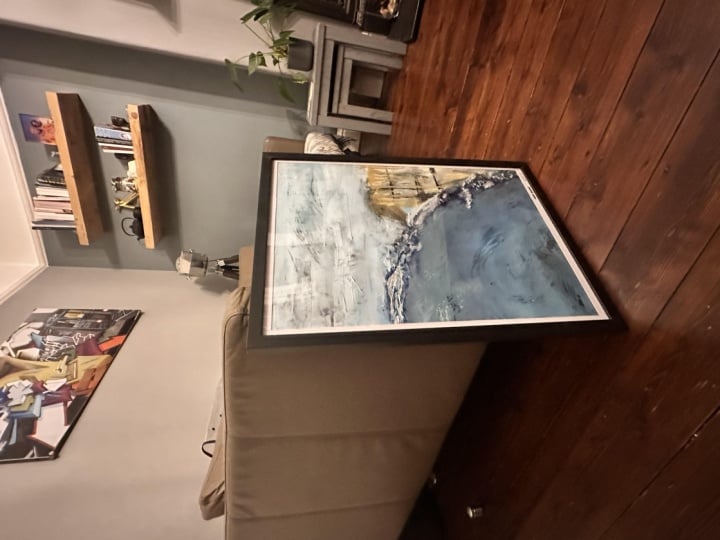
some contexts. Help the potential buyer
imagine what it'd be like owning your products by showing
your product in contexts, for example, show an art
print framed or on a wall. So close enjoy being worn if you're selling
affirmation cards, for example, show them
being used in displayed. If you're selling planners, stickers, show
them in a planner. If you're selling bookmarks, show them in a book,
you get the idea.
9. Editing Your Photos: On to the editing. So the editing of
each photo shoot enhance and already
amazing photo. Not save it. If the photo is already
stunning, it clear. You've considered
great composition. It's taken an awesome lighting than the editing of the photo. It should really be
quite easy and fun. As I've mentioned
previously in this class, I personally use Lightroom
to edit my photos. There are many other options
including free options, but this is just what I use. It costs 999 a month at the
time of filming in 2022. As I have the app on my laptop, I think the app on the phone is a little bit
cheaper at the moment. So here's how I edit my photos. I always avoid using
filters on my photos as I want the colors to look
as accurate as possible.
 Alice, Mixed Media Artist | Art Tutorials