Transcripts
1. Introduction: Hello, lovely. I'm Alice Ladkin and I'm a mixed media artist from Hampshire in the UK. In this short and sweet class, you'll learn some of my favorite ways to create interesting textures in mixed media. What I love most about mixed media is there are endless possibilities, it's all about play, and you can use the most random things in creative ways. It just gives me so much joy. Hopefully you enjoy these fun ideas and they get your creative mind whirring. This class goes really nicely with my fun acrylic painting techniques class. Any questions about anything, please don't hesitate to e-mail me or contact me on my social media on Instagram @AliceLadkinArt.
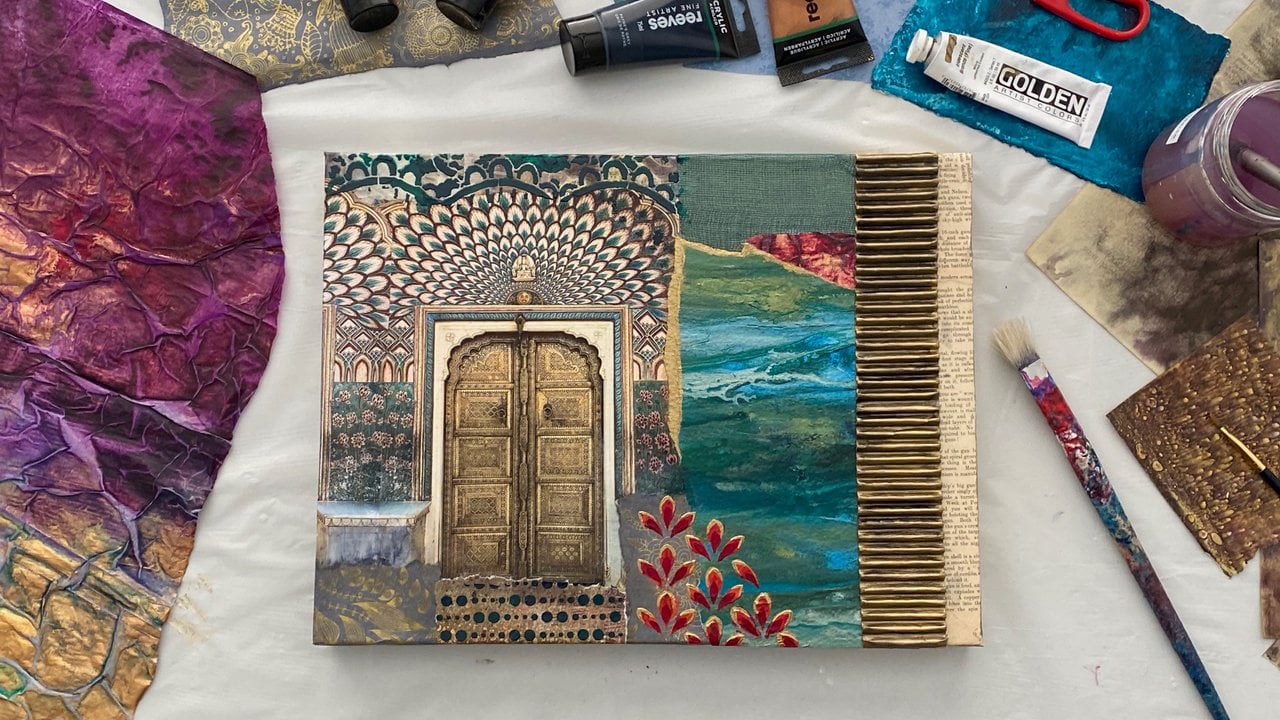
2. Collage: I'm using Canvas for this class. You don't have to use Canvas. You can use anything that accepts mixed media. Collage is the first technique that I'm going to be teaching you today. It's one of my all-time favorite mixed media techniques. Here I'm using matt medium as the adhesive. This is archival, I believe. I think you might be able to use PVA glue as well. I've not used that before and I didn't know how archival it is. So all you need for this is whatever you want to use as your collage, your adhesive and a brush. So you want to make sure that you clean your brushes really thoroughly after this because it does kind of damage it, because it's glue. You want to make sure that you put loads and loads of the adhesive down, be really, really generous. Don't skimp out at all. This glue does last quite a long time. So don't worry, you need to be really, really generous. If you don't put enough glue down to start with, once you put your paper and stuff on top, you can get little air bubbles and things like that so you don't want that. So be really generous with the glue and then put your paper or whatever you're using down, press it down with a brush and put loads of adhesive on top. Really seal it down and make sure there's no air bubbles under there. You can pretty much use whatever you want. I think that things with a matte surface tend to work a little bit better. So nothing with a shiny or gloss surface. You can use music sheets, pages from books, paper towels, pattern paper, craft paper, cardboard, fabric, even thread if you want to, so little thread that you sew with that can be quite cool. I like to use quite small pieces. It's just a little bit easier to work with. Obviously, it depends on the size of the surface that you're working on. If you're working on a massive Canvas, make the pieces little bit bigger. Otherwise, it'll take forever. You can cover the whole of your surface or just add the collage in certain places for variety. I do a mix of both. I like to tear the pieces up with my fingers, but you can obviously cut shapes and straight lines with scissors. You could just get really creative with this. Use what you can. I just tend to save up lots of bits of scrap paper. And I've bought some books just from charity shops. That's quite cool. And they last obviously for ages and ages, just adds a really lovely texture. I like to use this technique for my backgrounds. Just adds lots of variety and it's really fun.
3. Modelling Paste / Heavy Structure Gel: Molding paste or modelling paste (both the same thing I think) creates some fantastic textures and I really highly recommend getting some if you love mixed media. Molding paste or modelling paste is basically a medium that adds texture. It's a really thick paste That hardens really hard when it dries. Things to note, don't add any water whatsoever to your modeling paste and make sure to wash all your tools when finished because the paste will harden and it would be really difficult to... I might ruin it basically and be hard to get off. So I like to apply using a palette knife or you can even scrape it on with cardboard. You can use a paintbrush to see really cool brush marks showing through. Or you can use a sponge. Here, I'm just spreading it about. I'm not being neat with it because I'm trying to create texture. You can just be really creative with this. Kind of creates an impasto technique here. Here I'm just scraping through it with my palette knife, just creating really interesting textures and marks. You can even use a sponge-like I'm using here - that creates some really cool textures. And obviously once it dries, you want to give it lots of time to dry it properly. I'd say like 24 hours just to be sure. Especially if it's really thick, maybe even two days. And I've just literally, cut out some cardboard. Here I'm just scraping it through. That can be really cool. You can obviously cut out whatever shapes you want using the cardboard. You can just be really creative here. This is the whole point of mixed media. Just get really creative. I mean, these tools aren't expensive, a sponge and a piece of cardboard... you can create some really awesome textures. Here. I'm also using some string. So this is quite a cool technique if you like having lines throughout your paintings, it creates a really cool texture. So I just lay the string down, smooth out a little bit, make sure it's really sunken into the modelling paste. And then just pull the string out and create some really cool lines. And if you're feeling super creative and have the patience, you can even arrange the string in a pattern or the shape of a flower or a star or whatever you fancy. And that could be really cool too. Finally, one really important thing to note is modelling paste sometimes does tend to crack. So if you don't like that look, personally I do sometimes as it gives it a bit of an antique look, but if you don't, I would recommend using heavy structure gel instead, or mixing in a little bit of gel with the paste, just to reduce the likeliness of cracking.
4. Texture Mediums and Homemade Alternatives : Another really cool thing you can do with your molding paste or modelling paste is literally add texture to it. You can buy some textures from your art shop. They're usually called gel medium. You can buy beads, large grain gel, sand texture gel, things like that. Add it to the modelling paste and you have some really cool added texture. Alternatively, you can use heavy structure gel if you have that. Both things pretty much do the same thing. So here I'm actually using pencil shavings, so you don't need to go out and buy expensive things from the art shop. You can use something as simple as pencil shavings, that's one of my favorite things to use. I also love to use tea bags. So open up the tea bag and then just sprinkle it in to create some really interesting textures. Here I'm just mixing it together. I prefer personally mixing things together before putting on the canvas first, I guess you could put the paste or the heavy structure gel down first and then maybe sprinkle things in - whatever you fancy doing. I just prefer doing it this way. It makes it a little bit easier for me. And yeah, just creates some really cool effects. And it's really not difficult to do. You want to make sure that you leave this one to dry quite a while. I like to leave it, whenever I do this, I like to leave it at least 24 hours before painting anything onto it. Really want to make sure that it's fully dry. And also make sure that you clean all of your tools afterwards. Because especially with the modelling paste, it goes really, really hard and it will ruin your tools. Make sure that you clean or wipe down everything that touches the paste.
5. Cling Film: A fun, very easy way to apply paint and create some texture is just using cling film. So just kinda use it in the same way that you would with a sponge, scrunch up little bit, dip it into some paint and put it on the canvas. Try not to scrunch up too much so you get some really nice lines and textures. You can also add some heavy structure gel just to thicken up the paint a little bit more to get more textured peaks in the paint. But yeah, so this is just a really fun, simple thing that you can do using something that you probably already have in your house.
6. Bubble Wrap: This technique is pretty new to me and I'm already obsessed. So this one's really fun. All you need is a bubble wrap and a tube. You don't really need the tube to be honest if you apply it carefully, but I just love using a tube because it's a lot more fun. So this actually used to have gravy in it. You can use a kitchen roll or toilet roll tube, a Pringles can, or even a rolling pin if you want. Obviously be careful not to get any paint on it. So you literally just stick the bubble wrap on it. I've attached it using double-sided tape. Then I roll the bubble wrap in the paint. So the paint obviously only attaches to the bubbles. And then it just make some really cool textures. I really loved this one is so much fun. As you can see, I'm literally just rolling it on carefully. Be a bit careful not to smudge it. Look at it. It's just really cool and really fun. This create some lovely marks and textures.
7. Cardboard Cutout Shapes: You'll want to get that cardboard tube back out for this technique. This one's really fun. So using a cardboard tube, you just want to cut out some little shapes using cardboard. I've cut out some squares. You can obviously cut out whatever shapes you want, stars or circles, you can put on as many as you want in whatever shapes and sizes. I'm attaching them to the cardboard tube using double-sided tape. Really simple. This one is obviously very cheap. Then I'm making sure that I put the paint down quite thickly and I'm spreading out about. And then obviously just roll the tube and the cardboard shapes over the paint. And this creates some really fun textures. You can keep rolling the paint to make sure it's evenly spread if you want really clear shapes. But I quite like the effect of this personally, so I just roll it a couple of times, and as you can see, this is creating some really interesting textures.
8. Stencils: I personally love using stencils in my work. As you can see, these ones are very well used. I love to use them especially for my murals when I'm spray painting, these ones have lots of spray paint on. You can obviously use them in your mixed media work as well. They're really fun. I highly recommend getting some stencils. They're really not expensive at all. I think I've got these online, maybe from Etsy. But again, they were really inexpensive. You might be able to buy these at art shops as well, or you can even get really creative and make your own out of card. My little secret for this is adding heavy structure gel to my paint whenever I'm using stencils. It creates some added texture and you'll see what I mean if you do try this because it kind of raises up the outline. I'm mixing it really well. I like to use a palette knife because it's a lot easier and also a lot easier to clean because you just wipe it clean. Make sure not to add any water. I'm just putting the stencil down wherever I want it and attaching it with low tack masking tape to make sure it doesn't move about because I want some lovely clean lines. And then I'm getting a paintbrush and making sure that the paint is spread evenly over the stencil. You can also use this without any paint color if you want. So literally just using the heavy structure gel because it dries clear, it will just leave an imprint. So here if I was to use just the heavy structure gel, it would dry clear and make a leaf imprint that would show through when I add a thin paint over the top and look really cool. So making sure that it is spread evenly, I'm not pressing super hard to try and get those nice clean lines, carefully taking it off so none of the lines smudge. And because I'm using thick paint, this is a little bit easier as well. And as you can see, it's created some really thick stencil outlines. So again, make sure you leave at 24 hours for this to dry.
9. Posca Pens and Crayons: Two of my favorite mix media materials are posca pens and Caran D'ache neocolor crayons. Bit of a mouthful. So I'll use these at the end for mark making and you can create some really interesting textures at the end using these materials. They are water-based. So if you put paint on top, it might, especially with the crayons, they'll just pretty much wash away if you add paint on top. The posca pens are a little bit more resilient, but I would definitely just recommend using them at the end. Like I said, I'll just use these for general mark makings, adding some patterns, shapes, lines, doing outlines, things like that. Doing scribbles, especially for the crayons I'll add some scribbles, just adds a really nice just extra dimension to the work and brings it to life. The crayons show up best on smoother surfaces and on certain paint colors. So they don't show up super well just on a blank canvas, but on top of collage and darker paints, they show up really nicely. It obviously also depends on the colour of the crayons. So here you can see I've used Posca pens for the outline for the stag, and I've done lots of scribbles with the crayons in the background. I just really love how it looks and it creates some cool textures.
 Alice, Mixed Media Artist | Art Tutorials